A really quick post for you today to share a really quick card. Today is Freshly Made Sketches day and our lovely queen of color, Amy O’Neill, has given us a fabulous sketch! I have had a heavy flying schedule over the last couple of weeks but just ‘had’ to play along. So I kept it quick.
How to do that?? Start with a kit! In this case, I used a Paper Pumpkin (by Stampin’ Up) kit. I had already been working on putting the kit together and I tend to made small modifications to the designs. Usually by removing elements or layers…because, well, that is how I fly.
I am ashamed to say that this kit was one I have had since July. Which is crazy because I loved it when I first got it and still do. I just made some modifications by flipping the base, stamping with the cute border stamp and adding some sequins (not from the kit). It doesn’t take much to tweak the kits to personalize them to your style and taste!
The DT at FMS has so many great variations on the sketch…always the sign of a great one! Make sure you hop over to see the inspiration. I so appreciate you stopping by to visit. Until next time, have a great week.
Supplies (affiliate links included):
Stamps, Paper, Ink: Paper Pumpkin (Positively Picturesque – July 2017); Sequins, Washi Tape (Paper Pumpkin kit), Misti
Another week has flown by and we are back to Wednesday and Freshly Made Sketches day! I keep feeling like the holidays are sneaking right up on me. I decided I needed to get a bit more serious on my Christmas card production and thought it would be good to create some that are easy to reproduce. Karren Johnson‘s sketch this week to the rescue!
I pulled out this pretty set called Cheers to the Year by Stampin’ Up. Lovely snowflakes! I stamped them in Smokey Slate and Dapper Denim inks (SU). Pretty combination for sure! After some debate, I realized I had just the right sentiment for the job from the October Paper Pumpkin kit (Stampin’ Up) and it fit the space perfectly. The nature of the kits means that the images and sentiments are on trend and I really love this one! I thought it might need a little something extra so I added some Basic Pearls then popped it onto a Basic Gray card base. I think the assembly line is getting ready to get moving on this one!
I hope you are having a good week. The design team has created a lovely variety of cards with this fun sketch and I think it is one you will have fun with too. Hope you’ll have time to play along! I will be back on Friday with the latest from Fancy Friday. Until then, I hope you have a great day!
Supplies:
Stamp: Cheers to the Year (SU), Paper Pumpkin Oct 17 Sentiment; Paper: Thick Whisper White (SU), Basic Gray (SU); Ink: Smokey Slate, Dapper Denim; Accessories: Misti, Basic Pearls
Welcome to this month’s Fancy Friday Blog Hop! Our team is a group of stampers who love to make beautiful things. Sometimes they are clean, sometimes they are layered but the one thing I can say for sure is that our projects will be fancy! If you hopped over from the incredible Allison Okamitsu, welcome to the next stop. For September, we have created 3D Holiday Projects. And oh, what inspiration awaits you!
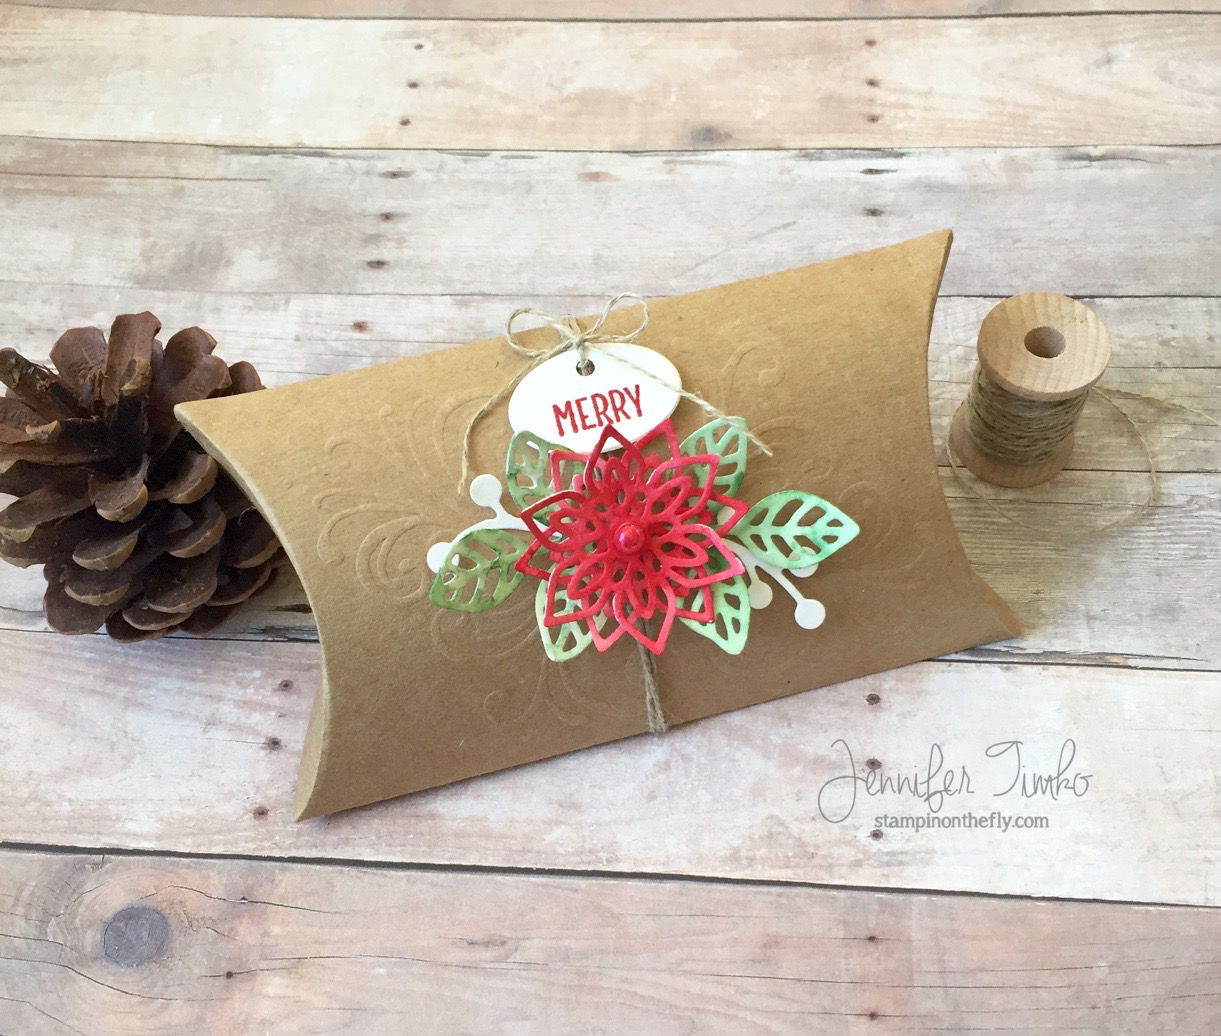
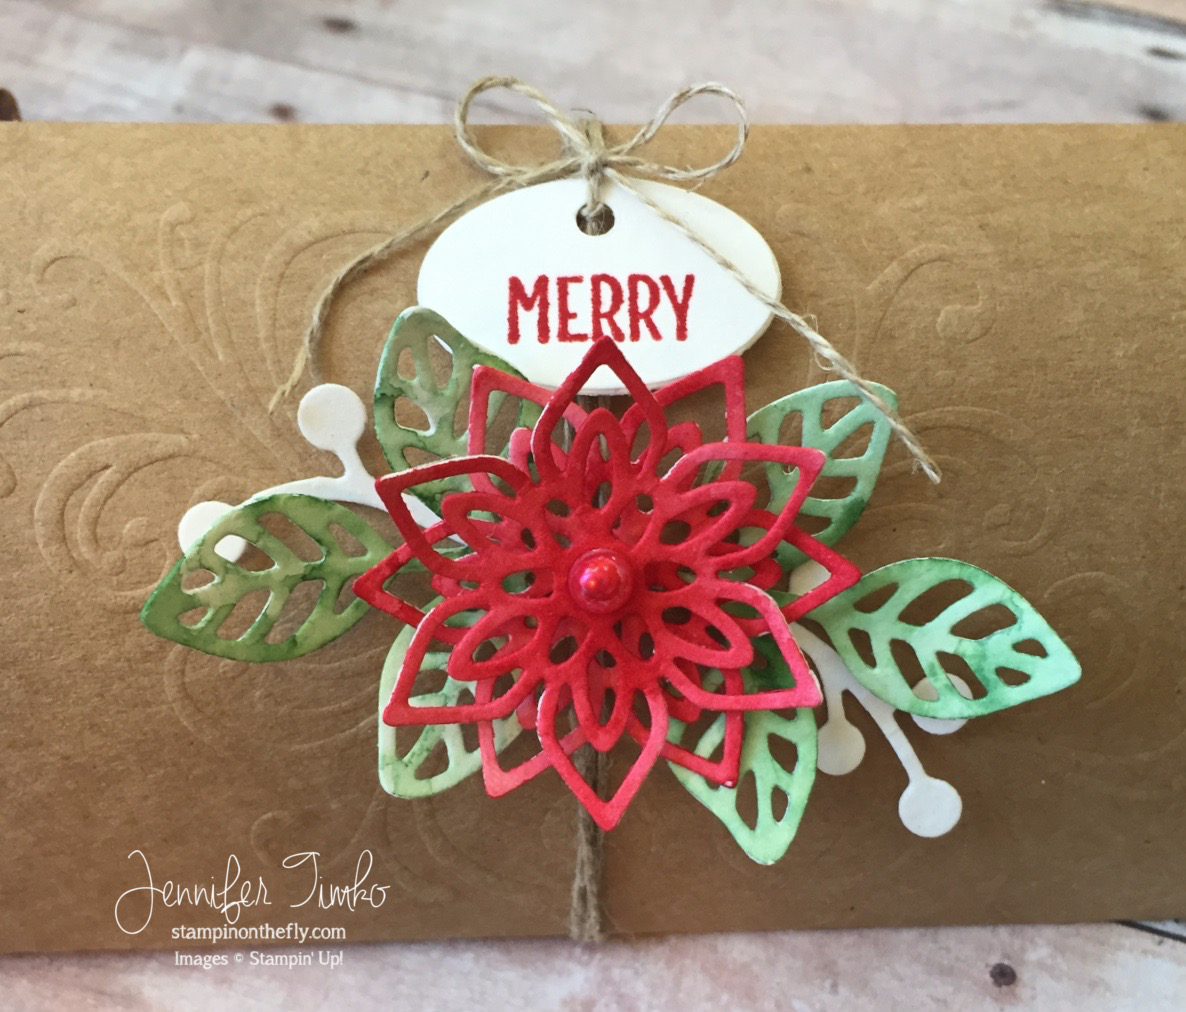
I have to admit that I don’t make a lot of “alternate” projects with my monthly Paper Pumpkin subscription because I usually love them exactly as they are! And I did love the one we got for September for sure. But I saw an opportunity to show you something else with more of a Christmas flair if you decided to use all those leaves on other projects. This pillow box has the most lovely swirl detail that really lends itself to any occasion. Using my Flourish Thinlits, I cut flowers, leaves and berries from watercolor paper. Then, with an aqua painter, I quickly added Real Red to the flowers, Garden Green to the leaves and left the berries white. Super fast but the watercolor look is a little softer than having used the dies on card stock (but you could totally do that to save a step!). I cut the bottom set of leaves off of each stem to make them more proportional to the flow and then took the berry stem and cut it apart to give me two berry sets from one die cut. I put a Mini Dimensional under the center of the flower (the perfect size!) and attached the second flower to the top one. Then I used Glue Dots to attack the rest behind the center of the flowers. Using a Basic Pearl that was colored with a Copic Marker, I added a center that covered all that was underneath.
Next, I stamped the sentiment from Merry Café onto some more watercolor paper (to ensure a color match) and then cut it out with the oval die from the Coffee Cups Framelits. I set it up for the sentiment to sit a little low in the oval to allow room to cut a little hole with my 1/8″ Circle Punch to create a tag. Cute, right? I wrapped the box with Linen Thread and tied on the tag. I used some glue to attach the floral spray to the box (to make sure it stayed put!).
Those of you who know me, know that 3D projects are not my go-to thing. But Paper Pumpkin elements make it easy to look like a real pro! Don’t be afraid to think outside the, well, box on those! I hope you enjoy the rest of the hop. Next up is my friend, the always amazing Jeanna Bohanon.
Stamp: Merry Café (SU); Ink: Real Red, Garden Green; Paper: Canson Watercolor; Accessories: Paper Pumpkin September, Multi Matte Medium (as glue for the floral spray), Big Shot, Coffee Cups Framelits (SU), Linen Thread, 1/8″ Circle Punch
Happy Wednesday to you! I took a little bit of a break last week to catch up on home things and to even clean my stamp room. Seriously, it was out of control and I needed to reorganize before I could work in there anymore. I’m sure you have been there!
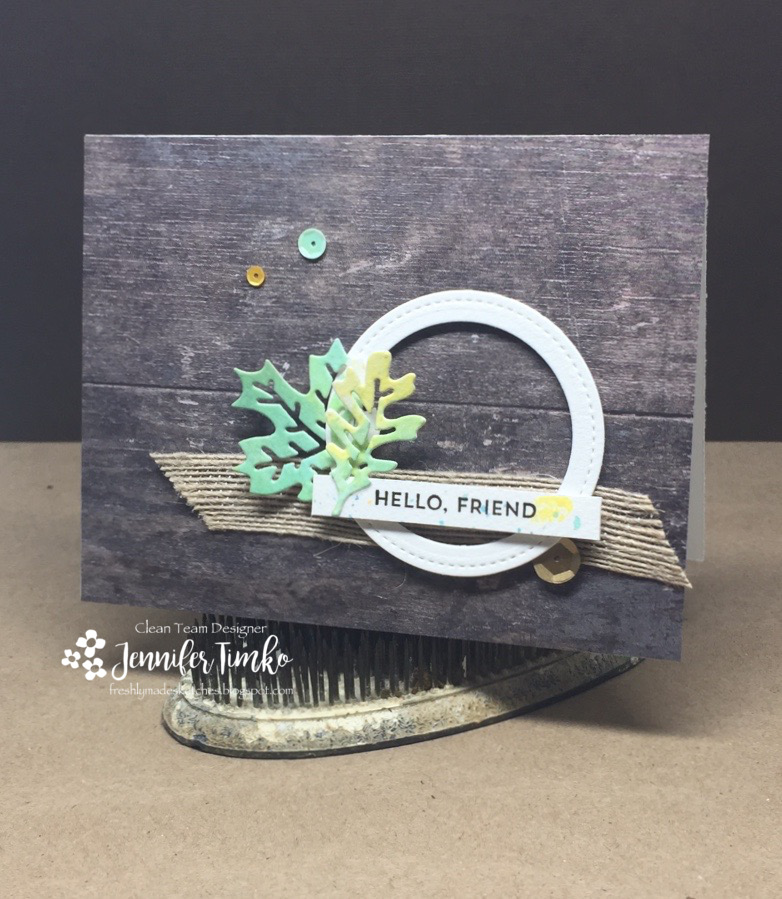
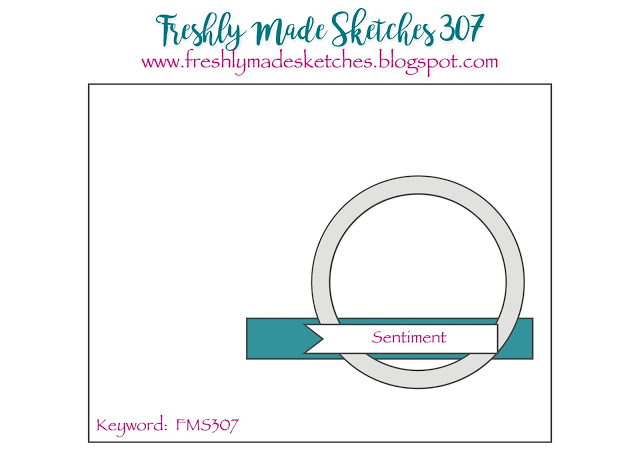
I’m the sketch hostess this week over at Freshly Made Sketches and I wanted to make a sketch that could be interpreted in a few different ways. I chose to go with it “as is” and made a little frame using my Stitched Shapes Framelits. If you follow the Newton’s Nook Designs newsletter, you saw how I created these leaves for yesterday’s “Designer’s Nook”. They use the Autumn Leaves Dies and are so pretty!! The background is the fabulous Wood Textures paper by Stampin’ Up (a go-to for fall, don’t you think?!). I added a piece of the 5/8″ Burlap Ribbon as another layer of texture. The sentiment strip was cut from the same paper that I used for the leaves (where I had splattered ink) and this stamp is from the July Paper Pumpkin. Don’t forget how much those add to your sentiment repertoire! I found a few sequins in coordinating colors so of course I had to throw them on!
I hope you enjoy this sketch. The design team has tons of inspiration, as always, and I would love to see you in the gallery! Thanks so much for stopping by today! See you soon!
Supplies:
Stamp: July Paper Pumpkin Sentiment; Paper: Arches Watercolor Paper, Wood Textures DSP (SU); Ink: Early Espresso, Tim Holtz Oxide Ink; Accessories: Misti, Big Shot, Stitched Shapes Dies (SU), Autumn Leaves Dies (Newton’s Nook Designs), 5/8″ Burlap Ribbon (SU), Sequins (Honey Bee Stamps, Pretty Pink Posh)
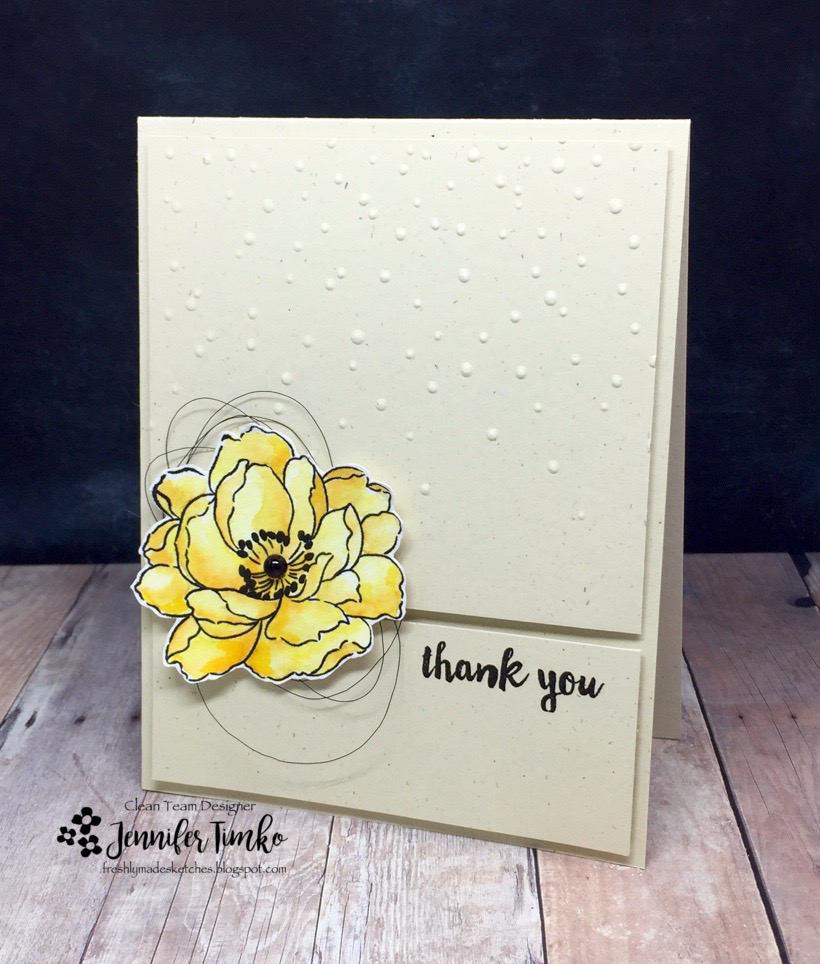
I hope you are having a great week! I’m so happy to share the latest sketch from Freshly Made Sketches. Our sketch hostess this week is one seriously amazing stamper! Jen Mitchell has created a gorgeous sketch for us and I’m totally in love with it!
I tried to use a different color palette than I have been playing with lately and started first with this go-to flower from Altenew’s Beautiful Day stamp set. I stamped using Versafine ink and then colored using Zig Clean Color Markers. Just two colors was all it took to get pretty variation on the petals. I fussy cut it out and then added it to this ivory base to match the sketch. I used the Softly Falling embossing folder to give dimension to the top panel and added a Paper Pumpkin sentiment on the bottom later. I then added a Basic Pearl (colored with a Sharpie) and some Black Metallic Thread to the flower.
This sketch has infinite potential and I think I may use it again soon! Love, love it! I hope you will too. So glad you stopped in for today’s card. I’ll be back tomorrow with a look at a new product and I can’t wait to share. Until then, have a great day!!
Supplies:
Stamps: Beautiful Day (Altenew), Paper Pumpkin sentiment(SU) ; Ink: Versafine Onyx Black, Zig Clean Color Markers; Paper: Naturals Ivory (SU retired); Black Metallic Thread, Basic Pearls, Big Shot, Softly Falling Embossing Folder, Dimensionals
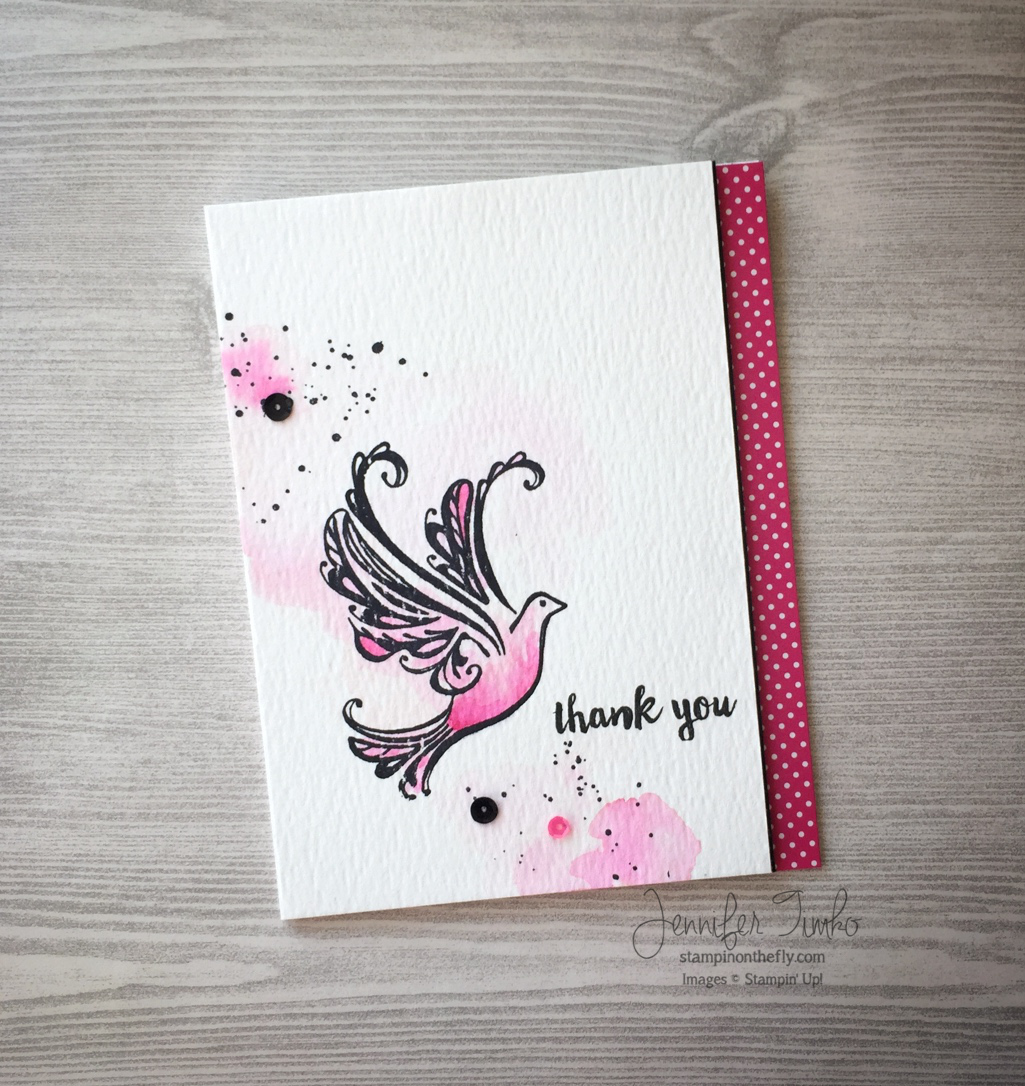
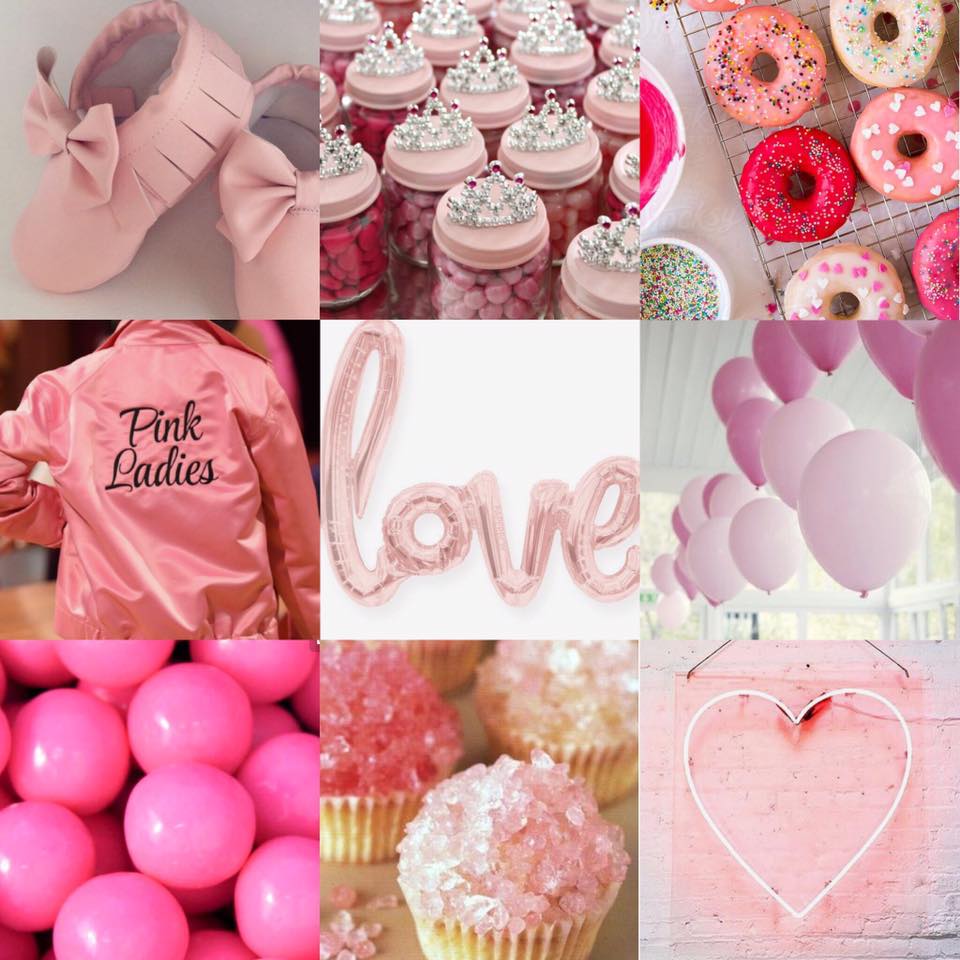
Welcome to this month’s Fancy Friday Blog Hop! Our team is a group of stampers who love to make beautiful things. Sometimes they are clean, sometimes they are layered but the one thing I can say for sure is that our projects will be fancy! If you hopped over from the amazing Susan Wong, welcome to the next stop. For February, we have an inspiration challenge….Think Pink!
I have loved this beautiful bird image from Strength & Prayers since I got it and I wanted to use it for a non-sympathy card. I thought playing with it in pink would be fun. I stamped the image onto watercolor paper and also stamped the splatters from Gorgeous Grunge. Then I started a loose watercolor with Pink Pirouette followed by additional coloring with Melon Mambo. I just pulled the color right from the lid of my ink pads using an Aqua Painter. Super easy to do, especially when you get to go out of the lines like I did here. After the color dried back a bit, I went back in and layered in some more Melon Mambo to add more depth. The sentiment is from a Paper Pumpkin set and I thought the font was a nice match to the art on the image. I added a small border on the colored panel with Basic Black card stock and put it on a Pop of Pink DSP base. Lots of pink here but you could use any color singly or a combination for a different look.
I hope you enjoy this fun look! There are some serious “pink girls” in our hop and I just know they will have had a great time creating with this theme.
Now for the rest of the hop! I’m telling you….this team is the most talented group. You will be happy you hopped! Next up is my amazing friend Connie Collins. Her work is always extraordinary and you are sure to love what she created!
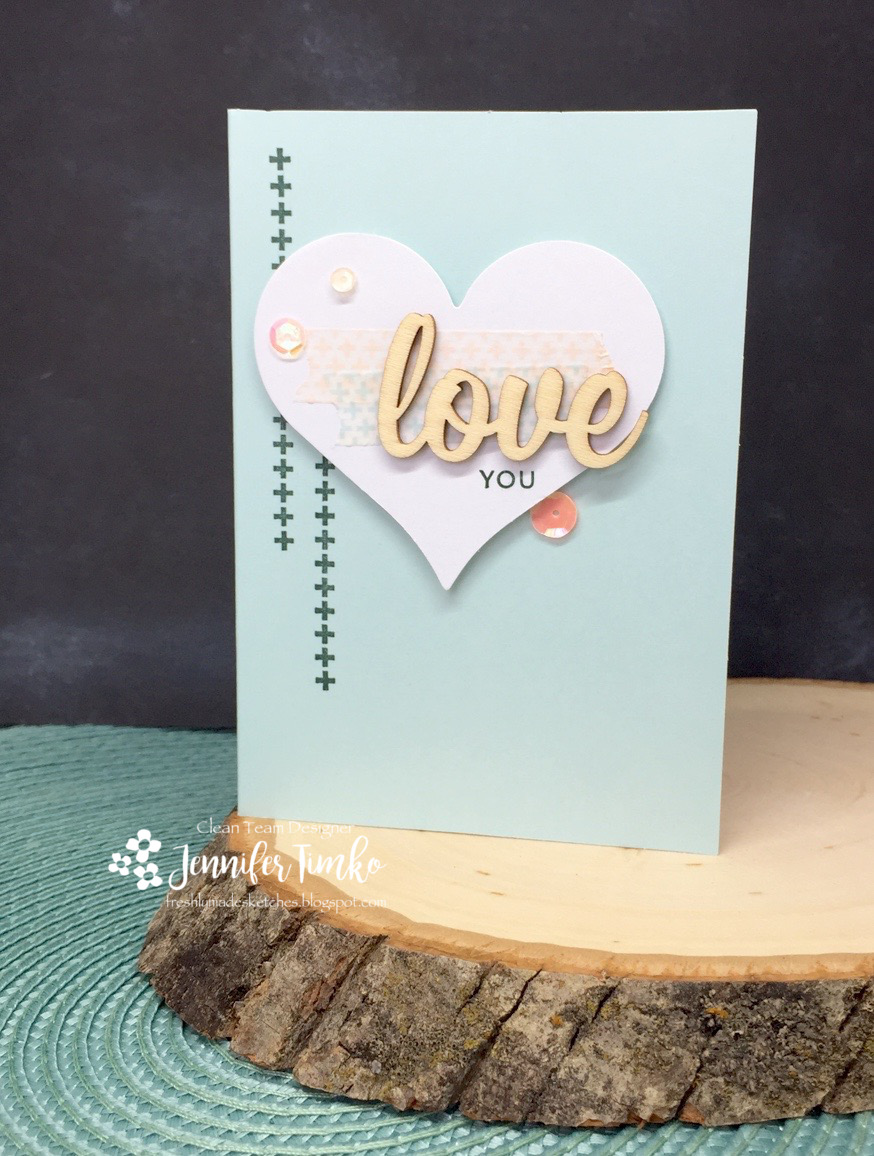
My favorite stamping day of the week is here! Happy Wednesday to you! I’m so excited to share this week’s sketch by coloring genius Karren Johnson. Her split panel concept is so fun and can lead to so many great ideas!
So I’m hoping that I didn’t stretch too far from the sketch but I really tried to make my watercolor ombré layer into three distinctive sections. I used the beautiful Tim Holtz Hickory Smoke Distress Ink to create the colors. I started with a light wash and then went back and layered on more ink. The heart is really one of the leaves from the Layering Leaves Die Set (Concord & 9th) and I just snipped the stem off to turn it into a heart. I colored a scrap of watercolor paper with my Wine Red Zig pen and washed it out a bit with water. Then I die cut with the leaf. So pretty! Finally, after some debate, I chose a sentiment. You see…I need a birthday card for my dear husband and I think this might hit the right masculine note (well, at least it isn’t a flower, haha!). I love that the Moon Rock ink from Altenew is a nice match to the distress ink on the panel with crisper stamping. The sentiment itself is from the January Paper Pumpkin kit. While the kit is an adorable Valentine’s 3-d set, the sentiments are going to be in your go-to list for a while. I love this font and this says it all!
I know the gallery will be full of inspiration this week. The design team has some amazing work already there for you to enjoy. Hope to see your take on the sketch! I’ll be back on Saturday with a fun hop that you are going to love. See you then!
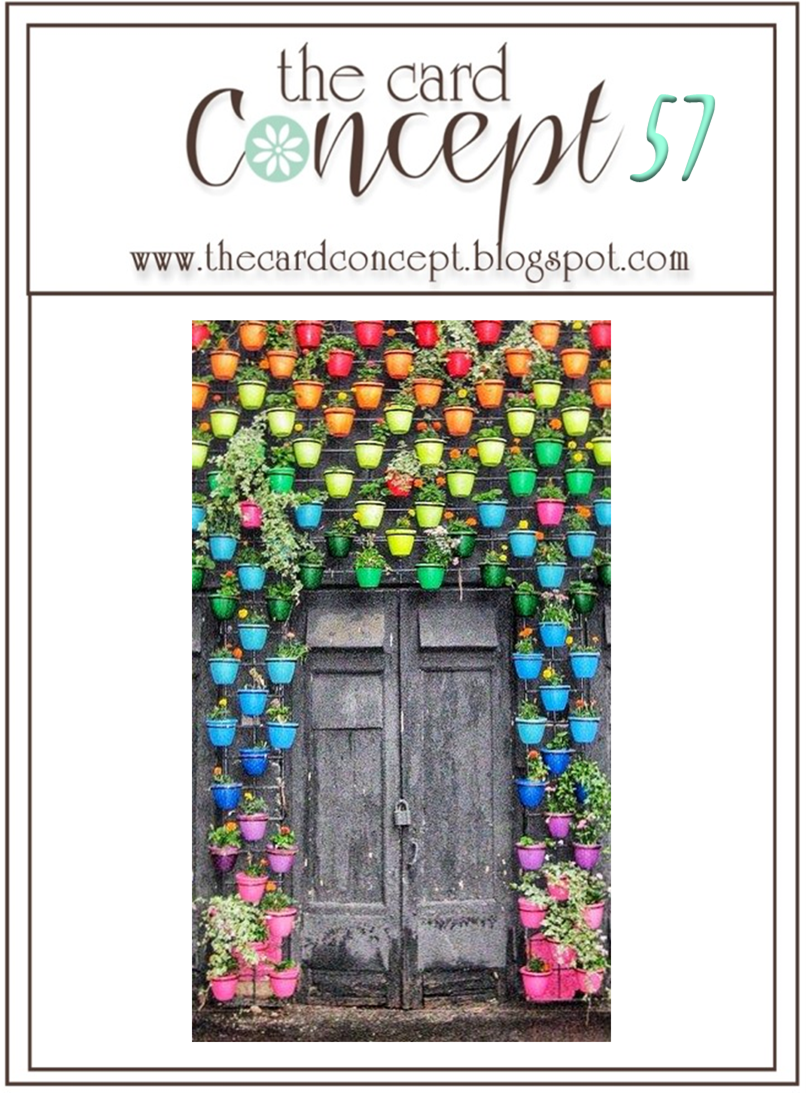
After a summer hiatus, we are back to stamping over at The Card Concept! And we are starting you off on a happy note with a fabulous inspiration piece that you are sure to love.
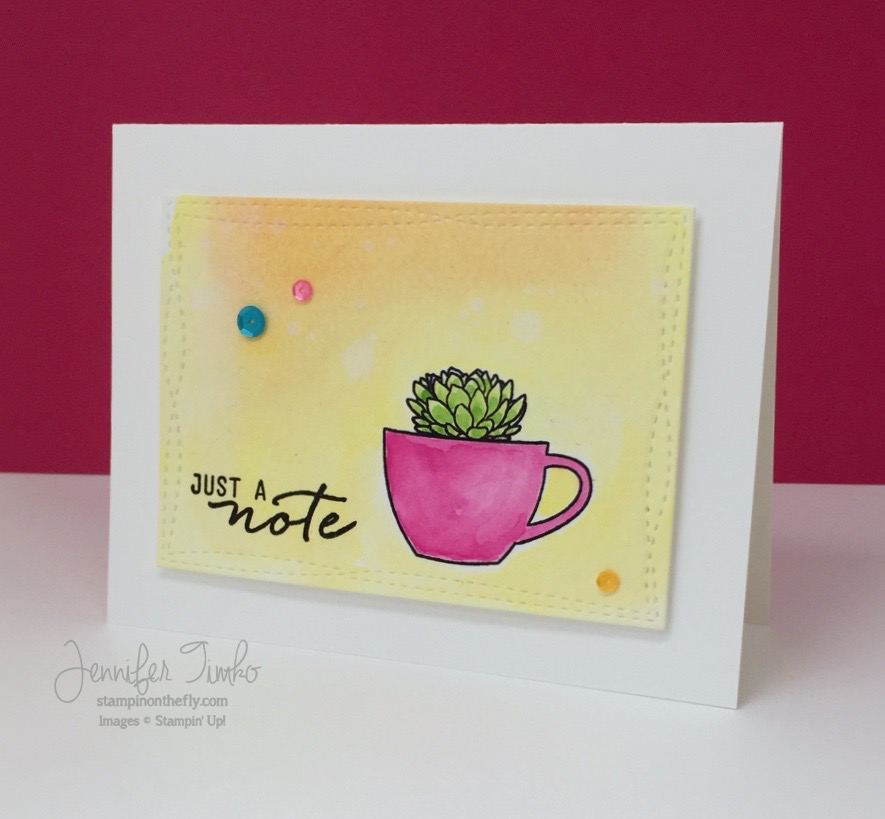
As soon as I saw all those little plants in the bright rainbow pots, I thought of this stamp set from an old Paper Pumpkin kit (SU). The little coffee cut just begs to be colored and the sweet plant is a perfect touch. I want this in real life!! I added a sentiment from the Watercolor Wishes set. I just thought this font was a nice match for the image. All of my coloring is using Tim Holtz Distress Inks in a variety of colors. The pink is Picked Raspberry which I totally adore!! I added these sequins from Pretty Pink Posh that mimic the colors from the inspiration and cut the panel using my Wonky Stitches Dies from My Favorite Things. In keeping with the Clean and Graphic style, I put my image panel up on a white card base to complete it.
Just an admin note, this is my second post of the day. If you are looking for my card for the Freshly Made Sketches challenge, just roll down. Thanks for stopping in today. I hope you are inspired by the team and have a great time choosing YOUR style this week for the challenge! See you soon!
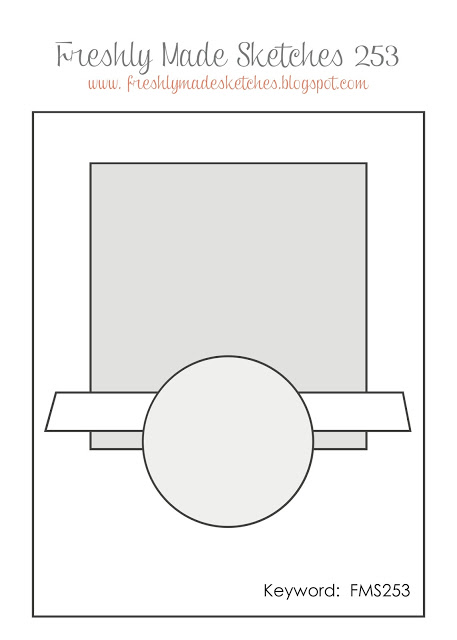
Oh do I have a fun one to share this week over at Freshly Made Sketches. The lovely Jennifer Brum is our hostess this week and she had this “out of the box” sketch for us that I just love! You are going to think of so many things to make!!
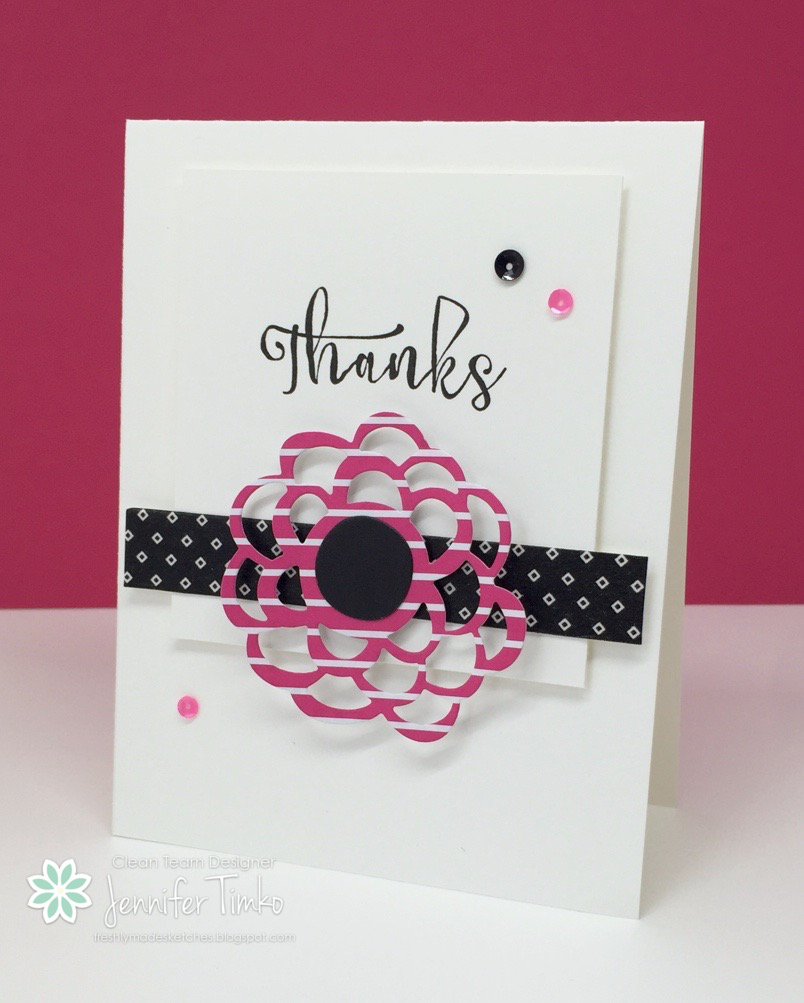
I pulled out my Pop of Pink DSP and Washi Tape and played around with some ideas before I decided….hang on…..to mostly keep it super simple. I know, shocker right?!! Haha!! I hadn’t used this flower die (Echo Park Paper Co) in a while and thought it would be great for the sketch. I thought it would be fun to use the die on this DSP and I like the effect. I took the coordinating Washi Tape and attached to a strip of white card stock. Not really the intended use but I just loved this particular pattern under the flower so….. The sentiment is from Paper Pumpkin (the same kit as my FMS card with the fall flowers last week). I think this curved font worked really well, don’t you?? A few sequins to finish.
This is my first post of the day but don’t be surprised when another goes up soon. The Card Concept Team is back from their summer break with a great challenge. So….three cards from me in two days. See, I have been a little more busy with my stamping! I hope you get some time to create too. See you soon!
Supplies:
Stamps: Paper Pumpkin (SU); Ink: Versafine Onyx Black; Paper: Thick Whisper White, Pop of Pink DSP; Accessories: Big Shot, Flower Die (Echo Park Paper Co.), Sequins (Pretty Pink Posh and SU), Dimensionals, Glue Dots, Pop of Pink Washi Tape
Paper Pumpkin is such a wonderful treat in the mail each month! I’m sure you have noticed how much I use the stamps well after the kit has been completed. In fact, many times my Paper Pumpkin stamps are my first go-to when I’m looking for sentiments. But I rarely show you what I make with the actual kits. Mostly because I make the kits exactly as designed or I give them to my boys to use for their cards. Yep….really! There was a kit in the spring (the May one, I think) that I simply opened and handed to my oldest so he could make thank you cards for his birthday presents. I showed him the directions, asked if he had any questions and left on a three day trip. When I came back the cards were made, written and ready to be addressed!!! Oh how I love you Paper Pumpkin!!!! *smile*
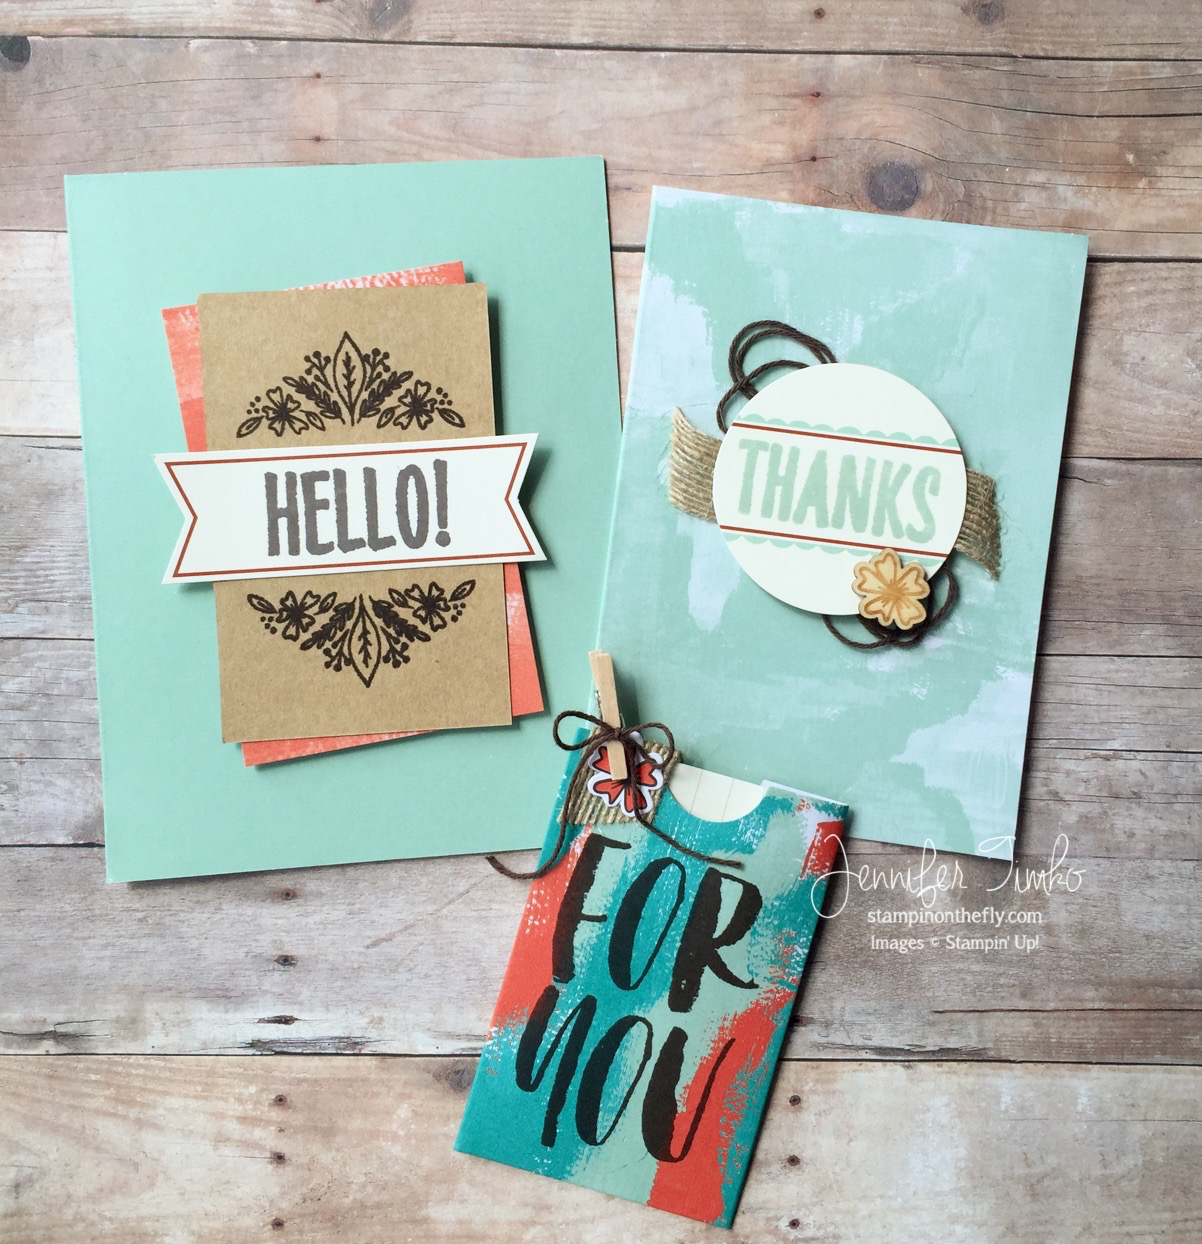
But I have to say that every now and then the original design is just not a “Jen card”. Certainly not a critique of the work from the Concept Artists since my work isn’t everyone’s cup of tea. But I thought it might be useful to show you how I turned a kit into projects that are totally me and incredibly helpful to have in my stash. If you haven’t already seen it, I am attaching a link to the video from Paper Pumpkin on how they intend you to use the kit HERE. I just sat down with the elements from the kit and did a little mixing and matching. My favorite card is the one I posted above. Isn’t it adorable?? And so easy. It does include the only thing I used that wasn’t already in the kit, Mint Macaron ink. But I suspect you already have that! All I did was cut the fun Burlap Ribbon and place the Espresso Twine behind the circle that was stamped in the Mint ink. A glue dot to attach the fun wooden element! The card base is the smaller of the two from the kit.And here is the whole kit put together. You can see I did the gift card holder exactly as the directions showed. I just made sure I inked the sentiment really well to get a bold look on it. (Your Misti is helpful with this since you can stamp multiple times, if needed) I combined other elements remaining for the larger card. And yep….I did have some stuff left over. Which I feel confident you will see on other projects. Because Paper Pumpkin is the gift that keeps on giving!!
I hope that these alternate ideas are helpful to you. And please remember to keep those stamps in an easy to reach place. They are super fun, completely on trend and perfect for so many projects!! Thanks so much for stopping in today. See you soon!
Supplies:
Stamps, Paper, Accessories and Ink: Paper Pumpkin (Bold Botanicals – August); Additional Ink: Mint Macaron; Additional Accessory: Misti
Primary Sidebar
We use cookies on our website to give you the most relevant experience by remembering your preferences and repeat visits. By clicking “Accept”, you consent to the use of ALL the cookies.
This website uses cookies to improve your experience while you navigate through the website. Out of these, the cookies that are categorized as necessary are stored on your browser as they are essential for the working of basic functionalities of the website. We also use third-party cookies that help us analyze and understand how you use this website. These cookies will be stored in your browser only with your consent. You also have the option to opt-out of these cookies. But opting out of some of these cookies may affect your browsing experience.
Necessary cookies are absolutely essential for the website to function properly. This category only includes cookies that ensures basic functionalities and security features of the website. These cookies do not store any personal information.
Any cookies that may not be particularly necessary for the website to function and is used specifically to collect user personal data via analytics, ads, other embedded contents are termed as non-necessary cookies. It is mandatory to procure user consent prior to running these cookies on your website.

 A really quick post for you today to share a really quick card. Today is Freshly Made Sketches day and our lovely queen of color, Amy O’Neill, has given us a fabulous sketch! I have had a heavy flying schedule over the last couple of weeks but just ‘had’ to play along. So I kept it quick.