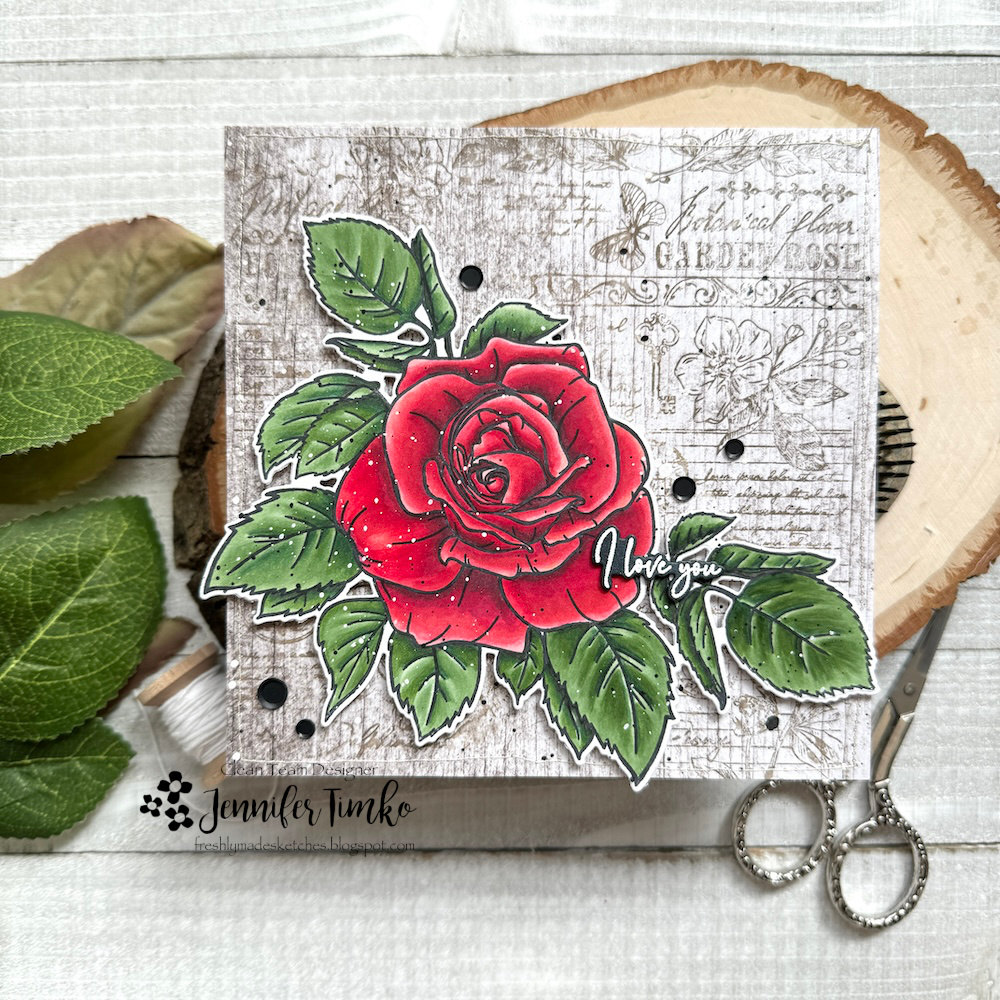
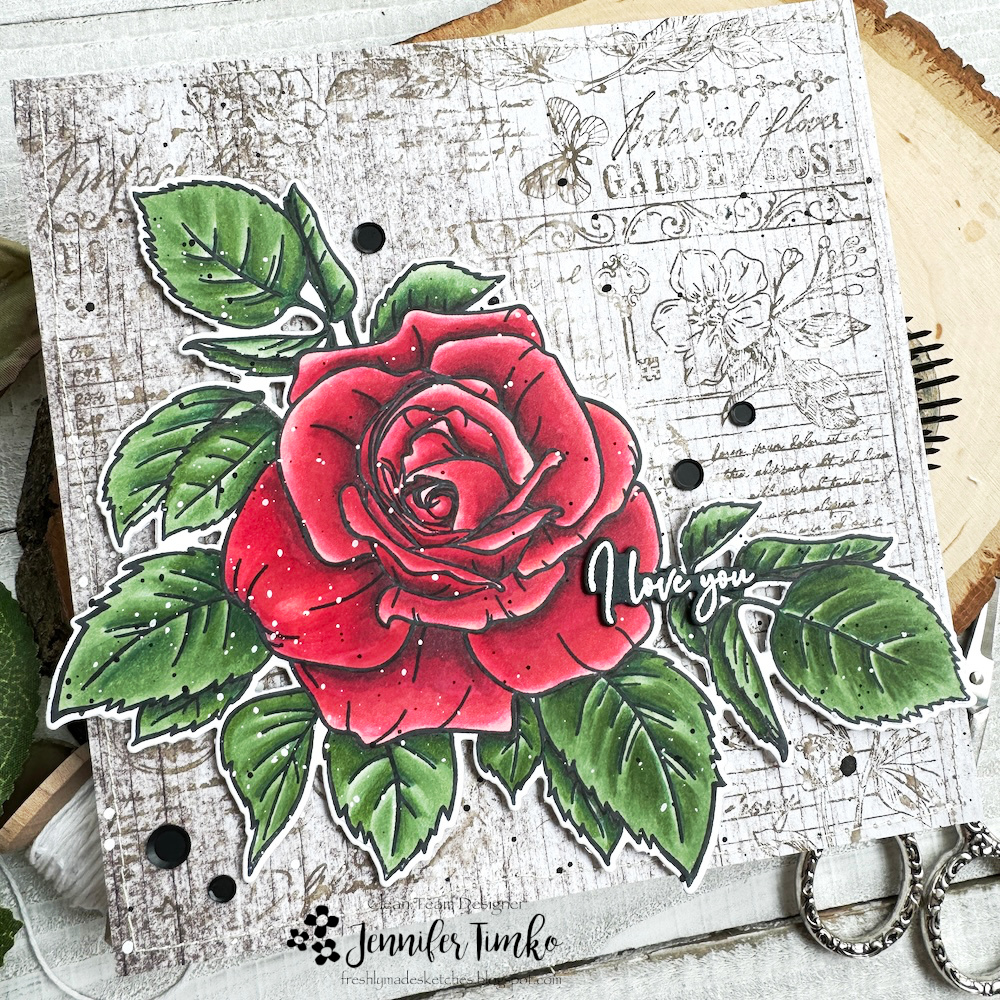
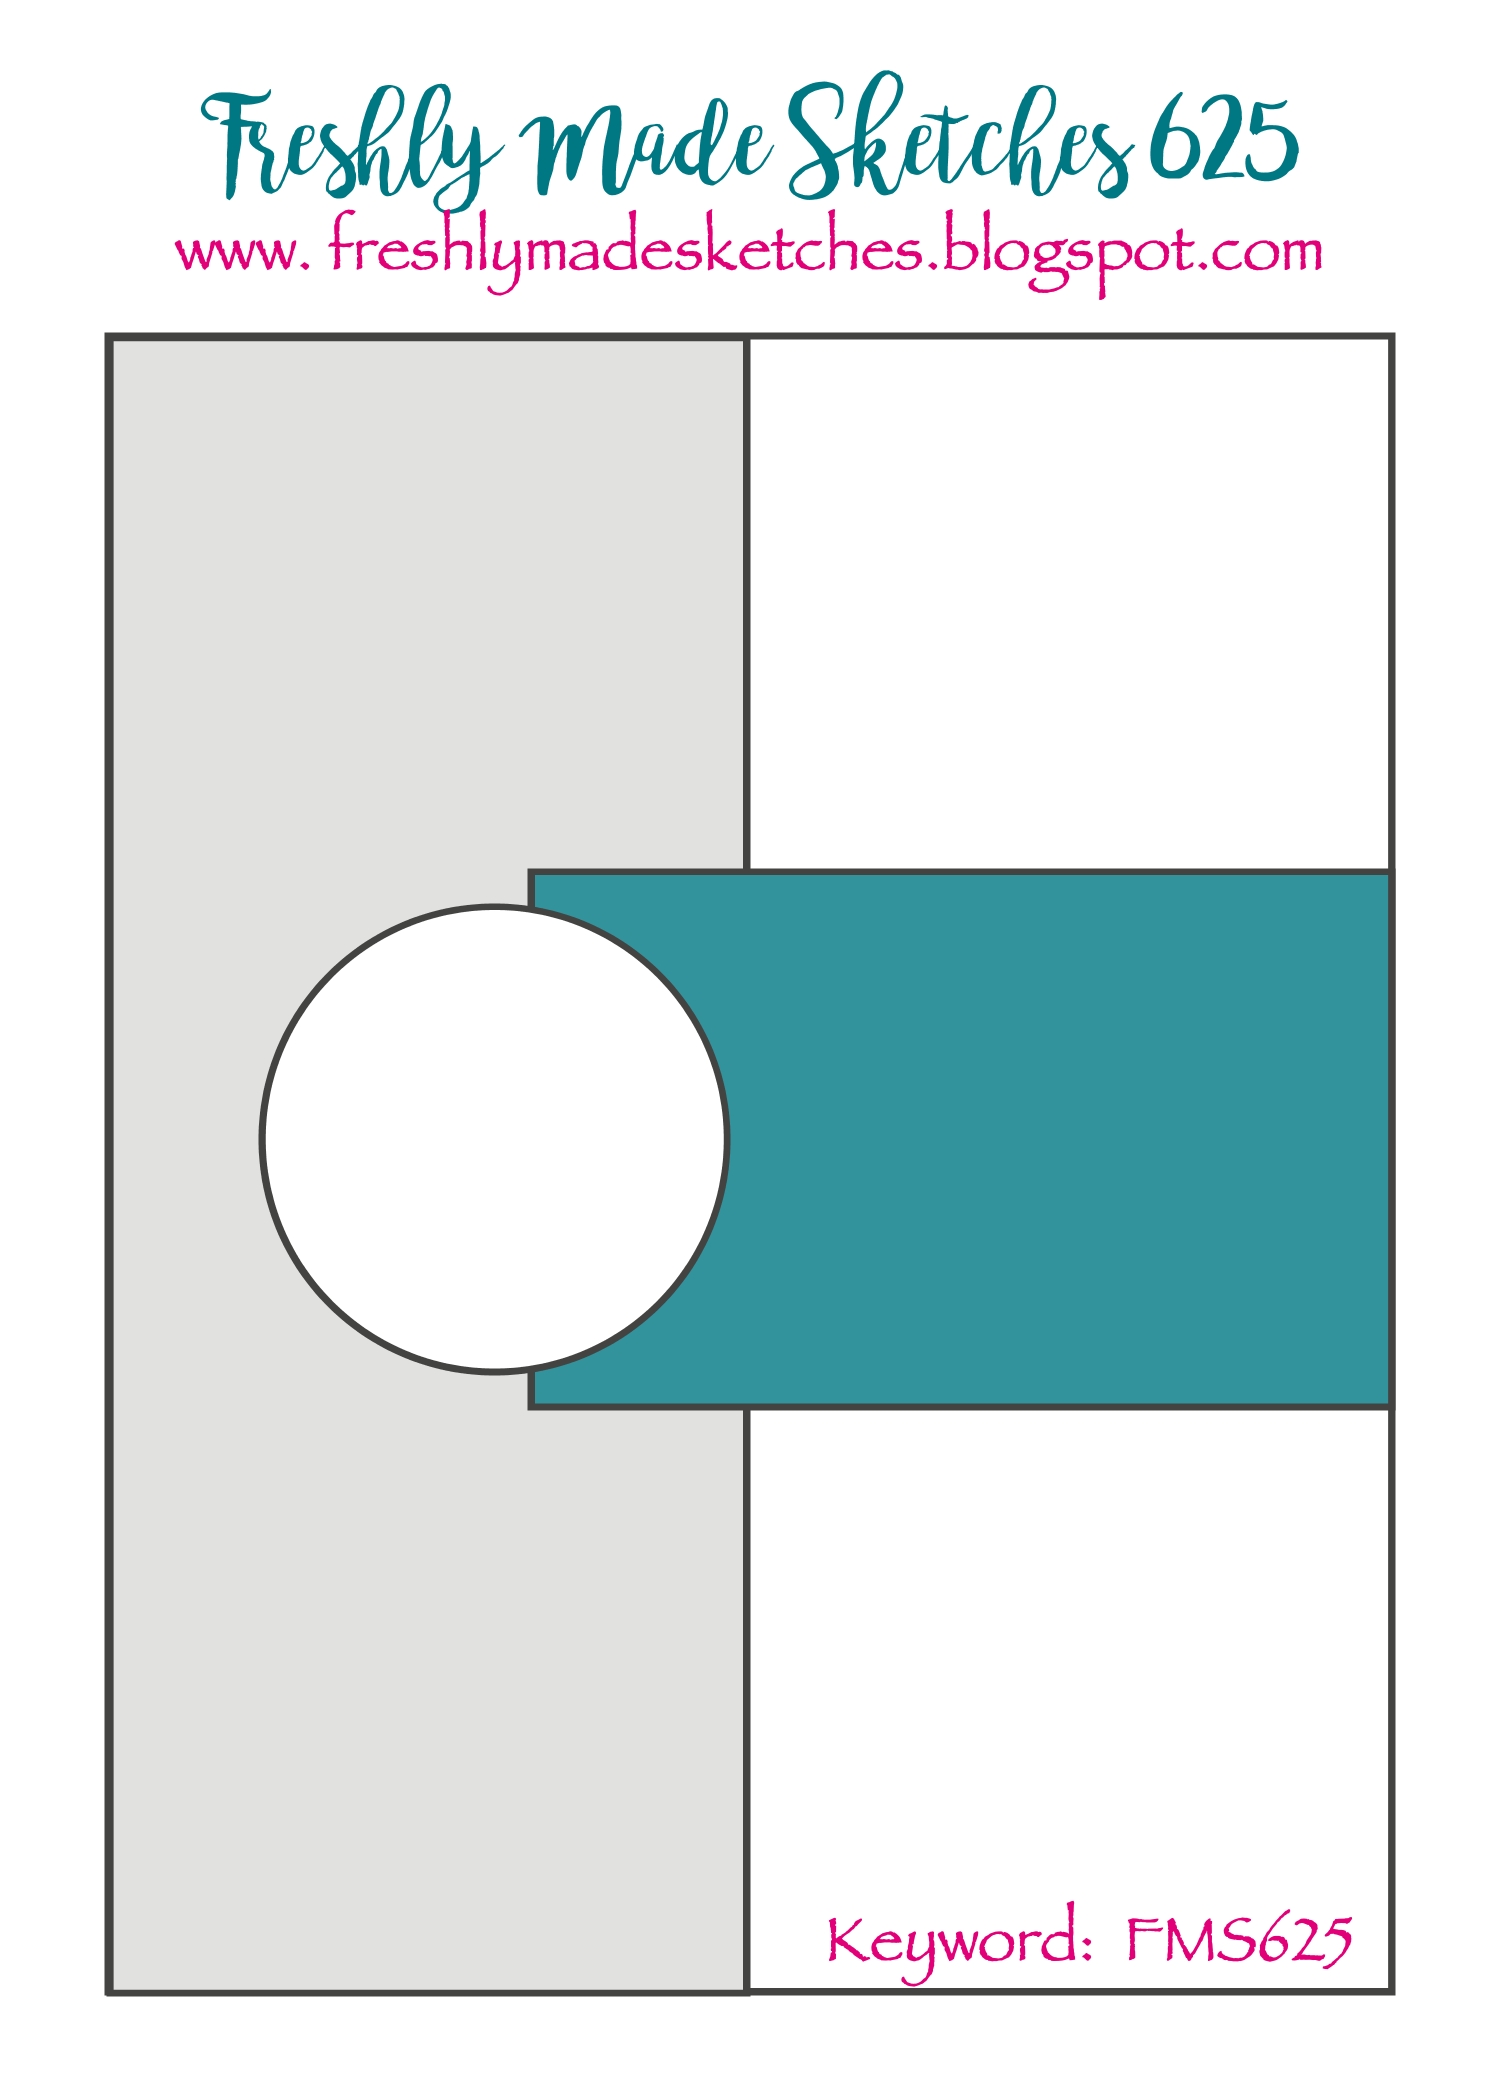
Hi everyone! Back with the latest from Freshly Made Sketches and I am the sketch designer this week. Not gonna lie, I cheated on the sketch and created it after I had colored my image for the card. I just HAD to use it!
This giant image is so beautiful and perfect for practicing coloring. In this case, Copic Marker coloring. I thought about a not-red rose but thought I’d just keep it classic for the first use of the stamp. It is the Big & Bold – Smell the Roses stamp and die set from Colorado Craft Company. I did the coloring over a few days and had fun playing with shading not just on the flower but on the leaves too.
The base of the card is 5-1/2″x 5-1/2″ so that I didn’t have to cut off any of the image. I used a woodgrain background and then did some “imperfect” stamping with the Vintage Flora stamp by Honey Bee Stamps. It isn’t as big as the card but I just inked up part of it with Distress Oxide Ink in Scorched Timber. I did some stitching around the edges and then I added some splatters in white gouache and black watercolor paint and a few black confetti pieces. Finally, I chose a sentiment from the stamp stamp set as the flower. Perfect for the red rose, don’t you think?!
I hope you enjoy this card as much as I did making it. Have a great rest of your week and I look forward to seeing you in the gallery!
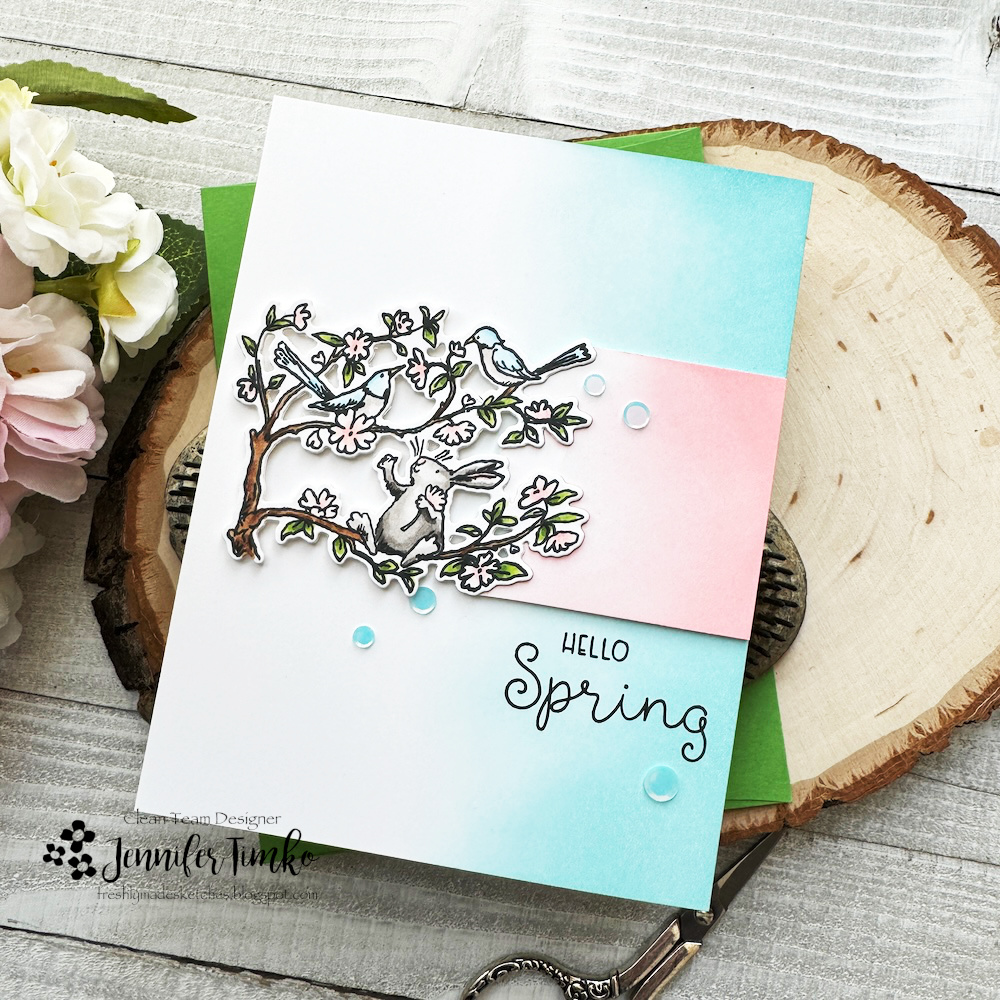
As I was coming over to write this post, I realized I never posted last week’s FMS card here. I did over at Instagram so a good time to remind you that I’m there as well: jentimko on Instagram. With that, we have a new sketch from Jen Brum for this week at Freshly Made Sketches and it is super fun. I took a little twist on the circle with a partial die cut edge to line it up with a die cut image.
I just got this sweet image from Colorado Craft Company called Finally Spring and thought it would be fun to use for the sketch. I love that the coloring only takes a few minutes since the images are so small. I used my Copics to create what I saw as cherry blossoms. Once that was completed I pondered how to make this work best.
I brushed on some Distress Oxides in Tumbled Glass and Broken China to “split” the panel. Then I added some Saltwater Taffy to an additional panel. Using the die for the image I did a partial die cut edge so that the image could nestle up in the cutouts. I make the image stand up a bit more, I cut two extra backing pieces to stack behind the image. Finally a sweet sentiment from the set.
I hope you like my interpretation of the sketch and will come over to join us. Thanks so much for stopping in today. See you soon!
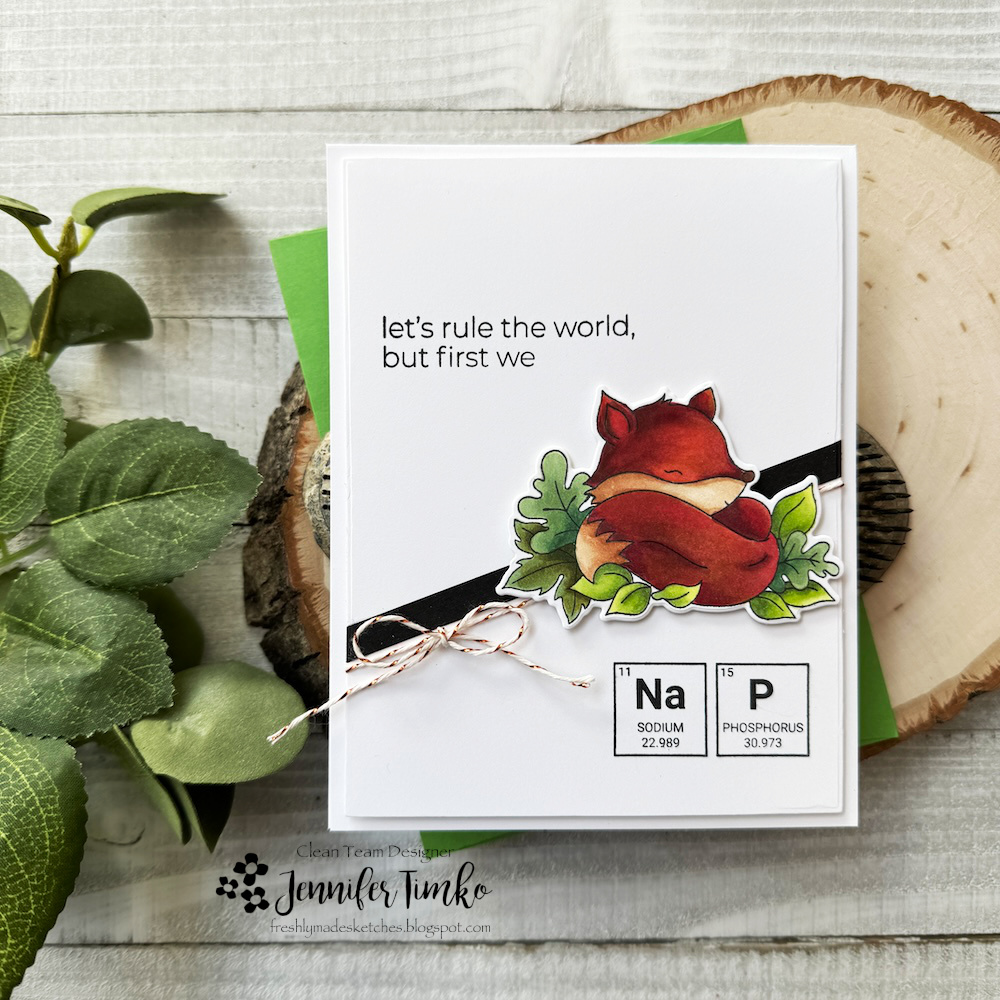
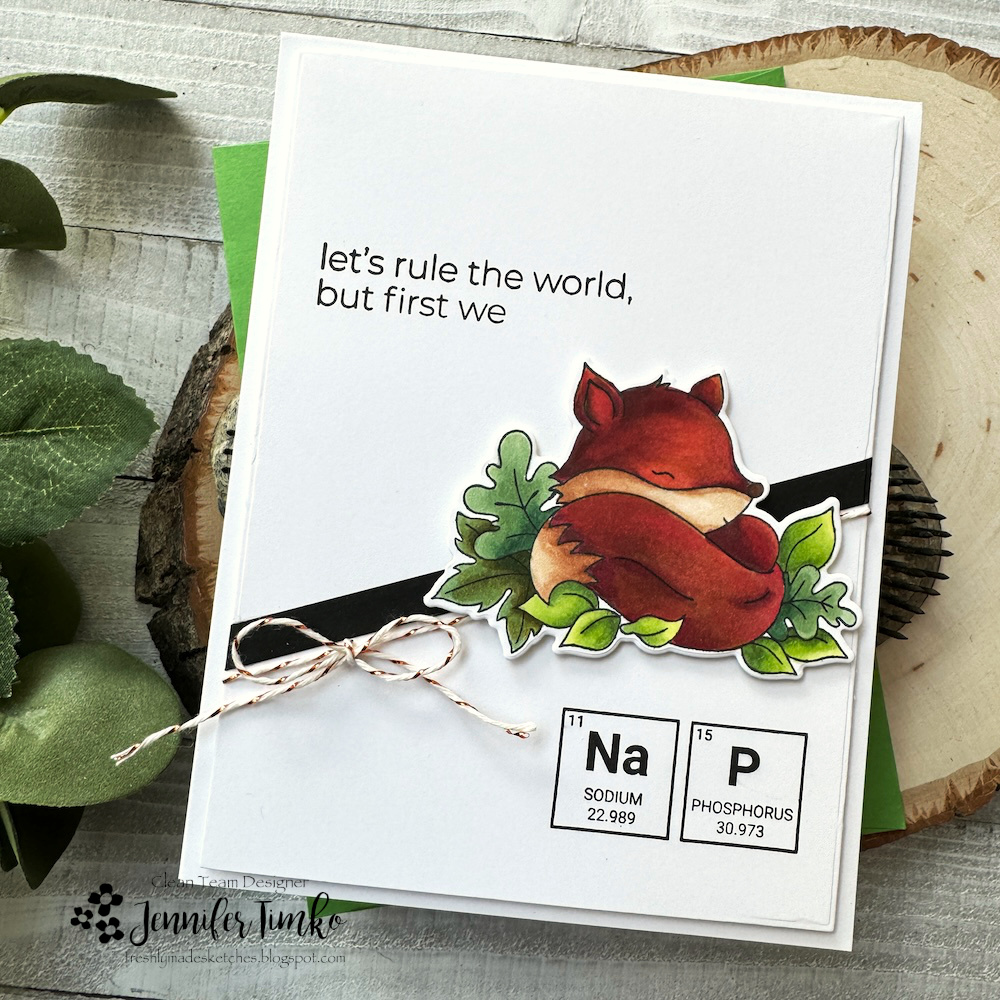
Hi everyone! I have a fun card for you this week courtesy of the latest Freshly Made Sketches challenge. Our always awesome Linda Callahan is our sketch designer this week and the gave us a fun slant on her sketch this week.
When I first say the release with these element stamps from The Rabbit Hole Designs, I knew I had to have them! My BioChem kid needs cards, after all! The Fall Foxes set is also so cute and I loved this little napping fellow for the sentiment. Seemed perfect for the sketch too. I did a bit of Copic coloring on the fox blending some of my browns and reds to get “fox color”. It was fun just to play with it and I wasn’t sure it would even work but I like how it turned out. And I decided to make him a spring fox!
I stamped on the sentiment (there are coordinating dies for the elements if needed) and kept the rest clean. A strip of black card stock and some twine with copper threading which I thought was fun with the fox. All ready to head out to the lad!
Hope you are having a great week. Just got back from a real live flying trip and it was nice to get out in the system for a few days. Reminded me of how much I love getting people where they need to go. Hope your week goes well. See you soon!
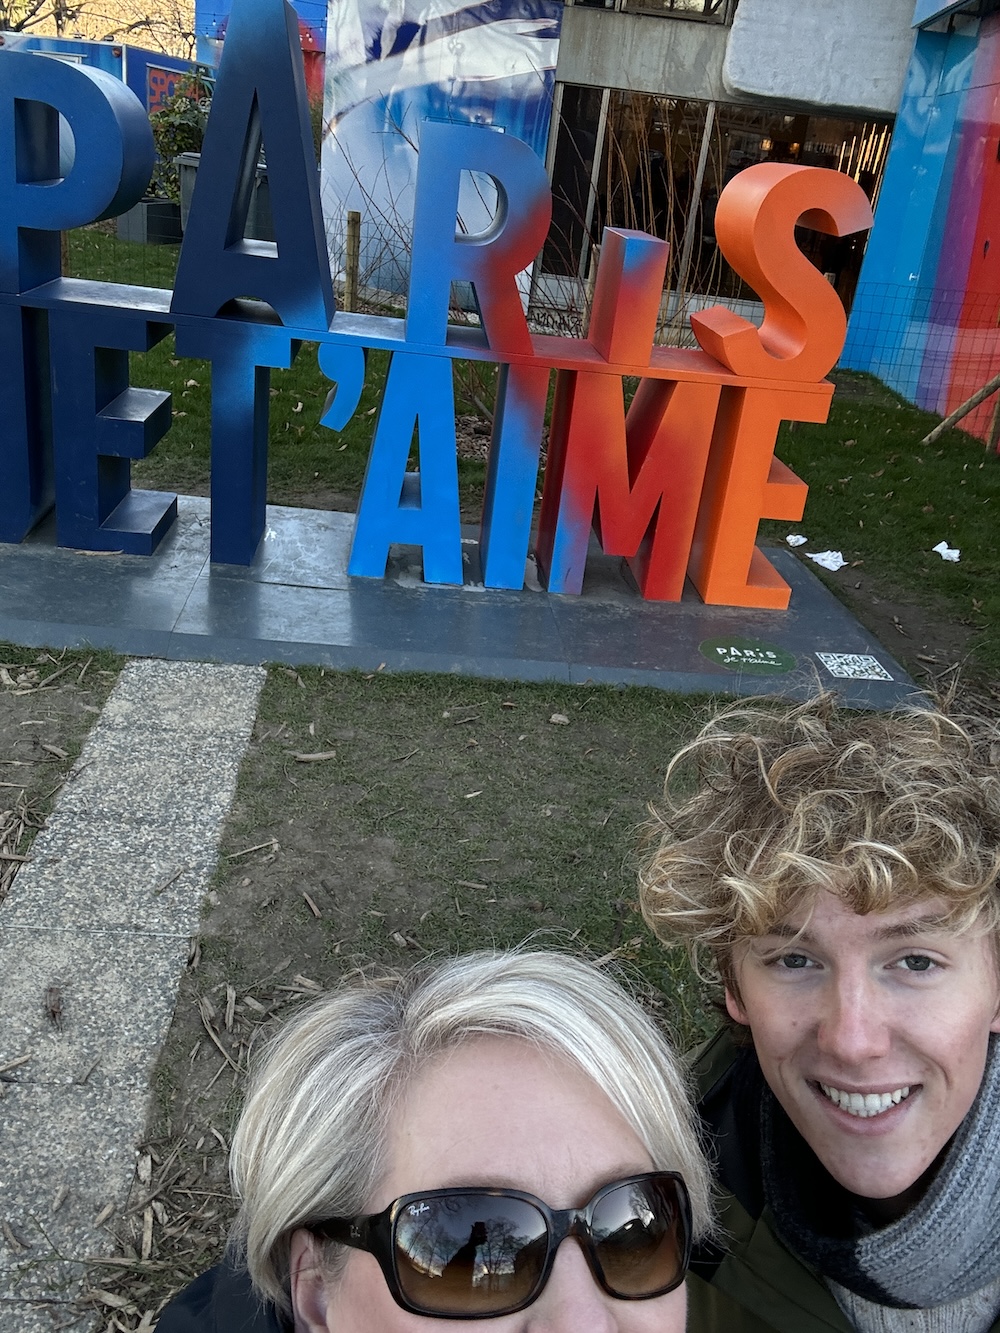
Hello, my friends! Long time since I have posted! I’m pretty sure I told you all that I would be doing some non-flying work for United and that is exactly what I have been off doing. I’m learning to teach a 4 day course on Leadership for new Captains and it is taking most of my bandwidth to work on (along with my required flying, of course). And then, I took advantage of a week off to jet away with my oldest – just the two of us – to Paris for a 4 day vacation. His time off has not aligned with the rest of the family since he went to college and he was in much need of a vacation. So I took advantage of my travel “privileges” (which mostly only work in off season travel) and off we went. He had a passport from right before Covid started and he had never used it. We fixed that! I have some photos at the bottom of the post if you are interested.
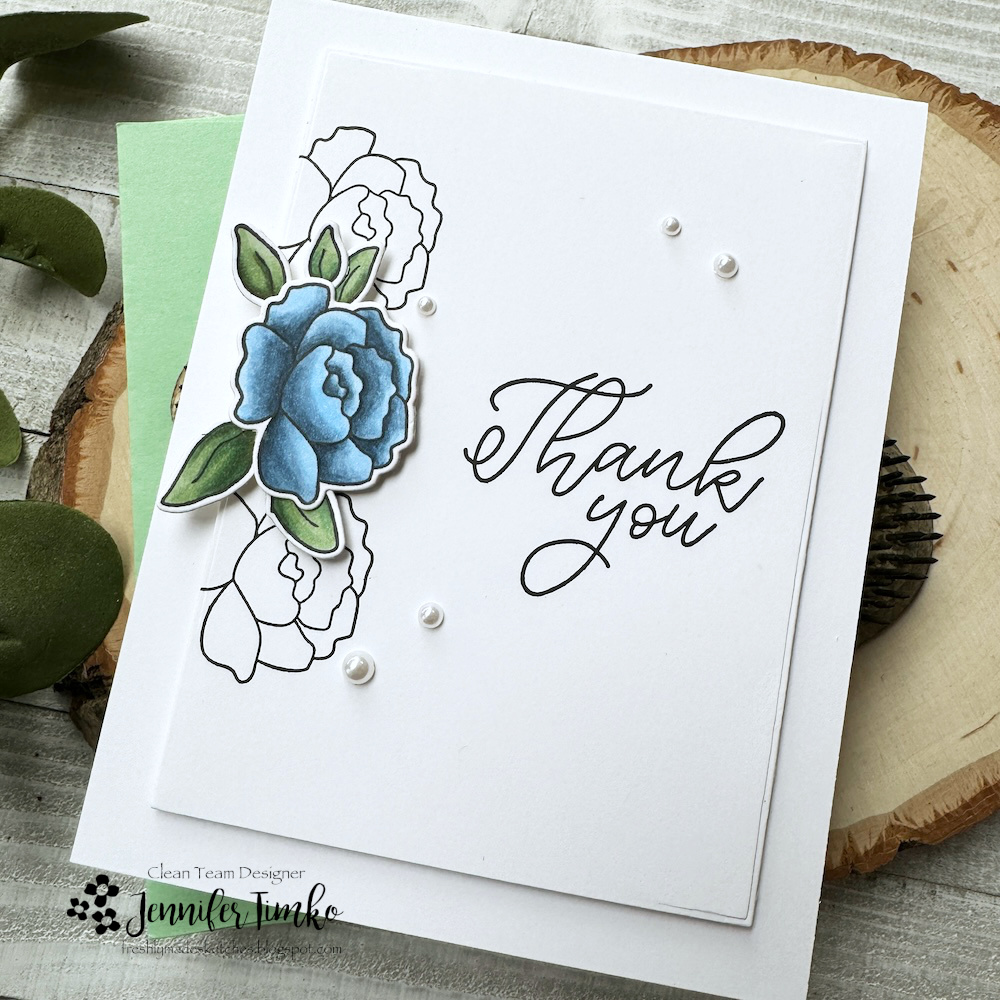
With that, I’m the sketch designer this week and in true form, did not even follow my own idea. In fairness, I created the sketch a while ago and well, all of the above things. I hope you will enjoy playing along with us at Freshly Made Sketches on this one.
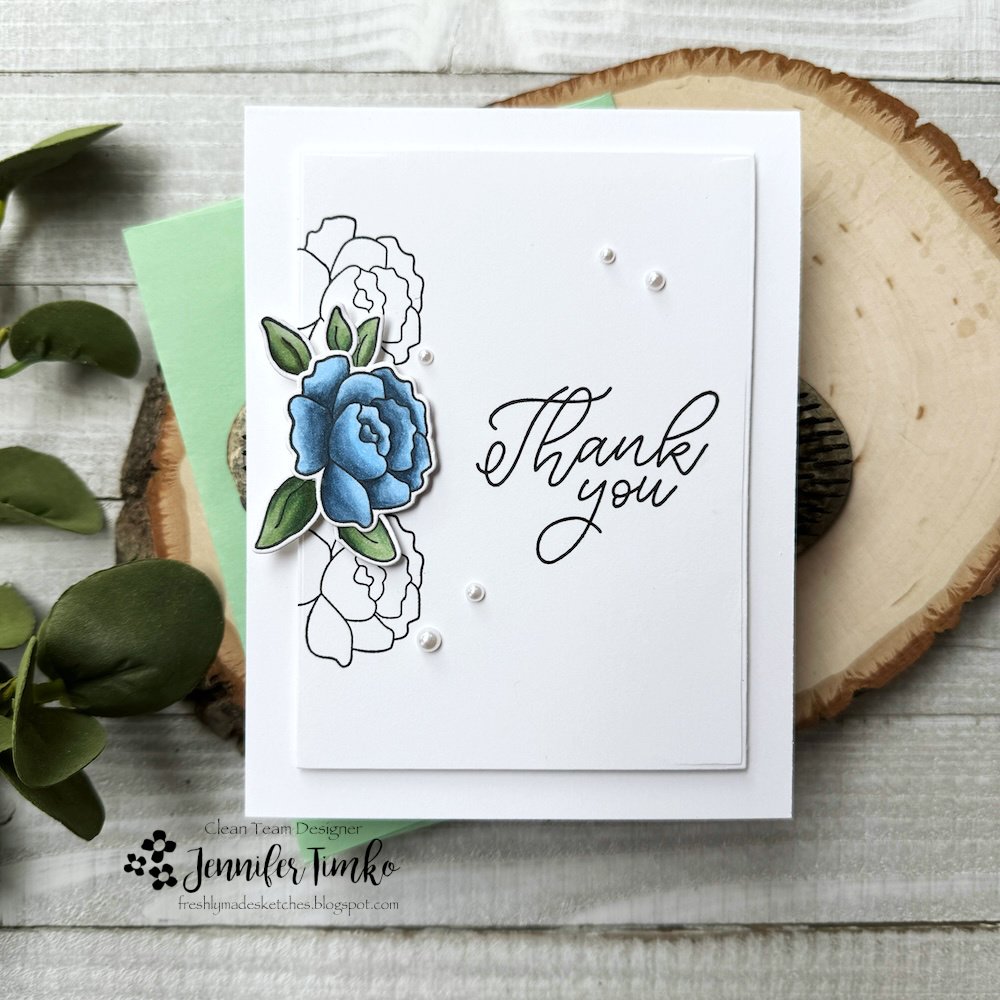
I thought I’d better get back into crafting with something fairly simple so I opted to color just one of the flowers and pop it up. I went with older sets and things I just love to keep it easy. The flowers/leaves are from Friendship Blooms by SugarPea Designs and I did some Copic Coloring on that. The sentiment is from an Ellen Hutson stamp set.
Most of the work is done by my Misti. I stamped and colored first, attached the leaves to the flower and then just looked at the spacing for stamping. I cut the stamped flower part with a rectangle die so I could cut off a bit of the edge. I popped the image layer up and added a few pearls. Clean, simple and just what I needed to clear my head a bit from all the chaos.
For our trip to Paris, we hit the ground running and saw Ste. Chapelle and the Musée D’Orsay on the first day. We did a food tour in Montmartre (highly recommend) and visited Sacre Coeur while in that area. Of course the Eiffel Tower plus the Musée de l’Armée (a fabulous military museum) and most of a day at the Louvre. Whew….that was a lot in a short time! It had been a long time since I had been there so it was nice to return! A few photos of our adventure.
Thanks for staying to visit a bit. I hope your week is great! I’ll be back soon (really…I actually have another card ready).
Happy New Year! I hope that you had a wonderful and safe holiday season. As we all get back to work and school, our team at Freshly Made Sketches has some fun to share too! Our amazing Stampin’ Up Artisan DT 2024 Member Narelle Farrugia is our sketch hostess and she has a clean and classic sketch to get us back to creating.
I thought I’d get back to it with a clean and simple little card with some easy coloring and happy colors. The Little Birdies set from Honey Bee Stamps seemed just right for the job. I stamped some of the images and colored them with my Copics. I love this little bird!
For the squared I used the inserts from the Lovely Layers: Seasonal Frame. These deckled edges give a bit of detail and make alignment less fussy. Great for a quick card! I brushed on some Distress Oxide Ink in Salty Ocean with a little bit of fade on the bottom. The sentiment is from the Mini Messages Stamp set (and there are MANY mini messages on this one!) and used the coordinating Mini Messages Banners Dies to cut it out.
I hope you will come over and join us this week. Make sure to stop by and say hi to the team (and especially tell Narelle a big congrats on being chosen for the ADT this year). Wishing you another year of happy crafting and I hope that 2024 brings you and your families much joy!
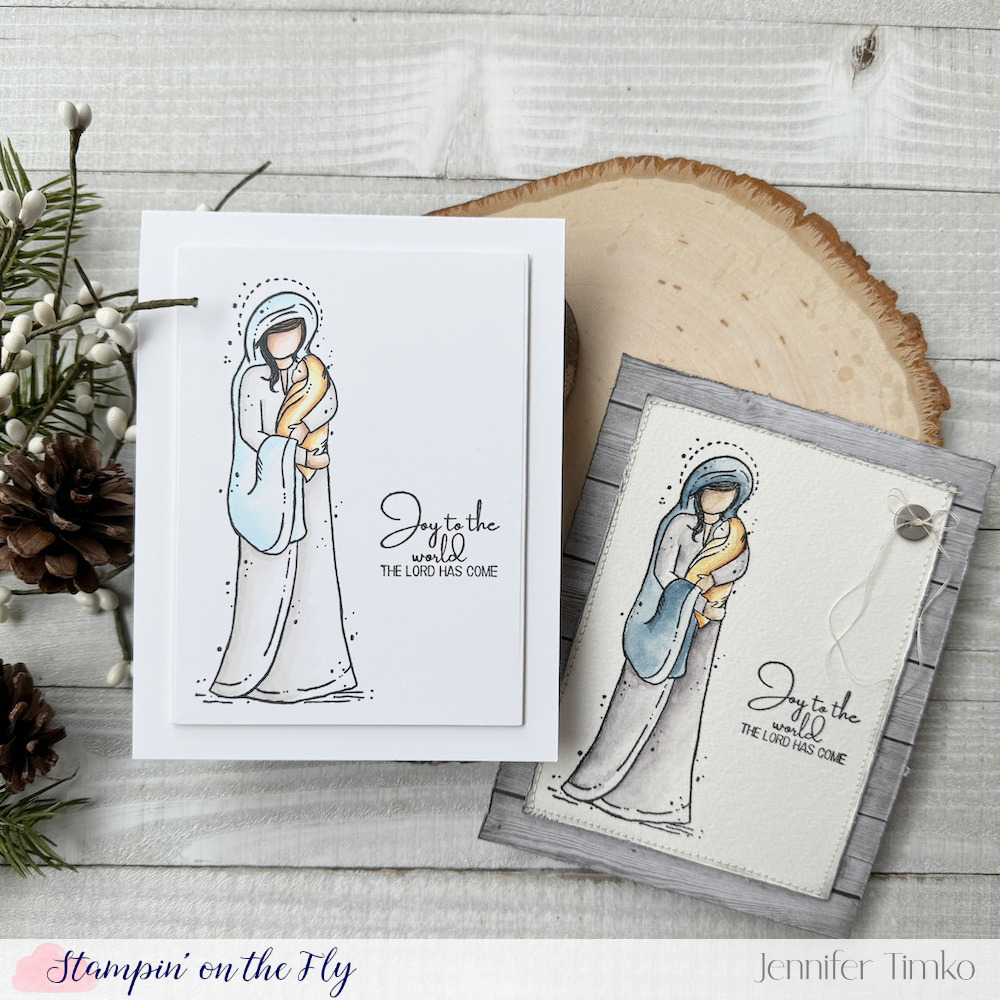
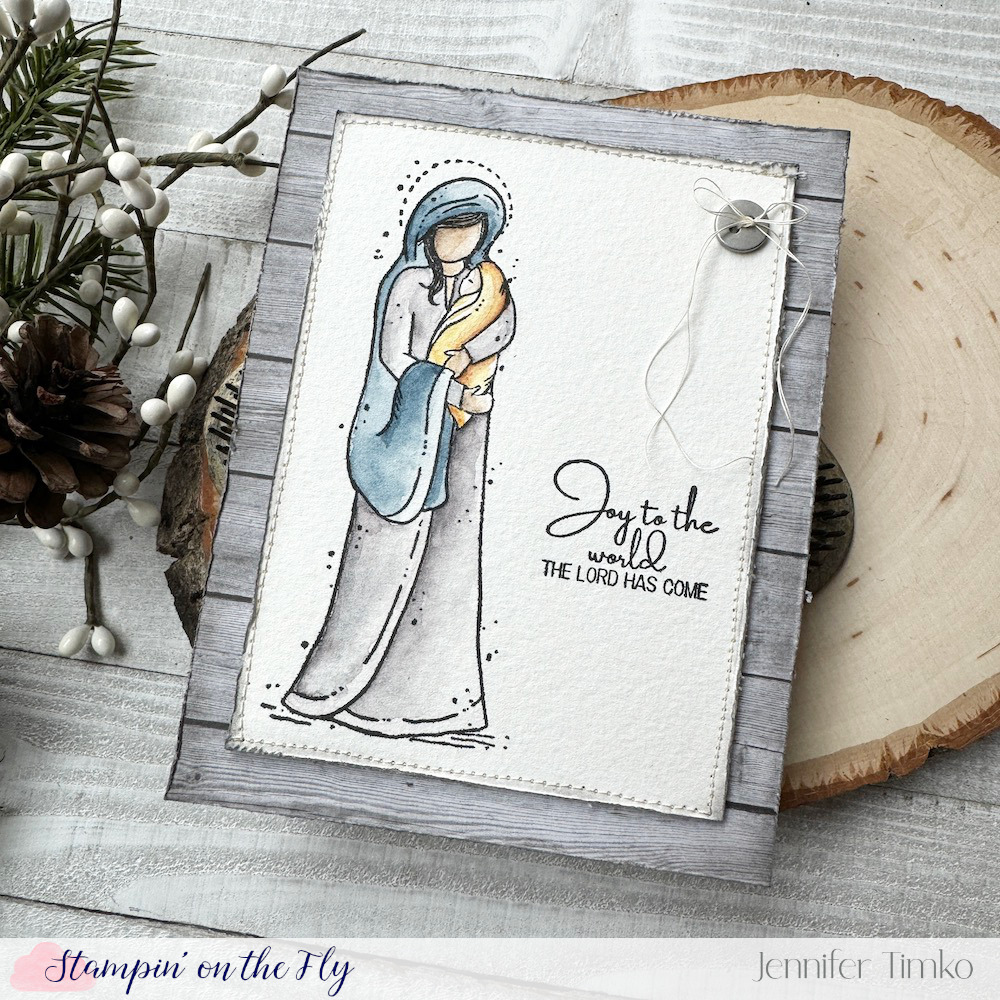
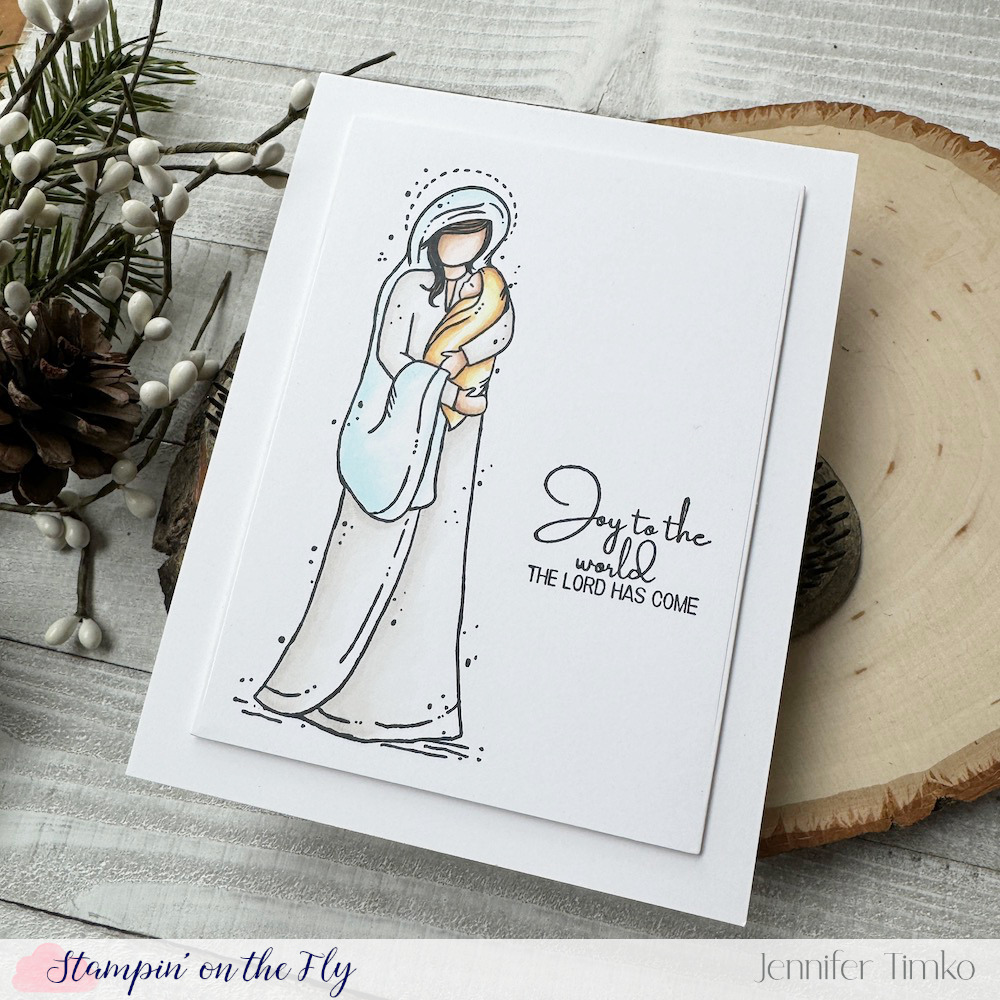
Wishing you and your family a very merry Christmas and a happy holiday season. My last card of the season and one of my new favorite images. Clean, simple, and the heart of our celebration.
This stamp is called the Joy of Jesus by Unity Stamps. I colored in Copics and watercolor and love both results. Same layout, just some sewing and distressing on the watercolor card.
Thank you for another year of kind words and support for my crafty adventures. I’ll be back in the new year and look forward to what 2024 brings. Wishing you peace and joy!
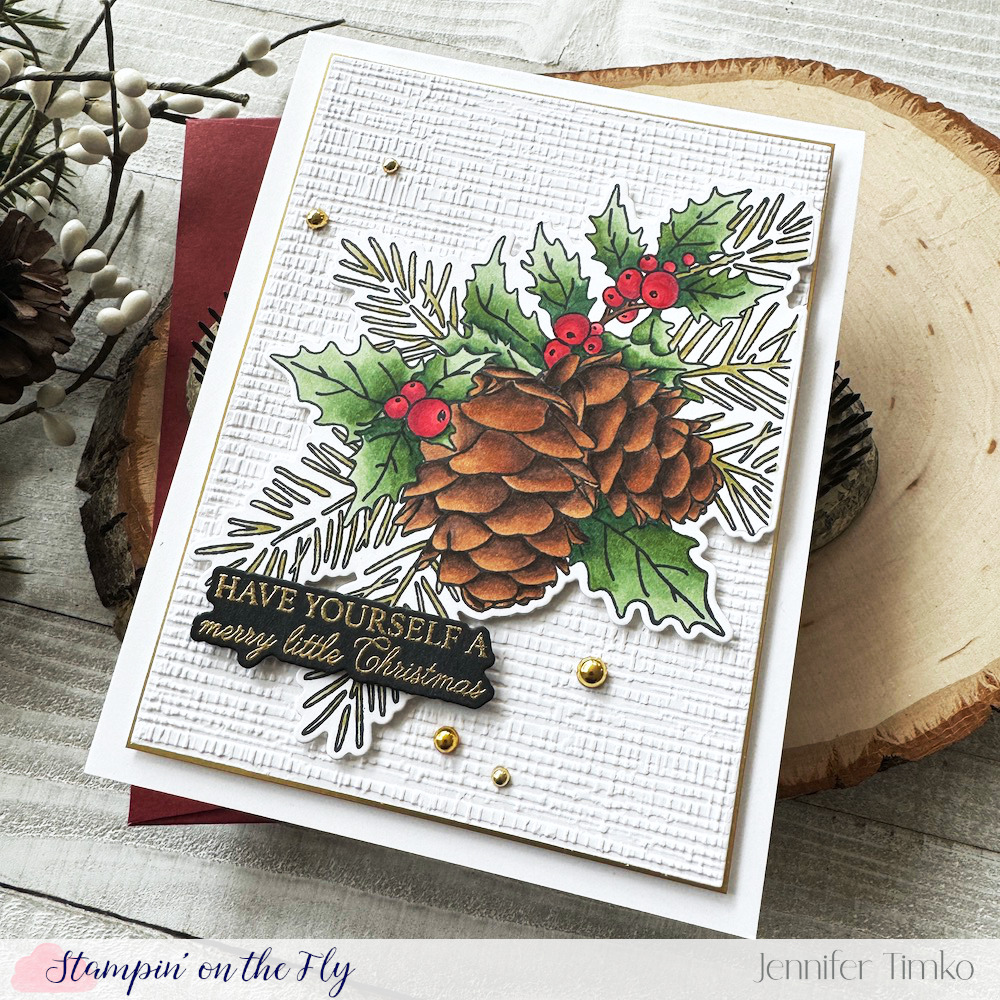
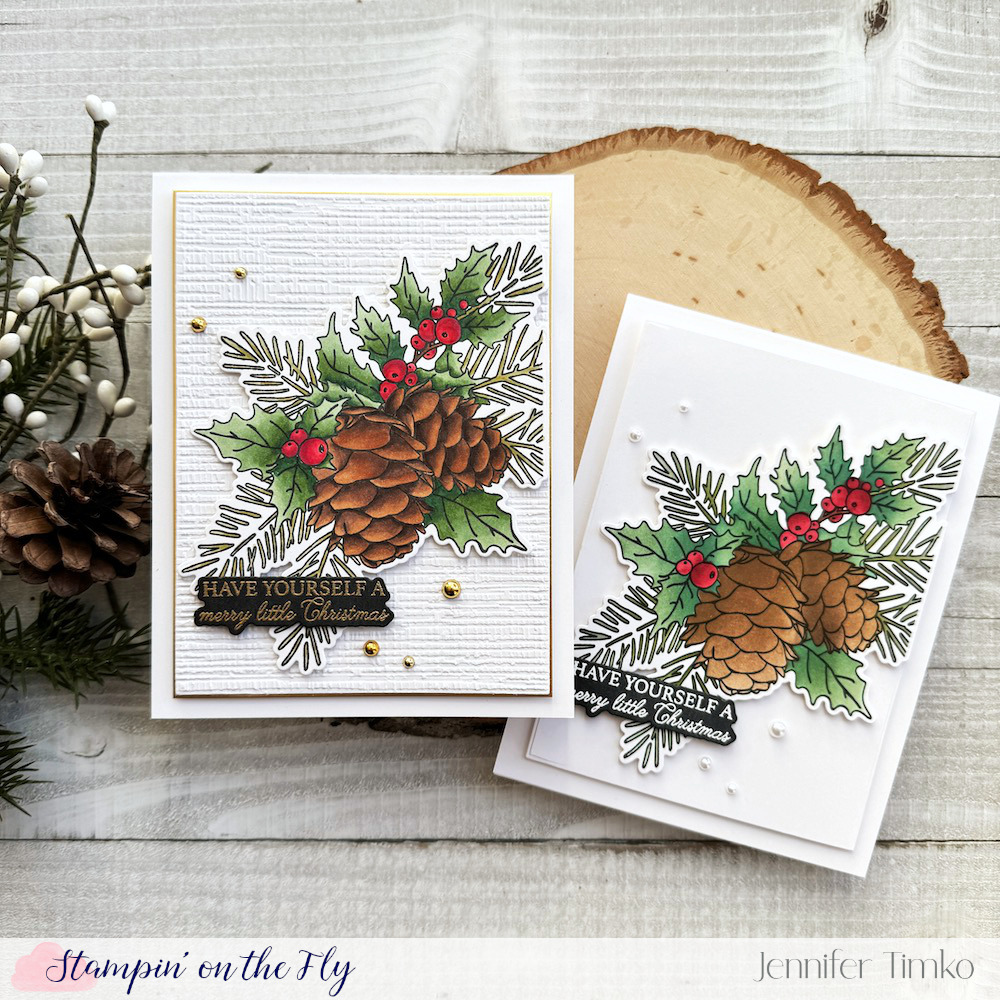
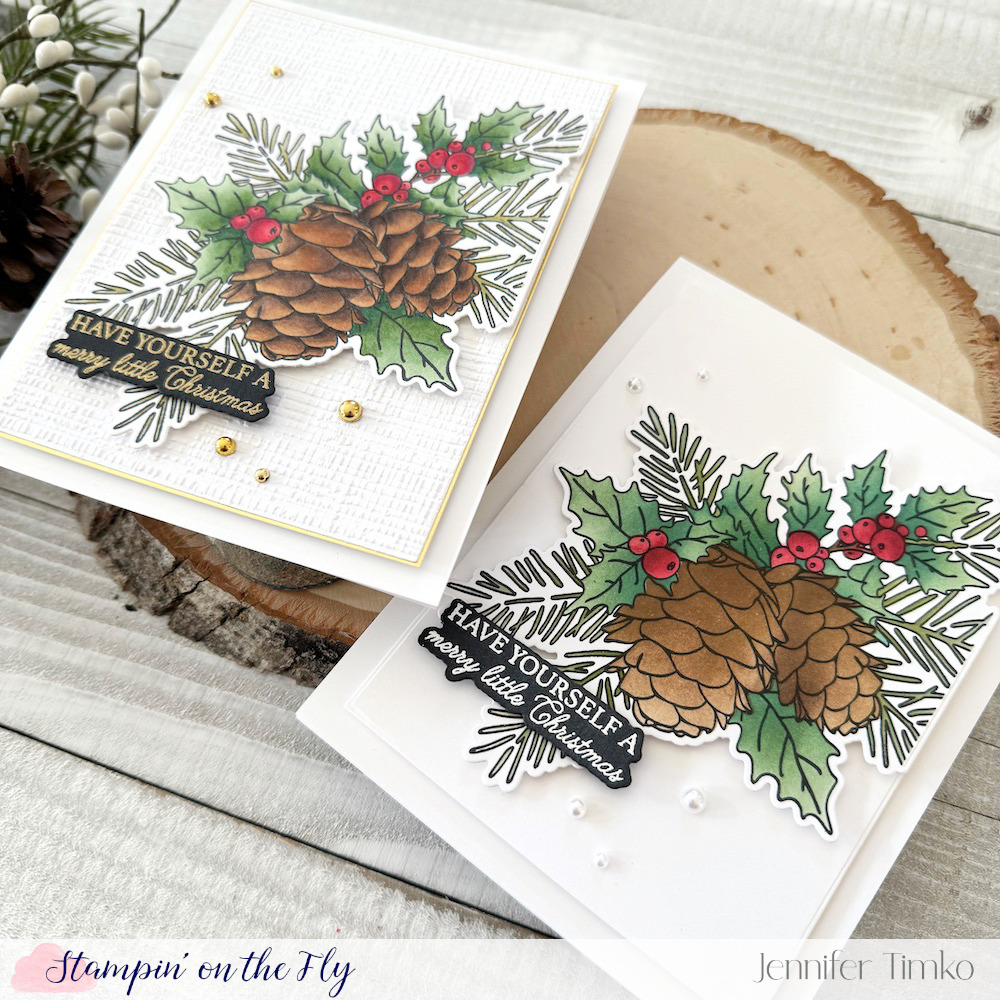
As this holiday season is in full swing, I wanted to share a series of cards I made with the Good Tidings line by Honey Bee Stamps. I started this as a test of stenciling on images. I see lots of people who create beautiful cards with stenciling as their method of coloring. But personally, I have not had a ton of success with it. Still, when I saw the Good Tidings suite, I thought yeah…just get the stencils too. I was already getting the stamps and dies and, knowing the quality of Honey Bee, the stencils were a worthwhile add-on.
First up, I went to my tried and true. Copic coloring! I loved coloring this image! I find it such a brain break and I get lost in the shading and details. But, when it comes to holiday cards, not the most efficient. This one took me about 2 hours to color. So next, I pulled out the stencils. To be honest, my first attempt was not good. I stenciled first and then over-stamped with the image. That did not work for me. So I tried again except that I stamped the image and then used the stencils for shading. Since I already had the Copic image, I looked to mimic those colors and shading with my Distress Inks. Here they are side by side:
I did not use the one stencil that has “highlights” for the leaves but otherwise just worked through the stack. Other than the shading on the pinecones, I was able to approximate the darks and lights using my Bitty Blender Brushes to help get more color in the nooks and crannies. And this one took me…..10 minutes. Yes, TEN. So in mass production, this is manageable and still feels hand colored and special. I’m a convert to the stencils! Obviously, the Copic markers allow for more depth but the stencils give such flexibility on time.
I finished these out in a way to match. On the Copic version, I used the Burlap 3D Embossing folder on the panel behind the image and matted it with Gold Cardstock from Erin Lee Creative. Both images with cut out with the coordinating die and I chose a sentiment from the stamp set for heat embossing (also with a coordinating die). Pearls to match but the layout is exactly the same.
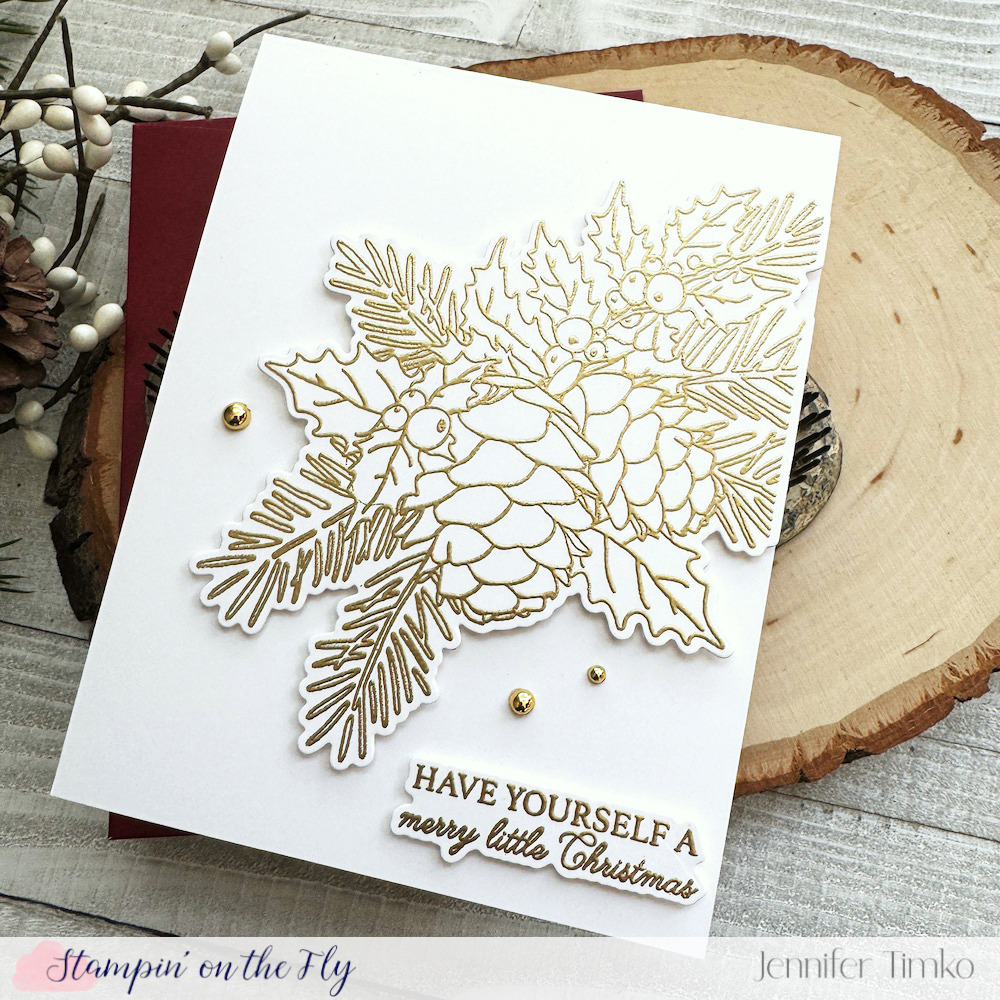
I created one more for those who might not have the stencil but still want a card that is easy to make in multiples. This time, the power of gold! I got rid of the extra layer and just stamped, embossed and cut out the image. Same sentiment and some pretty gold pearls.
I love the versatility of this suite and am so glad I took the chance on the stencils. The beauty of this image is what captured me and I will be using this for years to come.
I’m on call today and hoping the system stays quiet for a couple more days. Cookies to back and a few last presents to wrap. Wishing you a bit of calm in your hustle and bustle!
For those of you who know Michelle Lupton, you know that she is both super talented and one of the nicest people! Over the last years, she has done a series of CASE Me A Christmas Cards where she will CASE (Copy and Share Everything) one of her guests cards and vice versa. You take a non-holiday card and turn it into a holiday card using the inspiration of each other’s work. It is always such fun. This year, Michelle has had some things happen where she was just unable to commit to the project. Soooooo….a whole group of stampers committed to do it together in honor of her!!! This is primarily an Instagram event and all you have to do is go over to IG and search for the hashtag: #casemeachristmascard2023
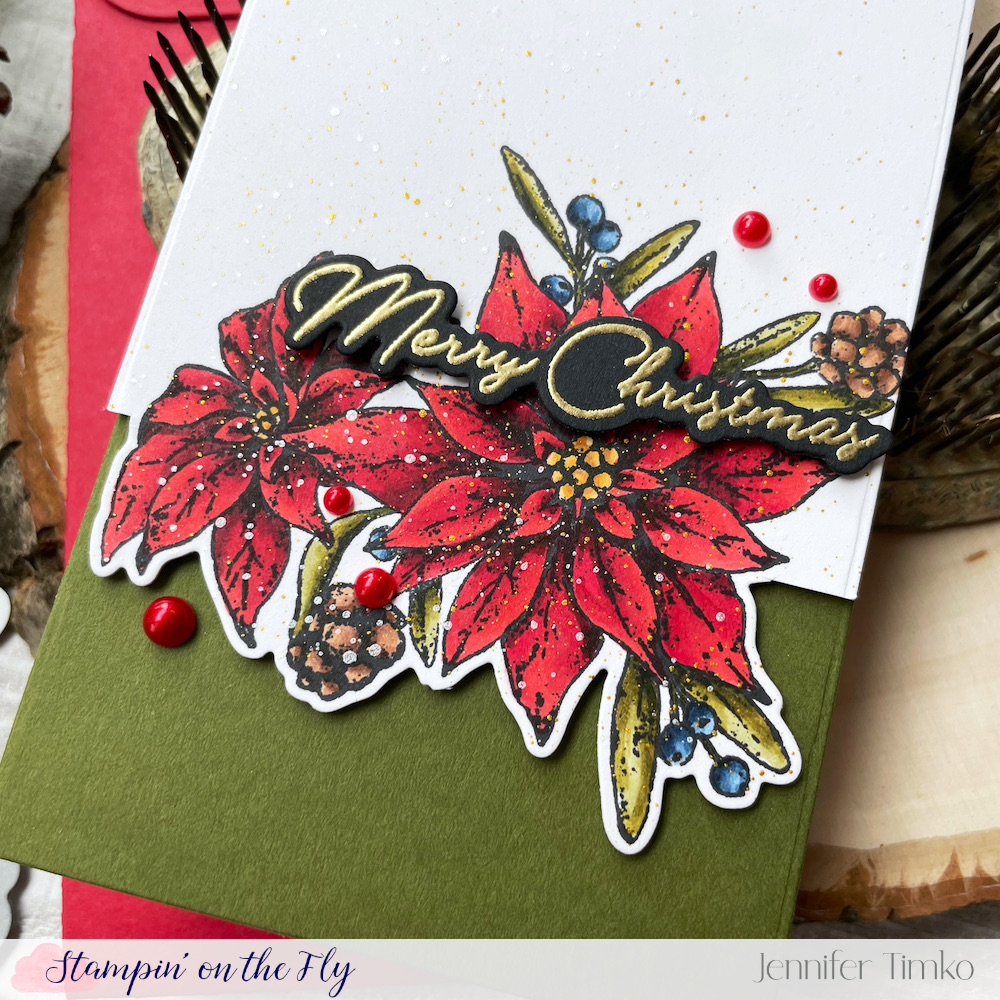
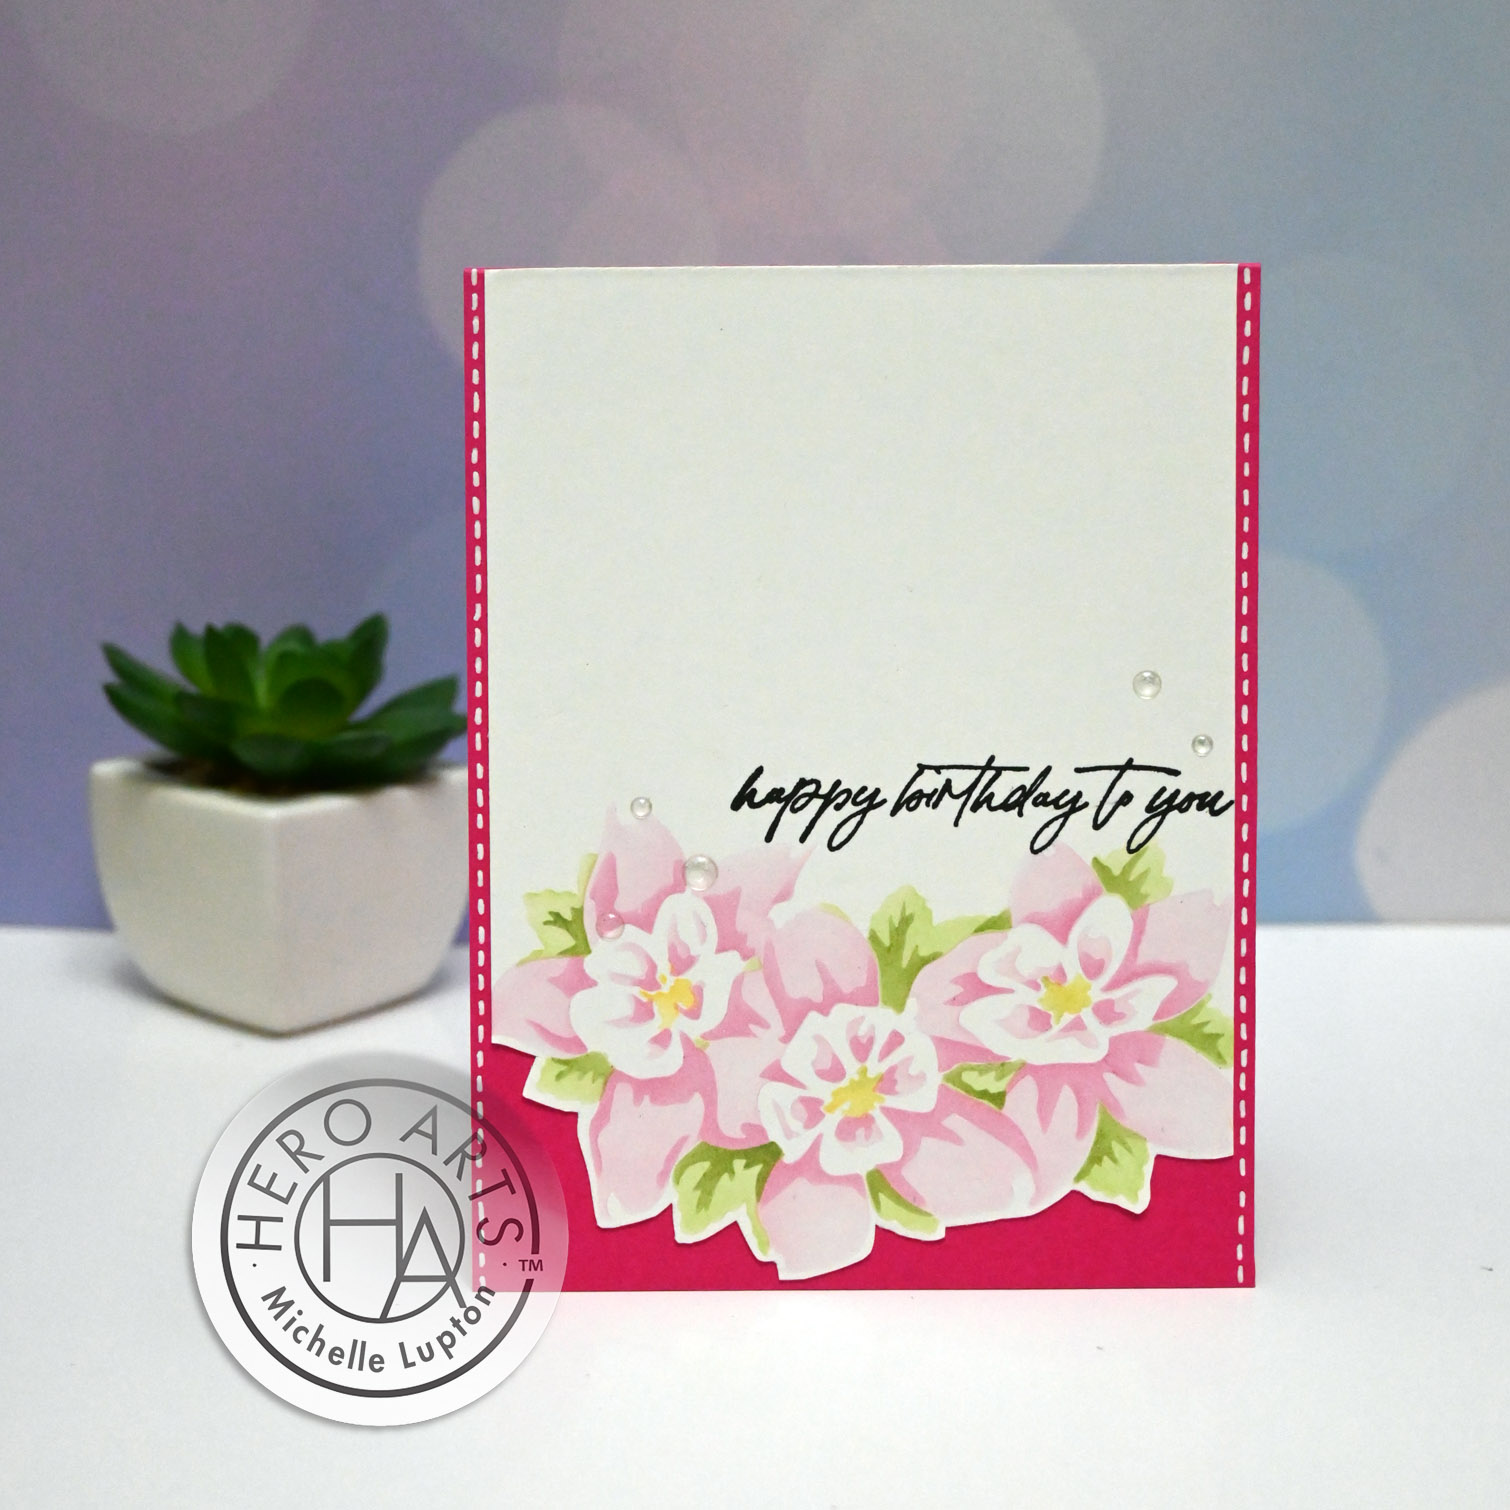
The hardest part of doing this for me is narrowing down the choice of what to CASE. I generally use the rule of three on a CASE where I change 3 things while keeping some of the main elements of the original. In this case, I chose a floral card with partial die cutting. Her original is posted below. I used the Joyful Poinsettia set from WPlus9 (I know you are super shocked) and found the die for the set worked perfectly in the partial die cutting. I used my Copic Markers to color the image with traditional colors.
I chose Artichoke Card Stock from Concord and 9th as my base once I had finished my coloring. Then I created a mini slimline card using the Sweet Stacks: Mini Slimline Dies. I heat embossed my sentiment in Gilded Embossing Powder on Black Card Stock by Concord and 9th. Oh, and if you have ever had trouble with heat embossing on black (I did and thought it was my powders…and I tried a lot of powders), this card stock changed the game. It is smoother and somehow the heat embossing stays crisper. YAY! I added some splatters with Gold and Irisdescent White and then some red pearls.
So here is Michelle’s gorgeous card. Things I kept: Partial Die Cut, Sentiment Placement, Florals and Gems. Things I changed: Slimline layout, Copic coloring, Raised sentiment, Image panel to edge.
I hope you like my version of her card. Please come over and celebrate with us all. Michelle is just beloved and I’m thrilled to be a part of this ode to her talent.
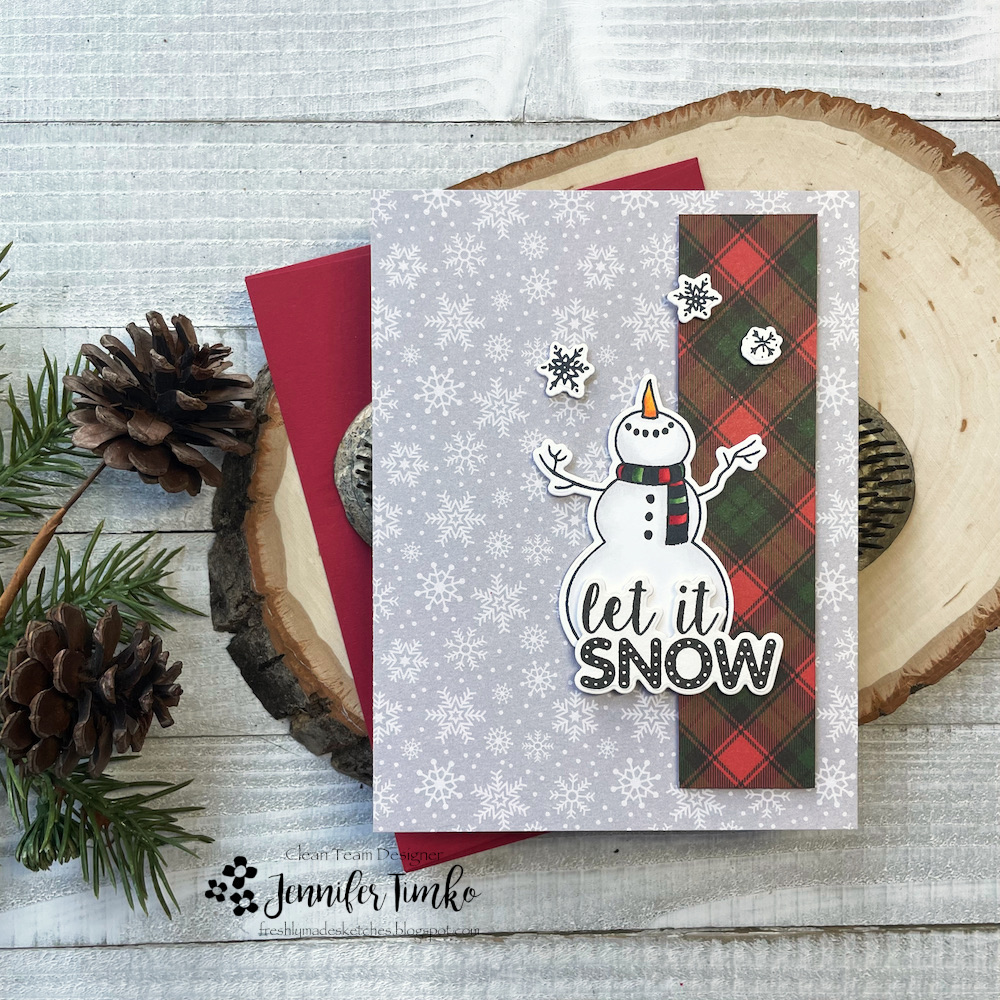
A fun sketch from the wonderful Jen Brum today at Freshly Made Sketches. I immediately saw a snowman! But others on our team have seen adorable stacks and other fun interpretations. You know that is a great sketch.
I pulled out my favorite snowman, an old retired set from Honey Bee Stamps called Let It Snow. I chose some patterned paper from the Make It Merry Paper Pad (look, the snowflakes are a great match!). I picked a red and green to coordinate with the paper for quick Copic coloring.
I stamped and cut the snowflakes and even had the sentiment already pre-cut from another stamping session in the past. I’m not really ready for snow yet but I am ready for cooler temps!
Thanks so much for stopping in today! I hope you will come over and join us at the challenge. See you soon!
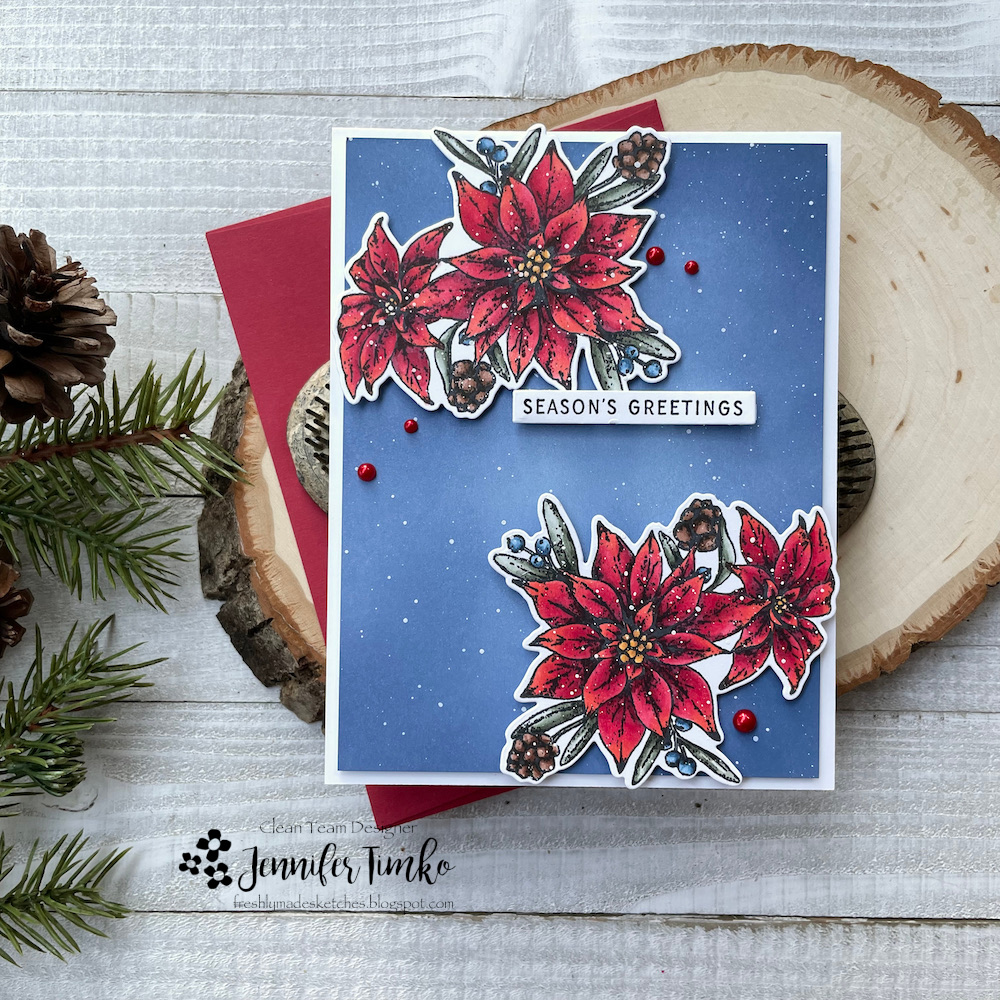
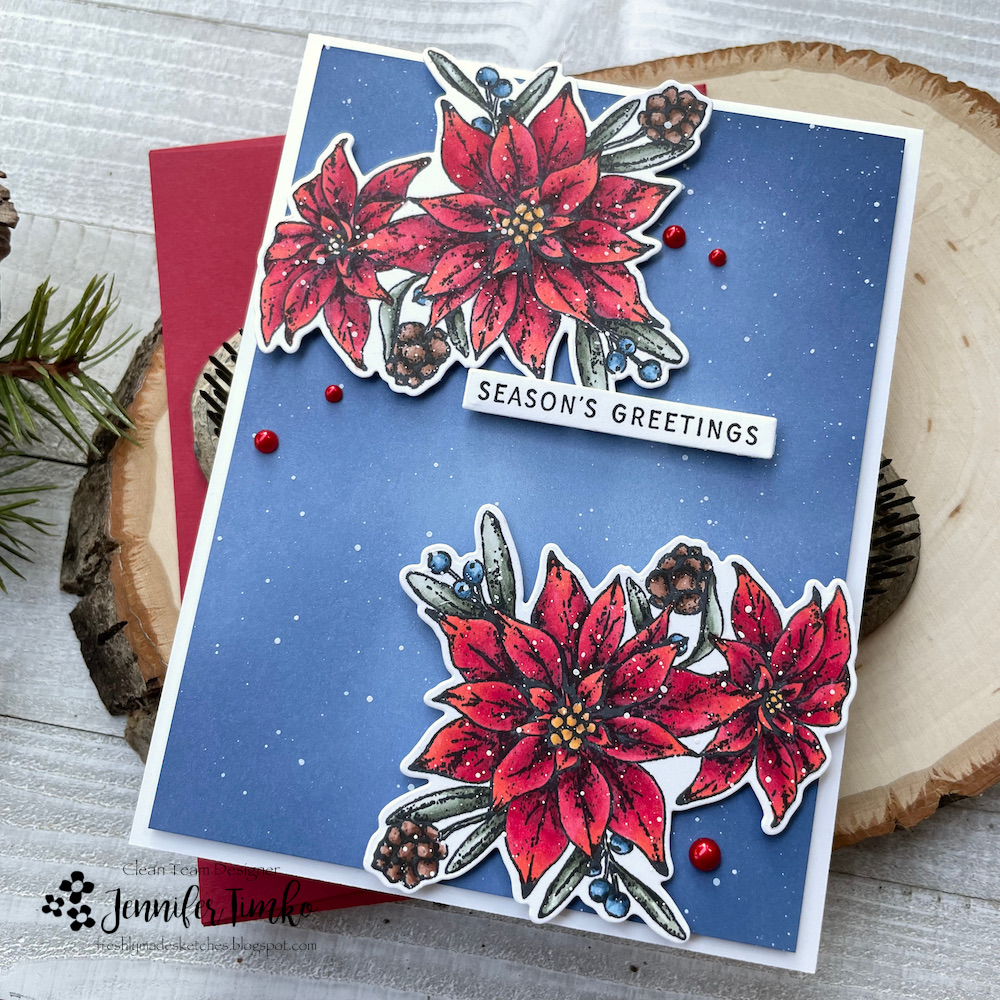
Hi everyone! Happy August to you! I am this week’s sketch designer at Freshly Made Sketches and I hope you will like this one. When I designed it, I had a floral in mind for the corner. I had this gorgeous poinsettia on my table from my last card so I opted to color the single image and go with Copics this time.
I stamped the image from Joyful Poinsettias twice and then colored. Dawn’s images have shading built into the design so I just followed her lead. I enjoyed spending a little time with my Copics! For the base I started with a light blue card stock and added Faded Jeans and Chipped Sapphire Distress Oxide Inks.
I decided to add some splatters with white gouache and some red pearls. The sentiment comes from the same set. I love all the options this set gives and I suspect you will see it in heavy rotation for this holiday season.
I hope you are having a wonderful start to your August. Thanks so much for stopping in today. I’ll see soon!
Primary Sidebar
We use cookies on our website to give you the most relevant experience by remembering your preferences and repeat visits. By clicking “Accept”, you consent to the use of ALL the cookies.
This website uses cookies to improve your experience while you navigate through the website. Out of these, the cookies that are categorized as necessary are stored on your browser as they are essential for the working of basic functionalities of the website. We also use third-party cookies that help us analyze and understand how you use this website. These cookies will be stored in your browser only with your consent. You also have the option to opt-out of these cookies. But opting out of some of these cookies may affect your browsing experience.
Necessary cookies are absolutely essential for the website to function properly. This category only includes cookies that ensures basic functionalities and security features of the website. These cookies do not store any personal information.
Any cookies that may not be particularly necessary for the website to function and is used specifically to collect user personal data via analytics, ads, other embedded contents are termed as non-necessary cookies. It is mandatory to procure user consent prior to running these cookies on your website.