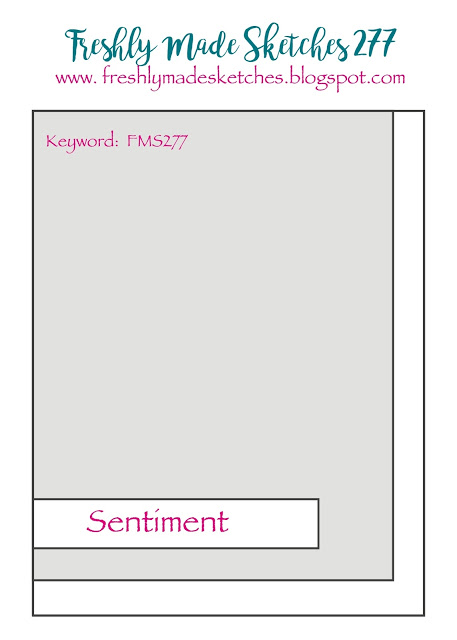
What is it about summer that seems to fly by?! Another week has come and gone already. I survived clothes shopping with the “back-to-school duo” and we are trying to fit in as much summer as we can over the next couple of weeks until school begins. With that, I am back today with a card for Freshly Made Sketches. The incredible Kim Singdahlsen has given us a unique and fantastic sketch that is sure to inspire you! I just love it!!
While I first thought about using some pretty papers for the panels, I realized that I liked the idea of washi tape instead. I found two from SU in my stash that have differing width stripes and I thought they would be great together. I created a watercolor background using Picked Raspberry Distress Ink and then added the washi tape. I stamped the gorgeous sentiment from Studio Katia in Versafine Onyx Black and then heat embossed with clear embossing powder. A few little sequins to finish. It kind of has a summer feel to it, don’t you think? Fun, bright and a little bit of whimsy.
I hope you will have as much fun with this as I did. Make sure you check out the work from the whole design team…always a treat!! I’ll be back tomorrow to share with you my project for the joint collaboration between Newton’s Nook Designs and Xyron. There is all kinds of fun happening at the NND blog so don’t miss out! Until then, have a great day!
Supplies:
Stamp: Mini Thank You (Studio Katia); Paper: Thick Whisper White (SU), Basic Black (SU); Ink: Versafine Onyx Black, Picked Raspberry Distress Ink; Accessories: Washi Tape (SU), Metallic Sequins (SU), Heat Tool, Clear Stampin’ Emboss Powder (SU), Misti
First of all, today is the day that the 4 Year Celebration release goes live over at Newton’s Nook Designs. To continue the fun, we are having a blog hop and I’m so thrilled to be a part of it.
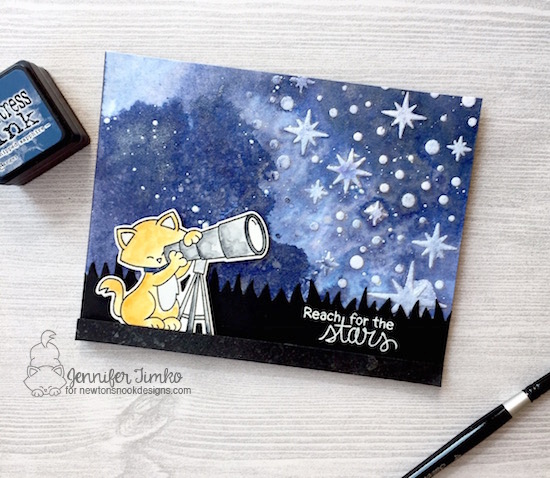
I told you yesterday that my favorite set from this release was Cosmic Newton (but seriously, choosing a favorite is like choosing a favorite ice cream…I love them all!). I used the new Stampin’ Up Embossing paste with the Starfield stencil on watercolor paper to start off my background. Next I added Chipped Sapphire Distress ink by painting it on with a brush. I got some of the light and dark coloring with that but wanted a little more dark. So I pulled out the trusty acetate and smooshed some more ink on, spritzed with water and applied to the panel. After it dried a bit, I spritzed on a Perfect Pearls mixture (in a spritzer with the powder and some water) to get a shine on the panel. And finally, I splattered on some Smooch Ink to add some extra “stars). I added a bit more of the Perfect Pearls onto the stars to help them pop. For the trees behind Newton, I used the Land Borders Dies. I was thrilled when it looked like the tops of trees in the shadows. Finally, I colored Newton and his telescope with some more Distress Ink. What a fun card to make!! This set just lends itself to fabulous backgrounds and tons of creativity!
I’m sure you notice how much fun I have had with the stencils this week. Well, there is a great deal that you are sure to love!So pretty much you can get the Pawprints stencil free on the order you were already going to make! WIN!! And speaking of winning…there is even MORE to win this week.
Celebrate with us and enter to win!
To celebrate 4 years Newton’s Nook Designs is giving away a $25 store credit to spend in their online shop to 4 lucky winners!
Here’s how to win:
Comment on the NND Design Team and Special Guest blogs (see list below)! The winner will be chosen at random from the collective blog hop posts. Make sure to check out each of their blogs and comment for your chance to win. You will not know which blog has been chosen so the more you comment on the better your chances are of winning! You have until Sunday, July 16th at 9pm CDT to comment. Winners will be announced on NND blog post on Monday, July 17th and will need to contact us to claim their prize so make sure you check back to see if you’ve won!
We hope you have enjoyed this week of celebration as much as we have! Your comments are so kind and your support is appreciated more than I can say. What a privilege it is to share with you all! Thanks so much and see you soon.
Stamps: Cosmic Newton (Newton’s Nook Designs); Ink: Versafine Onyx Black, Tim Holtz Distress Ink (Chipped Sapphire), Moonlight Smooch Ink (Clearsnap); Paper: Strathmore Bristol Smooth, Basic Black (SU); Accessories: Starfield Stencil, Big Shot, Cosmic Newton Dies (Newton’s Nook Designs), Land Borders Die (Newton’s Nook Designs), Misti Stamp Tool, Perfect Pearls, Winsor and Newton Paints, Heat Tool, White Embossing Powder
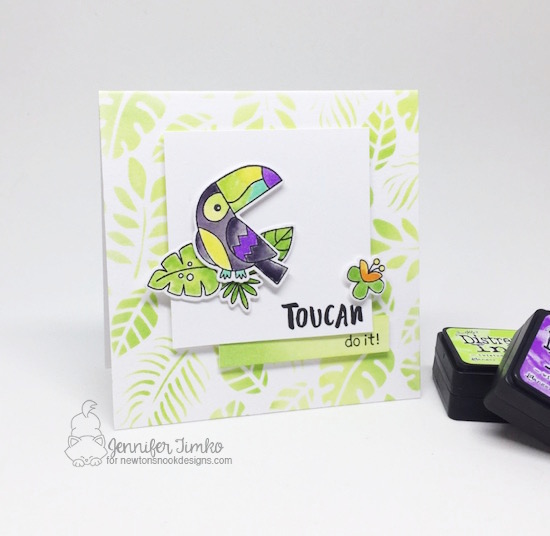
Back with day 3 of the 4 year celebration with Newton’s Nook Designs. Today we are showing off one set that I just think is adorable. It is called Toucan Party…such fun! I combined the reveal with the sketch from Freshly Made Sketches (where I am the sketch hostess this week).
The first thing I did for this card was pull out the awesome new Tropical Leaves stencil and create this background with Distress Ink (Twisted Citron and Mowed Lawn). Just look at what a great foundation it gives a card. Can I tell you how happy I am for these new stencils?? And it seems like all of you are loving them too! Then I stamped the toucan and some leaves and flowers using Versafine Onyx Black ink and colored using more Distress Ink. Want to see my “muse” for this one?
Just look at his amazing coloring!!! Nature certainly does it best so I just mimicked his colors. And I LOVE them!! Check out his little blue feet!!! Yeah…I know. Who can resist that?! Clearly not me! I colored some of the leaves as a background for him and then the flower as a balance element. I used the small panel of the sketch to show off part of the sentiment (and the puns in this one are super fun). Here is the sketch if you want to join in this week…I’d be thrilled to see you!
Would you like to win a $20 store credit to Newton’s Nook Designs? ONE lucky comment will be chosen from each reveal day to win!
Here’s how to win:
Comment on the NND blog and Design Team blogs (see list below)! Thewinner will be chosen at random from the collective reveal posts. Make sure to check out each of their blogs and comment for your chance to win. You will not know which blog has been chosen so the more you comment on the better your chances are of winning! You have until Thursday July 13th at 9pm CST to comment — winners will be announced on the blog post on Friday, July 14th.
Check out all the awesome Design Team Blogs below to enter:
I am so happy that you stopped in today. Tomorrow will be Day 4 of this great celebration and you can start looking forward to a fun extra on Friday! Stamps: Toucan Party (Newton’s Nook Designs); Ink: Versafine Onyx Black, Tim Holtz Distress Ink; Paper: Strathmore Bristol Smooth; Accessories: Tropical Leaves Stencil, Big Shot, Toucan Party Dies (Newton’s Nook Designs), Misti Stamp Tool
Are you ready for another day of celebration with Newton’s Nook Designs? Yesterday was quite the reveal, don’t you think?! Well, today you get to see two more stamp sets! It keeps getting better!
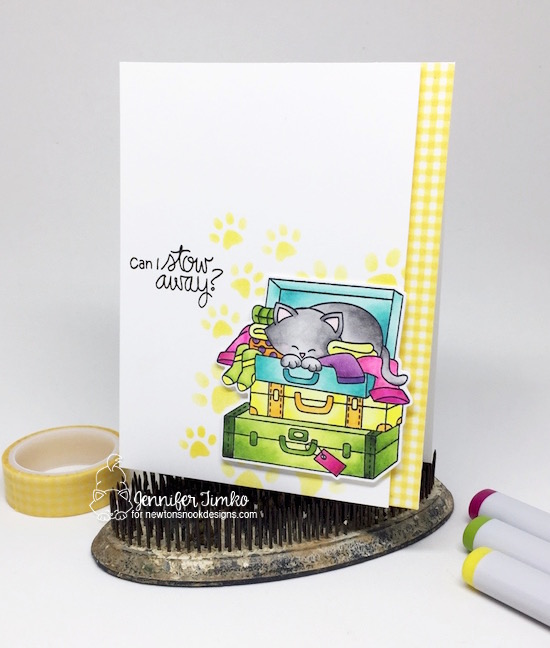
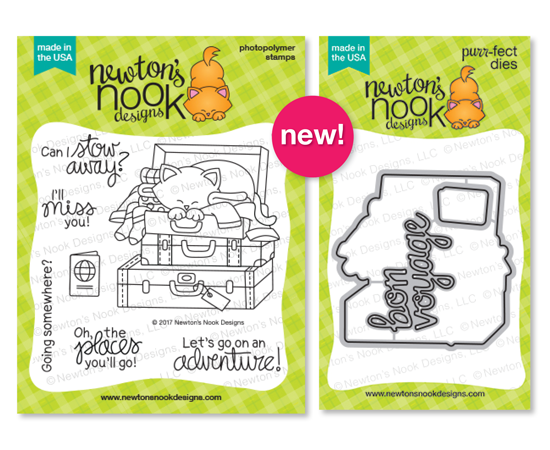
The first stamp I am going to show you is called Stowaway Newton. Now I don’t know about you, but I know a certain cat (a calico who shall remain nameless, haha) who likes to pack herself in my bag. And when I come home from trips, if I keep the bag closed she simply sleeps on top of it. So when I saw this set, I fell in love. I created the luggage I wish I could carry around airports by coloring with Copic Markers. Behind the image, I used the new Pawprints Stencil and some Distress Ink. This stencil is going to become a go-to with all my Newton stamps! The sweet little sentiments in the set are fabulous and I stamped this one with Versafine Onyx Black. I added a little bit of washi tape along the edge to finish this bright, happy card.
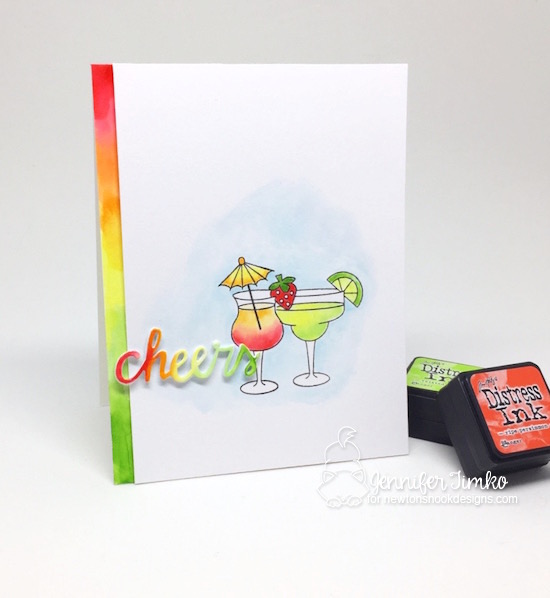
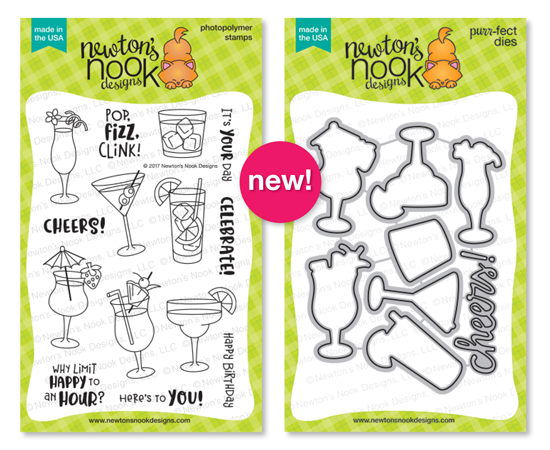
Apparently bright and happy was on my mind for today’s release cards because I chose a similar palette for this great set called Cocktail Mixer. I played around with my Distress Inks to created this pair of tropical drinks. Don’t they look tasty?! And what better sentiment than the one from the coordinating die set! I cut the sentiment from Bristol Smooth paper and then colored it using the same inks as the drinks. Kind of a tropical rainbow! Then I did the same rainbow effect for the side border. This is such an easy technique but it creates such a wow effect.
Would you like to win a $20 store credit to Newton’s Nook Designs? ONE lucky comment will be chosen from each reveal day to win!
Here’s how to win:
Comment on the NND blog and Design Team blogs (see list below)! Thewinner will be chosen at random from the collective reveal posts. Make sure to check out each of their blogs and comment for your chance to win. You will not know which blog has been chosen so the more you comment on the better your chances are of winning! You have until Thursday July 13th at 9pm CST to comment — winners will be announced on the blog post on Friday, July 14th.
Check out all the awesome Design Team Blogs below to enter:
I am so happy that you stopped in today. Tomorrow will be Day 3 of this great celebration and I also have a sketch from Freshly Made Sketches where I’ll be the sketch hostess. See you then! Stamps: Stowaway Newton (Newton’s Nook Designs), Cocktail Mixer (Newton’s Nook Designs); Ink: Versafine Onyx Black, Momento Tuxedo Black, Copic Markers, Tim Holtz Distress Ink; Paper: Strathmore Bristol Smooth, Thick Whisper White(SU); Accessories: Pawprints Stencil, Big Shot, Stowaway Newton Dies (Newton’s Nook Designs), Misti Stamp Tool, Washi Tape (SU retired)
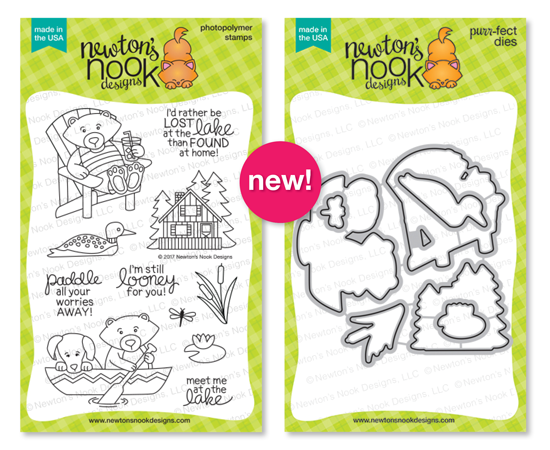
I am so thrilled to begin this amazing week celebrating 4 years of inspiration from Newton’s Nook Designs. What it takes to make the leap of faith to start your own company always amazes me but wow am I glad Newton’s Nook Designs is a part of this amazing industry! I might be a little biased but any time art can bring such smiles and joy, it is a wonderful thing and something to celebrate. And celebrate is what we are doing this week! My post today is longer than normal because we are revealing an incredible set of products. Two (yep TWO) stamp sets, four (oh yeah…FOUR) stencils and a new border dies set. And that is only today’s reveal. Hang on my friends! This is going to be fun!
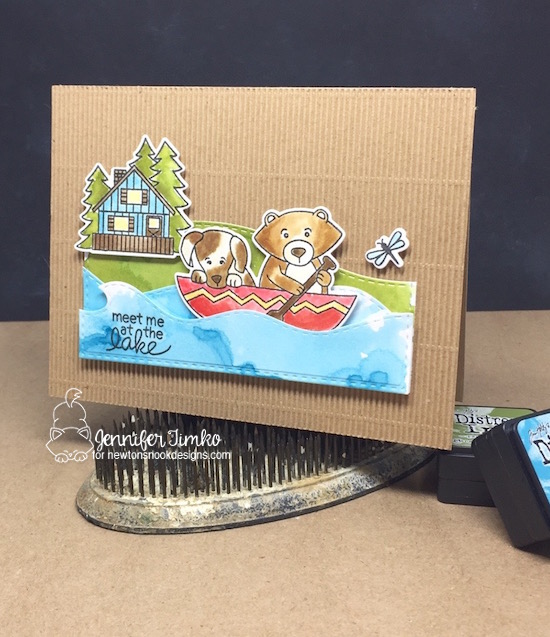
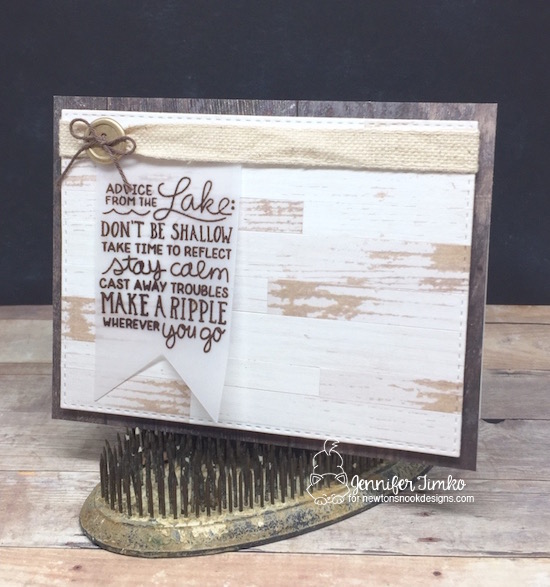
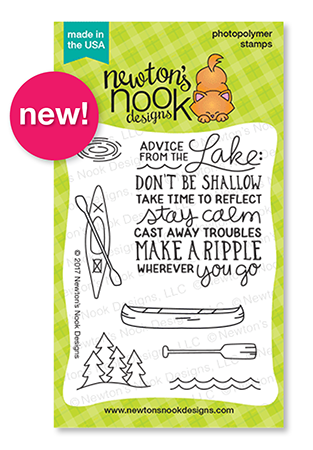
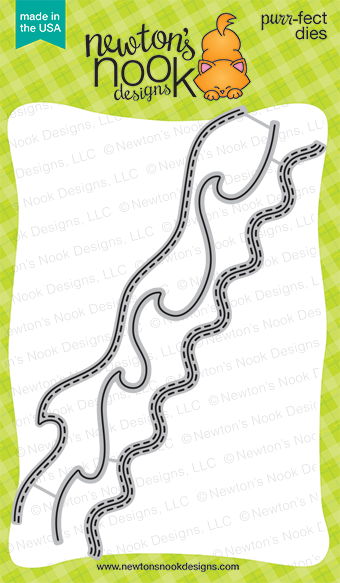
I’m going to start you off with a fun stamp set called Winston’s Lake House. Using Distress Ink in Broken China, I played with the “smoosh” technique for watercoloring. I applied ink to an acetate sheet and then spritzed it with water. Then I laid the acetate down onto Strathmore Bristol Smooth paper to get the cool water effect. I love how it turned out!! The way the color pools was perfect to created the dimension I wanted for the lake. After letting it dry, I used the new Sea Borders Dies (combined with a Stitched Rectangles Die) to created the waves for our little friends. All I had to do was offset the border die to get this look. Fun, right?? I did the same thing with Peeled Paint ink for the ground and used the Land Borders Dies instead. Yep…all the dies coordinate perfectly. Then I stamped the images in Versafine Onyx Black and colored with more Distress Ink. That little cottage is one I want to visit for sure! And not sure what it is about the little dragonfly but I just could not resist adding it on. The corrugated paper seemed like the perfect background for this scene to show off all the details in these new images and dies.So now on to the second stamp set called Lake Advice. I had a ton of ideas on how to use this with the Winston set but I thought maybe it was better just to focus on this sentiment. It is really a great one! I stamped it onto vellum using Early Espresso ink (SU) and then heat embossed it with clear embossing powder to make it really stand out. Then I took a piece of the Wood Textures DSP from SU (already a fabulous wooden look) and cut it up to make it look like planks on a palette. I used a darker color of the same DSP for the base.
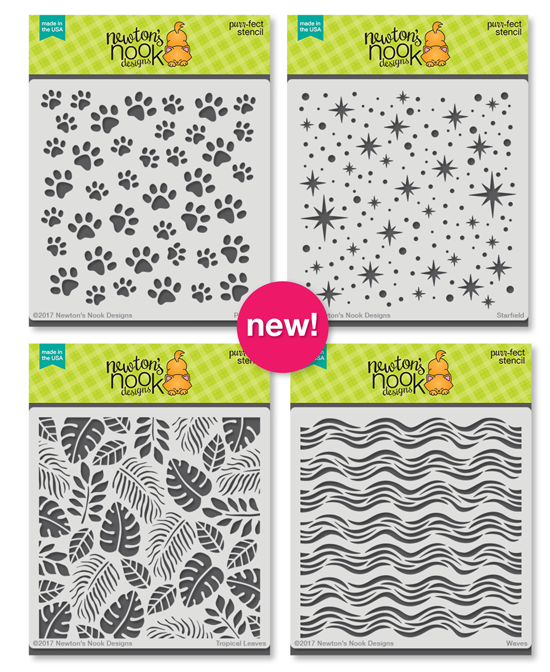
And now we get to talk about these stencils. You should have seen the response when the DT heard about them. And then again when we saw them!!! Oh, they are fun and so perfect for the release. Want to see them??? Of course you do! I will be showing you more with them as the week goes on too. And then check out what you could win this week!
Would you like to win a $20 store credit to Newton’s Nook Designs? ONE lucky comment will be chosen from each reveal day to win!
Here’s how to win:
Comment on the NND blog and Design Team blogs (see list below)! Thewinner will be chosen at random from the collective reveal posts. Make sure to check out each of their blogs and comment for your chance to win. You will not know which blog has been chosen so the more you comment on the better your chances are of winning! You have until Thursday July 13th at 9pm CST to comment — winners will be announced on the blog post on Friday, July 14th.
Check out all the awesome Design Team Blogs below to enter:
I am so happy that you stopped in today. Tomorrow will be Day 2 of this great celebration and I know you will be thrilled to see what comes next. I hope you have a great day! Stamps: Winston’s Lake House (Newton’s Nook Designs), Lake Advice (Newton’s Nook Designs); Ink: Versafine Onyx Black, Tim Holtz Distress Ink (Broken China, Peeled Paint, Scattered Straw, Candied Apple, Vintage Photo, Ground Espress0), Early Espresso; Paper: Strathmore Bristol Smooth, Corrugated Paper (SU, retired), Vellum (SU), Wood Textures DSP (SU); Accessories: Big Shot, Winston’s Lake House Dies (Newton’s Nook Designs), Stitched Rectangles Dies (SSS), Misti Stamp Tool, Ribbon (SU, retired), Gold Button (SU, retired), Linen Thread (SU)
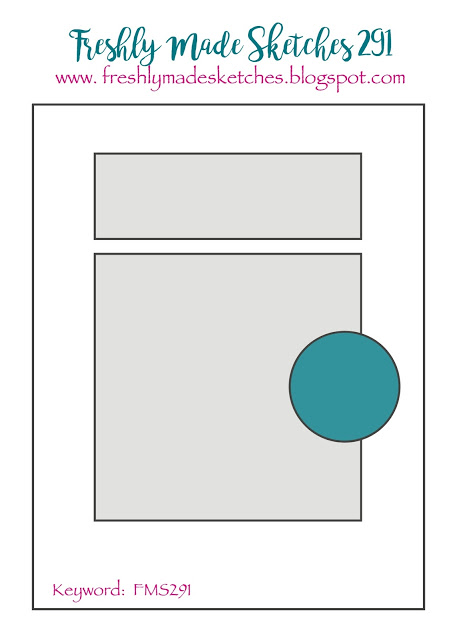
I hope your week has been wonderful and full of summer fun! We are still finishing up some school things with one of my sons so it doesn’t quite feel like summer yet…but soon! Just a few more days! And that anticipation was definitely on my mind as I worked on this card for today. Our hostess, the wonderful Jennifer Brum, has created a wonderful sketch for us at Freshly Made Sketches this week.
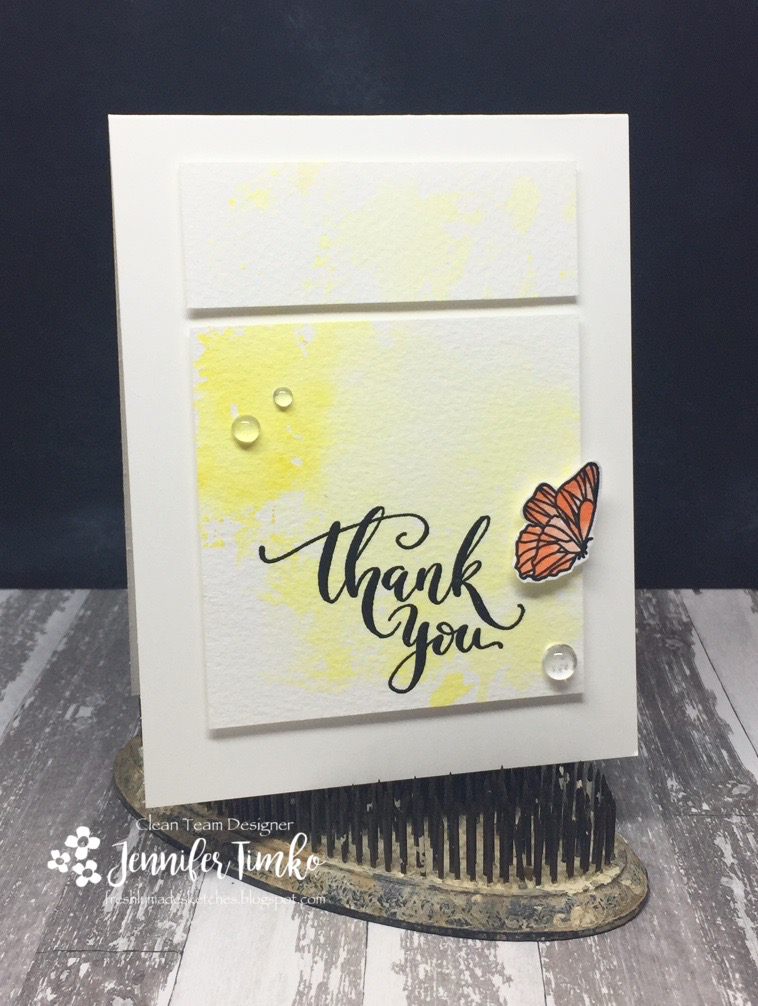
I started with this pretty little butterfly from Mama Elephant and did a quick coloring with Ripe Persimmon Distress Ink. I love butterflies and I’m finally started to see some around here. Always makes me happy! I created a watercolor background using a couple of yellow Distress Inks and the “smoosh” technique (apply the ink to acetate, spritz and ink the paper). I this the two tones of yellow add a nice contrast. This gorgeous sentiment comes from Studio Katia and it was an extra treat in our supplies that came for last week’s collaboration hop with Newton’s Nook Designs and Studio Katia. LOVE this scripty font, don’t you?! I thought a couple of the Clear Round Drops from Studio Katia to finish. Quick and easy and perfect for summer (and it let me get back outside on a beautiful day)!
I hope you have fun with this sketch. You can use designer paper, background stamps or keep it simple like it did. Tons of ways to use this one! The DT has shown you that, as always. Love those gals! I hope your week has time for some crafty fun. Until next time, thanks for stopping in!
Supplies:
Stamps: Butterfly Kisses (Mama Elephant), Thank You (Studio Katia); Ink: Versafine Onyx Black, Tim Holtz Distress Inks; Paper: Fabriano Extra WhiteWatercolor, Thick Whisper White (SU); Accessories: Misti, BrusH2O Water Pen, Clear Round Drops (Studio Katia)
Oh, look at the amazing sketch we have for you today over at Freshly Made Sketches! My friend Linda Callahan, queen of clever, is our hostess this week and her sketch will get you moving right to your craft room!
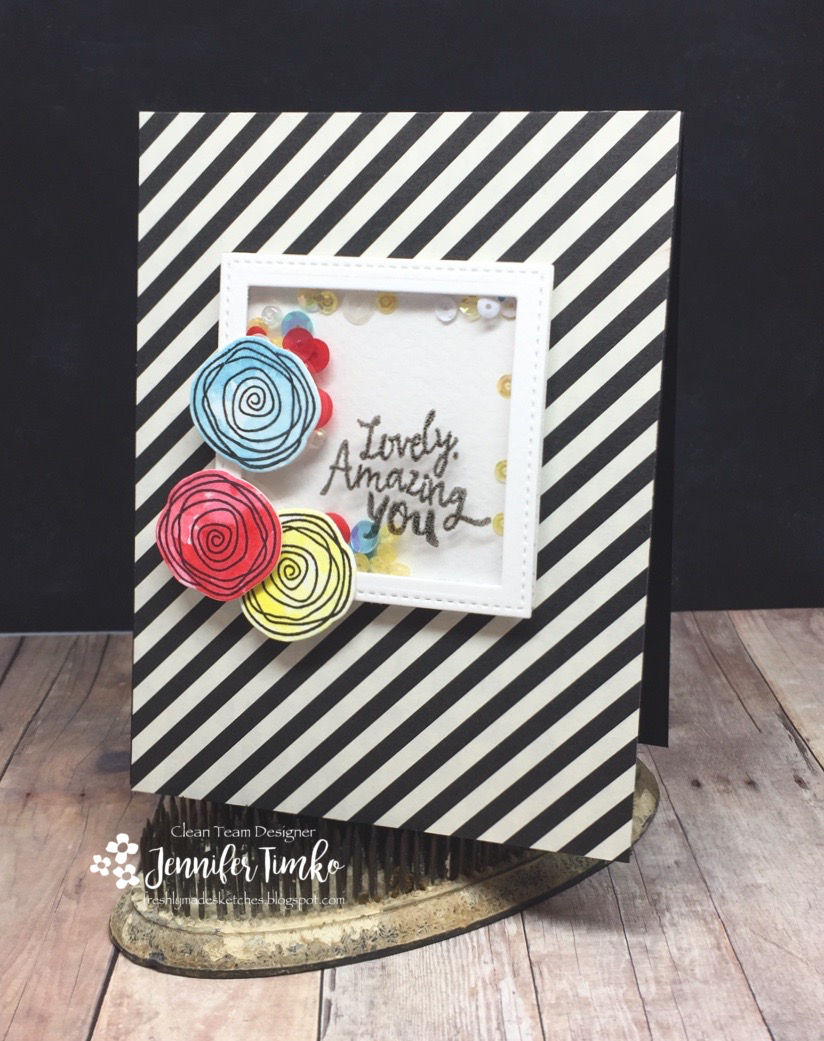
As soon as I saw the sketch, I thought shaker card. So that is just what I made! I did a quick watercolor using Tim Holtz Distress Inks on these fun flowers from the Lovely Blooms Stamp set (Newton’s Nook Designs) and cut them out with coordinating dies. I chose colors to match my awesome sequins from Studio Katia and to make my coordination easy. I cut a frame with Stitched Shapes Thinlits (SU). The sentiment from Happy Little Thoughts (NND) was stamped onto the window sheet (also cut with the square die) and then heat embossed it with clear embossing powder. Kind of wish I had black powder for a sharper look but I think this works with the loose watercolor look from the flowers. I rooted around in my DSP stack until I found a print that worked in the background. I kind of love these stripes!
I have been stamping madly and have lots coming up for you in the next couple of weeks. Until next time, I hope you have an amazing day! Thanks for stopping in!
Supplies:
Stamps: Lovely Blooms (Newton’s Nook Designs), Happy Little Thoughts (Newton’s Nook Designs); Ink: Versafine Onyx Black, Tim Holtz Distress Inks; Paper: Fabriano Watercolor, Typeset Specialty DSP (SU Retired); Accessories: Big Shot, Stitched Shapes Thinlits, Window Sheet, Sequins by Studio Katia and 28 Lilac Lane, Foam Adhesive Strips
Welcome back for another day of release week for the April release from Newton’s Nook Designs. Day 2 has a beautiful flower set called Lovely Blooms.
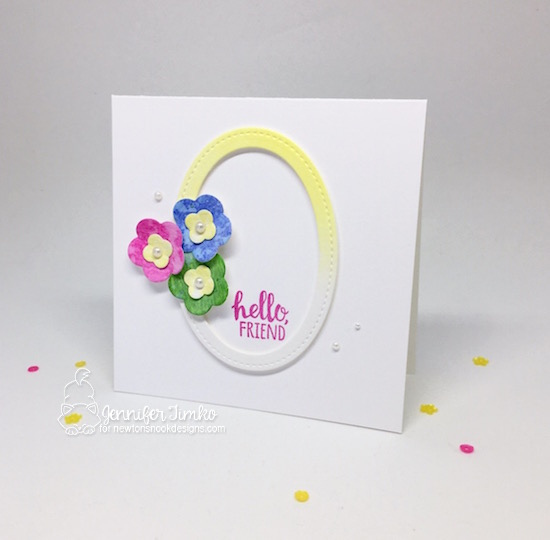
I hardly knew where to start with this set. If you follow me, you know I love myself a flower. And this set is full of pretty images to mix and match. I finally settled on creating a watercolor styled card but kept it simple. I sponged Distress Ink onto watercolor paper creating some ombré effects and then stamped over the sponging with the images. The coordinating Lovely Blooms Dies made short work of cutting things out so that I could create this pretty little arrangement. The script sentiments are really great so I chose to create this one for mom. Um….sorry mom, should have given a spoiler alert. I added a few sequins for a finishing touch and I just love the effect you get on this with no actual coloring required.
Of course, if you love to color, this set is totally for you too! I’ll show you what I mean tomorrow! Until then, you have a chance to win this set with just some simple commenting.
Would you like to win the “Lovely Blooms” Stamp Set? This set will be given away to ONE lucky winner!
Here’s how to win:
Comment on the NND blog and Design Team blogs (see list below)! Thewinner will be chosen at random from the collective reveal posts. Make sure to check out each of their blogs and comment for your chance to win. You will not know which blog has been chosen so the more you comment on the better your chances are of winning! You have until Thursday April 13th at 9pm CST to comment — winners will be announced on the blog post on Friday, April 14th.
Check out all the awesome Design Team Blogs below to enter:
I am so happy that you stopped in today. Tomorrow will be Day 3 of release week and I know you will be thrilled to see what comes next. I hope you have a great day! Stamp: Lovely Blooms (Newton’s Nook Designs); Ink: Versafine Onyx Black, Tim Holtz Distress Ink; Paper: Marina Mist (SU), Thick Whisper White (SU), Tim Holtz Watercolor, Basic Black; Accessories: Big Shot, Lovely Blooms Dies (Newton’s Nook Designs), Misti Stamp Tool, Heat Tool, White Stampin’ Emboss Powder (SU), Sequins (Pretty Pink Posh)
The art in this beautiful stamp set is unique and really pretty but I also fell in love with the sentiments. I created this card to show one of them off and to also highlight that the dies are able to multitask. On a piece of watercolor paper (Tim Holtz Distress), I sponged on some different Tim Holtz Distress Inks in Picked Raspberry, Mowed Lawn, Blueprint Sketch and Squeezed Lemonade then splattered on a bit of water. Using the dies, I cut out the flowers big and small. Additionally I created a frame with the ovals from my Stitched Shapes dies. I stamped the sentiment in Picked Raspberry onto a white base (using the Misti helps since I needed to stamp a few times given the nature of Distress Ink). All I had to do was group my flowers and add some Basic Pearls.
I love when die sets lend themselves to quick cards and I think these flowers are ones I’ll return to again and again (and of course, all the other adorable shapes in the set!). Back tomorrow with the latest from Freshly Made Sketches. Thanks so much for stopping in. See you soon!
So is it acting like spring where you are? Well, it certainly has been in Virginia and that inspired my card for today. I’m the sketch hostess over at Freshly Made Sketches this week and I hope you will love the sketch I created for you. It is also the beginning of Kathy Racoosin‘s 30 Day Coloring Challenge (The Daily Marker 30 Day) which is a month of amazing inspiration that fills IG feeds with lovely art. It reminds us, as crafters, to take a little time every day just to make a little something that is pretty.
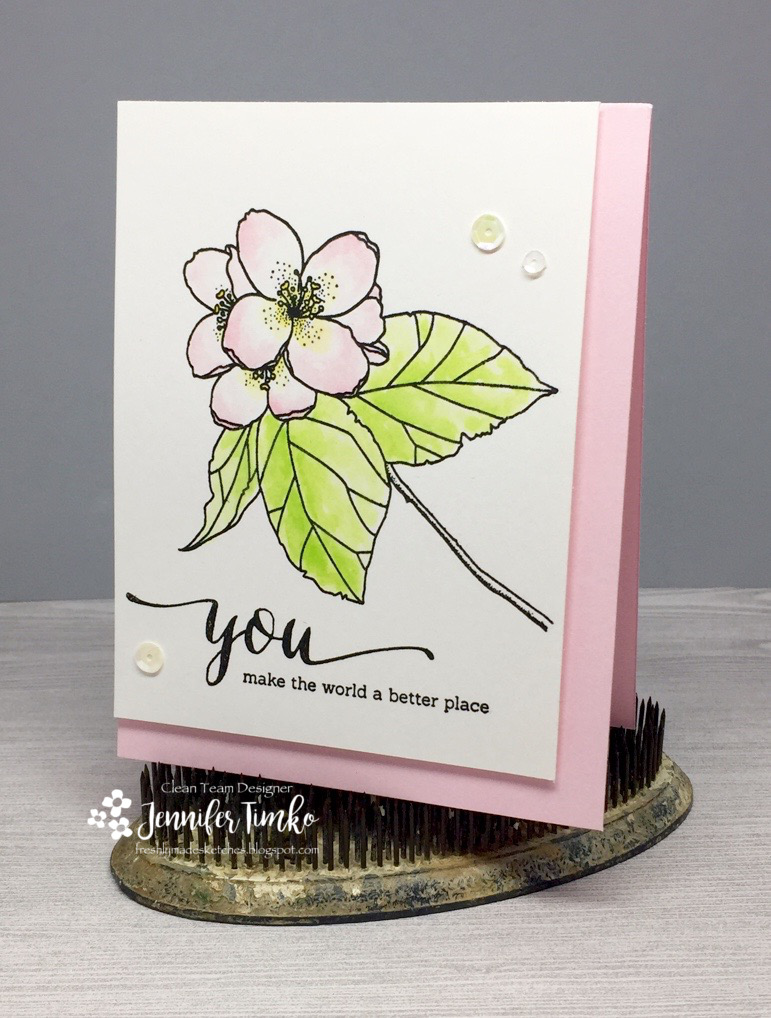
I kept my coloring pretty simple for today and used this gorgeous flower from Mama Elephant. Inspired by some of the cherry blossoms that are sure to be popping out any time here in my yard, I chose a soft pink for the flowers. The sentiment comes from the set too and I think it is a favorite of mine. The image and sentiments were stamped in Versafine Onyx Black and the flower was coloring using Tim Holtz Distess Inks.
I hope you will join us with this sketch. I tried to make one that is open to techniques, large images or even pretty DSP. The team, of course, used all of these ideas and I’m sure you will come up with even more! Thanks for stopping in today. Remember….YOU make the world a better place! You certainly make mine better! Have a great day.
We use cookies on our website to give you the most relevant experience by remembering your preferences and repeat visits. By clicking “Accept”, you consent to the use of ALL the cookies.
This website uses cookies to improve your experience while you navigate through the website. Out of these, the cookies that are categorized as necessary are stored on your browser as they are essential for the working of basic functionalities of the website. We also use third-party cookies that help us analyze and understand how you use this website. These cookies will be stored in your browser only with your consent. You also have the option to opt-out of these cookies. But opting out of some of these cookies may affect your browsing experience.
Necessary cookies are absolutely essential for the website to function properly. This category only includes cookies that ensures basic functionalities and security features of the website. These cookies do not store any personal information.
Any cookies that may not be particularly necessary for the website to function and is used specifically to collect user personal data via analytics, ads, other embedded contents are termed as non-necessary cookies. It is mandatory to procure user consent prior to running these cookies on your website.

 What is it about summer that seems to fly by?! Another week has come and gone already. I survived clothes shopping with the “back-to-school duo” and we are trying to fit in as much summer as we can over the next couple of weeks until school begins. With that, I am back today with a card for Freshly Made Sketches. The incredible Kim Singdahlsen has given us a unique and fantastic sketch that is sure to inspire you! I just love it!!