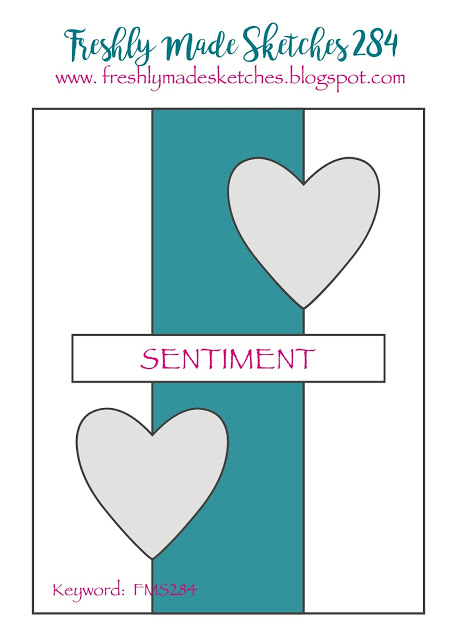
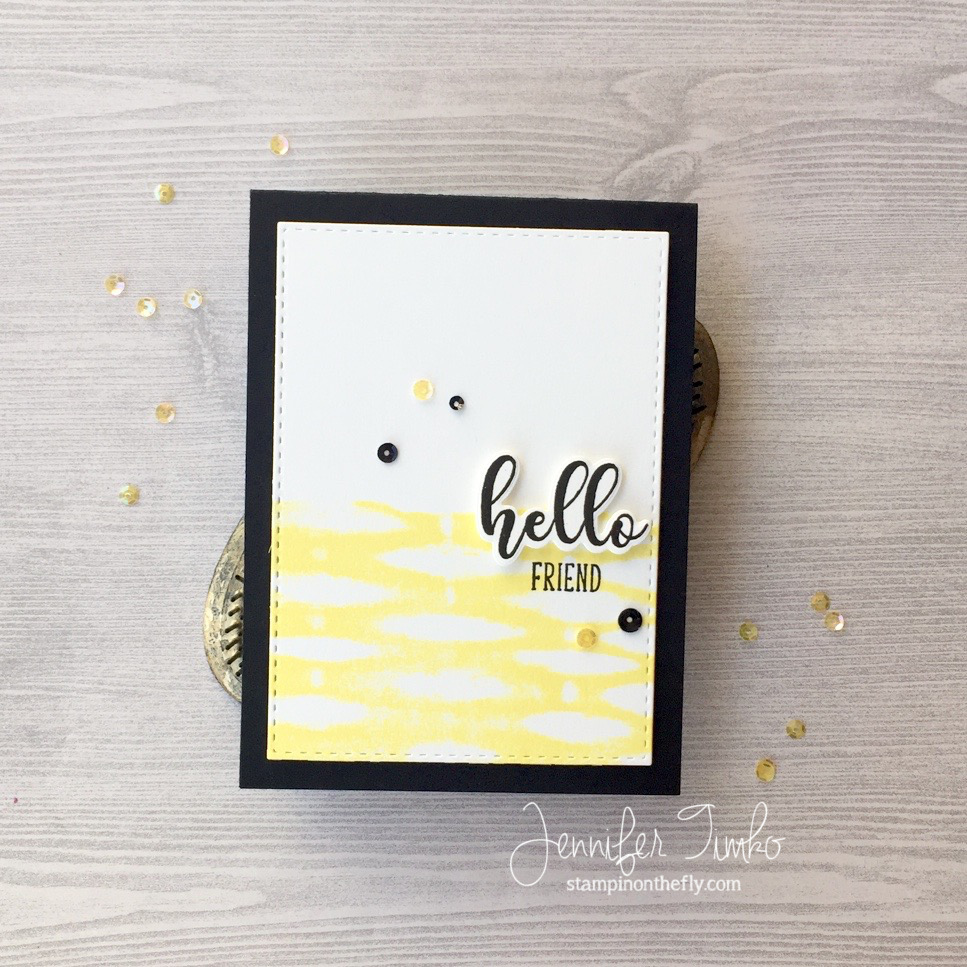
I got a chance yesterday to create a quick card and I knew when I saw that latest from CAS(E) this Sketch I had to join in. And I knew exactly what I wanted to use for the sketch element….my Magic Stamp!
I showed you a card with a Newton’s Nook sentiment during the release that used a background made with this and for today’s card, I used a background that was created using a wooden basket. The texture is really fun! Something about the sunny yellow seemed right (since I am ready for spring) so I used my Tim Holtz Distress Oxide Ink in Squeezed Lemonade. What a pretty color! The sentiment comes from Gina K Designs (I love that die with the ‘hello’) and then I just added some sequins.
The sketch over at CTS is a great one for CAS cards and you are sure to want to join in too. Glad you stopped in today. Back tomorrow with another fun collaboration that I get to share in. Until then, have a great day!
Supplies:
Stamp: Hearts and Flowers (Gina K Designs), Magic Stamp (Clearsnap); Paper: Basic Black (SU), Solar White (Neenah); Ink: Tim Holtz Distress Oxide Ink (Squeezed Lemonade), Versafine Onyx Black; Accessories: Big Shot, Stitched Rectangles Dies (SSS), Sequins
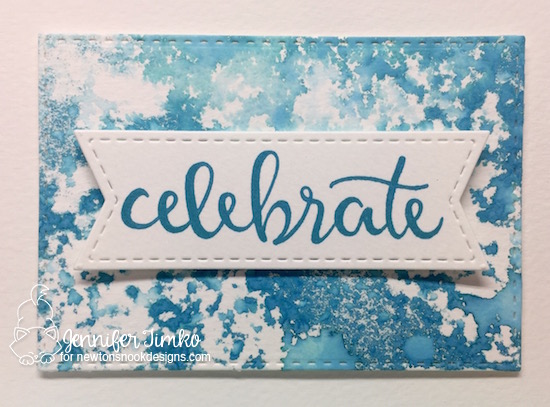
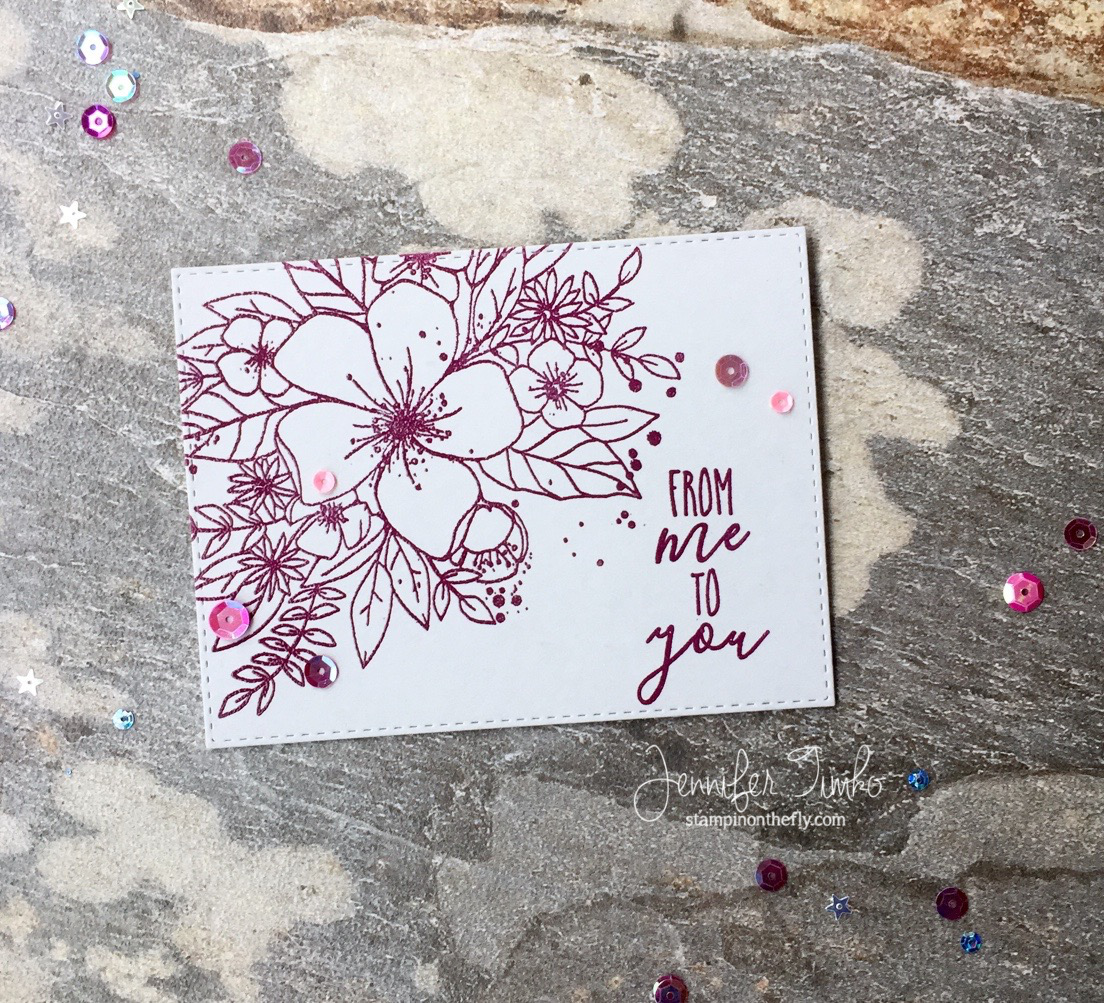
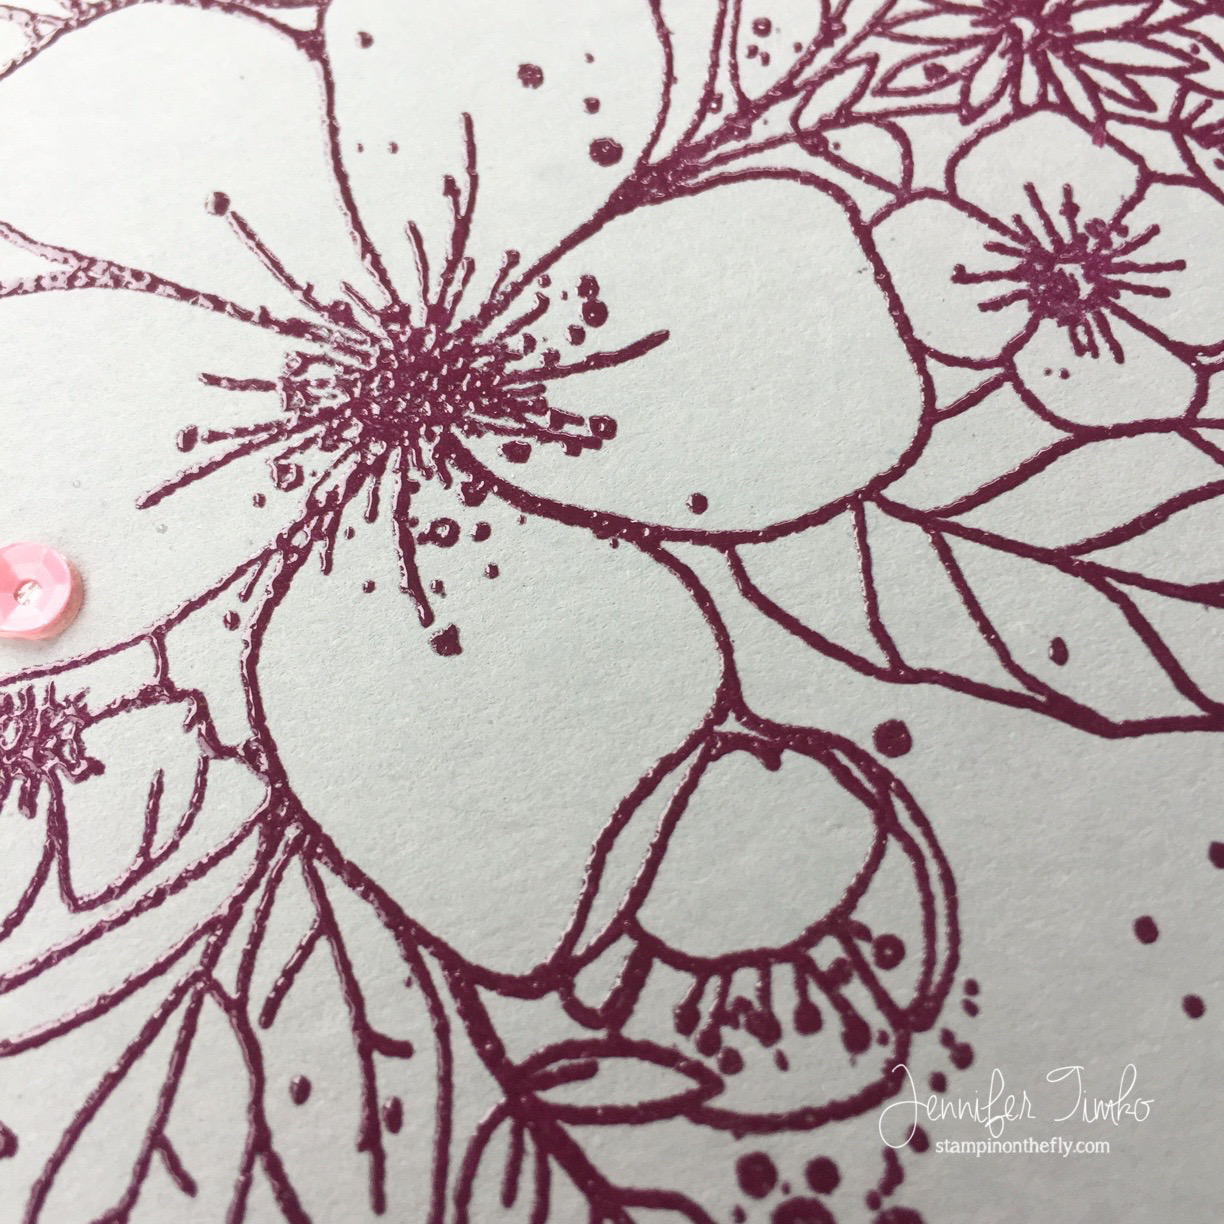
Welcome back for the last day of the March Release from Newton’s Nook Designs. For our final reveal I have what you are sure to see as a “work horse” stamp set…a wonderful sentiment set called Birthday Essentials.
So I have a confession to make. My name is Jennifer and I’m a sentiment hoarder. I love sentiment sets. I “collect” sentiment sets. Having just the right ones for inside and outside the card is simply a quest so I hold on to them even as I let images go now and then. So when a set that is all about birthdays comes along, you can bet that I’m doing a happy dance. Another truth (because, hey it is just among friends)…I never seem to have enough masculine cards. Perhaps it is because Kitty Kate and I are outnumbered. Perhaps it is my obsession with cute images and all flowers. But somehow, when it comes time to reach for a card for man, I don’t have the right one. So I committed to making one (and I’ll be making a few more just like it). I felt like I need a cool background so I used this fun Magic Stamp by Clearsnap. It allows you to make your own background and just stamp. I was playing with it on my trip to Kansas and the incredible Jen Shults (yes, I did just name drop) suggested I press it into some concrete on the sidewalk. And I got this texture. Cool!! I inked it up with Distress Oxide Ink and just stamped onto watercolor paper, then spritzed with a little water.
This big bold sentiment (which fits perfectly onto the Frames and Flags Die banner) becomes the focus and I have a fabulous, non-girly, no bling birthday card. Yay!!! And while this is super clean, the great script sentiment makes this still feel special. Birthday Essentials for the win!!
I hope you like this card idea and I’m just sure you will love everything the team made for today. Now one more time for this release… A chance to win!!
Would you like to win the “Birthday Essentials” Stamp Set?
Each set will be given away to ONE lucky winner!
Here’s how to win:
Comment on the NND blog and Design Team blogs (see list below)! Thewinner will be chosen at random from the collective reveal posts. Make sure to check out each of their blogs and comment for your chance to win. You will not know which blog has been chosen so the more you comment on the better your chances are of winning! You have until Thursday, March 15th at 9pm CST to comment — winners will be announced on the blog post on Friday, March 16th.
Check out all the awesome Design Team Blogs below to enter:
Thanks for stopping in today and during this whole week. All of your comments are so appreciated and I’m so happy you share some of your time with me. The release goes live tomorrow so make your list and check it twice. I think this one is going fly off the shelves!Supplies:
Stamps: Birthday Essentials (Newton’s Nook Designs), Magic Stamp (Clear Snap); Ink: Broken China Distress Oxide Ink (Tim Holtz); Paper: Canson XL Watercolor Paper; Accessories: Big Shot, Frames and Flags Dies (NND), Stitched Rectangles Dies (SSS), Dimensionals (SU)
First of all, today is the day that the 4 Year Celebration release goes live over at Newton’s Nook Designs. To continue the fun, we are having a blog hop and I’m so thrilled to be a part of it.
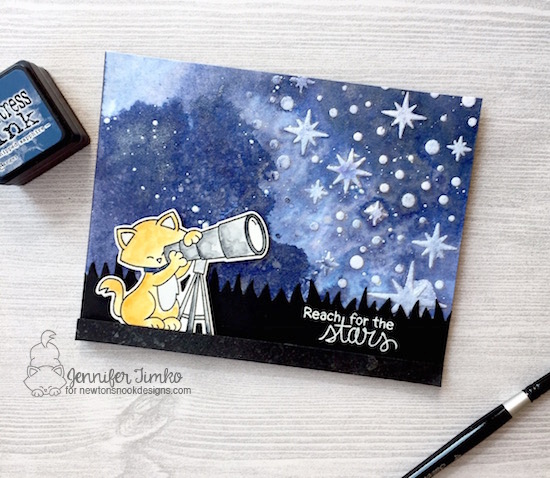
I told you yesterday that my favorite set from this release was Cosmic Newton (but seriously, choosing a favorite is like choosing a favorite ice cream…I love them all!). I used the new Stampin’ Up Embossing paste with the Starfield stencil on watercolor paper to start off my background. Next I added Chipped Sapphire Distress ink by painting it on with a brush. I got some of the light and dark coloring with that but wanted a little more dark. So I pulled out the trusty acetate and smooshed some more ink on, spritzed with water and applied to the panel. After it dried a bit, I spritzed on a Perfect Pearls mixture (in a spritzer with the powder and some water) to get a shine on the panel. And finally, I splattered on some Smooch Ink to add some extra “stars). I added a bit more of the Perfect Pearls onto the stars to help them pop. For the trees behind Newton, I used the Land Borders Dies. I was thrilled when it looked like the tops of trees in the shadows. Finally, I colored Newton and his telescope with some more Distress Ink. What a fun card to make!! This set just lends itself to fabulous backgrounds and tons of creativity!
I’m sure you notice how much fun I have had with the stencils this week. Well, there is a great deal that you are sure to love!So pretty much you can get the Pawprints stencil free on the order you were already going to make! WIN!! And speaking of winning…there is even MORE to win this week.
Celebrate with us and enter to win!
To celebrate 4 years Newton’s Nook Designs is giving away a $25 store credit to spend in their online shop to 4 lucky winners!
Here’s how to win:
Comment on the NND Design Team and Special Guest blogs (see list below)! The winner will be chosen at random from the collective blog hop posts. Make sure to check out each of their blogs and comment for your chance to win. You will not know which blog has been chosen so the more you comment on the better your chances are of winning! You have until Sunday, July 16th at 9pm CDT to comment. Winners will be announced on NND blog post on Monday, July 17th and will need to contact us to claim their prize so make sure you check back to see if you’ve won!
We hope you have enjoyed this week of celebration as much as we have! Your comments are so kind and your support is appreciated more than I can say. What a privilege it is to share with you all! Thanks so much and see you soon.
Stamps: Cosmic Newton (Newton’s Nook Designs); Ink: Versafine Onyx Black, Tim Holtz Distress Ink (Chipped Sapphire), Moonlight Smooch Ink (Clearsnap); Paper: Strathmore Bristol Smooth, Basic Black (SU); Accessories: Starfield Stencil, Big Shot, Cosmic Newton Dies (Newton’s Nook Designs), Land Borders Die (Newton’s Nook Designs), Misti Stamp Tool, Perfect Pearls, Winsor and Newton Paints, Heat Tool, White Embossing Powder
I get to share some projects I have been holding on to that are part of a product review for Splitcoaststampers. Many of you know my long standing love of “Splitcoast” because it is always full of creative inspiration, techniques, tutorials and reviews. I was asked to take a look at some Clearsnap Petal Point Pigment Inks that are being released in two new color groupings (Sunset and Boardwalk). Please hop right over to see my thoughts and the analyses of some amazing stampers (and their projects!) – Product Review. If you want to see the whole gallery of work with these inks, CLICK HERE.
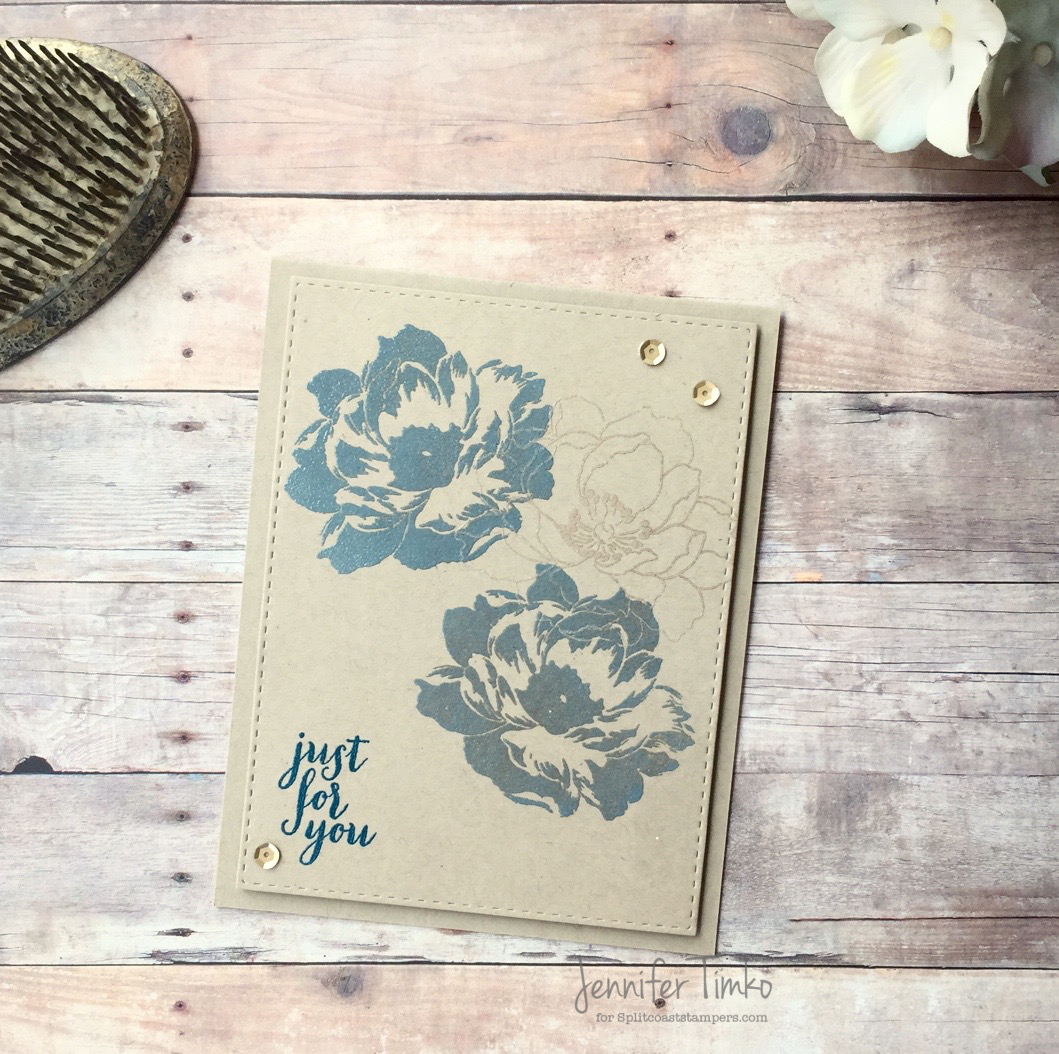
In my review, I mention how I was playing with the ink and trying new things. I reference a card on kraft (Crumb Cake) card stock and an ombré card. I wanted to share those here too since I had not put them on my blog yet. I love the pretty Sunset color family for my Congrats card, don’t you?! The strong colors from the pigment ink are fabulous on this background stamp!In my flower card I was able to use the Boardwalk ink to get a gorgeous look on my Crumb Cake paper. I love how the Dune color is a match and yet shows up beautifully with the line image flower. While you are over at Splitcoast, take some time to look around and appreciate all the resources. You’ll be glad you did! Thanks for stopping in today. See you soon!
Supplies:
Stamps: Beautiful Day (Altenew), Paper Pumpkin sentiment(SU), Dotty Angles (SU retired); Ink: Clearsnap Petal Point Inks in Sunset and Boardwalk; Paper: Crumb Cake, Thick Whisper White, Early Espresso; Accessories: Big Shot, Stitched Rectangles Dies (SSS), Wooden Element Sentiment (SU), Twine, Gold Sequins, Heat Tool, Clear Stampin’ Emboss Powder
I had some time to just stamp last week and I wanted to join in the April Challenge from Where Creativity Meets C9. Their theme this month is One Layer. Sounded right up my alley! With a one layer card the whole focus falls to the image so I choose the beautiful Hello Lovely stamp by Concord & 9th. I really do love it!
Once I had the stamp chosen, the fun was in the colors. I used a light gray card stock and this gorgeous purple pigment ink. It happens to be a sneak peek of a new release coming soon from Clear Snap. Pretty, isn’t it?! The nice part about pigment ink is the strength of color and how it embosses. I just heat embossed with Clear embossing powder. All the work here is done by the great image and the ink!The sentiment for this comes from a holiday set (also C9), O Christmas Tree. I love when sets have purposes beyond the holiday! After cutting the panel with a stitched rectangles die, I thought the card needed just a little more. I recently won some beautiful sequins from 28 Lilac Lane (designed by May Flaum) and the Mixed Berry set went perfectly with the ink. I added a few just to give an extra something to the card.
I hope you are having a great week! I am slowly coming back to reality after a week vacation. Our family took a wonderful trip to San Diego last week…what a treat! The boys both had some real favorites events. Oldest loved seeing the USS Midway and all the airplanes while the youngest enjoyed both the zoo and Sea World. I love a vacation that can allow everyone to see something that feeds their interests!
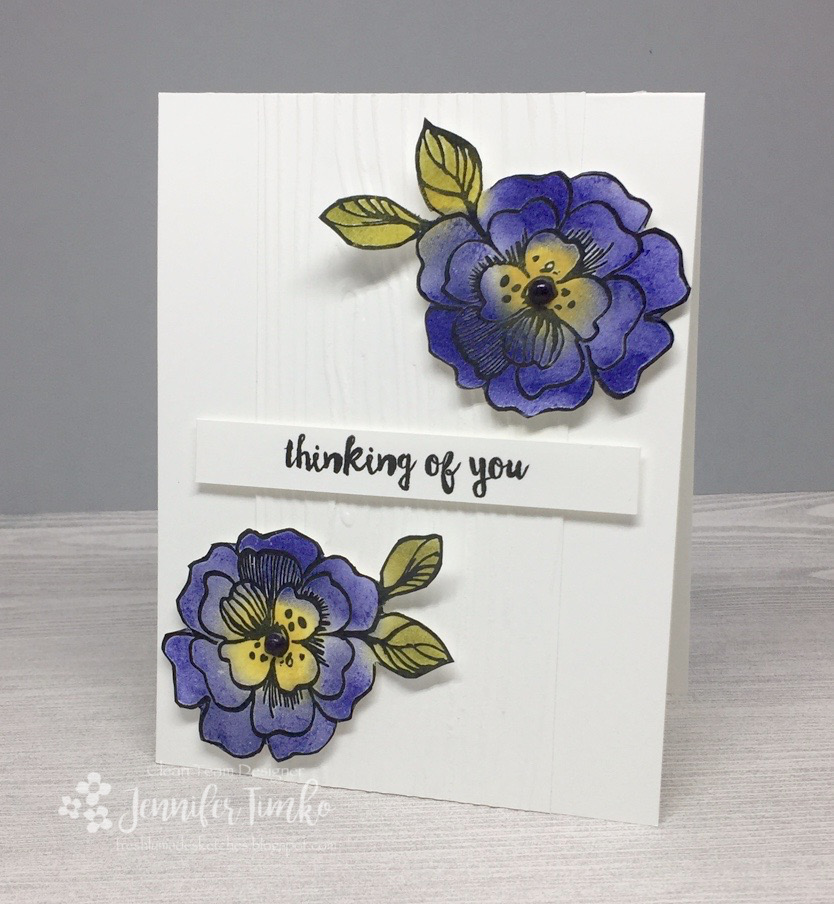
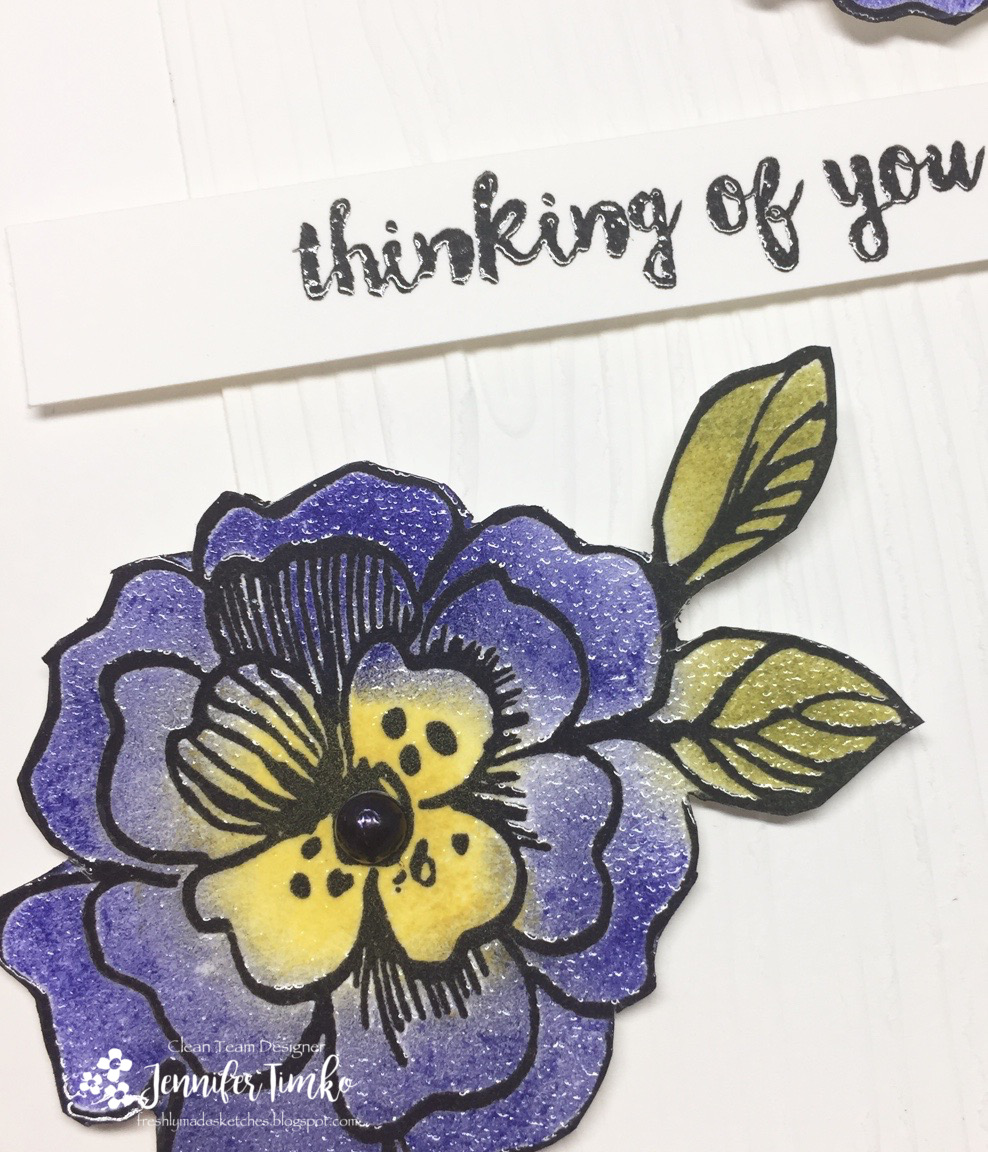
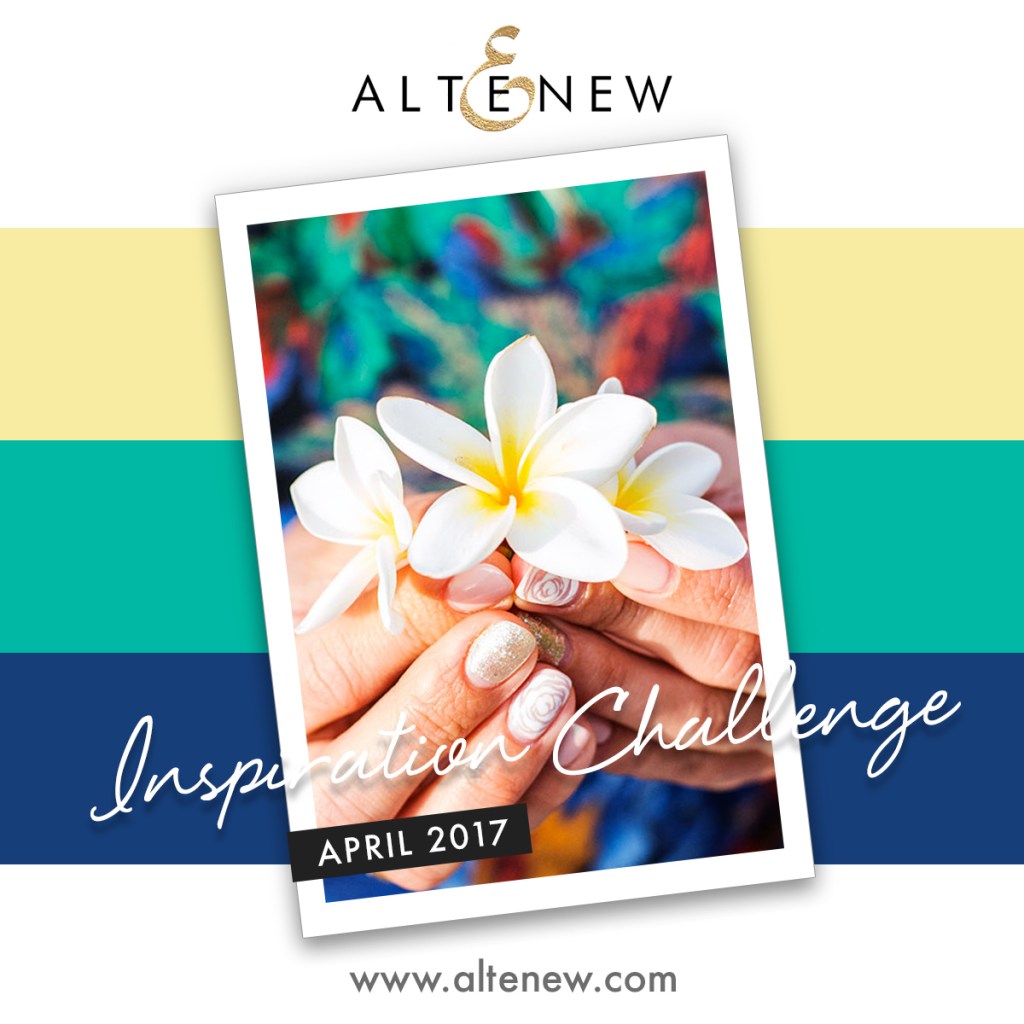
So I finally got back into the craft room yesterday and that always seems to be a slow process for me. Fortunately, Karren created a fabulous (and really workable) sketch for Freshly Made Sketches that made it a bit easier. I knew I wanted to use these pretty flowers from Altenew (Botanical Garden) and also pulled inspiration from Altenew’s April Inspiration Challenge. I loved the blue and the yellow and also the bokeh styling of their photo.
For my flowers, I wanted to try a new to me technique. I have some sneak peek Petal Point inks from Clearsnap that are pigment inks so I tried this technique from Jennifer McGuire. It is a little bit messy but I agree with Jennifer that using your fingers to apply ink is easy to control. It also allowed me to have a bit of a splattered look on the flowers per the inspiration.
The fun part with pigment ink is that it stays stickier for a little longer and that allows time to be able to come back and emboss the whole image. The effect gives a bit of shine and depth to the card that is hard to capture in a picture. For my center panel of the sketch, I cut a piece of Thick Whisper White and embossed it with the Woodgrain Embossing Folder (SU). It adds a subtle texture without pulling attention from the flowers.
I hope you are off to a great week. I’m back to stamping today and a bit of gardening too. I love this time of year in Virginia and my youngest is still off this week for break. We are getting the gardens all ready for planting our vegetables and re-mulching to get things tidy after the winter. I’m lucky he is such a great helper! Thanks for stopping in today. See you soon! Supplies:
Stamp: Botanical Garden (Altenew), Sentiment (Paper Pumpkin by SU) ; Ink: Versafine Onyx Black, Petal Point Pigment Inks; Paper: Thick Whisper White; Accessories: Clear Embossing Powder, Heat Tool, Big Shot, Woodgrain TIEF (SU), Dimensionals, Basic Pearls (SU), Black Sharpie Marker
I am thrilled to finally share with you that I have been working on a Product Review for Splitcoaststampers over the last few weeks. I’m sure you already know that Splitcoaststampers is always on the leading edge in looking for the latest and greatest in products, helping put focus on talented designers and a one-stop-shop for inspiration and information! What a privilege it is to get the call about doing a review for something new!
For this round I am reviewing a new ink offering from Clearsnap called the Colorbox 4-Color Premium Dye Ink. It configures a color family of inks all into one box to make your stamping convenient and allow you to have perfectly coordinated colors with simply one box. Hop right over to the Product Focus page and you can see all the reviews and projects from the whole Product Review Team!
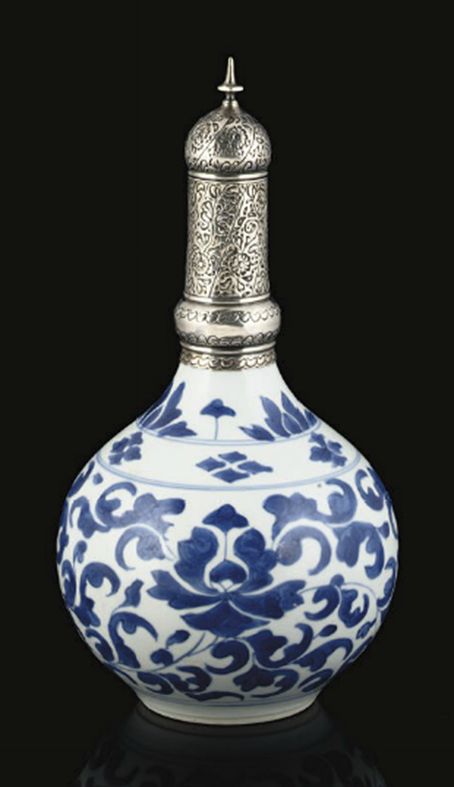
For my project today, I used the Summer palette’s blue to create this pretty card. I was inspired by a cool piece of pottery I saw on Pinterest that reminded me of the Detailed Floral Thinlets (picture below). I just had to see if I could mimic the look. Here is the video tutorial showing you the how-to:
If you cannot see it via your email, you can go to YouTube directly by clicking this link: Pottery Inspired Watercolor
I hope that you enjoy this fun technique. You could totally do this in multiple colors as well for a great result! Thanks so much for stopping in today. See you soon!
Click HERE to purchase wonderful Stampin’ Up products!
Stamp: Flourishing Phrases; Paper: Fabriano Watercolor, Whisper White (Base); Ink: Colorbox 4-Color Premium Dye Ink in Summer; Accessories: Big Shot, Details Florals Thinlits Dies, Paint Brush, Dimensionals, Sequins (Share Kindess set from Pretty Pink Posh)
Primary Sidebar
We use cookies on our website to give you the most relevant experience by remembering your preferences and repeat visits. By clicking “Accept”, you consent to the use of ALL the cookies.
This website uses cookies to improve your experience while you navigate through the website. Out of these, the cookies that are categorized as necessary are stored on your browser as they are essential for the working of basic functionalities of the website. We also use third-party cookies that help us analyze and understand how you use this website. These cookies will be stored in your browser only with your consent. You also have the option to opt-out of these cookies. But opting out of some of these cookies may affect your browsing experience.
Necessary cookies are absolutely essential for the website to function properly. This category only includes cookies that ensures basic functionalities and security features of the website. These cookies do not store any personal information.
Any cookies that may not be particularly necessary for the website to function and is used specifically to collect user personal data via analytics, ads, other embedded contents are termed as non-necessary cookies. It is mandatory to procure user consent prior to running these cookies on your website.

 I got a chance yesterday to create a quick card and I knew when I saw that latest from CAS(E) this Sketch I had to join in. And I knew exactly what I wanted to use for the sketch element….my Magic Stamp!
 The sketch over at CTS is a great one for CAS cards and you are sure to want to join in too. Glad you stopped in today. Back tomorrow with another fun collaboration that I get to share in. Until then, have a great day!