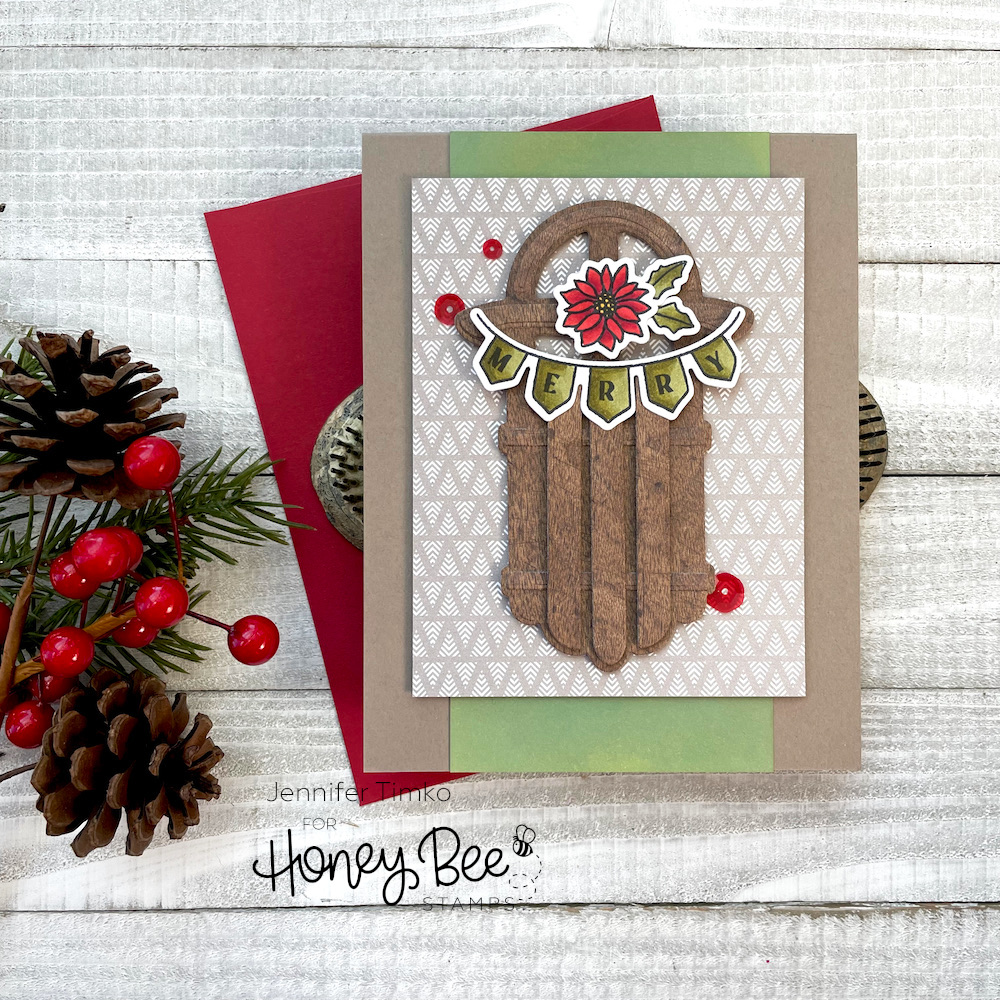
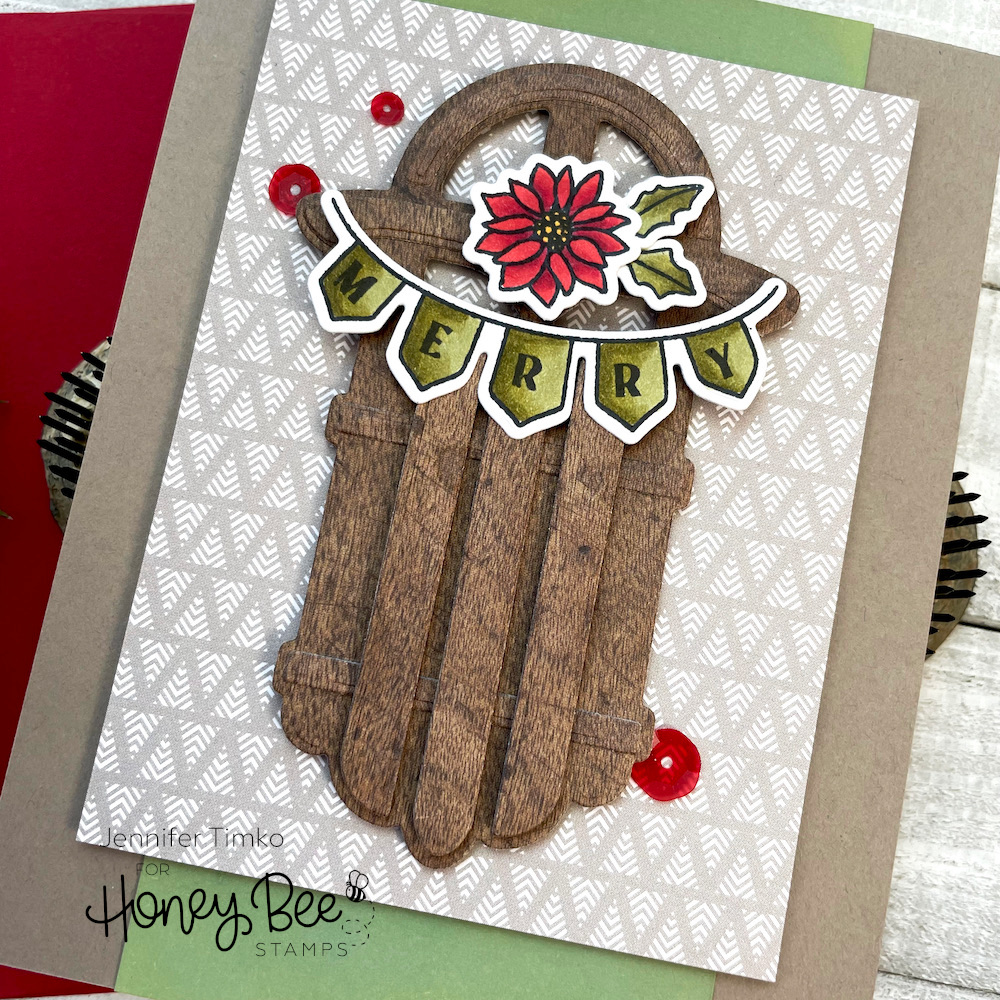
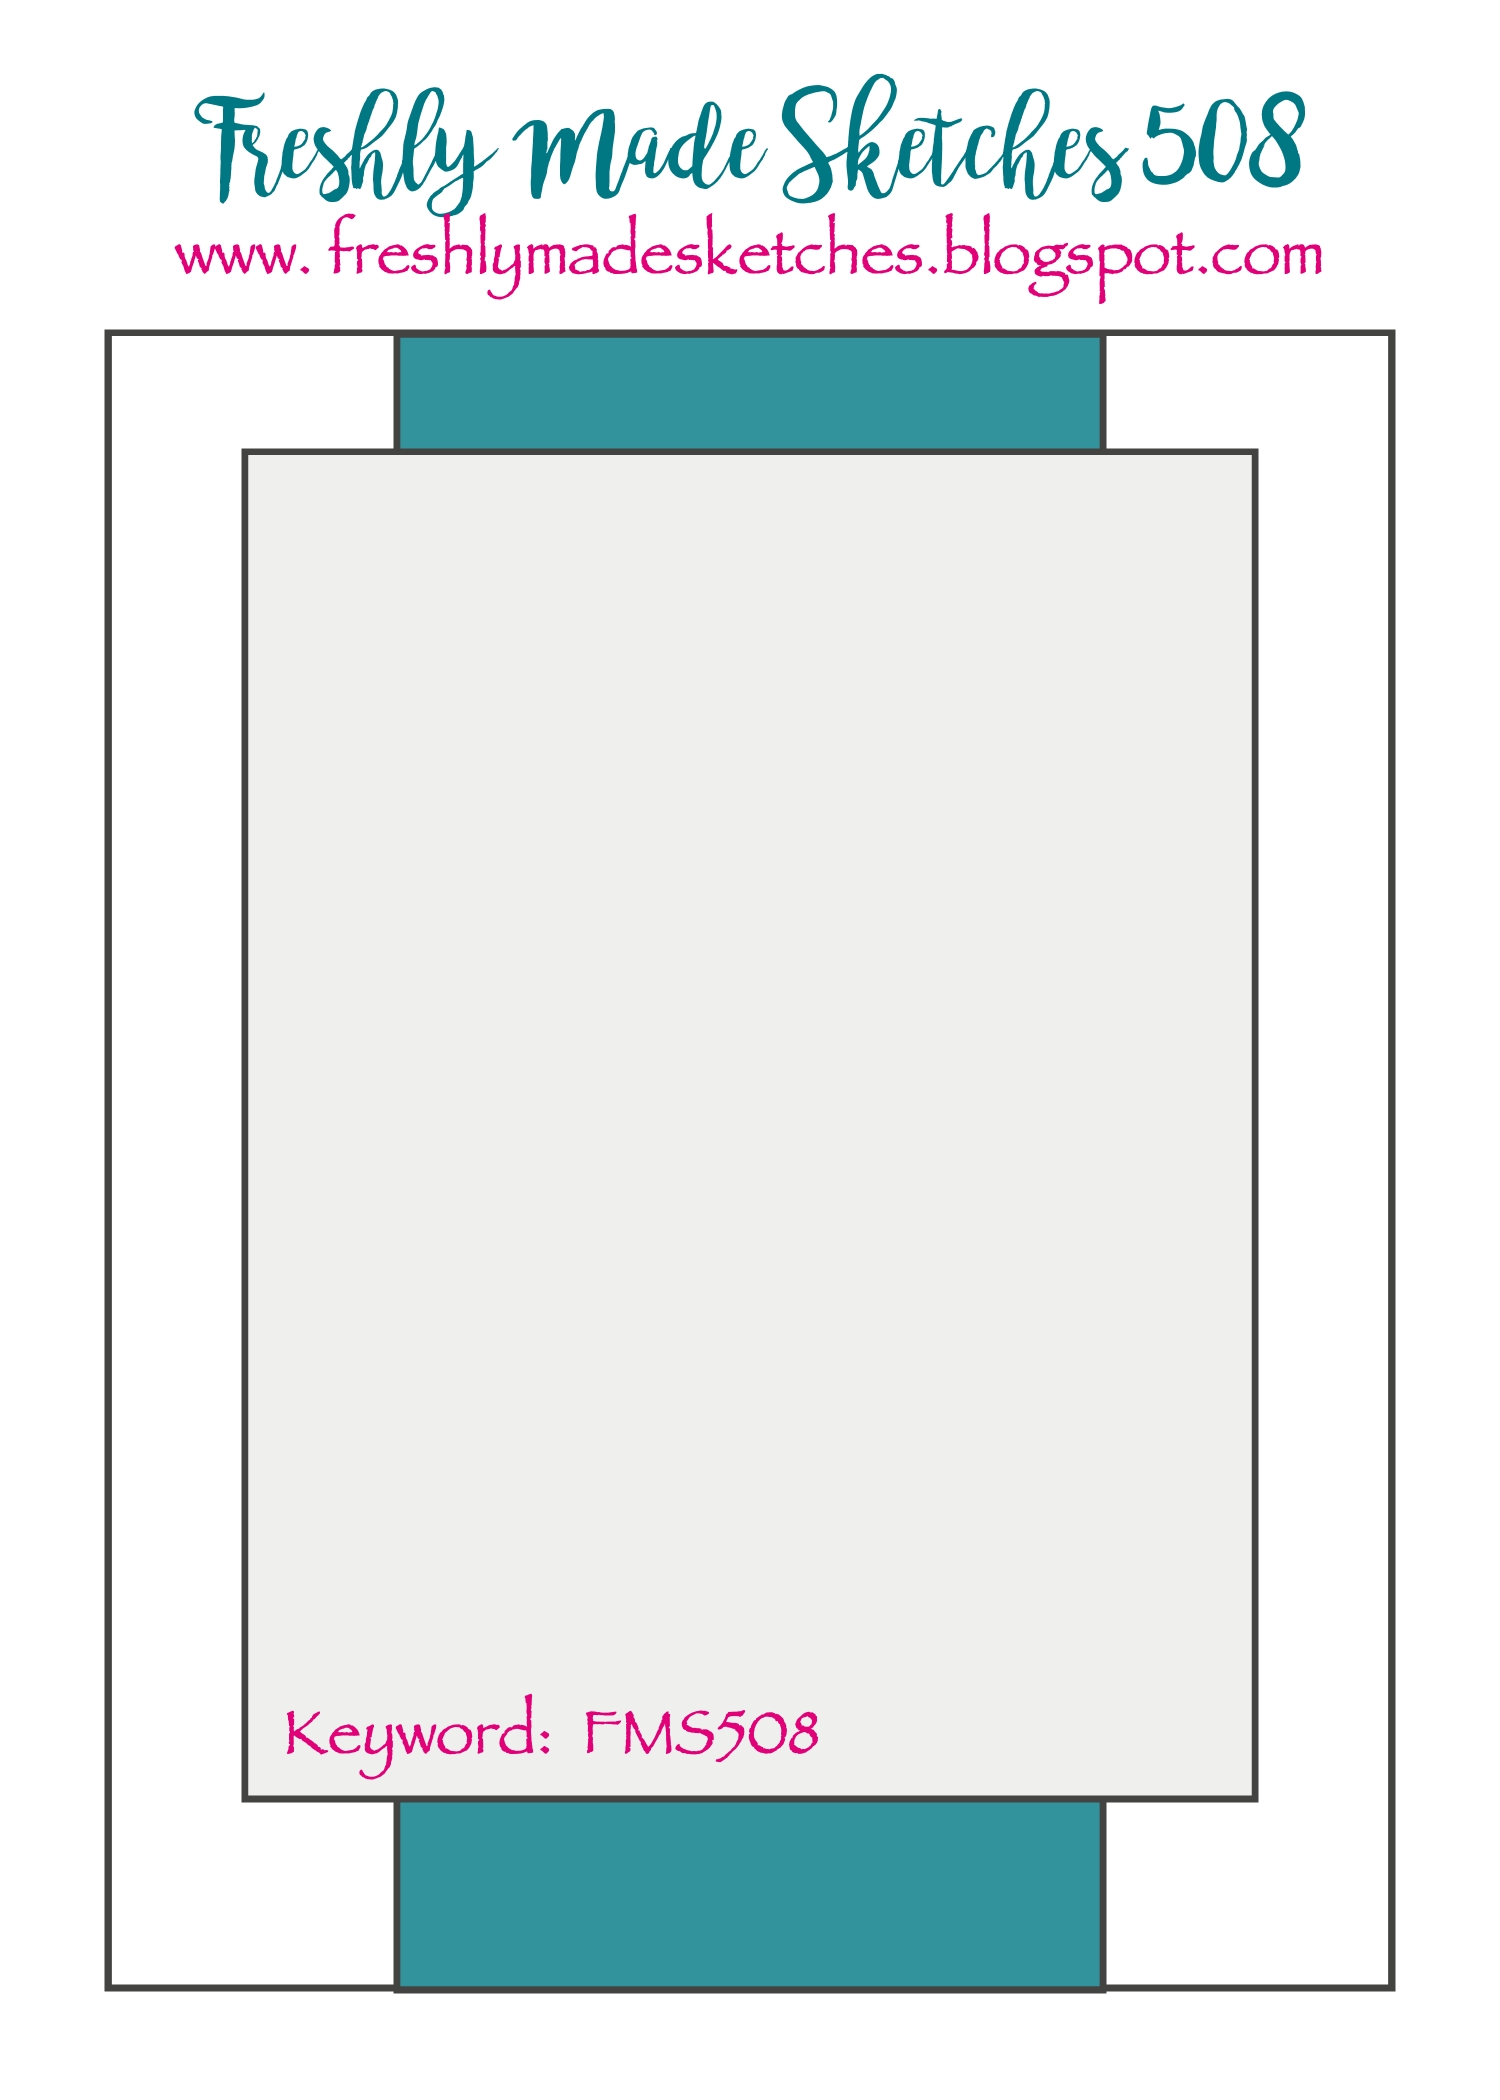
I’m super excited to share a combination card today. It is Honey Bee Stamps Instagram Hop day (with chances to win!!) and I used the Freshly Made Sketches challenge for my sketch inspiration. Perfect timing for this fabulous sketch designed by the fabulous Jacquie Southas.
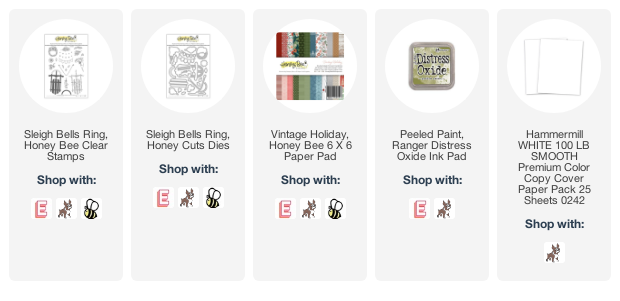
When I saw the sketch, I knew just the focal point I wanted to use. Sleigh Bells Ring is a new stamp and die set from Honey Bee Stamps and it is a treat to use. The sled die is so fun and full of details but yet easy to put together. I used some wood grain paper from my stash for the sled. Then I used some of the elements from the stamp set to decorate the sled.
Once I had the sled built, I thought this cool print from the Vintage Holiday paper pack was added wonderful texture and was great for the sketch. I inked a panel with Peeled Paint Distress Oxide Ink and put it all on a taupe base.
Come over to Instagram to hop with us for a chance to win and I hope to see you playing along with the sketch. Thanks for stopping in today!
Welcome to the Honey Bee Stamps Vintage Holiday Release Sneak Peeks! Today is the last day of our peeks at the new release and, as usual, you will be totally wow’d by all the amazing sets.
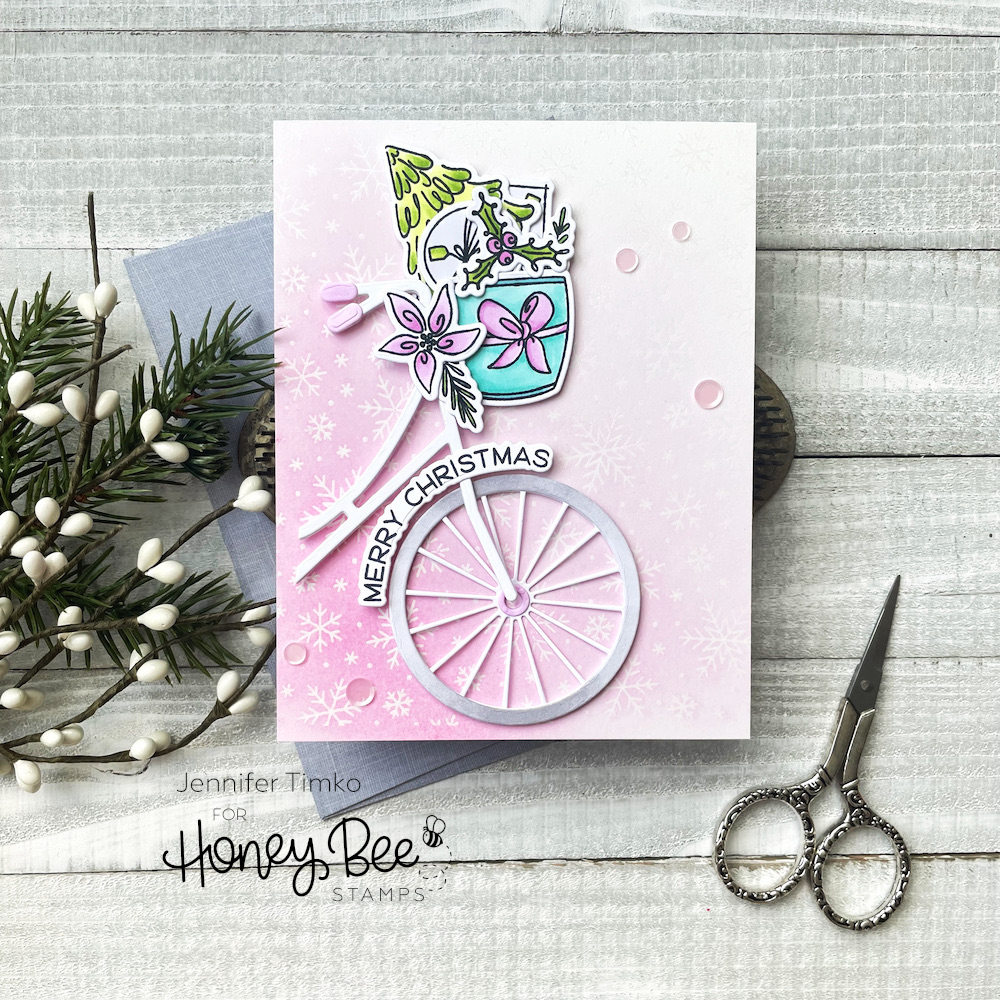
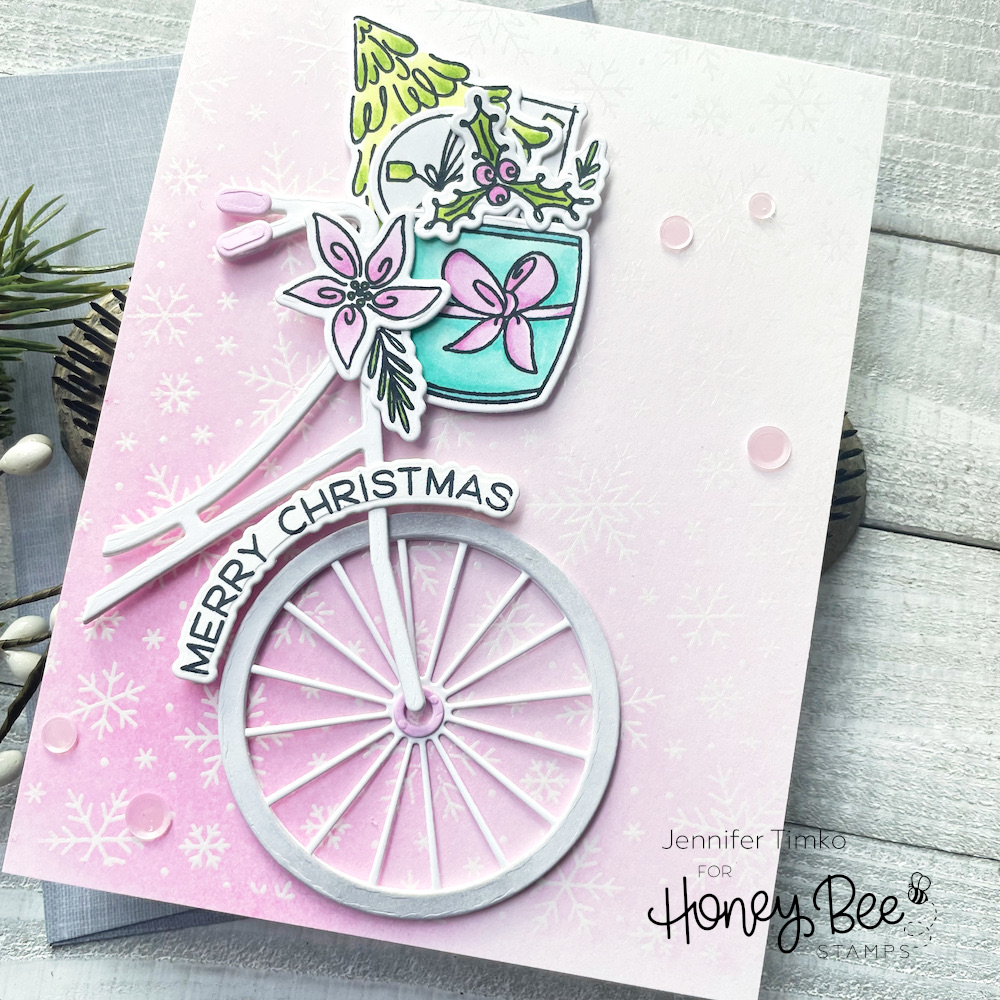
The Riding By…Holiday Style is an add-on set to the Riding By Set and Bicycle Builder Honey Cut Dies. I love all the options! AND, these images could be used just for tags or without the bike too. Love that. But I used it in the intended way. I stamped a bunch of the images in Momento Tuxedo Black Ink and colored in non-traditional colors of pink, teal and lime green. After cutting them out with the coordinating dies, I started playing with how I’d build my bike. I left the frame white and colored the tire in pale gray. I added a few pink accents too. I did cut two more of the “tire” die (not the spokes part) and the bike frame to give a bit more depth.
I used the Honey Bee Stamps Precision Glue to attach all the parts together. Then, I decided I needed a bit of pop from the background. I stamped the new Falling Snow Background Stamp in Versamark Ink and heat embossed with clear embossing powder. I brushed on a bright pink ink and the emboss resist worked perfectly. I pulled some of the Bubblegum Confetti Mix out as the final accents.
So glad you stopped in today. Remember the release goes live tonight! I hope you will consider shopping with me via the affiliate links highlighted at the top of the post. Have a wonderful day!
Welcome to the Honey Bee Stamps Vintage Holiday Release Sneak Peeks! Today is day twoof our peeks at the new release and, as usual, you will be totally wow’d by all the amazing sets.
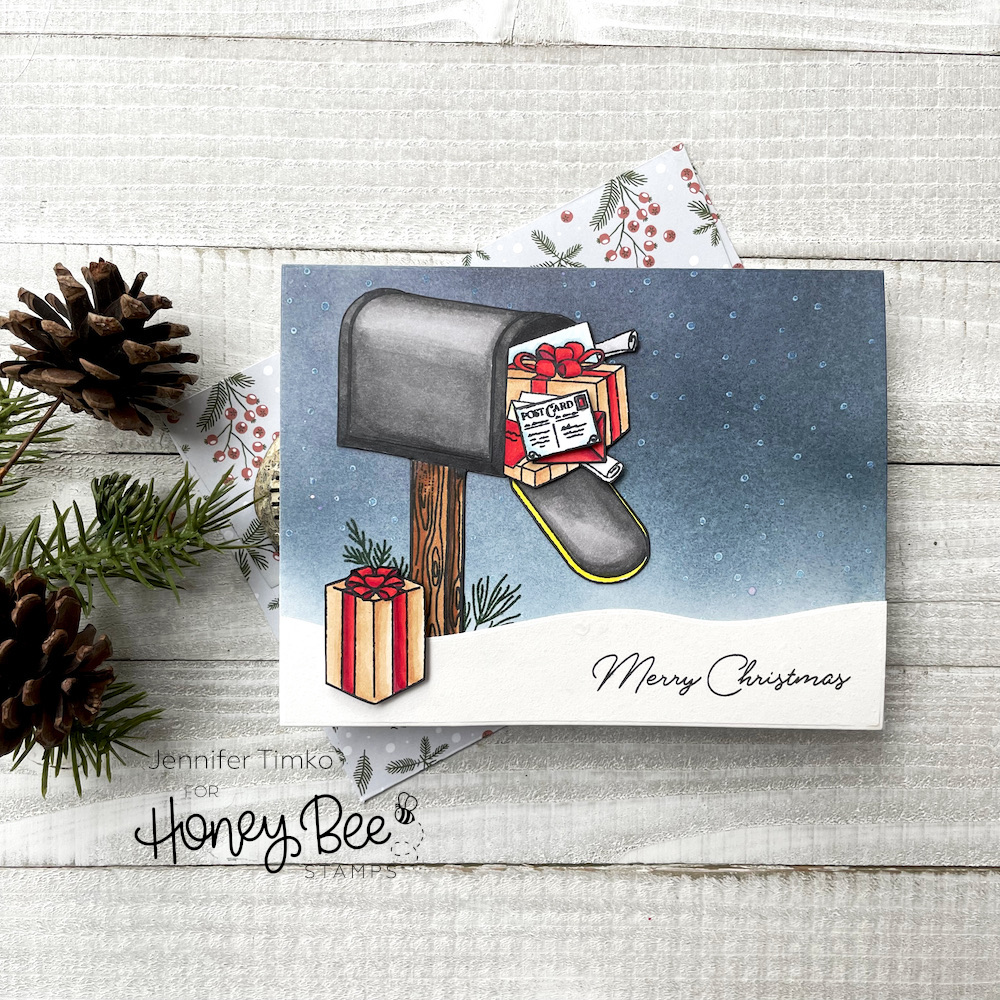
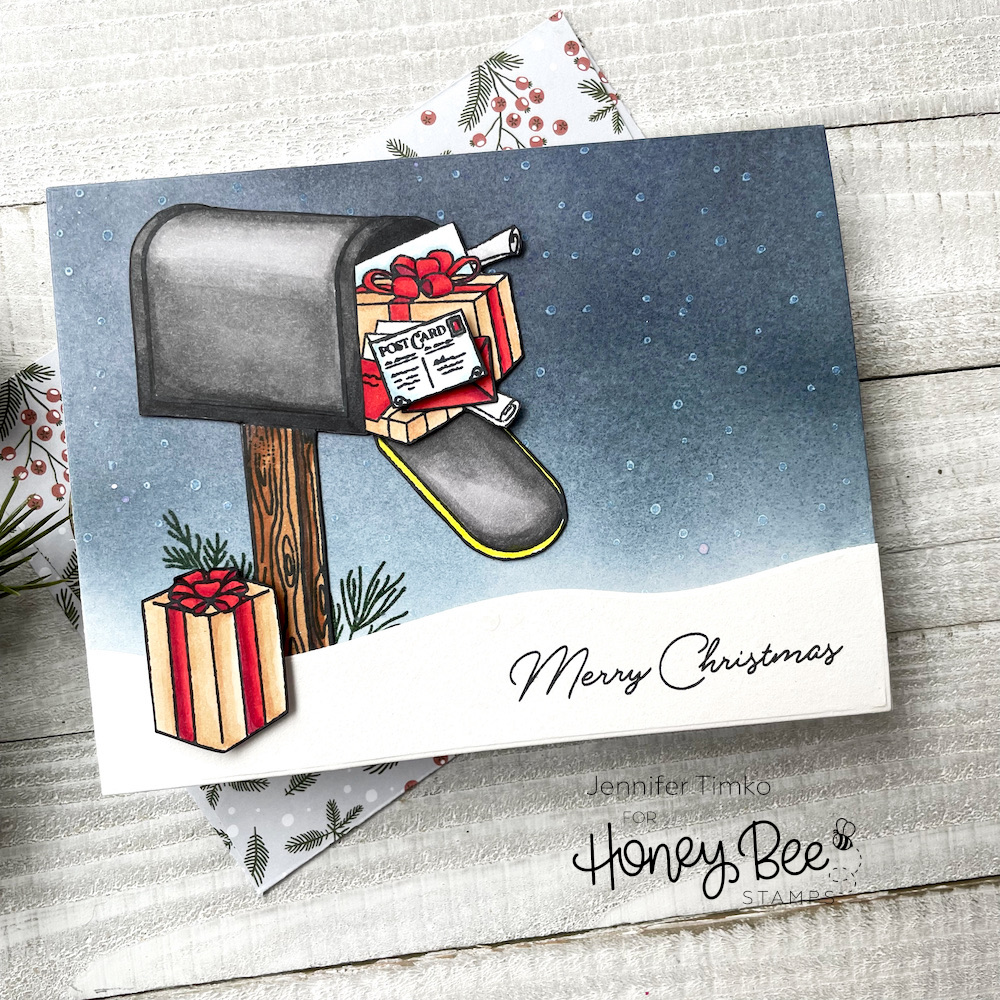
Today I am introducing the new Merry Mail stamps and coordinating dies and the Inside: Holiday Sentiments stamps and dies. (These affiliate links will not be live until the release opens for sale on October 14th after the Release Party on IG and FB at 8p CT.)
This was a fun card to make and I love this Merry Mail set for all the options in it. The mailbox is made so it can be open or closed and you have so many extras too. I stamped the images in Momento Tuxedo Black and then colored with Copic Markers. While there are dies for this set, I went for a more realistic look so I fussy cut the images.
I then inked up a dark blue background and stamped on the snowflakes from the set in white ink. Using the Horizon Slimline Borders, I cut a snow bank and then spritzed it with shimmer spray. I positioned the branches on the blue layer where I wanted to put the mailbox and stamped with green ink. Then, using the new Inside: Holiday Sentiments, I stamped the Merry Christmas. I put it all together with Honey Bee Precision glue and popped up the post card and the present on the ground with foam tape.
So glad you stopped in today. Back tomorrow for day two of the peeks! Have a great start to your week.
Welcome to the Honey Bee Stamps Vintage Holiday Release Sneak Peeks! Today is day one of our peeks at the new release and, as usual, you will be totally wow’d by all the amazing sets.
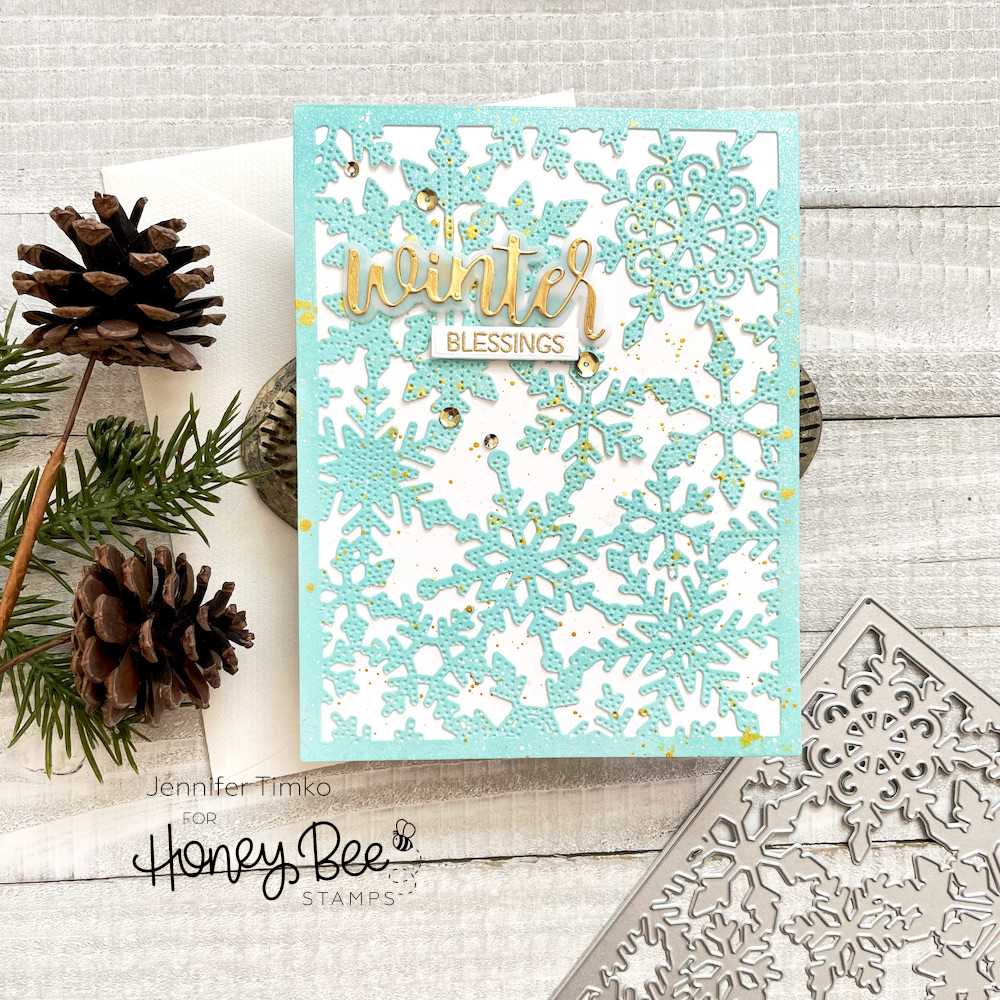
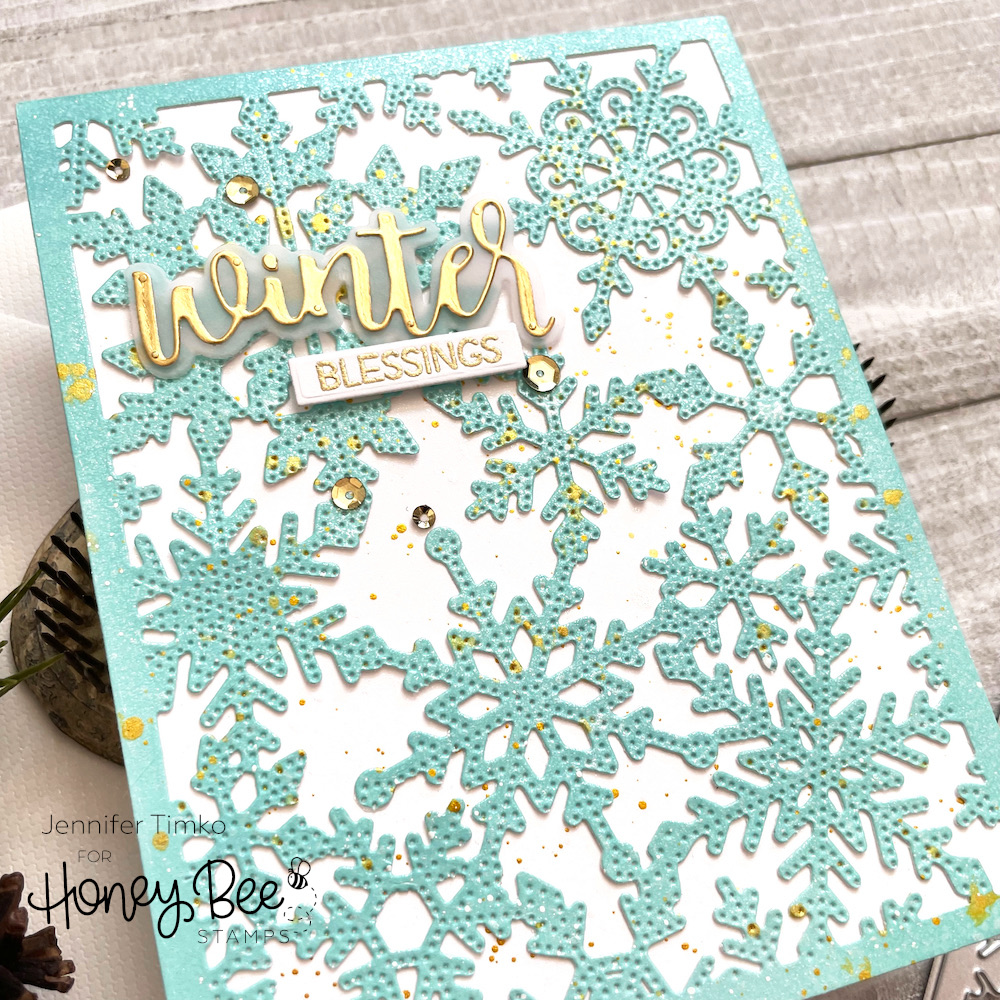
I have twice the inspiration for you today because I just could not help myself. Let’s face it, holiday card making is my absolute favorite!! I am so excited to show you new cover plate dies and a stand alone die set you are sure to love. I am introducing the Fancy Flakes A2 Cover Plate Die, the Pierced Fancy Flakes A2 Cover Plate Die and the Pine Tree Honey Cut Dies. (These affiliate links will not be live until the release opens for sale on October 14th after the Release Party on IG and FB at 8p CT.)
To start, I just had to make a card with the combination of the Fancy Flakes and Pierced Fancy Flakes dies. These are stand alone dies that can also be used together. Fabulous!! I inked a panel with Salvaged Patina Distress Oxide Ink and first cut with the Fancy Flakes die. Then I lined up the Pierced die and ran it though again. Yeah, it is that easy. For a little more interest, I splattered on some Shimmer Mist and Gold ink and then, while I was at it, did the same to a white card base.
I glued the snowflake layer onto the base using the Precision Tip Glue by Honey Bee Stamps. This glue is just awesome. It gives just a bit of time to position the layer and then it holds tight. I used one of the products from the last release to finish the card. The Bitty Buzzwords – Seasons Honey Cut Dies had just the right sentiment. I used more gold paper and then some gold embossing too. Finally, a few gold sequins.
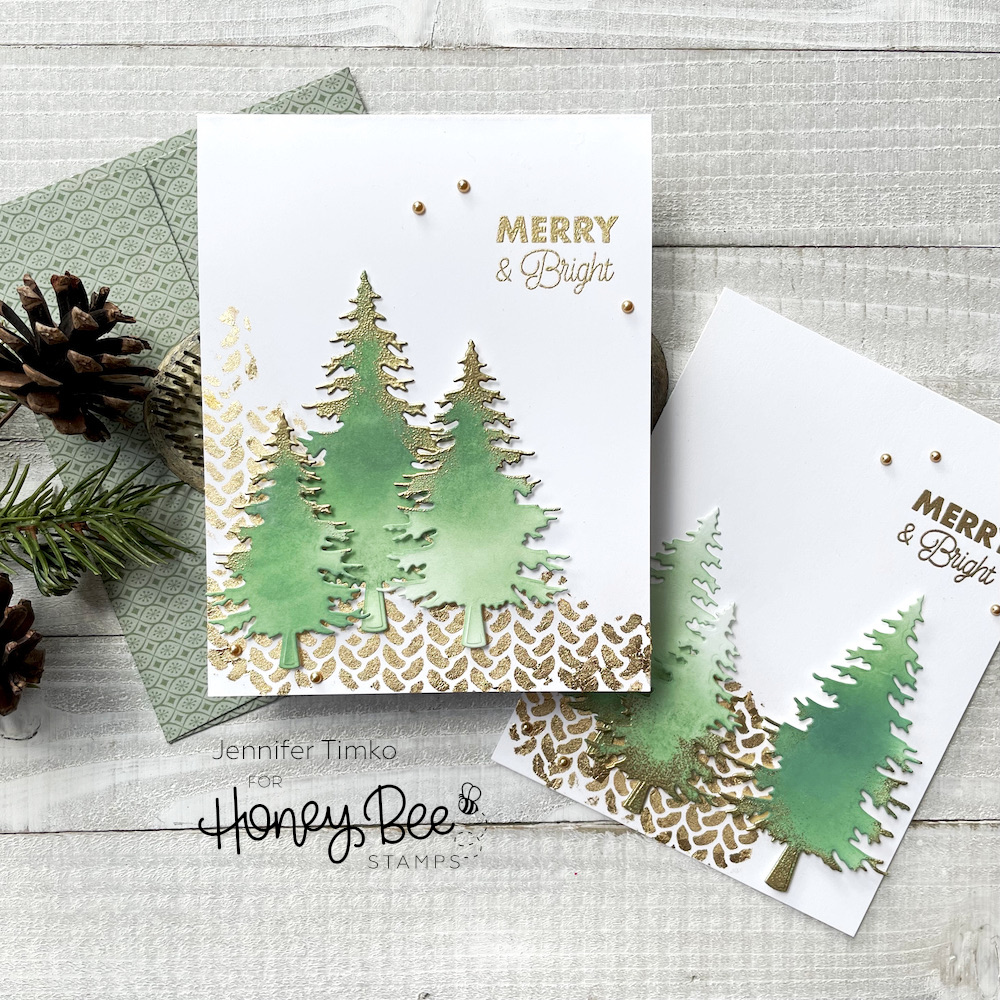
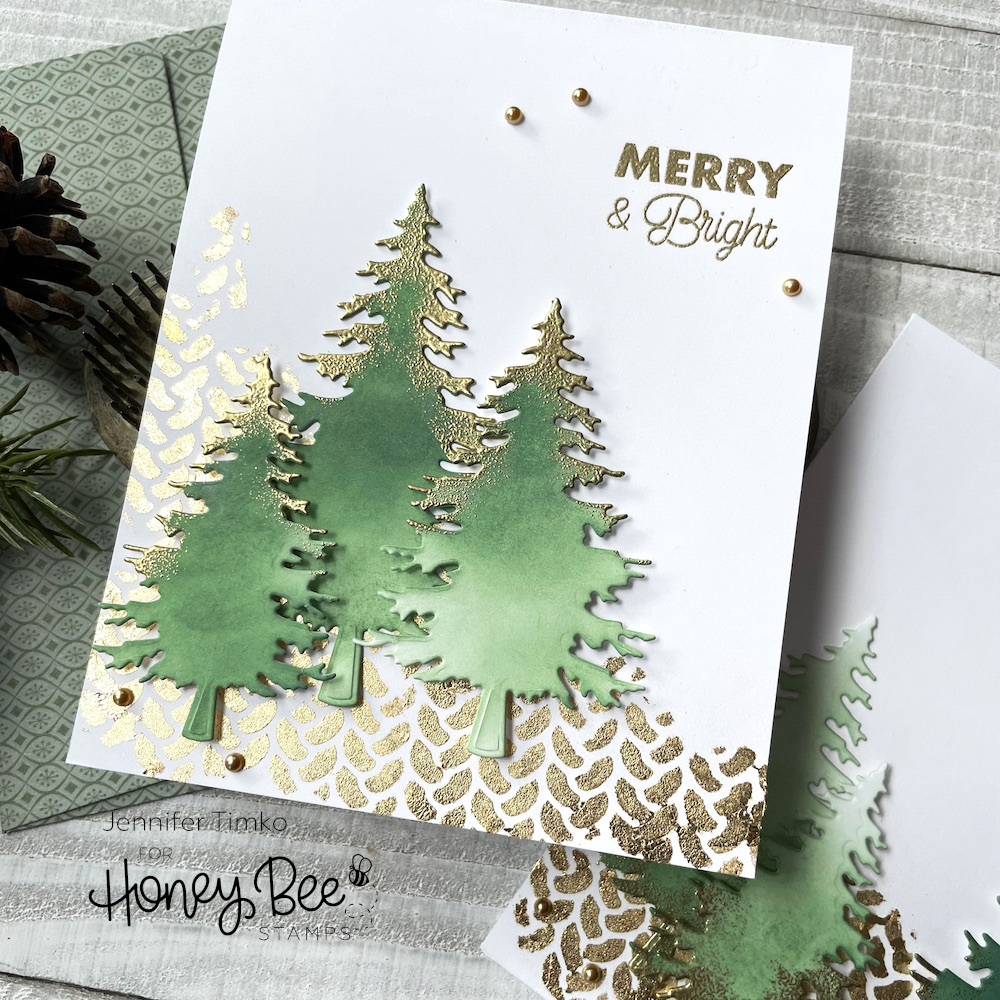
For my next card, I kept to the gold accent theme. The new Pine Trees Honey Cut Dies are going to be seen A LOT around here over the next couple of months. I love the quick simplicity of them! I cut them from white Hammermill card stock and inked them with Rustic Wilderness Distress Oxide Ink. After letting them dry for a bit, I added some anti-stick powder and then inked the edges with Versamark Ink. You can see I did one card with the tops and one with the bottom of the dies. I wasn’t sure which I would like and the answer was both! I added gold embossing powder and heated. Such an easy way to get a lot of extra detail.
For the details behind the trees, I used the Cable Knit Sweater Stencil in a new to me way. I pounced on some Tombow Mono Glue through the stencil. Because it remains sticky, I could then add on Nuvo Guilding Flakes for this cool, not too precise version of shine. The sentiment comes from a set that you will get to see later this week.
So glad you stopped in today. Back tomorrow for day two of the peeks! Have a great start to your week.
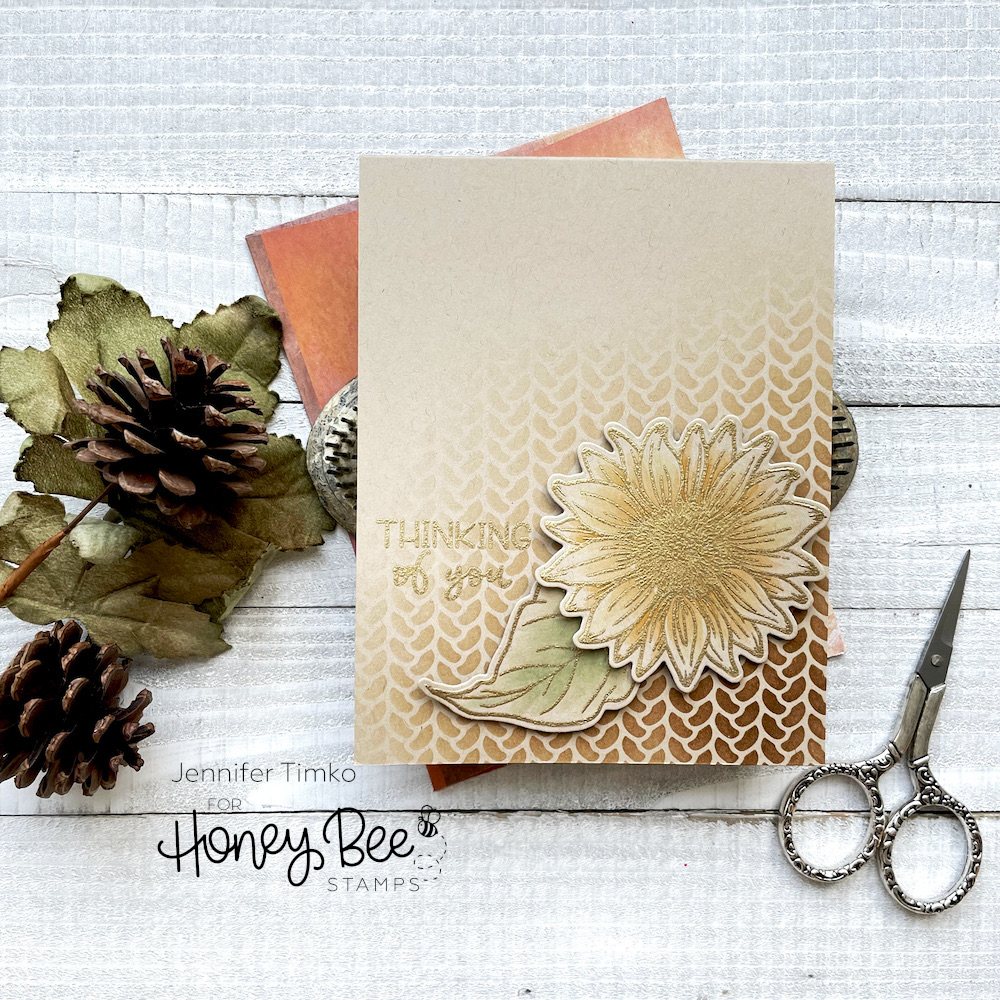
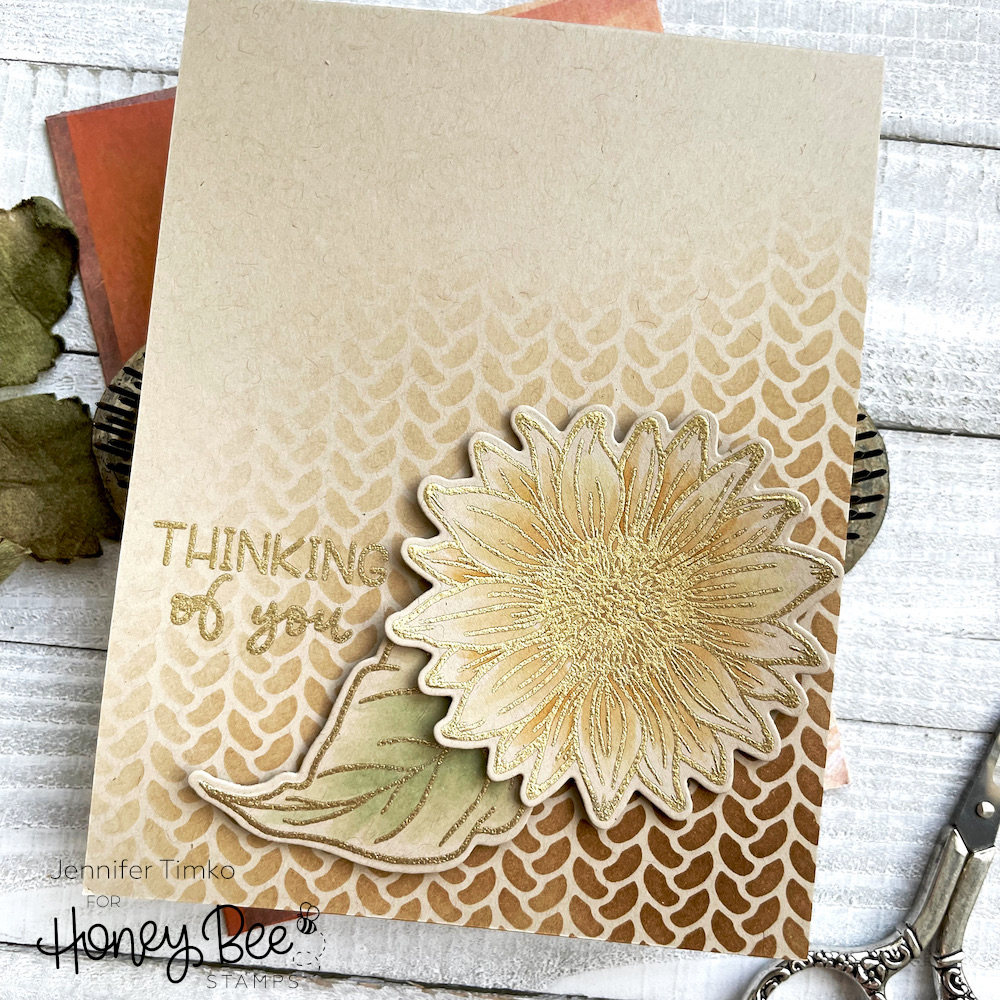
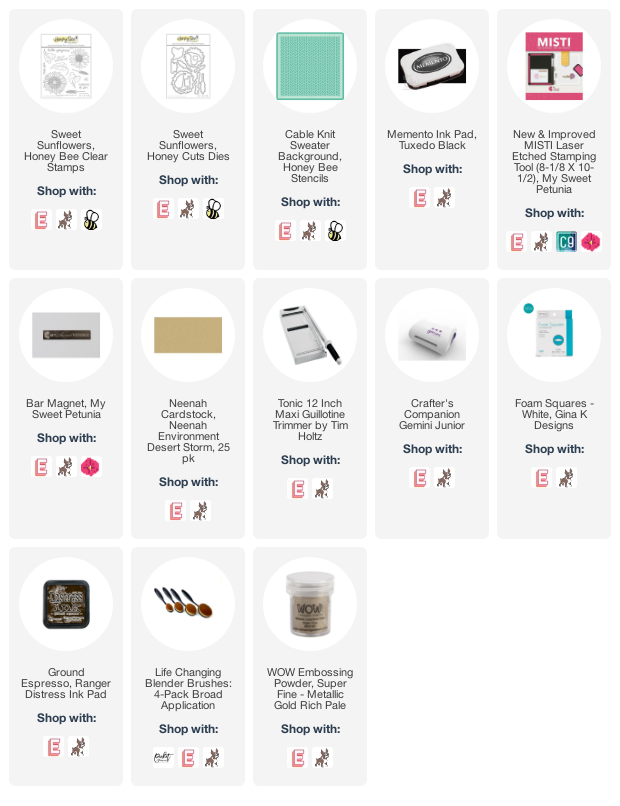
I’m over on Instagram with this card for Honey Bee Stamps but wanted to share it with you here too. I was in the mood to create a pretty fall card and thought I would pull out the new Cable Knit Stencil and Sweet Sunflowers from Honey Bee Stamps. They are so pretty together!
I played with neutrals on this card and kind of like the end result. First, I inked the stencil in Ground Espresso Distress Ink onto Desert Storm card stock. Then I stamped the flower in a neutral pale in onto the same card stock in my Misti. Just enough color to see the details. I added just a little bit of color with Copic Markers (YR21, YR24, G20, G21). Then I put it back into the Misti.
I re-stamped in Versamark ink and they added gold embossing powder. This prevents your marker tips getting damaged by the embossing and the Misti makes it simple to do. Finally, I added the sentiment with Versamark and more heat embossing. As always, the gold is hard to photograph but it really is pretty in person.
Thanks for stopping in today. Hope you have a wonderful weekend!
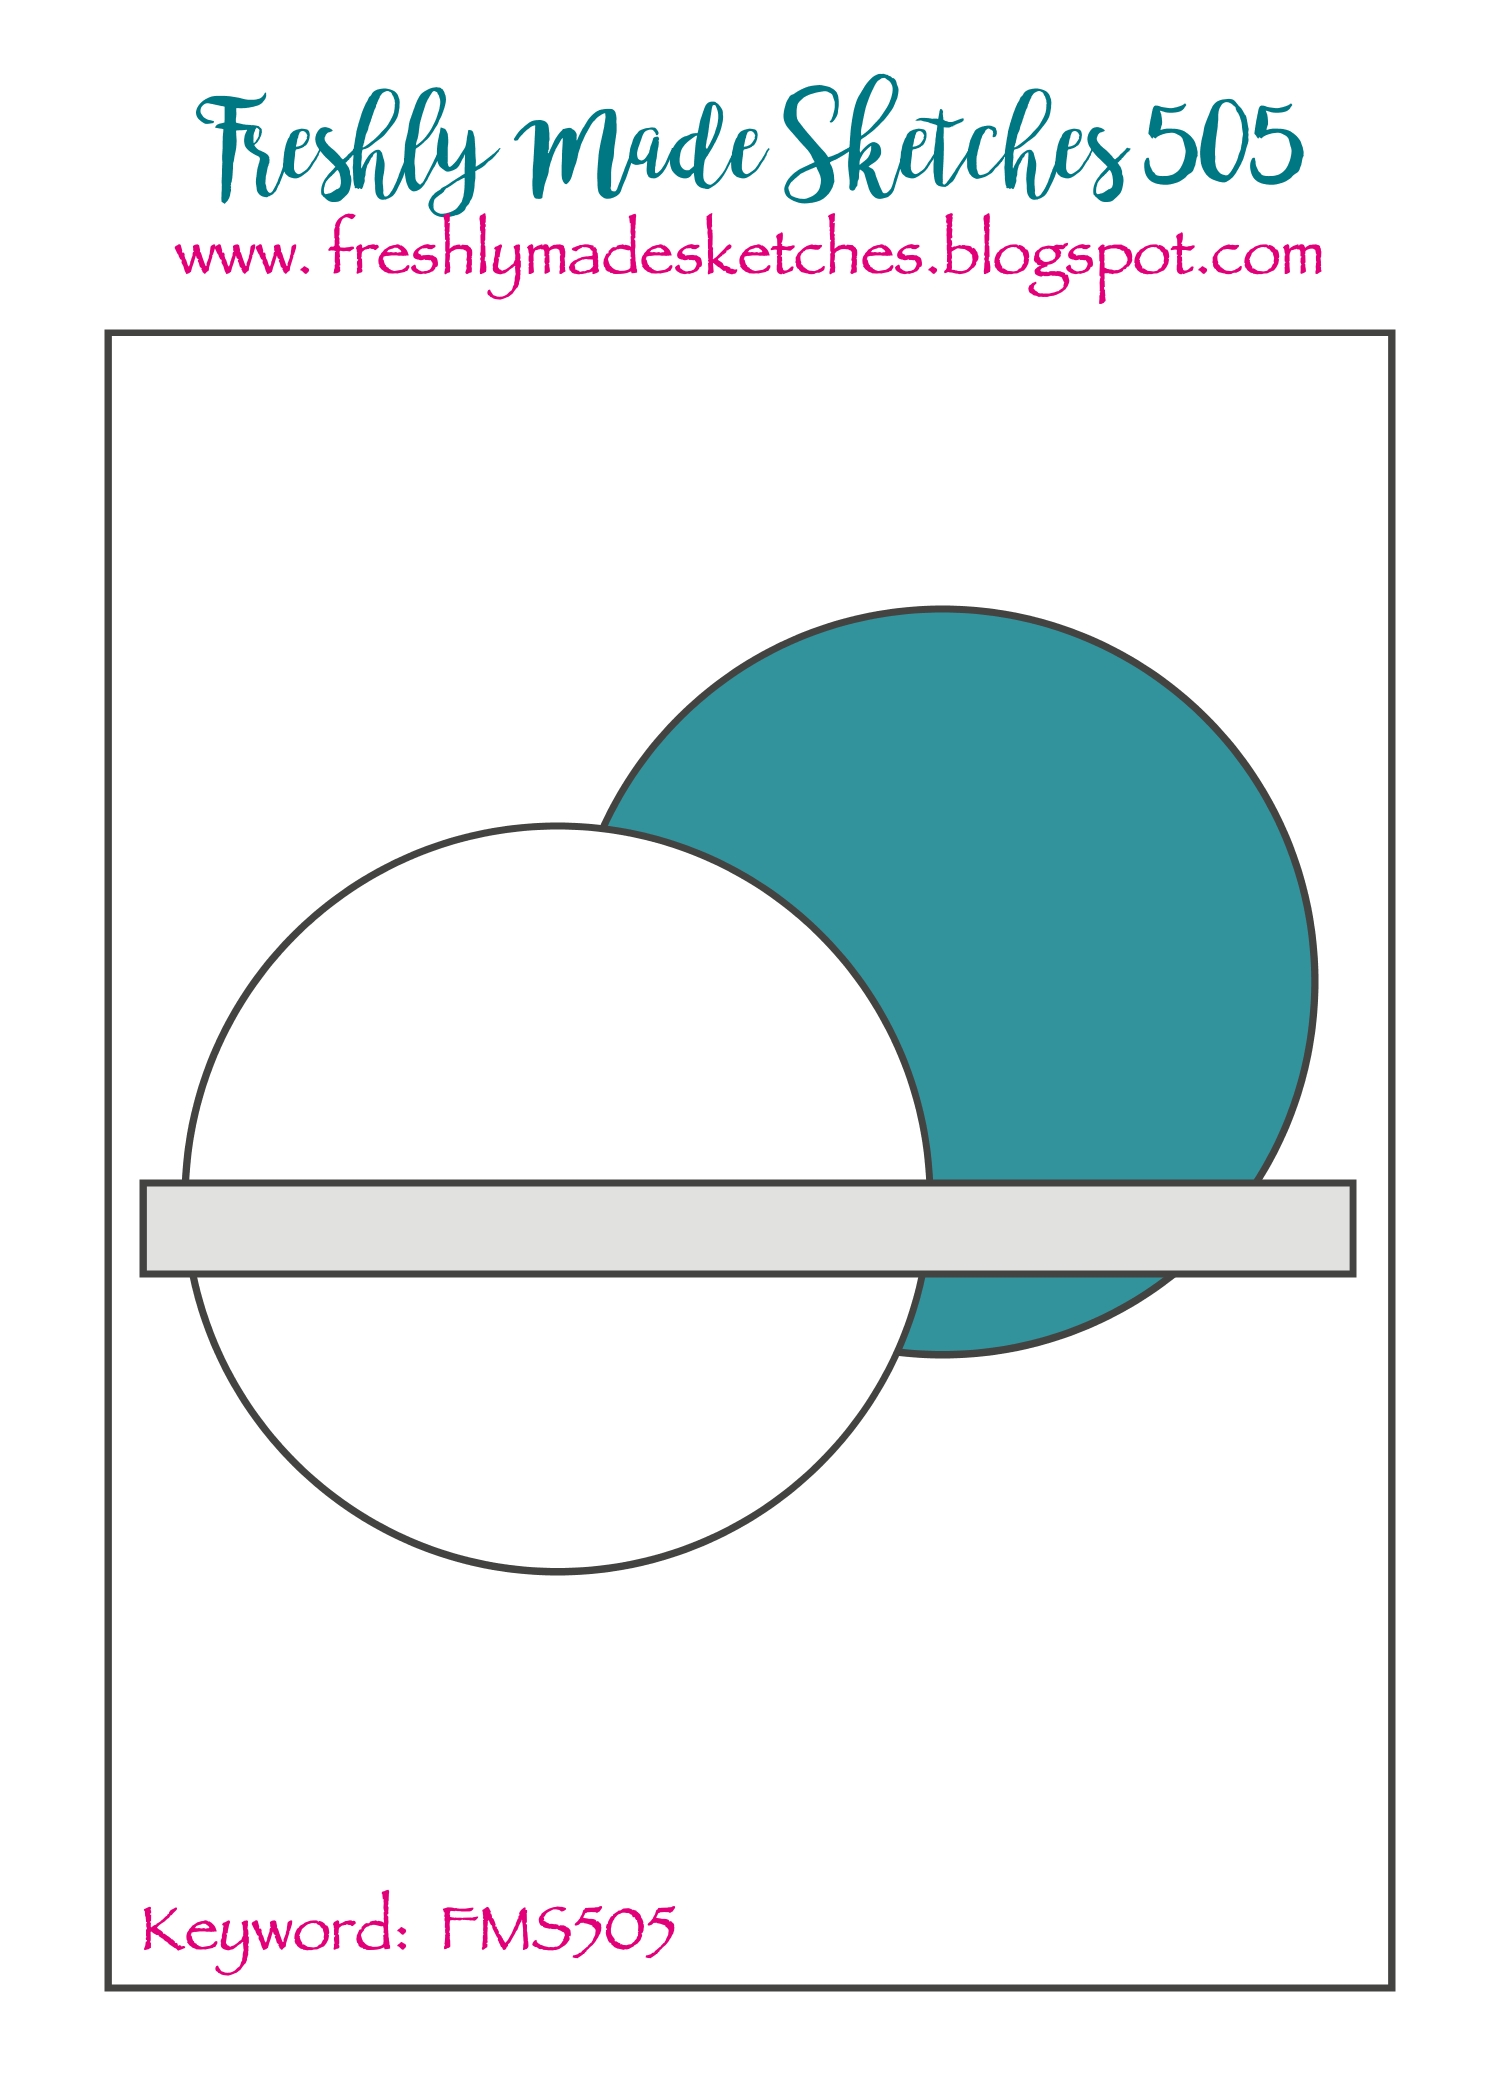
Happy middle of the week! Time for a new Freshly Made Sketches challenge and we have a fun one designed by the lovely Amy O’Neill. I think you will like the sketch too.
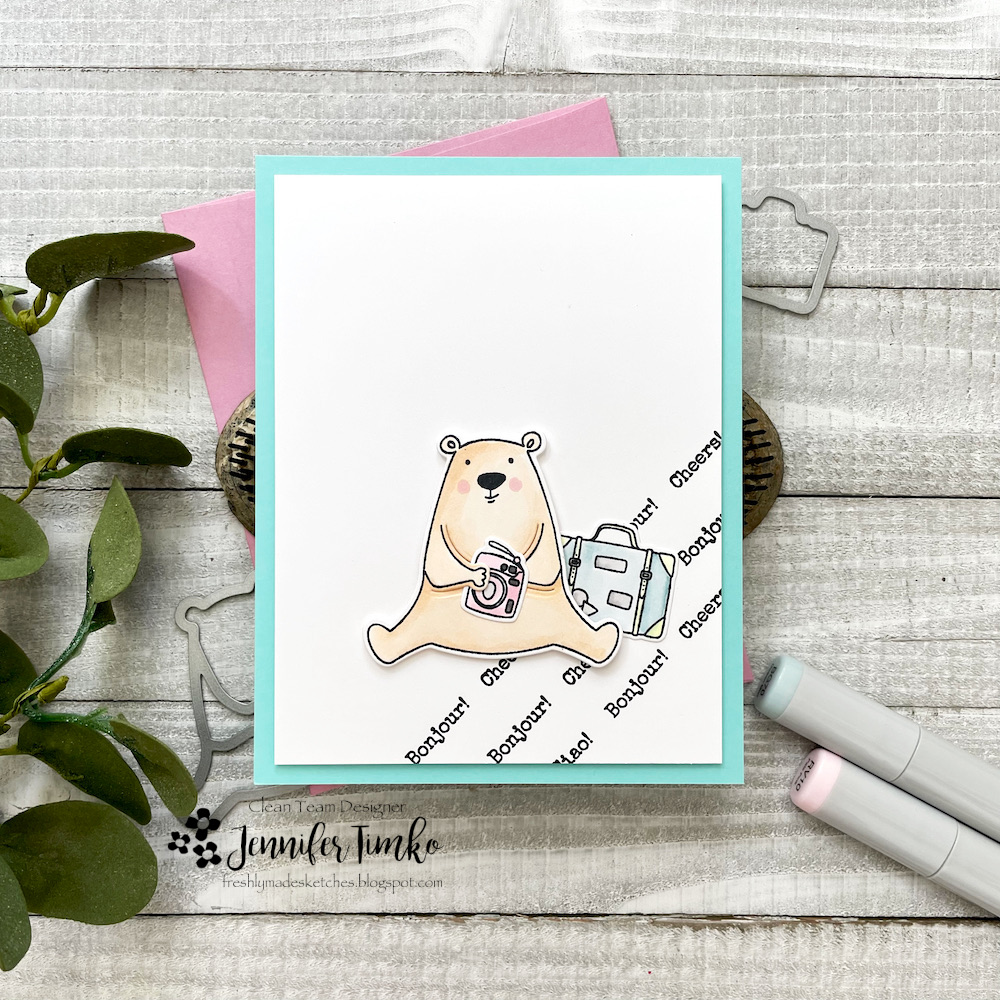
As soon as I saw the sketch, I knew I wanted to use the new Bear Ware Grand Tour stamp set by Ellen Hutson. This set is just so cute!! I lined up the sentiments on a block and just stamped them on the angle. A fun way to use little sentiments, don’t you think? Then I did some quick Copic coloring on the bear and a few of the elements.
After some debate, I cut the panel down a little and put it on a colored base to help it pop a bit. I think it was the right choice. And that’s it. Easy and fun!
Glad you stopped by today. Hope the rest of your week is good and I’ll see you Friday.
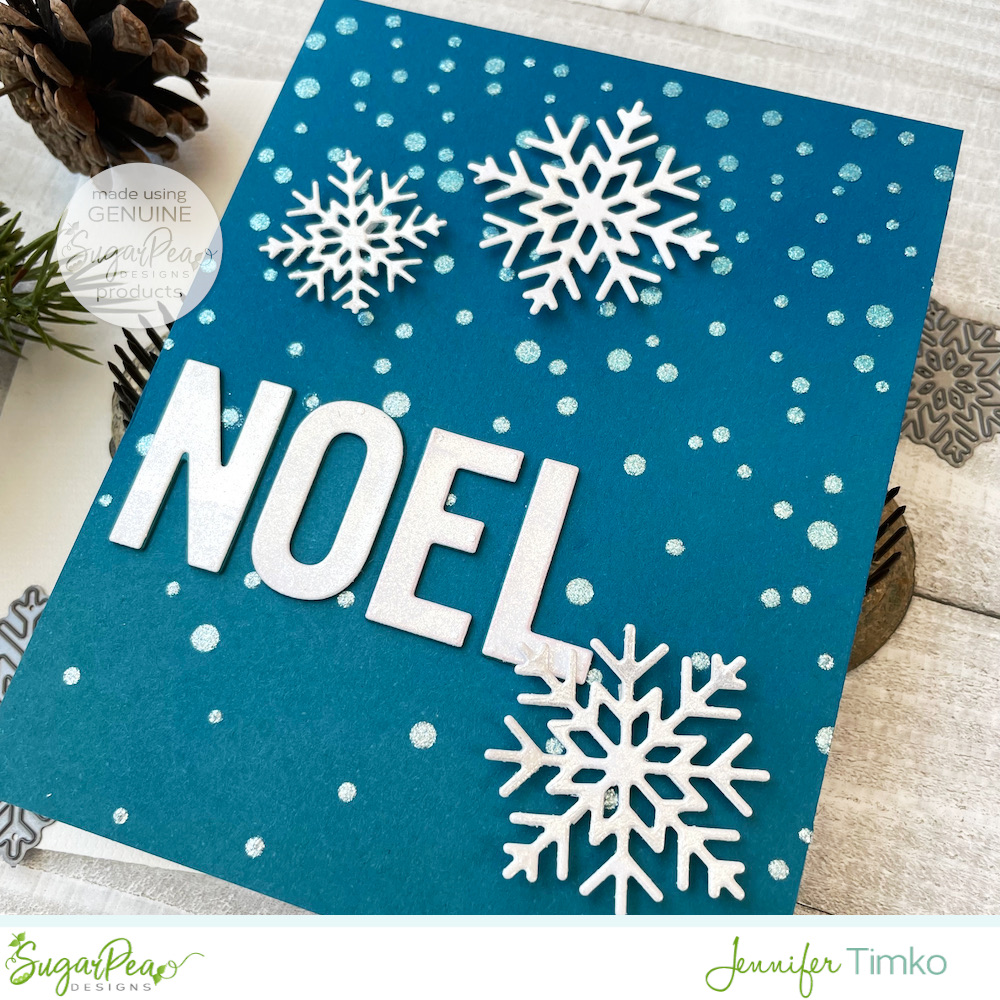
I’m over at the SugarPea Designs company blog today with some monthly inspiration. Over the next few weeks, you will see that I’m in full holiday mode and this card shows that.
I thought it would be fun to create my own sentiment with a block alphabet die set and just add details. To get started, I took some blue card stock and then inked on a little bit of Distress Ink for a little more shading. Then, using the Falling Snow Stencil, I added some Picket Fence Paper Glitz. Suffice it to say that none of my pictures come close to showing you the shimmer and shine. While I had the Paper Glitz out, I also applied some to a plain piece of white card stock. Just a thin layer!
Once the white panel was dry, I simply cut the word Noel using the Block Alphabet SugarCut dies and the snowflakes from the Snowflake Tag SugarCut dies. More shimmer and shine! For the letters, I cut two more of the blue card stock so I could give it a bit more dimension. A bit of foam tape under the snowflakes too. And that’s it. Easy to do in an assembly line too if you like making more than one of a design.
Thanks for stopping in. Glad to see you today. Hope your day is great!
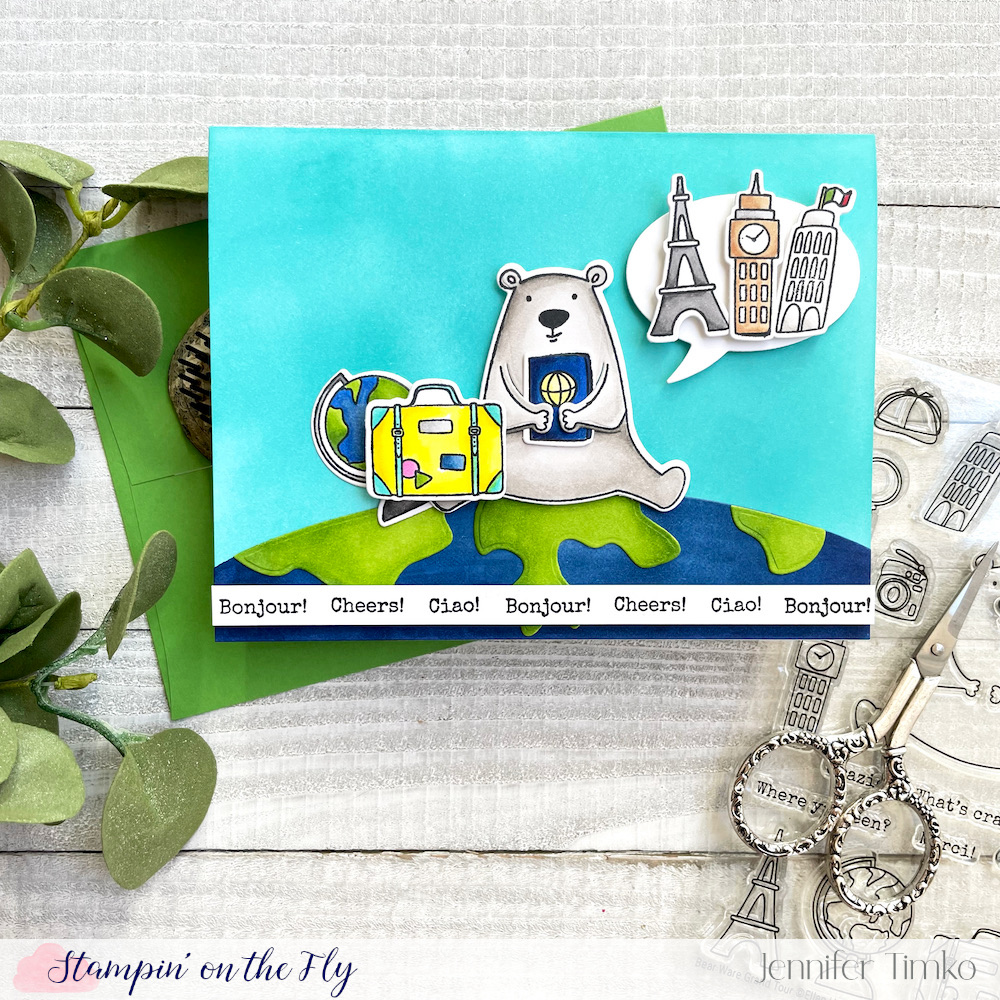
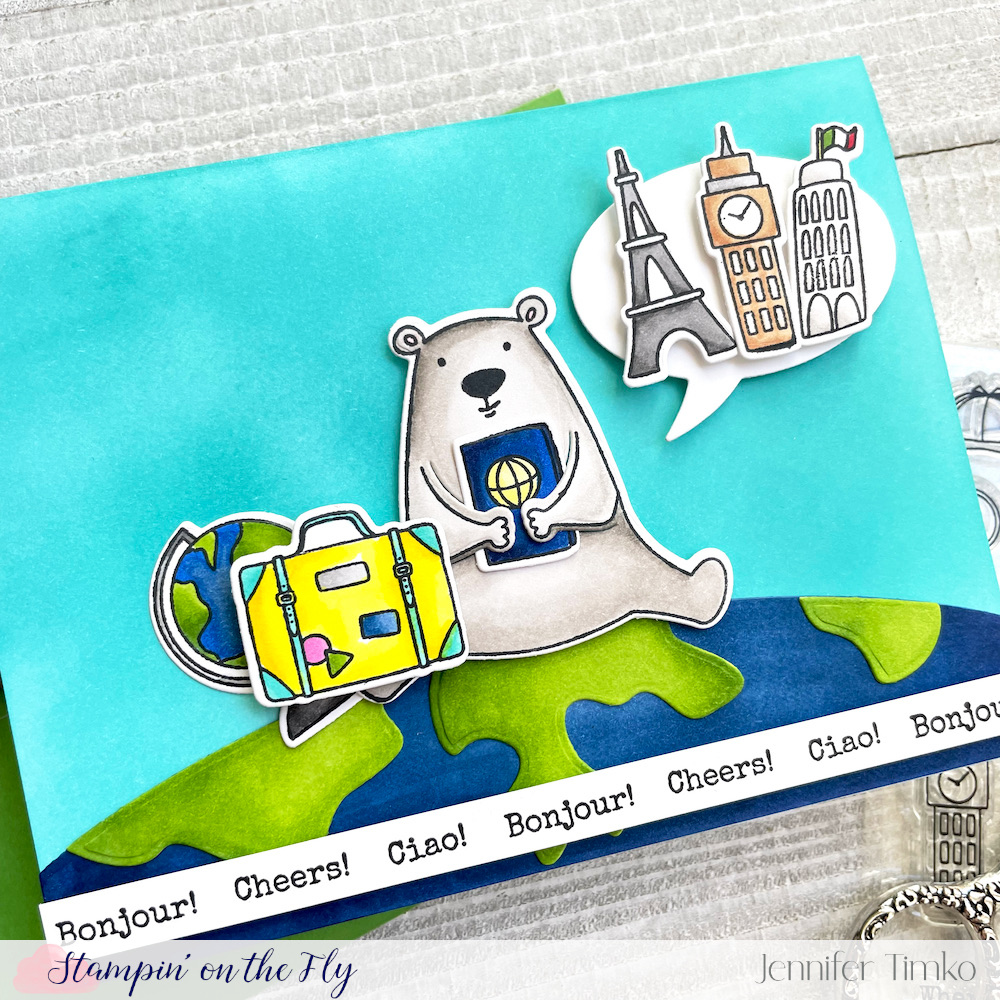
Happy World Card Making Day! Really. It is a thing. And it makes me super happy! I was lucky enough to be invited to help share some of the new Essentials by Ellen product line by Ellen Hutson and they are really fun. You’ll see that they were practically made for me!
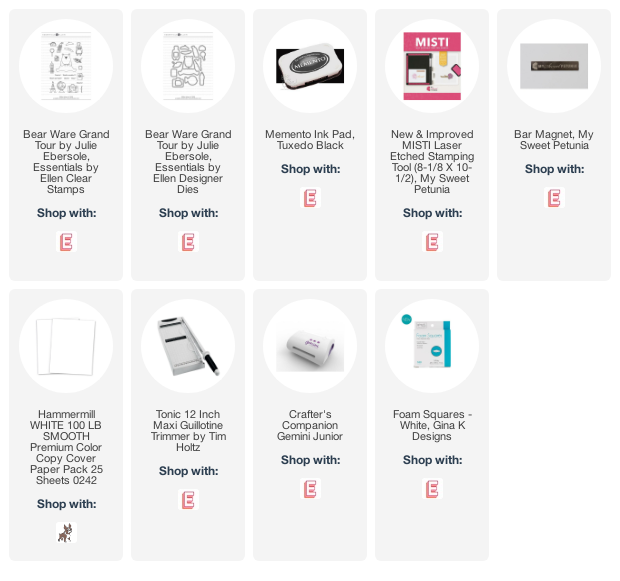
As soon as I saw these products I knew exactly what card I was going to make. I wanted our little friend to be all ready to go on the adventures they have missed out on over the last year or two. Passport – check. Bag packed – check. Globe to spin for deciding – check. Ready to go! This adorable set is called the Bear Ware Grand Tour and comes with coordinating dies. I joined it with the new Planet Surface dies.
The bear is super cute, of course, but it is all the extra elements that really make the set. You can see the iconic buildings and there are fun details that go with each along with sentiments. I chose a few and used them like a banner.
Try not to fall over but I actually created a video to go with this card. I know, it is has been over a year since I made one. I thought it would be more fun to show you how I made this so hop over to check it out. I kept the video short and I’d love your feedback on it.
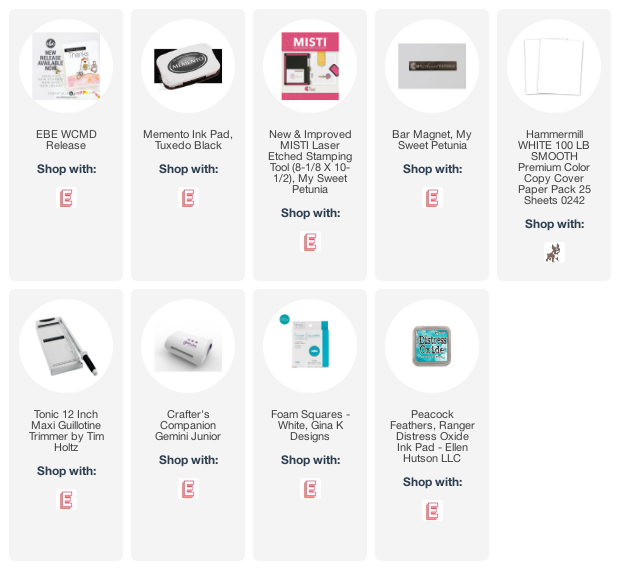
I hope you enjoy this release and have some time to craft today. Below I have listed links to the new release (the first one should take you to the shopping page). These are affiliate links which help me but have no additional cost to you. Have a great weekend!
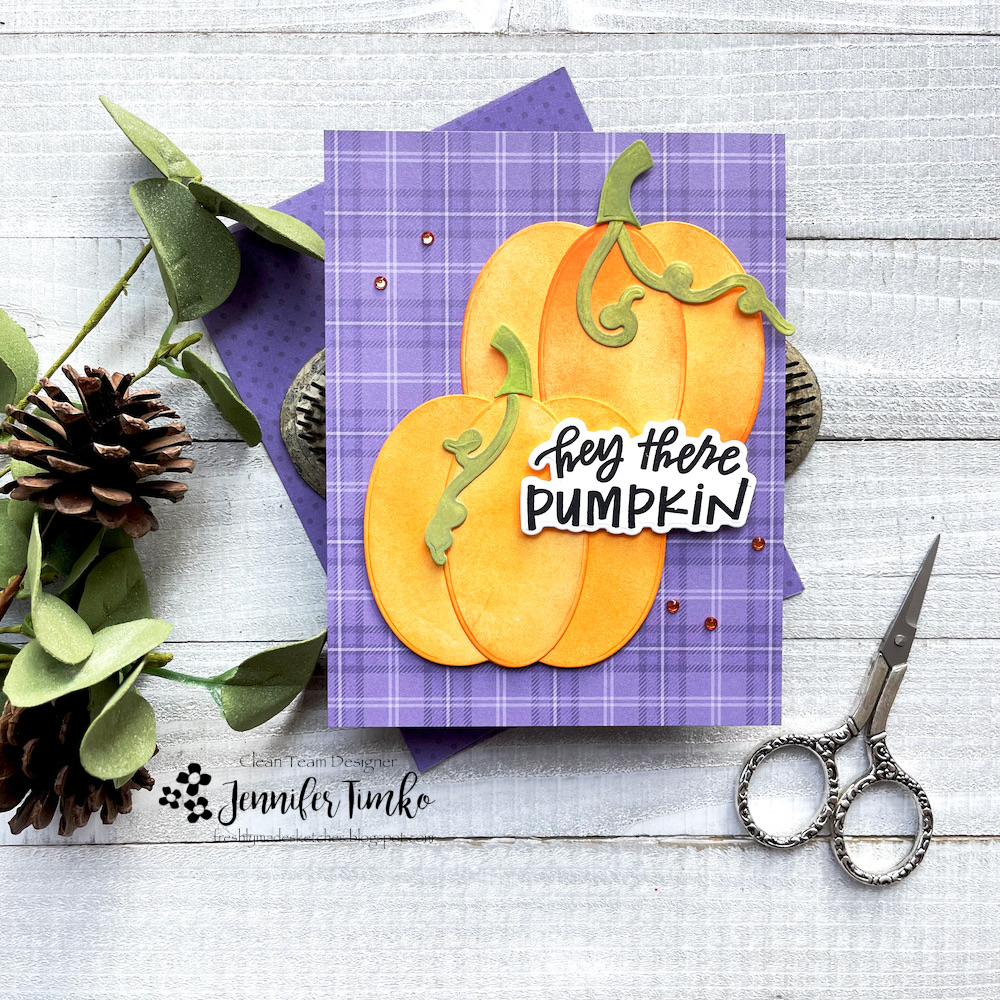
I have a fun sketch to share with you today! The always amazing Narelle has designed a great one for this week at Freshly Made Sketches.
Normally when I see big circles, I immediately think flower. And to be honest, I did here too. But then I remembered the pumpkins!! I wanted to bring these Patchwork Pumpkin dies back out to play some more. Instead of using the stamped designs (which would have been totally cute too), I just went with basic inking. I cut the elements from Hammermill card stock and then sponged on the ink. Super simple. I stamped the sentiment from the set and cut it out with its coordinating die. To add a little more interest, I chose a pattern from the Halloween Harvest Paper Pack. I love the purple plaid!! A few gems from the Halloween Harvest Gem Pack to finish.
Thanks for stopping in today! I hope you are having a great week. See you again soon!
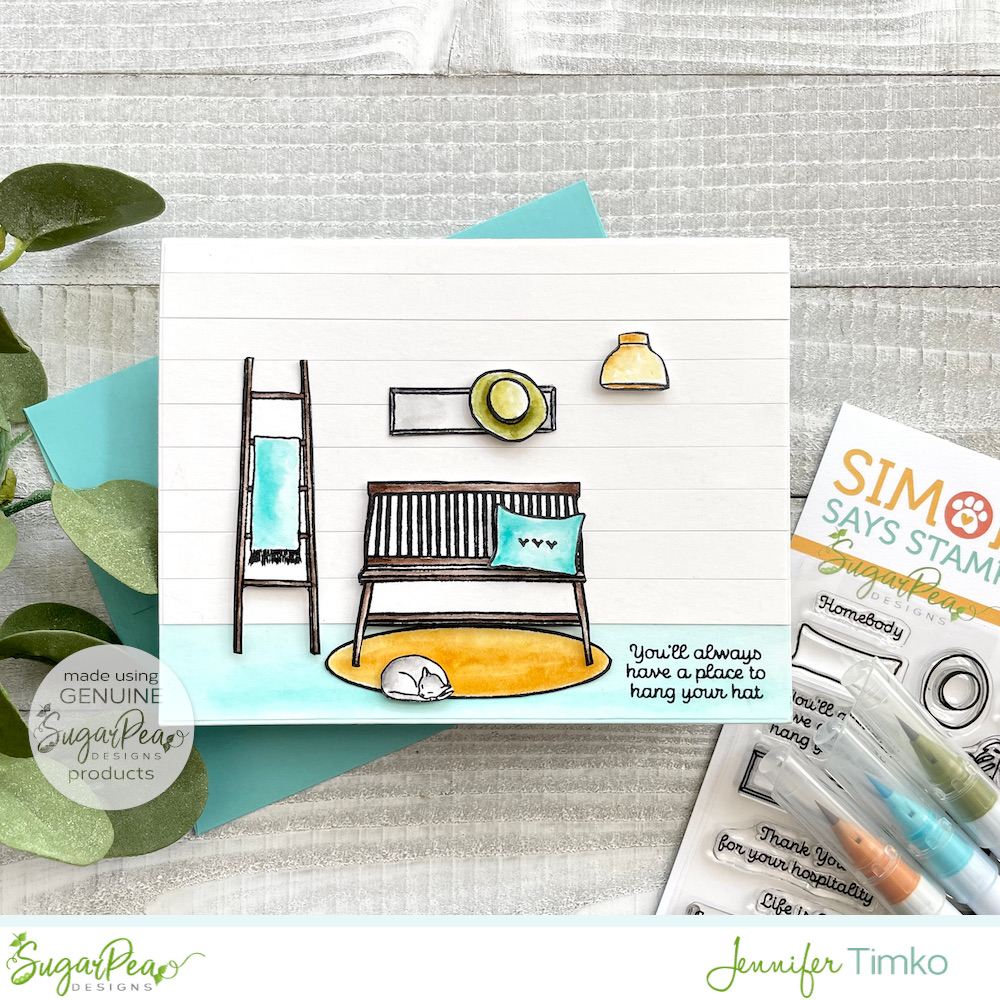
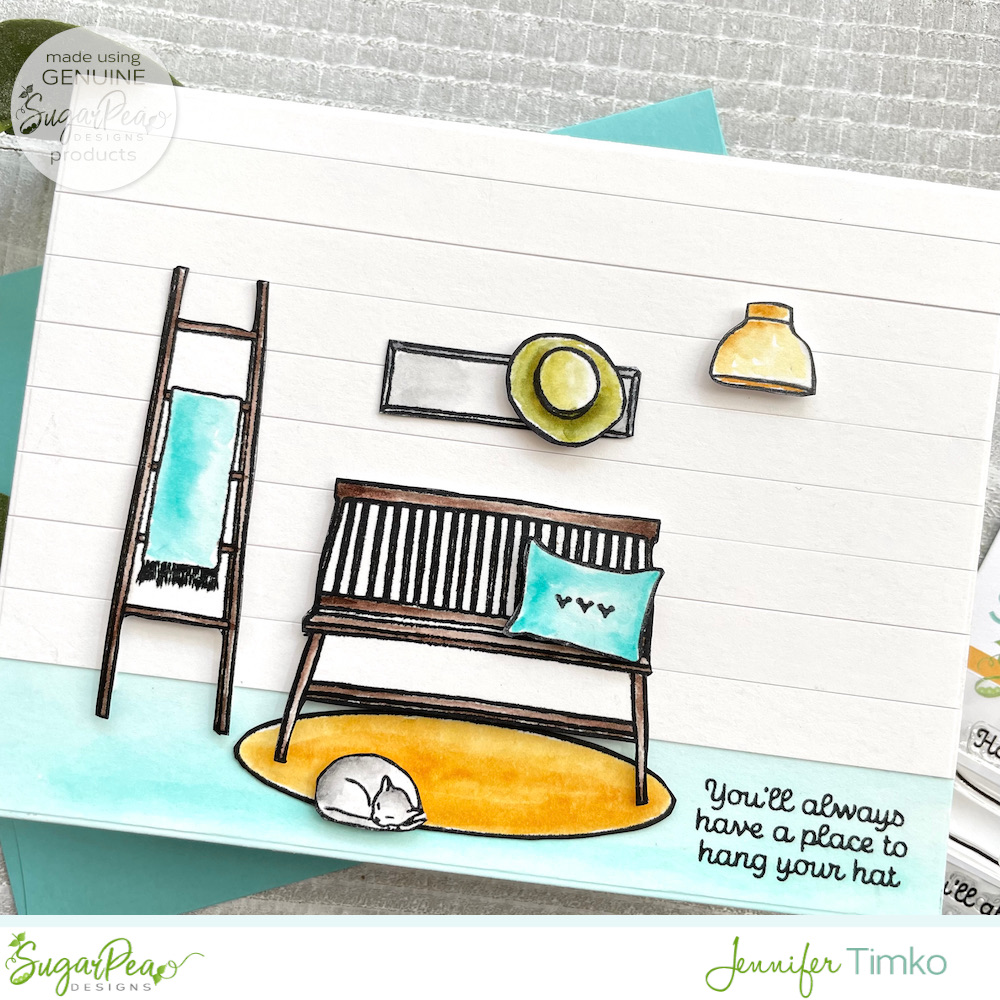
Happy Stamptember with Simon Says Stamp and SugarPea Designs! If you are not familiar with this, Simon Says Stamp has a month long celebration with collaborations and other amazing fun. Today is the collaboration with SugarPea Designs!
SugarPea Designs has designed the Everyday Home Stamp Set with coordinating dies for this exclusive release. And when I say exclusive, I’m not kidding. This will fly out the door and once it is gone, it is gone. Shop early and shop fast!
This pretty set is just wonderful for making sweet scenes. I designed an entry, complete with shiplap, that would make anyone feel welcome. I stamped the images using Versafine Clair on Bristol Smooth paper and then colored with Zig Markers. I did not have the dies (but there are coordinating dies!) so I fussy cut the elements.
To add a bit more fun to the scene, I also included some images from a sister set called Let’s Stay Home. Knowing that these Stamptember sets go quickly, I wanted you to know about a similar one that is readily available. For the shiplap, I just cut the card stock into strips and glued it down to my base where I had already colored the floor section. Easy to do and it adds such fun detail.
Ok, that is it for today! Thanks so much for stopping in. I have my affiliate links below (at no cost to you) and I would love it if you considered shopping with me. Have a wonderful Saturday!
Primary Sidebar
We use cookies on our website to give you the most relevant experience by remembering your preferences and repeat visits. By clicking “Accept”, you consent to the use of ALL the cookies.
This website uses cookies to improve your experience while you navigate through the website. Out of these, the cookies that are categorized as necessary are stored on your browser as they are essential for the working of basic functionalities of the website. We also use third-party cookies that help us analyze and understand how you use this website. These cookies will be stored in your browser only with your consent. You also have the option to opt-out of these cookies. But opting out of some of these cookies may affect your browsing experience.
Necessary cookies are absolutely essential for the website to function properly. This category only includes cookies that ensures basic functionalities and security features of the website. These cookies do not store any personal information.
Any cookies that may not be particularly necessary for the website to function and is used specifically to collect user personal data via analytics, ads, other embedded contents are termed as non-necessary cookies. It is mandatory to procure user consent prior to running these cookies on your website.