Today I’m continuing with my last card for the Product Review of the Misti at Splitcoaststampers. I wanted to demonstrate how this stamp positioner is different than any other tool out there. Take look!
Most of the how-to details are in the video so I’ll let you watch how I made it there. I did make a mistake in the name of the stamp set in the video (because I actually had the mentioned stamp on my table too). It is Festive Flurry, also retired.
Want to learn more about the new configuration for the Misti? Hop right over to the Product Focus page and you can see all the reviews and projects from the whole Product Review Team!
I hope that you have enjoyed these Misti projects! I will be back next week with some new projects I’ve been working on. Until then, thanks so much for stopping in!
Click HERE to purchase wonderful Stampin’ Up products!
I am so excited to share with you today. I got to stamp with some friends over the weekend and it was so much fun. I even had a new stamper join in. Four cards, Jen style, and she totally kept up with us!! This was our technique card of the class and we had more fun with it. This background is so spectacular and yet SOOO easy. Really! Trust me. Ok….I thought you might not believe me so I made a video.
I saw this cool technique last week as shown by the oh so talented Jennifer McGuire. She used a different medium and I wanted to see what happened when I tried reinkers. Wow is what happens! Beyond the background I love how the Sleigh Ride Edgelits can be used to create a pretty scene within the PL Cards & Labels Framelits. This may be one of my favorite cards so far this season. Hope you love it too!
I’ll be back tomorrow with a new card for Freshly Made Sketches. Until then, have a great day!
Click HERE to purchase wonderful Stampin’ Up products!
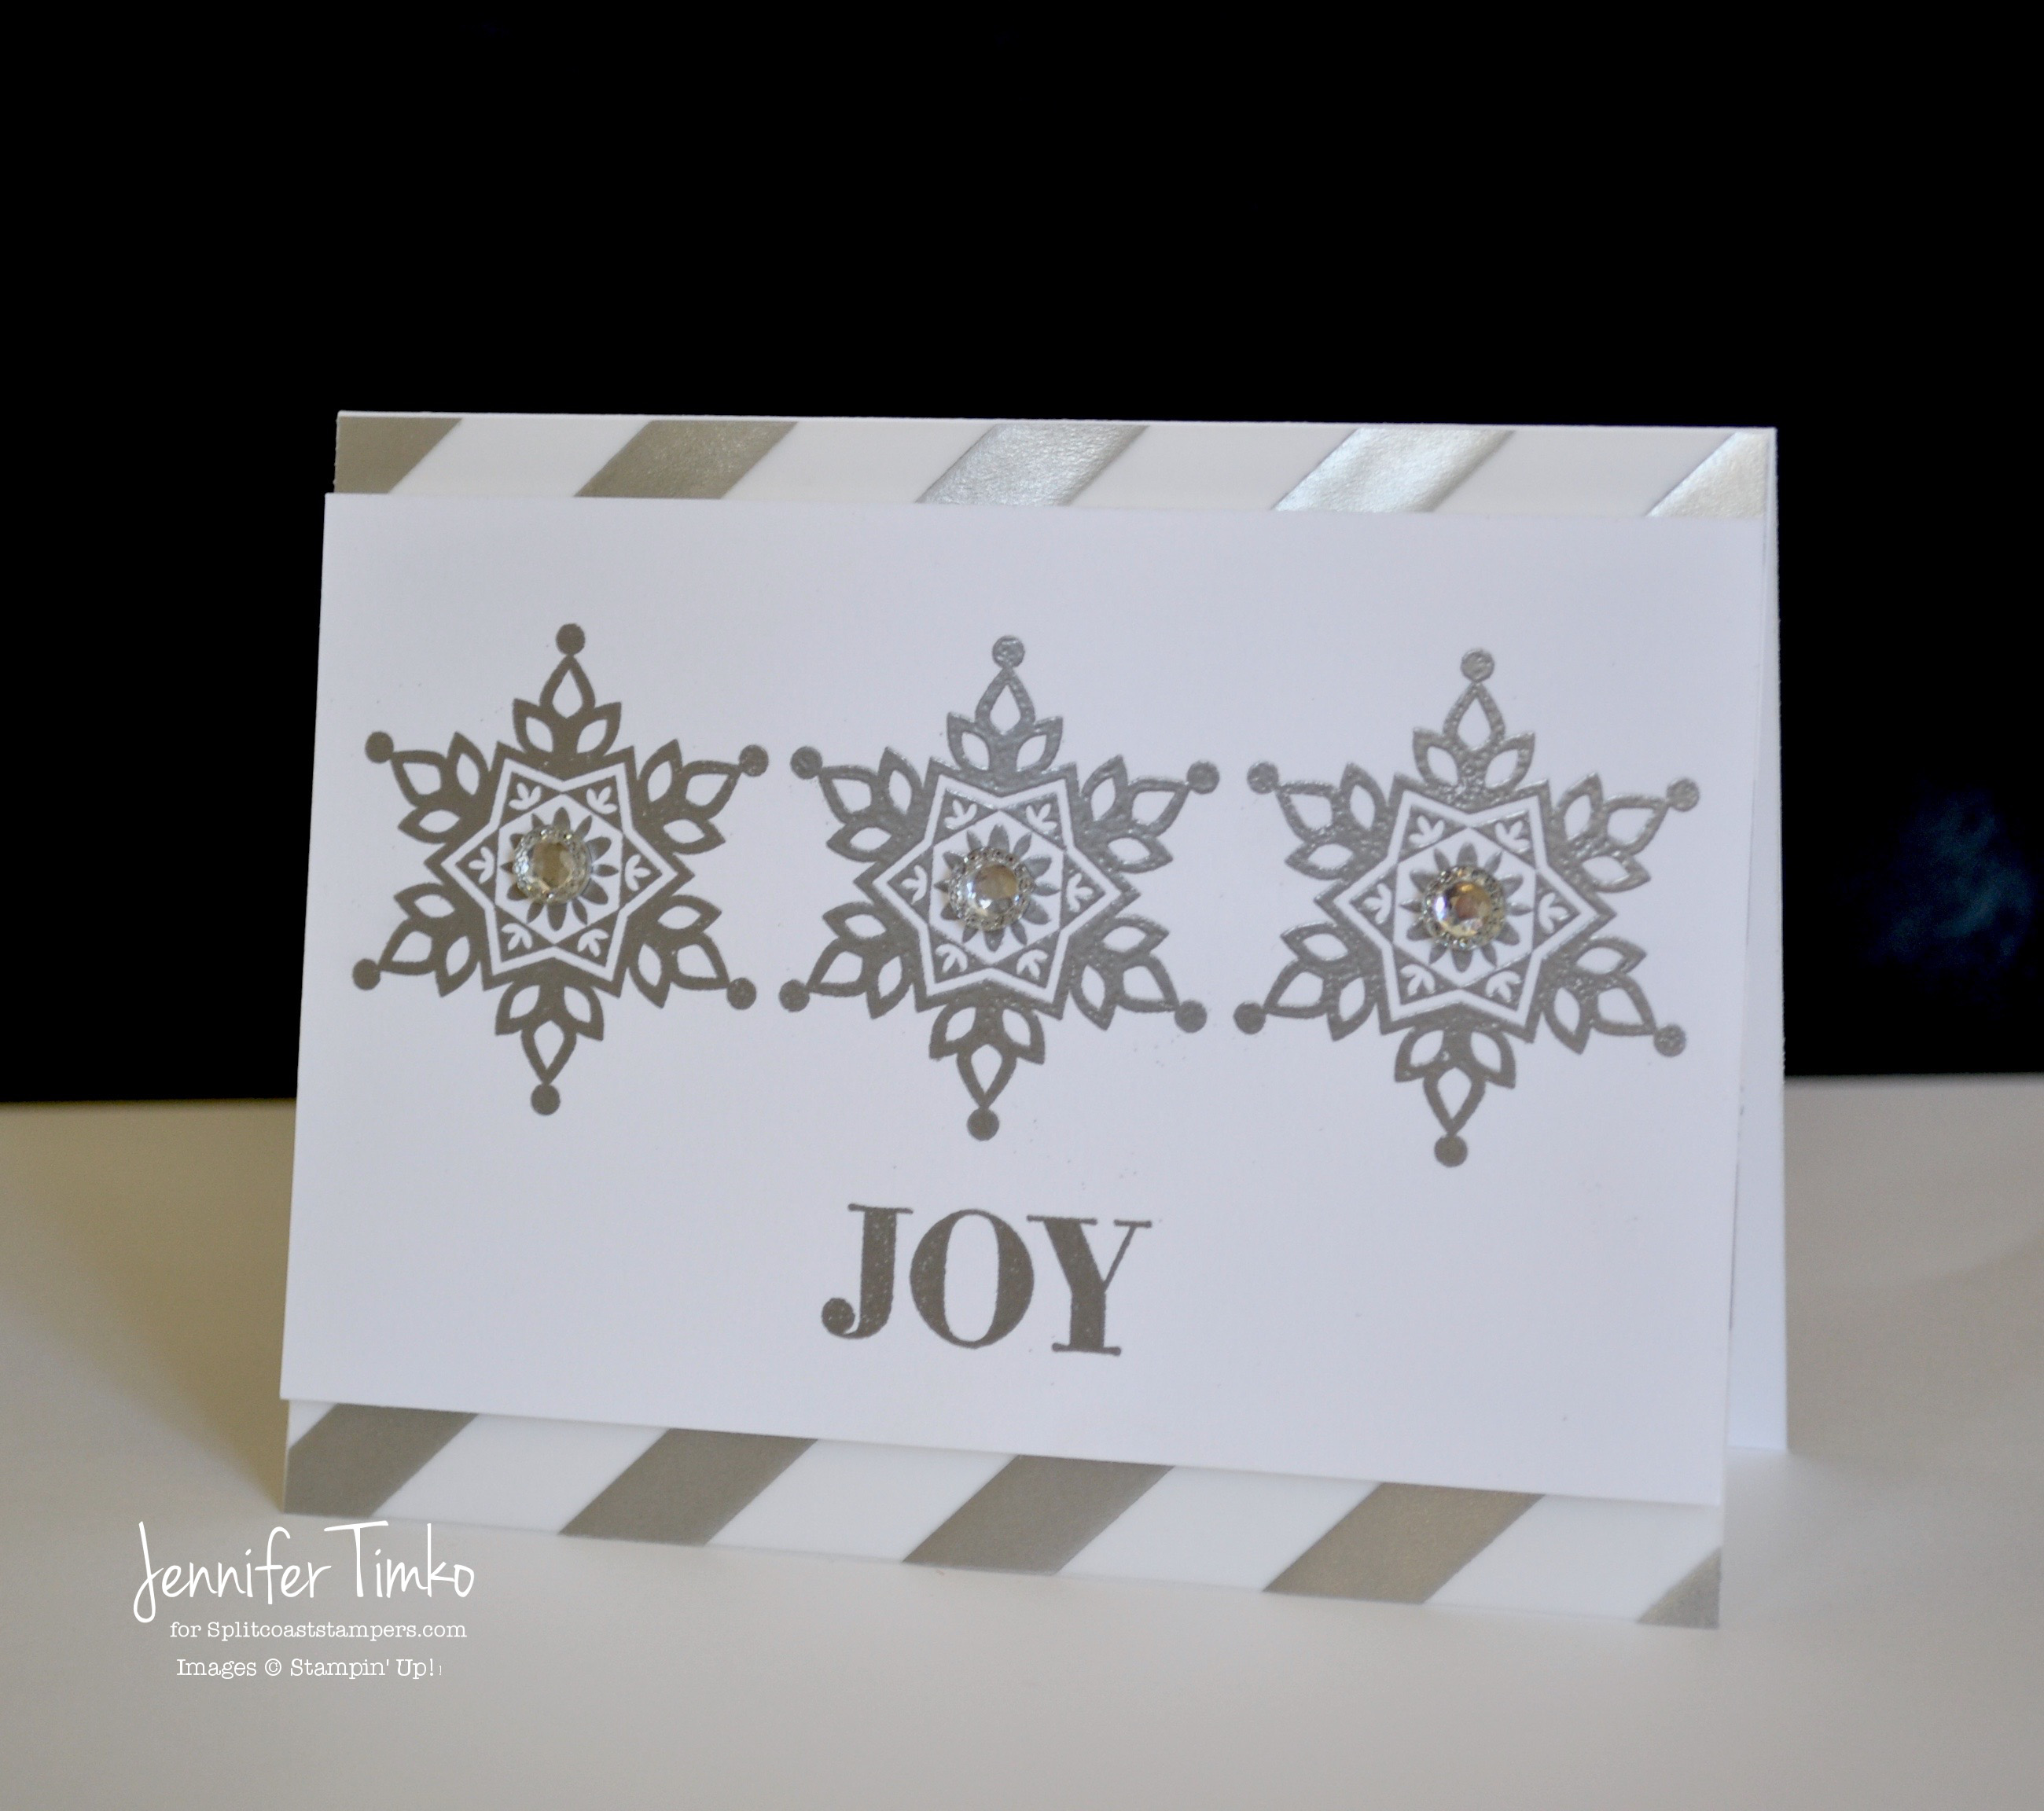
Stamp: Holly Jolly Christmas ; Ink: Night of Navy, Blackberry Bliss; Paper: Watercolor, Thick Whisper White, Dazzling Diamonds Glimmer Paper; Accessories: Big Shot, Sleigh Ride Edgelits, Project Life Card & Labels Framelits, Softly Falling Embossing Folder, Iced Rhinestones, Dimensionals
I am so excited to share with you this month’s project with for our Fancy Friday monthly hop! If you just came over from the amazing Jeanna, welcome to the next stop. My friends and I want to be able to share with you our ideas in a monthly format. We will use different themes each month – sometimes colors, sometimes a sketch, sometimes a stamp set focus. The one thing you can count on is that it will be fancy! Over our year on the 2013 Artisan Design Team, “fancy” became our word to describe the best projects, the best new clothes, even the best pedicure colors. Now we want to share with you our take on “fancy” each month. This month our theme is “Anything Goes”. With all the chaos of summer, we decided just to see what happened on the crafting tables!
I thought it would be fun to play with watercoloring this week. Backgrounds seem to be all the rage and using stencils is a perfect way to create really cool versions. I made two versions of this card just to show how you can personalize this concept. Using watercolor paper, I started by laying down a little bit of clean water. Then I dipped a paint brush in ink (Cucumber Crush and Blackberry Bliss were my colors here). I added it randomly creating light and dark spots. Once I was happy, I laid down the diamond stencil from the new Happy Patterns Decorative Masks. When you push it down on top of the inking you did, the colors pool a bit in the shapes. I helped it along by adding additional color into selected diamonds. I held the edges of the stencil down using clear blocks (very high tech, lol) and hit the paper with the low setting of my heat tool to dry it some. When it was only damp, I added just a little more ink. Then I let it dry completely. While it was drying, I figured out the rest of the card. I took two leftover butterflies from my Watercolor Wishes Kit (they give you extras!) and inked them with Versamark and embossed them with Gold Embossing Powder. I cut the sentiment using my Greetings Thinlits Dies and Gold Foil. I wound up some of the new Gold Metallic Thread and laid it onto the White Vellum. A little bit of Multipurpose Adhesive on the sentiment holds the thread and the sentiment to the vellum. Finally I added some sequins from the new Metallics Sequins Assortment. The panels were attached to card bases matching the ink. This is a little time consuming but such a fun thing to try when you are feeling artsy!
I’m so glad you stopped in to visit today. I hope you have a great time seeing all the beautiful things on our hop.
The amazing Mercedes Weber is up next! Wait until you see the fancy holiday card she created!
I’m so excited to share my new edition of Stamps on the Fly! You all know how much I love working with sketches and I thought it would be fun to share that with you. I have a brand new page up telling you all the details including the links on how to get these PDF tutorials for FREE!
My first month’s sketch is one you are sure to love. It is a classic and usable in so many ways! Have embossing, stenciling, instructions on shabby bows and more for you this month! How do you get it?? Just click below for all the details!
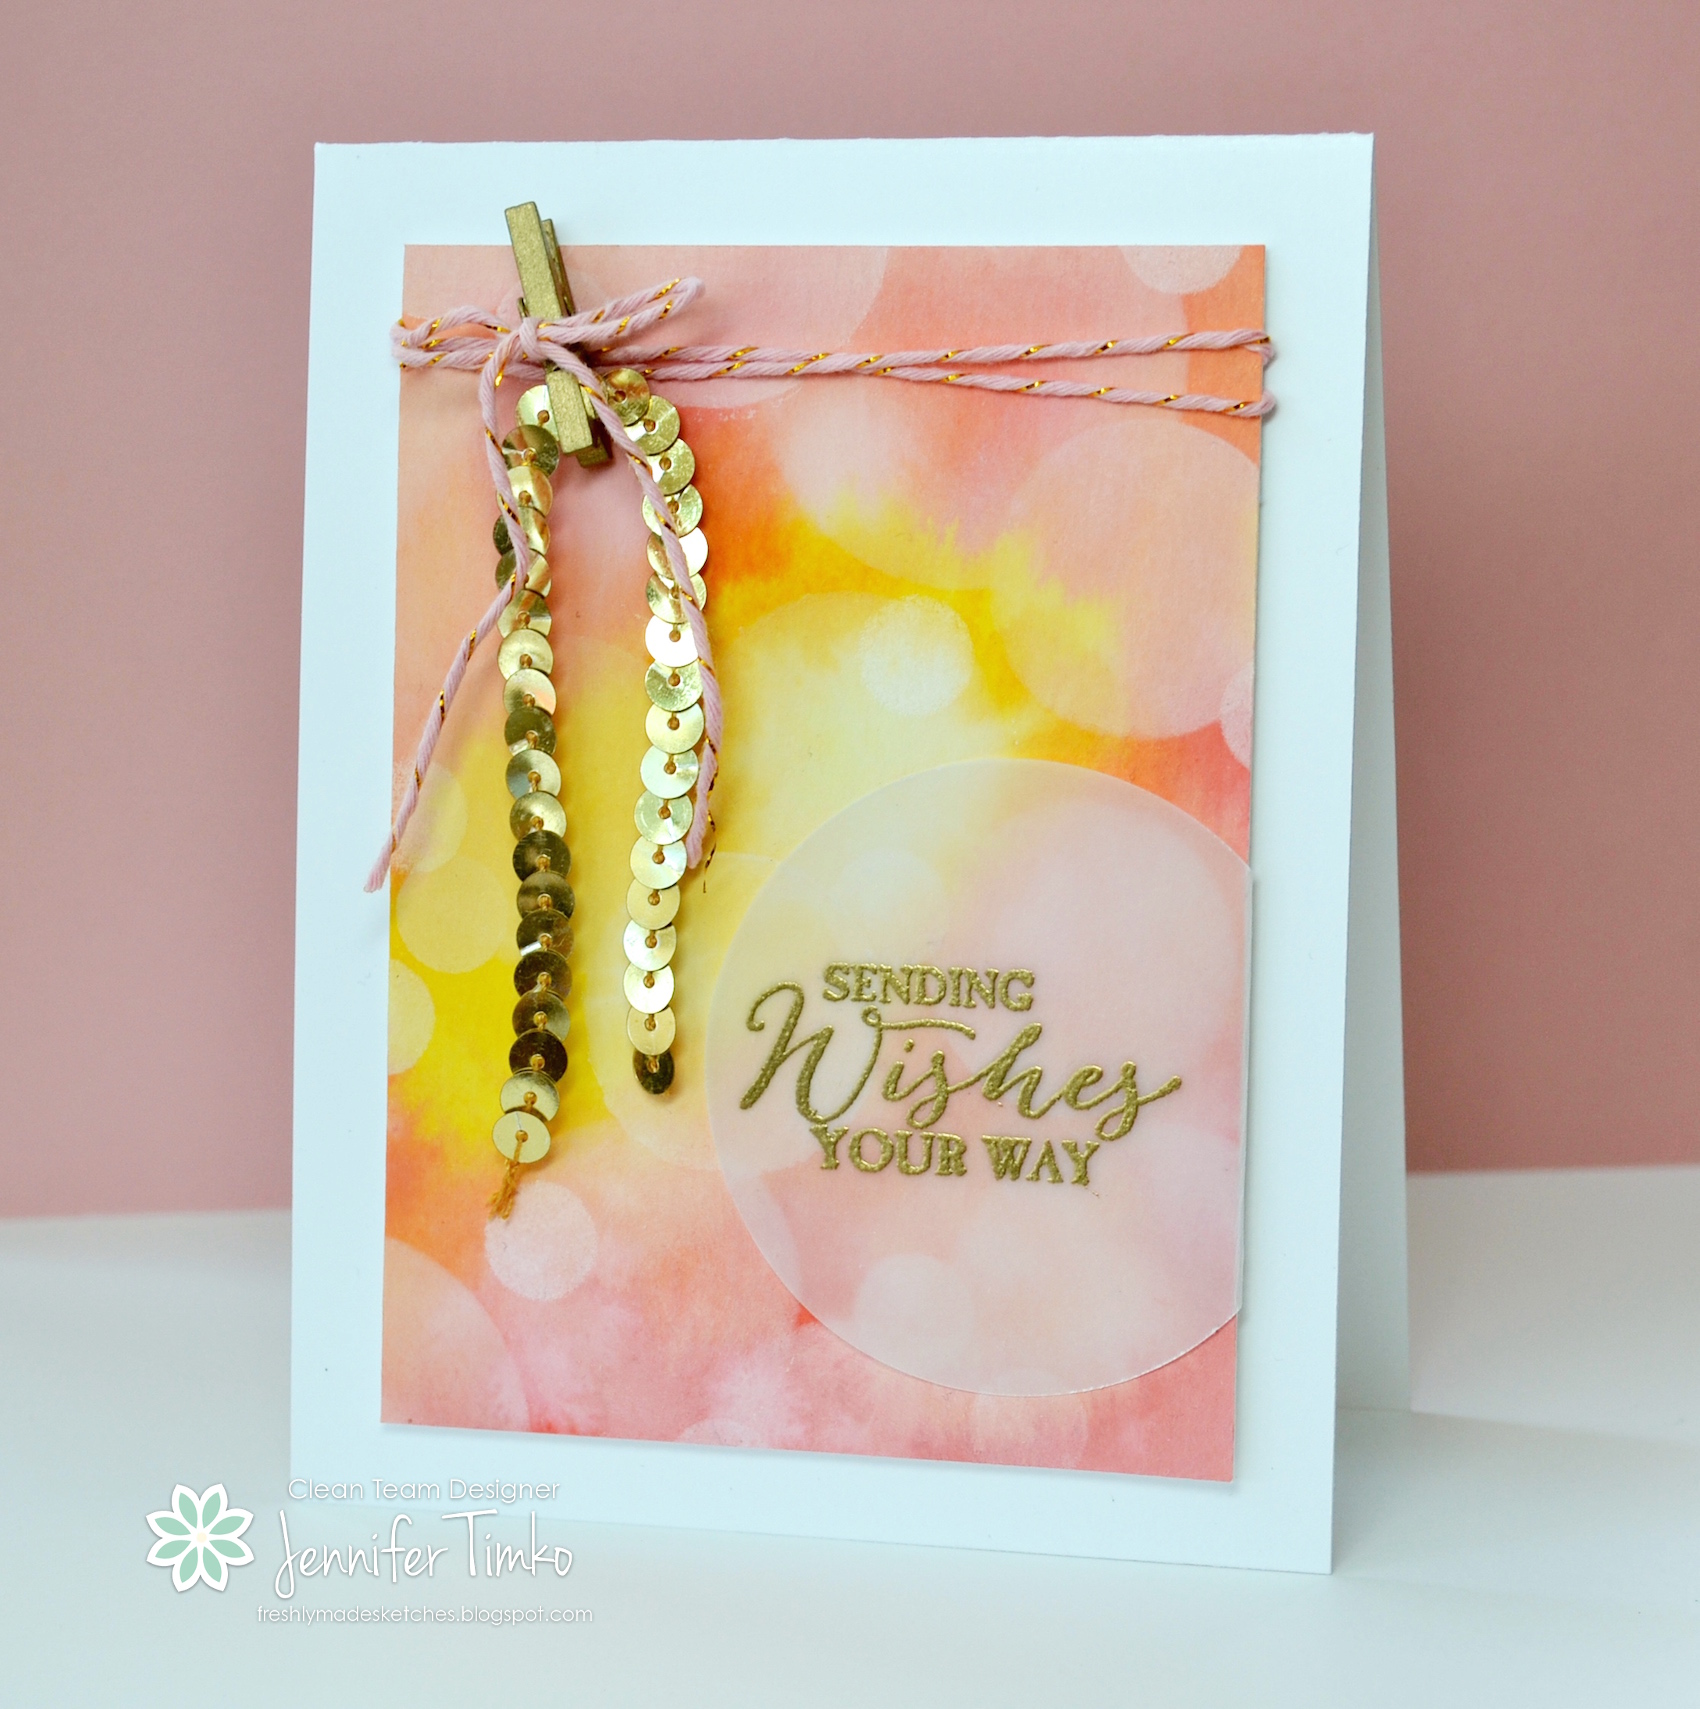
I am so happy to share today’s card with you! My friend Jen Brum has created such a fun sketch for us over at Freshly Made Sketches. In honor of Jen’s, um, aversion to circles I have created a card that is all about circles. *smile* I hope she appreciates my sense of humor on it!
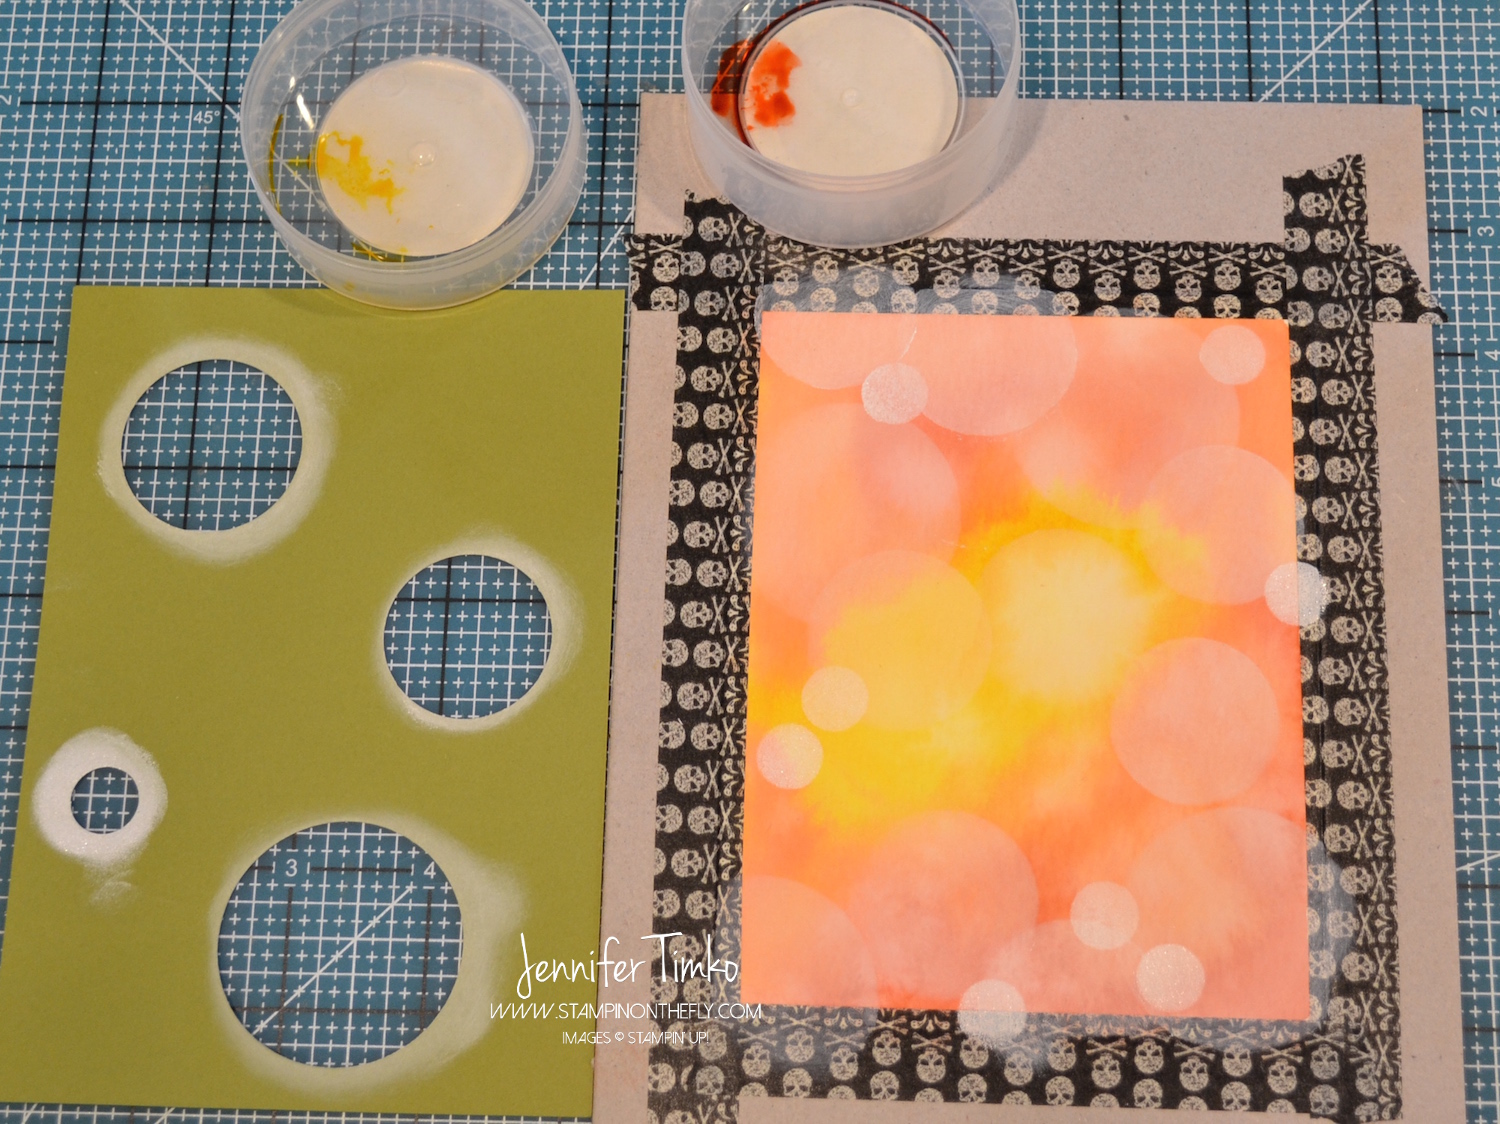
So the bokeh technique is all about circles. Or at least my version is. Bokeh is a photography technique defined as the way a lens renders points of light. The key is the blur effect. Bokeh has also been all the rage in the stamping world for a while and I finally gave it a go. I’ll tell you a bit about how I created the card and then I have photos on how I created the panel itself. I stamped this sentiment from Butterfly Basic in Gold Encore Ink onto Vellum and then heat embossed it with Gold Stampin’ Emboss Powder. Then I punched it out with my 2-1/2″ Circle Punch. I love the way the vellum mimics the look of the inked circles! I used a little bit of Tombow Multipurpose Adhesive on the vellum behind the words to attach the vellum invisibly and also tacked down the portion I folded over on the back side. I had this Blushing Bride Gold Baker’s Twine left over from this month’s Paper Pumpkin kit and it worked perfectly here, don’t you think? To go along with the gold, I added a Gold Mini Metallic Clothespin and Gold Sequin Trim.
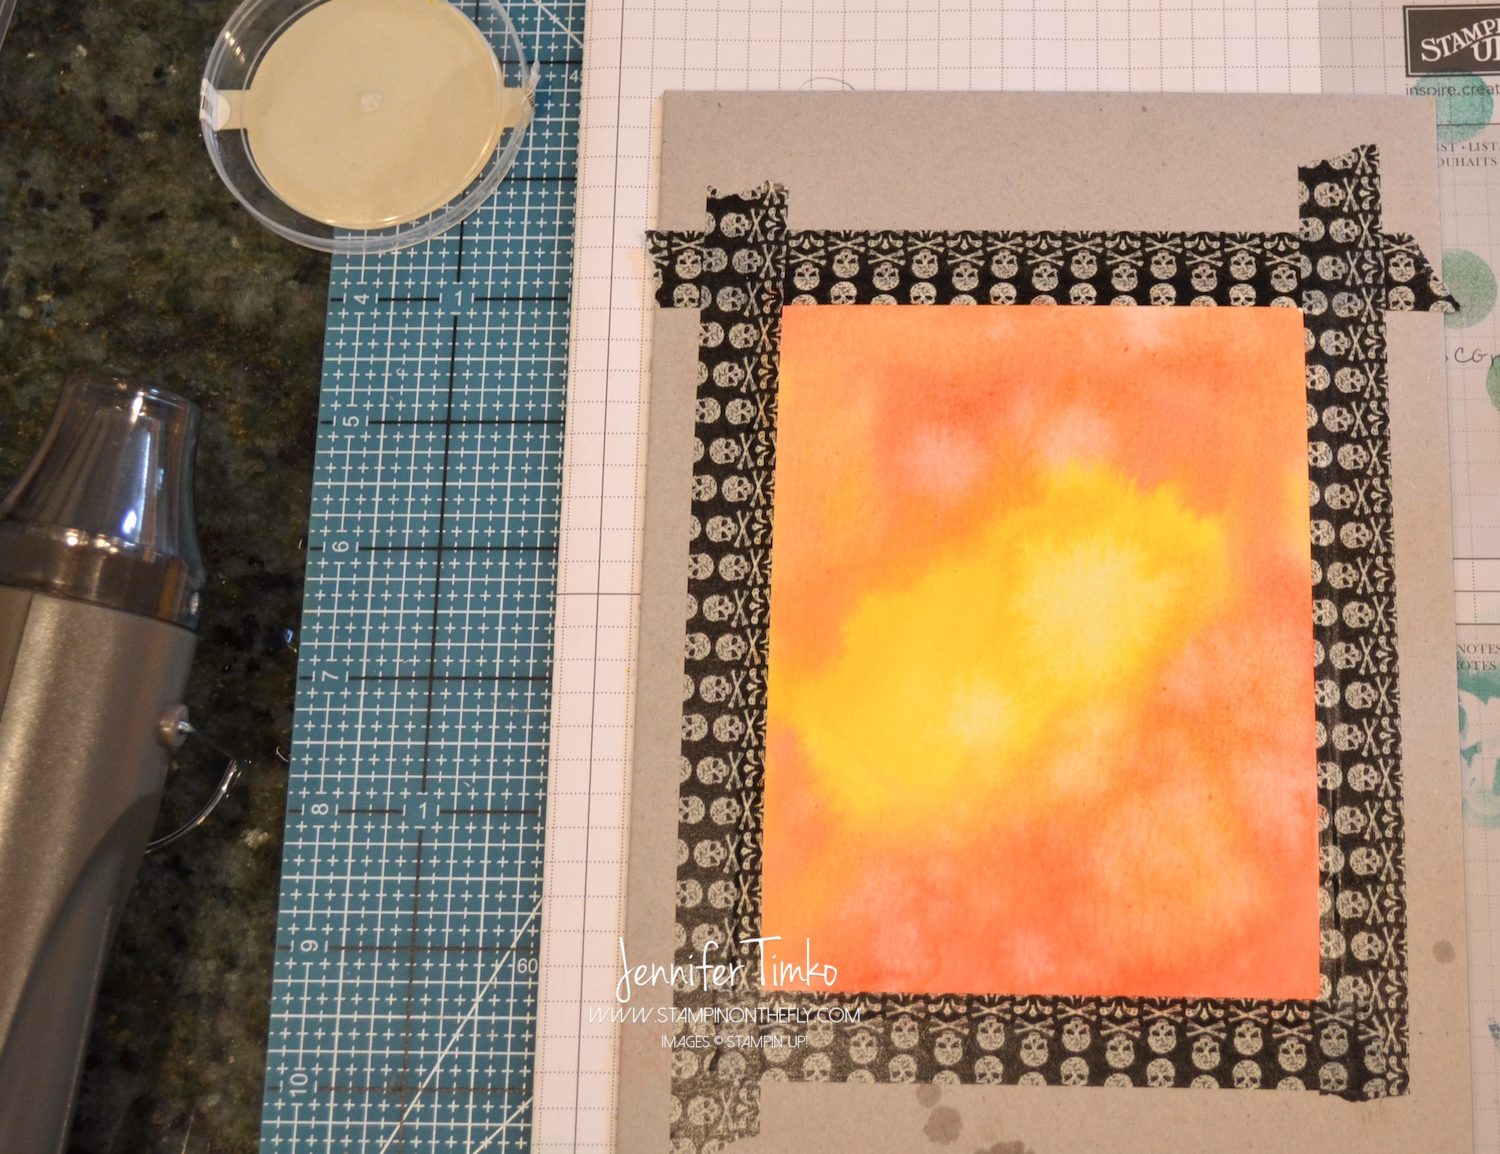
Now for the panel. You can click on the photos to expand them if needed. I took watercolor paper and taped it to a piece of chipboard (the stuff that comes in kits to protect materials) using old washi tape. Then using a paint brush I washed water over the whole panel. I put a few drops of Daffodil Delight Reinker in a container and using the same wet brush, picked up the reinker and splatted it onto the paper. Then I did the same with Calypso Coral Reinker. On the places where is seemed really dark or too watery, I pounced on the paper with a paper towel to absorb some of the extra. This leads to a mottle look and I feel like the mottling is key to success with the rest of the technique. You can let it dry naturally or use the low setting of your heat tool. You can see which one I chose (because I’m impatient).
Here you can see my reinker containers (old button boxes). Then using circle punches I made a template using card stock (punches listed in materials below). If you have circle framelits, you can use them instead. I grabbed a trusty sponge dauber and started adding on circles using White Craft Ink. Bigger circles are lighter and smaller circles are darker. You can use just the dauber for the small circles if you want but my precision with those is a bit lacking. I liked the template better. Just add circles until you have the effect you want. Let that panel dry thoroughly again, pull it up and trim to size. It really is MUCH easier than I expected!! I used this video as a basis for mine and then just used Stampin’ Up stuff instead.
Let me know if you have any questions about this! Don’t be like me and put it off. Pull out some of your favorite colors and give it a try!
The team has done their usual fantastic job with the sketch and I know you will have fun with it too. Another classic in the making! Thanks so much for stopping in today. See you soon!
Click HERE to purchase these wonderful Stampin’ Up products!
Welcome back! I hope you really enjoyed the weekend’s hop and I’m thrilled you came back to join me today. Today I am going to share with you the how-to on my Faux Stained Glass card. I’m so thrilled with this one and I hope you love it too!
To see how to color and create this one, just watch my video tutorial:
I continue stamping away for all the fun stuff this month. I have more cards created for Hope You Can Cling To plus the Dirty Dozen over at Splitcoaststampers. And I am the sketch hostess this Wednesday at Freshly Made Sketches! Stampy, stampy, busy bee!!
Tomorrow I’ll be back with the details on the other two cards I created for the hop and I hope you’ll come back to see me. Until then, thanks so much for stopping in!
Click HERE to purchase these wonderful Stampin’ Up products!
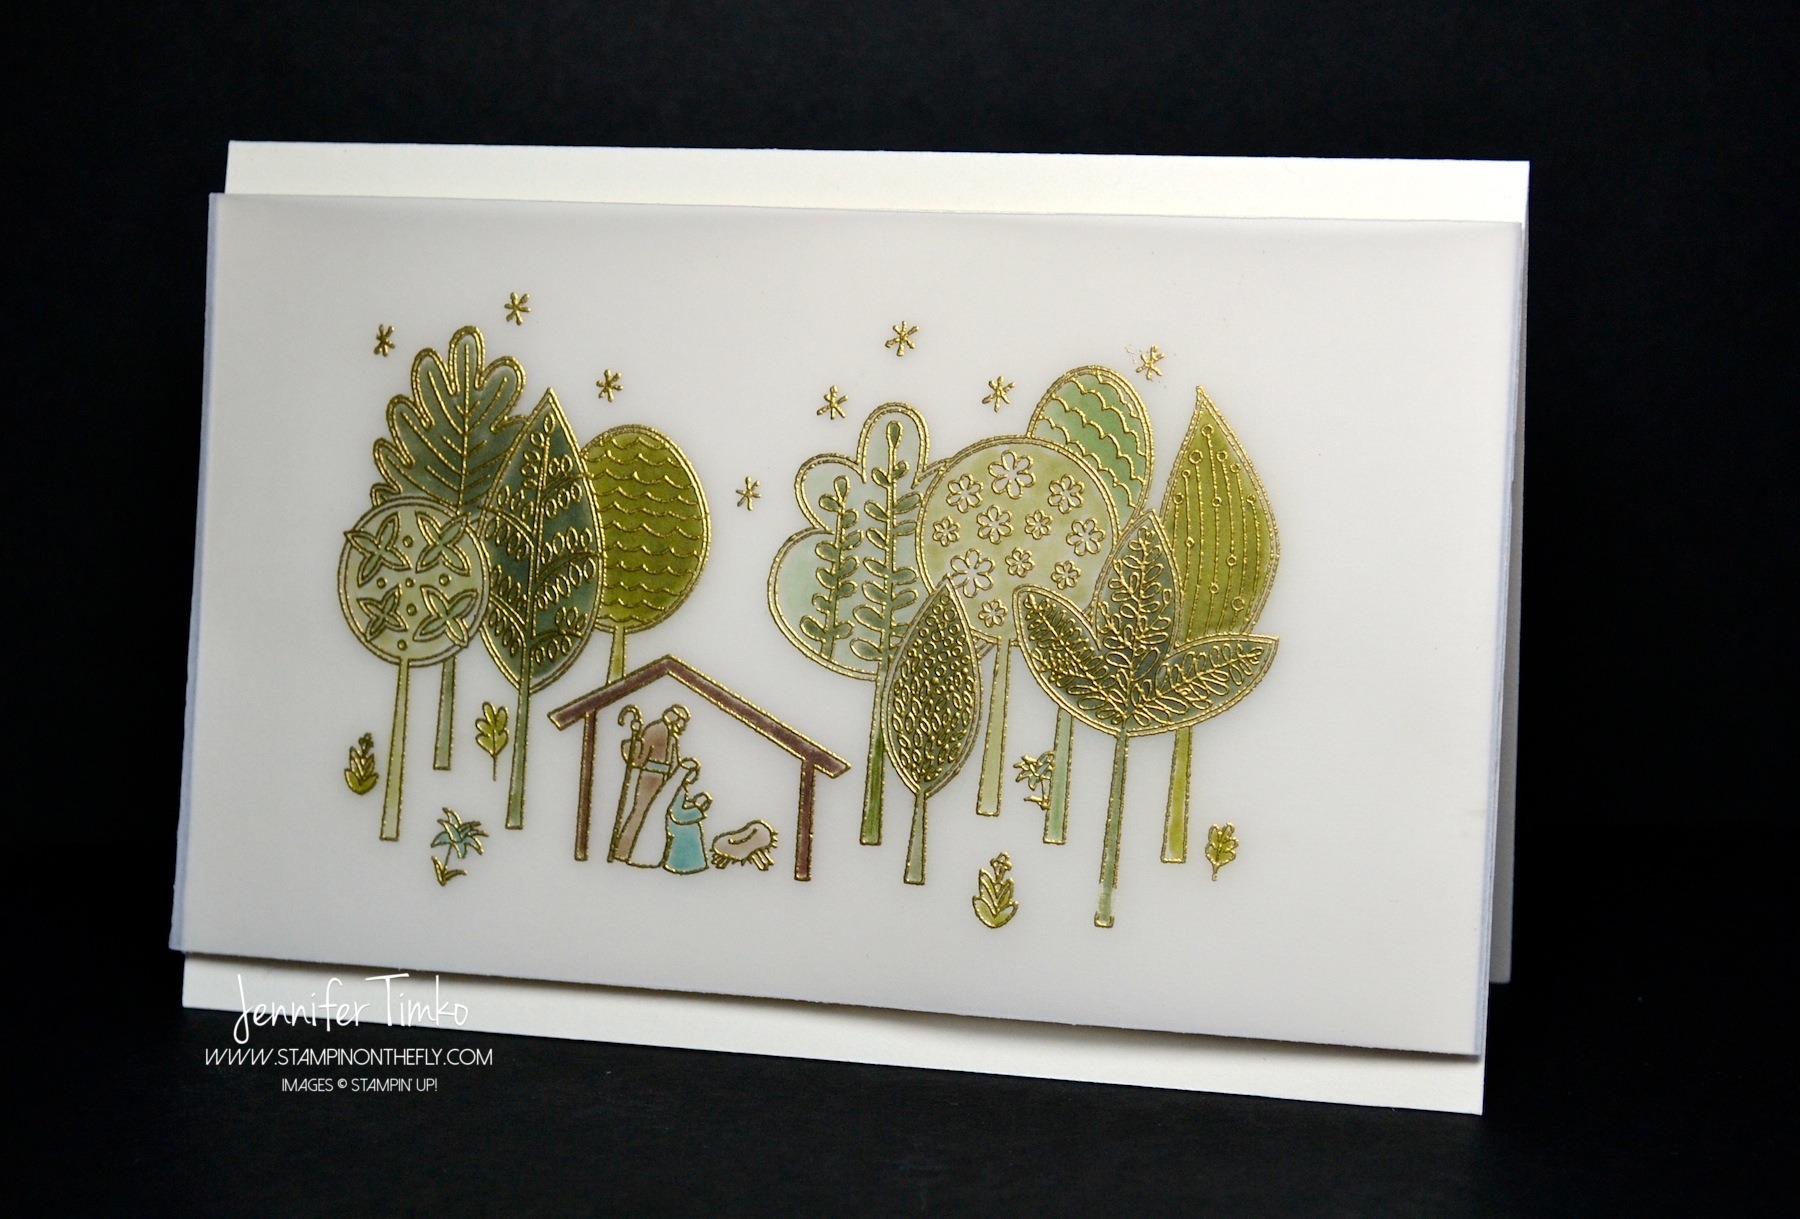
Stamp: The Newborn King; Paper: Very Vanilla, White Vellum; Ink: Gold Encore, Stampin’ Write Markers; Accessories: Gold Stampin’ Emboss Powder, Heat Tool, Dimensionals, Simply Scored Scoring Tool
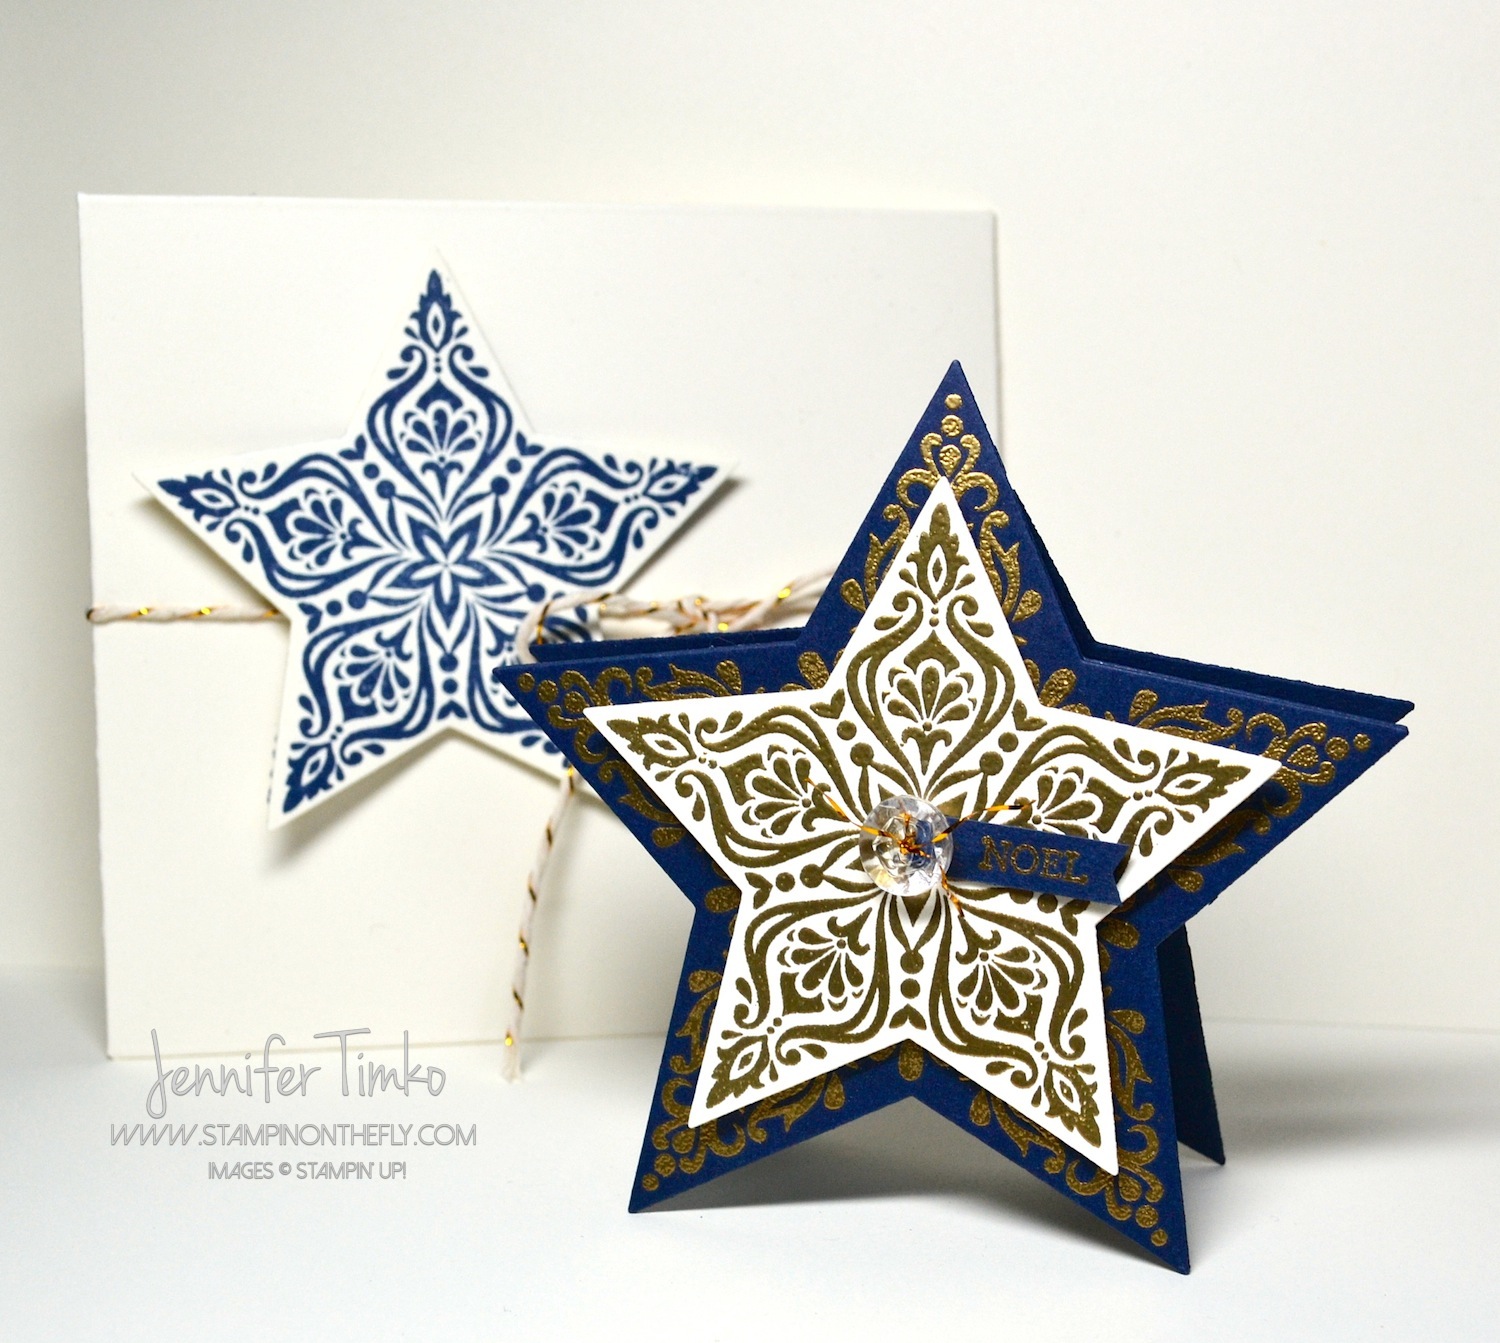
I am so happy to be here today to show you a fun project I created for my Hostess Club members this month. I always think shaped cards are special! Then one of my club members suggested that we make one this month and I thought it was the perfect time to show you a version with the new Bright & Beautiful stamp set and coordinating Star Framelits.
This card is so elegant with the gold and navy and really easy to make. Yes….easy! And a new first for me on this blog….drum roll please….a video tutorial! As I was working on the videos tutorials for my Stamps on the Fly class this month, I realized I should post some here sometimes too. I can’t wait to see what you think!! Please let me know. Also, there is a variation in the video so don’t miss that!
Well, since I don’t have to type up the instructions, let’s go right to the video. (I provided a direct link under the embedded image for my email readers.)
While I promised this would be up yesterday, I had to get ready to go on a trip and that slowed me a bit. Hopefully the video makes up for the tardiness!
I have been stamping away for some new things coming in October! A blog hop, Hope You Can Cling To Challenge at Splitcoaststampers, more Stamps on the Fly….whew! Can’t wait to share it all but hopefully you’ll love them! For now, I’m out on the road and trying to catch up on some of the “admin” stuff during my layovers. I hope that your weekend is fantastic! If you are traveling, look for me! Thanks so much for stopping in today!
Click HERE to purchase these wonderful Stampin’ Up products!
Stamp: Bright & Beautiful; Paper: Very Vanilla, Night of Navy; Ink: Versamark, Night of Navy; Accessories: Big Shot, Stars Framelits, Heat Tool, Gold Stampin’ Emboss Powder, Dimensionals, Vintage Faceted Button, Gold Metallic Baker’s Twine, Gold Sequins, Rhinestones
I am so happy to have a guest today on my blog!! I had the great joy of meeting her when I went to Convention over the summer and she is my second upline at Stampin’ Up! Her name is Lisa Curcio and wow am I lucky to be in her downline!! My immediate upline Brandi had always spoken so kindly of Lisa (and Brandi is just amazing too) so I knew she had to be special. Even still, imagine my surprise when at our very first time meeting she came bearing the most amazing handmade gifts!! Stampin’ Up has blessed me in so many ways and with so many friendships…what a joy to work with such an amazing company.
Given that the last few weeks have been so light with postings, I thought it would be fun for you to get to know Lisa too. I am always so excited when I find a new blog to follow and I suspect you are just like me about that! Lisa has just started a blog named after her, Lisa Curcio. She made an awesome project and agreed to let me post a picture here so that you all can see it. Yes, you can go ahead and say it out loud (I did). WOW! This card box with coordinating cards is gorgeous isn’t it??
Here is what Lisa has to say about it:
“Christmas…66 days away! Have you given any thought to your Christmas cards? Have you considered what gifts you would like to give for those on your shopping list? Would you like to give a unique, one-of-a-kind gift? Check out this EASY project! Its sure to cover all those questions on your holiday “to do” list!”
I know…you want all the details on how to make this don’t you??!! It is easy to get. Hop right over to her blog and she has all the details and a tutorial. While you are there, stop and take a look around because her blog is loaded with ideas. Yes, she is much more consistent at posting than I am so get a good cup of coffee or tea, you might be there awhile!!
Well, I survived the 4th Grade field trip yesterday and we have a big school fundraiser today (with lots of parents needed, of course) so my stamping hasn’t been given quite the time I had hoped for. You can expect to see more from me next week though since I have a fun card to share that was chosen by Stampin’ Up to be in the demonstrator magazine, Stampin’ Success!
Hope your weekend is fantastic! Don’t forget to tell Lisa hi when you stop in and tell her I sent you! *smile*
Over at SUO Challenges this week we are celebrating! Our own Michelle Laycock has been a Stampin’ Up demonstrator for 10 years and we thought it appropriate to make “Congratulations” cards in her honor. These are always fun cards to make, aren’t they??!!
As I told you last week, my boys and I went down to Washington DC for the Cherry Blossom Festival and to visit the wonderful museums. Card first and then I’ll share the inspiration photos. With cherry blossoms on the brain, I had no choice but to pull out a flower set…and what better set than Elements of Style? I wanted the focus to be on the flowers so I thought I’d try using my Labels Collection Embosslits to create a frame. First I cut the center piece out of Watercolor Paper. I stamped the flower and colored it using my Blender Pen with Pink Pirouette, Blushing Bride and Pear Pizzazz inks. Next, I created an embossed frame on Very Vanilla paper. Getting the Big Shot “sandwich” right was the only difficult part. Here it is:
Multipurpose Platform on Tab 1
Cutting Pad
Silicone Rubber Mat
Very Vanilla Card Stock
Embosslit with the cutting edge turned up (**see note)
Typing paper
Cutting Pad
Shim (for me a piece of thick paper that comes in the DSP packs)
**Note: Make sure the cutting edge is turned up or you could cut into your silicone mat
Every Big Shot is a little different so you may have to play with the “shim” part to get the desired level of embossing.
I added a “Potato Masher” bow (tutorial here) and some of the tiniest of the pearls in the Basic Pearl pack. I love the elegance of this card!!
Now, in truth, almost all the cherry blossoms are already gone. But I went in search of and found some holdouts! The first picture is from a set of trees near the Jefferson Memorial (which you see in the background). These are a later blooming variant. The second picture is from a lone tree along the Tidal Basin that was still blooming. I loved that I could get the Washington Monument in the photo! I tormented my children with many pictures of them with the trees too but will save those for an MDS project.
Well, off to enjoy a beautiful day here in Virginia. I hope that you will join us at SUO Challenges with your happy cards! See you tomorrow!
Stamps: Elements of Style, Silhouette Sentiments (hostess, retired); Paper: Very Vanilla, Watercolor; Ink: Early Espresso, Pink Pirouette, Blushing Bride, Pear Pizzazz; Accessories: Big Shot, Labels Collection Embosslits, Very Vanilla Seam Binding, Blender Pen, Basic Pearls, Dimensionals
I know I am completely biased but I just love the sketches from Freshly Made Sketches every single week. This week Lesley Croghan of Always Playing with Paper has brought us another great one.
I started in a whole different direction on this one using a watercolored panel and some masculine papers. But you know what…the Bright Blossoms and Summer Smooches just kept calling out to me. Sometimes you just have to listen! I have just fallen in love with these little flowers. I love tulips anyways and the fun little prints on these stamps add so much. As soon as I saw the little rectangles on this sketch, I knew that it would involve little bows of some sort (what a surprise!). I used the fork bow method using this tutorial and the awesome Island Indigo Ruffled Ribbon. Because of the weight of the ribbon, I used Sticky Strip instead of Mini Glue Dots to hold them onto the card. With the texture coming from the bows I realized that the stamped panel need some dimension. I stamped a couple more flowers and the vase and the fussy cut them. To add that little extra finish to those, I ran a Stampin’ Write Marker around the edges of the cut out pieces (I find doing this from behind reduces the risk to your cut pieces in case you slip). That lovely sentiment from Precious Butterflies came out again. I just love the happy colors from the Summer Smooches DSP and this print is particularly great! The stamp and the DSP will be available in April so just a couple more days!!
The design team has some fabulous takes on the sketch and I know you will love using it. Can’t wait to see what you dream up!
I’m off to the Cherry Blossom Festival today (even though they are mostly gone) and some fun with my boys. I hope your day is fantastic. See you again soon!!
Stamps: Bright Blossoms, Precious Butterflies (hostess); Paper: Summer Smooches DSP, Daffodil Delight, Island Indigo, Whisper White; Ink: Daffodil Delight, Island Indigo; Accessories: Island Indigo 3/8″ Ruffled Ribbon, Dimensionals, Sticky Strip
Primary Sidebar
We use cookies on our website to give you the most relevant experience by remembering your preferences and repeat visits. By clicking “Accept”, you consent to the use of ALL the cookies.
This website uses cookies to improve your experience while you navigate through the website. Out of these, the cookies that are categorized as necessary are stored on your browser as they are essential for the working of basic functionalities of the website. We also use third-party cookies that help us analyze and understand how you use this website. These cookies will be stored in your browser only with your consent. You also have the option to opt-out of these cookies. But opting out of some of these cookies may affect your browsing experience.
Necessary cookies are absolutely essential for the website to function properly. This category only includes cookies that ensures basic functionalities and security features of the website. These cookies do not store any personal information.
Any cookies that may not be particularly necessary for the website to function and is used specifically to collect user personal data via analytics, ads, other embedded contents are termed as non-necessary cookies. It is mandatory to procure user consent prior to running these cookies on your website.