Skip to content

Stampin’ Addicts Retiring Stamps Hop – Regarding Dahlias

Stampin’ Addicts Retiring Stamps Hop – Regarding Dahlias published on 8 Comments on Stampin’ Addicts Retiring Stamps Hop – Regarding Dahlias

Retiring Banner

Wow am I happy to be hopping with my friends over at Stampin’ Addicts this week.  They are some of my favorite stampers and I always love the inspiration I find in their hops.  It is time to bid a fond farewell to our retiring stamp sets and it will certainly be hard to say good-bye to some of them.

If you just came over from the wonderful Carmen of Stamping Addiction, I’m so glad you are here!  Don’t you love her projects with Quinceanera?  If you want to see everyone who is hopping or if you get lost along the way, just click over to the Stampin’ Addicts site for the entire list.

So I chose one of my favorite ever stamp sets for the hop.  Regarding Dahlias has that fabulous flower.  Seriously, it cannot make a bad card this flower.  But then there are the great sentiments too!  I find myself pulling them all the time!

SA Retiring Hop - Golden Dahlia

My first card today is all about gold!  I took the flower and stamped it in Gold Encore ink then heat embossed with Gold Stampin’ Emboss Powder.  I cut the panel so that I could allow a strip of the Gold Foil to show through.  A super easy way to add some wow!  The Gold Basic Button is tied with the metallic threads from the Gold Metallic Baker’s Twine and I added a sentiment from Flower Patch.  I love the clean elegance of this card!

SA Retiring Hop - Thank you

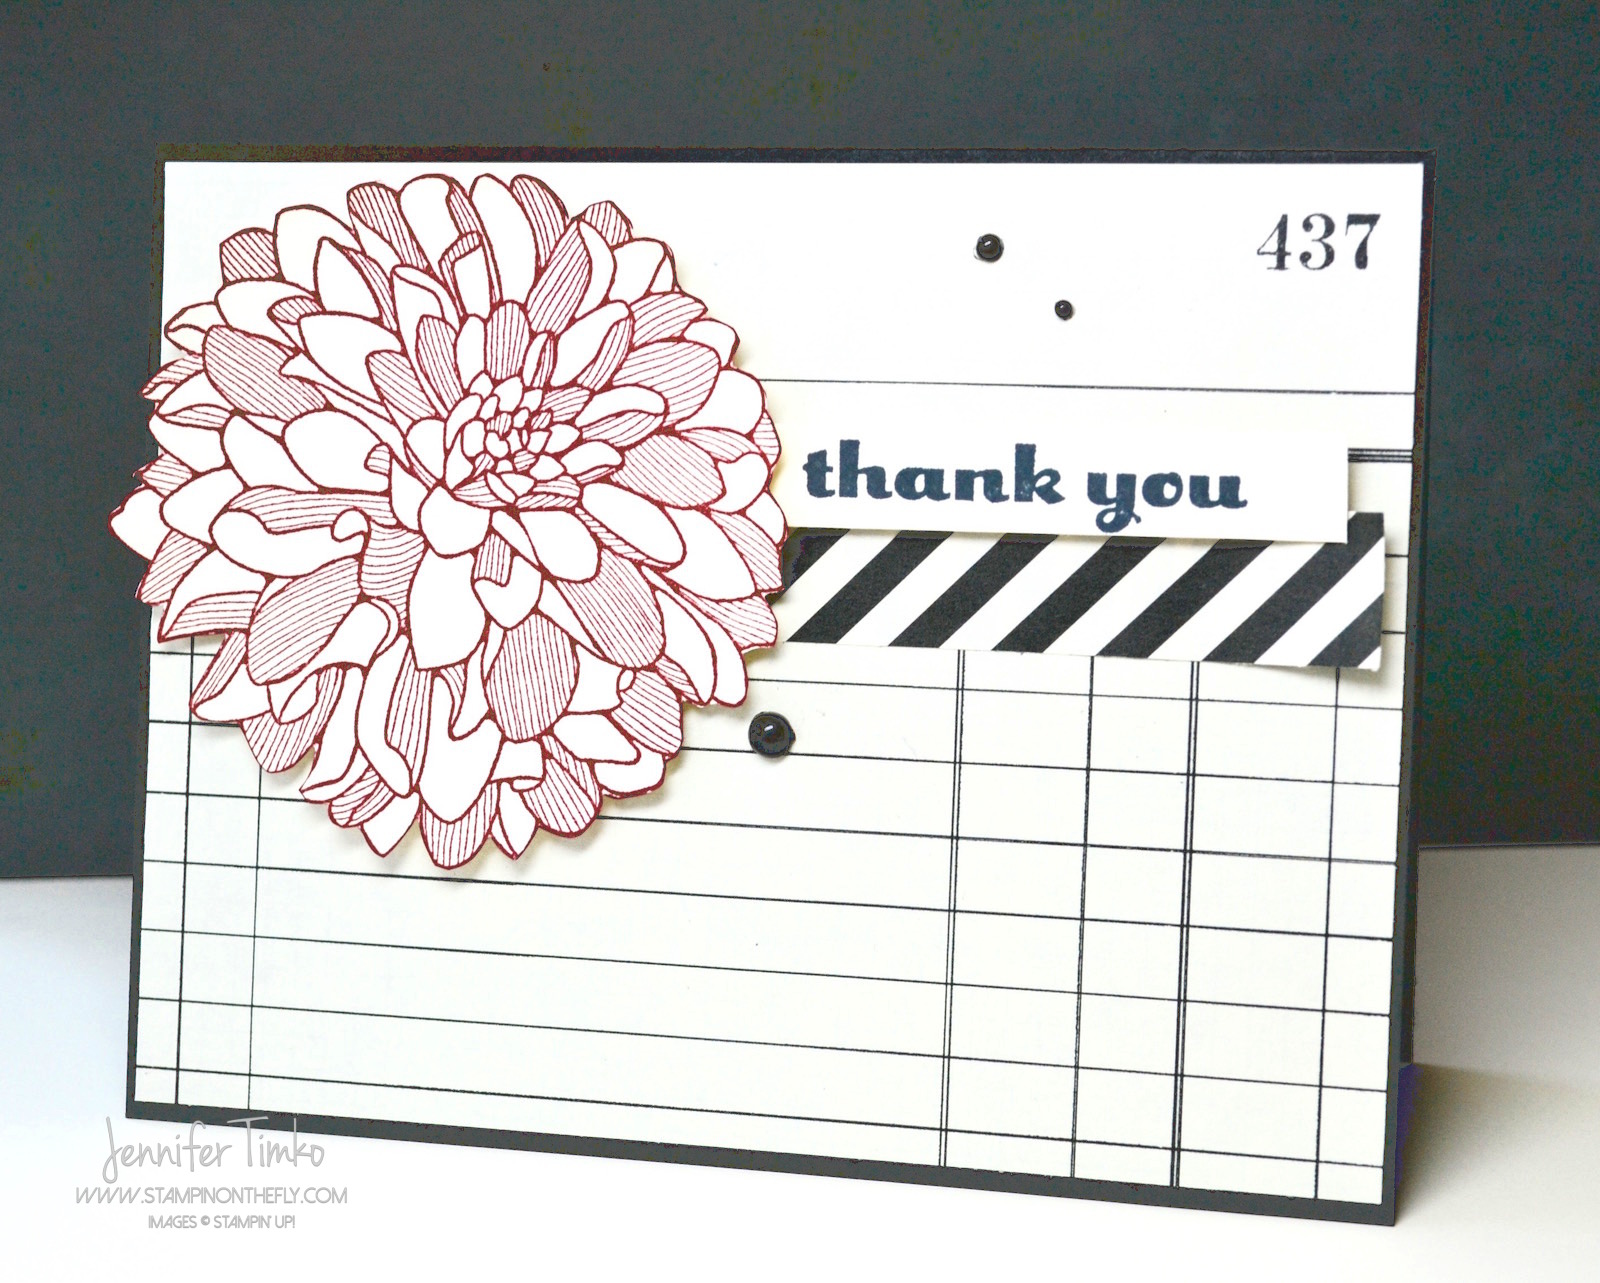
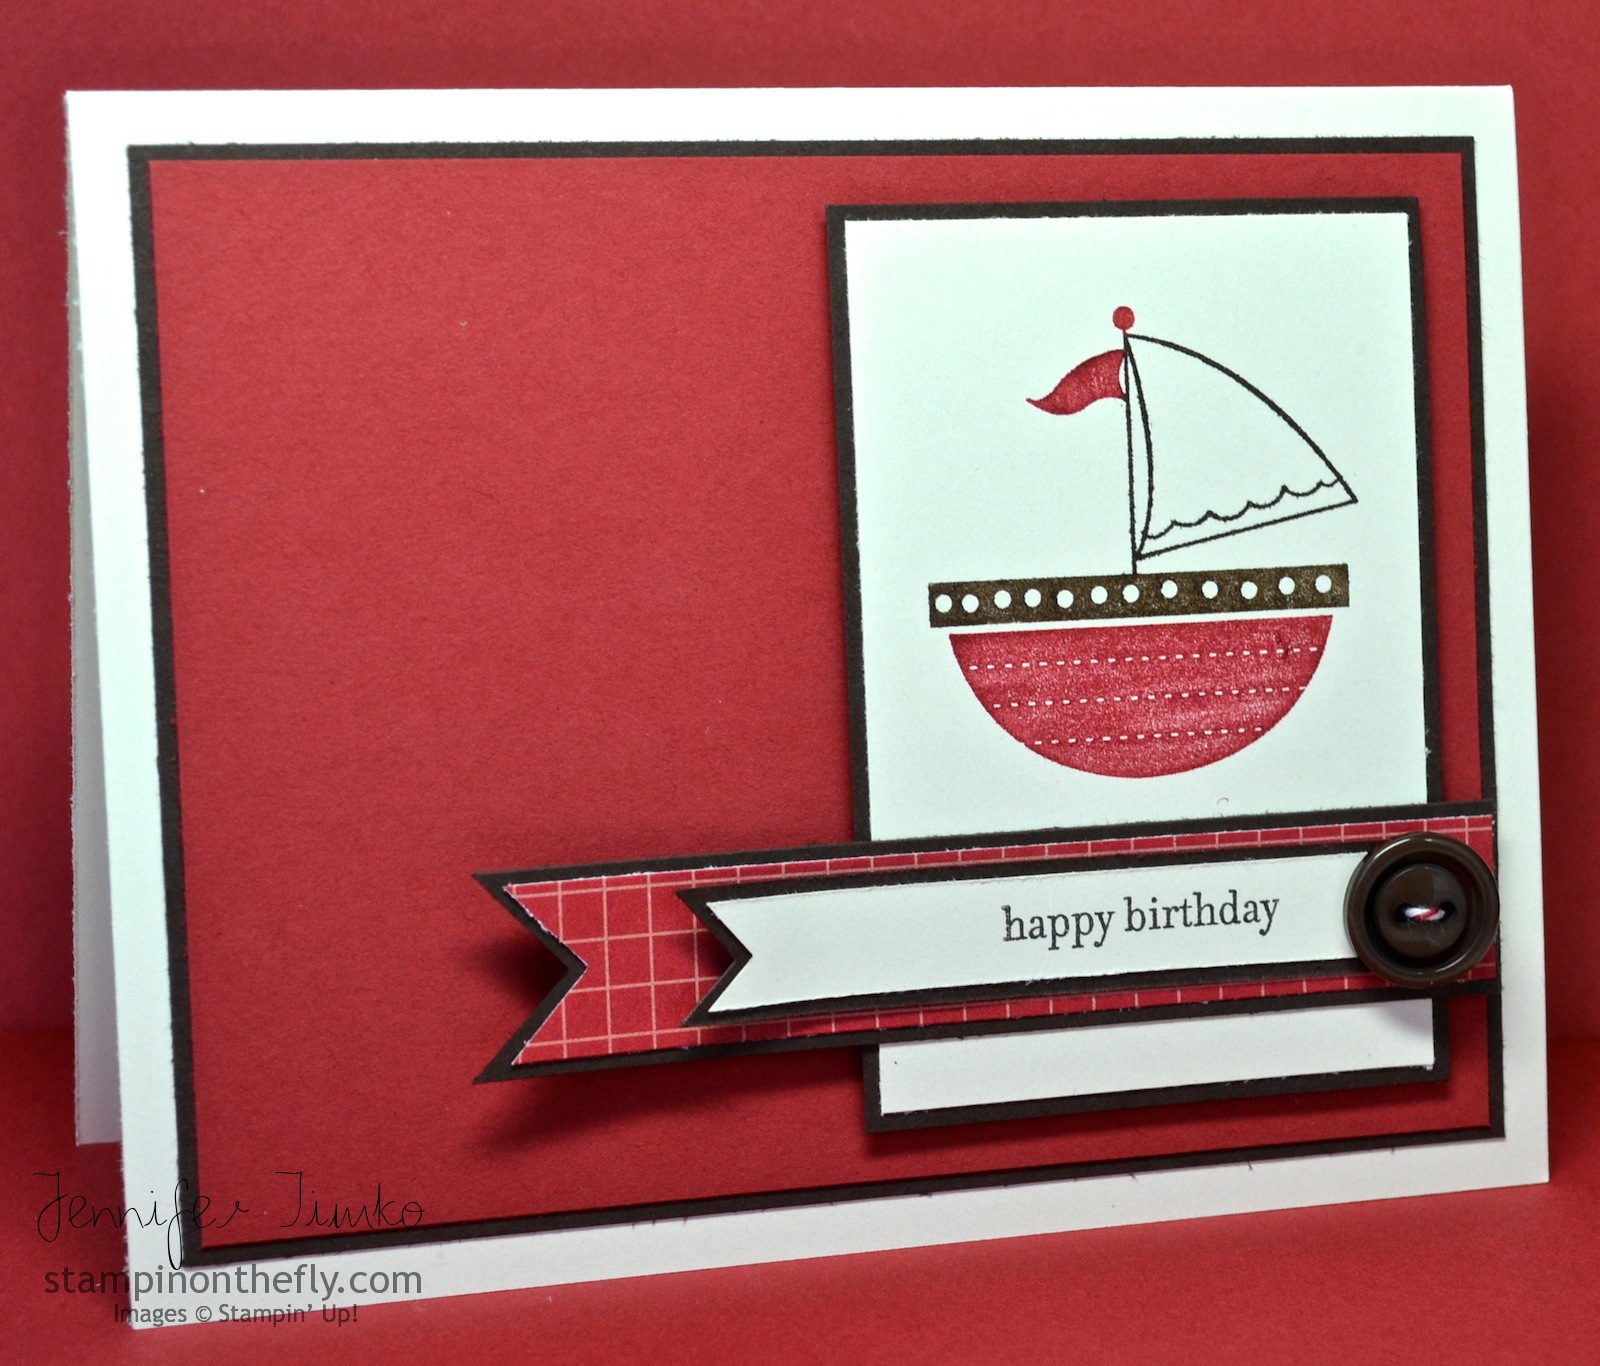
Next up is a card using my favorite color combination for this flower.  Cherry Cobbler with black and white/vanilla.  Typeset DSP provides the the background and stripes details.  The flower and sentiment are stamped on Very Vanilla card stock.  I popped some layers up on Dimensionals and added some Basic Pearls that were colored with a black Sharpie marker.

I hope you like today’s projects.  Like you, I can’t wait to see all that the others have for inspiration!  Hop on over to my friend Heidi at Running w/Scissors Stamper to continue on your way around.  She has some wonderful things to show you with Starburst Sayings.  So glad you dropped in today.  See you again soon!

Click HERE to purchase these wonderful Stampin’ Up products!

Stamps:  Regarding Dahlias, Flower Patch; Paper:  Whisper White, Very Vanilla, Typeset DSP, Basic Black; Ink:  Gold Encore, Momento Tuxedo Black, Cherry Cobbler; Accessories:  Heat Tool, Gold Stampin’ Emboss Powder, Basic Gold Button, Gold Metallic Baker’s Twine, Basic Pearls

Previous

Next

May Sneak Peek

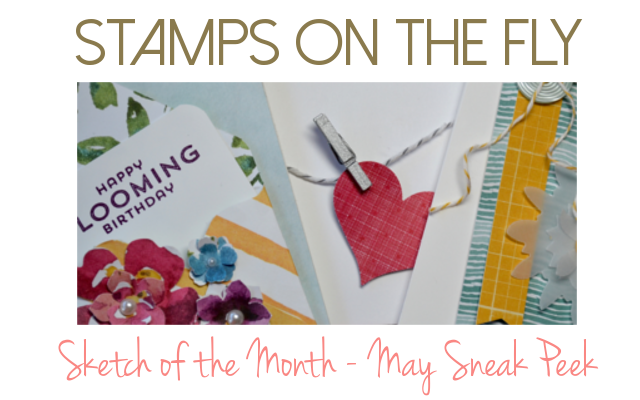
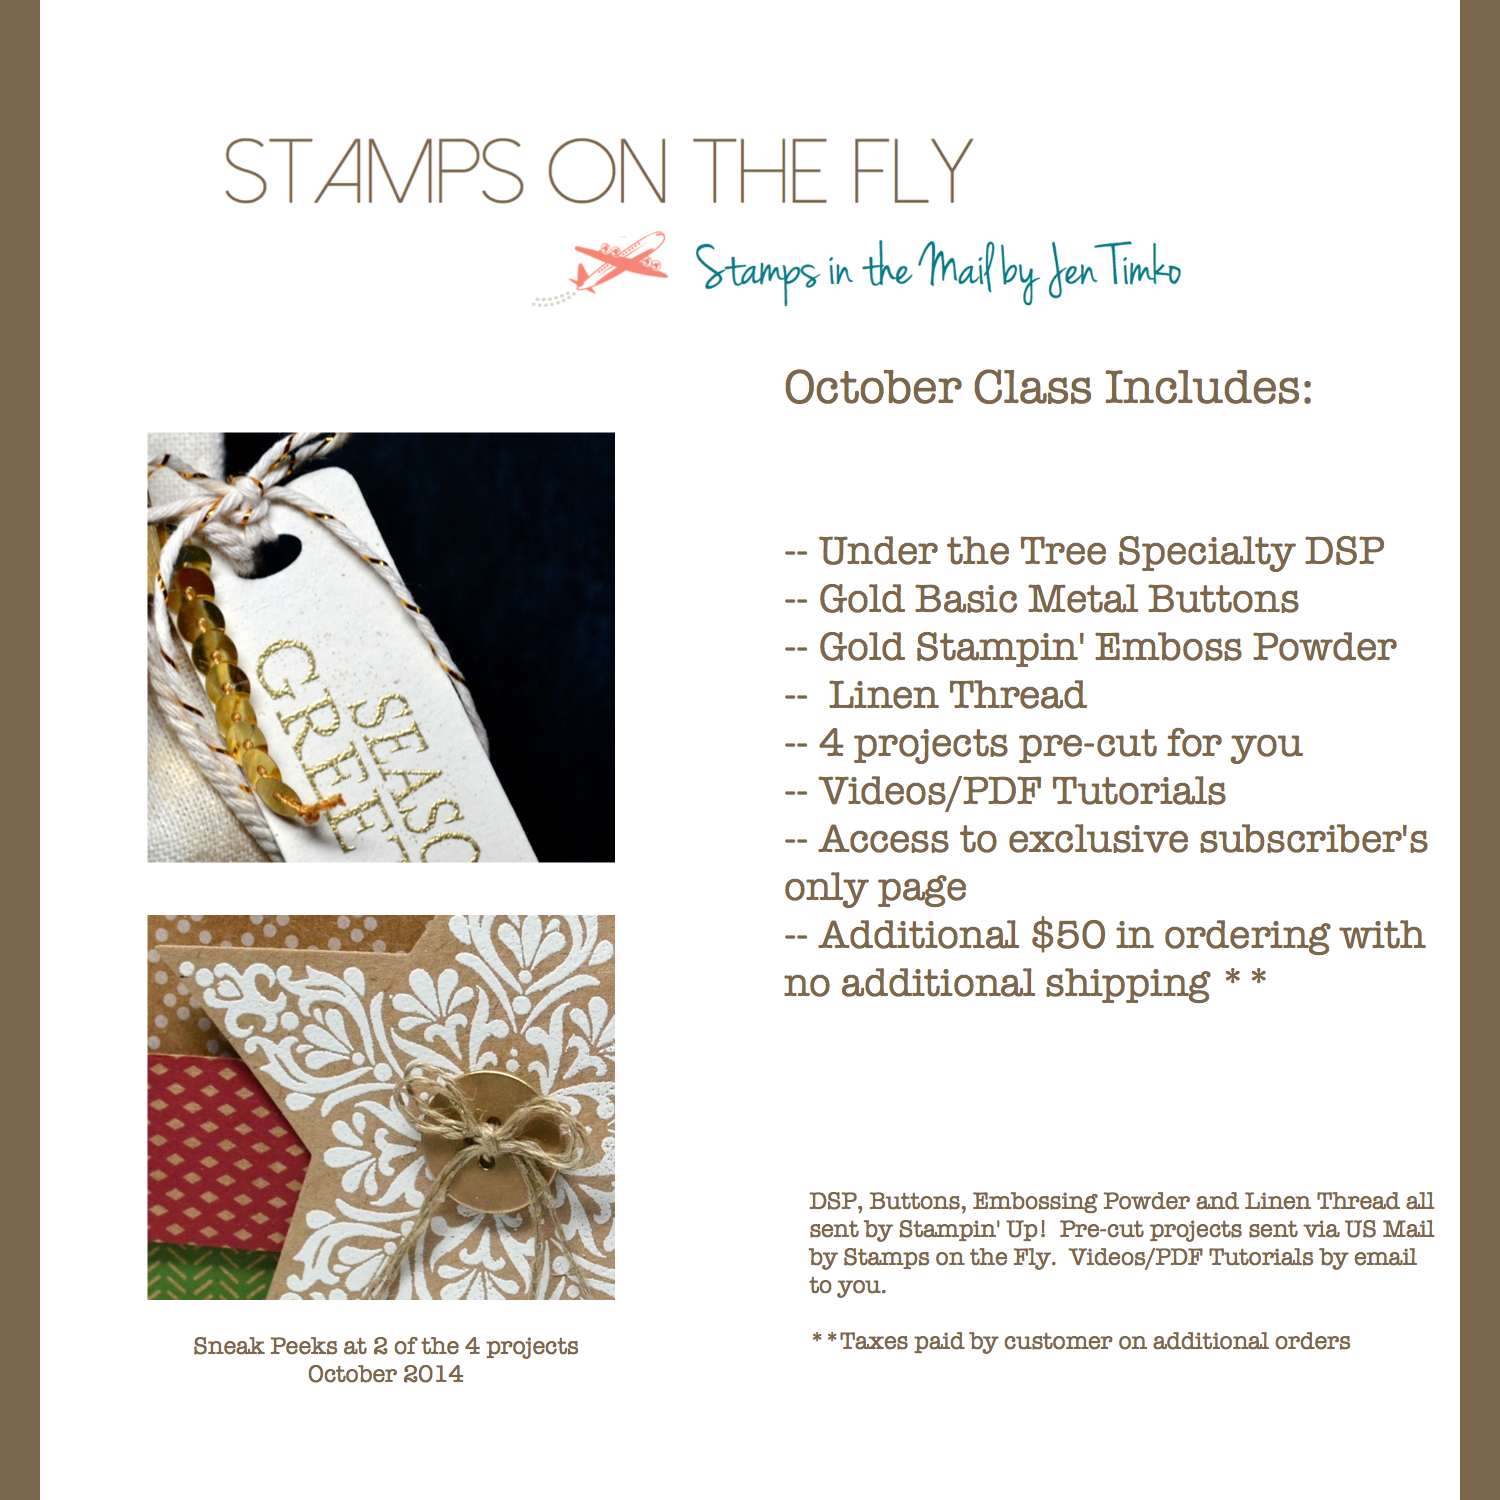
I’m so excited to share my new edition of Stamps on the Fly!  You all know how much I love working with sketches and I thought it would be fun to share that with you.  I have a page up telling you all the details including the links on how to get these PDF tutorials for FREE!

Available for international customers and demonstrators too!  Just click below for all the details!

Stamps on the Fly – May Sketch Edition

Blog Signature 2015

The Newborn King – Card Details

The Newborn King – Card Details published on 1 Comment on The Newborn King – Card Details

I’m so excited to share with you the details from the other two cards from last weekend’s blog hop with the Stampin’ Addicts.  Both of these cards were created with real mailing in mind.  Flat, duplicatable but still special.

SA Winter Hop - Shimmery Gold KingThis first one is so pretty in person and the camera just can’t really capture the subtle shimmer on it.  First, the card is made using Shimmery White Card Stock.  I just love the bit of sparkle in this paper!!  I stamped in image with Encore Gold Ink and then embossed it with Gold Stampin’ Emboss Powder.  Then I created a frame for the image using an Apothecary Accents Framelit.  I stamped the sentiment in the gold and embossed it too.  The frame layer is popped up on Dimensionals (make sure you use plenty around the frame to prevent bending or sagging).  This is a super simple card but it has a certain wow factor that I love.

SA Winter Hop - King 1This second card was created with a watercolor wash.  I inked only the stable and Holy Family with my Baked Brown Sugar marker and stamped on Watercolor Paper.  The star is stamped the same way.  Then I colored in the Holy Family using my Blender Pen and Pool Party (Mary), Baked Brown Sugar (Joseph, manger and stable) and So Saffron (inside stable and star).  Then, using a paint brush dipped in water, I picked up Smoky Slate for the sky and Baked Brown Sugar for the earth to create the background.  I allowed the watery brush to hit edges of stamped images to create the softer effect.  The sentiment was stamped while the paper was still a bit damp to match.  Finally, I added just a little shimmer with my clear Spica pen on the star.  Gold Foil frames the stamped image layer.  To create the background, I stamped my Hardwood stamp onto Soft Suede card stock with Soft Suede ink and cut apart on the lines.  I sponged each layer and then put it back together on the base.

I hope you enjoy these cards and this stamp set.  It has such potential for pretty coloring but it is equally elegant left plan and just embossed.

I’m so glad you stopped in today to see these.  It has been a busy couple of weeks and I have to confess that I am a bit burned out.  I plan to take the next few days to stamp just for me and finish some projects that are sitting around still in pieces on my desk.  Please tell me that I’m not the only one who has those all around?!  I have a busy week of posting next week for you though.  Two cards for Hope You Can Cling To Challenges that I can hardly wait to share plus another super sketch from Freshly Made Sketches.  Until then, I hope you have some time to stamp!  See you soon!

Click HERE to purchase these wonderful Stampin’ Up products!

Stamp:  The Newborn King, Hardwood; Paper:  Shimmery White, Watercolor, Gold Foil, Soft Suede; Ink:  Gold Encore, Baked Brown Sugar, Smoky Slate, So Saffron, Pool Party; Accessories:  Gold Stampin’ Emboss Powder, Heat Tool, Big Shot, Apothecary Accents Framelits, Blender Pen, Paintbrush, Clear Spica Pen

Blog Signature 2014-001


The Newborn King – Faux Stained Glass

The Newborn King – Faux Stained Glass published on 7 Comments on The Newborn King – Faux Stained Glass

SA Winter Hop - King 3

Welcome back!  I hope you really enjoyed the weekend’s hop and I’m thrilled you came back to join me today.  Today I am going to share with you the how-to on my Faux Stained Glass card.  I’m so thrilled with this one and I hope you love it too!

To see how to color and create this one, just watch my video tutorial:

The direct link to YouTube is here:  Faux Stained Glass Technique

I continue stamping away for all the fun stuff this month.  I have more cards created for Hope You Can Cling To plus the Dirty Dozen over at Splitcoaststampers.  And I am the sketch hostess this Wednesday at Freshly Made Sketches!  Stampy, stampy, busy bee!!

Tomorrow I’ll be back with the details on the other two cards I created for the hop and I hope you’ll come back to see me.  Until then, thanks so much for stopping in!

Click HERE to purchase these wonderful Stampin’ Up products!

Stamp:  The Newborn King; Paper:  Very Vanilla, White Vellum; Ink:  Gold Encore, Stampin’ Write Markers; Accessories:  Gold Stampin’ Emboss Powder, Heat Tool, Dimensionals, Simply Scored Scoring Tool

Blog Signature 2014-001


Stampin’ Addicts Winter Holiday Blog Hop ’14

Stampin’ Addicts Winter Holiday Blog Hop ’14 published on 13 Comments on Stampin’ Addicts Winter Holiday Blog Hop ’14

Winter Blog Hop Banner-001

We are coming up on the most wonderful time of the year, aren’t we?!!  And what better time to join my friends the Stampin’ Addicts in a hop to show you some of the best of the Holiday Catalog from Stampin’ Up!  If you don’t know the Stampin’ Addicts, we are a dedicated group of stampers who love Stampin’ Up products.  If you just came over from the awesome Yapha Mason, I just know you loved her projects with Mingle All The Way!  She always shows the most lovely things!  If you are just starting here, all you have to do is click your way around using the buttons and links at the bottom of each post.

When I first got this year’s Holiday Catalog, the set that spoke to me the loudest was The Newborn King.  Something about that little nativity and the super cool trees make me so happy!

Jen Timko - SA Winter Hop - Watercolor King

My first card for you today focuses right on that lovely nativity scene.  I chose this watercolor look to highlight the Holy Family.  The light coming from within the stable and a little twinkle on the star are there to show the significance of the event.  Some Gold Foil adds a bit of shine on the border.

Jen Timko - SA Winter Hop - Shimmery Gold KingMy next card also has gold but it becomes a highlight of the card!  For this one, I stamp and emboss the whole scene in gold and frame it with a layer cut with the Apothecary Accents Framelits.  If you click to enlarge the picture, you can see the shimmer from the Shimmery White Card Stock.

Jen Timko - SA Winter Hop - Faux Stain Glass KingFor my last card, I am showing you a faux stain glass look.  More gold embossing and White Vellum Card Stock create the foundation for this elegant card.  Want to know how to make it??  I want to show you!!  I’ll be back on Monday with a video on exactly how to color this and how to create this card!  I’m super excited to share!

Now see….you love this set too, don’t you?!  With the details on the stamp, you can keep the rest of the card clean.  Perfect for techniques and mailable cards!

Make sure you come back to see me on Monday for all the techniques on the cards.  Now off to see the fabulous Tina Adams and her projects with Christmas Bauble!  Until Monday….hope you have a great weekend!

Winter Holiday Blog Buttons-002Winter Holiday Blog Buttons-001


Click HERE to purchase these wonderful Stampin’ Up products!

Blog Signature 2014-001


Sign ups are open for Month 2 of  Stamps on the Fly Bright & Beautiful Edition.  Click the link for details on how to join the fun!

Stamps on the Fly Peek - Oct 14-001


Stampin’ Addicts Winter Holiday Blog Hop

Stampin’ Addicts Winter Holiday Blog Hop published on 21 Comments on Stampin’ Addicts Winter Holiday Blog Hop

2013-holiday-banner

Welcome to the Winter Holiday Blog Hop from the Stampin’ Addicts!  I am so excited to share this hop with some of my favorite stampers.  The Stampin’ Addicts are a supportive group of crafters who love Stampin’ Up.  I have been an “Addict” for years and love hopping with them.  If you have come over from Debra Burgin of Heartfelt Inkspiration, I know you were wow’d by her Wonderful Wreath projects!  I love all of the seasonal projects she created!  If you are starting here, just hop all the way around using the buttons on each post.  You won’t want to miss a thing!

I chose to make projects using the Expressions Thinlits and I am so happy I did!  These little words are so fun to use!  I made one card for each word and will show them in order of their respective holidays.

Holiday Hop - ThankfulFirst up is Thanksgiving!  Ok, this really could be used all autumn long but it really looks like Thanksgiving to me.  I used some burlap and attached it to a Baked Brown Sugar layer then added the leaves from Magnificent Maple and the thinlit word.  That whole panel is popped up on Dimensionals.  The thinlit and leaves are attached using Crystal Effects (a light hand).

Holiday Hop - Merry Christmas

Next up is Christmas and what better than combining the thinlit with a great sentiment stamp.  I chose More Merry Messages because I like the script paired with the traditional font.  Just add in this great print from Season of Style and you get a fun card that is easy to duplicate.  A few buttons finish it off!

Holiday Hop - Love You

Finally, a little bit of of a Valentine’s preview.  Although this is just a great card for any special person!  Ok, Jennifer, where did you get the thought bubble?!  It is just an oval cut out with the Ovals Framelits and then I snipped the extra triangle out…yep, quick and fun!  The “you!” comes from Yippee Skippee and I added in a little bit of Epic Day Washi Tape that I placed first on Whisper White card stock.  There is Cherry Cobbler behind the thought bubble so it seemed perfect to add in Cherry Cobbler Baker’s Twine too.

Ok.  Now you can see why you NEED these little thinlits.  You may have seen this tip before but add a little piece of waxed paper between the paper you are cutting and the thinlit to make it easier to pop it out.

Now off to the fantastic blog of Paula Wright of Stampin’ with Paula!  You will love what she has created with the Gift Bow Die!

2013-holiday-previous2013-holiday-next

Blog signature 2013-001

Mystery Hostess plus Blog Hop Details

Mystery Hostess plus Blog Hop Details published on 1 Comment on Mystery Hostess plus Blog Hop Details

As part of my celebration of the Free Shipping being offered by Stampin’ Up, I am offering a chance to be a Mystery Hostess!!  You qualify if you make a $30 or more (before tax) order from my Online Store by Monday at 6p Eastern using this Hostess Code:  DHH32PGZ.  Where do you enter the code?  Take a look at the screen shot below and in the lower left corner you can see where to enter it.  This is the Checkout page and your order has to have the code entered to qualify.

Screen Shot 2013-04-07 at 1.41.24 PMYou can also contact me with your order and payment information at the email address in my blog header and I’ll be happy to enter it for you!!  I will need to be able to contact the winner after 6p Eastern to find out their hostess requests.

Ok…now onto the blog hop details.  If you missed the hop, you will want to go take a look!  The Stampin’ Addicts celebrated the Color Refresh by highlighting the retiring colors.   My color was Riding Hood Red!

SA Color Refresh Hop - Sailboat


I think this is a lovely rich vintage red and it makes fabulous boy cards.  It is particularly nice with Early Espresso!  I used my Stampin’ Write Markers to color this sailboat from Moving Forward.  I just love this little stamp!  This lined print from Storytime DSP is one of my favorites in that pack (and I love that pack).  It added a wonderful tone-on-tone feel to this layout!  I have been using it a lot lately.

SA Color Refresh Hop - Angel


To create this angel card I pulled out my Ovals Framelits and the Lacy Brocade Embossing Folder.  First I found the right sized oval for the angel and then grabbed the next one up.  Using Very Vanilla card stock, I cut out the oval first and then embossed the layer with the embossing folder.  I took the cut out oval and then put the smaller framelit on it to cut the right sized piece for stamping (and almost no wasted card stock).  After stamping the angel it seemed to still need a little something so I sponged the edges of the oval and the embossed panel with Crumb Cake ink.  Then, I tied up a shabby bow out of Very Vanilla Seam Binding and tied it up with a Vintage Faceted Button and some Linen Thread.  I used the words this way for some other Christmas cards last year and really liked it so I did it again here.  It keeps the sentiment subtle but highlights the reason for the season!  Both the oval and the embossed layer are popped up on Dimensionals and the bow was attached using Sticky Strip.

I hope you enjoyed these projects and I look forward to seeing who the winner is of the Mystery Hostess benefits!!  Thanks so much for stopping back by today!  See you tomorrow for the latest SUO Challenge!

Card 1 – Stamps:  Moving Forward, Teeny Tiny Wishes; Paper:  Riding Hood Red, Very Vanilla, Early Espresso, Storytime DSP; Ink:  Riding Hood Red, Early Espresso; Accessories:  Neutrals Buttons, 1-3/4″ Square Punch, Cherry Cobbler Baker’s Twine

Card 2 – Stamp:  Rejoicing With You; Paper:  Very Vanilla; Ink:  Riding Hood Red; Accessories:  Big Shot, Lacy Brocade Embossing Folder, Ovals Framelits, Very Vanilla Seam Binding, Jewelry Tag Punch, Vintage Faceted Buttons, Linen Thread

Blog signature 2013-001

Stampin’ Addicts Retiring Colors Blog Hop

Stampin’ Addicts Retiring Colors Blog Hop published on 21 Comments on Stampin’ Addicts Retiring Colors Blog Hop

Screen Shot 2013-04-05 at 8.15.17 AM


Welcome to the Stampin’ Addicts Retiring Color Blog Hop!!  I am joining in with my friends from Stampin’ Addicts to bid a fond farewell to colors that are retiring in the Color Refresh at Stampin’ Up.  We have all chosen a focus color and you will have a great time hopping around for inspiration!  If you are coming in from Cindy’s blog Heart’s Delight Cards, I know you are amazed by her gorgeous projects with Baja Breeze.  Her flowers are amazing!  Let’s take a moment of silence for one of my all time favorite colors, shall we???  *smile*  Yes, I do really love Baja Breeze!

My color for the hop is Riding Hood Red.  This is a lovely vintage red and pairs so beautifully with browns and grays.  I particularly love it with Early Espresso!

SA Color Refresh Hop - SailboatI think is is wonderful for boy cards so I created a birthday card using the sailboat from Moving Forward (the RMHC set).  I added in a little bit of Storytime DSP and a sentiment from Teeny Tiny Wishes.  The sketch is courtesy of Fab Friday Challenges.

Another fabulous use for this rich red is for Christmas cards so I pulled out one of my favorite new sets from this year’s catalog, Rejoicing with You.

SA Color Refresh Hop - AngelI wanted to really show off the angel so I kept all the accessories as subtle as possible.  This red takes on a real elegance when paired with the Lacy Brocade Embossing Folder.  I topped it off with a shabby bow tied up with a Vintage Faceted Button and some Linen Thread.  Little sentiments from the same set were punched with the Jewelry Tag Punch and tucked under the button.

I hope that you have enjoyed my Riding Hood Red projects.  Next up on the hop is Debbi at Come Stamp With Me.  She is focusing on Bravo Burgandy and I know you will love her work!  Thanks so much for stopping in.  If you have any questions on my cards, I will post a little more detail tomorrow (Monday).  See you again soon!

Screen Shot 2013-04-05 at 1.41.23 PM

Screen Shot 2013-04-05 at 1.38.59 PM


Blog signature 2013-001

Snowflake tags and mini paint can

Snowflake tags and mini paint can published on 2 Comments on Snowflake tags and mini paint can

Finally, the details on the mini paint can and the coordinating tags!  I just love these little cans that I got from the Container Store.  They are clear and can be decorated in lots of different ways.  Here I simply cut two pieces of Whisper White, Midnight Muse and Silver Glimmer papers to create a wrap around for the bottom of the container.  I made them short enough that they go under the handle attachment points to keep it easy!  Before attaching them to the can with Sticky Strip, I stamped the snowflakes from Snowflake Soiree and cut the scallops in the Glimmer Paper with the Adorning Accents Edgelit.

I wanted to create a tag for the can and started playing with the snowflakes in the set and the snowflakes in the new Snow Flurry Bigz Die.  What do you know??  They coordinate!  Of course!!  So I cut some out of the Silver Glimmer Paper and Midnight Muse card stock.  I layered two of the flakes on top of the stamped snowflake and then used the inverse flakes to add an embellishment to the can.  Basic Rhinestones were are great last detail to add additional sparkle!  I’m not normally a “glitter gal” but these products sure to make it easy to love shine and shimmer!

I made a bunch of tags to put into the paint can (along with some other treats).  These are so quick and easy!  I stamped the snowflakes on Shimmery White Paper and punched them out with a 2-1/2″ Circle Punch and a 1-1/4″ Circle Punch.  I just love the words in the Snowflake Soiree set and I chose ‘Merry’ for the back of the tag.  Of course a To/From would be great here too.  The smaller snowflake was layered using a Dimensional and another Basic Rhinestone finished the centers.  I used some White Baker’s Twine for attaching these to bags or boxes.

As many times as I tried, I could never get the sparkle on these to photograph but trust me when I say they are really pretty!  I hope you love these little projects.  Never too soon to start working on teacher gifts or gifts for the special people in your life!!

Thanks for stopping in today.  For those of you in the US, I hope you have a wonderful and safe Labor Day weekend!  See you again soon.

Stamps:  Snowflake Soiree; Paper:  Whisper White, Shimmery White, Silver Glimmer, Midnight Muse; Ink:  Midnight Muse; Accessories:  Big Shot, Snow Flurry Bigz Die, Circle Punches (2-1/2″, 1-1/4″, 1/16″), White Baker’s Twine, White 5/8″ Organza Ribbon, Basic Rhinestones, Mini Paint Can

Snowflake Soiree Cards

Snowflake Soiree Cards published on 4 Comments on Snowflake Soiree Cards

Here today to give you the details on the card I made for the Stampin’ Addicts Blog Hop.  And I actually have two cards to show you.  The first is from the hop and the second is a more subdued version that I made for the Control Freaks Convention Swap.

This is a different view than the one I showed for the hop.  I tried to capture the sparkle in about a billion pictures and finally accepted that it just wouldn’t be as pretty as it is in person!  I started by stamping the snowflakes in Versamark ink and then embossing them with Iridescent Ice Embossing Powder.  Then using my brayer, I added Midnight Muse ink until I was happy with the coverage.  You can go lighter or almost match the card stock like I did here.  Just wipe the excess ink from the embossed images and you are done.  I hand cut the banner out of Shimmery White Paper and used that as the background as well.  Finally I topped off the banner with doubled up Vintage Faceted Buttons.  The smallest one fits into the largest one!!!  So cool!!  Basic Rhinestones just begged to be added and you should see how pretty it is in the center of the button!

Just a little close-up to show you the embossing (after all, I did take all those pictures).

Now for the second card, I know it looks a lot the same in the picture but in person has a very different feel.  This one was made using Very Vanilla and Pearls.  The embossing was done with Clear Embossing Powder.  You can see from the two cards that the depth of brayering was a little different.  It is something fun to play with!  Lessons learned…make sure if you are using the new ink pads that you have reinker on hand (at least if you plan to make more than about 10 of these).  The new pads work beautifully with the brayer but they hold ink differently and you have to re-ink more often and with not as much ink.

Well, I hope you have enjoyed these!  As you can see, it is a SUO Challenges Tuesday and I am not in this week.  With it being the last week of summer break for my boys, I have taken the week off from the design teams.  That, and I’m singing the summer theme song “On the Road Again”.  *smile*  I hope you are having a great week.  Thanks so much for stopping by!  See you again in the next couple of days with details on the mini paint can and the tags from the hop.

Stamps:  Snowflake Soiree, More Merry Messages; Paper:  Shimmery White, Whisper White (card 1), Very Vanilla (card 2), Midnight Muse; Ink:  Midnight Muse; Accessories:  Heat Tool, Iridescent Ice EP (card 1), Clear EP (card 2), Vintage Faceted Buttons, Basic Rhinestones (card 1), Basic Pearls (card 2)

Stampin’ Addicts Holiday Blog Hop

Stampin’ Addicts Holiday Blog Hop published on 24 Comments on Stampin’ Addicts Holiday Blog Hop


Welcome to the Stampin’ Addicts Holiday Catalog Blog Hop!!  We are celebrating the amazing Holiday Catalog and I know you will be so inspired by everyone’s projects.  I am first so I’ll try to start you off with a sparkly holiday celebration.  If you started somewhere in the middle, you came over from Tanya’s Tinkerin’ In Ink and I know you were wowed by her creativity with Wonderfall!  That bag, the candles and, of course, the card…amazing!  My set for today is Snowflake Soiree.  It was the very first set I wanted from the Holiday Catalog and I think it is beautiful!  I hope you love my projects (and you can click on any of them to see them larger).

I thought it would be fun to make a gift set so I created a card, the altered paint can and some tags.  I have to say that the beautiful sparkle off this set just cannot be completely photographed.


This card is embossed using Iridescent Ice Embossing Powder and then brayered using Midnight Muse.  Shimmery White Paper provides a subtle bit of extra shine in the background.  Rhinestones top off the snowflakes perfectly, don’t you think?

This little paint can was altered using Silver Shimmer Paper, Midnight Muse and Whisper White.  I came upon a happy coincidence while making the little tag and found that the snowflakes from the new Snow Flurry Die coordinate with the stamp.  I love how Stampin’ Up does this!!

Finally I created some fun and quick tags to put in the little paint can (along with some holiday treats).  These are so quick and easy!  They are also created using Shimmery White Paper for a bit of extra shine and a Basic Rhinestone finishes it off.

I’ll be back over the next week with details on each project.  For now, make sure you move on over to Sharon’s blog, Created by You, to see her projects made with Joyous Celebrations.  You’ll be so impressed with the different looks all from one set!  Enjoy the hop!!


Primary Sidebar