Skip to content

Cracked glass Christmas

Cracked glass Christmas published on 2 Comments on Cracked glass Christmas

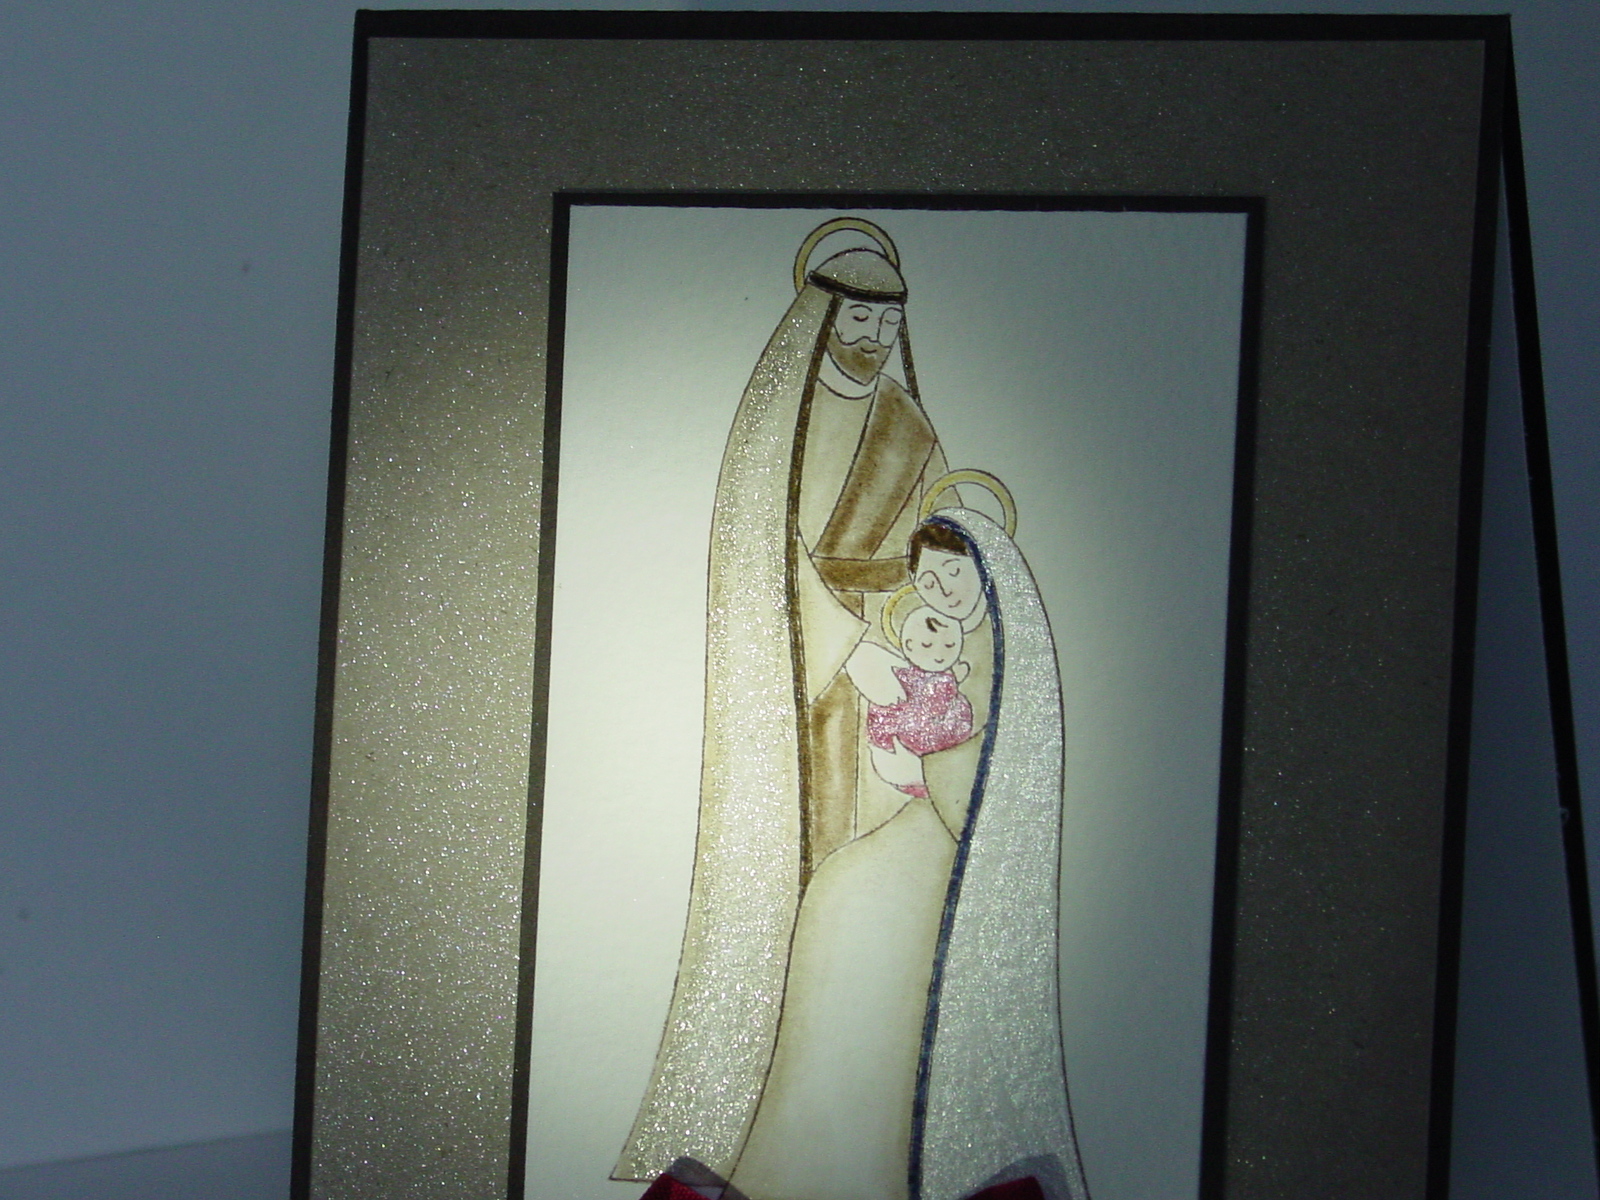
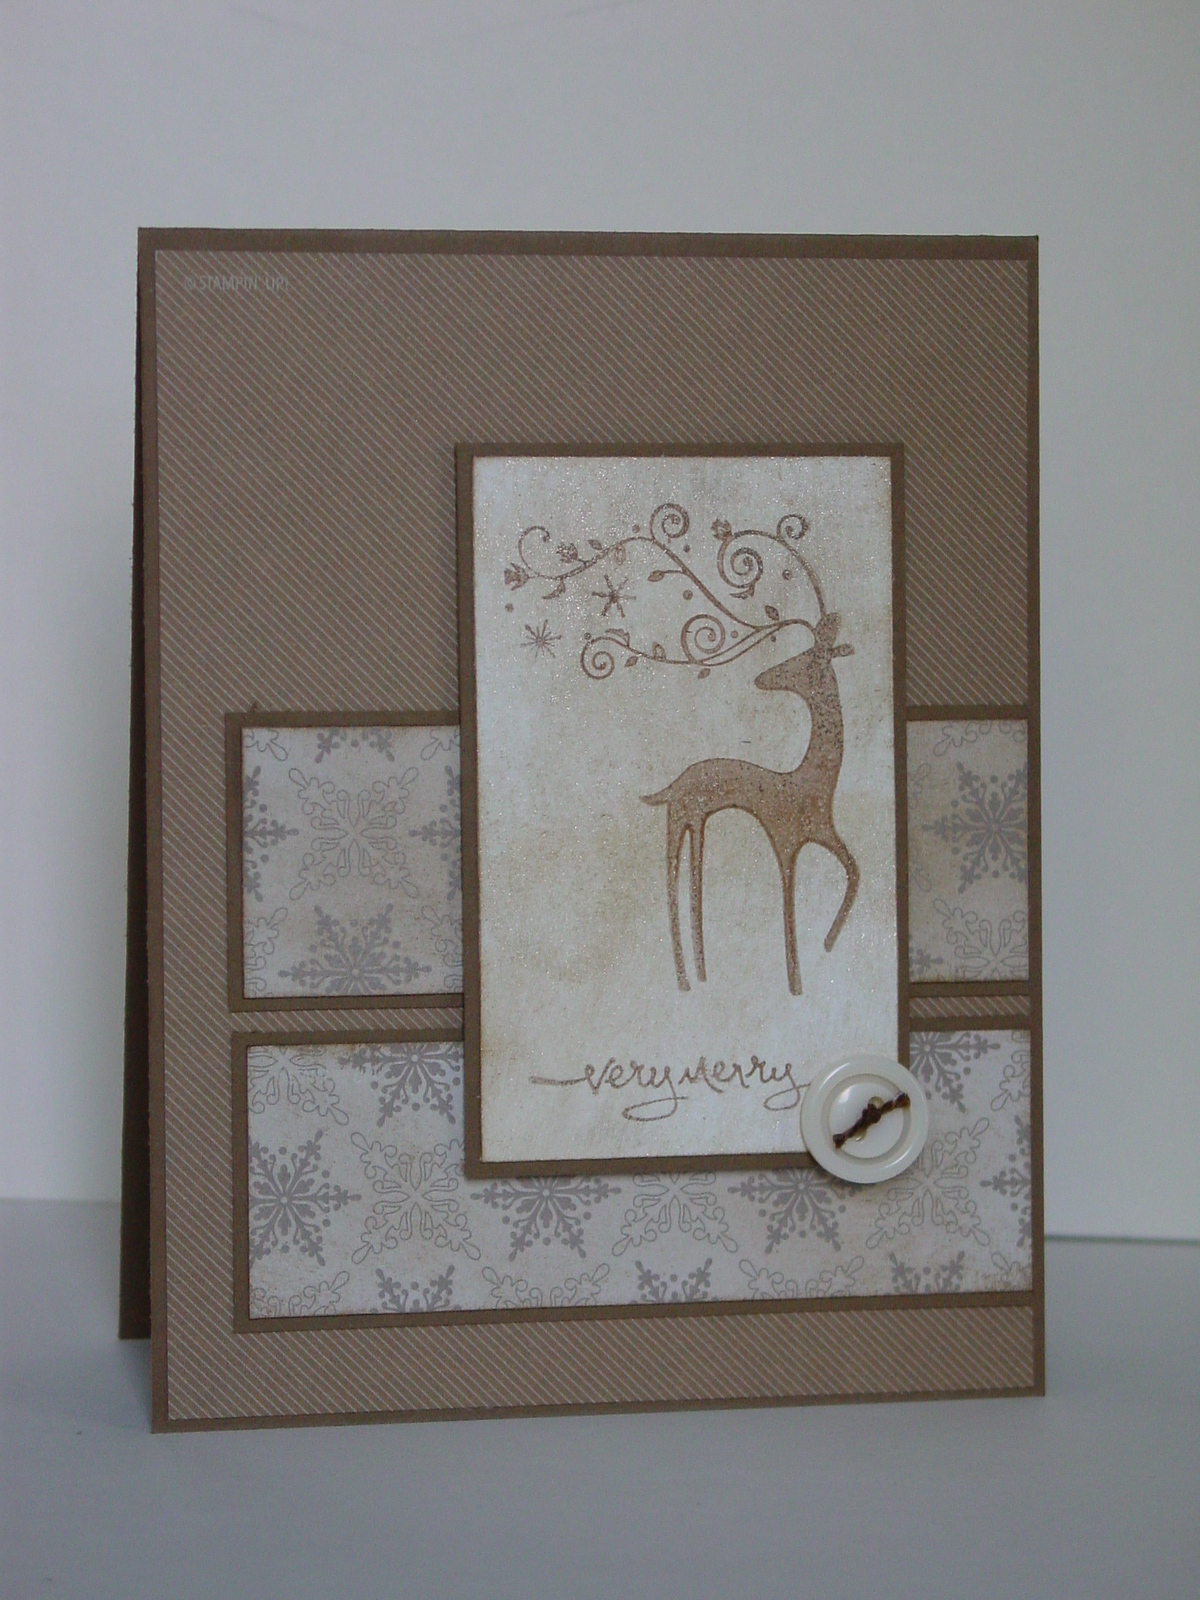
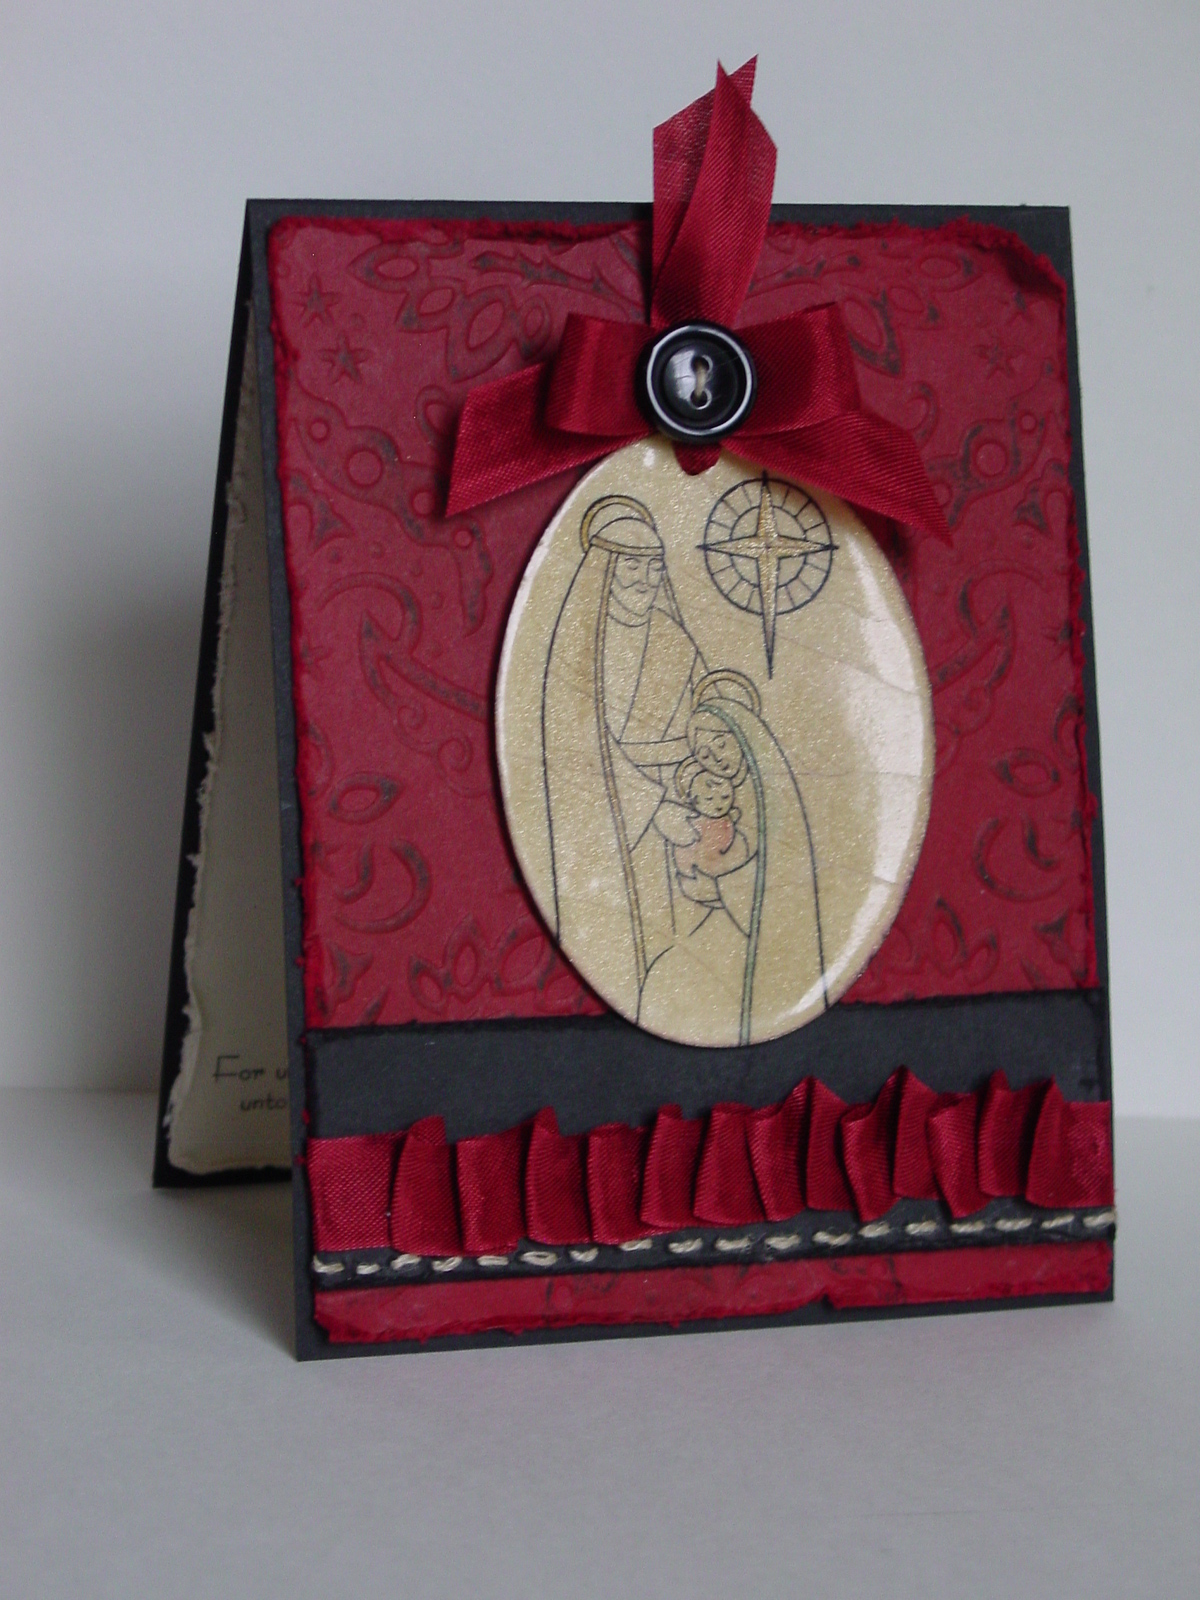
I’m back today to give a little more detail on the cracked glass card I did for the Stampin’ Addicts Holiday Mini Blog Hop.  I talked a little bit there about the stamped image.  I think what made me the happiest was how the sparkle of the Shimmer Paint came through the “cracked glass”.  I wasn’t sure if that detail would be lost after all the embossing but instead it seemed to intensify.  Here are some more pictures of the card:

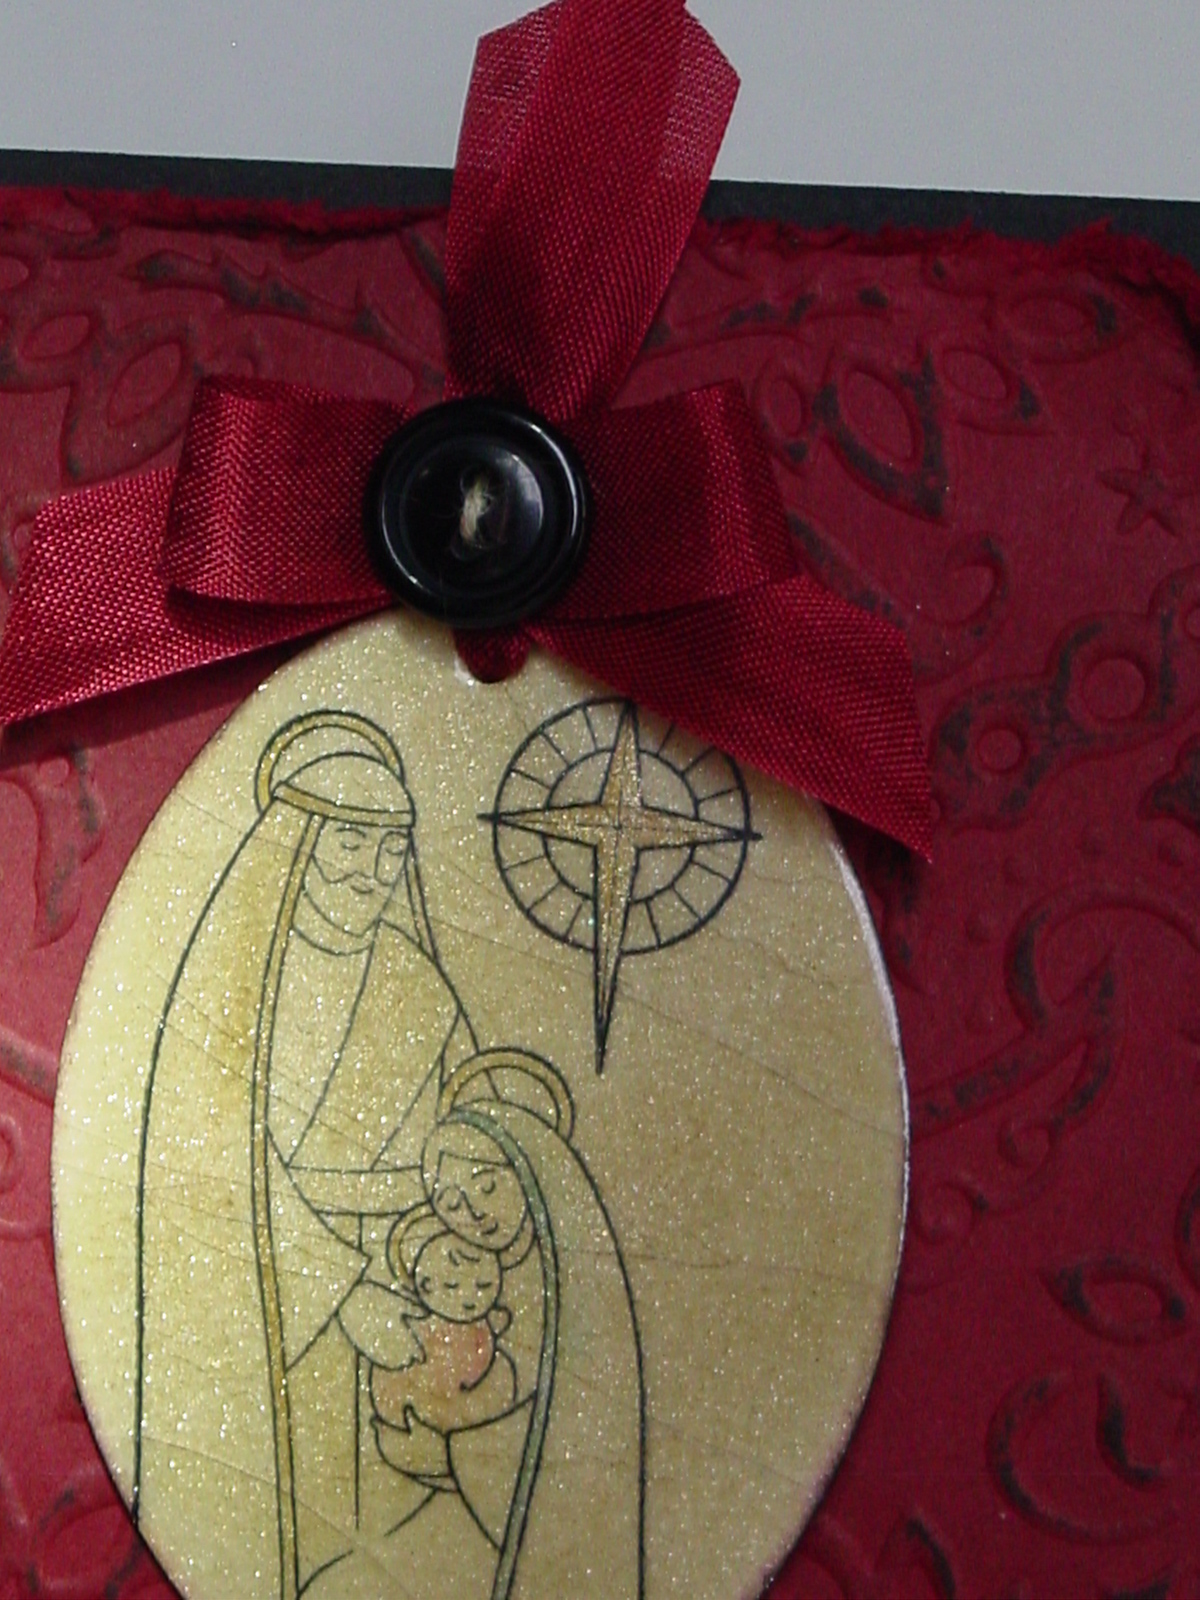
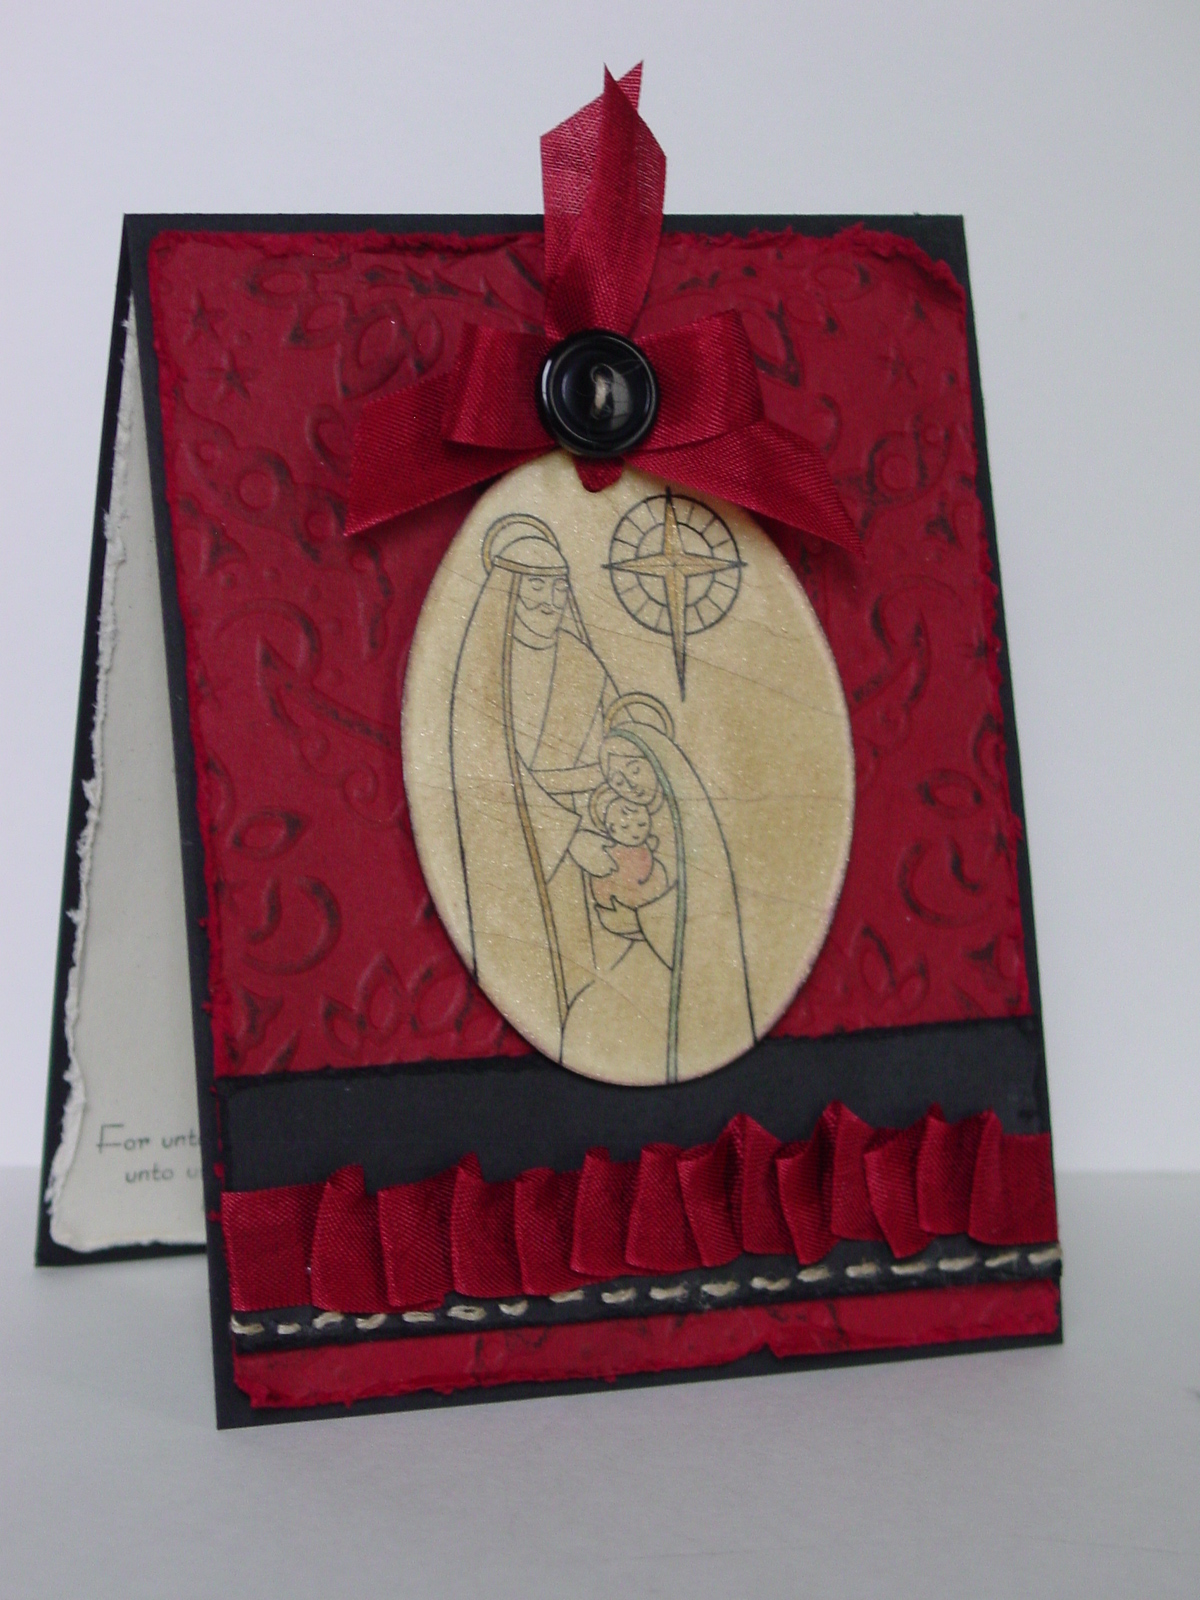
I recommend that you click on the first picture and then click again in order to see all the details.  I kept the colors muted in order to give it a faded/aged feel.  While I had put Champagne Mist Shimmer Paint over the entire panel with a sponge dauber, I also added more Shimmer Paint with a Blender Pen tip on the star and the halos.  I am considering making more of these and putting chipboard on the back of them to create ornaments as gifts.  I just feel like this would be lovely on a tree!

I want to give you a little more about how I made the background panel, as well, since I discovered something cool.  I got the idea from watching a training video made by Stampin’ Up about the new Distressing Essentials.  In the video, it was recommended to used the stamp in the kit to apply the ink in order to control the application.  I don’t have the kit (yet) so I used one of the clear blocks and “inked” it with a Soft Suede ink pad.  Then I rubbed gently over the embossed panel.  The ink was a bit random and highlighted the raised sections.  It was easy to control and I could add as much as I wanted without overdoing it.  Just another reason I am glad to have those clear blocks! 

After stitching the Linen Thread onto the black panel, I put a line of Sticky Strip across it.  The Seam Binding was then randomly ruffled across.  If you have a ruffle that sticks up a bit to much or won’t go where you want it, just add a Mini Glue Dot. 

I think everything else on the card is self-explanatory.  Thanks so much for stopping by today.  Hope you have a great rest of your week!

A Pals Sketch Birthday

A Pals Sketch Birthday published on 2 Comments on A Pals Sketch Birthday

The son of a dear friend turns one this week and I needed a card, of course!  In a dramatic turn from ALL of the Christmas cards I have been working on, I pulled out my Play Date DSP to see what I could come up with.  The Pals Paper Arts this week was designed by Margaret Moody so of course it is fantatic.  Make sure you go check it out!  I have done a similar card concept before with the numbers but, as I mentioned then, the  numbers are what made me buy this paper.  I love the idea of highlighting the specific birthday using the monochromatic and the mulitcolored papers!  That is what I did again on this one.  I love the bold colors in this DSP and I let the paper do most of the work.  After I got the numbers panel completed, I needed a little something for balance and tied on a button from the Brights Designer Buttons collection.  I layered the Oval Punches and used the phrase from Teeny Tiny Wishes. 

Didn’t this turn out cute?  The mommy of the little boy loved it and I’m happy that it highlights the special birthday.

Now, since I can’t let you go without SOMETHING from Christmas, I have a close-up of one of my cards from the Stampin’ Addicts Blog Hop last weekend.  I shined a light on the card so that I could capture all the shimmer from the Shimmer Paints I used.  I am not normally a “glitter girl” but the sparkle from this card is so pretty in person.  I hope this gives you more of a feel for it.

Thanks for stopping in today.  Tomorrow I will have close-up pictures and details about my cracked glass card from the hop.  Have a great day!

Stamp:  Teeny Tiny Wishes; Paper:  Chocolate Chip, So Saffron, Play Date DSP; Ink:  Chocolate Chip; Accessories:  Large and Small Oval Punches, Chocolate Chip Wide Grosgrain (ret), Brights Designer Buttons, Dimensionals

All products are Stampin’ Up!

Christmas is in the air!

Christmas is in the air! published on No Comments on Christmas is in the air!

It may be the end of August but Christmas is in the air around my house.  I continue to work towards making cards for my Operation Write Home challenge.  Only two more weeks until the big “stamp-a-palooza” known as an Open House.  Today I am posting two more cards made for my donation box.  But first, as promised in the Stampin’ Addicts Blog Hop post, I have some more pictures of the candle I made using Rejoicing in Christmas.  The picture shown over the weekend shows the subtlety of the colors but didn’t quite show the shine on the candle.  As I mentioned in that write-up, I watercolored the ink onto the tissue paper and then applied Champagne Mist Shimmer Paint on top.  One of the unexpected effects of this was that the Shimmer Paint took on a gold-leaf feel.  Here are some pictures that show this a little better:

Now on to my cards for today.    The first uses this week’s OCC Sketch Challenge 30 which is a super layout.  The start of this card was actully the tag.  As part of the “creative process” for the blog hop, this was a leftover piece.  Not one to waste a good scrap, I realized that it fit perfectly into the sketch.  I pulled out my friend Dasher again (really, I do have other sets but he works with so many things!).  The result is a card I really like and that isn’t too complicated to replicate.  The ribbon, I confess, is non-SU and was tied onto a gift box from Mother’s Day (perfume).  This nice piece of grosgrain was just waiting for the right card.  Here is the result:

The final card for today uses last week’s OWH Stars & Stamps Sketch Challenge 31.  This is one of those go-to layouts that will work time and time again.  They have a lot of super ideas over there, by the way, so check them out!  I pulled out some retired SU paper from last year, Christmas Cocoa DSP.  The snowflake paper immediately inspired another tone-on-tone card.  I sponged some Soft Suede on the Whisper White paper and then added a little Champagne Mist Shimmer Paint with a sponge dauber.  Dasher was out and I threw a little more ink on him.  While I certainly want each card for OWH to be special, I also need to make as many as I can.  For me that means staying with one “theme” per stampining session.  I am encouraging my participants to do the same so we can fill a nice big box for those heroes!!  Ok, the rest of this card explains itself so here it is:

Thanks for dropping by today.  Tomorrow I will have a birthday card (for a change of pace) and on Wednesday, some more details on my cracked glass card from the blog hop.  If you missed the hop, please go over to Stampin’ Addicts and take a look at all the wonderful projects from Stampin’ Up’s new Holiday Mini.

Candle:

Stamp:  Rejoicing in Christmas; Ink:  Early Espresso, Soft Suede, Not Quite Navy, More Mustard; Paper:  Tissue; Accessories:  Blender pen, Aquapainter, Champagne Mist Shimmer Paint, Heat tool, Espresso Satin Ribbon

Card 1:

Stamp:  Dasher, All Holidays; Ink:  Soft Suede, Cherry Cobbler, Basic Black; Paper:  Basic Black, Cherry Cobbler, Soft Suede, Naturals Ivory; Accessories:  Neutrals Designer Buttons, Ribbon, Shimmer paint (on tag with sponge dauber)

Card 2:

Stamp:  Dasher, Short & Sweet; Ink:  Soft Suede; Paper:  Christmas Cocoa DSP (ret), Soft Suede, Whisper White; Accessories:  Neutrals Designer Buttons

All products Stampin’ Up unless otherwise indicated.

Holiday Mini Blog Hop – Rejoicing in Christmas

Holiday Mini Blog Hop – Rejoicing in Christmas published on 42 Comments on Holiday Mini Blog Hop – Rejoicing in Christmas


Welcome to your next stop on the Stampin’ Addicts Holiday Mini Blog Hop!!    If you missed someone or want to see the whole hop list, just click on the banner above.  I am sure you loved Cindy’s projects with Jolly Bingo Bits!  If you missed it, jump right on over to her blog, Heart’s Delight Cards.  My chosen set for this hop is Rejoicing in Christmas and let me tell you, this set is worth rejoicing over!  I have been looking for the right Holy Family set for a while and this exceeds all my hopes.  You can see any project closer simply by clicking on the image.

My first project is a card that really puts the focus on the Holy Family itself.  I kept the card stock colors a bit subdued in order to shine the light on them…and I mean shine.  Yes, my shimmer paint has returned in full force for this set of projects!  I stamped the image on watercolor paper to start.  Using my blender pen and Crumb Cake ink I colored Mary’s dress and Joseph’s garments.  I used Night of Navy and Early Espresso on the borders of Mary and Joseph’s head coverings, respectively.  Some Cherry Cobbler was used for Jesus and So Saffron for the halos.  This is where the fun started.  I pulled out my Champagne Mist and Frost White shimmer paints.  Mary’s veil had no color on it and I used the Frost White to give it a beautiful shine.  I added a little that was left on my Aqua Painter to put some shimmer on Jesus.  Finally, I used the Champagne Mist on Joseph.  To up the wow factor, I sprayed my homemade shimmer mist (rubbing alcohol and Shimmer Paint) onto the Crumb Cake paper.  I tied on the richly colored Cherry Cobbler seam binding (p. 21 Mini) and was done.  The sketch is the Fall-to Layout 103 from last week.

My next project started looking towards holiday gifts for teachers.  As I say that, I have to admit that this one will stay right here at my house and I’ll just have to make more.  I have never stamped on a candle before but this set seemed tailor made for it.  I used white tissue paper and stamped the Holy Family, the star and the quote in Early Espresso ink.  Using my blender pen again, I gently applied Soft Suede, Not Quite Navy and More Mustard ink to the image.  On Jesus, the star, the halos and the headpieces I applied Champagne Mist Shimmer Paint.  I cut the image and used wax paper to hold the image on the candle.  Heat was applied with my heat tool to melt the paper into the wax.  Finally, I put on Early Espresso Satin Ribbon using Sticky Strip.  You can see the motivation for the colors in the candle in the picture beside it.  I will have a more detailed set of pictures on Monday so watch for that.

My next project is a card that takes advantage of the vintage trend.  I started by cutting out a large oval of watercolor paper with my Ovals die and my Big Shot.  I sponged the paper with Soft Suede and then applied Champagne Mist Shimmer Paint with a sponge dauber to the whole oval.  I stamped the star and the Holy Family with Black Stazon ink and watercolored them lightly using Soft Suede, Cherry Cobbler and Not Quite Navy.  I punched a hole in the top of the oval with my 1/16″ Circle Punch.  I then used the Cracked Glass technique on the oval.  Again using my Big Shot, I rolled out my Cherry Cobbler paper with the Backgrounds 1 Texturz Plate.  I hand-stitched linen thread onto my Basic Black paper strip and added the Cherry Cobbler Seam Binding.  Finally, I made the oval look more like an ornament by adding more Seam Binding and a black button from the Neutrals Designer Buttons.  I will have more available on this project on Wednesday.

My final project is probably my favorite of all.  Yes, it isn’t technically my project but I did convince my 7 year old son to make it for me so that should count for something.  As much as I love my “serious” items above, what drew me to this set was the friendliness of it.  So, using my Watercolor Pencils, he generously colored this beautiful image.  We chose Pacific Point paper to match his work when he was finished and tied on some old Chocolate Chip ribbon (I apologize for the one non-current item but he chose it and I couldn’t say no).  It is impossible not to smile after seeing this.  He is so proud of it that he is going to donate it to my Operation Write Home challenge

If you have any specific questions about any of these, make sure to leave it in the comments so I can address them in my posts next week.  I hope you love these projects as much as I do!

Now it is time to head on over to Barbara’s Creative Stampin’ Spot to see her wonderful things made with A Cute Christmas and the Candy Cane DSP.

<–Previous Post           Next Post–>

All products are Stampin’ Up!

Whimsical Farewell

Whimsical Farewell published on 25 Comments on Whimsical Farewell

Welcome to the Stampin’ Addicts Retiring Sets Mega Hop!!  If you joined me from The Stampin’ Bunny, I’m sure you were impressed by Rhonda’s projects with A Beautiful Thing.  Her work always inspires me!  If I am your first stop, you can find links to the entire hop over at Stampin’ Addicts.  After the hop you can look around over there for all the “Positively Stampin’ Up” fun…it is a super site with lots of amazing artists!

 I am so thrilled that you stopped by to see my projects with the retiring set Garden Whimsy.  This has been a wonderful “go-to” set for me because the images always make me smile!  It is that time of year here in VA…the long awaited last weeks of school.  Since the kids have been counting, I’m not sure how it snuck up on me but my first project is a quick little treat box.  Perfect for 4 pieces of Ghirardelli chocolate squares…and for a last minute teacher treat!!  I will have more info available on Monday with the “how-to” on this box.  It is such a great way to use up some of those last strips of DSP and it comes together in about 10 minutes.  I used Basic Black card stock for the box and Lovely Flowers DSP (Hostess) to brighten it up.  The little lady bug uses Melon Mambo, So Saffron and Basic Black Stampin’ Write Markers.  I stamped her on Whisper White then punched her out with the 1 1/4″ circle punch.  The So Saffron circle was punched with the 1 3/8″ circle punch and the Scallop Circle is Melon Mambo.  I put the box together using Sticky Strip and then used dimensionals on the bottom of the Scallop Circle to attach it to the box.  The Corner Rounder punch finished up the box perfectly.   If you want to see any project closer, just click on the picture.

My next project uses the big butterfly from Garden Whimsy.  This butterfly happens to be PERFECT for the Rock n’ Roll technique.  If you aren’t familiar with this technique, you need to be!  It is a super way to add dimension to large solid stamps.  First you ink up your stamp with a lighter color.  Then chose a complementary darker color and “roll” the stamp’s edges on the ink pad.  Make sure that the darker color pad is dark enough to not be corrupted by the lighter color ink.  I used my Black marker to finish off the butterfly’s antenna.  The words are from the retiring hostess set Lovely Flowers, the DSP strips are from Lovely Flowers and Tea Party.  I used the circle punches again to keep a continuity amongst the projects.  The layout is courtesy of Karen Giron and her Sweet Sunday Sketch Challenge.

Finally, I wanted to use another technique and the “out of the box” look works really well with the flower in this set.  I simply stamped the flower and the butterfly, then using my paper cutter I cut up to the edges of the flower.  The rest was trimmed with scissors.  I love how the black really pops the Melon Mambo on this card!

I hope that you have enjoyed your stop here at Stampin’ on the Fly!    Here is a final look at all the projects together:

I’d love to hear what you think about my projects so don’t forget to leave a comment.  Your next stop is to visit Joyce at Stampin’ Central.  She is using the beautiful Le Jardin Botanique and you will love her work!!  Your jaw will drop when you see her brayering!!  Enjoy the hop and I look forward to seeing you again soon.

…GO TO NEXT BLOG…

Box – – Stamps:  Garden Whimsy; Paper:  Basic Black, Lovely Flowers DSP, Whisper White, So Saffron, Melon Mambo; Ink:  Melon Mambo, So Saffron, Basic Black; Accessories:  Circle punches, Scallop circle punch, Sticky Tape, Dimensionals

Card 1 – – Stamps:  Garden Whimsy, Lovely Flowers; Paper:  So Saffron, Basic Black, Lovely Flowers DSP, Tea Party DSP, Whisper White; Ink:  So Saffron, Melon Mambo, Basic Black; Accessories:  Circle punches, Dimensionals, Black Brads

Card 2 – – Stamps:  Garden Whimsy, Short & Sweet; Paper:  Lovely Flowers DSP, Melon Mambo, Basic Black; Ink:  Melon Mambo, So Saffron, Old Olive; Accessories:  Paper cutter, Dimensionals

All products are Stampin’ Up!

Two for one

Two for one published on No Comments on Two for one

Happy Monday to you all!  I hope you had a beautiful weekend.  I know my family had a wonderful Easter…what a blessing!  I actually have two cards for you today.  The first is a birthday card for a 7 year old boy who is a friend of one of my sons.  The second was a card for a swap that I did with Stampin’ Addicts.  I received my swaps on Saturday, so I feel safe in finally posting my card.

The first card uses a sketch from Stampin’ 411, their sketch challenge 145.  I also followed this week’s Our Creative Corner challenge to “Break out the buttons”.  The sketch seems to lean towards using a button so this was an easy combination.

ssc145


I had some left over DSP from the Hand Drawn hostess bundle that has been retired.  It is such a kid-friendly paper so I seem to always use it on cards where I need something quick and easy.  This sketch  is perfect for that Happy Birthday paper in the bundle!  I used the lined paper to stamp the hat and words from Party Hearty.  The celery ribbon is from the ribbon bundle in last year’s Sale-a-bration.  Sometimes it is nice to use up some of those oldies but goodies!!  The button is from the Sherbet button set.

Stampin'411 SC145, OCCC buttons


My card for the swap uses a variation of a sketch from Taylored Expressions.  Her sketches are always wonderful.  This swap was for thank you cards and the cards I got back are just super.  For swap cards (especially a demonstrator swap), I like to stick to one stamp set and one DSP.  In this case, the stamp and the paper are all from the Lovely Flowers level 3 hostess bundle.  I hope they are as happy with this card as I am with theirs!! 

TESC104 - Thank You Swap (SA)

Easter break has begun with the kids and the weather remains perfect in Northern VA.  My garden is sprouting with spinach, peas and sugar snap peas!  Yea, yea, and yea!!  Hope you have a great day.  Thanks so much for stopping by!

Card 1:  Stamp:  Party Hearty; Paper:  Hand Drawn DSP, Certainly Celery; Ink:  Ruby Red, Certainly Celery; Accessories:  Sherbet button, Celery ribbon (SAB ’09), Dimensionals

Card2:  Stamp:  Lovely Flowers; Paper:  Lovely Flowers DSP, Chocolate Chip; Ink:  Chocolate Chip, Old Olive, Rich Razzleberry, Crushed Curry; Accessories:  Chocolate satin ribbon

Stampin' Addicts Birthday Blog Hop

Stampin' Addicts Birthday Blog Hop published on No Comments on Stampin' Addicts Birthday Blog Hop

 SABDbanner[1]


Happy Birthday, Stampin’ Addicts!!  I’m thrilled you stopped by for the Birthday Blog Hop!!  Stampin’ Addicts is one of my favorite sites and a go-to place for tons of creative ideas!  I’m stop #20 so if you have missed any, please go here to see all the links.  For those coming over from Kandi’s blog, My Sweet Stampin’ Spot, weren’t you completely wowed by her fabulous “green” ideas??!!  My theme for this hop is “limited supplies”.  All stampers have to start somewhere and many don’t have tons of accessories (yet!).  My goal was to use basic card stock, stamps, ink and only one extra item.  I find that I lean on designer paper a lot for my stamping and it really sparked my creativity when I went back to basics!  Don’t forget, if you click on any picture, you can see a closer view. 

My first card showcases the lovely Hostess set, Of the Earth, and some of my favorite colors.  The simple addition of Stampin’ Up’s new satin ribbon (Occasions Mini) really makes this card special!  I’m in love with the Well Scripted word set, too.  The framing effect of the Chocolate Chip card stock steps up a simple layout.

SA Birthday Blog Hop - Basic layout

Color blocking is another wonderful way to add some “wow” to a card.  I love how the Basic Black layer really makes these colors pop!  I cut a second cupcake top and put it on dimensionals to add additional depth and added a Real Red corduroy button.  Such an easy card to put together and I love the strong colors with this set (Party Hearty)!!


SA Birthday Blog Hop - Color blocking


Well, I said it at the beginning, I LOVE designer series papers!  Since I couldn’t use them…I created my own!  And because I created my own, I was able to make a card in two colors that have sat dormant in my stash for far too long.  I really love the combination of Blush Blossom and Close to Cocoa.  The softness of the colors led me to the wonderful new set Vintage Vogue and the card almost made itself!  I used the vine to stamp on the Blush Blossom paper and create the texture of a designer paper.  I cut out the two flowers and used the Very Vanilla satin ribbon to make the center (the how-to on that center is in my post dated Jan. 20, 2010).  It was still missing something and I realized this card had a shabby chic feel to it…so I did a little distressing and here it is!  The layout started with a challenge from Stampin’ 411 (SSC138) which I modified slightly. 


SA Birthday Blog Hop - Shabby Chic

 Thanks so much for stopping by!  All of these cards qualify for the Pals Paper Arts challenge this week to Keep It Simple, Sweetie (KISS)!  Your comments are most welcome and definitely appreciated!  Now, your next stop on the hop is a visit to Linda at Olive Stamps.  You’ll love her quick and simple birthday cards!

Card details:

1.  Stamps:  Of the Earth (Hostess), Well Scripted (Occasions Mini); Paper:  Mellow Moss, Bordering Blue, Chocolate Chip, Whisper White; Ink:  Mellow Moss, Bordering Blue, Chocolate Chip; Accessory:  Chocolate Chip satin ribbon

2.  Stamp:  Party Hearty; Paper:  Taken with Teal, Real Red, Crushed Curry, Basic Black, Whisper White; Ink:  Taken with Teal, Real Red, Crushed Curry; Accessory:  Real Red Corduroy Buttons (Occasions Mini)

3.  Stamps:  Vintage Vogue, Well Scripted (both Occasions Mini); Paper:  Close to Cocoa, Blush Blossom, Very Vanilla; Ink:  Close to Cocoa, Blush Blossom; Accessory:  Very Vanilla satin ribbon

Stampin' Addicts Birthday Blog Hop

Stampin' Addicts Birthday Blog Hop published on No Comments on Stampin' Addicts Birthday Blog Hop


SABDbanner[1]


Mark your calendars!  One of my favorite sites, Stampin’ Addicts, is having its first birthday this month!!  They are hosting a Birthday Blog Hop featuring birthday themed cards and projects with Stampin’ Up! products.  I’ll be joining 24 amazingly talented stamping bloggers in this celebration on February 20th and 21st.  Don’t miss this fun event!!

Primary Sidebar