I’m a little late with this today but I have been in full snow prep mode! The snow started at noon and we are hunkered down for whatever comes! My boys have promised me they will help me shovel along with their playing in the snow. Good lads!
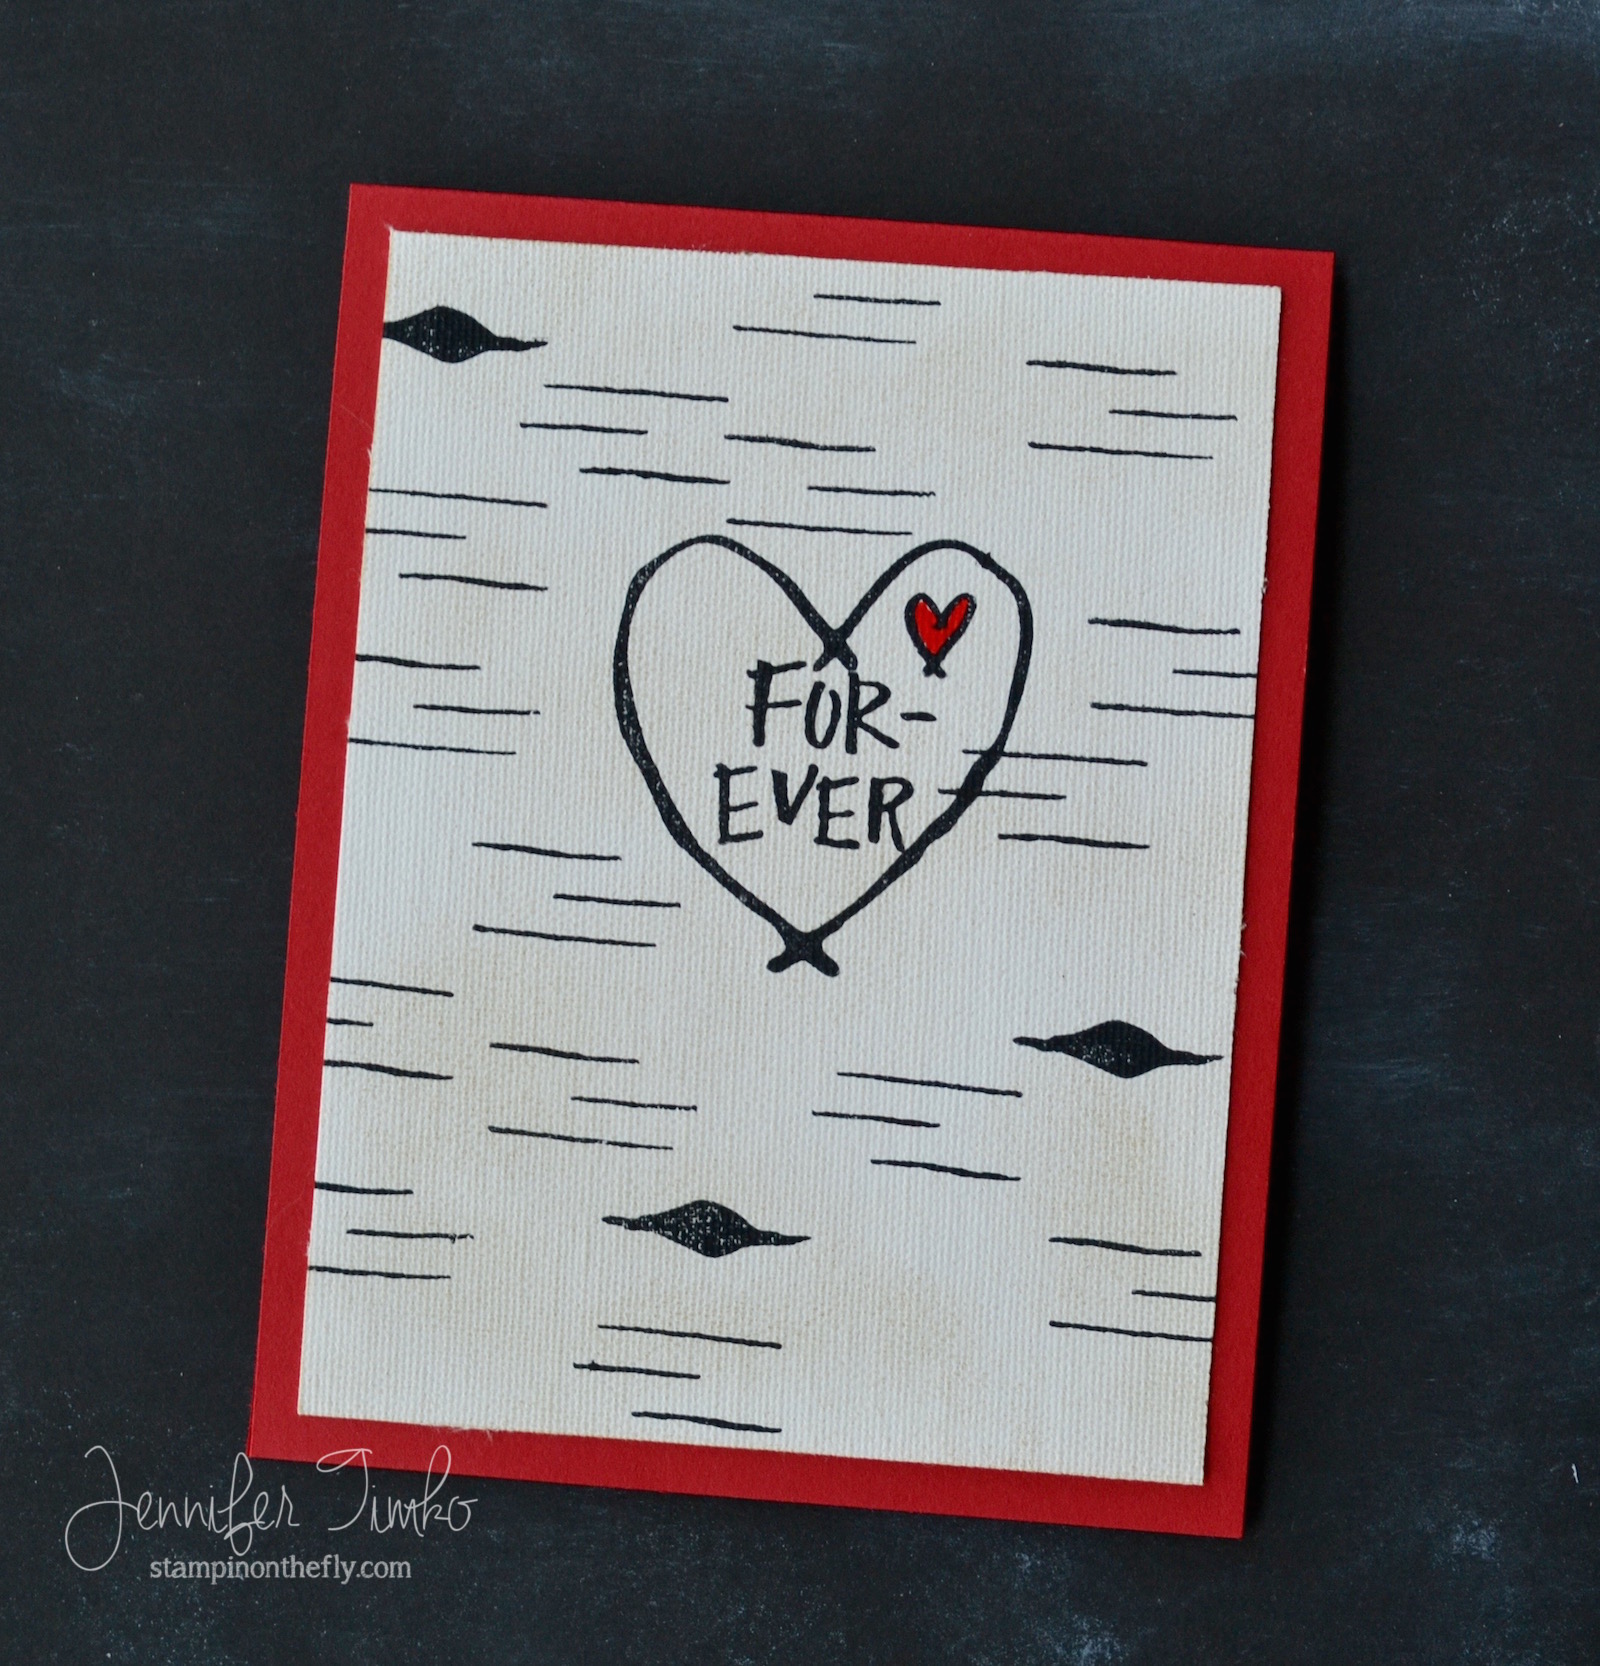
I have a fun little Valentine for you today using a set I used recently called Tree Hugs from Concord and 9th. I used the retired Canvas Creations as my base and sponged on a little Crumb Cake ink to start. I stamped the big heart, the sentiment and the little heart and added in the “birch” lines and marks using Momento Tuxedo Black ink. A little bit of a red Copic marker for the little heart and I put it on a Real Red base. A nice, clean and masculine Valentine!
Just a note…over the next couple of days I’m doing a little construction on the blog. Bear with me if things seem a bit off as I get widgets and details rebuilt. Hoping for a cleaner look that works better with devices when I’m done.
Thanks so much for stopping in today
Stamp: Tree Hugs (Concord and 9th); Ink: Momento Tuxedo Black; Paper: Real Red; Accessories: Canvas Creations (SU ret), Copic Marker
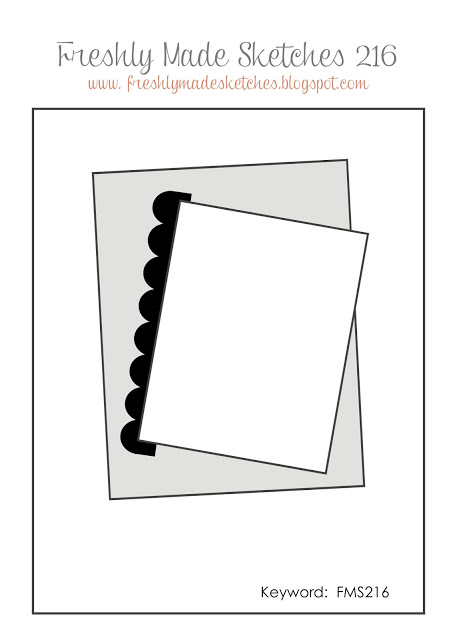
Do you hear the panic in my typing??!!!! The snow is coming, the snow is coming!!! And apparently lots of it to Northern Virginia. So I did what any reasonable stamper would do…..I created a happy spring card with not a snowflake in sight! Over at Freshly Made Sketches this week we have an awesomely fun one for you to try. It comes courtesy of the lovely Jen Brum who has clearly decided to embrace her fears as a new year’s resolution. She notoriously does not like it when we put circles in the sketch and then she went and created this one! Bravest woman I know, haha!
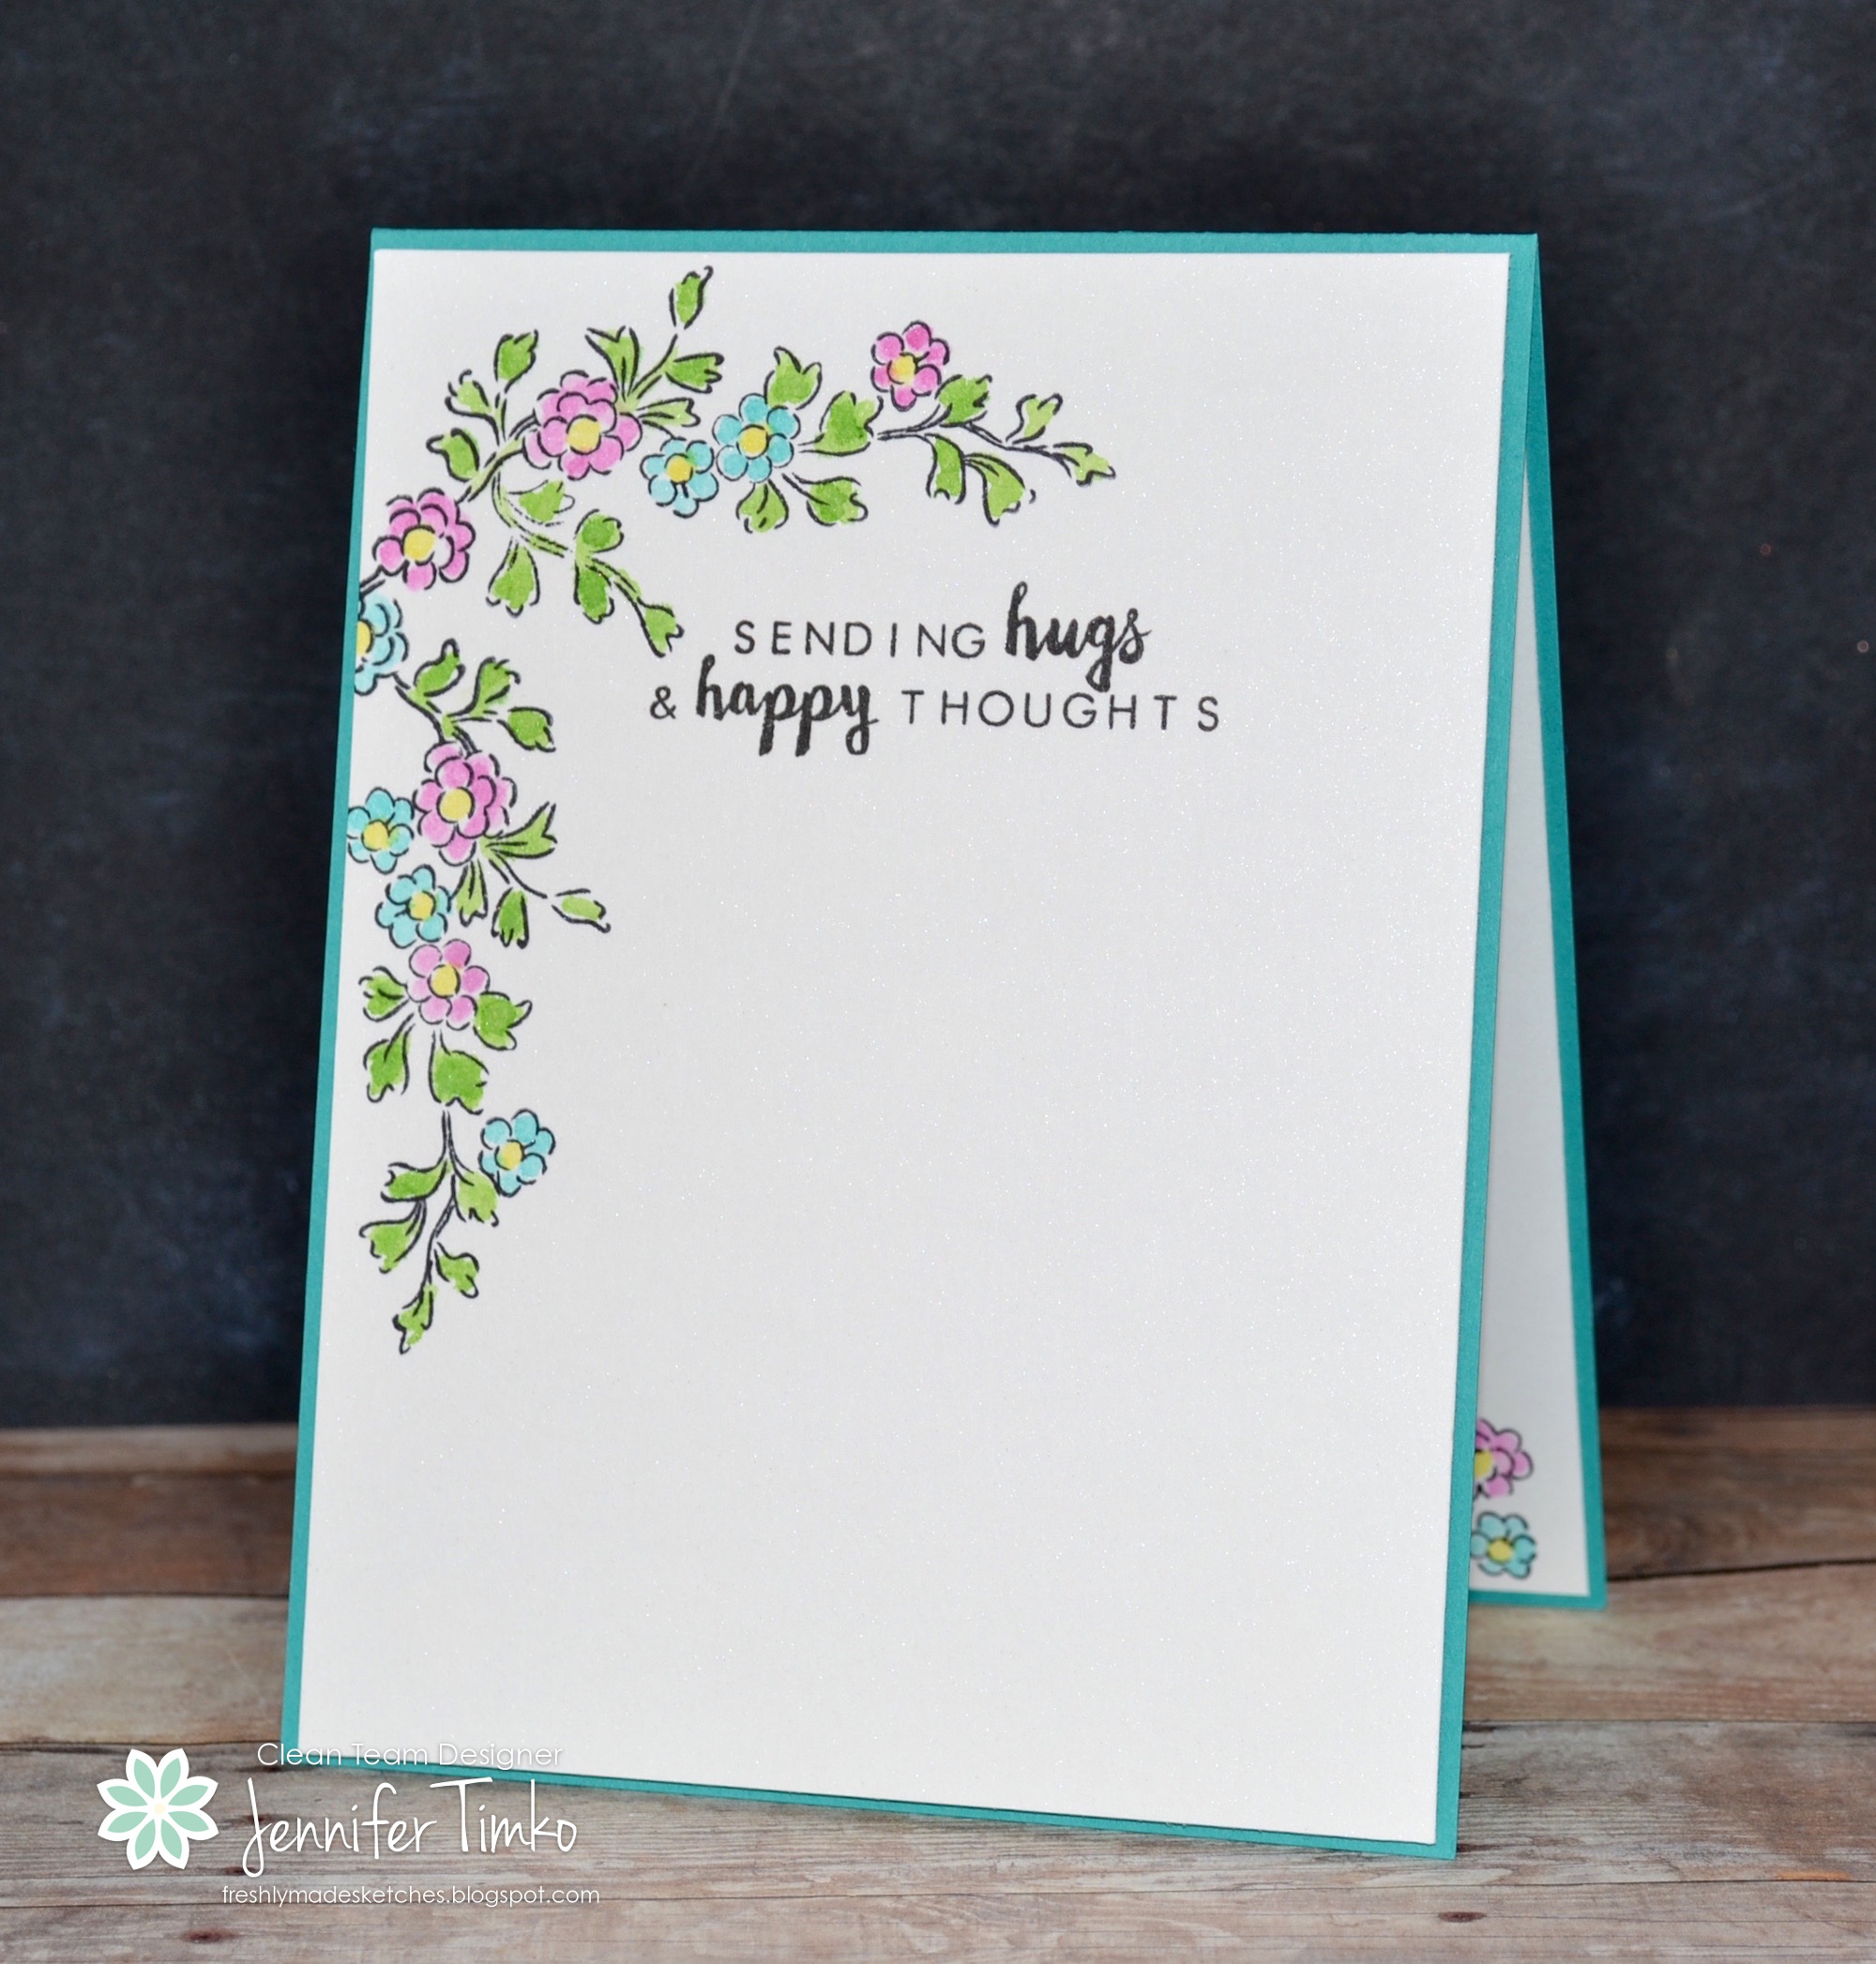
I played around with the idea of flowers and was looking through the stash when I saw this little floral spray in my Beautiful Day stamp from Altenew. I thought it would be perfect to use in the corner and I just love how this turned out. Using WPlus9 Black Dye Ink, I stamped the image onto Shimmery White Paper (SU) then added a couple more little flowers from the set to fill out gaps. With my Zig Water Pen, I colored using Tim Holtz Distress Inks. Easy and so pretty! Then I lined up the sentiment on my Misti and stamped in the WPlus9 Ink again. I stamped another few flowers inside the card (you can see them peeking out) and colored them up to. Fast and oh so happy!
I hope you enjoy this one as much as I liked making it. Now hop right on over to the challenge and let’s see what you make of the circles!
Thanks so much for stopping in today. Back on Friday with a fun Valentine card! See you then!
Stamps: Beautiful Day (Altenew); Ink: WPlu9 Black Dye Ink, Tim Holtz Distress Inks; Paper: Shimmery White, Bermuda Bay (SU); Accessories: Zig Water Pen, Misti
Happy weekend to you!! I hope you are having a great one! I had a little time to stamp yesterday and I wanted to join in some fun challenges. First, I saw an incredibly cool sketch over at CAS(E) this Sketch and I decided to combine it with the Simon Says Stamp Wednesday Challenge to use Ombre in your card.
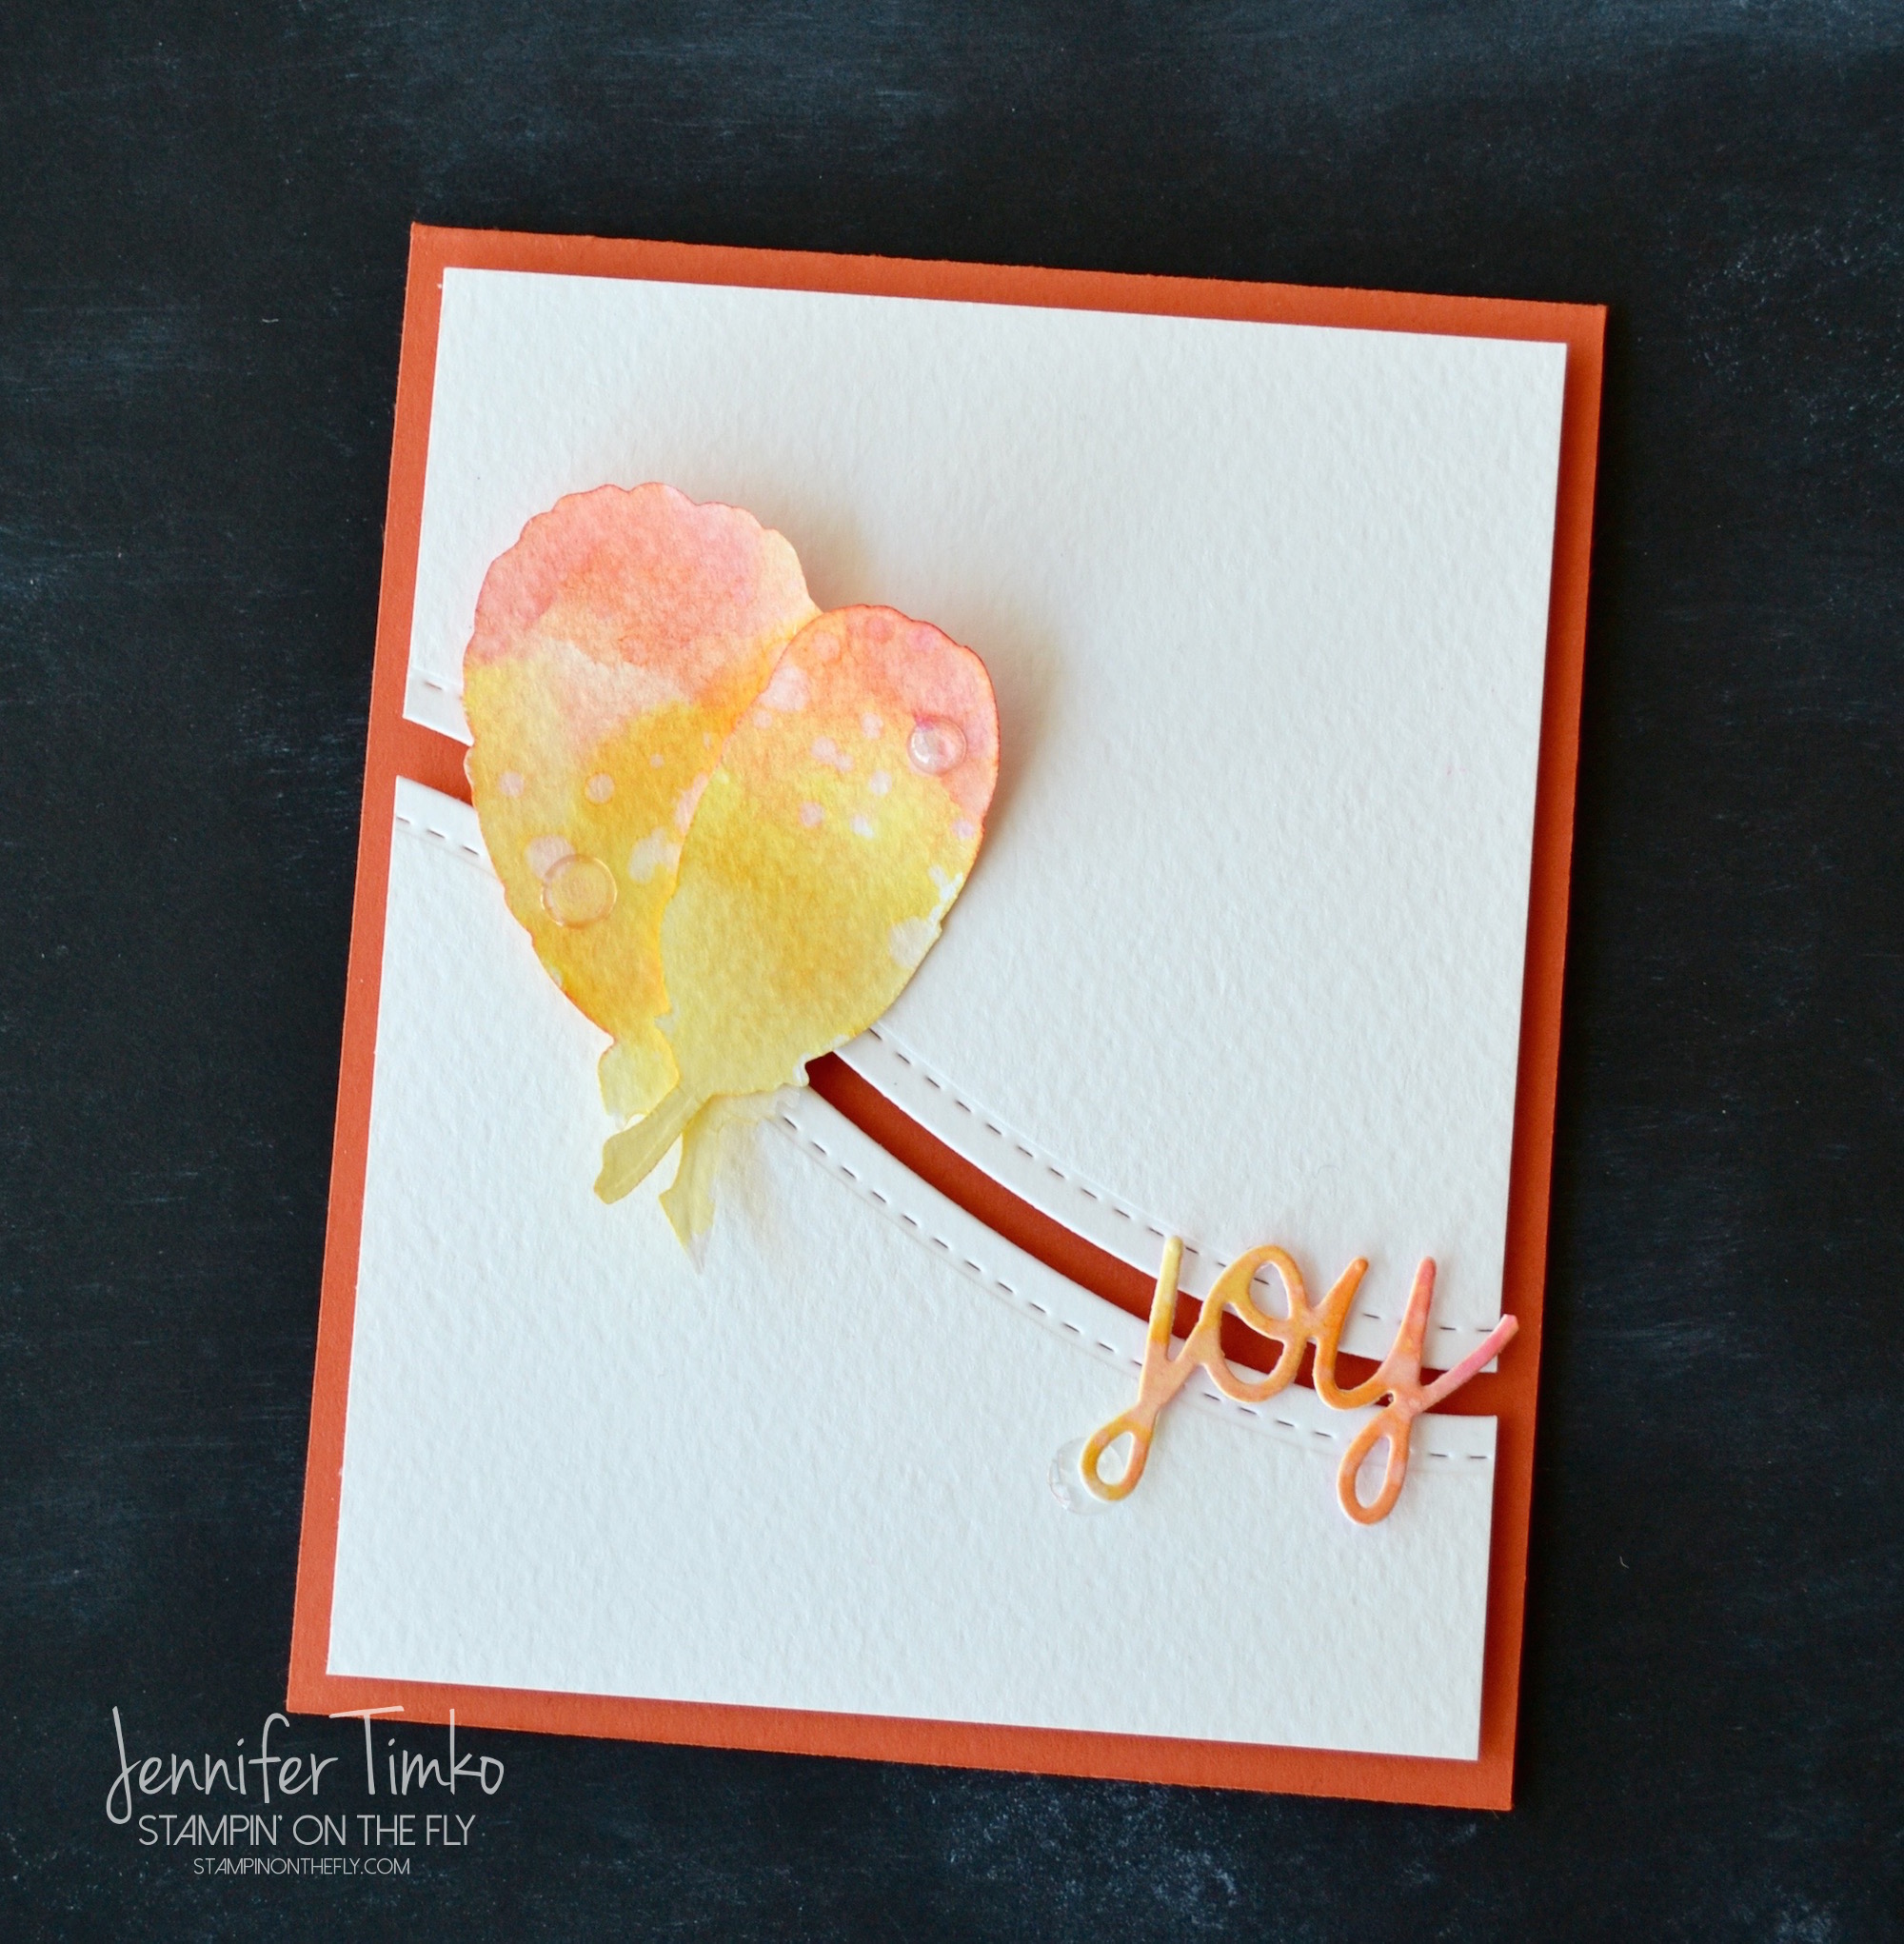
I had the feathers out on my desk still from the FMS Challenge this week so that was my starting place. Instead of using the stamp set that coordinates, I only used the Fancy Feathers Dies (Lil’ Inker Designs) and cut a couple out of Fabriano Watercolor Paper. Then using Tim Holtz Distress Inks in Squeezed Lemonade, Spiced Marmalade, Ripe Persimmon and Picked Raspberry (sounds like a tasty summer treat, doesn’t it?!), I colored to create a graduated ombre look to the feathers. After they were dry, I spritzed on a little water to add to the look. For the sentiment I went in reverse and inked up the watercolor paper first (same colors) and then cut it out with a little bonus die that I got from Taylored Expressions with an order….love the size and font on this one! Then on to the sketch. I found this one intriguing but challenging. I thought this curved stitched die from the Border Builders set (Lil’ Inker Designs) did a pretty good job of approximating the sketch so I cut some more watercolor paper with it and put in on a Tangerine Tango (SU) card base. Finally I added the White Perfect Accents (backs removed) to finish.
Well, off to see what the weekend holds. Thanks for stopping in today. See you soon!
Ink: Tim Holtz Distress (Squeezed Lemonade, Spiced Marmalade, Ripe Persimmon and Picked Raspberry); Paper: Fabriano Watercolor, Tangerine Tango (SU); Accessories: Big Shot, Fancy Feathers Dies (LID), Border Builders Dies (LID), Joy Die (TE), Zig Water Pen, Dimensionals, White Perfect Accents (SU)
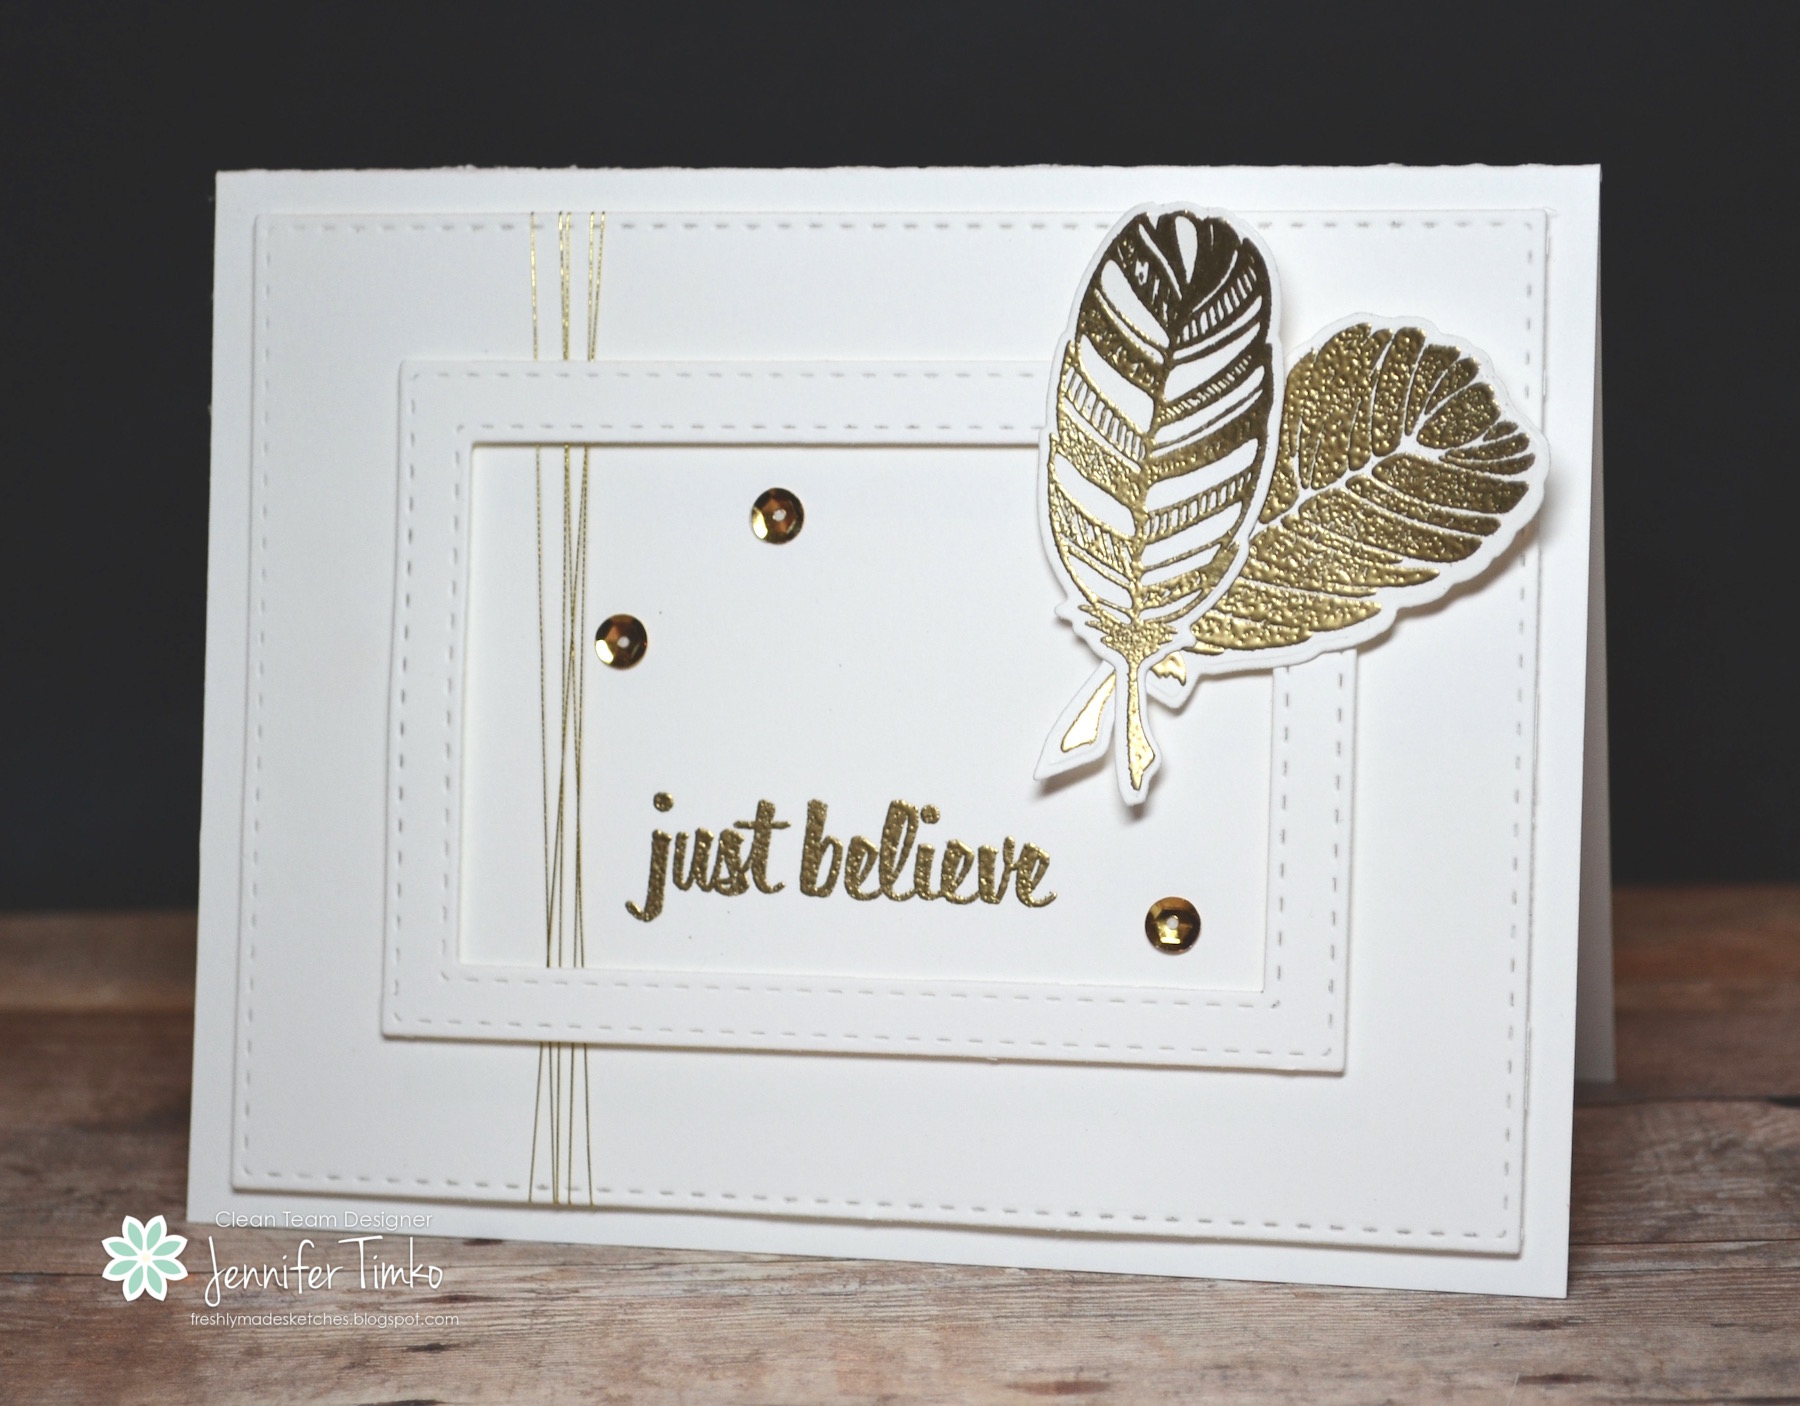
Well, winter has finally found its way to Northern Virginia….wow it is cold today!! The good news is that the weather was just the excuse to hang out in the stamp room yesterday. My mom is visiting so we did some stamping and hanging out. She was a big help on this card because I kept running into creative road blocks. Which is crazy because this sketch is awesome! The oh so amazing Cindy Hall created this one and it is a classic for sure.
Over the Black Friday time frame, I took advantage of some great deals from Lil’ Inker Designs and purchased this Fancy Feathers stamp set that I had wanted for quite a while. I just love these feathers and their matching dies! The sentiments in the set fill some holes I had too so this was a big win to find it on sale! Now that the holidays are over, I finally had the chance to break out the set and I love it even more than I thought! I kept this to all gold and white. I cheated a little, maybe, on the sketch because I didn’t create two panel colors on the base but I think I kept to the spirit of the layout at least. Good thing Cindy already told us that we could not be fired with her as the boss this week! Whew! *smile* I inked up the feathers using Versamark and heat embossed them with Gold Stampin’ Emboss Powder. The same for the sentiment. I created the frame by layering the Stitched Rectangles Dies from Simon Says Stamp. The Gold Thread and gold sequins from the Metallics Sequins (SU) add a little more gold goodness! For some reason it looks dark here but the shine in person is really pretty. I just love the sentiment and my mom had a great suggestion for the perfect recipient!
Ok, the team has rocked the sketch and you are going to have a great time with it for sure. So off to the stamp rooms! Can’t wait to see your creations!
Thanks so much for stopping in today. See you soon!
I’m so happy to be able to share this fun card I created last week for the Simon Wednesday Challenge! The challenge was “Something New” and I totally just had to pull out the latest stamp that I got from Concord and 9th called Tree Hugs. I just love that you can create your own birch trees and add a little carving. I suppose that Valentine’s Day is right around the corner (already?!) and this set makes awesome masculine cards! I stamped the trees onto Whisper White using Momento Tuxedo Black ink. It took a little bit of masking to create the angled trees and the branch but nothing too time consuming. Then I set about coloring. I used two Copic colors and that was it! BG11 is the light aqua background and then E31 adds a little shading to the trees and carving. I was so happy that Santa brought me some Copics for Christmas and E31 was in that little pack of neutrals that he knew I just had to have!! When I was all done coloring, I trimmed the image layer using my Big Shot and the Stitched Rectangles Dies from Simon Says Stamp.
Hope you enjoy this fun card. Back on Wednesday for the latest from Freshly Made Sketches! See you then!
Stamp: Tree Hugs (Concord and 9th); Ink: Momento Tuxedo Black; Paper: Whisper White, Basic Black; Accessories: Big Shot, Drummer Boy Dies(WPlus9), Stitched Rectangles (SSS), Zig Water Pen, Dimensionals, Softly Falling Embossing Folder (SU)
Happy first Wednesday of the new year and welcome back to another year of challenges from Freshly Made Sketches!! I have to admit that it was nice to have a little bit of time off but wow, were you all busy in the FMS gallery. We were so thrilled to be a part of your holiday stamping and really enjoyed seeing your creations! The oh so talented Kim Singdahlsen has a fun and unique sketch for this week and it is sure to get you right to playing with all your new holiday gifts!
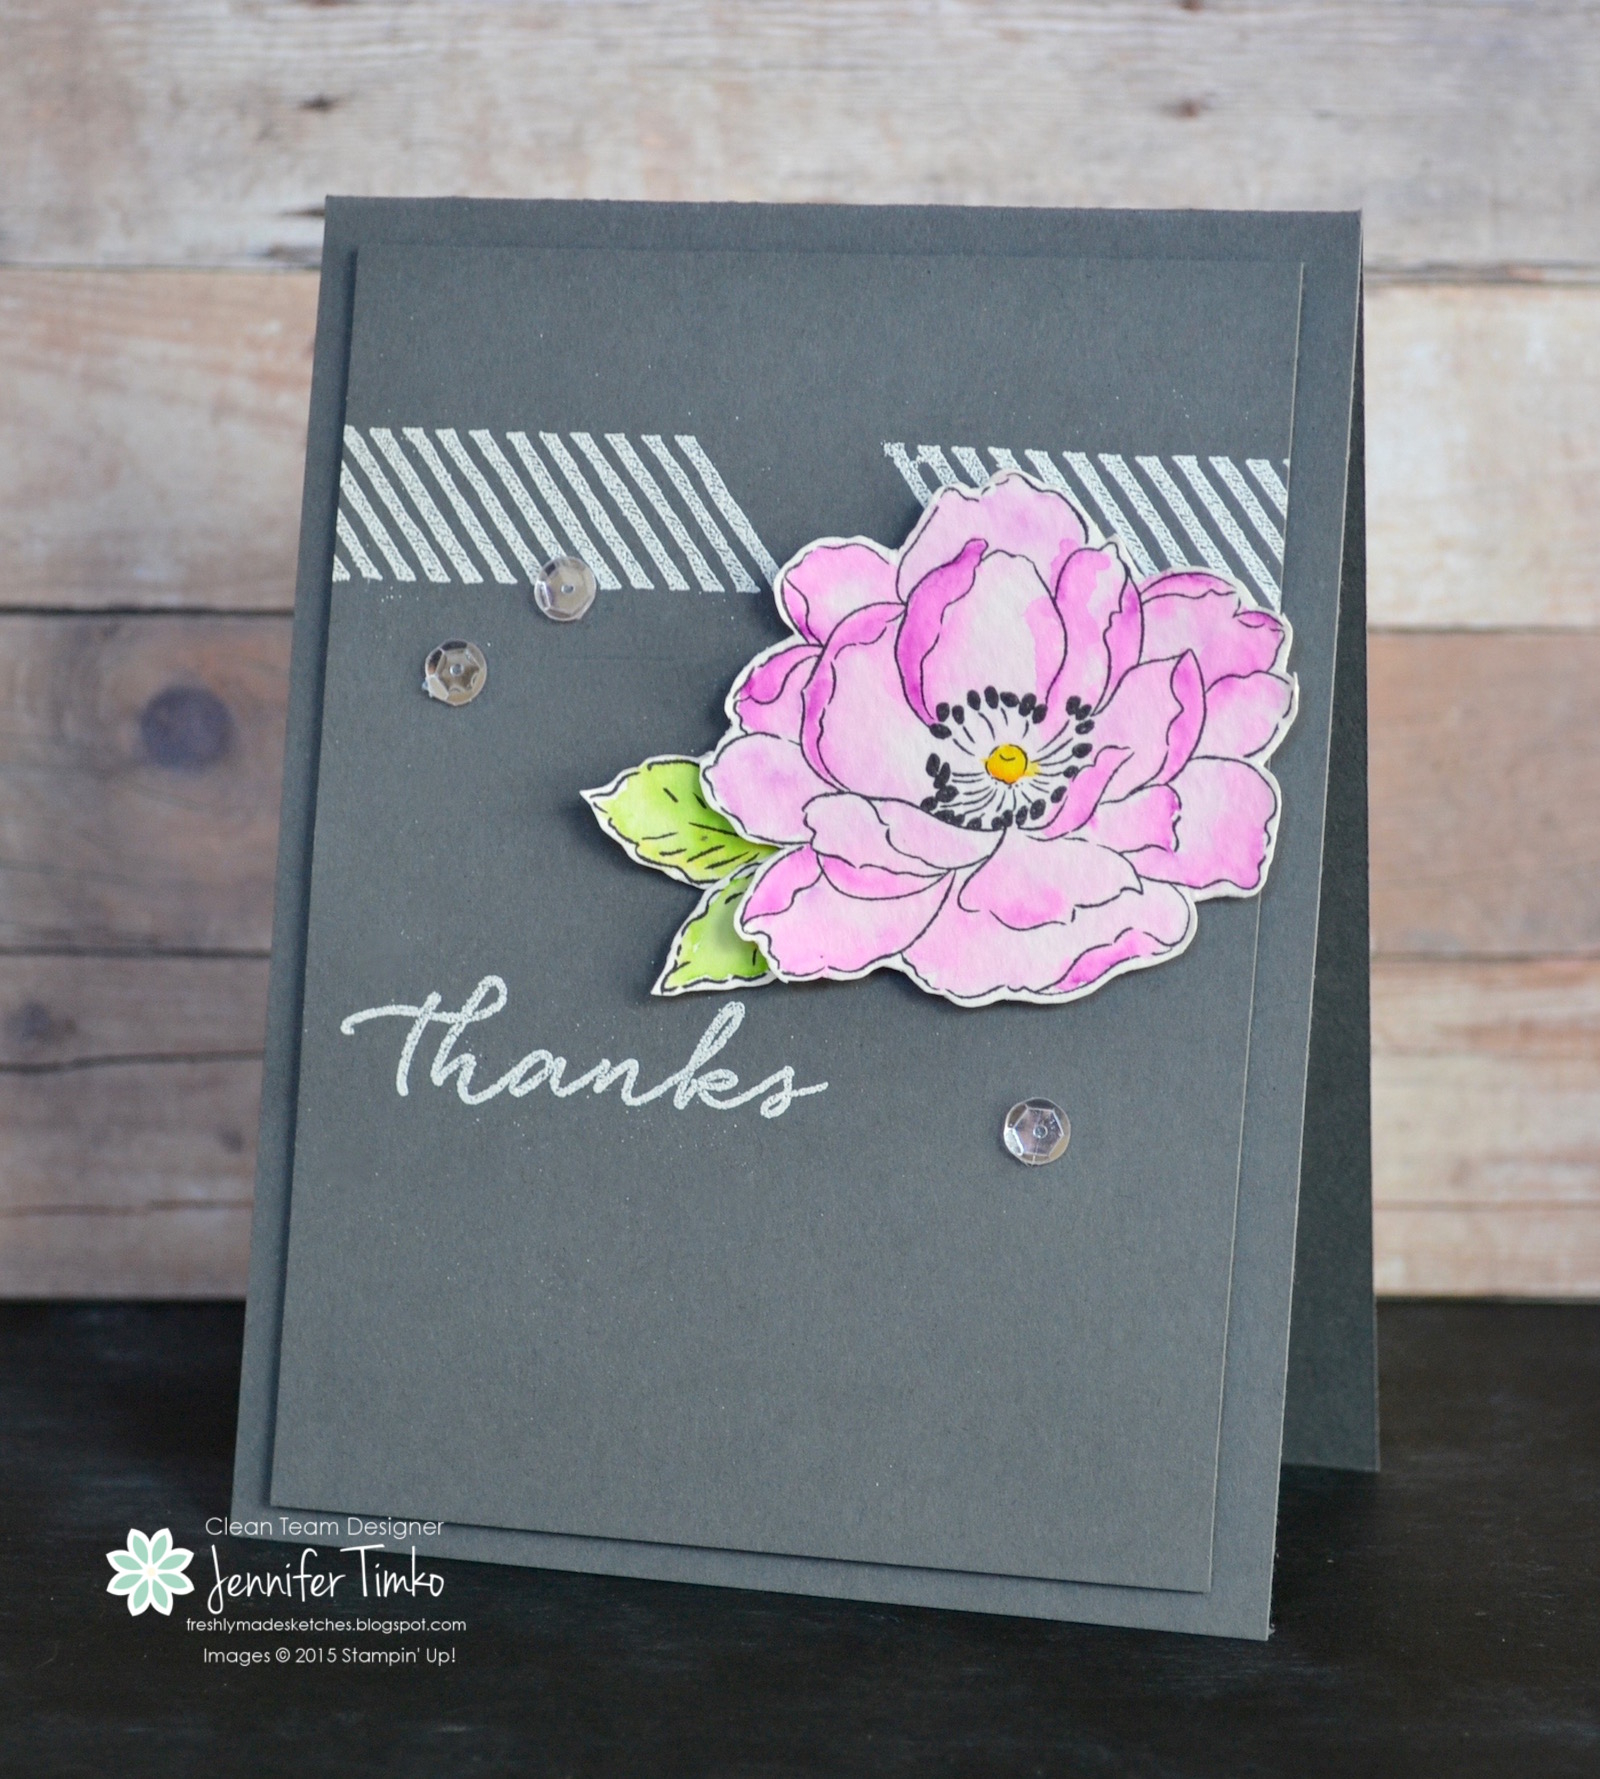
The focal point of my card today is this gorgeous flower from Altenew from the set Beautiful Day. I had been showing a friend how to use the Zig Clean Color Markers one day and this flower was the result (hers was really lovely too). Because it was sitting on my desk calling to be used, I built the card up around it. I stamped with the diagonal image from Gorgeous Grunge (SU) using Versamark Ink onto Basic Gray card stock and then heat embossed with White Stampin’ Emboss Powder. I did the same with the sentiment from the Watercolor Wishes stamp set. After fussy cutting the flower and leaves, I popped them up on Dimensionals. These lovely sequins from Pretty Pink Posh were the perfect finish, don’t you think?!
Now I will let you get to the rest of the team’s gorgeous work! You can tell they were happy to get back to the sketches too!
Thanks so much for stopping in today. I hope your week is fantastic! See you soon!
Click HERE to purchase wonderful Stampin’ Up products!
Stamps: Beautiful Day (Altenew), Gorgeous Grunge, Watercolor Wishes; Ink: Versamark, WPlus9 Black Dye Ink, Zig Clean Color Markers; Paper: Fabriano Watercolor, Basic Gray; Accessories: Heat Tool, White Stampin’ Emboss Powder, Dimensionals, Pretty Pink Posh Sequins 6mm Sparkling Clear
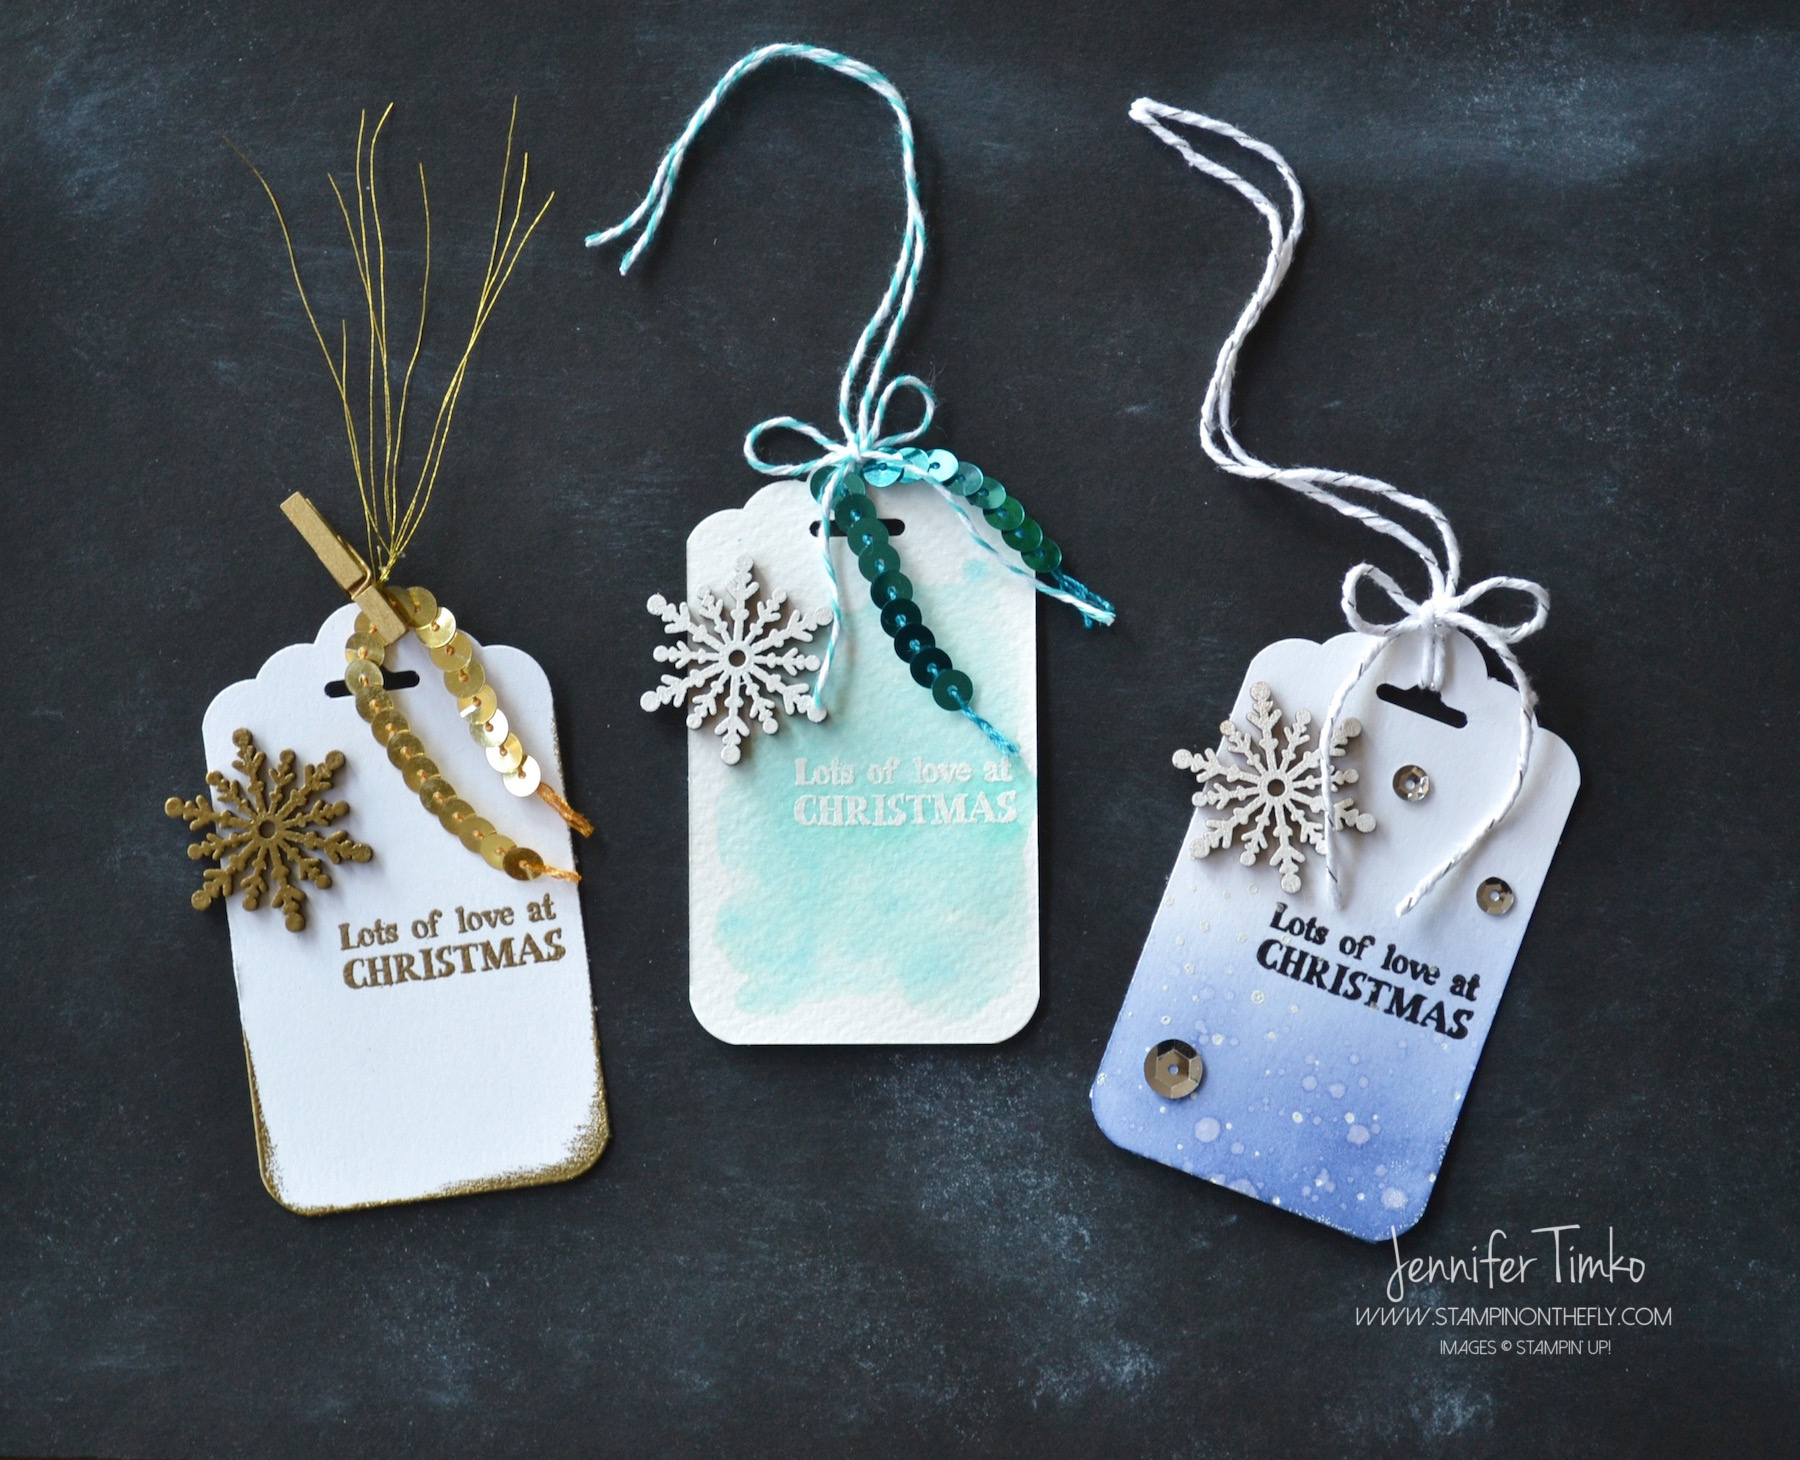
I know it isn’t the last Friday of the month yet but, like last month, the Fancy Friday team decided to hop a little early in order to get ahead for the holidays. Our team is a group of demonstrators who love to make beautiful things. Sometimes they are clean, sometimes they are layered but the one thing I can say for sure is that our projects will be fancy! If you hopped over from my dear friend Cindy, welcome to the next stop. For December we are creating a Fancy Tags. Always a last minute thing for me so I’m happy to see (and share) some ideas for you!
The first thing you may notice about these tags is that they are distinctly different styles. The second….they are all the same tag. Just like the two cards I posted last week, at this time of year it is simply too hard for me to come up with totally new sketches and ideas. So, I just kind of do a riff on one idea. Totally what I did here. The tags are created using the Scalloped Tag Topper Punch and the corner rounder from my Envelope Punch Board (but the Project Life Corner Punch works perfectly too). I cut the paper to 3-1/2″ x 2″ and punched. The two outside tags are Thick Whisper White and the middle tag is Fabriano Watercolor Paper.
Here are the specifics of each:
Gold Tag – Apply Embossing Buddy to whole tag. Take your Versamark ink pad and dip the edges of your tag right onto the pad. Apply Gold Stampin’ Emboss Powder on the inked edges and heat emboss. Smoosh your Snowflake Element into Versamark and apply more Gold Stampin’ Emboss Powder, heat emboss that too. Stamp sentiment from Santa’s Gifts with Versamark and add even more embossing powder. Tie on some Gold Thread, add Gold Sequin Trim holding it on with a Gold Mini Metallic Clothespin.
Watercolor Tag – Apply Embossing Buddy to whole tag. Stamp sentiment with Versamark ink and add White Stampin’ Emboss Powder. Heat Emboss. Apply a little bit of water to the paper, using an Aquapainter apply Bermuda Bay Ink. Ink up Snowflake Element with Versamark and add White Stampin’ Emboss Powder then heat emboss. Tie on Bermuda Bay Sequin Trim with Bermuda Bay Baker’s Twine.
Sequin Tag – Using Tim Holtz Distress Ink in Chipped Sapphire, sponge on ink using the Mini Blending Tool (Tim Holtz). Spritz on water and let dry. Ink Softly Falling Embossing Folder with Versamark and stamp onto tag. Add White Stampin’ Emboss Powder and heat emboss. Stamp sentiment with Momento Tuxedo Black. Emboss snowflake with white (like above). Tie on Silver Baker’s Twine (this came from an old Paper Pumpkin). Add sequins.
All the snowflakes were attached to the tags using the Fine Tip Glue Pen with a place for the To/From on the back.
Along with Allison, Kaitlyn, Krista and Marisa that joined in last month, we are also welcoming Sarah for December. These ladies are seriously talented and totally fancy!!
The fabulous Mercedes Weber is up next! Wait until you see what she created!
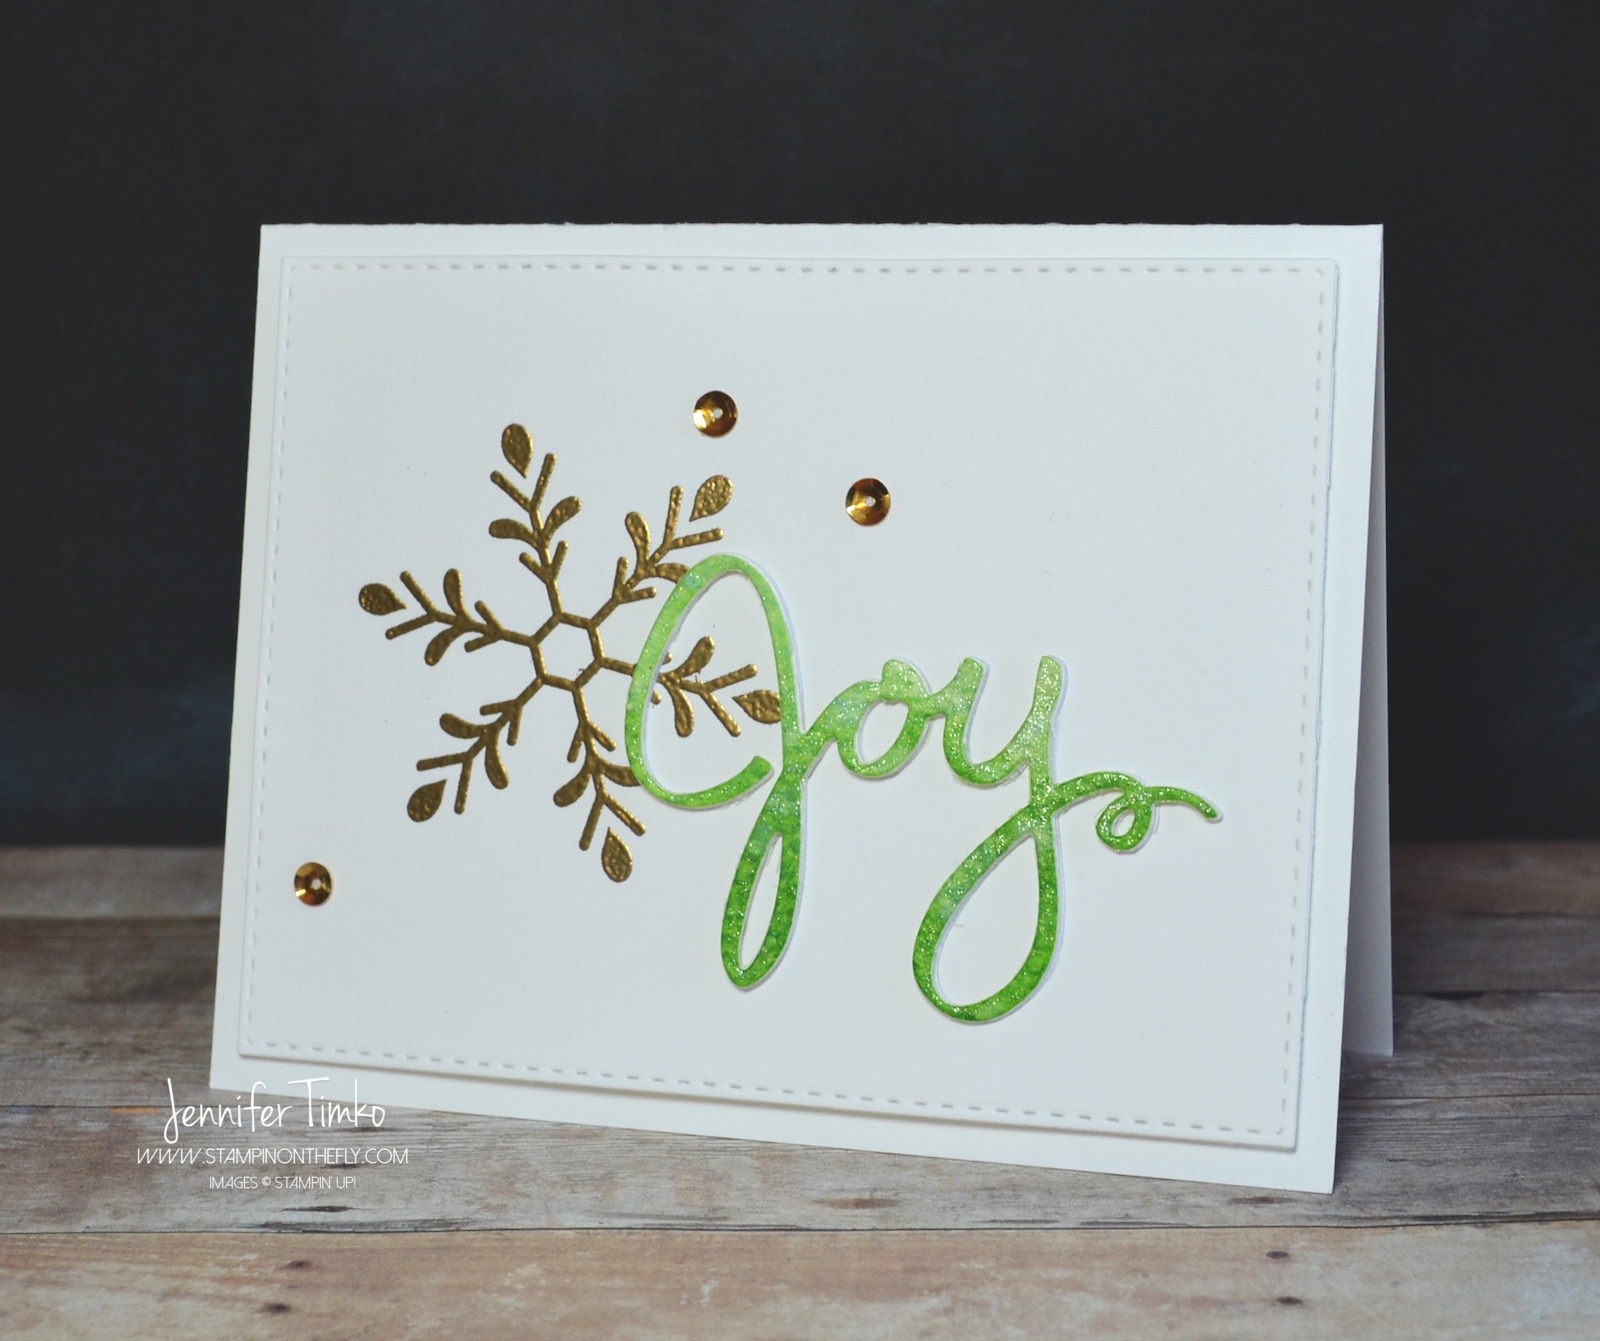
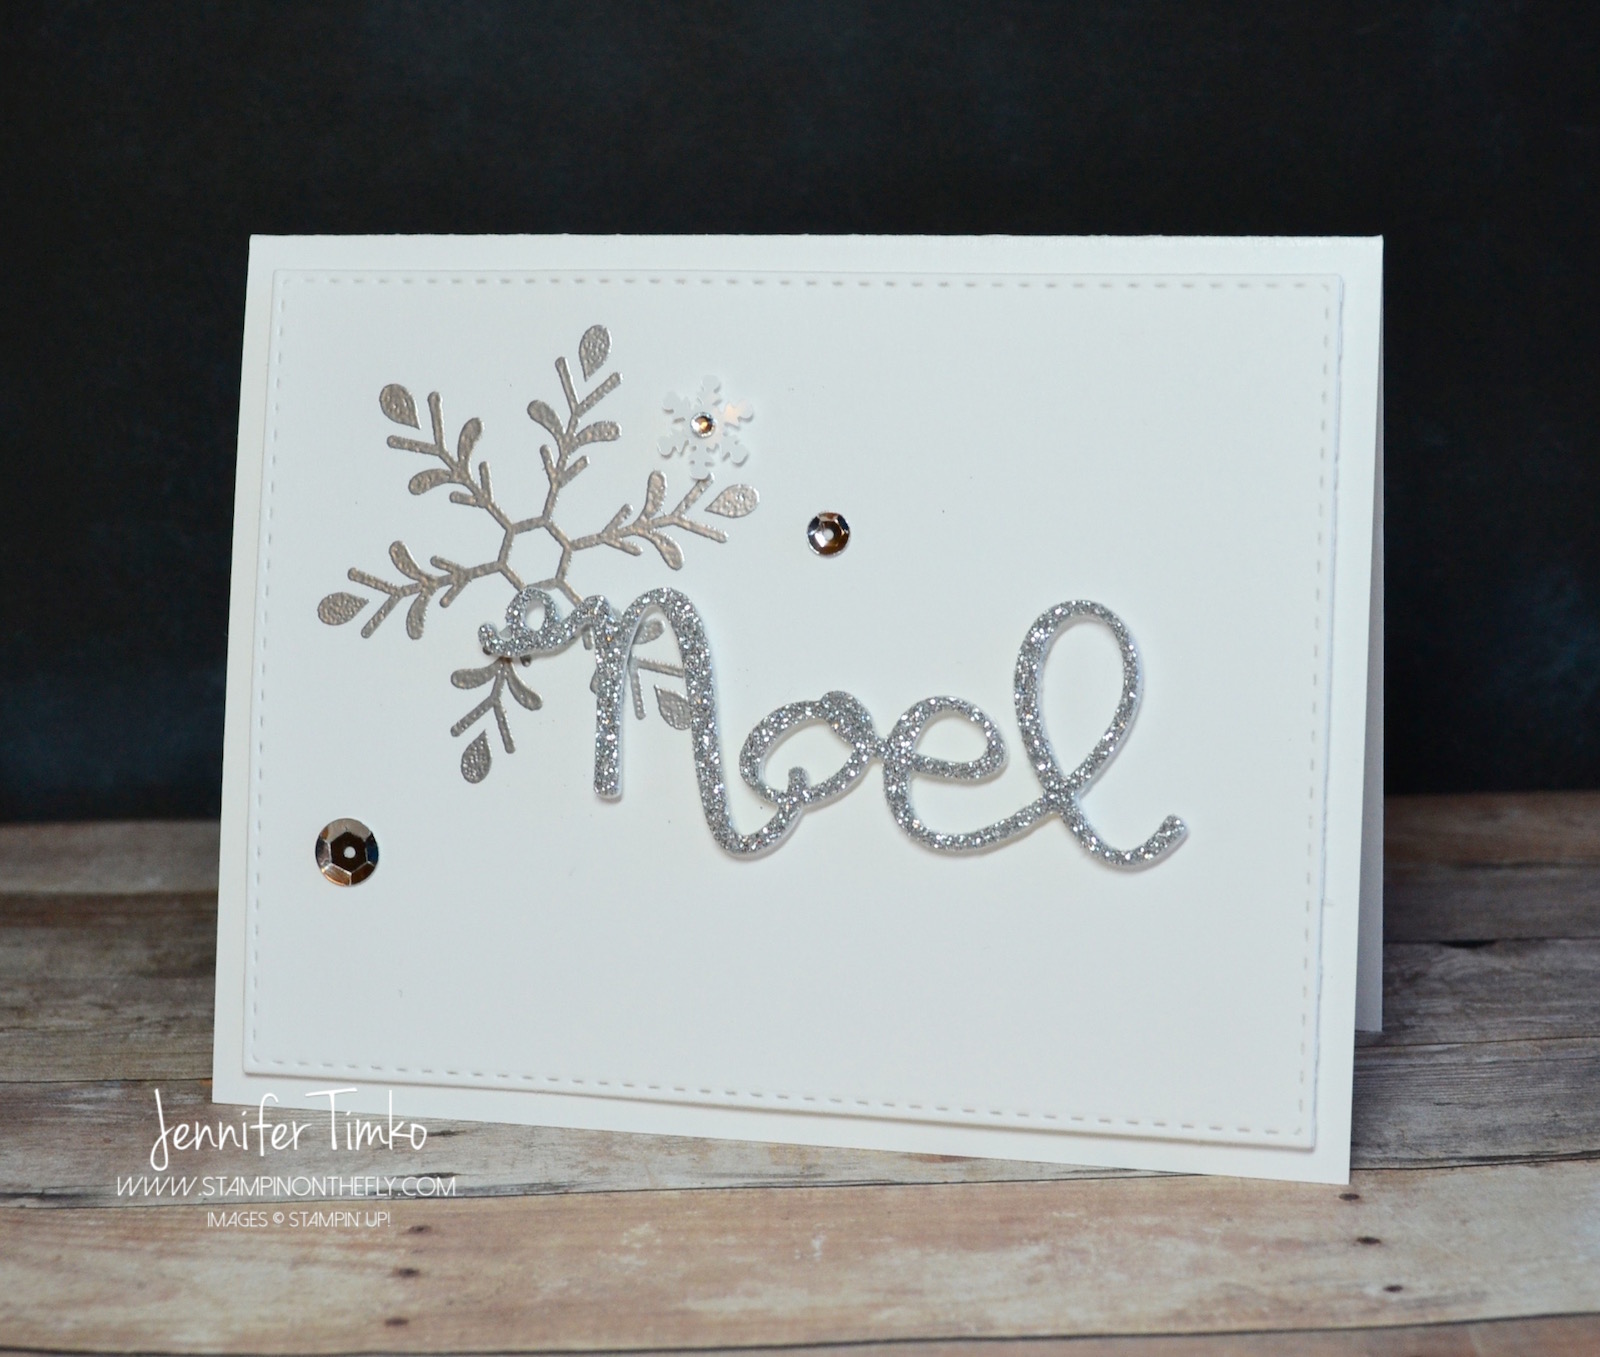
I’m here today with two cards that are pretty much exactly the same but with a very different look. Let’s face it, this is the time of year to work smarter not harder! So the basics…. I stamped the awesome snowflake from Holly Jolly Greeting with Versamark and heat embossed with Gold (and Silver) Stampin’ Emboss Powder. The image panels were cut out using the Stitched Rectangles Die (Simon Says Stamp). Using the lovely sentiment dies from the Wonderful Wreath Framelits, I cut multiple layers from Thick Whisper White. I then stacked them up and glued them together using the Fine Tip Glue Pen. For the top layer, I used Watercolor Paper (Fabriano) and Silver Glimmer paper respectively. On the watercolor paper, I colored the sentiment with Tim Holtz Distress Ink (Mowed Lawn) and an Aquapainter, dabbing some off to create an ombre look. Once dry, I covered the sentiment with Clear Wink of Stella (coming in the new Occasions catalog!). I added sequins onto each to add a little more shine.
So there you have it! Two versions of the same card. Easy to duplicate and fun to make! I think I need to make a few more!
Hope you had a great week. Thanks for stopping in today!
Stamp: Holly Jolly Greetings; Ink: Versamark, Tim Holtz Distress Ink; Paper: Fabriano Watercolor, Thick Whisper White, Silver Glimmer Paper; Accessories: Big Shot, Wonderful Wreath Framelits, Stitched Rectangles (SSS), Heat Tool, Metallics Sequins, Retired Sequins, Basic Rhinestones, Clear Wink of Stella, Fine Tip Glue Pen
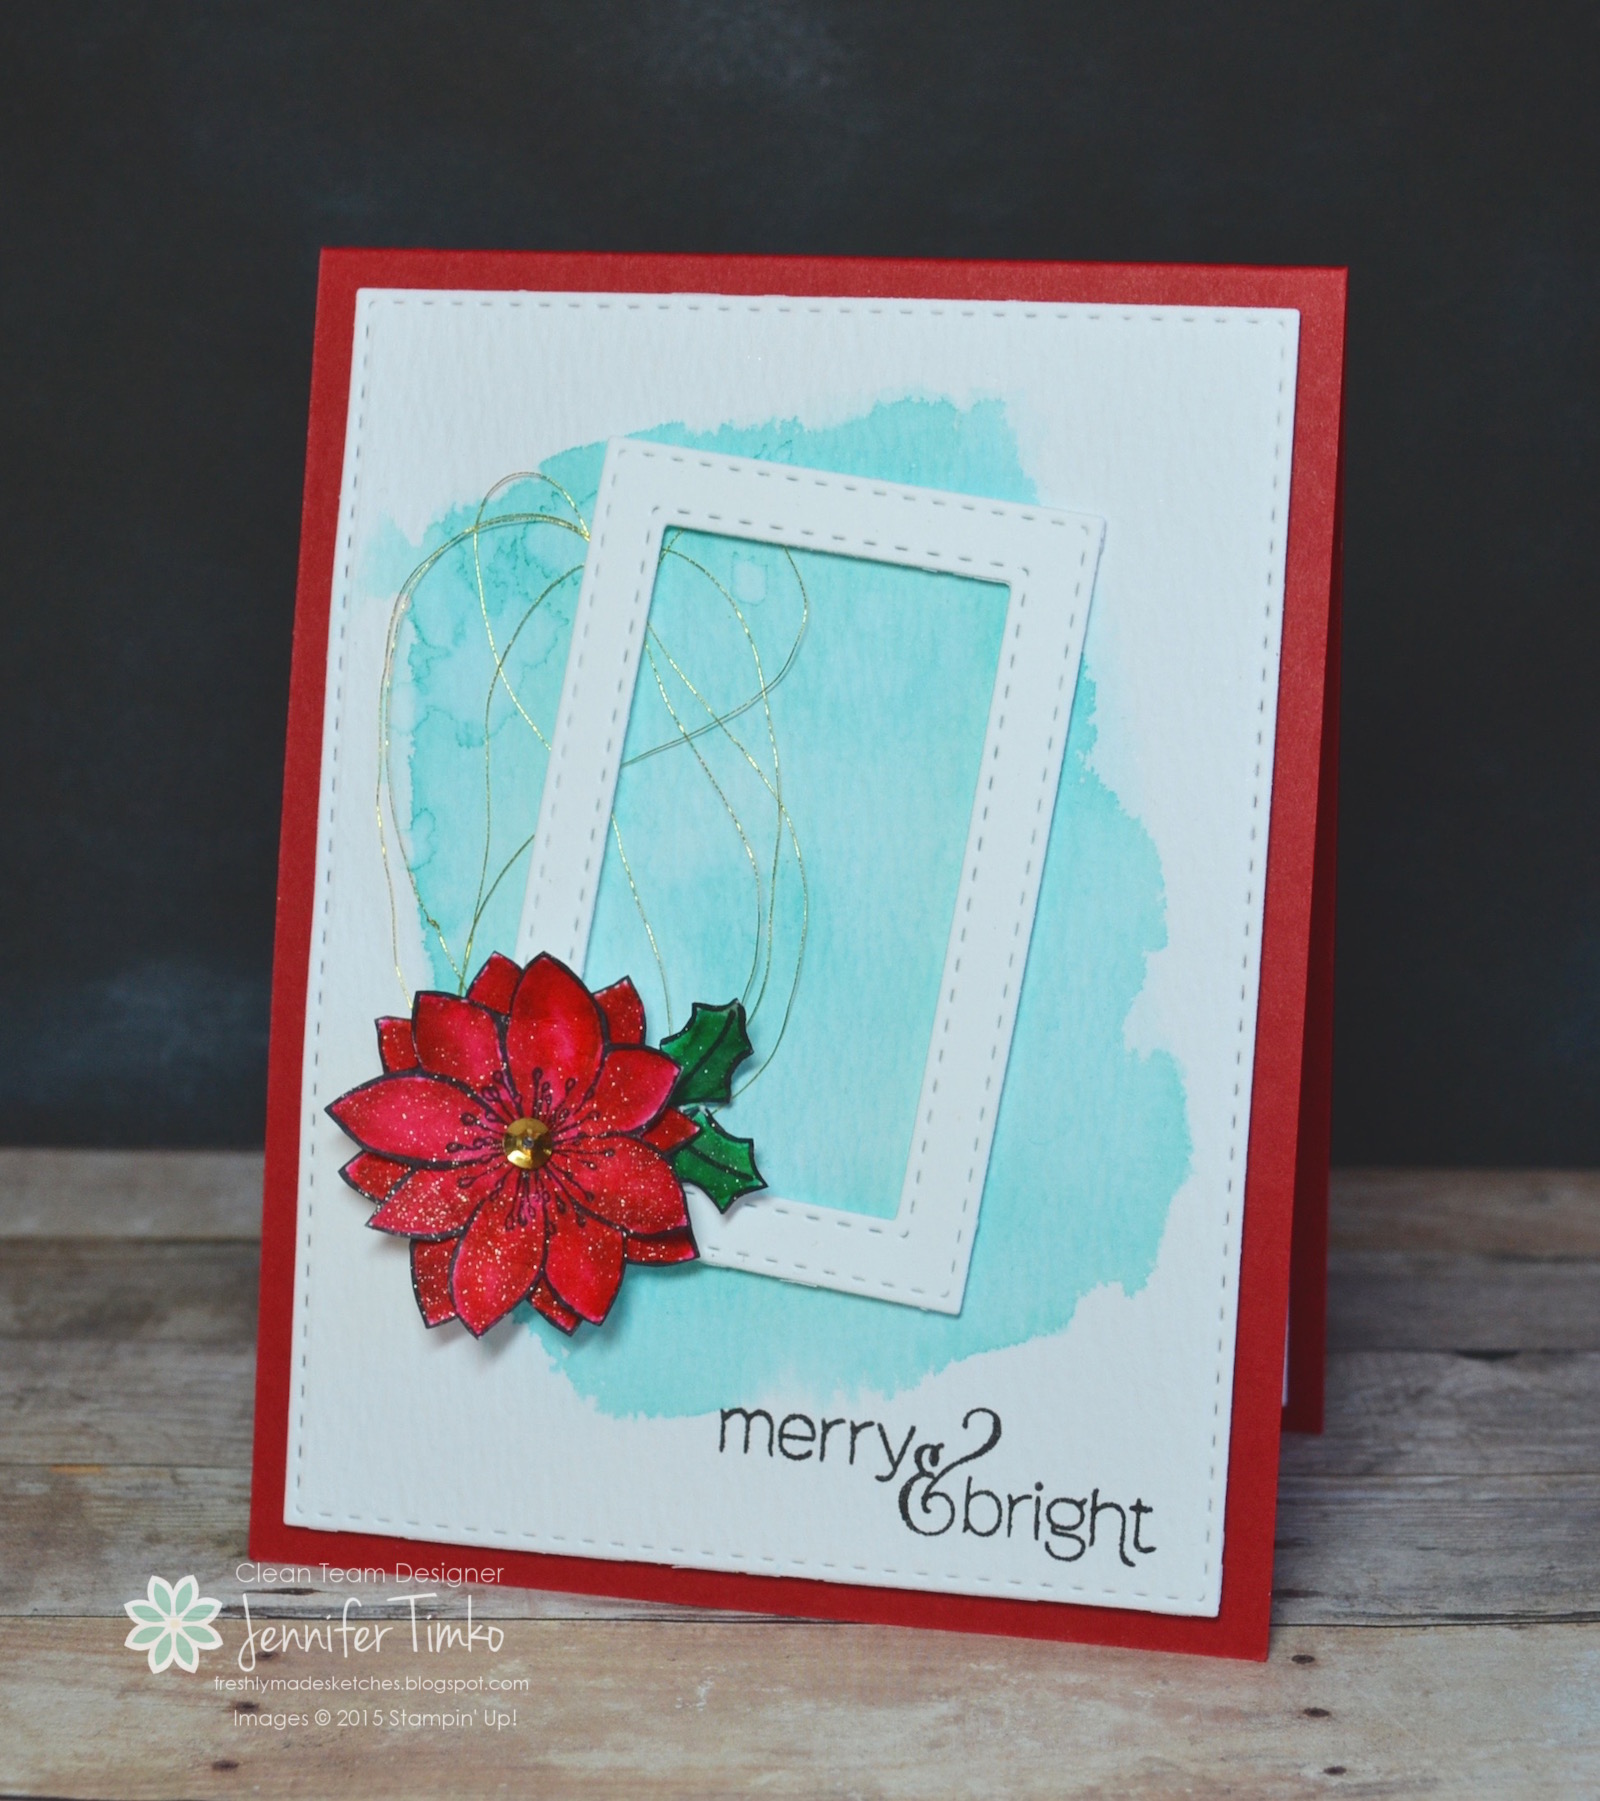
Today I have such a treat for you! Another fabulous sketch from Freshly Made Sketches. It is brought to you by our sketch hostess Rita Wright. As always, she comes up with something fun and fresh! Love it!
I tried to keep it clean and played with using watercoloring as one of the “panels”. I like the effect and how the stitched frame works with it. I layered two Stitched Rectangle Dies (Simon Says Stamp) to create the frame…easy peasy. All the stamps from from Paper Pumpkin. The poinsettia is the flower from October’s kit layered and colored with Zig Markers. The holly and sentiment come from the November kit. The picture doesn’t do it any justice but the flower and holly are topped with Clear Wink of Stella and the sparkle in person is lovely. I cheated a little on the scalloped element because I just could not seem to make it work with any strips of paper there. So I added Gold Thread instead. Hope Rita gives me a little latitude on that! A little gold sequin in the center of the flower ties into the gold.
I hope you enjoy this week’s inspiration and all that the design team has created. I’ll be back on Friday with a couple more quick holiday cards because, well, it is time for QUICK holiday cards now isn’t it?! *smile* See you then!
Click HERE to purchase wonderful Stampin’ Up products!
Stamps: Paper Pumpkin kits (Oct/Nov); Ink: WPlus9 Black Dye Ink, Tim Holtz Distress Ink Peacock Feathers, Zig Clean Color Markers; Paper: Watercolor (Tim Holtz Distress Paper), Real Red; Accessories: Big Shot, Stitched Rectangles Dies (SSS), Gold Thread, Metallics Sequins, Clear Wink of Stella
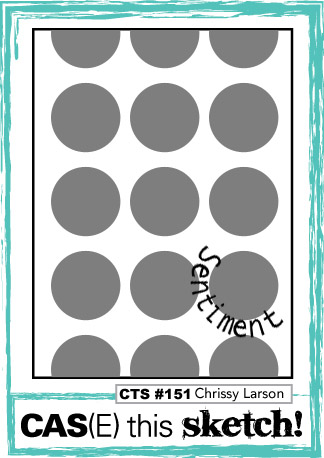
I had some time to stamp last week and thought I would give the latest sketch at CAS(E) this Sketch a go. All the circles were a little daunting at first but then I found my butterfly stamp from Garden in Bloom. It works perfectly. Using my handy dandy Misti, I was able to line these up just by moving the card stock in fixed intervals. Worked pretty well! The butterflies are stamped first using Pool Party and then the outlines were stamped with Momento Tuxedo Black. I cut the panel using the Stitched Rectangles die from Simon Says Stamp and added the sentiment from the CAS-ual Fridays set Mon Ami. I added a black background panel and some black sequins from the Metallics Sequins pack.
Hope you enjoy this one today. There is still some time to give the sketch a go and you’ll be happy you did. Back tomorrow with the latest from Freshly Made Sketches. Until then, have a great day!
Stamps: Garden in Bloom, Mon Ami (CAS-ual Fridays Stamps); Ink: Pool Party, Momento Tuxedo Black; Paper: Thick Whisper White (SU), Basic Black; Accessories: Big Shot, Stitched Rectangles Dies (SSS), Metallic Sequins, MISTI
Primary Sidebar
We use cookies on our website to give you the most relevant experience by remembering your preferences and repeat visits. By clicking “Accept”, you consent to the use of ALL the cookies.
This website uses cookies to improve your experience while you navigate through the website. Out of these, the cookies that are categorized as necessary are stored on your browser as they are essential for the working of basic functionalities of the website. We also use third-party cookies that help us analyze and understand how you use this website. These cookies will be stored in your browser only with your consent. You also have the option to opt-out of these cookies. But opting out of some of these cookies may affect your browsing experience.
Necessary cookies are absolutely essential for the website to function properly. This category only includes cookies that ensures basic functionalities and security features of the website. These cookies do not store any personal information.
Any cookies that may not be particularly necessary for the website to function and is used specifically to collect user personal data via analytics, ads, other embedded contents are termed as non-necessary cookies. It is mandatory to procure user consent prior to running these cookies on your website.