Skip to content

Freshly Made Sketches #611

Freshly Made Sketches #611 published on 10 Comments on Freshly Made Sketches #611

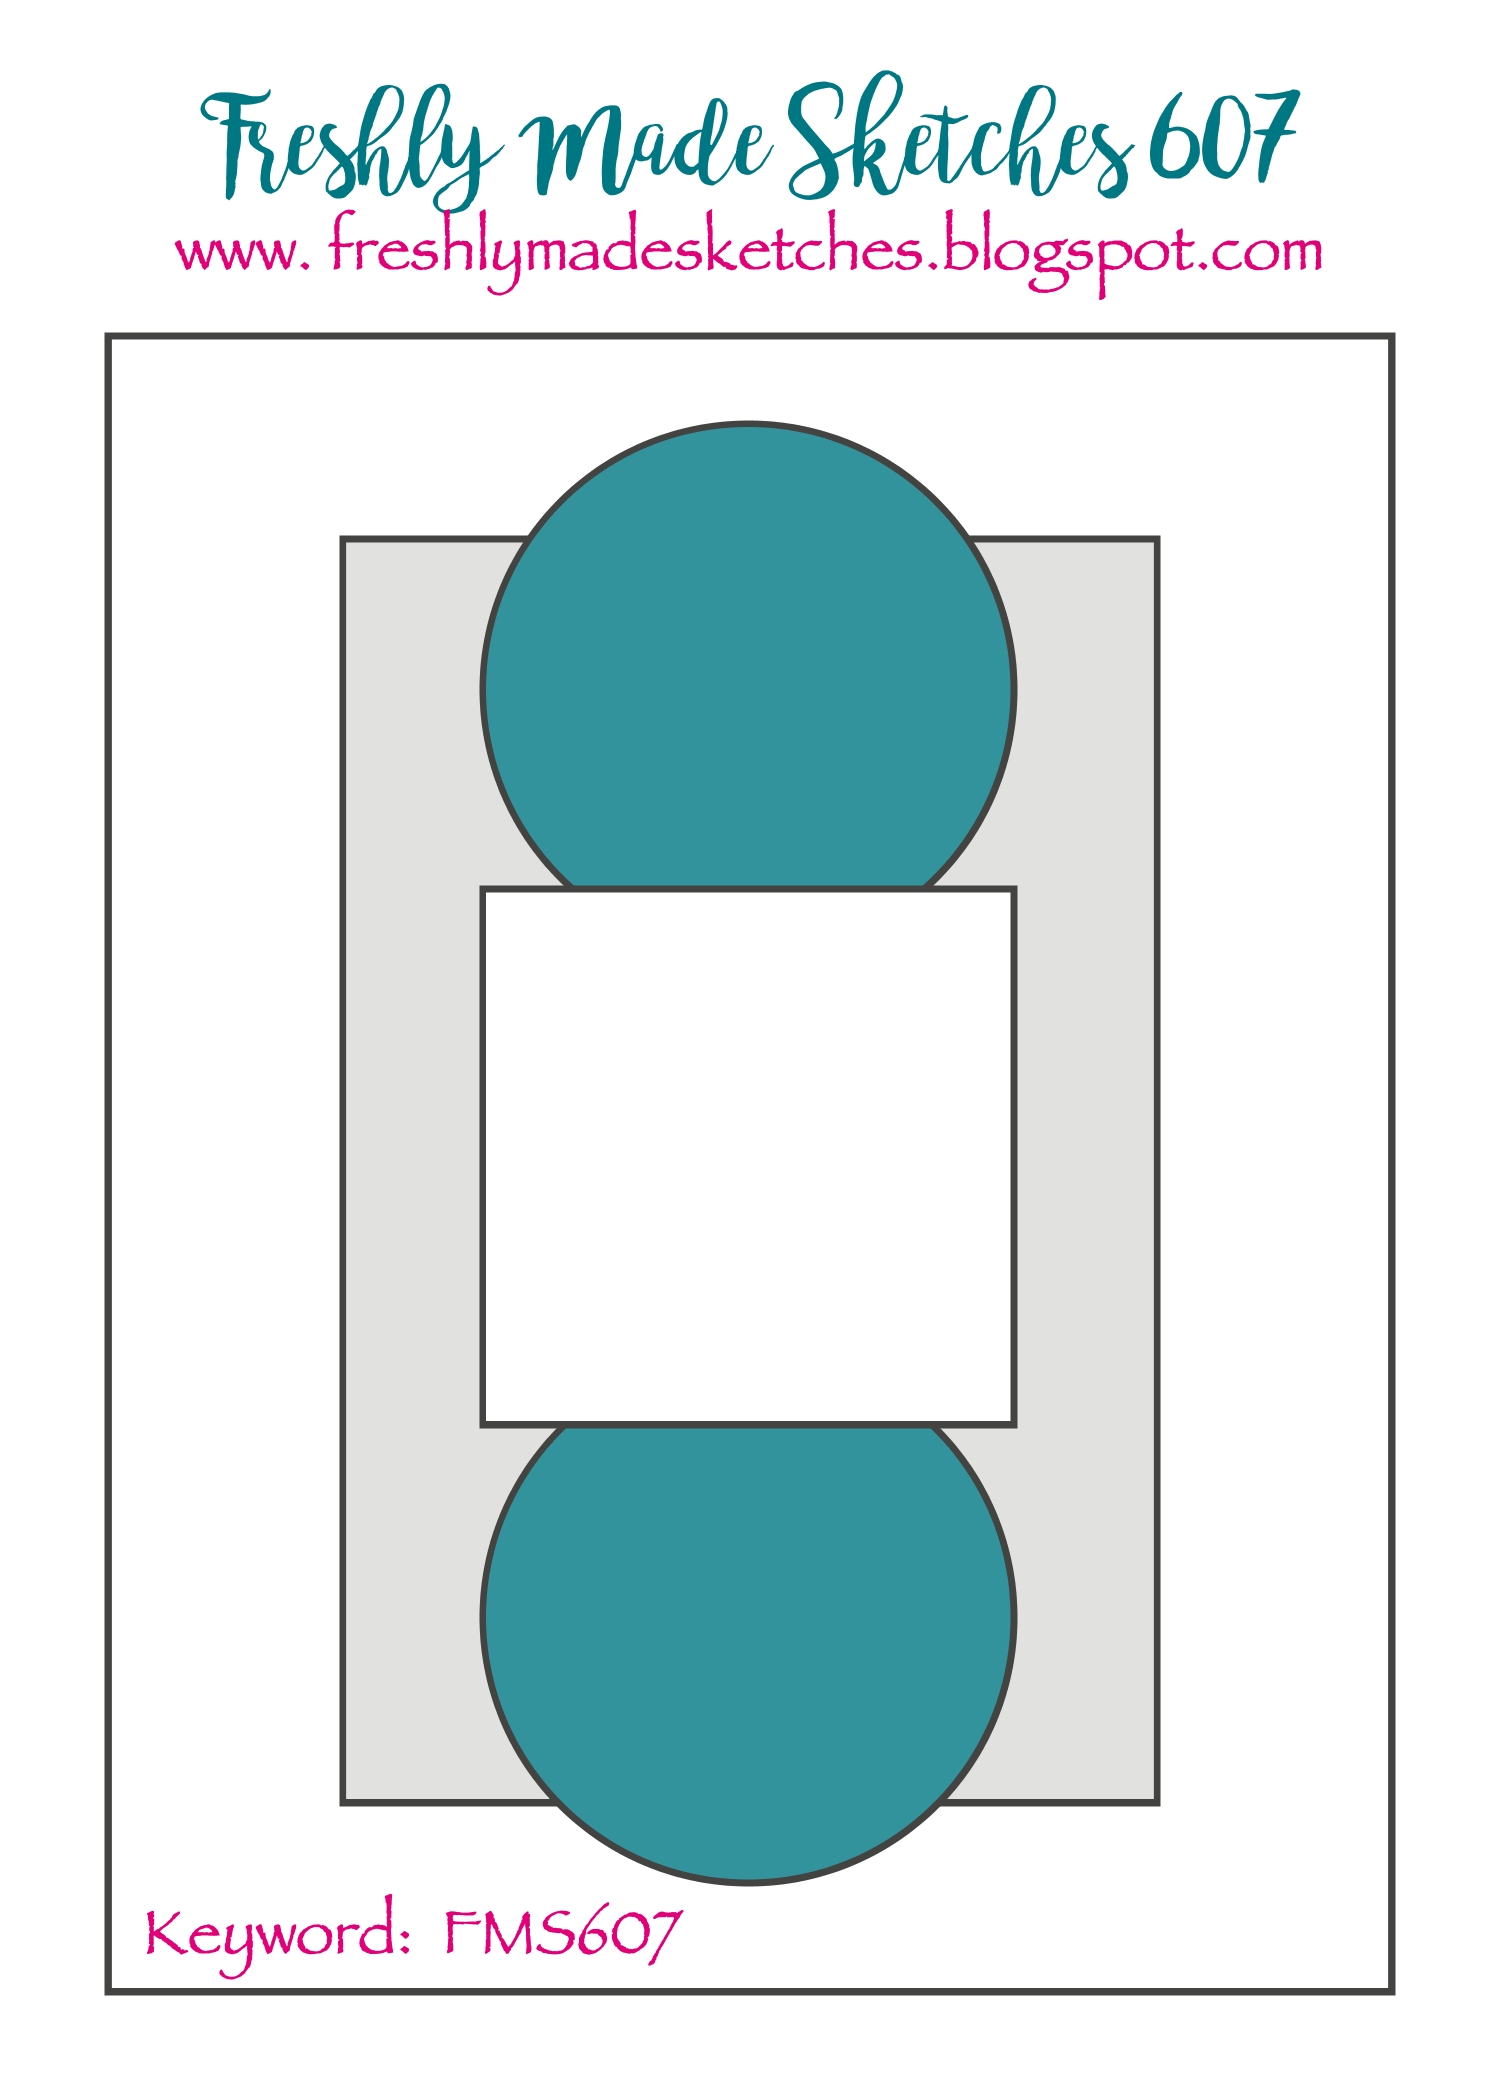
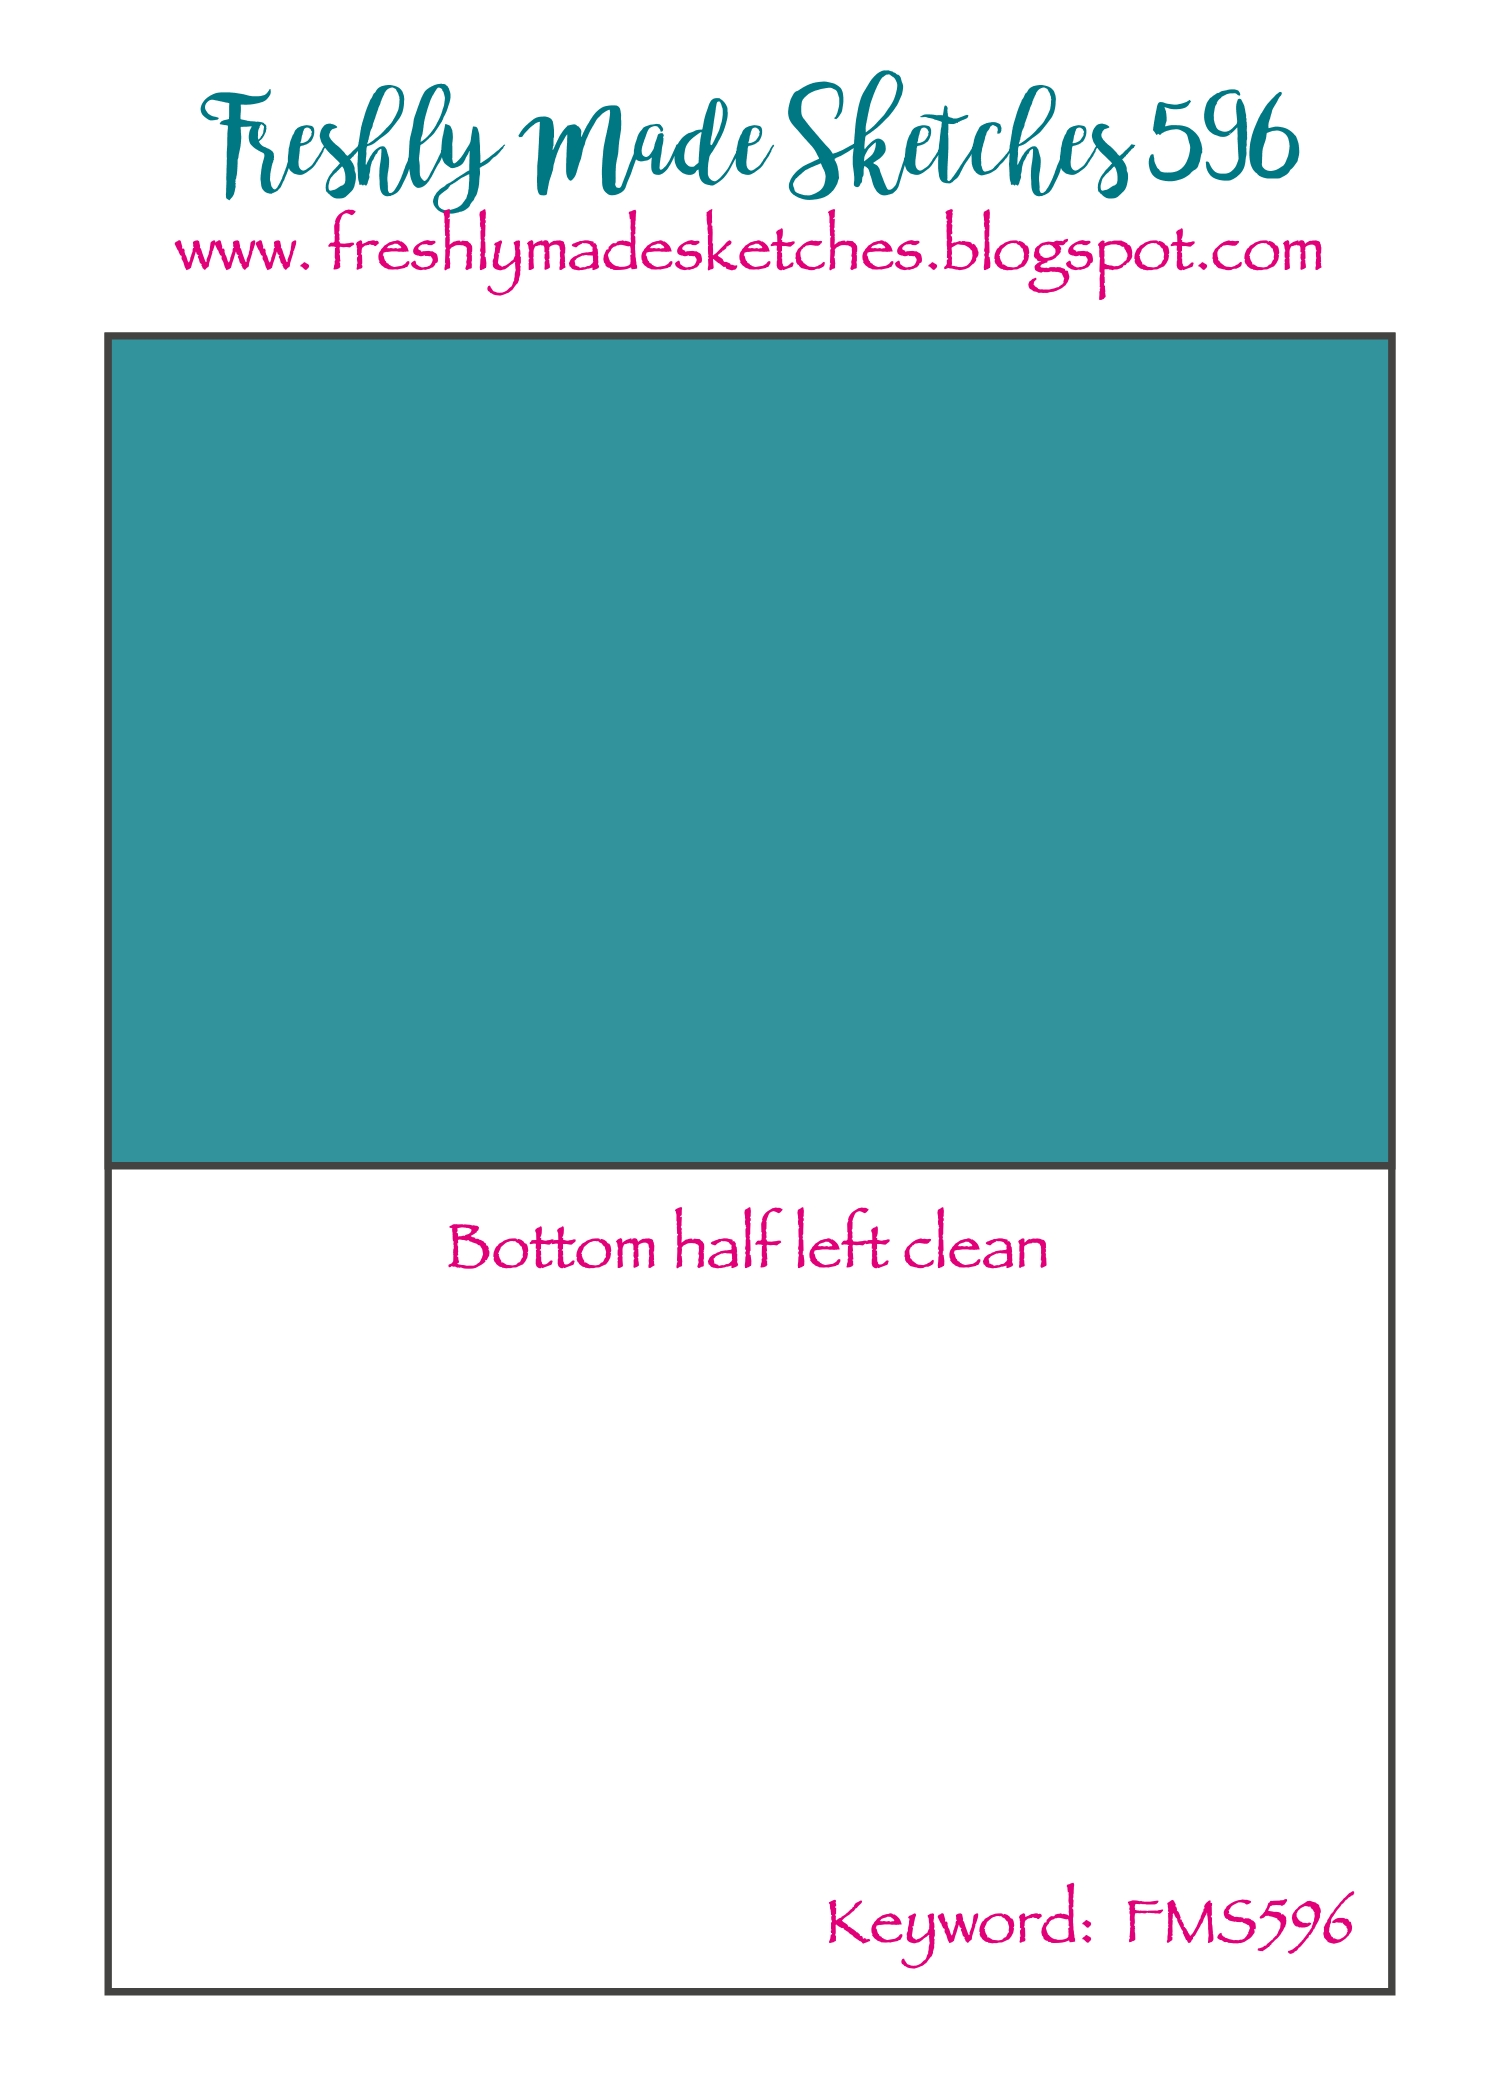
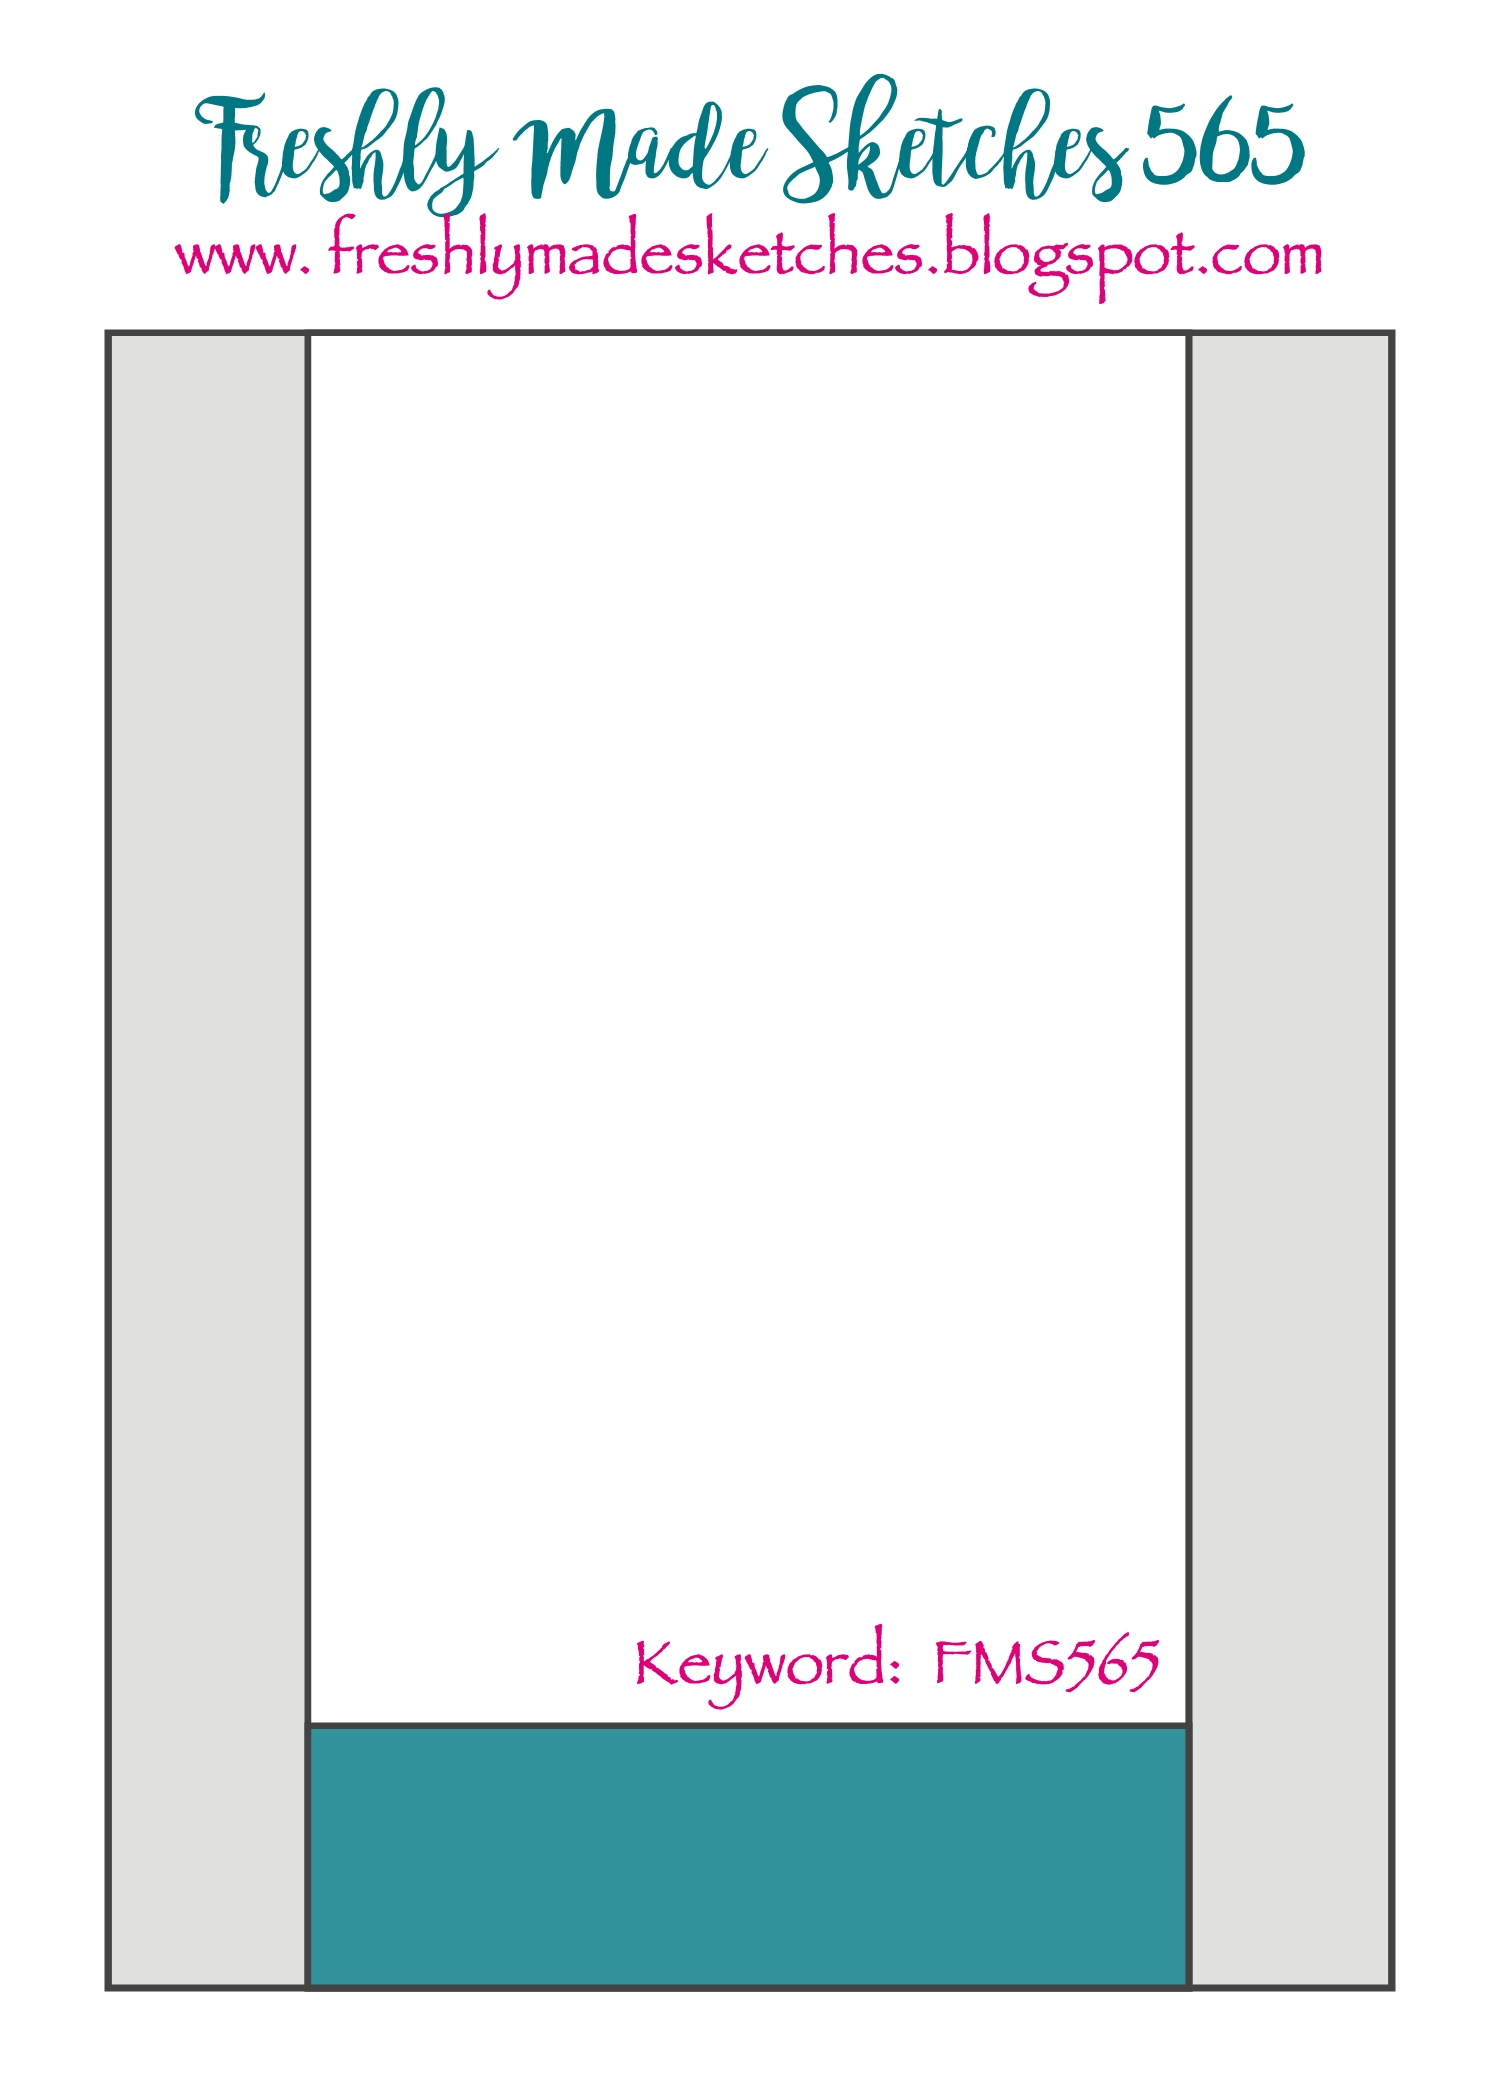
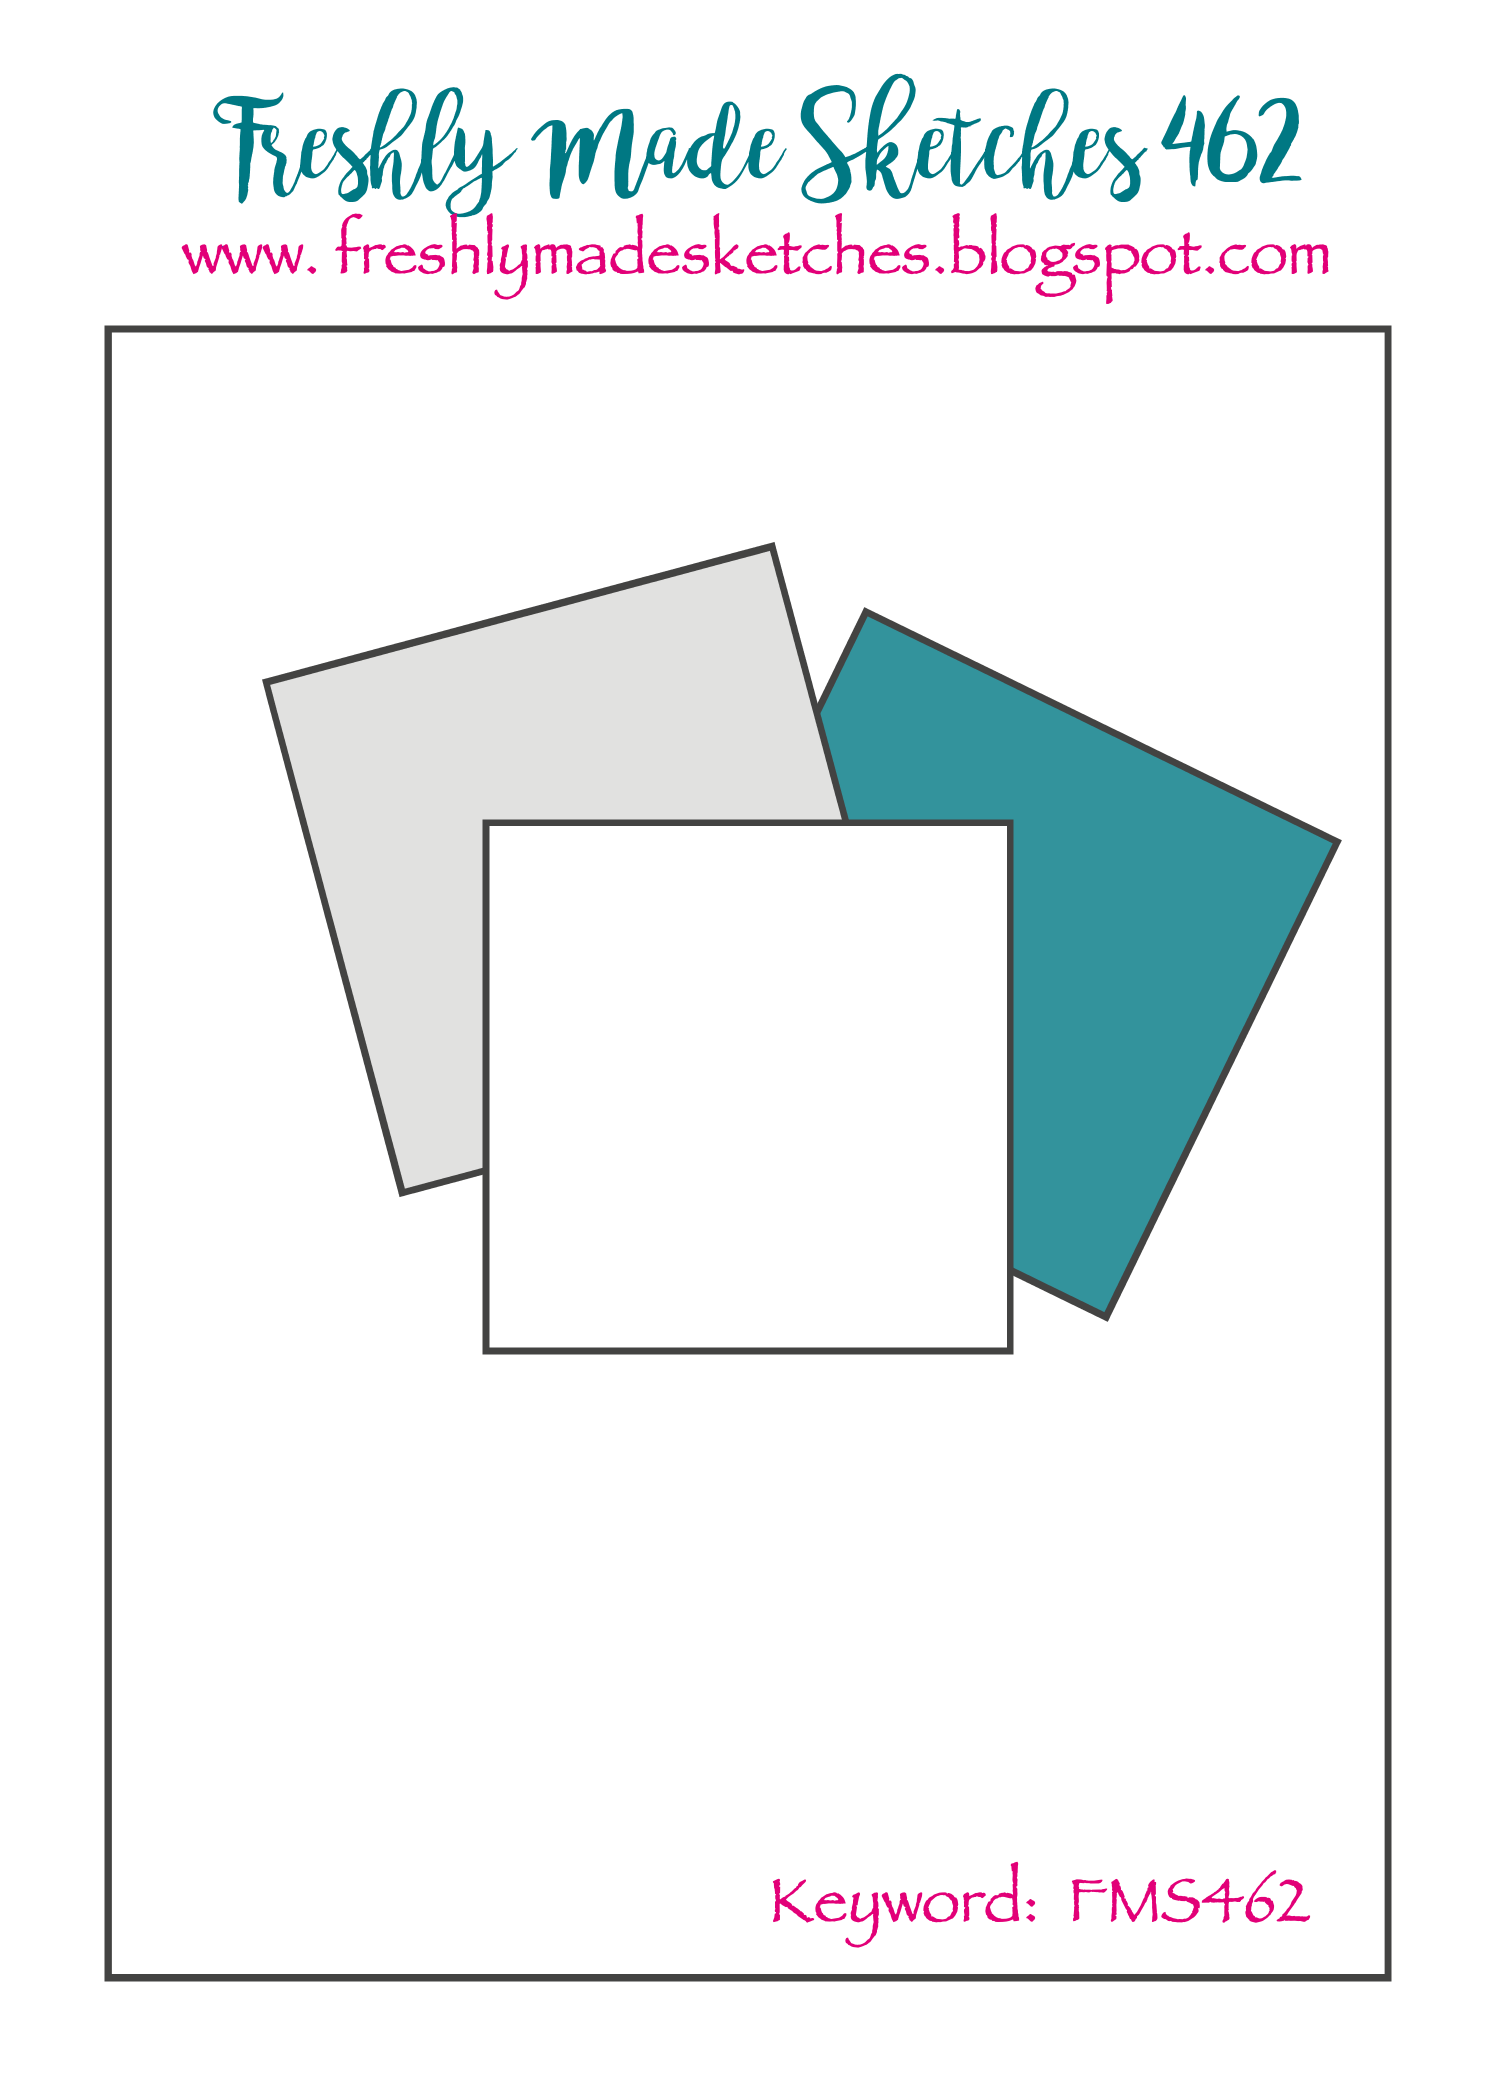
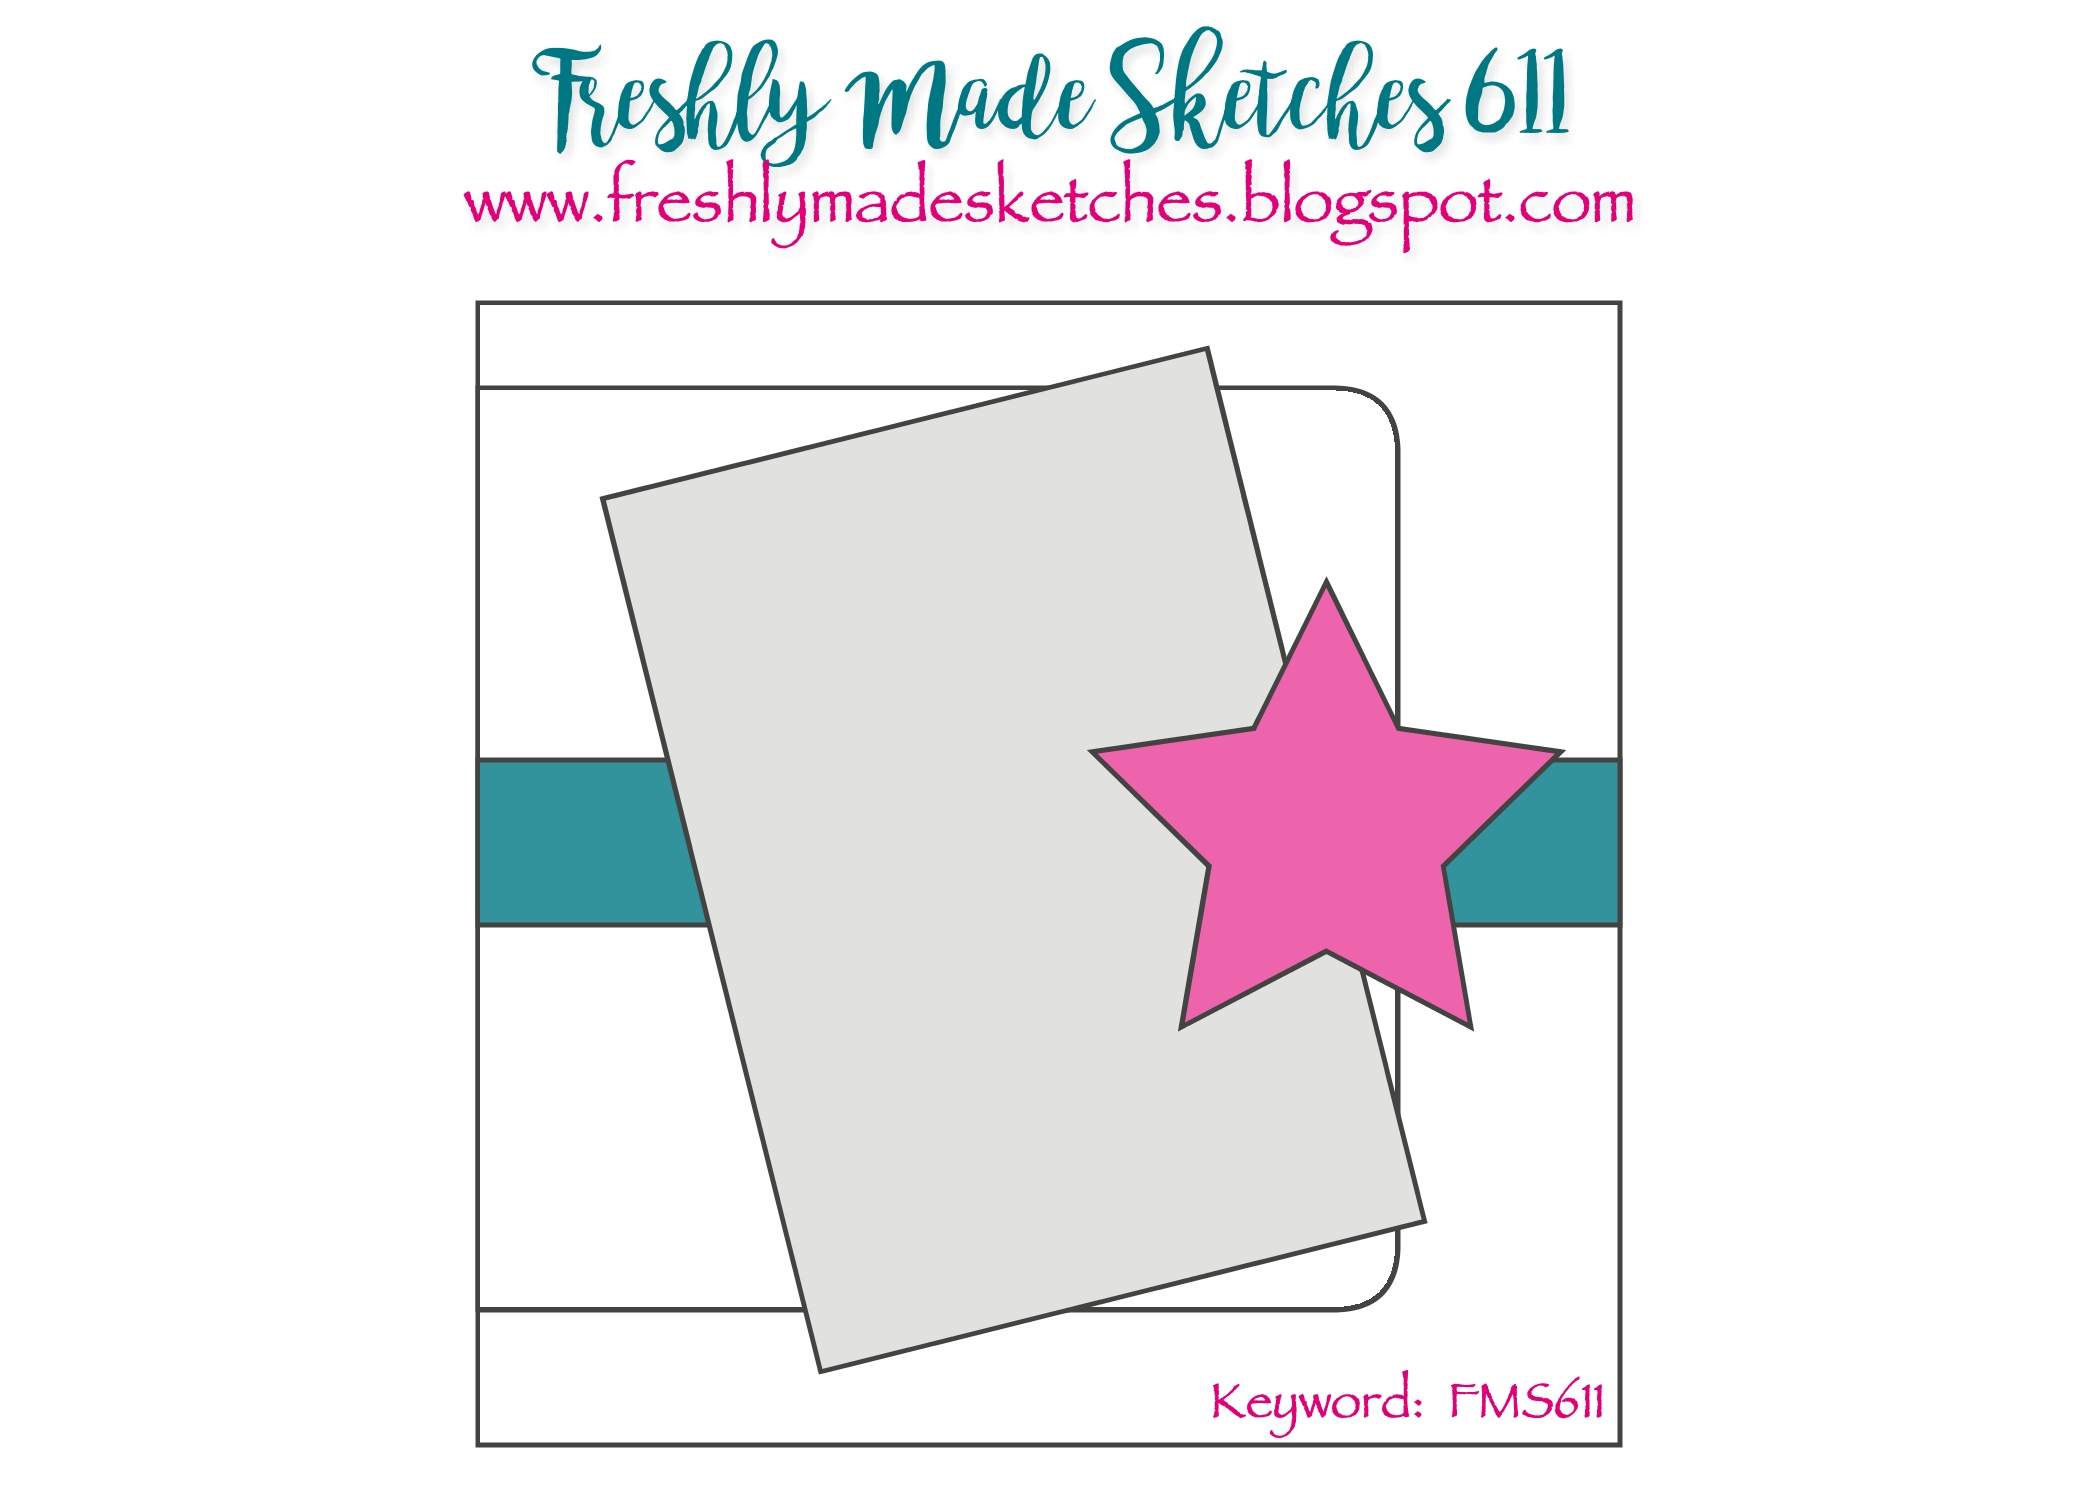
Do you hear it? That freight train of the holiday season has started coming down the tracks!! I’m pretty sure I’m already behind! I think you will be getting holiday cards non-stop from now on (ok, like you haven’t already but now I’m really, REALLY all in). Good thing the amazing Jen Mitchell has a great sketch for us this week at Freshly Made Sketches!

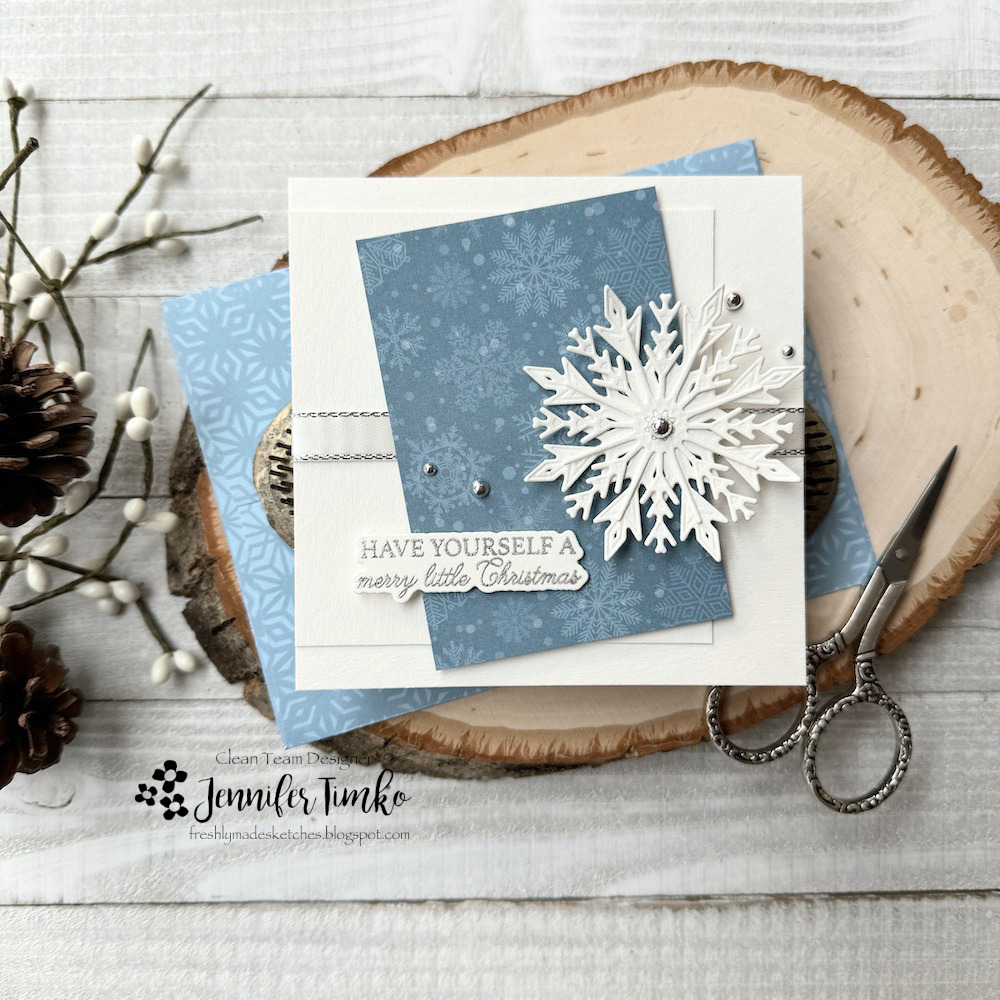
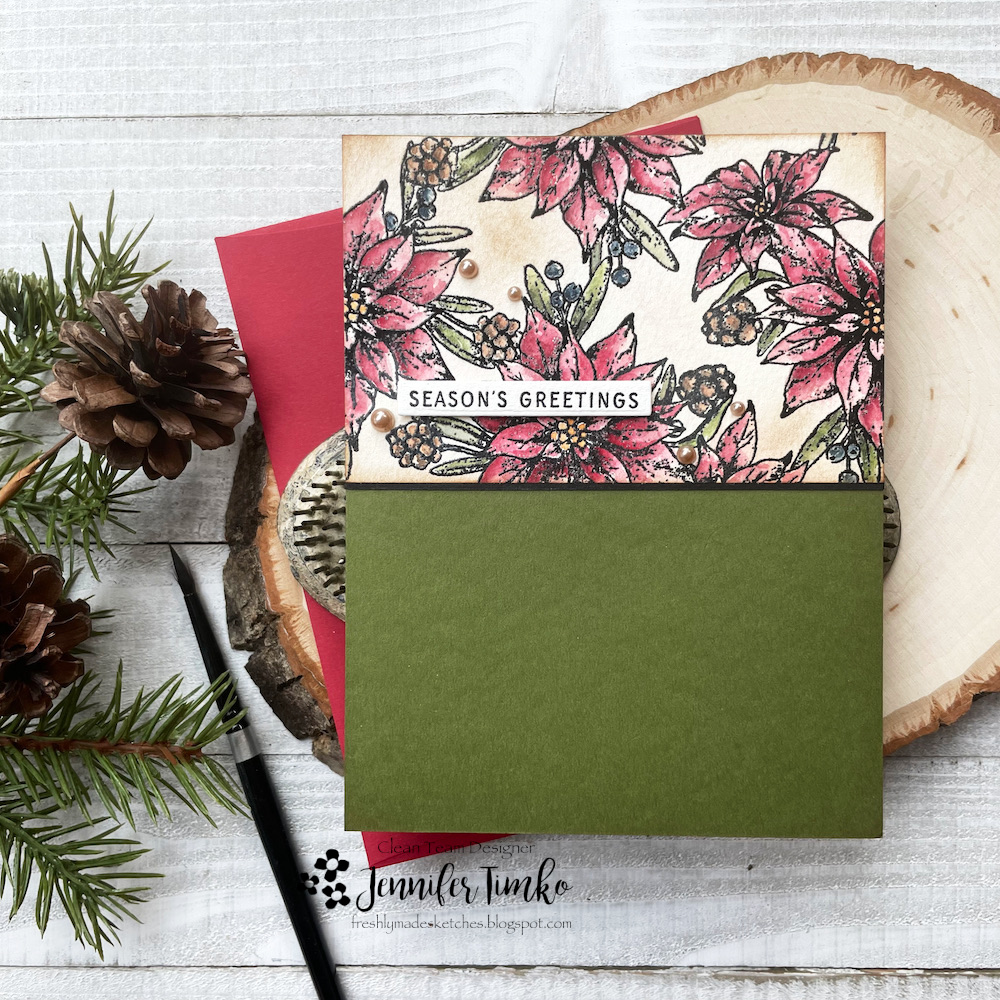
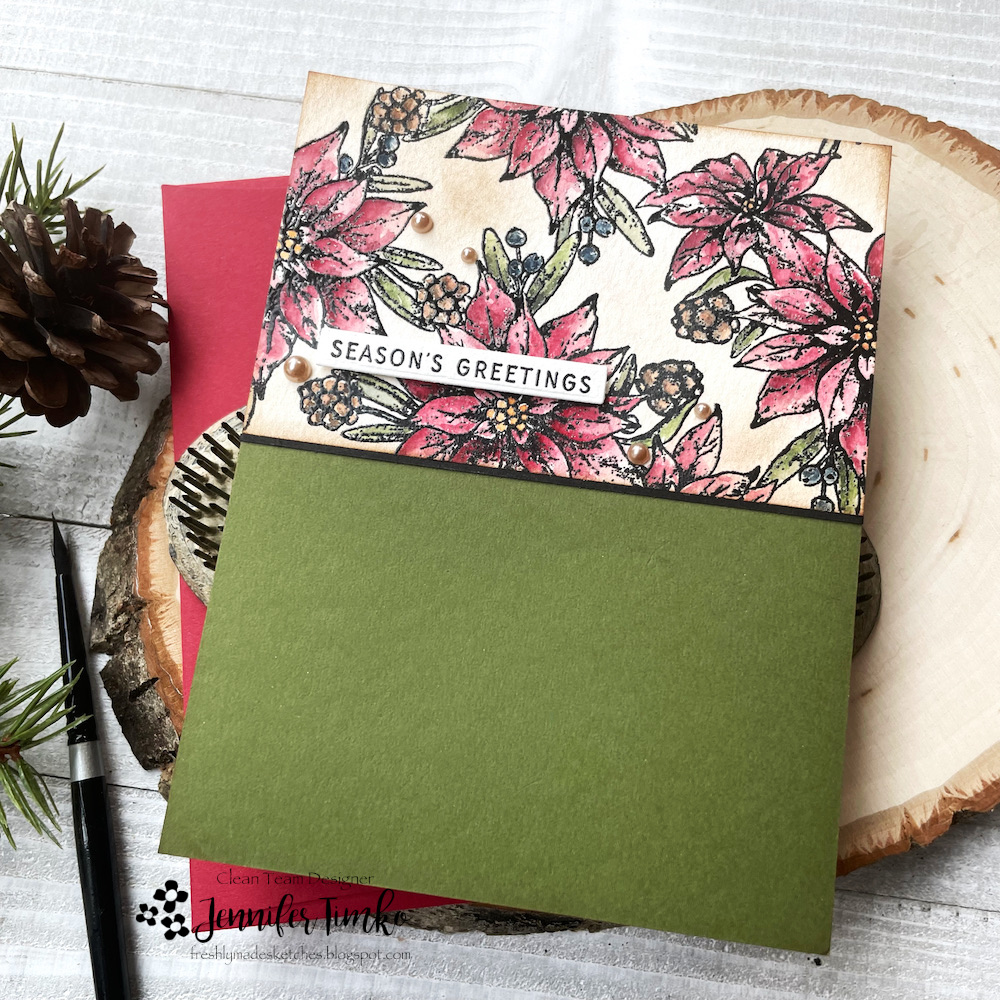
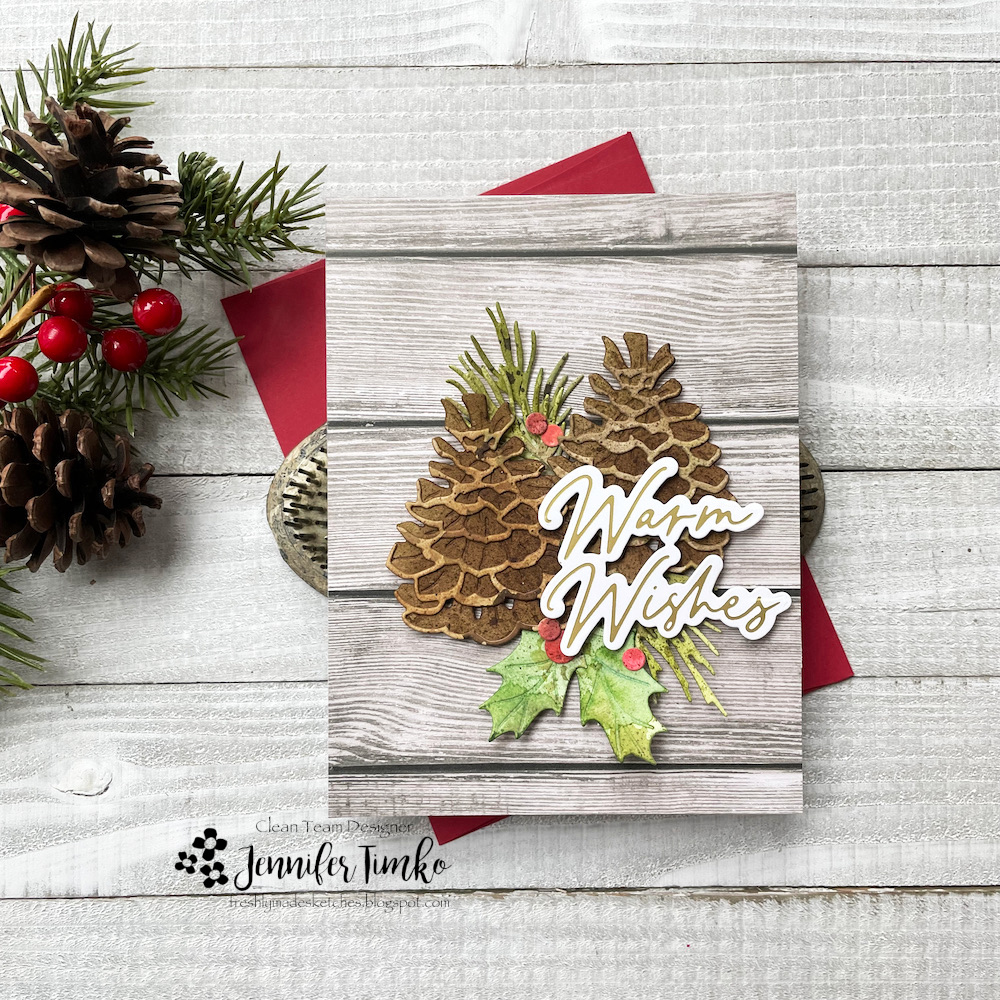
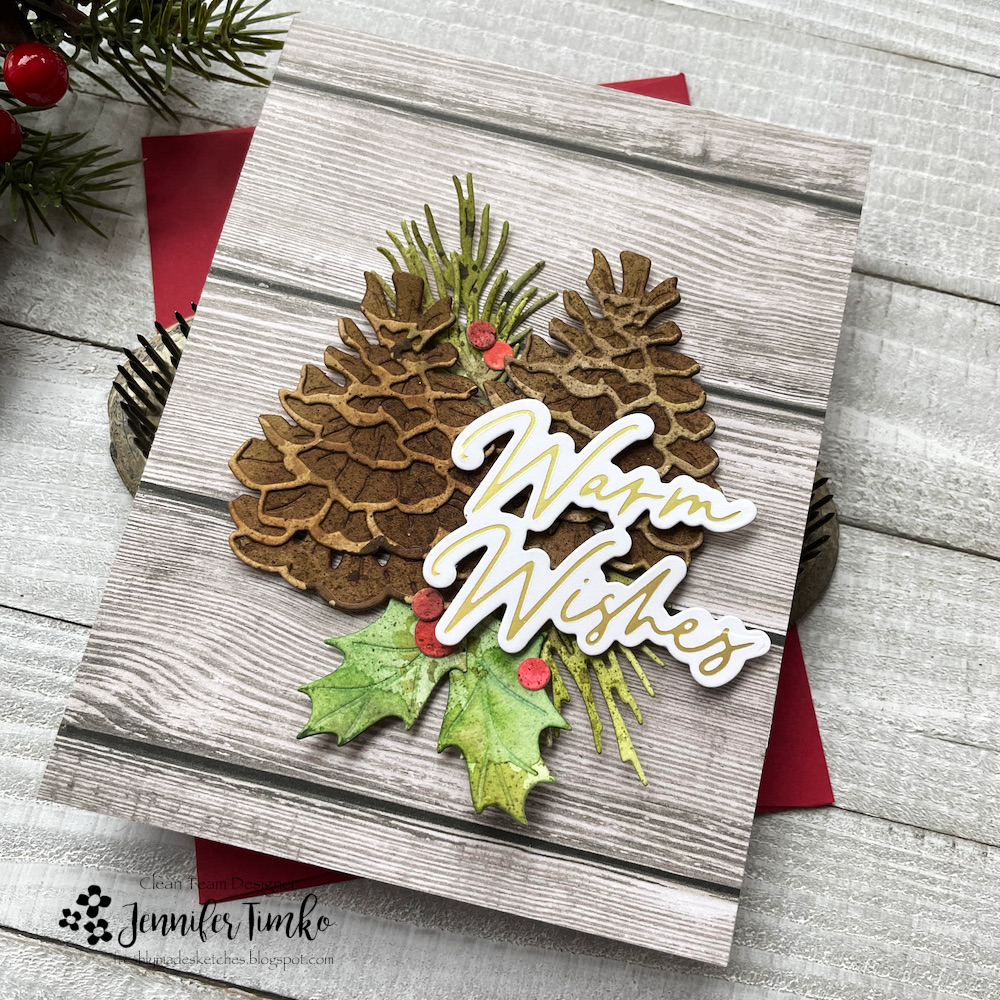
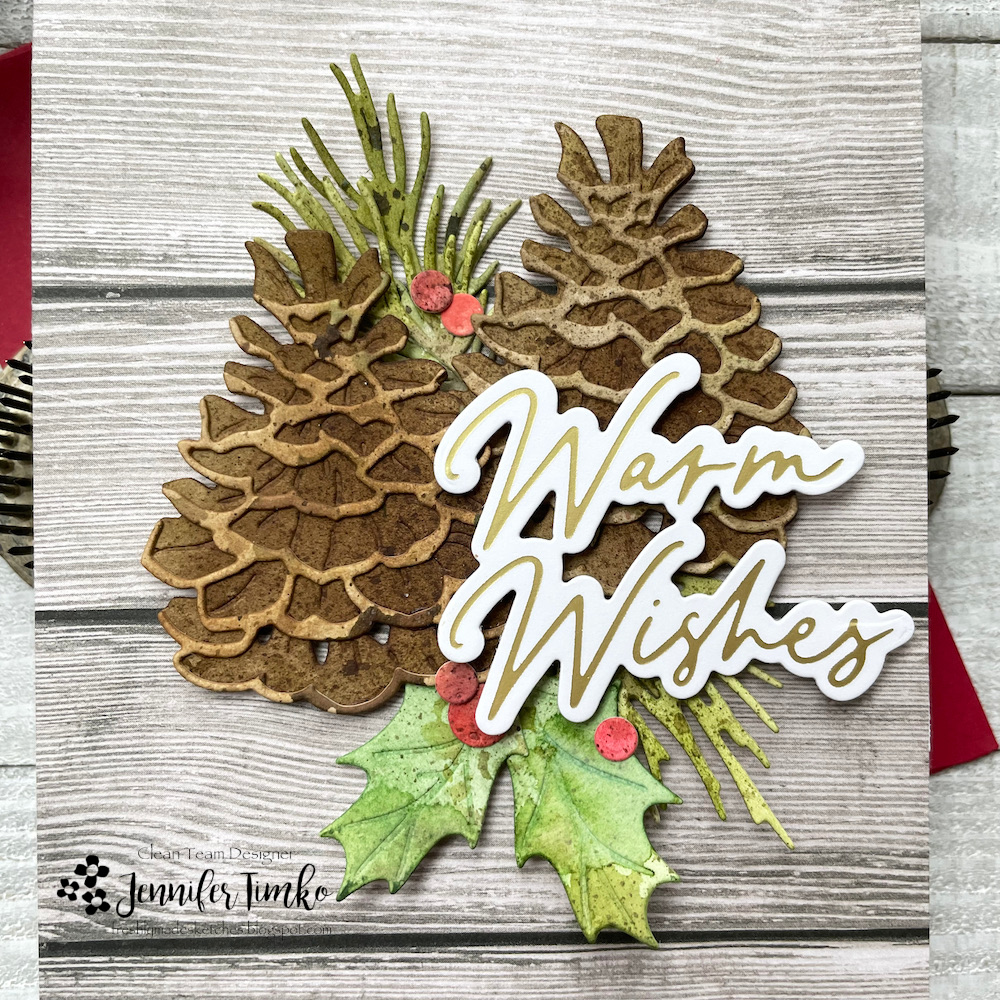
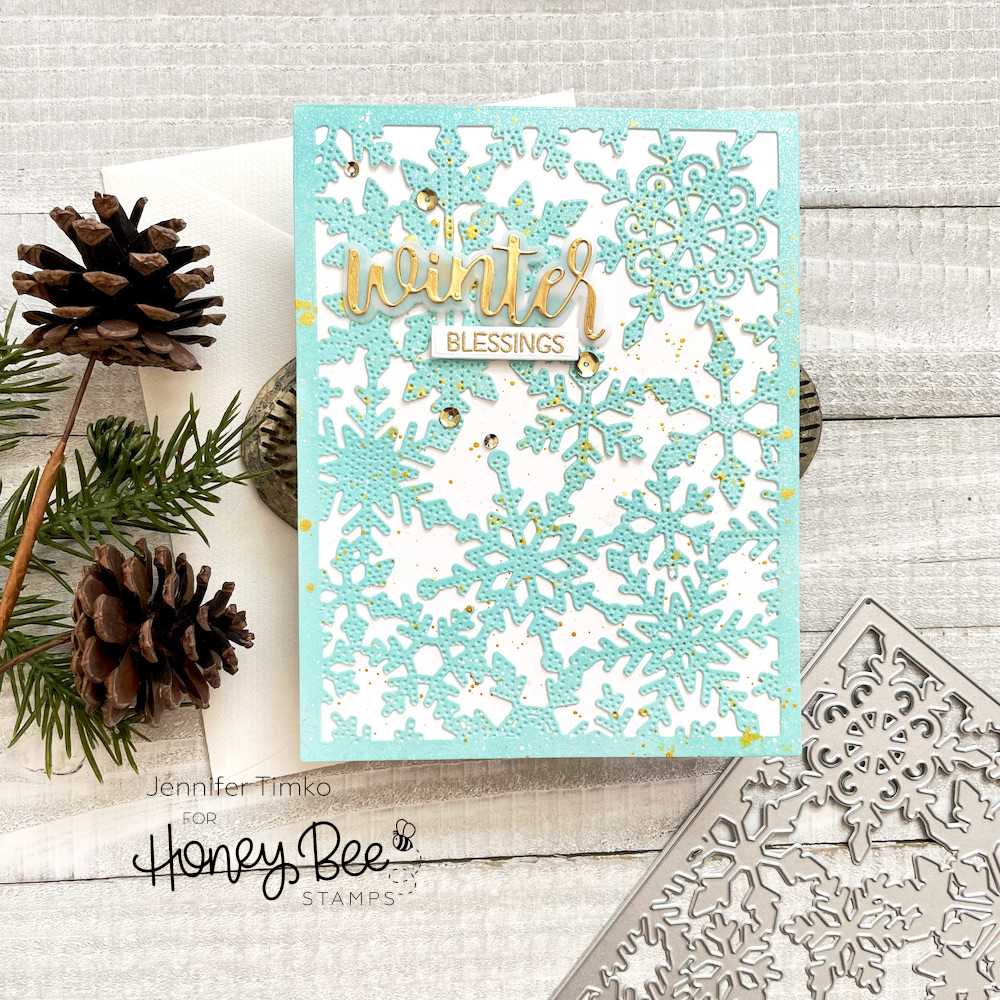
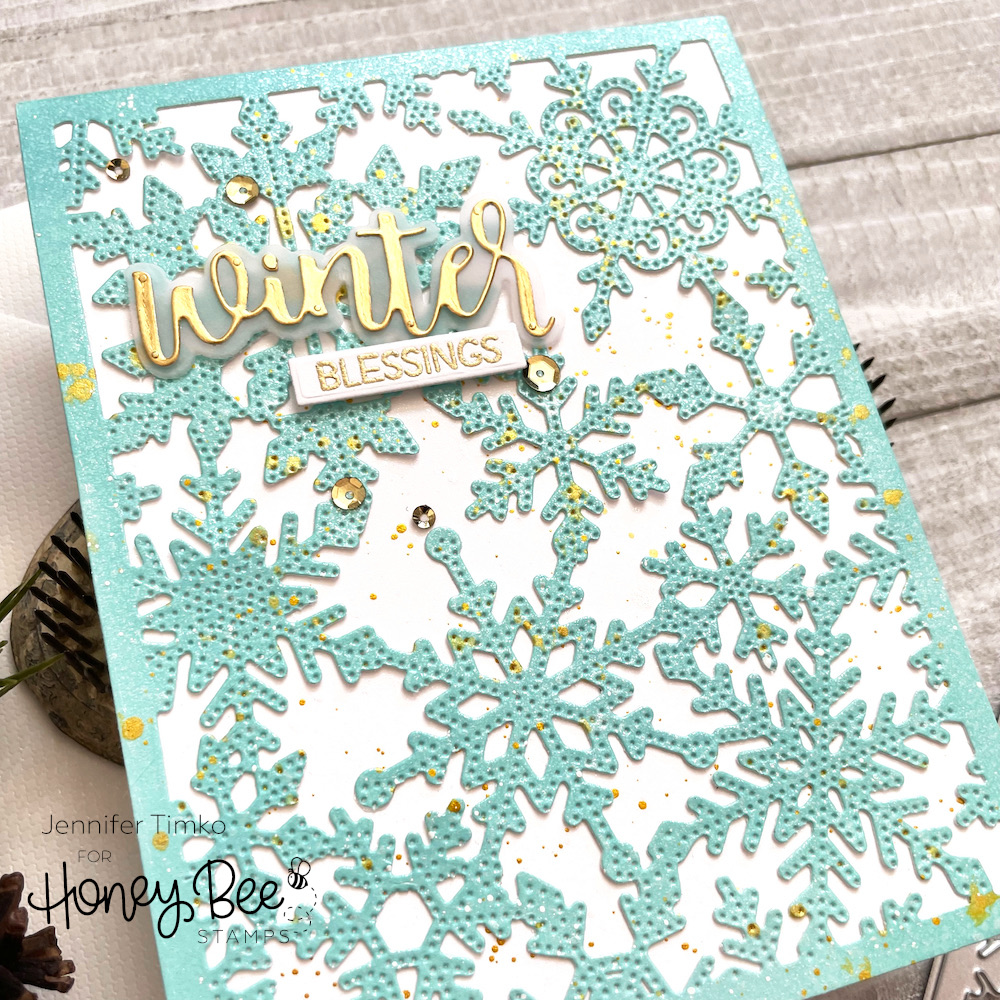
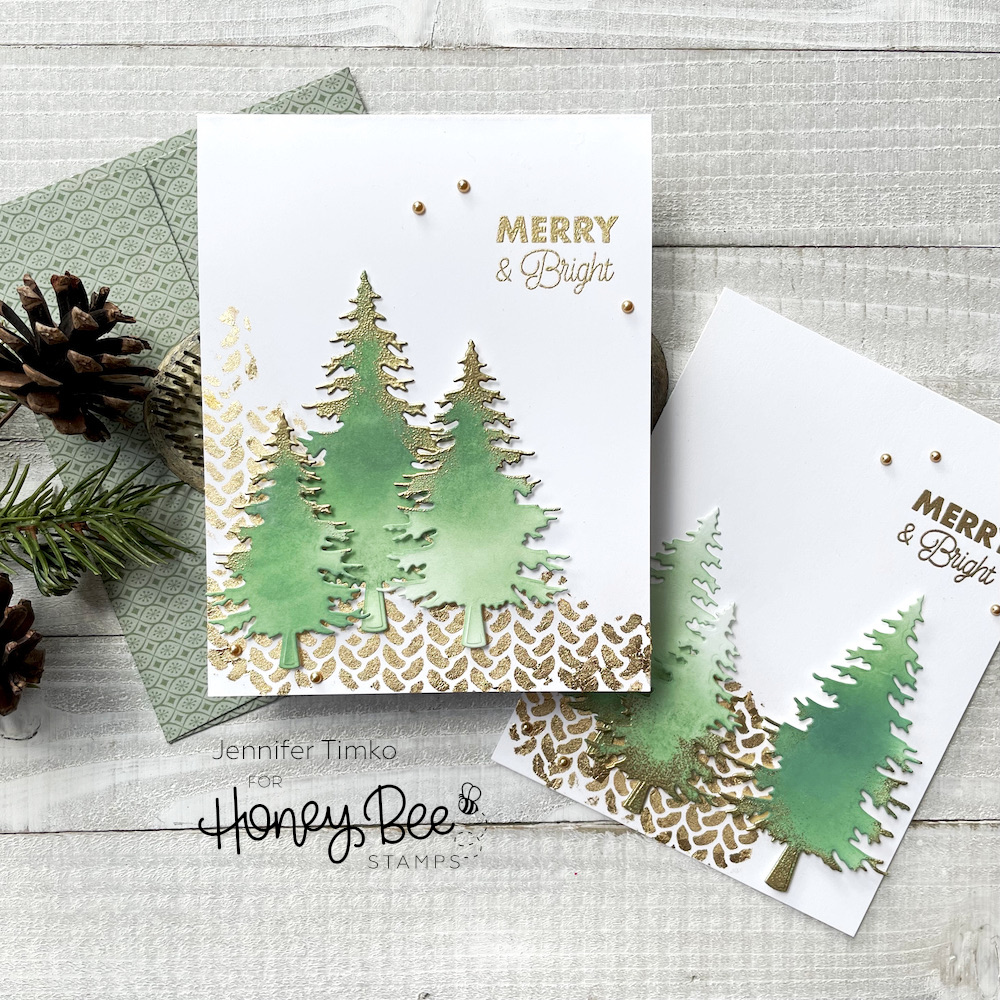
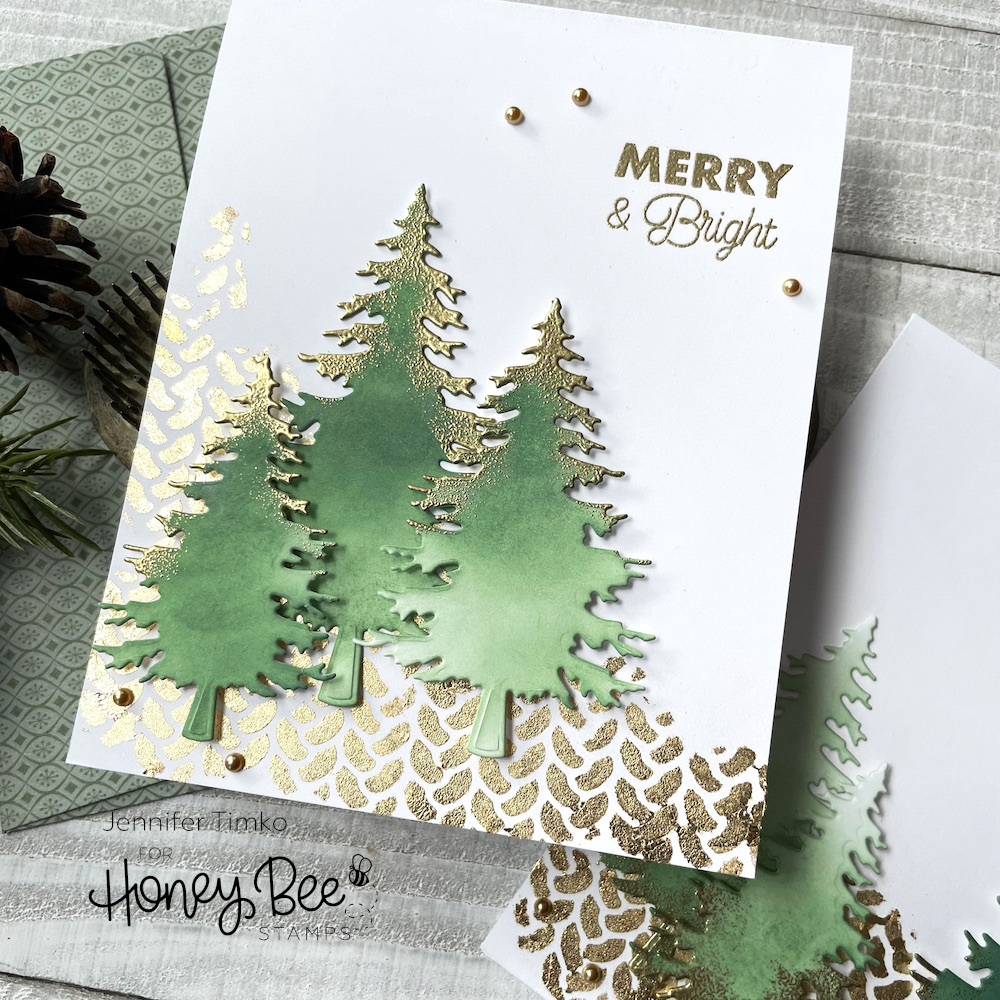
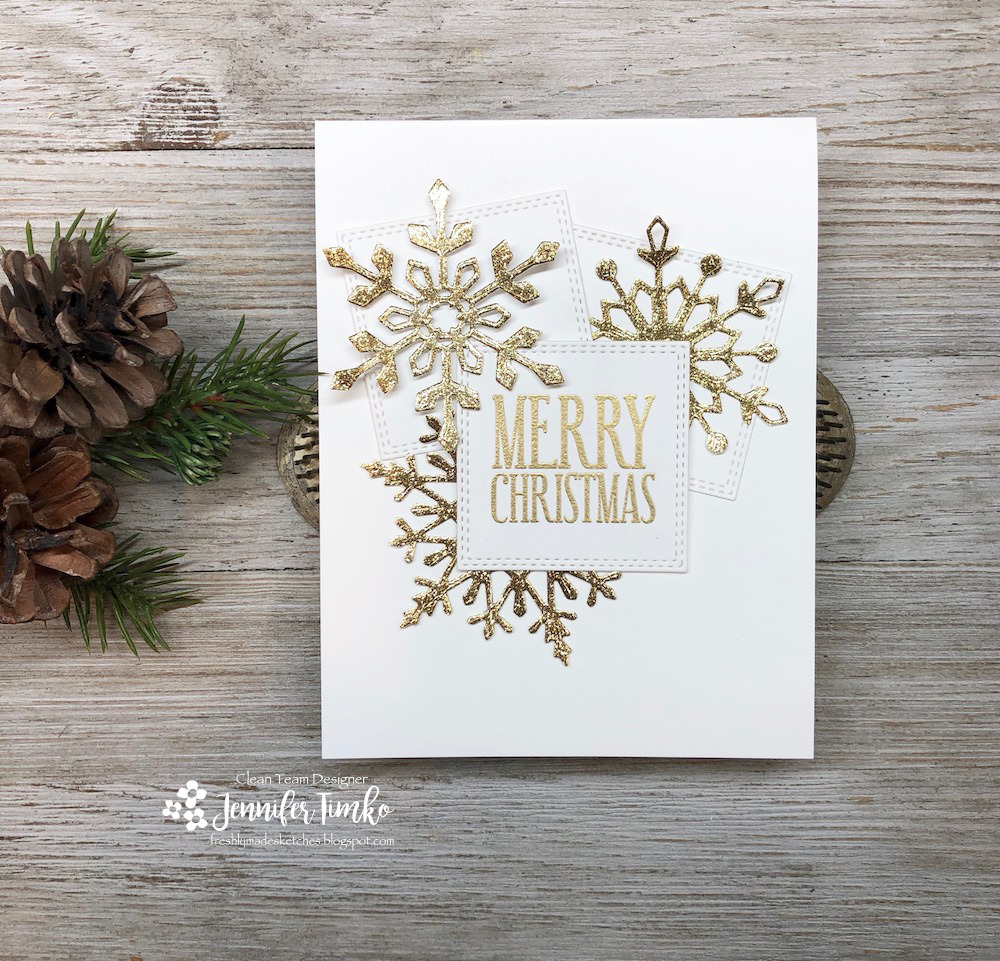
For the last few weeks, I’ve been doing lots with inking on die cuts. This week, I opted for clean. I pulled out products from Honey Bee Stamps latest release (and added some older things too) and had such fun on this. To start with, the Lovely Layers: Large Snowflake was going to be the star of the show. I wasn’t sure how the background was going to go so I started with the snowflake. First I cut it from glitter paper (it is GORGEOUS) but realized it wasn’t right for this card. So I used some watercolor paper with the thoughts I might ink it up. But just looking at all the detail on that thicker paper, I opted to just leave it plain and I love it. Using the same watercolor paper, I cut a card based and the other plain layer. I found this print from the old Vintage Holiday Paper Pack that has coordinating snowflakes (I love how HBS keeps things coordinated from season to season!!).

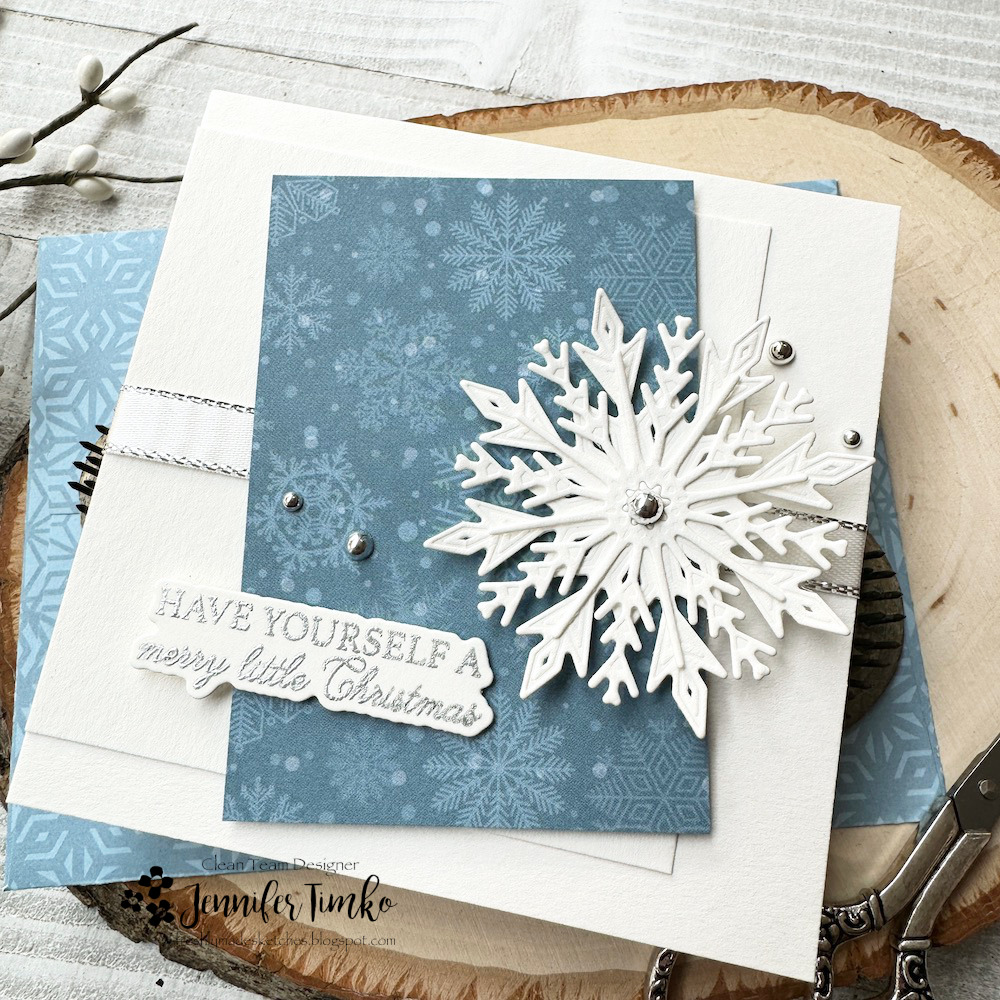
I decided that I needed a bit of shine on this so I heat embossed the sentiment from the Good Tidings Stamp Set in silver and cut out with a coordinating die. The shiny silver pearls are from the new Metallic Mix Pearls. Fun to have some super shiny choices! The ribbon with the silver edges was from my stash and was a great finish. I like that I can make a few more of these with no trouble and add to my stash!

I hope this week finds you well. I appreciate you stopping by and spending a few minutes of your day with me. See you soon!

Freshly Made Sketches #607

Freshly Made Sketches #607 published on 7 Comments on Freshly Made Sketches #607

We have a super interesting sketch this week at Freshly Made Sketches created by the lovely Amy O’Neill. At first, I thought flowers and a large sentiment. Then, I thought stencils. And finally, I came to this plan. Well, sort of.

This started out with the plan to put a pinecone at the top and bottom of the sentiment. And for the record, a totally different sentiment (went through a few on this one). I just could not get the pinecone to look right in the opposite direction which is crazy since that is how they are on trees but… Some days are just like that. In any case, I did lots of spritzing and inking on these Lovely Layers: Winter Greenery dies. These Bitty Buzzwords: Holiday sentiment finally worked just right on a rectangle with gold heat embossing.

Again, the plan went a little sideways. I planned to add red berries to the holly but at the last minute opted to add some gold embossing to the leaves and elements. Once that was there, the red didn’t make sense. So I added some gold pearls instead! I had a little time when making this which is good because I just had to keep walking away until inspiration struck. But in the end, I had fun just playing around and that is the entire point of this, after all.

The team has all kinds of cool takes on this one and I think the gallery is going to be super fun! Oh, and as I’m typing I realized I missed the rectangle layer. Sigh. Hope Amy doesn’t fire me, lol! Have a lovely week. Stay safe and be kind. Goodness knows we need a lot of kind.

Freshly Made Sketches #596

Freshly Made Sketches #596 published on 5 Comments on Freshly Made Sketches #596

A cool new sketch idea at Freshly Made Sketches! Judy has us doing halfsies! Designs only on the top half of the card and the bottom is clean. I found it a bit of a challenge but happy with the final result.

Along with the new set from WPlus9 that I used last week, I ordered another set called Joyful Poinsettias. I like the background style design along with the single flower and sentiments in the set. Again with the watercoloring (because I know Dawn designs like a water colorist). I stamped the image in black then heat embossed with clear embossing powder. I colored the flowers and leaves and tried to keep to a more vintage palette. After it was dry, I added a little Vintage Photo Distress Ink with a light hand to “age” the white spaces.

I waited until I was done coloring to choose the base and I went with Artichoke by Concord and 9th. I stamped and embossed the sentiment, going with a small one to keep it on the top half of the card. Finally I added some champagne colored pearls as accents.

I hope you find a bit of inspiration in this card. I had lots of fun spending a little time on the watercoloring. Thanks so much for stopping in. See you soon!

Freshly Made Sketches #566

Freshly Made Sketches #566 published on 4 Comments on Freshly Made Sketches #566

I’m sharing the last Freshly Made Sketches challenge of the year and it is just fabulous for last minute holiday cards or cards made when you are done with holiday cards. The wonderful Narelle has one with tons of possibility, as you can see with the team’s cards.

In a crazy move, I made a card that is NOT a painted tree! I reverted back to some of my favorite dies of the season from Honey Bee Stamps. These Lovely Layers: Winter Greenery elements are just so pretty and I had not used the pinecones yet. I thought they were perfect for the sketch. I started with a piece of watercolor paper that I sprayed with Pumice Stone Distress Spray and added some Rustic Wilderness Distress Ink. I was just neutral with texture as a starting point.

Using that piece of paper, I cut out all of the elements for the card. All the little color textures on the pieces are because of that first layer of ink. Once each piece was cut, I added more Distress Ink to color each one its proper shade. I used Distress Ink because it is more sheer so I kept the other details and splatters.

I played around with the placement of the elements and then went to decide the background. I found this taupe-ish wood grain in my Grain and Grunge Paper Pack that was perfect. The gold foiled sentiment was just the right size for the sketch and I love the bit of shine it adds.

I hope you will come over and join us if you have time to craft during the holidays. You can join multiple times and we love seeing all you create! Thanks for stopping by today. Back soon with a few more cards I’ve been making for the holidays.

Freshly Made Sketches #565

Freshly Made Sketches #565 published on 5 Comments on Freshly Made Sketches #565

Happy Wednesday! I am back today with the latest sketch from Freshly Made Sketches and another watercolor tree. Truly, I’m obsessed. I did get a question on the tutorial on the watercolor trees. Dawn has a group on Facebook called WPlus9 Encourage Creativity where she has lives twice a week or so. The tree painting was on November 15th. Now, on to the latest sketch from the incredible Karren Johnson.

Armed with my confidence from the last watercolor tree, I attempted another style and, oh my word, it worked! I wanted to use it with the sketch this week and had to play around with backgrounds that worked. I finally settled on some patterned paper from Honey Bee Stamps.

I love this traditional plaid behind the tree and thought the dark wood print grounded the card nicely. In keeping with the sketch (loosely, at least) I chose a sentiment from Inside: Holiday Sentiments (Honey Bee Stamps). I had added a few gouache splatters to the tree after painting but still thought it needed a little something extra. A twine bow seemed to be just the right amount of detail.

I hope you’ll come over to join us for this week’s challenge. This sketch is perfect for those last minute holiday cards! I appreciate you dropping by. See you again soon!

Holly Jolly from Honey Bee Stamps

Holly Jolly from Honey Bee Stamps published on No Comments on Holly Jolly from Honey Bee Stamps

I have been working away on Christmas cards and trying some new techniques. I find that watching “lives” with my stamping friends inspires me to try things I would never otherwise do. This card is the result of one I watched with the queen of artsy, inky goodness – Lydia Fiedler.

Last week, Lydia was showing how to add color and depth to a background stamp and I was inspired to try it with the Holly Jolly background stamp from Honey Bee Stamps. There is nothing particularly hard about the process, it just takes a bit of time and patience. I started with a piece of Bristol Smooth paper larger than the image and put it in my Misti. The Misti is key to the technique since you stamp the image over and over again. Using my Mini Distress Inks, I started adding colors selectively on the image. I kind of went around and around the image adding and layering the inks. This gives you an idea of the work in progress. After this point I added some Peacock Feathers and Villainous Potion. It is kind of an experiment which is what makes it fun.

Once I had the panel inked, I decided I wanted it to take on a vintage vibe so I added Distress Oxide Ink in Antique Linen and some Vintage Photo Distress Ink on the edges. Next I splattered on some Early Espresso ink. I chose a section that seemed the most balanced and cut it with a rectangle die. Separately, I inked the big image in black ink and used the coordinating dies to cut all the sentiments out…such a great way to have a bunch of fun font sentiments on hand. I used the script Holly Jolly and matched the distress inking from the main panel.

Using the Make It Merry paper pack, I chose a plaid for the base layer and some of the red/green prints for my poinsettia. I little gold center to add some elegance.

This inking technique has made me look at some background stamps differently and I look forward to using this again. If you are every needing some inspiration to try new things, go visit my friend Lydia. She is amazing and truly her tutorials will just make your day happier. Hope you have a wonderful day!

Honey Bee Stamps Vintage Holiday Release – Sneak Peek Day 4

Honey Bee Stamps Vintage Holiday Release – Sneak Peek Day 4 published on 1 Comment on Honey Bee Stamps Vintage Holiday Release – Sneak Peek Day 4

Welcome to the Honey Bee Stamps Vintage Holiday Release Sneak Peeks! Today is the last day of our peeks at the new release and, as usual, you will be totally wow’d by all the amazing sets.

Today I am introducing new Falling Snow Background Stamp and the Riding By…Holiday Style Stamp Set and coordinating Honey Cut Dies. (These affiliate links will not be live until the release opens for sale TONIGHT, October 14th after the Release Party on IG and FB at 8p CT.)

The Riding By…Holiday Style is an add-on set to the Riding By Set and Bicycle Builder Honey Cut Dies. I love all the options! AND, these images could be used just for tags or without the bike too. Love that. But I used it in the intended way. I stamped a bunch of the images in Momento Tuxedo Black Ink and colored in non-traditional colors of pink, teal and lime green. After cutting them out with the coordinating dies, I started playing with how I’d build my bike. I left the frame white and colored the tire in pale gray. I added a few pink accents too. I did cut two more of the “tire” die (not the spokes part) and the bike frame to give a bit more depth.

I used the Honey Bee Stamps Precision Glue to attach all the parts together. Then, I decided I needed a bit of pop from the background. I stamped the new Falling Snow Background Stamp in Versamark Ink and heat embossed with clear embossing powder. I brushed on a bright pink ink and the emboss resist worked perfectly. I pulled some of the Bubblegum Confetti Mix out as the final accents.

So glad you stopped in today. Remember the release goes live tonight! I hope you will consider shopping with me via the affiliate links highlighted at the top of the post. Have a wonderful day!

Honey Bee Stamps Vintage Holiday Release – Sneak Peek Day 1

Honey Bee Stamps Vintage Holiday Release – Sneak Peek Day 1 published on 1 Comment on Honey Bee Stamps Vintage Holiday Release – Sneak Peek Day 1

Welcome to the Honey Bee Stamps Vintage Holiday Release Sneak Peeks! Today is day one of our peeks at the new release and, as usual, you will be totally wow’d by all the amazing sets.

I have twice the inspiration for you today because I just could not help myself. Let’s face it, holiday card making is my absolute favorite!! I am so excited to show you new cover plate dies and a stand alone die set you are sure to love. I am introducing the Fancy Flakes A2 Cover Plate Die, the Pierced Fancy Flakes A2 Cover Plate Die and the Pine Tree Honey Cut Dies. (These affiliate links will not be live until the release opens for sale on October 14th after the Release Party on IG and FB at 8p CT.)

To start, I just had to make a card with the combination of the Fancy Flakes and Pierced Fancy Flakes dies. These are stand alone dies that can also be used together. Fabulous!! I inked a panel with Salvaged Patina Distress Oxide Ink and first cut with the Fancy Flakes die. Then I lined up the Pierced die and ran it though again. Yeah, it is that easy. For a little more interest, I splattered on some Shimmer Mist and Gold ink and then, while I was at it, did the same to a white card base.

I glued the snowflake layer onto the base using the Precision Tip Glue by Honey Bee Stamps. This glue is just awesome. It gives just a bit of time to position the layer and then it holds tight. I used one of the products from the last release to finish the card. The Bitty Buzzwords – Seasons Honey Cut Dies had just the right sentiment. I used more gold paper and then some gold embossing too. Finally, a few gold sequins.

For my next card, I kept to the gold accent theme. The new Pine Trees Honey Cut Dies are going to be seen A LOT around here over the next couple of months. I love the quick simplicity of them! I cut them from white Hammermill card stock and inked them with Rustic Wilderness Distress Oxide Ink. After letting them dry for a bit, I added some anti-stick powder and then inked the edges with Versamark Ink. You can see I did one card with the tops and one with the bottom of the dies. I wasn’t sure which I would like and the answer was both! I added gold embossing powder and heated. Such an easy way to get a lot of extra detail.

For the details behind the trees, I used the Cable Knit Sweater Stencil in a new to me way. I pounced on some Tombow Mono Glue through the stencil. Because it remains sticky, I could then add on Nuvo Guilding Flakes for this cool, not too precise version of shine. The sentiment comes from a set that you will get to see later this week.

So glad you stopped in today. Back tomorrow for day two of the peeks! Have a great start to your week.

Freshly Made Sketches #462

Freshly Made Sketches #462 published on 6 Comments on Freshly Made Sketches #462

Happy middle of the week! Here with our weekly challenge from Freshly Made Sketches. Our sketch designer is Narelle Farrugia and this one is really fun. Go read about her inspiration for the sketch too…I love how we can be inspired to create by so many things.

If any of you have ever tried to get good photos of glitter and embossing, you are now feeling my pain! *smile* This card is all about shimmer and shine and my camera just cannot capture it in its full glory. But you get the idea. I used products by Gina K Designs today. The Double Stitched Squares were my logical starting place for the sketch and then I went all in on the Sparkle and Shine Kit. The snowflakes dies come from the kit and I used them on gold Glitter Card Stock. The sentiment is from the Holiday Tapestry set from the kit. I stamped it in Versamark and heat embossed with gold embossing powder.

I hope you will come over and join us this week. It is always such a joy to scroll through the gallery looking at your beautiful creations. Thanks for stopping in today! See you soon.

Picket Fence Studios and WOW! Embossing Collaboration Blog Hop

Picket Fence Studios and WOW! Embossing Collaboration Blog Hop published on 35 Comments on Picket Fence Studios and WOW! Embossing Collaboration Blog Hop

I love when crafty companies get together and share the joy! It is such a great part of our industry and one to celebrate! Today, Picket Fence Studios and WOW! Embossing are joining together. Two teams, tons of inspiration! Hang on for some AH-MAZING projects! If you arrived from Erica’s blog, welcome. If you are starting with me, just hop along with the list at the bottom until you get back here. Oh, and I can’t forget to mention PRIZES! Yes, of course there are prizes from these two amazing companies! Details later in the post.

I know that we are still in July but, to be honest, if I don’t start on Christmas cards now I will never get them done. One of the things I look for when designing mine for the year is something I can make in bulk that won’t make me too crazy. I don’t love creating in bulk, you see. So the design needs to be simple but with a special touch. As a CAS stamper, simple seems to be what I make the most of but the special part…that is where the WOW! embossing powders come in. When I was playing with this design, I originally tested two powders on this pretty Neenah Desert Storm paper. Both results were so pretty that I could not decide which I liked. So I asked my most honest critics. My boys! One chose “gold” and one chose “silver”. And I realized I didn’t have to actual choose at all!

Armed with my trusty MISTI, I had all the elements in place to stamp multiples. This Fern Picture Frame stamp from Picket Fence Studios is gorgeous for holiday cards! All the detail is perfect for embossing! I stamped in Versamark Ink and then heat embossed with White Pearl and Oyster Glintz powders. I had a happy accident with these choices, by the way. I had played with a number of colors on white card stock and knew how gorgeous they are in “true” color. But on the kraft, these took on the silver and gold look. I love products that can really give value and can multitask. I was pleasantly surprised that this could happen with embossing powder! When I get further along with my creating for Christmas, don’t be surprised when you see this exact card layout done on white with these powders and others. The sentiment for this card comes from the String of Lights Stamp Set. This whole set would be amazing with embossing powders….hmmm, chances are I’ll be making that too. I thought a few sequins were the perfect touch on the wreaths and I found some in my large stash that matched perfectly. Love the monochromatic feel but you could use colored jewels or pearls too. So now to more fun….

PRIZES – No Blog hop is complete without a prize!

WOW! Embossing Powders has 6 powders of your choosing along with a WOW carry case to store your powders safely in.

Picket Fence  is giving away a $50 gift certificate to their store.

The Winners will be chosen at random from the comments left on THE POSTS.

To join this GIVEAWAY you must leave a comment on each blog post to have a chance at getting your hands on the prize. This hop is open internationally. Below is the entire blog hop roll in case you get lost along the way. Next up is ISHA GUPTA and you are sure to be, well, WOW’d!

Thanks so much for stopping through today! See you again soon!

Primary Sidebar