Skip to content

Bright Hopes Gift Box

Bright Hopes Gift Box published on 6 Comments on Bright Hopes Gift Box

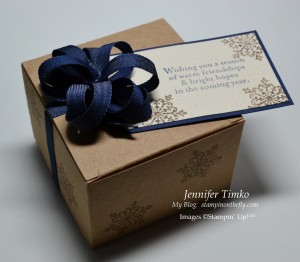
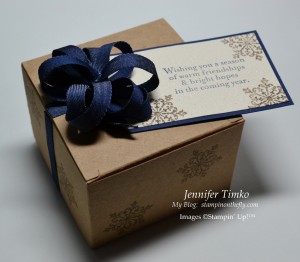
Today I am going to show you a little more detail about the Kraft Gift Box project from the Stampin’ Addicts Holiday Mini Blog Hop.  I love these little boxes and you really can’t beat the price!!  To start, I stamped the snowflake from Bright Hopes all around the sides of the box using Soft Suede and then assembled the box per the included instructions.
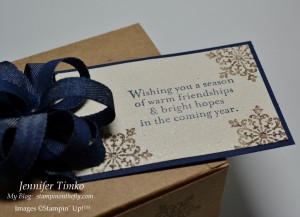
Next I created a tag using a Naturals Ivory.  I used my Champagne Mist Shimmer paint to create a Shimmer Spray.  All you have to do is fill a travel size spray container with about 1 ounce (half a bottle) of regular rubbing alcohol.  Then add drops of Shimmer Paint until it is as shimmery as you like (I use about 12-15 drops since I want some sparkle).  Shake well before each use.  I recommend you use this where the alcohol will not cause damage, either using the Color Catcher or other protective surface.  Spray your tag and set aside to dry.  Then I stamped with Soft Suede Ink again and Night of Navy.  You can see the sparkle if you click to look close-up but it is much prettier in person!

Next was the ribbon.  I used the Puffy Bow Tutorial from the extraordinarily talented stampers at Stampin’ 411.  I love their challenges but make sure you take some time to peruse their tutorials.  Fantastic information!!  The Denim Jean Ribbon is not quite as easy to cut as the Seam Binding shown in the tutorial but with a little patience you just follow the same instructions.  I left “tails” and attached the bow and tails to the top with Sticky Strip (I wrapped the ends around the lid).  I did the same with a length of ribbon around the box to make it look like a package.  Trim the ribbon to the right length and carefully, really carefully, seal the ends of the ribbon with a lighter so they don’t fray.
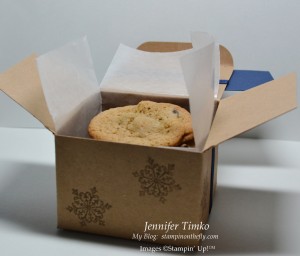
This allows you to open the box without having to take anything apart.  Just so you know, the box was perfect for five chocolate chip cookies.  Sadly, the cookies didn’t last much beyond this photo being taken.  My boys were waiting very patiently for me to finish and how could I say no??!!

I’m planning on ordering more packages of these little boxes and using them for all kinds of holiday gifts.  I can’t wait to make more of these bows using all kinds of other ribbon.  Just make sure you tell the Operators thanks for the tutorial and give them credit if you use it!!

I’m off to put some last minute touches on a project for tomorrow.  I look forward to sharing it and some fun news!  See you then!

Stamp:  Bright Hopes; Paper:  Naturals Ivory, Night of Navy; Ink:  Night Of Navy, Soft Suede: Accessories:  Kraft Gift Box, Blue Denim Jean Ribbon, Sticky Strip

All products are Stampin’ Up!

Patterned birthday cake

Patterned birthday cake published on 9 Comments on Patterned birthday cake

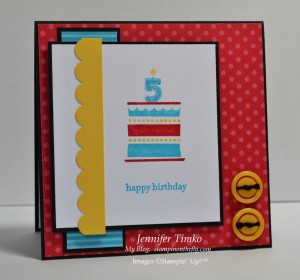
I am already a big fan of the new catalog set Patterned Party because I can see making so many different kinds of cards with it!  When I saw the sketch over at Create with Connie and Mary this week, I knew that this was exactly the set to use.  It didn’t hurt that I needed a birthday card for one of my youngest son’s friends!

My trusty Brights Designer Paper Pack seemed just right for the layers and I love how the colors pop against the Basic Black background.  I inked up the cake using Stampin’ Write Markers.  Next, I colored only the number 5 candle and put it on top of the cake with the help of my Stamp-a-ma-jig.  Some Brights Designer Buttons finished off the sketch.

I hope you like this fun card!  So glad you dropped in today.  It is going to be a busy week of posting for me so don’t be surprised.  I’ll be back tomorrow with more information about the gift box from the weekend’s blog hop.  Thursday will hold a new challenge for you (and I get to tell you about some cool news)!  Thanks for stopping in today.  Hope to see you again soon!

Stamps:  Patterned Party, Teeny Tiny Wishes; Paper:  Brights Designer Paper Pack, Basic Black, Whisper White; Ink:  Real Red, Tempting Turquoise, Daffodil Delight; Accessories:  Scallop Edge Punch, Brights Designer Buttons, Dimensionals, Stamp-a-ma-jig, Black Thread (non-SU)

All products Stampin’ Up unless otherwise indicated!

Fork bow tutorial

Fork bow tutorial published on 15 Comments on Fork bow tutorial

As promised in Friday’s post for the Stampin’ Addicts Blog Hop, I am here today with a tutorial on how to make the bow for the wreath card.  Supplies needed:  a salad fork and some Cherry Cobbler Seam Binding.  All pictures can be enlarged by clicking on the photo.

*Disclaimer* – This is in no way an original idea.  I have watched variations of this from very talented stampers and have simply taken pictures to show how I created the bow for my card.

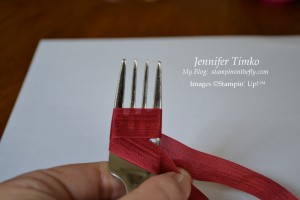
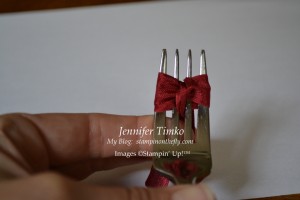
My bow is a “double” bow.  Cut your Seam Binding about 9 inches long.  Start with a tail in front of the fork and then wrap around twice.

When it has been wrapped around twice it should look like the picture above.

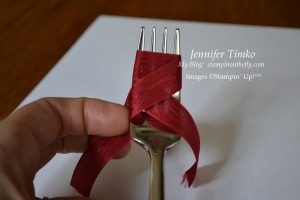
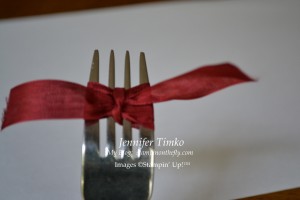
Next take the top tail and put it through the center of your fork.  Give a snug pull to get it seated at the bottom of your bow.

In the above picture I had not yet pulled the bottom tail enough (do as I say, not as I photograph  *smile*).  Next take the remaining tail and pull it through the center tines on the top.  How you see it now will be the front of your bow so now is the time to fuss with the center to make it look smooth.

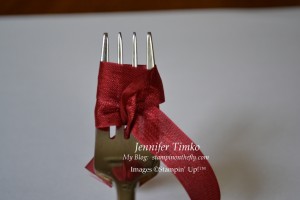
Turn your fork over and tie the two tails together as shown.  You will only make one tie and then pull it as tight as you like to make the front pretty.

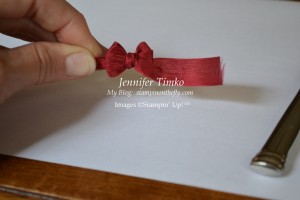
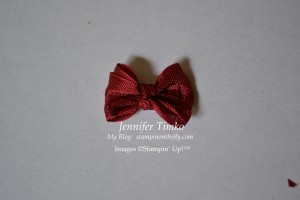
Take the bow off the fork and tighten/straighten as needed.  Your bow should now look like the picture above.

Finally, turn the bow over and cut off the tails.  I placed two Mini Glue Dots at the ends of the cut off tails and attached it to the card.  This helps to keep the bow attached securely and keeps the ends from coming loose.

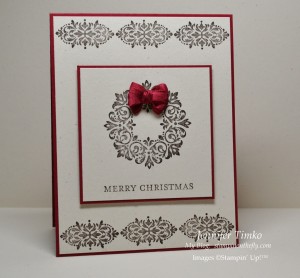
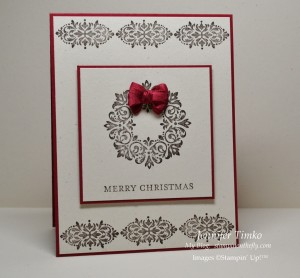
Here is the final card again.  I did use my Stamp-a-ma-jig to line up the border detail on the top and bottom of the card.  The wreath panel is popped up on Dimensionals.

I hope these pictures help you make these cool little bows.  Please let me know if you have any questions about them!  I’ll be back later in the week to show you the bow for the tree card that uses yet another commonly found kitchen utensil.  Tomorrow, I have a fun birthday card for you so come on back by!  Hope you have had a safe weekend and that the storms have not affected you adversely.

Stamp:  Bright Hopes; Paper:  Naturals Ivory, Cherry Cobbler; Ink: Early Espresso; Accessories:  Cherry Cobbler Seam Binding, Mini Glue Dots, Dimensionals, Stamp-a-ma-jig

All products are Stampin’ Up!


Stampin’ Addicts Holiday Mini Blog Hop

Stampin’ Addicts Holiday Mini Blog Hop published on 25 Comments on Stampin’ Addicts Holiday Mini Blog Hop

PhotobucketWelcome to the Stampin’ Addicts Holiday Mini Blog Hop!!  There is so much about the new Holiday Mini to be excited about and I know your wish list is expanding as you go through this hop.  If you have already been hopping, then you came from Tanya Boser’s Tinkerin’ in Ink with Tanya.  Her projects with Christmas Lodge are just fantastic!  My set today is Bright Hopes.  It was the first “must-have” for me from this set and I’ll bet it will be for you too.  It is versatile and beautiful!  Don’t forget that you can click on any picture to see it with more detail.

My first card uses the wreath and the border stamp from the set.  I love that this card is easy to duplicate but it still has a special feel to it.  The bow is the star of the show and I love how the size matches perfectly with the wreath.  I will be back on Monday with a tutorial on the bow so make sure you come back by!

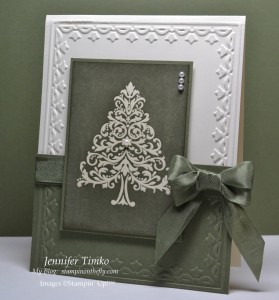
For my next card, I pulled out the tree from the set.  I knew I wanted a bit of a pop from this so I also got out my brayer.  I embossed the tree onto Very Vanilla paper using Versamark Ink and Clear Stampin’ Emboss Powder.  Then I inked up the brayer with Always Artichoke and rolled it across the tree.  A little sponging on the edges finished up the image panel.  I thought that the Framed Tulips Embossing Folder was a great style match for the tree so I added the embossing to the base.  Finally, some Basic Pearls and the beautiful Always Artichoke Seam Binding were added as the final touch.

My final project for today uses Bright Hopes with the new Kraft Gift Box.  I created a tag with the set and then added some snowflakes to the box itself.  When you look at the close-up picture you can see that the tag has a bit of sparkle.  This comes from Shimmer Paint spray.  The bow is made with the new Blue Denim Jean Ribbon.  More details on the how-to for this box will be available later in the week.

Thanks for stopping in today.  The next stop on the hop is Lisa Young at Add Ink and Stamp.  She has some wonderful projects with Stitched Stockings that you are sure to love!

SUOC26 – Come join the party

SUOC26 – Come join the party published on 8 Comments on SUOC26 – Come join the party

It is time for another SU Only Challenge and we are asking to see your invitations!  Whatever your occasion, we can’t wait to see how you invite people to join you.

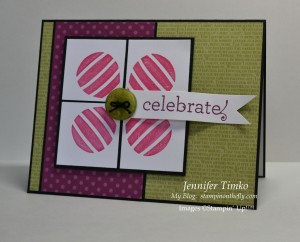
I knew I wanted to make an invitation using the Up, Up and Away set.  Of course I love the set as balloons but it can also make flowers!!!  Using a sketch from the Pals Paper Arts Challenge designed by the talented Margaret Moody, I stamped the striped balloons on the angle and put them together to look like a flower.  My Brights Designer Paper Pack provided the DSP and I added an Old Olive button as the flower center.  The sentiment comes from Inviting which is one of those great to have, all purpose word sets!

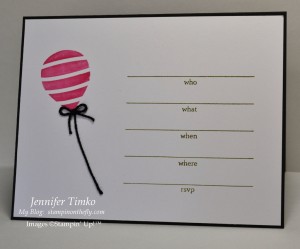
I decorated the inside of the card with another kind of balloon and a place to put all the party details.

I hope you can come over and join the fun on this challenge.  Don’t forget that you have almost two weeks to complete your entry!

Thanks so much for stopping by today.   I will be back on Friday for a Stampin’ Addicts Holiday Mini Blog Hop.  You won’t want to miss it!!

Stamps:  Up, Up and Away, Inviting; Paper:  Brights Designer Paper Pack, Basic Black, Whisper White; Ink:  Melon Mambo, Old Olive (inside); Accessories:  Brights Designer Buttons, Dimensionals, Black Thread

Birthday Flower

Birthday Flower published on 10 Comments on Birthday Flower

I had a little extra stamping time yesterday so I was able to play the Stampin’ Royalty Challenge this week.  The design team there are some of my favorite stampers and I love to play their challenge!  This week is a sketch (one of my favorite challenges to do).

I started with the new Fruit & Flowers set and the matching Berry Blossoms DSP.  After a few false starts, I settled on the flower as the focal stamp and the Early Espresso dots paper as the print.  The sentiment is from Up, Up and Away (another new favorite) with the tiny flower from Fruit & Flowers and I finished it up with some Lucky Limeade Ruffled Ribbon.  I can’t seem to say enough about how much I like this new ribbon.  It ties so well and gives that popular ruffled look with no extra work!  I stamped another one of the big flowers inside to give it a finished feeling.  I do this alot but you can actually see it in this picture.

Well, off to the rest of my weekend activities.  Hope you get some extra time to stamp, too!  See you again on Tuesday for the next SU Only Challenge!

Stamps:  Fruit & Flowers, Up, Up and Away; Paper:  Berry Blossoms DSP, Calypso Coral, Early Espresso, Whisper White; Ink:  Calypso Coral, Lucky Limeade, Early Espresso; Accessories:  1 1/4″ Circle Punch, 1 3/8″ Circle Punch, Lucky Limeade Ruffled Ribbon, Dimensionals

All products are Stampin’ Up!

More butterflies

More butterflies published on 17 Comments on More butterflies

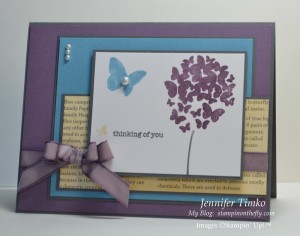
I enjoyed making Monday’s card so much that I didn’t want to put away the Precious Butterflies set.  Lucky for me that The Friday Mashup feels the same way about butterflies this week and they have a “Butterflies and Bling” challenge.  I chose to mash it up and use their colors too.  Marina Mist, Perfect Plum and I added So Saffron plus a neutral of Basic Gray.

 A La Card Monkey has this sketch combined with a “thinking of you” card, both of which I used too.

I did end up using a mirror image of the sketch.  I stamped the image panel with intention of following the sketch exactly but when I started to lay it out, I realized it needed to be switched around.  I really love this butterfly flower.  It lends itself to so many cards!  The So Saffon layer is First Edition Specialty DSP that has been brayered with So Saffron ink.  I added some Basic Pearls as the bling part of the Mashup.  Hopefully it is bling-y enough!

It was fun to sit down and stamp with these challenges!  Don’t forget that you can earn this set (and other fabulous choices) by hostessing a Stampin’ Up workshop.  The new hostess program makes it easier than ever to earn beautiful stamps!  I hope your week is going well.  Thanks for dropping by today.  See you again soon!

Stamps:  Precious Butterflies, Teeny Tiny Wishes; Paper:  Basic Gray, Perfect Plum, Marina Mist, First Edition Specialty DSP, Whisper White; Ink:  Perfect Plum, Marina Mist, Basic Gray, So Saffron; Accessories:  Perfect Plum Taffeta Ribbon, Basic Pearls, Dimensionals, Brayer

All products are Stampin’ Up!
ColorLab 53

ColorLab 53 published on 10 Comments on ColorLab 53

It is Monday….why are you posting the ColorLab Challenge??!!  Well, after one year of color challenges it was time for an update.  The ColorLab Challenge is becoming a monthly challenge posted on the 15th of each month.  See this week’s challenge post for all the details!

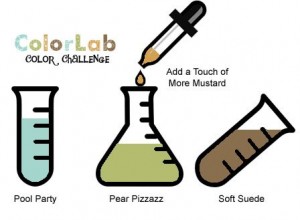
Now to this week’s colors.  Pool Party, Pear Pizzazz, Soft Suede and a touch of More Mustard.  These are inspired by the beautiful Spice Cake DSP from the new Holiday Mini.  I am SOOOO happy I got this paper in my preorder!!  Pool Party and Pear Pizzazz are so nice together and the Soft Suede is a great neutral to add.  More Mustard adds the perfect pop of yellow!

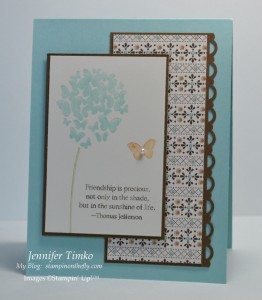
When I looked closer at the colors, I immediately knew I wanted to use the new Hostess Set, Precious Butterflies.  This is such a quick and easy set to use.  I’m in love with the flower made of butterflies!  I stamped off the little More Mustard butterfly to keep him in the same pale palette as the flower.  I chose one of the patterns from Spice Cake DSP and added a Scallop Trim Border with a quick punch.  I popped the image up on Dimensionals but it was still missing something.  Ahhh, a Basic Pearl, of course!

You know (if you have spent any time reading my blog) that I am a huge fan of Baja Breeze but this Pool Party is kind of a summer version.  The more I use it, the more I love it!  Now you have a whole month to play the challenge so no excuses.  I can’t wait to see what you make!

I have been working busily on cards for some upcoming classes and a Holiday Mini Blog Hop starting August 26th.  You’ll get to see them eventually but I might not have much to post this week.  If I can get all my required stamping done, I hope to have some time just to play some challenges.  Thanks for stopping in today.  I will see you again later in the week!

Stamp:  Precious Butterflies; Paper:  Spice Cake DSP, Pool Party, Soft Suede, Very Vanilla; Ink:  Pool Party, Soft Suede, Pear Pizzazz, More Mustard; Accessories:  Scallop Trim Border Punch, Basic Pearls, Dimensionals

All products are Stampin’ Up!


Holiday Mini Sneak Peek

Holiday Mini Sneak Peek published on 12 Comments on Holiday Mini Sneak Peek

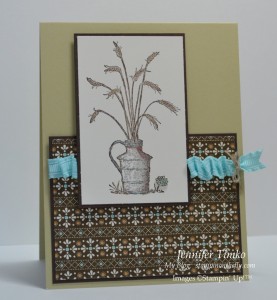
Okay…I know that you probably haven’t even had time to find everything you love about the new Idea Book & Catalog and here I am talking about a sneak peek!!   But let’s face it.  We all LOVE a sneak peek!!  I couldn’t resist using some of the new items from my Holiday Mini preorder for the sketch from Stampin’ 411 this week.

The image is from a set called Always Thankful and it has the most beautiful images for coloring.  I chose the milk jug and wheat image since it was perfect for the sketch.  The paper in the background is from the new Spice Cake DSP.  I mean really…is is possible to not love spice cake??!  As always with Stampin’ Up papers, this set of designs is amazing!  The little flower on the side of the milk jug is not a part of the image but actually comes from a different stamp in the set.  I simply stamped it, colored it and cut it out.  It is attached with a Mini Glue Dot that gives it just a little dimension.  Last, I wanted to add some ribbon in keeping with the sketch.  I reached for the new In Color Ruffled Ribbon in Pool Party (which matches the new DSP).  I ruffled it a little more using Sticky Strip and tied it with some Linen Thread.

I hope you like this little peek into the fun things coming to you starting September 1st.  Just wait until you get to see what other fabulous products will be available!!  Thanks for stopping in today.  For those expecting a ColorLab challenge, this is a week off and some fun changes are coming.  Come back next Thursday for more information!!  See you again soon!

Stamp:  Always Thankful; Paper:  Spice Cake DSP, River Rock, Early Espresso, Very Vanilla; Ink:  Early Espresso, River Rock, Soft Suede, Pool Party; Accessories:  Blender Pen, Pool Party Ruffled Ribbon, Linen Thread, Mini Glue Dots

All products are Stampin’ Up!


SUOC25 – Favorite New Stamp Set

SUOC25 – Favorite New Stamp Set published on 10 Comments on SUOC25 – Favorite New Stamp Set

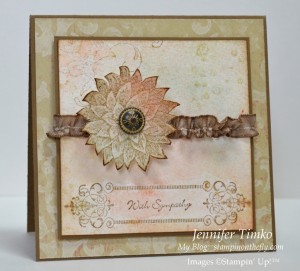
The new 2011-12 Idea Book & Catalog has been available for just over a month and the SU Only Challenge Team wants to see your favorite stamp set!  Oh I know…how can you possible choose??!!  That was my thought when I first saw the challenge!  After sitting down and looking at all my new sets, I finally decided on Creative Elements.  It was one of my first “must have” stamps when I first looked through the catalog.  I love that it has such a variety of images and can be used to create so many different looks.

I started knowing that I wanted to try collage stamping.  In fact, I was really inspired by this card by Jenna Barber.  I had never tried this technique and I was surprised at how easily it came together.  I started with Watercolor Paper (it comes in a new larger size – yea!).  First I sponged on some River Rock, Cajun Craze and Soft Suede ink creating some different colored sections.  Then I stamped on the flourish from Creative Elements in Soft Suede (it was stamped off a bit first).  I realized that I wasn’t completely happy with the base coloring so I took my Aquapainter and blended the colors around.  The paper was still a little damp when I stamped the frame image (Soft Suede) which allowed it to run at the ends a bit.  It needed something else so I pulled out the water spots stamp from French Foliage and added them in River Rock.  I used another piece of Watercolor Paper and created a similar background with my Aquapainter.  After it dried, I stamped the flower on it and cut it out.  I added an Antique Brad to the center and then some new Soft Suede Taffeta Ribbon that uses the pulled thread technique.  Finally I layered the stamped image on a square of the new Well Worn DSP.

I see so many possibilities with this stamp so you can expect many more cards with it!  Shelli Gardner has challenged us to make “Thinking of You” cards this month for those who need a special card to let them know you care.  I added the sentiment from Teeny Tiny Wishes and, thankfully, don’t need this right now.  I find that when sympathy cards are needed there is sometimes no time to stamp.  I try to have a couple of beautiful versions ready just in case.

Thanks for stopping in today.  I can’t wait to see what you create with YOUR favorite stamp set.  Don’t forget, the SU Only Challenge  runs for just under two weeks so there is plenty of time to enter!

Stamps:  Creative Elements, Teeny Tiny Wishes, French Foliage; Paper:  Well Worn DSP, Watercolor Paper, Soft Suede; Ink:  Soft Suede, River Rock, Cajun Craze; Accessories:  Antique Brads, Soft Suede Taffeta Ribbon, Sponges, Aquapainter, Dimensionals

All products are Stampin’ Up!
 

Primary Sidebar