Skip to content

Moving Forward

Moving Forward published on 15 Comments on Moving Forward

*My thanks to the PPA design team for choosing this as a Pals Paper Artist Pick!*
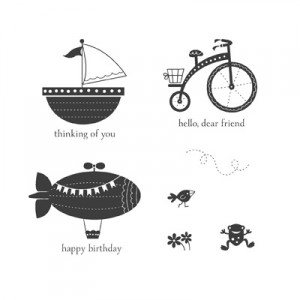
I debated many names for this post but it seems that the name of the Ronald McDonald House Charities stamp says it all!  For so many, the battle with a child’s health issue is all about looking to the future — future research, future good health, future dreams!  Ronald McDonald House Charities supports the families so that they can support the sick/hospitalized child.  I am incredibly proud to be part of a company that supports this amazing charity.  Stampin’ Up gives proceeds from a designated stamp every year and has so far donated over $1 million.  During Convention this year, Stampin’ Up gave every demonstrator there a free copy of this stamp.  I knew then and there that I wanted to do something amazing to pay this gift forward…but what??!!

I have been following the progress of a local Warrenton girl, Sydney Davies, who is strong and amazing.  Her big brother Tyler was an assistant coach for my oldest son’s soccer team this year and I became familiar with this remarkable family.  Sydney was diagnosed just over one year ago with Acute Myeloid Leukemia (AML) and has been in the hospital almost every day since.  She is working very hard to be strong enough for a bone marrow transplant.  Her family recently went up to the Minnesota Children’s Hospital in hopes that she would get her transplant.  Sadly, it was not to be and she needs a higher white blood cell count for this to be possible.  So she has come home to Virginia.  I read in her latest Caring Bridge update that the doctors feel she is doing well enough to spend some time with family and friends, leaving the safety of the hospital.  In her mother’s words, they are taking “baby steps” and moving over to a Ronald McDonald House in Fairfax.  Sydney is in need of a miracle and for now RMHC is helping her and her family to continue to fight for that miracle.

I knew immediately what I wanted to do.  So I am running a “stamp drive”!!  I want to sell as many Moving Forward stamp sets as possible so that the profits go to this amazing charity.  Please let me be clear.  I am NOT looking to profit on this.  In order for that to happen I will donate any and all commissions from the sales of this stamp to Sydney’s Children’s Cancer Research Fund.  Additionally, if the orders made directly through me add up to a workshop ($150) then I will randomly select one of those who ordered as the hostess.  You can order this stamp via my DBWS (click on the Shop Online airplane on the sidebar) or through me directly.  I prefer the second method so that I can give someone a great hostess benefit but I will celebrate the sale either way.  You can comment on this post, leaving your e-mail, and I will get back to you or you can email me directly at jentimko@gmail.com.  I’d like to run this stamp drive for one week so please contact me or order as soon as possible (but no later than August 1st).  If you don’t feel the need for this set and still want to help, I would love it if you donated directly to Sydney’s fund at the link above!!
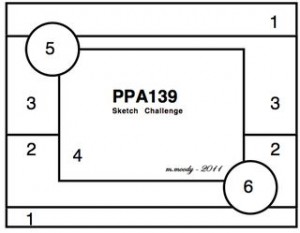
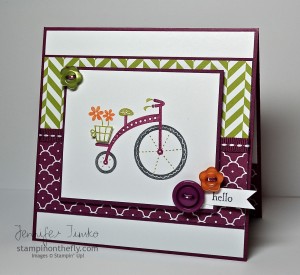
Of course the card above uses this fun set.  How sweet is this little tricycle?  I used my Stampin’ Write Markers to color it in Rich Razzleberry, Lucky Limeade and Basic Gray.  Then I added some Pumpkin Pie flowers from the set for the basket.  I stamped a second basket and cut it out for some dimension.  The prints are from Summer Smooches DSP and I added some of the new 1/4″ Stitched Grograin Ribbon in Rich Razzleberry across the middle.  Some Bright Buttons finished off this fun sketch from Pals Paper Arts.

Thanks so much for stopping in today.  I look forward to ordering a lot of Moving Forward stamps for this great cause and sending this little card to the Davies family with our donation!



Poppies for the Freaks

Poppies for the Freaks published on 6 Comments on Poppies for the Freaks

Today is the last day of Convention…how did the time fly by so fast??!!  I want to share another swap card with you.  This one was for a Control Freaks swap.  I know you know the “Freaks” since they are some of the most amazing stampers.  I still have to pinch myself when I realize that I get to share cards with them.

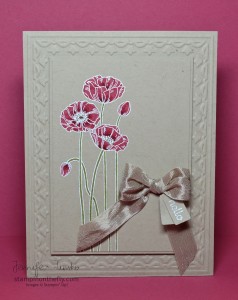
I knew that I wanted to use the flowers from Pleasant Poppies again for this swap.  In fact, I have wanted to use this direct marker technique on the poppies since I first spied this set in the catalog.  I simply love the pop of color against a Crumb Cake background (as evidenced by my pins in Pinterest).  I started by stamping the flowers with Versamark and then embossing with White Stampin’ Emboss Powder.  Then I colored with a Melon Mambo Stampin’ Write Marker and went back to highlight with a Raspberry Ripple Stampin’ Write Marker.  The stems were colored in Lucky Limeade.  I just love the Framed Tulips Embossing Folder and how it sets off a focal image so I thought it would be a nice addition to the monochromatic layers.  I finished it off with a bow made from Crumb Cake Seam Binding and some little tags made with the Jewelry Tag Punch.  The sentiment is from Teeny Tiny Wishes.

This fabulous new set has so many possibilities and I can’t wait to continue trying new ways to color it.  Shelli Gardner, the CEO of Stampin’ Up, has her New to You Creative Challenge and I’m going to enter this one there.

So remember yesterday when I said that I felt like a groupie at a rock concert??  Well let me show you why.  Take a look at the first picture on this link to Lyssa Zwolanek’s blog, Song of My Heart Stampers.  Yes, it is me!!  Ok, it is me with Lyssa and Cindy Elam (my roommate here and fellow SUO Challenges team member).  Lyssa is one of the most generous stampers and was selected for the prestigious Founder’s Circle this year.  So great to see such an amazing stamper rewarded for sharing what she loves with such grace!

What a whirlwind Convention has been.  I’ll have lots to tell you over the next couple of weeks and pictures to share too!  Thanks for dropping by today.  See you again soon!

Stamps:  Pleasant Poppies, Teeny Tiny Wishes; Paper:  Crumb Cake; Ink:  Versamark, Melon Mambo, Raspberry Ripple, Lucky Limeade, Whisper White Craft; Accessories:  Big Shot, Framed Tulips EF, White Stampin’ Emboss Powder, Heat Tool, Crumb Cake Seam Binding, Jewelry Tag Punch

Freshly Made Sketches #44

Freshly Made Sketches #44 published on 6 Comments on Freshly Made Sketches #44

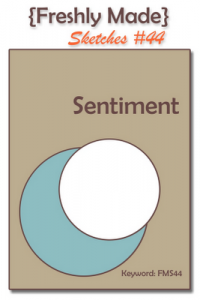
Today is the day!!!!  I am at Convention and today is check-in day!!  Yippee!  I have been looking so forward to this and I can hardly believe it is finally here.  It is also Freshly Made Sketches day and Jen Mitchell has brought us a cool layout!  At first I wasn’t so sure I would like it but my card came together so easily.  Frankly a miracle given the clutter in my brain leading up to Convention.

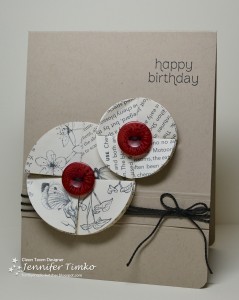
First the details on the card, then how I came to this design.  I started with a Crumb Cake base and using my Simply Scored Scoring Tool, placed two scored lines 3/4″ apart.  I added a little Crumb Cake layer between the two scored lines and wrapped black embroidery thread around the panel.  This allows you to have the one layer card look and not see the thread when the card is opened.  I punched 8 circles — 4 with my 1-3/4″ Circle Punch and 4 with my 2-1/2″ Circle Punch — out of First Edition DSP.  On the larger circles I made sure to find some line art so that it would show in the flower.  I took each circle and folded it in quarters then glued them to a 1″ circle base using Crystal Effects as the glue.  The Crystal Effects holds really well and I only had to glue the corners that came together.  This allows for the quartered circles to raise up a bit and give texture.  I added a couple of Cherry Cobbler buttons to the centers.  The smaller flower is popped up on a Dimensional to allow it to layer properly.  The sentiment comes from my new favorite set from the catalog.  I know, I know….really??  Your favorite set is a WORD SET???  Well, a good word set is like a great pair of shoes.  It makes everything look better!  This is one of those sets that has three always needed sentiments and is just the right size.

Now, I was a little worried about getting this card done last weekend.  I am on reserve (on call) with United this month and I got called to go out on a one-day trip Sunday.  I had a REALLY early departure out of Baltimore which is a pretty good distance from my house.  I flew to Chicago and then had to ride back to Washington Dulles and be taken back to my car in Baltimore.  Yes, this is what the schedulers do to make sure those flights go out on time.  Well, I was sitting in the back of the plane on the ride back to Dulles and was next to a man in khaki pants reading a newspaper.  I had the sketch with me and was trying to come up with a plan so I could make the card right when I got home.  The light bulb came on with the newsprint and the khaki pants.  I had wanted to make these flowers but then I knew what colors and paper to use.  The card came together so fast when I got home.  I love it when that happens!  So now you know how I spend layover times and “deadhead” (riding in the back) time…planning the next card.

Ok, enough chatter.  Make sure you go check out the cool cards from the rest of the team. Works of art as usual!!  I’ll be back tomorrow with one of my swap cards from Convention!  I am pre-scheduling my posts but will update with current information if  I can.

I am entering this in the So Shelli Creative Challenge for this month, the New to You Challenge.  She wants us to focus on our new favorite stamp set and I thought this was the perfect card to share why I love Just For You!

Stamp:  Just For You; Paper:  First Edition DSP, Crumb Cake; Ink:  Stazon Black; Accessories:  Circle Punches (1″, 1-3/4″, 2-1/2″), Regals Buttons, Simply Scored Scoring Tool, Crystal Effects, Thread

Christmas Tree – Two ways

Christmas Tree – Two ways published on 10 Comments on Christmas Tree – Two ways

Have you ever made a card that you like so much that you see other potential in it??  That is how I felt about a card I made for the Stampin’ Addicts Holiday Mini Blog Hop.  I have never given that card a full explanation and I thought you’d like to see its sister card too.

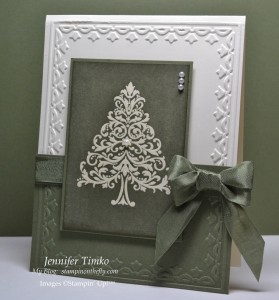
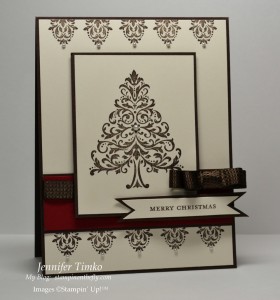
This was the very first card I made with Bright Hopes and it still may be my favorite so far.  I have always loved Always Artichoke and it seems so beautiful when put with Very Vanilla.  I stamped the Christmas tree in Versamark and then embossed with Clear Stampin’ Emboss Powder.  I inked up my Brayer and rolled it across then finished the edges with a little extra sponging.  The bow uses the “potato masher” technique that I showed you in a previous tutorial.  The Always Artichoke layer was attached to the Very Vanilla base and then run through my Big Shot with the Framed Tulips Embossing Folder.  I added some pearls for some extra elegance and popped the stamped layer up on Dimensionals.

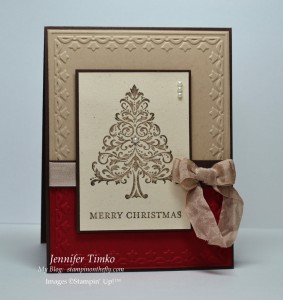
You can see that the second card is really exactly the same in most ways.  I did not emboss the tree (although that would be a beautiful addition) but instead added shimmer to the stamped panel.  I created my own Shimmer  Paint spray by adding Champagne Mist Shimmer Paint to regular rubbing alcohol (about 12-15 drops per 1 ounce) and sprayed it on the Naturals Ivory paper.  I created a different style double bow and frayed the ends a bit to match the earthier tones.  I do find that it is particularly hard to photograph any projects made with the Shimmer Paint spray.

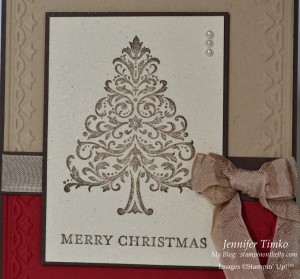
This close-up picture gives you a better idea but this is one of those cards that is just prettier in person.  The wonderful thing about the Shimmer Paint spray is that you can add sparkle without it coming off.  Really perfect for the mass production of your Christmas cards!!

I look forward to hearing which of these cards you like better and why.  The second card was for a Stampin’ Addicts swap and you should see the amazing cards I got in return.  What an amazing group!

Thanks for stopping in today!  I hope these inspire you to start thinking about your holiday cards.  Start now and you’ll have them done well before the holiday season!!  Have a great week!

Card 1:  Stamp:  Bright Hopes; Paper:  Always Artichoke, Very Vanilla; Ink:  Versamark; Accessories:  Brayer, Embossing Tool, Clear Stampin’ Emboss Powder, Basic Pearls, Always Artichoke Seam Binding, Big Shot, Framed Tulips Embossing Folder, Dimensionals

Card 2:  Stamp:  Bright Hopes; Paper:  Naturals Ivory, Cherry Cobbler, Early Espresso; Ink:  Early Espresso; Accessories:  Champagne Mist Shimmer Paint, Big Shot, Framed Tulips Embossing Folder, Basic Pearls, Crumb Cake Seam Binding, Dimensionals

All products are Stampin’ Up!

Bright Christmas

Bright Christmas published on 13 Comments on Bright Christmas

Happy Saturday everyone!  I’m back today with a card made with my new favorite Christmas set, Bright Hopes.  I just love this set!!  I’m was also excited to play with the new sketch from Freshly Made Sketches, FMS3.

I flipped the sketch to accomodate the tree, as you can see.  This set is perfect for the challenge because it is best kept “clean”.  The intricate details on the stamps do all the work!  I interpreted the scallops on the sketch in a slightly different way and used the border stamp to created a scallop look.  Trust me, your Stamp-a-ma-jig is your best friend here.  I did find that the card was a bit “bottom heavy” (and no one wants to be bottom heavy!!) so I added matching scallops to the top of the card.  Problem solved!  I tied the beautiful Early Espresso Quilted Ribbon into a double bow and finally added a sentiment on the banner.  As usual, it is hard to photograph the dimension on the card and the banner is raised in the midde with Dimensionals with the ends flared up a bit.  The final addition was the Basic Pearls, another perfect little detail.

I hope you like this Christmas card as much as I do.  I am fully in Christmas card planning mode so you can expect to start seeing lots more.  In fact I will be back on Monday with two more cards (two cards, one layout) with Bright Hopes.  Thanks for stopping in today!!  Have a wonderful weekend!

Stamps:  Bright Hopes, Teeny Tiny Wishes; Paper:  Very Vanilla, Early Espresso, Cherry Cobbler; Ink:  Early Espresso; Accessories:  Early Espresso Quilted Satin Ribbon, Basic Pearls, Dimensionals, Stamp-a-ma-jig


SUOC25 – Favorite New Stamp Set

SUOC25 – Favorite New Stamp Set published on 10 Comments on SUOC25 – Favorite New Stamp Set

The new 2011-12 Idea Book & Catalog has been available for just over a month and the SU Only Challenge Team wants to see your favorite stamp set!  Oh I know…how can you possible choose??!!  That was my thought when I first saw the challenge!  After sitting down and looking at all my new sets, I finally decided on Creative Elements.  It was one of my first “must have” stamps when I first looked through the catalog.  I love that it has such a variety of images and can be used to create so many different looks.

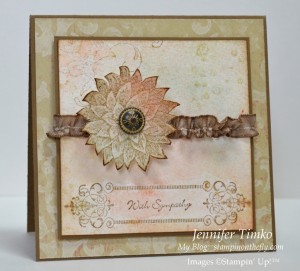
I started knowing that I wanted to try collage stamping.  In fact, I was really inspired by this card by Jenna Barber.  I had never tried this technique and I was surprised at how easily it came together.  I started with Watercolor Paper (it comes in a new larger size – yea!).  First I sponged on some River Rock, Cajun Craze and Soft Suede ink creating some different colored sections.  Then I stamped on the flourish from Creative Elements in Soft Suede (it was stamped off a bit first).  I realized that I wasn’t completely happy with the base coloring so I took my Aquapainter and blended the colors around.  The paper was still a little damp when I stamped the frame image (Soft Suede) which allowed it to run at the ends a bit.  It needed something else so I pulled out the water spots stamp from French Foliage and added them in River Rock.  I used another piece of Watercolor Paper and created a similar background with my Aquapainter.  After it dried, I stamped the flower on it and cut it out.  I added an Antique Brad to the center and then some new Soft Suede Taffeta Ribbon that uses the pulled thread technique.  Finally I layered the stamped image on a square of the new Well Worn DSP.

I see so many possibilities with this stamp so you can expect many more cards with it!  Shelli Gardner has challenged us to make “Thinking of You” cards this month for those who need a special card to let them know you care.  I added the sentiment from Teeny Tiny Wishes and, thankfully, don’t need this right now.  I find that when sympathy cards are needed there is sometimes no time to stamp.  I try to have a couple of beautiful versions ready just in case.

Thanks for stopping in today.  I can’t wait to see what you create with YOUR favorite stamp set.  Don’t forget, the SU Only Challenge  runs for just under two weeks so there is plenty of time to enter!

Stamps:  Creative Elements, Teeny Tiny Wishes, French Foliage; Paper:  Well Worn DSP, Watercolor Paper, Soft Suede; Ink:  Soft Suede, River Rock, Cajun Craze; Accessories:  Antique Brads, Soft Suede Taffeta Ribbon, Sponges, Aquapainter, Dimensionals

All products are Stampin’ Up!


Triangle Tag

Triangle Tag published on 6 Comments on Triangle Tag

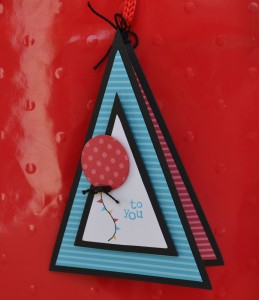
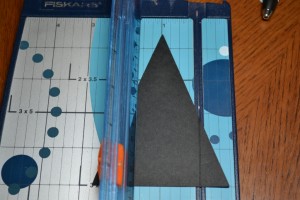
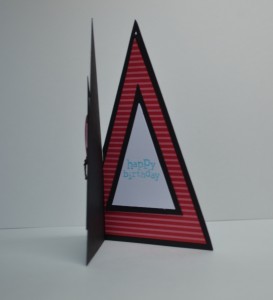
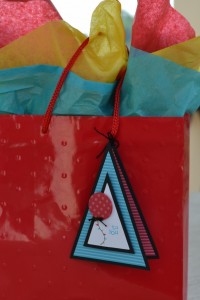
I knew when I got the Perfect Pennants Die for my Big Shot that I was going to love it!  This little tag is just one of the reasons!!  Making this is really easy and I love that it is different.  To make it I started with my die and cut the large and medium triangles out of Basic Black card stock.  I then cut another two large triangles out of the Turquoise and Real Red DSPs.  Finally, I cut two of the small triangles out of Whisper White.  Cut 1/4″ off the bottom of both DSP triangles to make them layer properly (yes, it is that simple!!).  I inked up the pennant stamp using my Stampin’ Write Markers and stamped it on one of the Whisper White triangles.  Using my 1″ Circle Punch, I created a balloon and then popped it up on a Dimensional.  For the words, I inked only part of the sentiment with my marker.

Next, you attach the Real Red DSP to one of the large triangles.  Turn the triangle face down and score like shown in the picture.

**  NOTE:  I scored this way because I like to fold toward the “valley” of the score.

Once scored, turn it back over and put Sticky Strip in the small triangle.  Attach it to the front triangle.  Finish decorating the front if you haven’t already.

Finally, add your little triangles to the inside.  I had to cut them down just a little to make them layer correctly.  I pierced a hole in the top of the tag and attached it to the bag using black thread (non-SU).  I used this same thread as a little bow for the balloon.

I hope you like this project!  Truly, it takes longer to read about it than it does to make!!

Thanks for dropping in today.  Please come back Wednesday for some of the specifics on my MDS Shadow Box project from the hop.  Have a great day!!

Stamp:  Up, Up and Away; Paper:  Brights Designer Paper Pack, Basic Black, Whisper White; Ink:  Tempting Turquoise, Real Red, Daffodil Delight, Basic Black; Accessories:  Big Shot, Perfect Pennants Die, 1″ Circle Punch, Sticky Strip, Dimensionals

All products are Stampin’ Up unless otherwise indicated.


Stampin’ Addicts New Catalog Blog Hop

Stampin’ Addicts New Catalog Blog Hop published on 21 Comments on Stampin’ Addicts New Catalog Blog Hop

Photobucket

Welcome to the Stampin’ Addicts New Catalog Mega Hop!!!  We are celebrating the new Stampin’ Up 2011-12 Catalog Stampin’ Addicts style!  If you just hopped over from Heidi’s blog, RunningwScissorsStamper, I know you have been blown away by her projects with Under the Big Top.  That three ring circus card…fantastic!!  She never ceases to amaze me with her creativity!  I will continue the Big Top Product Suite trend with Up, Up and Away.  Words cannot describe how thrilled I am with this set!!

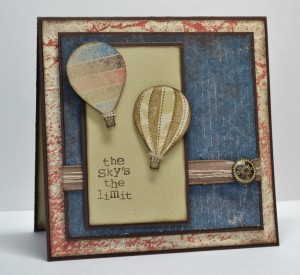
When I first saw this set, I had a vision of vintage balloons!  Then I saw the unbelievable beautiful Well Worn DSP and I knew that they had to be combined.  I stamped the striped balloon image on the River Rock print and cut it out.  The other balloon comes from stamping on the reverse side of the paper with the solid balloon image and then cutting it out.  I used my Color Spritzer Tool to add a little splatter of River Rock ink on the image panel and the new Soft Suede Taffeta is put together with Linen Thread and an Antique Brad.  This is a card for a college graduation and I love it!

I love the colors on in the Big Top Product Suite (p. 62) and wanted to make a fun and quick project with them.  This is a little triangle gift tag made with my new Perfect Pennants Die for the Big Shot.  I used my 1″ circle punch to create a party balloon and “to you” is inked with a Stampin’ Write Marker.  The inside uses the remainder of the sentiment (“happy birthday”).  This is an easy tag to make and I will provide the instructions next week.

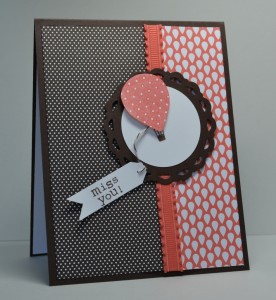
If you have ever worked with Stampin’ Up’s Designer Series Papers, you already know that they are amazing.  I really liked the Berry Blossoms Product Suite in the catalog (p.99) but when I opened the paper in person…WOW!!  This Calypso Coral pattern practically asked to be used with Up, Up and Away and the Early Espresso pattern mimics the polka dots in the balloon.  I used one of the scalloped circles from the Perfect Pennant Die as my frame and the lovely Ruffled Ribbon to add more texture.  This classic layout gets a little wow factor from the banner attached with the Early Espresso Baker’s Twine.

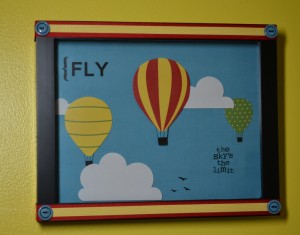
 My final project is probably the one that makes me the happiest!!  This is a My Digital Studio creation made just for my youngest son’s room.  As you can see, his walls are Daffodil Delight so what better than the Big Top Birthday Embellishments Download as a place to start?  I used the digital Up, Up and Away to create the balloons.  The hardest part of this project was taking a picture that shows how cute it is!  I will be back with more specifics on this next week, too!

Clearly, flying is near and dear to my heart and this set has really inspired me!  I hope that you feel just as inspired to make fabulous projects with it!

Now off to your next stop on the hop.  Cindy over at Heart’s Delight Cards has some super projects made with Pennant Parade.  Just wait until you see her golf card, and her Christmas card, and….  Make sure you come back next week for more specifics on my projects.  If you have any questions you really want answered, let me know in a comment.  Enjoy the hop!

Photobucket                Photobucket

SUOC17 – A butterfly for Mom

SUOC17 – A butterfly for Mom published on 18 Comments on SUOC17 – A butterfly for Mom

This week at SU Only Challenges we are making Mother’s Day cards!  Now if the special mom in your life is anything like my mom, she saves and loves the cards that are sent.  You know what that means, of course.  You get to really pull out the stops and make a spectacular card knowing it will be truly appreciated!

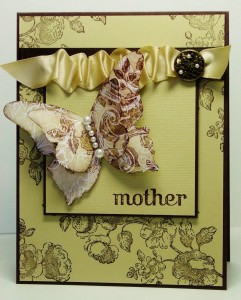
I told you last week that I had been playing around with versions of the Beautiful Butterflies die combined with the Elements of Style stamp set.  This is really a stepped up version of my butterfly from that post.  I started with my gorgeous Presto Patterns DSP and ran it through my Big Shot with the Beautiful Butterflies die.  Then I stamped on the two butterflies with the flower stamp.  I watercolored in some River Rock and Early Espresso on the stamp image and then sponged on some more River Rock to bring out the pattern of the DSP.  A little extra sponging on the edges was done in Early Espresso.  I love the soft look of River Rock and how it makes for a non-standard palette so I made that the main color of this card.  The sentiment was stamped on River Rock textured card stock and comes from the All Holiday set (I just used a marker on the word I wanted).  I stamped the flower image again on the large piece of River Rock to create a toile look.

Next came the ribbon.  Sadly, there is no River Rock ribbon right now but I have an easy solution.  Make it!  It is much quicker to do than I would have ever thought.  I took Very Vanilla Satin Ribbon and colored it River Rock with a Stampin’ Write Marker.  Then I simply spritzed it with water and blended the ink to look uniform.  Let it dry and it is ready to use.  This is also a great way to get ribbon in a color that you don’t use very often!

I put a piece of Early Espresso Satin Ribbon under the River Rock ribbon to add the right balance and scrunched the River Rock onto the textured card stock layer.  All that was left was adding the final details…an Antique Brad and Basic Pearls.  I attached the butterfly together with Crystal Effects so that his wings could look like he is ready to fly.

It is fun to make a card that goes a little beyond on effort…especially for mom!  You have two weeks to show us your beautiful creations for Mother’s Day.  Convieniently enough, that should give you time to get yours made and in the mail too!  This fantastic layout comes from Stampin’ 411, by the way, and I am also entering it into Shelli Gardner’s Creative Challenge this month.  After all, April showers bring flowers and the flowers bring butterflies!

Thanks for stopping by today.  Make sure you go see the other amazing creations by the SU Only Challenges design team.  You will love them!

Stamps:  Elements of Style, All Holidays; Paper:  Early Espresso, River Rock, River Rock Textured, Presto Patterns DSP; Ink:  River Rock, Early Espresso; Accessories:  Big Shot, Beautiful Butterflies Die, Blender Pen, Sponges, Very Vanilla Satin Ribbon, Early Espresso Satin Ribbon, Basic Pearls, Antique Brad, Crystal Effects, Sticky Strip, Dimensionals

All products are Stampin’ Up!

SUO Challenge 15 – Birthday Party

SUO Challenge 15 – Birthday Party published on 16 Comments on SUO Challenge 15 – Birthday Party

This week over at SUO Challenges we have a fun and useful challenge…make any birthday card!  Well, I ALWAYS need to have birthday cards around so I was particularly happy for this one.  I thought I would shake it up a bit and try a new-to-me fancy fold.  I have made varients but have never done a criss-cross card.  Oh, I know…hard to believe, especially when they are so fun to put together.

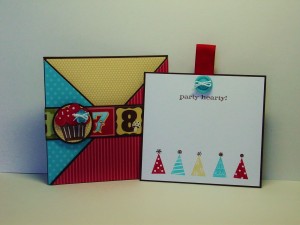
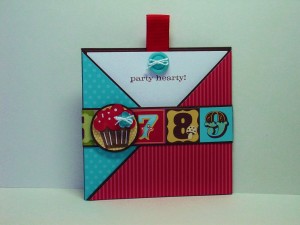
The key to success with this fold is designer paper so that is where I started.  I pulled out my much loved remnants of Play Date DSP and based my colors on it.   As soon as I looked at the paper, I knew I would use the numbers as the belly band.  Then I went to my Brights Designer Paper Stack and pulled a Real Red design and a Tempting Turquoise design…I knew I had a winner!  After seeing this tutorial, I decided to make my card 4 1/4″ square so I cut two pieces of Early Espresso card stock to 4 1/4″ x 8 1/2″.  Score them both at 4 1/4″ and cut the upper triangle off one half of each using your paper cutter (just like the tutorial except you will have a square instead of a rectangle).  I used my trusty Sticky Strip to attach the two pieces together.  For the designer papers, I started with a 4 1/8″  square of both the Real Red stripe and the Tempting Turquoise dots papers and cut them on the diagonal.  A piece of the Play Date DSP So Saffron dots paper was also cut to 4 1/8″ square for the back square panel.  I attached the designer papers and then secured the triangle panels using Sticky Strip (again, as shown in the tutorial).  I cut off a row of numbers from the Play Date DSP and attached it to another Early Espresso piece of card stock.  Because I didn’t want the belly band to be removable, I attached the band to the card and secured the two ends in the back with more Sticky Strip.  Using my 1 3/8″ and 1 1/4″ Circle Punches, I punched out Early Espresso and a leftover piece of So Saffron DSP.  The cupcake from Party Hearty was stamped on Whisper White and cut out.  I popped the top of the cupcake up on a Dimensional and added a Turquoise button from the Brights Designer Buttons.

The inside came together quickly.  A Whisper White piece cut to 4″ square where  I stamped on the party hats from Party Hearty and added the sentiment where you could see it peeking out.  It was layered on an Early Espresso piece cut to 4 1/8″ square, with a loop of Real Red 5/8″ Grosgrain  tucked in as a tab. Something was still missing so I added another Tempting Turquoise button to finish the look.

Hint 1:  Since you are using different DSP’s for this, you are perfectly set up to make two cards.  I love to design once and stamp twice.  Much more time efficient and you have another card for when you need one in a hurry!

Hint 2:  Your Stamp-a-ma-jig is your best friend when trying to get the sentiment placed properly.  This is one time where you really need those words centered!

Hint 3:  Because the wide grosgrain is so nice and substantial, only put the front part of the loop between the Whisper White and Early Espresso.  Attach the back part of the loop to the back of the pull-out layer using Sticky Strip.

Shelli Gardner, CEO of Stampin’ Up, is “Crazy for Cupcakes” in this month’s So Shelli Challenge and so am I!!  I have been a fan of the cupcake in Party Hearty for quite a while so I am thrilled to submit this to her challenge!  Creative Sketches is doing a fancy folds challenge this week so I will post it there as well.

Thanks so much for dropping by today!  I hope you have fun playing with your Stampin’ Up birthday sets this week.  I look forward to seeing your submissions at SUO Challenges!

Stamp:  Party Hearty; Paper:  Play Date DSP, Brights Designer Paper Stack, Early Espresso, Whisper White; Ink:  Real Red, Tempting Turquoise, So Saffron, Early Espresso; Accessories:  Sticky Strip, Stamp-a-ma-jig, Paper Cutter, 1 3/8″ Circle Punch, 1 1/4″ Circle Punch, Brights Designer Buttons, Dimensionals, White Thread

Primary Sidebar