Skip to content

Merry Christmas!

Merry Christmas! published on 5 Comments on Merry Christmas!

As I sit here on Christmas Eve I realize that I haven’t posted in over a week.  I, like many of you, have been running around getting everything ready for Christmas.  My cards are finally all sent and most of the presents are wrapped.  My children are doing a bit of arts and crafts for final decorations.  My mother is here enjoying the chaos of two little boys as they get more and more excited for the big day.  In short…not much time for posting.  I have been working on some projects for the new year so I will have lots for you as we get into January.
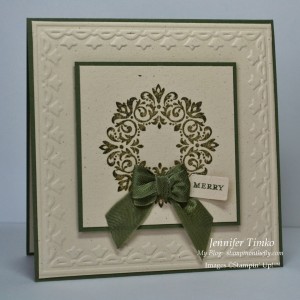
I thought it appropriate to show you two final cards using Bright Hopes.  I might as well have called these “A few of my favorite things”.  My favorite Christmas set this year, my favorite color combination (Vanilla/Always Artichoke), my favorite embossing folder (Framed Tulips) and my favorite ribbon (Seam Binding).  This first version doesn’t photograph as pretty as it is in person.  I used Naturals Ivory paper and embossed the wreath with Clear Embossing Powder (over Versamark/Always Artichoke).  I didn’t make lots of them but enough to share with some close family and my club members.
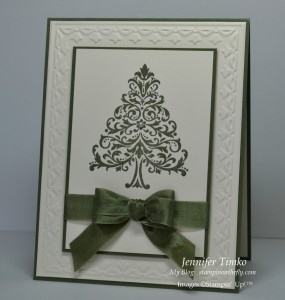
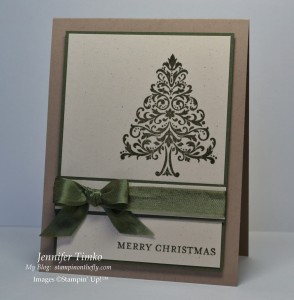
The second version was a bit quicker with no heat embossing.  I used the lovely tree and Very Vanilla card stock on this one.

I hope that all of you have a happy holiday season.  Whether it be Christmas, Hanukkah, or Kwanzaa, I hope that you are surrounded by family and friends.  I feel blessed to share my stamping adventures with you and I thank you for sharing your thoughts back with me.  I wish you peace and joy!

See you next week with some new challenges and maybe (I really hope I can get one done) a preview of the new Occasions Mini.

Stocking Gift Card Holder

Stocking Gift Card Holder published on 6 Comments on Stocking Gift Card Holder

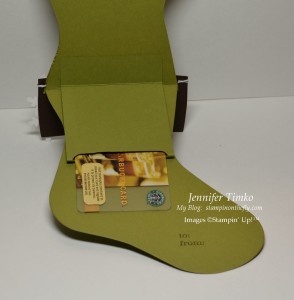
I’m continuing today with another project from my Christmas Wow Class last week.  Let’s face it, we all end up needing to give gift cards sometimes.  I know I personally love the gift of shopping for myself so I ask for them.  The problem is always in the presentation.  A gift card by itself always seems to be missing something.

I found this fun tutorial from Michelle Suit at Faith, Trust and Pixiedust and knew that I had to make it!  I changed the outer design but kept to her measurements and directions.  Thanks Michelle for a wonderful tutorial!  I used Old Olive and Early Espresso for my stocking colors.  My stocking is embossed with the Snow Burst Embossing Folder and I added the Baker’s Twin as trim for the Early Espresso pieces.  You do this by laying down a very thin line of Multipurpose Glue (Tombo).  I added some snowflakes from my Northern Frost die and a sentiment from Teeny Tiny Wishes.  The magic of this is on the inside!

Look at the gift card!  Tucked neatly inside the little stocking!  This is so easy to do with your Word Window Punch that you won’t believe it.  My “to/from” is from an unknown set from Stampin’ Up.  I think the set is gone but I kept this stamp.  I will tell you that Sticky Strip is your good friend when putting together this card.  You won’t have to worry about anything coming apart no matter who gets this!

The best part…now you can wrap this up in a little box and the recipient can ooh and aah and still get the gift card they wanted.  Perfect!  Cross off another project done for Christmas!

I’ll be back tomorrow with my latest card for Freshly Made Sketches.  Don’t forget to check back.  You’ll want to have this sketch on hand for any spare crafting time you get over the holiday weekend!  Thanks so much for dropping by today!

Stamps:  Teeny Tiny Wishes, Unknown SU; Paper:  Old Olive, Early Espresso, Whisper White; Ink:  Early Espresso; Accessories:  Big Shot, Holiday Stocking Die, Snow Burst EF, Northern Frost Die, Early Espresso Baker’s Twine, Word Window Punch, Sticky Strip, Mini Glue Dots

All products are Stampin’ Up!

More Christmas 101

More Christmas 101 published on 8 Comments on More Christmas 101

My Christmas 101 class this week was so much fun.  The point of the class was cards that are easily duplicated but that still feel special.  Yesterday’s card had the sparkle of the wreath.  Today we are working in a more subtle but elegant palette.

This card is perfect for the new stamper or if you want to limit your costs on creating your cards.  The beautiful detail on the Bright Hopes tree adds a certain elegance that is elevated by the bow.  The bow is created with my trust potato masher (instructions here).  My class looked at me with a bit of skepticism when we started these but all their bows ended up looking just like mine.  I may have some converts!  We talked a lot about visual triangles and how they make a card look complete.  We also discussed layouts that can use interchangeable stamps.  Imagine this card with Dasher in Cherry Cobbler and Early Espresso or in this same color set using the tree from Season of Joy and the matching sentiment from the set.  The card would feel different but you haven’t had to do any extra work.  All these are elements I use when designing my own Christmas cards.

I hope this helps you as you approach the holiday card making season.  It is not too late to start!!  I’ll be back next week with lots more…a new SUO Challenges, the Creative Crew November Challenges and of course a new Freshly Made Sketch.  Off to work on finishing those projects….  Have a great weekend!

Stamp:  Bright Hopes; Paper:  Crumb Cake, Always Artichoke, Natural Ivory; Ink:  Always Artichoke; Accessories:  Artichoke Seam Binding, Dimensionals

All products are Stampin’ Up!

Holiday Mini Sneak Peek

Holiday Mini Sneak Peek published on 12 Comments on Holiday Mini Sneak Peek

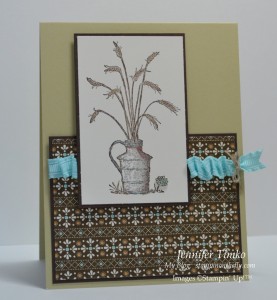
Okay…I know that you probably haven’t even had time to find everything you love about the new Idea Book & Catalog and here I am talking about a sneak peek!!   But let’s face it.  We all LOVE a sneak peek!!  I couldn’t resist using some of the new items from my Holiday Mini preorder for the sketch from Stampin’ 411 this week.

The image is from a set called Always Thankful and it has the most beautiful images for coloring.  I chose the milk jug and wheat image since it was perfect for the sketch.  The paper in the background is from the new Spice Cake DSP.  I mean really…is is possible to not love spice cake??!  As always with Stampin’ Up papers, this set of designs is amazing!  The little flower on the side of the milk jug is not a part of the image but actually comes from a different stamp in the set.  I simply stamped it, colored it and cut it out.  It is attached with a Mini Glue Dot that gives it just a little dimension.  Last, I wanted to add some ribbon in keeping with the sketch.  I reached for the new In Color Ruffled Ribbon in Pool Party (which matches the new DSP).  I ruffled it a little more using Sticky Strip and tied it with some Linen Thread.

I hope you like this little peek into the fun things coming to you starting September 1st.  Just wait until you get to see what other fabulous products will be available!!  Thanks for stopping in today.  For those expecting a ColorLab challenge, this is a week off and some fun changes are coming.  Come back next Thursday for more information!!  See you again soon!

Stamp:  Always Thankful; Paper:  Spice Cake DSP, River Rock, Early Espresso, Very Vanilla; Ink:  Early Espresso, River Rock, Soft Suede, Pool Party; Accessories:  Blender Pen, Pool Party Ruffled Ribbon, Linen Thread, Mini Glue Dots

All products are Stampin’ Up!


Primary Sidebar