Skip to content

Moving Forward

Moving Forward published on 15 Comments on Moving Forward

*My thanks to the PPA design team for choosing this as a Pals Paper Artist Pick!*

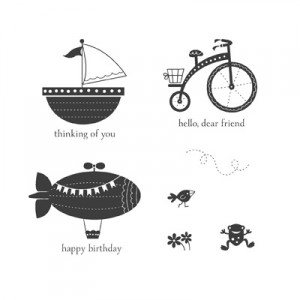
I debated many names for this post but it seems that the name of the Ronald McDonald House Charities stamp says it all!  For so many, the battle with a child’s health issue is all about looking to the future — future research, future good health, future dreams!  Ronald McDonald House Charities supports the families so that they can support the sick/hospitalized child.  I am incredibly proud to be part of a company that supports this amazing charity.  Stampin’ Up gives proceeds from a designated stamp every year and has so far donated over $1 million.  During Convention this year, Stampin’ Up gave every demonstrator there a free copy of this stamp.  I knew then and there that I wanted to do something amazing to pay this gift forward…but what??!!

I have been following the progress of a local Warrenton girl, Sydney Davies, who is strong and amazing.  Her big brother Tyler was an assistant coach for my oldest son’s soccer team this year and I became familiar with this remarkable family.  Sydney was diagnosed just over one year ago with Acute Myeloid Leukemia (AML) and has been in the hospital almost every day since.  She is working very hard to be strong enough for a bone marrow transplant.  Her family recently went up to the Minnesota Children’s Hospital in hopes that she would get her transplant.  Sadly, it was not to be and she needs a higher white blood cell count for this to be possible.  So she has come home to Virginia.  I read in her latest Caring Bridge update that the doctors feel she is doing well enough to spend some time with family and friends, leaving the safety of the hospital.  In her mother’s words, they are taking “baby steps” and moving over to a Ronald McDonald House in Fairfax.  Sydney is in need of a miracle and for now RMHC is helping her and her family to continue to fight for that miracle.

I knew immediately what I wanted to do.  So I am running a “stamp drive”!!  I want to sell as many Moving Forward stamp sets as possible so that the profits go to this amazing charity.  Please let me be clear.  I am NOT looking to profit on this.  In order for that to happen I will donate any and all commissions from the sales of this stamp to Sydney’s Children’s Cancer Research Fund.  Additionally, if the orders made directly through me add up to a workshop ($150) then I will randomly select one of those who ordered as the hostess.  You can order this stamp via my DBWS (click on the Shop Online airplane on the sidebar) or through me directly.  I prefer the second method so that I can give someone a great hostess benefit but I will celebrate the sale either way.  You can comment on this post, leaving your e-mail, and I will get back to you or you can email me directly at jentimko@gmail.com.  I’d like to run this stamp drive for one week so please contact me or order as soon as possible (but no later than August 1st).  If you don’t feel the need for this set and still want to help, I would love it if you donated directly to Sydney’s fund at the link above!!

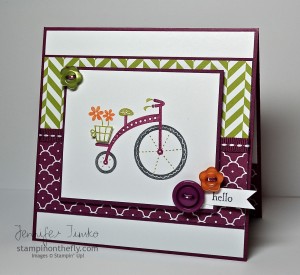
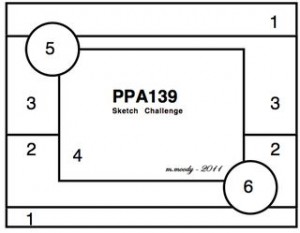
Of course the card above uses this fun set.  How sweet is this little tricycle?  I used my Stampin’ Write Markers to color it in Rich Razzleberry, Lucky Limeade and Basic Gray.  Then I added some Pumpkin Pie flowers from the set for the basket.  I stamped a second basket and cut it out for some dimension.  The prints are from Summer Smooches DSP and I added some of the new 1/4″ Stitched Grograin Ribbon in Rich Razzleberry across the middle.  Some Bright Buttons finished off this fun sketch from Pals Paper Arts.

Thanks so much for stopping in today.  I look forward to ordering a lot of Moving Forward stamps for this great cause and sending this little card to the Davies family with our donation!


Freshly Made Sketches #45

Freshly Made Sketches #45 published on 9 Comments on Freshly Made Sketches #45

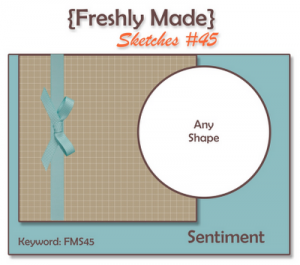
I’m back for a second post for the day with a new Freshly Made Sketches layout.  This awesome sketch is courtesy of Cindy Hall from Pretty Impact.  Great one, don’t you think?

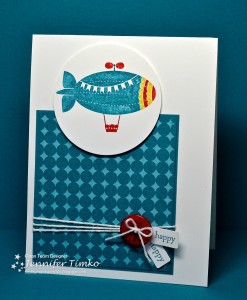
I decided to use the stamp set Moving Forward.  This is the Ronald McDonald House Charities set for the year from Stampin’ Up and $3 of every set purchased goes straight to RMHC.  WOW!!  I love this blimp and inked it up as soon as I could on Monday morning.  I will say that it probably needs to be sanded a little (I find that is always best for crisp images on stamps with large flat surfaces) but I was too excited to play with it.  The sketch was flipped and I chose this Summer Smooches DSP print as my color inspiration.  The blimp was colored using Stampin’ Write Markers in Island Indigo, Real Red and Daffodil Delight.  A little White Baker’s Twine and a Real Red Button were perfect for the ribbon element and I added some Jewelry Tags that punched the words from the stamp.

This stamp was given to every demonstrator that was at Convention.  Cool, huh?  Please come back tomorrow to see some more information about this set and all it can do for families.

Until then, make sure you go see the design team’s fabulous cards!  Hope your day is wonderful!

Stamp:  Moving Forward; Paper:  Summer Smooches DSP, Whisper White, Island Indigo; Ink:  Real Red, Daffodil Delight, Island Indigo; Accessories:  White Baker’s Twine, Brights Buttons, Jewelry Tag Punch, 2-1/2″ Circle Punch


SUOC 50 – Buttons and Brads

SUOC 50 – Buttons and Brads published on 3 Comments on SUOC 50 – Buttons and Brads

The theme for this week’s SUO Challenge should be perfect for just about everyone!! Buttons and Brads!  I love them and I know you do too!  The team has shown so many ways to use these wonderful accessories and I can’t wait to see what you create.

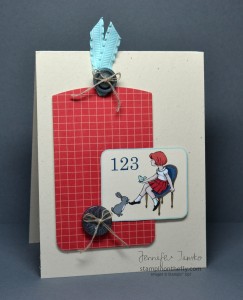
Remember how I told you I got A LOT of free stuff at Convention??  Well, this card uses some of it.  Because this was my first time at Convention, I was invited to a “First Timers Lunch”.  When we got there, they gave us the Storytime DSP.  How fun is that??!!  I cut a rectangle for the tag and then used the Adorning Accents Edgelit to cut the curve on the top and a Corner Rounder Punch for the bottom.  The image is actually cut straight from the DSP too…no stamping or coloring on my part!  How fun and easy!  I added some Basic Gray buttons tied with Linen Thread and the Pool Party Ruffled Ribbon.

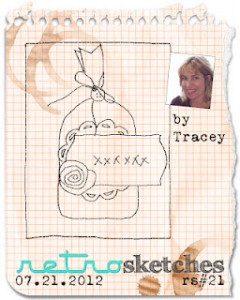
This sketch is courtesy of Retro Sketches #21.  Fun isn’t it??!!  So glad I got to play this week.  I’m so glad you stopped in and I’ll see you again in just a bit since this is the first of two posts for today (due to the SUOC Convention delay).  Have a great day!

Paper:  Storytime DSP, Naturals Ivory; Accessories:  Pool Party Ruffled Ribbon, Neutrals Buttons Linen Thread, Dimensionals


Convention Fun!!

Convention Fun!! published on No Comments on Convention Fun!!

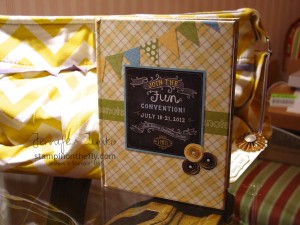
Home from Stampin’ Up Convention 2012!  Wow, what a whirlwind of fun!  I am hoping to actually stamp today with all the free stamps I came home with but thought I should show you some of awesome things I got!

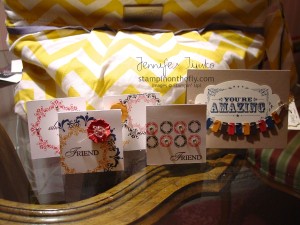
I’ll start with “the bag”.  There are definitely better pictures of the Convention bag on many other sites but here is mine with some of the Make & Take cards.  The Your Amazing card was such fun to make (those little tickets are just a quick punch with the new Ticket Duo Builder Punch.  The little 3×3 cards go into a Kraft Gift Box (which I will be putting together this week, I hope).  They use the Daydream Medallions stamp and the Floral Frames Framelits.  I altered them from the originals just a little bit and I LOVE them!!  There are more M&T projects but I don’t have pictures quite yet.

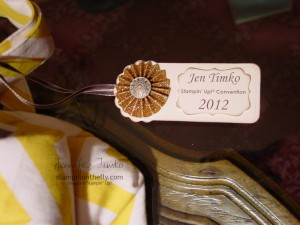
The first picture here is a bag tag created by Cindy Elam.  Now I can say that this picture doesn’t even come close to showing you how pretty this is.  It used the new Champagne Glimmer Paper from the Holiday Catalog and it sparkles like you cannot believe!!  The back of the tag is all Glimmer Paper!!  WOW!!!  Lots and lots of demos were taking pictures of this since they loved it everywhere I took my bag.

The second picture is my notebook from Heidi Baks.  This amazing notebook was created by Heidi using My Digital Studio (MDS).  It looks so professionally made that other demos were asking Cindy (she got one too) where she found it at Momento Mall.  I have all my notes from Convention in it and can’t wait to show my customers this book in person!  If you have ever wondered what an MDS print product from SU looks like, I can verify that it is strong, sturdy and beautiful!

Well, back to unpacking and getting back to reality.  I’m on reserve again starting tomorrow.  Trying to get my cards ready for SUO Challenges and Freshly Made Sketches this week.  Hope to see you for those!!  Thanks for stopping in today!

Poppies for the Freaks

Poppies for the Freaks published on 6 Comments on Poppies for the Freaks

Today is the last day of Convention…how did the time fly by so fast??!!  I want to share another swap card with you.  This one was for a Control Freaks swap.  I know you know the “Freaks” since they are some of the most amazing stampers.  I still have to pinch myself when I realize that I get to share cards with them.

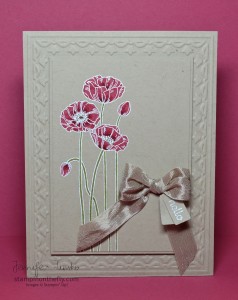
I knew that I wanted to use the flowers from Pleasant Poppies again for this swap.  In fact, I have wanted to use this direct marker technique on the poppies since I first spied this set in the catalog.  I simply love the pop of color against a Crumb Cake background (as evidenced by my pins in Pinterest).  I started by stamping the flowers with Versamark and then embossing with White Stampin’ Emboss Powder.  Then I colored with a Melon Mambo Stampin’ Write Marker and went back to highlight with a Raspberry Ripple Stampin’ Write Marker.  The stems were colored in Lucky Limeade.  I just love the Framed Tulips Embossing Folder and how it sets off a focal image so I thought it would be a nice addition to the monochromatic layers.  I finished it off with a bow made from Crumb Cake Seam Binding and some little tags made with the Jewelry Tag Punch.  The sentiment is from Teeny Tiny Wishes.

This fabulous new set has so many possibilities and I can’t wait to continue trying new ways to color it.  Shelli Gardner, the CEO of Stampin’ Up, has her New to You Creative Challenge and I’m going to enter this one there.

So remember yesterday when I said that I felt like a groupie at a rock concert??  Well let me show you why.  Take a look at the first picture on this link to Lyssa Zwolanek’s blog, Song of My Heart Stampers.  Yes, it is me!!  Ok, it is me with Lyssa and Cindy Elam (my roommate here and fellow SUO Challenges team member).  Lyssa is one of the most generous stampers and was selected for the prestigious Founder’s Circle this year.  So great to see such an amazing stamper rewarded for sharing what she loves with such grace!

What a whirlwind Convention has been.  I’ll have lots to tell you over the next couple of weeks and pictures to share too!  Thanks for dropping by today.  See you again soon!

Stamps:  Pleasant Poppies, Teeny Tiny Wishes; Paper:  Crumb Cake; Ink:  Versamark, Melon Mambo, Raspberry Ripple, Lucky Limeade, Whisper White Craft; Accessories:  Big Shot, Framed Tulips EF, White Stampin’ Emboss Powder, Heat Tool, Crumb Cake Seam Binding, Jewelry Tag Punch

Convention Roommate Gifts

Convention Roommate Gifts published on 2 Comments on Convention Roommate Gifts

My roommates for Convention are two amazingly talented stampers!!  Cindy Elam of Heart’s Delight Cards and Heidi Baks of RunningwScissorsStamper are also on the design team with me at SUO Challenges.  How exciting that I get to be one of their roommates!!  Needless to say, I could not just make any old thing for these two so I went out of my box and got to thinking about 3-D projects.  One thing led to another and this is what I came up with.

I found these adorable little mini paint cans at the Container Store and little tins too.  I decorated them with Floral District DSP and created flowers for the tops of the paint cans out of  Floral District fabric.  The flowers are made with the Fun Flowers die and I used fabric stiffener to add a little oomph to the fabric.  The tags were created using My Digital Studio and then printed by the print services at Stampin’ Up.  They came just the right size and with the little hole punched.  I just had them laminated to protect them.  I promise that Cindy has a tag too, you just see the back side of hers in the tag picture.  Actually, I made two for each.  One for their paint cans and one to add to their Convention bags (to help tell them apart from the thousands of others that are just the same).  I filled the cans with some little goodies to make the trip better.

Yesterday was the most amazing and inspirational day I have had with Stampin’ Up!  My second upline, Lisa Curcio, took this picture right before my 5 year walk.  What an wonderful 5 years it has been!! The theme for Convention 2010 is I Am….  My classes yesterday were I Am Doing Business My Way with Rhonda Wade and Tami White; I Am Savvy with Dawn Griffith, Laura Mulligan and Meg Wheeler; and I Am Reaching Out with Emily Montoya.  So many great ideas for classes and clubs, ways to be a better demonstrator and, of course, amazing projects!!  I feel like a groupie at a rock concert as I meet demonstrators whose work I so admire.  Can’t wait for more today.  I’ll have more picture tomorrow of Make and Takes and updates on today’s activities!  If you want to see some more pictures, run right over to Heidi’s blog (posted above) and see the great convention bag, Main Stage and project wall pics and the cool things from Momento Mall!

Hope your week is going great.  Thanks for stopping by today.  Another swap tomorrow.  This one was for the Control Freaks swap.  See you then!


Poppy District

Poppy District published on 4 Comments on Poppy District

As promised, I have the first of my swaps for Convention today.  This was for a swap with the Stampin’ Addicts.  We had a Meet & Greet get-together last night and I signed up for a general swap with them.

I just fell in love with Pleasant Poppies as soon as I saw it in the new catalog.  I thought it would be nice to watercolor the flowers using Blender Pens and combine the image with Floral District DSP.  The texture in the background comes from the new Fancy Fan Embossing Folder and I LOVE how it coordinates with the print in the DSP.  Of course I needed to tie on some of the lovely Rose Red Seam Binding to finish it off!  The flowers were colored first with a Pink Pirouette Stampin’ Write Marker (direct to paper) and then I added Melon Mambo and Rose Red ink with my Blender pen to add layers of color to the flower.  The stems were finished with Lucky Limeade and the centers with Basic Gray.  The swaps I got back are so fantastic and I hope to share some of these with you in the upcoming weeks.

Well, back to the fun of Convention.  Tomorrow…roommate gifts!

Stamps:  Pleasant Poppies, Just For You; Paper:  Whisper White, Basic Black. Floral District DSP; Ink:  Black Stazon, Pink Pirouette, Melon Mambo, Rose Red, Basic Gray, Lucky Limeade; Accessories:  Big Shot, Fancy Fan EF, Rose Red Seam Binding, Blender Pen

Freshly Made Sketches #44

Freshly Made Sketches #44 published on 6 Comments on Freshly Made Sketches #44

Today is the day!!!!  I am at Convention and today is check-in day!!  Yippee!  I have been looking so forward to this and I can hardly believe it is finally here.  It is also Freshly Made Sketches day and Jen Mitchell has brought us a cool layout!  At first I wasn’t so sure I would like it but my card came together so easily.  Frankly a miracle given the clutter in my brain leading up to Convention.

First the details on the card, then how I came to this design.  I started with a Crumb Cake base and using my Simply Scored Scoring Tool, placed two scored lines 3/4″ apart.  I added a little Crumb Cake layer between the two scored lines and wrapped black embroidery thread around the panel.  This allows you to have the one layer card look and not see the thread when the card is opened.  I punched 8 circles — 4 with my 1-3/4″ Circle Punch and 4 with my 2-1/2″ Circle Punch — out of First Edition DSP.  On the larger circles I made sure to find some line art so that it would show in the flower.  I took each circle and folded it in quarters then glued them to a 1″ circle base using Crystal Effects as the glue.  The Crystal Effects holds really well and I only had to glue the corners that came together.  This allows for the quartered circles to raise up a bit and give texture.  I added a couple of Cherry Cobbler buttons to the centers.  The smaller flower is popped up on a Dimensional to allow it to layer properly.  The sentiment comes from my new favorite set from the catalog.  I know, I know….really??  Your favorite set is a WORD SET???  Well, a good word set is like a great pair of shoes.  It makes everything look better!  This is one of those sets that has three always needed sentiments and is just the right size.

Now, I was a little worried about getting this card done last weekend.  I am on reserve (on call) with United this month and I got called to go out on a one-day trip Sunday.  I had a REALLY early departure out of Baltimore which is a pretty good distance from my house.  I flew to Chicago and then had to ride back to Washington Dulles and be taken back to my car in Baltimore.  Yes, this is what the schedulers do to make sure those flights go out on time.  Well, I was sitting in the back of the plane on the ride back to Dulles and was next to a man in khaki pants reading a newspaper.  I had the sketch with me and was trying to come up with a plan so I could make the card right when I got home.  The light bulb came on with the newsprint and the khaki pants.  I had wanted to make these flowers but then I knew what colors and paper to use.  The card came together so fast when I got home.  I love it when that happens!  So now you know how I spend layover times and “deadhead” (riding in the back) time…planning the next card.

Ok, enough chatter.  Make sure you go check out the cool cards from the rest of the team. Works of art as usual!!  I’ll be back tomorrow with one of my swap cards from Convention!  I am pre-scheduling my posts but will update with current information if  I can.

I am entering this in the So Shelli Creative Challenge for this month, the New to You Challenge.  She wants us to focus on our new favorite stamp set and I thought this was the perfect card to share why I love Just For You!

Stamp:  Just For You; Paper:  First Edition DSP, Crumb Cake; Ink:  Stazon Black; Accessories:  Circle Punches (1″, 1-3/4″, 2-1/2″), Regals Buttons, Simply Scored Scoring Tool, Crystal Effects, Thread

Freshly Made Sketches #43

Freshly Made Sketches #43 published on 12 Comments on Freshly Made Sketches #43

Today over at Freshly Made Sketches we have a new sketch courtesy of Tui Nathan at Stampin-Time.  This one is just fantastic and I simply love the cards from the design team this week.

I have to confess that I am feeling a bit of mojo loss.  I have been making my swap cards (which I do like) and some projects for my Convention roommates (which I really like) and this card just seemed to be one too many things.  Fortunately, my mom had ordered the new Elegant Butterfly punch and its matching stamp set, Papillon Potpourri.  I pulled out the retired Spice Cake DSP since it still is a favorite of mine.    My mom is in town and she helped me align the butterflies.  We thought it was missing something so I added a little “fork” bow made with Early Espresso Satin Ribbon (retired).

I’m hoping to get some time to create something else with this great sketch.  In the mean time, make sure you go take a look at the beautiful creations the design team has made.  I am so in love with them (I see more Pinterest pins in my future!).  Hope your day is wonderful!

Stamp:  Made For You; Paper:  Spice Cake DSP (retired), Pool Party, Early Espresso, More Mustard, Very Vanilla; Ink:  Early Espresso; Accessories:  Elegant Butterfly Punch, Basic Pearls, Early Espresso Satin Ribbon (retired)

SUOC49 – Special Thank You

SUOC49 – Special Thank You published on 2 Comments on SUOC49 – Special Thank You

Well, I am late on my post and that seems to be how everything is going these days!  SUO Challenges has a wonderful theme for the next two weeks…a special thank you card!  I always need a thank you card so this one was fun to do!

I just got a pack of the new Flower District fabric.  Yes, fabric!!  I am not a big seamstress but I just could not resist this fabric!!  I just cut a strip of the fabric the long way (about 1″ wide) and rolled it onto a circle cut from Sticky Pages.  The sketch comes from the Fall-to layout this week (FTL198).  What a great sketch to feature this fun flower!  Now I will say that this isn’t necessarily something I would just drop in the mail due to the thickness of the flower but how cool to deliver by hand as a thank you!  I have just the recipient in mind!

You’ll be seeing more with fabric from me in the near future but for now it is back to swaps and preparing for Convention.  So much stamping to do, so little time!!  With any luck, I will have everything photographed and ready for you to see next week while I am gone!

Make sure you stop by the SUO Challenges site to see the wow designs from the rest of the team!  See you tomorrow for a card using the latest Freshly Made Sketches layout!

Stamp:  Made For You; Paper:  Floral District DSP, Whisper White, Rich Razzleberry; Ink:  Rich Razzleberry; Accessories:  Floral District Fabric, Sticky Pages, Bright Buttons, White Baker’s Twine, Brights Brads

Primary Sidebar