I am so happy to share the latest from Freshly Made Sketches today! I am the sketch hostess this week and I hope you will enjoy this one. As I pondered what to do, I thought about a “one layer” look for the sketch. This is what I came up with. In fairness, my final card isn’t really one layer but I hope that means there are lots of ways to create with it.
I scoured around my stamps to figure out what I wanted for the groupings and came across this pretty Posie Fill In from Concord and 9th. And then I realized that the coordinating dies were PERFECT for the sketch. The big sentiment in the middle is from that! So I stamped the flowers in shades of aqua (Mermaid and Peacock by Lawn Fawn) and then stamped the outlines in black. The flowers are easily cut out with the coordinating dies. I cut the sentiment from white card stock and then layered on the flowers alternating the heights with regular adhesive and foam tape. Then using my paper cutter, I trimmed off the edges of the flowers to make them flush. Using more foam tape, I popped the stamped image up on an aqua card base (Bermuda Bay by Stampin’ Up). I added the letter “middles” from the R and the D on more foam tape and that was it.
Something about these colors really made me happy when I was creating it. While I’m content with some winter weather that still may be due, the fresh spring look of this appealed to me. I hope that you will have some time to play along this week. The team has outdone themselves and I hope you enjoy their creations too. Thanks so much for stopping in today. I’ll be back to crafting tomorrow as the Picket Fence Studios team is preparing for the CHA (Creativation) release later this month. You will be blown away!! I’ll try to sneak in something just for fun to share sooner though. Until then, have a great rest of your week.
It is SUO Challenges day and our theme this week will work for everyone! Designer papers! We all love them and they make stamping so fun and easy! Stampin’ Up’s designer series papers really are amazing because the coordinate with our exclusive colors and stamps…makes it even easier to make fantastic cards! The hardest part for this challenge was choosing which paper set to highlight.
It shouldn’t surprise you that I went with the Floral District DSP. Let’s face it…I love it! It just says summery and fun. I thought I’d pull out a new set Daydream Medallions and see if I could make these work together. I think yes! Once I stamped the medallions, I went off to search for a sentiment and came back with the Convention stamp set I Am. This one was exclusive to Convention and I love the sentiments in it. I thought this was a fun way to show them. I added a new Vintage Faceted Button (LOVE these) to finish it off. See, the DSP did all the work of deciding the colors! The sketch is courtesy of the Fall-to Layout 202. It was just perfect for showcasing these pretty papers.
Now when you go over to SUO Challenges you will find two notable things. First, you’ll see that I’m not the only one that loves Floral District DSP! Second, and most importantly, you will notice a change in our design team. We have added the most awesomely talented Connie Babbert of Inkspired Treasures. The whole team is so happy to have her join us! Make sure you go tell her welcome too.
I’ll be back tomorrow with a new card for Freshly Made Sketches. Until then, have a great day. Thanks so much for stopping by!
Stamps: Daydream Medallions, I Am; Paper: Floral District DSP, Basic Black, Whisper White; Ink: Rose Red, Daffodil Delight, Basic Black; Accessories: Stamp-a-ma-jig, Vintage Faceted Buttons, Thread, Dimensionals
Well, I am late on my post and that seems to be how everything is going these days! SUO Challenges has a wonderful theme for the next two weeks…a special thank you card! I always need a thank you card so this one was fun to do!
I just got a pack of the new Flower District fabric. Yes, fabric!! I am not a big seamstress but I just could not resist this fabric!! I just cut a strip of the fabric the long way (about 1″ wide) and rolled it onto a circle cut from Sticky Pages. The sketch comes from the Fall-to layout this week (FTL198). What a great sketch to feature this fun flower! Now I will say that this isn’t necessarily something I would just drop in the mail due to the thickness of the flower but how cool to deliver by hand as a thank you! I have just the recipient in mind!
You’ll be seeing more with fabric from me in the near future but for now it is back to swaps and preparing for Convention. So much stamping to do, so little time!! With any luck, I will have everything photographed and ready for you to see next week while I am gone!
Make sure you stop by the SUO Challenges site to see the wow designs from the rest of the team! See you tomorrow for a card using the latest Freshly Made Sketches layout!
Stamp: Made For You; Paper: Floral District DSP, Whisper White, Rich Razzleberry; Ink: Rich Razzleberry; Accessories: Floral District Fabric, Sticky Pages, Bright Buttons, White Baker’s Twine, Brights Brads
Hooray for the Red, White and Blue!! Okay, in this case we have Red, Blue and Blue (with a little Naturals Ivory) but you get the point. The ColorLab Challenge is timely, as usual…ready for the Independence Day holiday here in the U.S. The stampers over at Stampin’ Royalty are celebrating their patriotism and this color selection fit right in for me.
You may have noticed that pinwheels are showing up everywhere so I decided to give it a try. I took some Not Quite Navy card stock and sponged on Night of Navy ink to make it pop. The DSP is from the retiring Jolly Holiday paper – one last showing! You’ll notice that I threaded a thin strip through the buttons too. Today is the LAST DAY to order any retiring items so don’t put it off any longer!! The layout comes from the Fall-to Layout Challenge.
I hope you are ready for the new catalog to launch…my order is standing by (and getting longer). With any luck, you’ll start seeing cards with some new products in week or so! Off for some summer fun with the kids today! Have a great rest of your week!
Stamp: Inviting; Paper: Jolly Holiday (retiring), Not Quite Navy, Naturals Ivory; Ink: Cherry Cobbler, Night of Navy; Accessories: Neutrals Designer Buttons, Dimensionals, Sticky Strip, Piercing Tool, Mat Pack
This week’s ColorLab Challenge colors are courtesy of…..me! The design team chose colors for the whole month and this is what I came up with. I knew this palette would be awesome for Father’s Day cards and now is the time to get working on them!! Of course the Last Chance lists came out yesterday (see yesterday’s post for more information) and that inspired me to pull out the Father’s Day stamp from All Holidays, one of the retiring sets.
This is one of those word stamps that provides focal point and sentiment all in one. Then, I just let some accessories do the rest of the work. The Early Espresso Baker’s Twine was cinched by tying on a Regals button (technically Cajun Craze but with the Not Quite Navy behind it, it goes perfectly). The Not Quite Navy panel was embossed using my Big Shot and the Square Lattice Embossing Folder. I used the layout from the Fall-to Layout 142.
I can’t wait for you to see what the rest of the team has created with these colors and I look forward to seeing your creations too! Thanks for stopping in today. See you again soon!
Stamp: All Holidays; Paper: Early Espresso, Not Quite Navy, Riding Hood Red; Ink: Early Espresso, Not Quite Navy, Riding Hood Red; Accessories: Big Shot, Square Lattice Embossing Folder, Early Espresso Baker’s Twine, Regals Buttons, Dimensionals
It was a busy weekend around my house. In typical style, I was working last minute on Valentine’s Day treats for my boys’ classes and their teachers. Not sure why but this always seems to be something I put off. I started out with the treats for the kids by pulling out an old set called Mini Messages. This is one that I bought early in my stamping life and never knew quite what to do with it. Inspiration hit and off I went!
I stamped the “my friend” script in Soft Suede on Very Vanilla and punched it out with a Large Tag punch. I then stamped the heart in Cherry Cobbler and cut it out. Yes, it would have been loads easier if I had used any of our large variety of heart punches but sadly, none live at my house (this WILL be fixed!!). The Extra-Large Tag Punch was used on Cherry Cobbler paper and I just had to assemble. I put some chocolate into Medium Cellophane Bags, punched a hole in the tags with a 1/16″ Circle Punch and tied them closed with Vanilla 1/8″ Taffeta Ribbon. Easy and done!
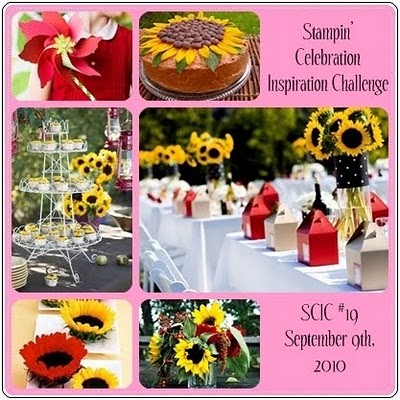
Being a demonstrator has so many cool advantages and one was that we received a sample of the Love Impressions Rub-Ons as a free gift from Stampin’ Up! Before I went to work on cards for the teachers, I wanted to make two Valentine’s for my sweet sons. The front card is one of those. It uses the FTL127 layout which seemed perfect for this. There is absolutely no stamping on either of these cards. It is all rub-ons (even on the inside of the card)! I put the heart balloons on Whisper White card stock and cut them out so that I could pop them up on Dimensionals. The heart paper is from the Play Date DSP set. When I saw Stampin’ Celebration’s inspiration piece this week, I knew I’d use the XOXO balloon for it! Don’t forget to take a look at all the cool Valentine’s Day goodies they created!
Both of the cards here were used for my sons’ teachers (of course some treats were included for them too). All of these cards qualify for one of my favorite challenges, Stampin’ Royalty. Their SR#58 is Hearts, Hearts and More Hearts and that sums up my crafting this weekend!
Thanks for stopping by to see my crazy Valentine-a-pa-looza weekend results. I hope your day is a happy one!
Cards:
Stamps: None; Paper: Whisper White, Basic Gray, Real Red, Play Date DSP; Ink: None; Accessories: Love Impressions Rub-ons (Occasions Mini), Dimensionals, Brights Buttons, Thread (non-SU)
All products are Stampin’ Up unless otherwise indicated!
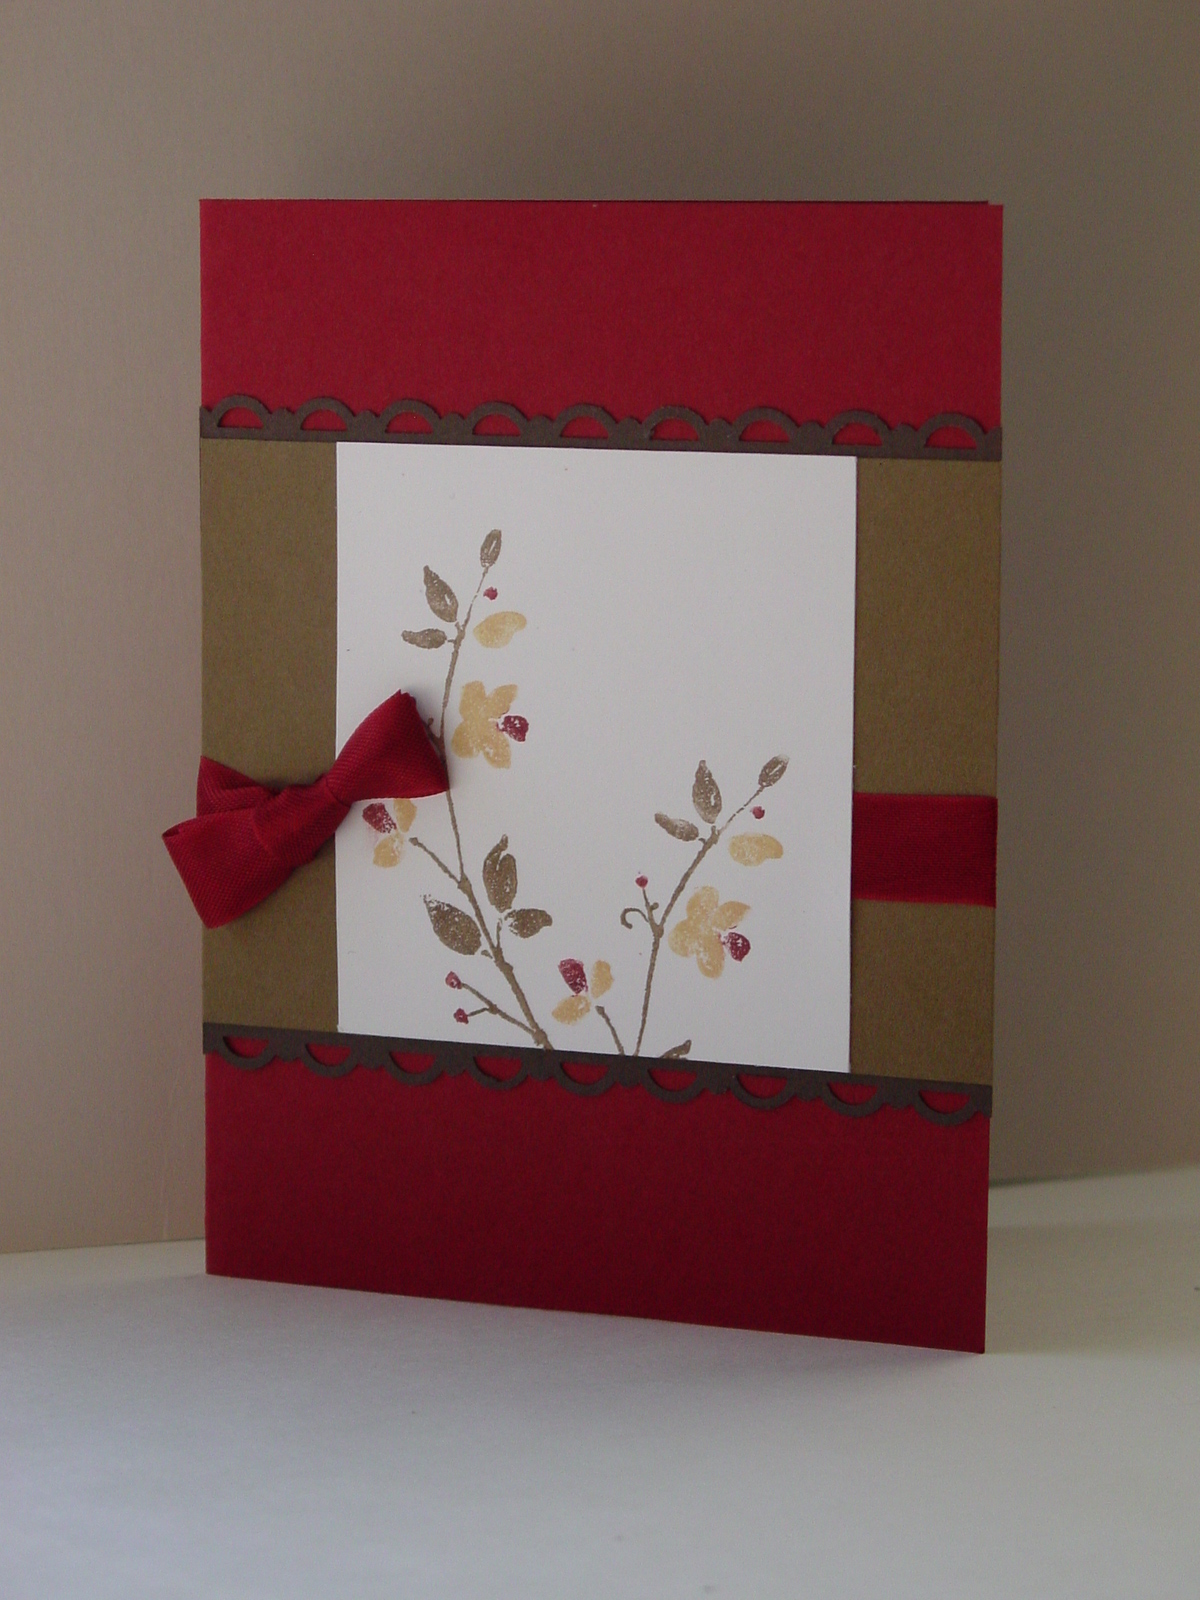
When my mom and I were stamping earlier in the week, we created a couple of cards using my Day of Gratitude set. I wanted to show mom that all cards didn’t have to take forever to make (or need tons of products). I pulled Stacey’s Curtain Call: Act 54 challenge up and saw her beautiful fall colors.
The clean&simple Fall-to Layout 114 was another great help:
Taking those two, we got to work. I used the Rock and Roll with a Twist technique again. I inked up the leaves in More Mustard and then applied Pumpkin Pie and Cajun Craze with a sponge dauber. Just make sure you clean the stamp in between to keep the oranges off of your Mustard. On went a sentiment in Cajun Craze. It seemed a little plain so I added some piercing and a non-SU ribbon left over from a package. So quick and so cute!
Not to be outdone, my mom changed up the layout a bit and did straight stamping in the challenge colors. Here is her card:
Pretty awesome for a new stamper, don’t you think??!! Well, I might be biased but I love her card!
I’m off to work on some Christmas cards. I really do need to get caught up on my own!! Thanks for stopping in and I’ll see you again soon!
Stamp: Day of Gratitude; Paper: Very Vanilla, Cajun Craze; Ink: More Mustard, Pumpkin Pie, Cajun Craze; Accessories: Paper Piercing Tool, Mat Pack, Non-SU ribbon
All products are Stampin’ Up unless otherwise indicated.
I’m still recovering a bit from my Operation Write Home extravaganza so this will be short. This is one of the cards for my box being shipped to OWH later this week. I’ll have a picture of the box all loaded up in tomorrow’s post. The Clean&Simple layout 107 is a great one and I used it to create a card during my open house. I also leaned on Stampin’ Celebration for some inspiration. Believe me, with all that stamping, I needed the inspiration to keep the ideas moving!
I love the colors in this picture! One of the things I did to help everyone maximize their stamping was to pull out all my sets (current and retired) and had people bring some of their stamping favorites. You know the sets…the ones where every card is one you like. One of my friends brought over her Watercolor Trio and I had to use it (I also used it in my previous post’s card). I started with some Cherry Cobbler, added Soft Suede and Early Espresso, and then some Daffodil Delight as the yellow. The card is pretty self explanatory so I’ll just show it to you.
I left off the sentiment because so that the recipient can use it for any purpose. I found myself making more cards like this than usual to give our deployed heroes more options.
Don’t forget to take a look at Operation Write Home to see if there is a stamping event near you this month!! Have a great week.
Welcome to your next stop on the Stampin’ Addicts Holiday Mini Blog Hop!! If you missed someone or want to see the whole hop list, just click on the banner above. I am sure you loved Cindy’s projects with Jolly Bingo Bits! If you missed it, jump right on over to her blog, Heart’s Delight Cards. My chosen set for this hop is Rejoicing in Christmas and let me tell you, this set is worth rejoicing over! I have been looking for the right Holy Family set for a while and this exceeds all my hopes. You can see any project closer simply by clicking on the image.
My first project is a card that really puts the focus on the Holy Family itself. I kept the card stock colors a bit subdued in order to shine the light on them…and I mean shine. Yes, my shimmer paint has returned in full force for this set of projects! I stamped the image on watercolor paper to start. Using my blender pen and Crumb Cake ink I colored Mary’s dress and Joseph’s garments. I used Night of Navy and Early Espresso on the borders of Mary and Joseph’s head coverings, respectively. Some Cherry Cobbler was used for Jesus and So Saffron for the halos. This is where the fun started. I pulled out my Champagne Mist and Frost White shimmer paints. Mary’s veil had no color on it and I used the Frost White to give it a beautiful shine. I added a little that was left on my Aqua Painter to put some shimmer on Jesus. Finally, I used the Champagne Mist on Joseph. To up the wow factor, I sprayed my homemade shimmer mist (rubbing alcohol and Shimmer Paint) onto the Crumb Cake paper. I tied on the richly colored Cherry Cobbler seam binding (p. 21 Mini) and was done. The sketch is the Fall-to Layout 103 from last week.
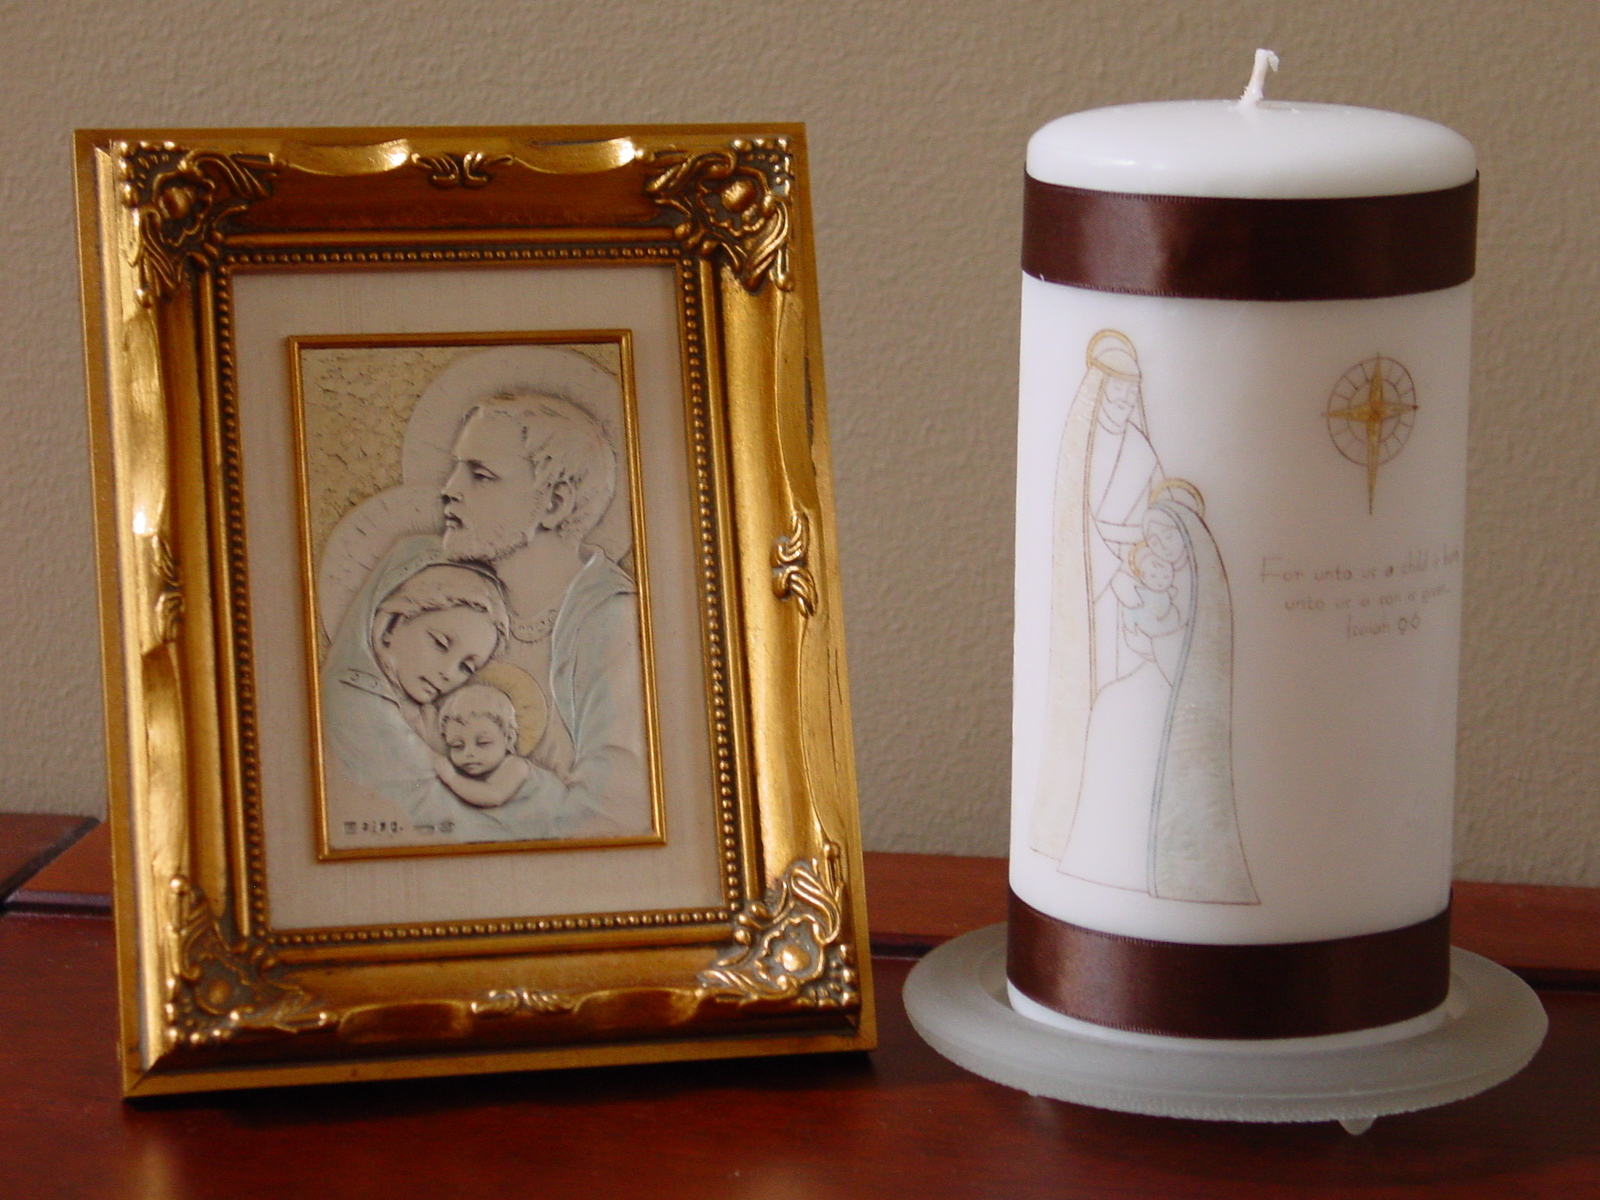
My next project started looking towards holiday gifts for teachers. As I say that, I have to admit that this one will stay right here at my house and I’ll just have to make more. I have never stamped on a candle before but this set seemed tailor made for it. I used white tissue paper and stamped the Holy Family, the star and the quote in Early Espresso ink. Using my blender pen again, I gently applied Soft Suede, Not Quite Navy and More Mustard ink to the image. On Jesus, the star, the halos and the headpieces I applied Champagne Mist Shimmer Paint. I cut the image and used wax paper to hold the image on the candle. Heat was applied with my heat tool to melt the paper into the wax. Finally, I put on Early Espresso Satin Ribbon using Sticky Strip. You can see the motivation for the colors in the candle in the picture beside it. I will have a more detailed set of pictures on Monday so watch for that.
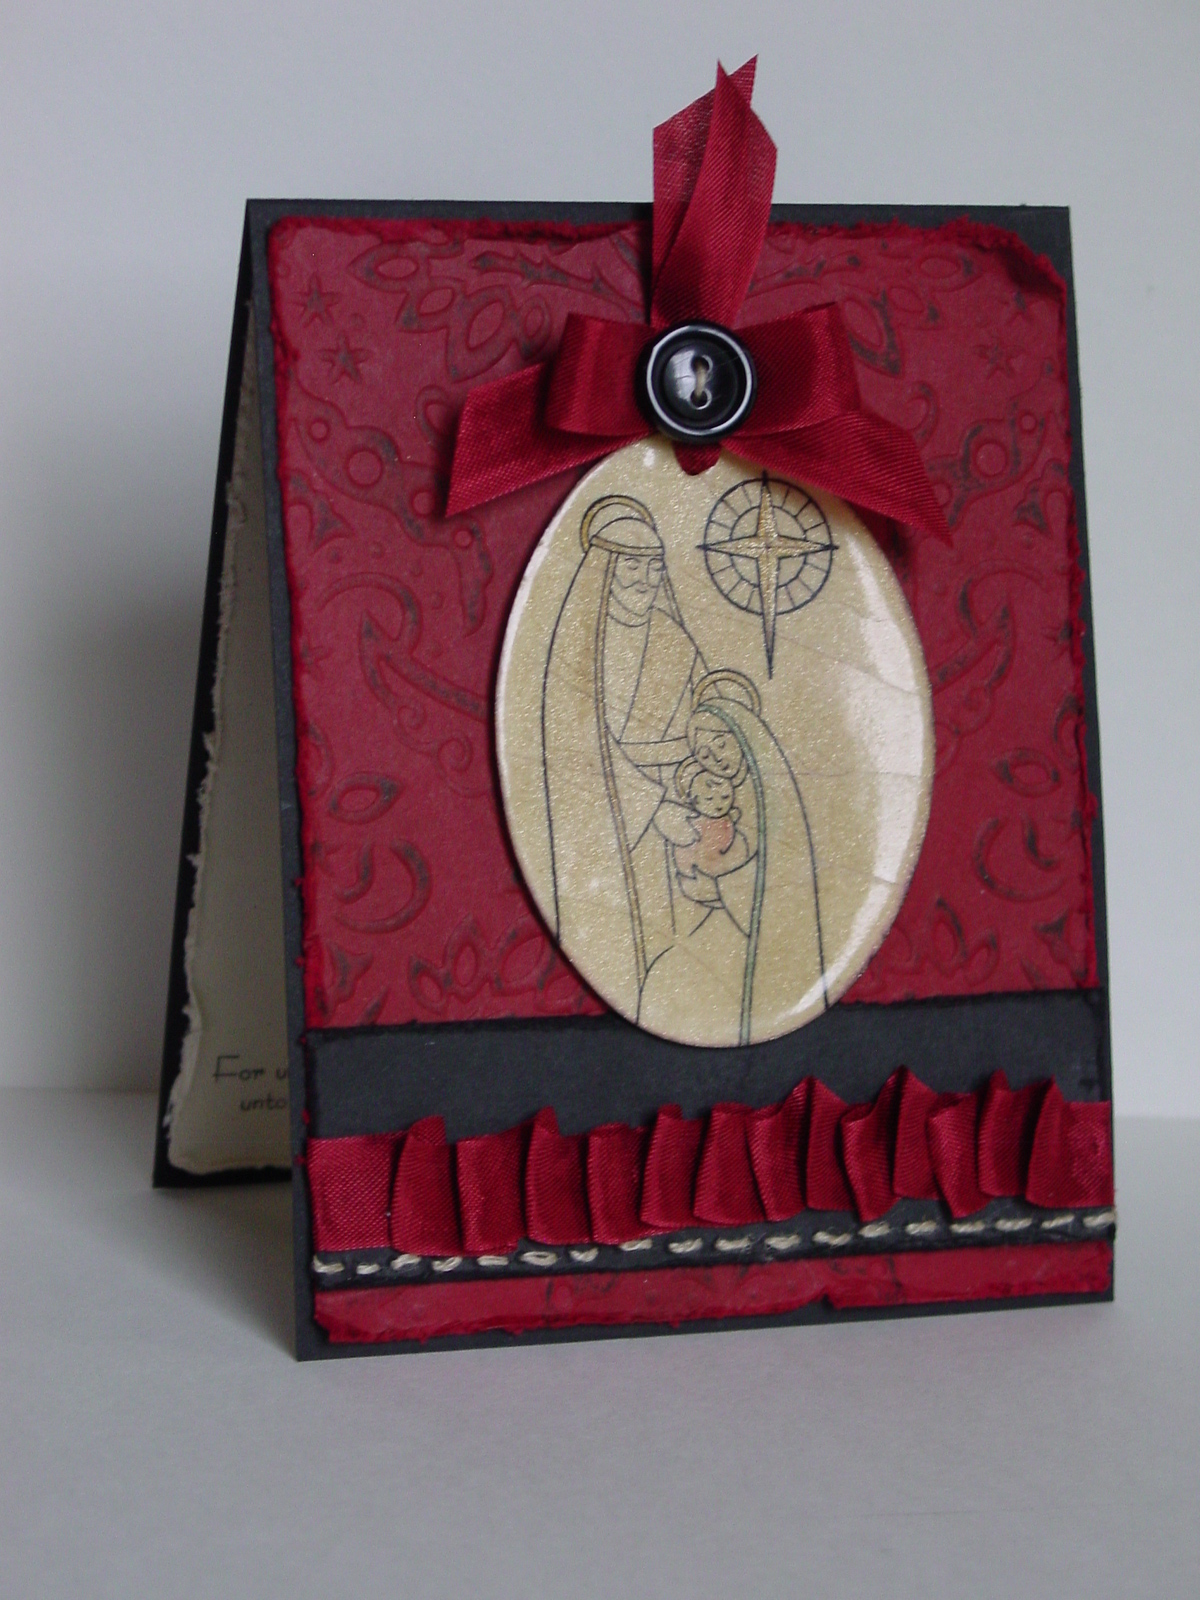
My next project is a card that takes advantage of the vintage trend. I started by cutting out a large oval of watercolor paper with my Ovals die and my Big Shot. I sponged the paper with Soft Suede and then applied Champagne Mist Shimmer Paint with a sponge dauber to the whole oval. I stamped the star and the Holy Family with Black Stazon ink and watercolored them lightly using Soft Suede, Cherry Cobbler and Not Quite Navy. I punched a hole in the top of the oval with my 1/16″ Circle Punch. I then used the Cracked Glass technique on the oval. Again using my Big Shot, I rolled out my Cherry Cobbler paper with the Backgrounds 1 Texturz Plate. I hand-stitched linen thread onto my Basic Black paper strip and added the Cherry Cobbler Seam Binding. Finally, I made the oval look more like an ornament by adding more Seam Binding and a black button from the Neutrals Designer Buttons. I will have more available on this project on Wednesday.
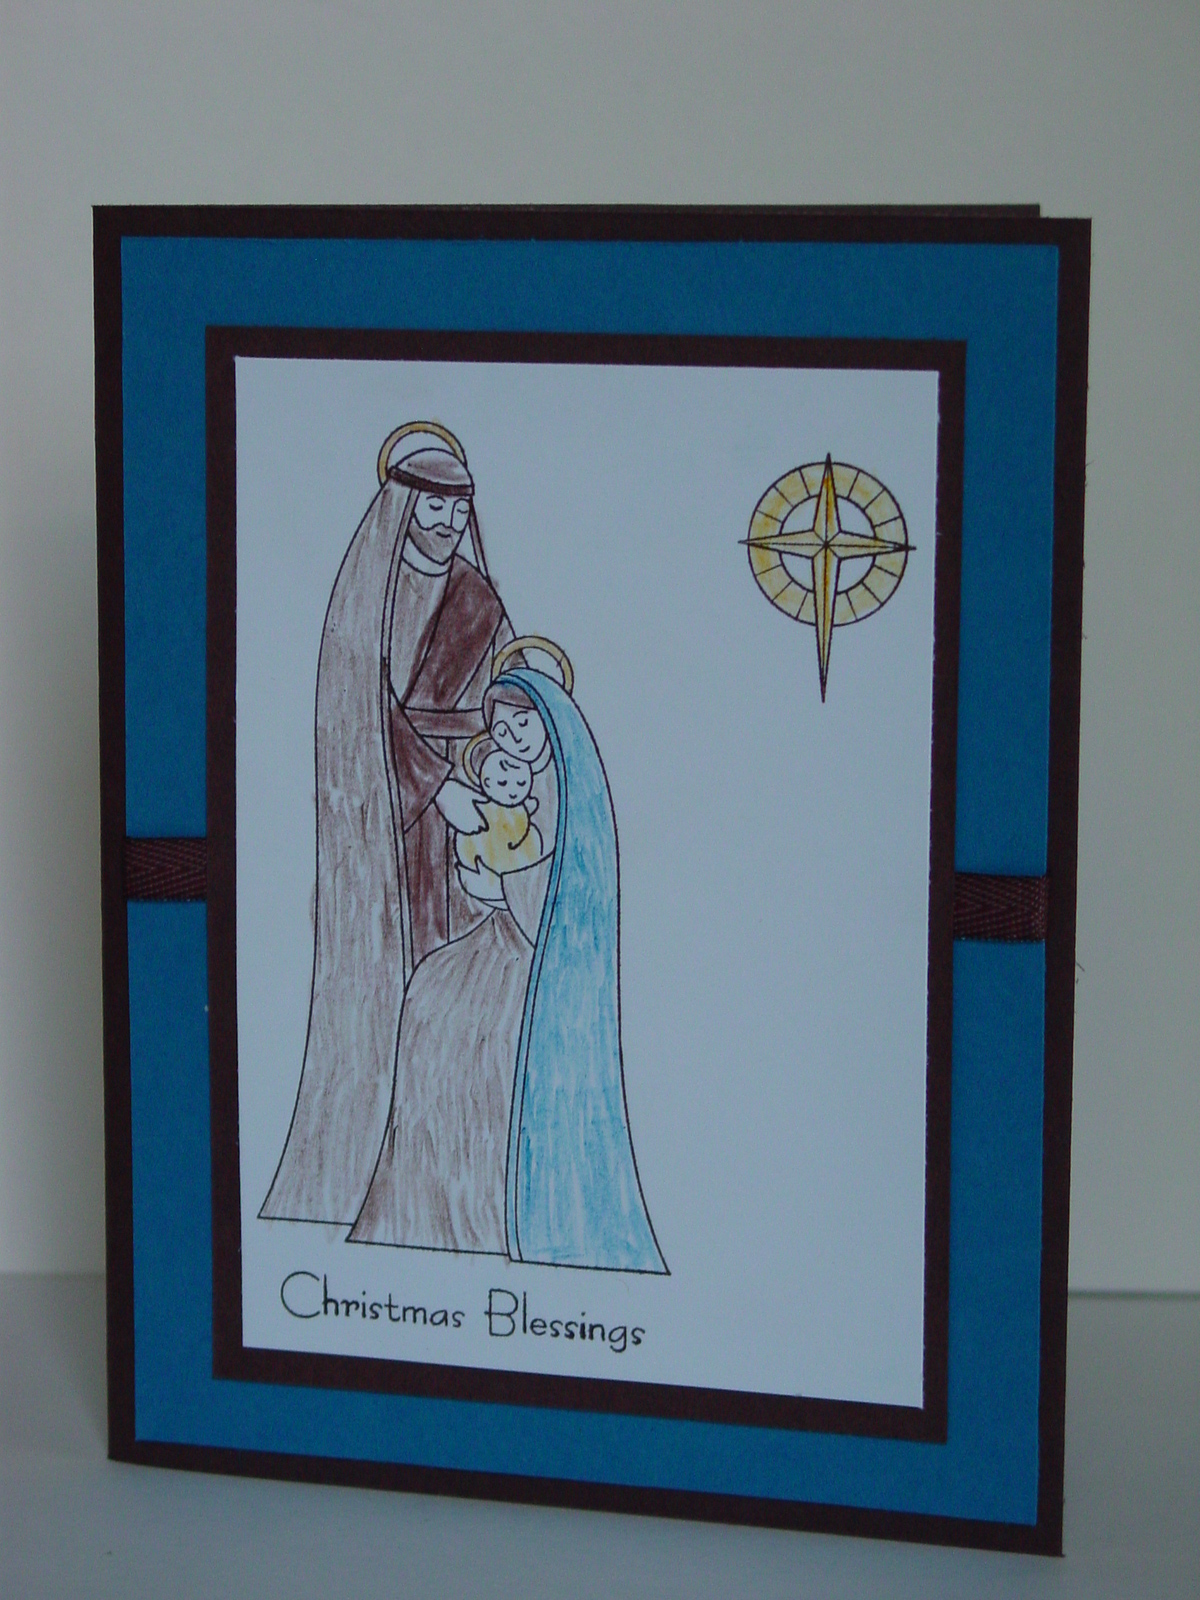
My final project is probably my favorite of all. Yes, it isn’t technically my project but I did convince my 7 year old son to make it for me so that should count for something. As much as I love my “serious” items above, what drew me to this set was the friendliness of it. So, using my Watercolor Pencils, he generously colored this beautiful image. We chose Pacific Point paper to match his work when he was finished and tied on some old Chocolate Chip ribbon (I apologize for the one non-current item but he chose it and I couldn’t say no). It is impossible not to smile after seeing this. He is so proud of it that he is going to donate it to my Operation Write Home challenge.
If you have any specific questions about any of these, make sure to leave it in the comments so I can address them in my posts next week. I hope you love these projects as much as I do!
Now it is time to head on over to Barbara’s Creative Stampin’ Spot to see her wonderful things made with A Cute Christmas and the Candy Cane DSP.
While I posted a Father’s Day card a few back, my husband had seen that one (a club card). That, and I do like to make sure he gets his own original cards every now and then! Branch Out is the set I wanted to work with for this card. It is one of the few retired sets that I keep just for my very own stamping…mostly because it always makes me happy to work with it. I used a new to me challenge for the layout over at Clean&Simple Stamping. This is their Fall-to Layout #95:
I also used the colors from Stamping 411‘s Thursday color challenge…Chocolate Chip, Baja Breeze, and Certainly Celery. The Baja DSP is left over hostess paper from when Baja Breeze was an In Color. I can’t tell you how thrilled I am to see it come back! Not much else to explain. See, doesn’t this tree just make you happy??
I hope that your family has a wonderful Father’s Day weekend! Give all those Dad’s big hugs for all they do (I know we will!)!!
We use cookies on our website to give you the most relevant experience by remembering your preferences and repeat visits. By clicking “Accept”, you consent to the use of ALL the cookies.
This website uses cookies to improve your experience while you navigate through the website. Out of these, the cookies that are categorized as necessary are stored on your browser as they are essential for the working of basic functionalities of the website. We also use third-party cookies that help us analyze and understand how you use this website. These cookies will be stored in your browser only with your consent. You also have the option to opt-out of these cookies. But opting out of some of these cookies may affect your browsing experience.
Necessary cookies are absolutely essential for the website to function properly. This category only includes cookies that ensures basic functionalities and security features of the website. These cookies do not store any personal information.
Any cookies that may not be particularly necessary for the website to function and is used specifically to collect user personal data via analytics, ads, other embedded contents are termed as non-necessary cookies. It is mandatory to procure user consent prior to running these cookies on your website.

 I scoured around my stamps to figure out what I wanted for the groupings and came across this pretty Posie Fill In from Concord and 9th. And then I realized that the coordinating dies were PERFECT for the sketch. The big sentiment in the middle is from that! So I stamped the flowers in shades of aqua (Mermaid and Peacock by Lawn Fawn) and then stamped the outlines in black. The flowers are easily cut out with the coordinating dies. I cut the sentiment from white card stock and then layered on the flowers alternating the heights with regular adhesive and foam tape. Then using my paper cutter, I trimmed off the edges of the flowers to make them flush. Using more foam tape, I popped the stamped image up on an aqua card base (Bermuda Bay by Stampin’ Up). I added the letter “middles” from the R and the D on more foam tape and that was it.
 Something about these colors really made me happy when I was creating it. While I’m content with some winter weather that still may be due, the fresh spring look of this appealed to me. I hope that you will have some time to play along this week. The team has outdone themselves and I hope you enjoy their creations too. Thanks so much for stopping in today. I’ll be back to crafting tomorrow as the Picket Fence Studios team is preparing for the CHA (Creativation) release later this month. You will be blown away!! I’ll try to sneak in something just for fun to share sooner though. Until then, have a great rest of your week.


")


")


 Taking those two, we got to work. I used the Rock and Roll with a Twist technique again. I inked up the leaves in More Mustard and then applied Pumpkin Pie and Cajun Craze with a sponge dauber. Just make sure you clean the stamp in between to keep the oranges off of your Mustard. On went a sentiment in Cajun Craze. It seemed a little plain so I added some piercing and a non-SU ribbon left over from a package. So quick and so cute!