Skip to content

Merry Everything for Honey Bee Stamps

Merry Everything for Honey Bee Stamps published on 3 Comments on Merry Everything for Honey Bee Stamps

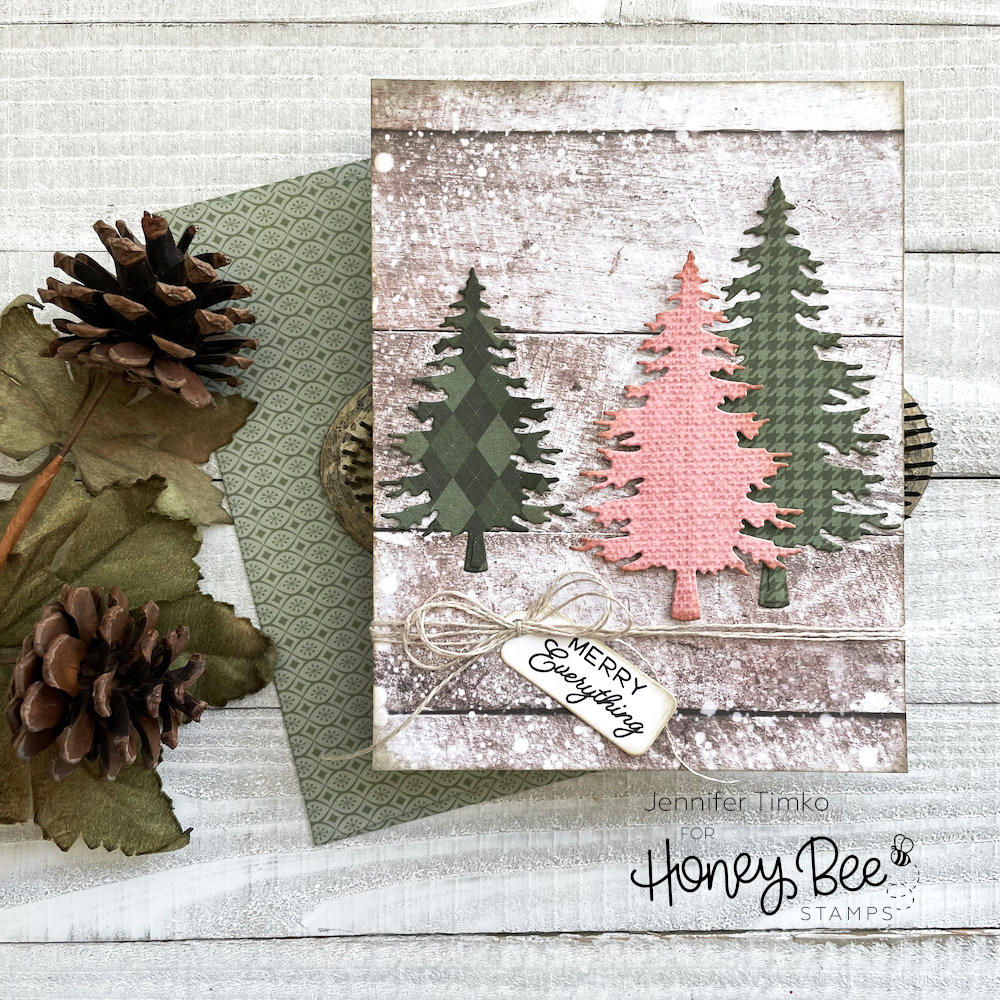
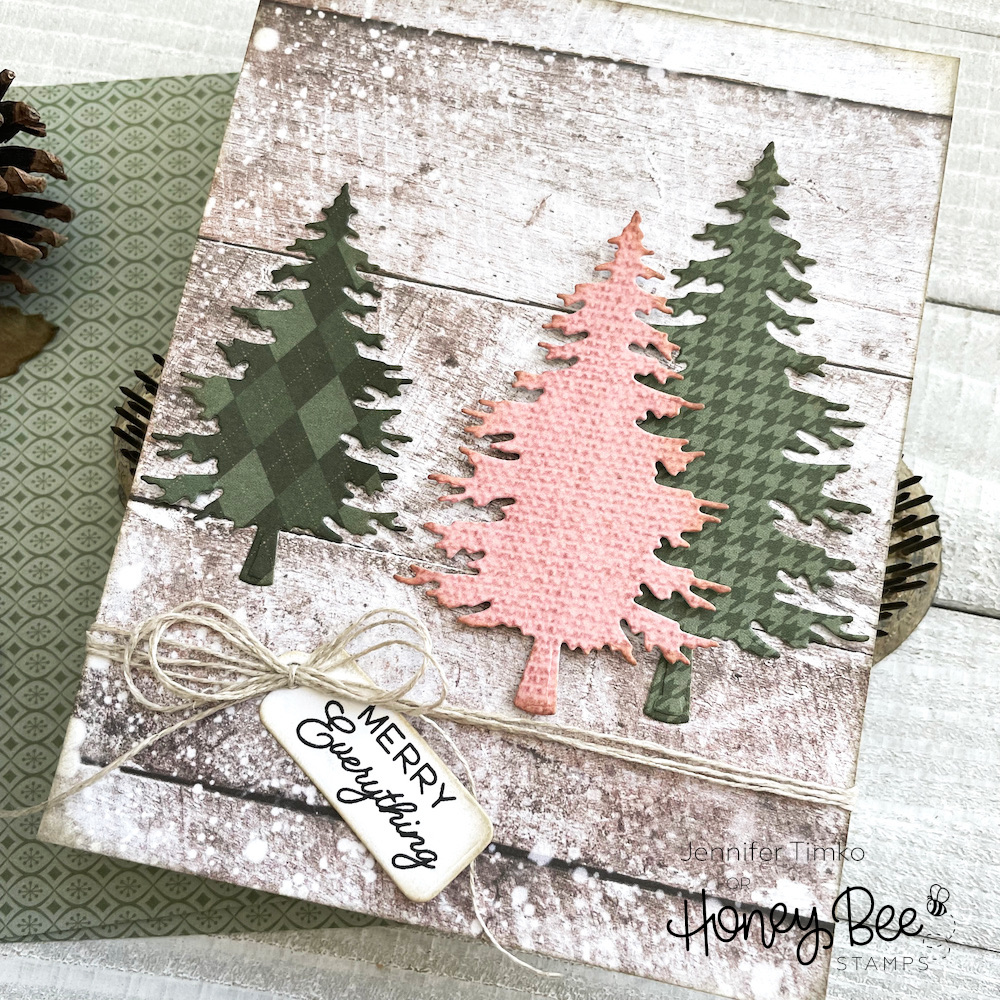
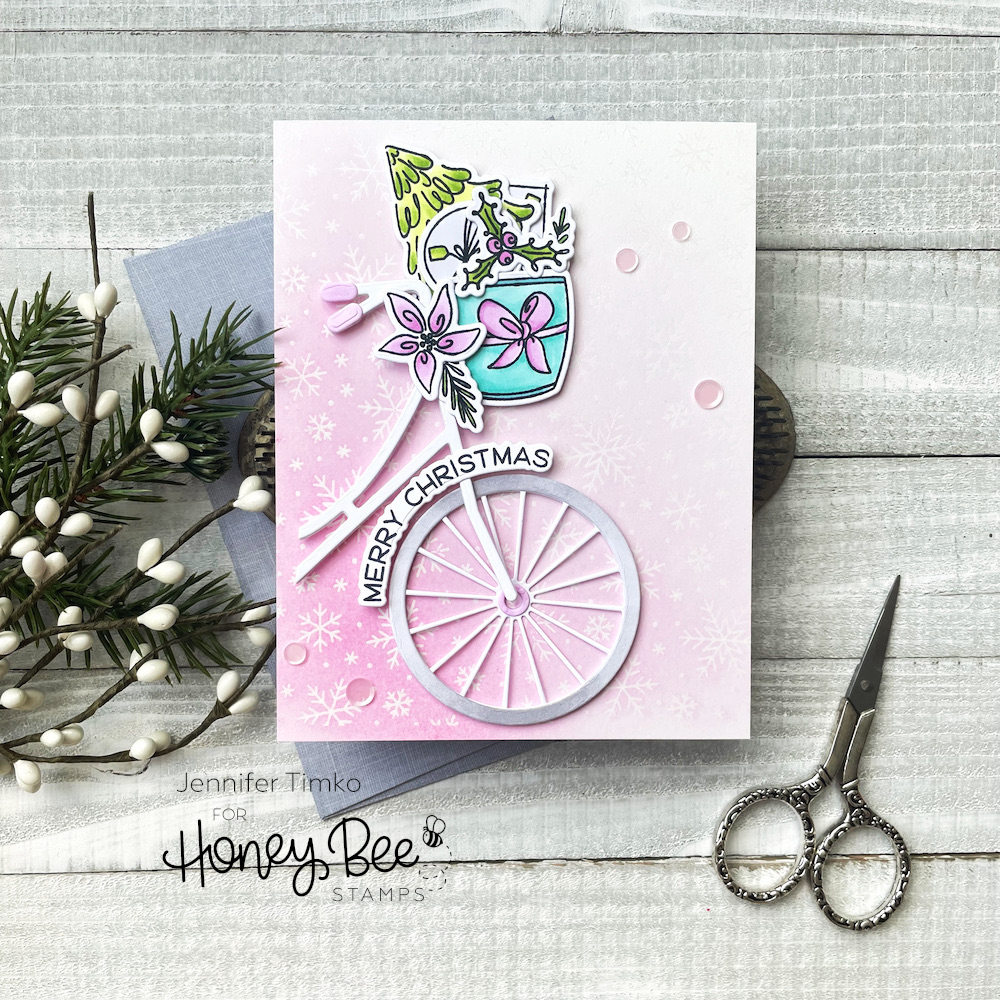
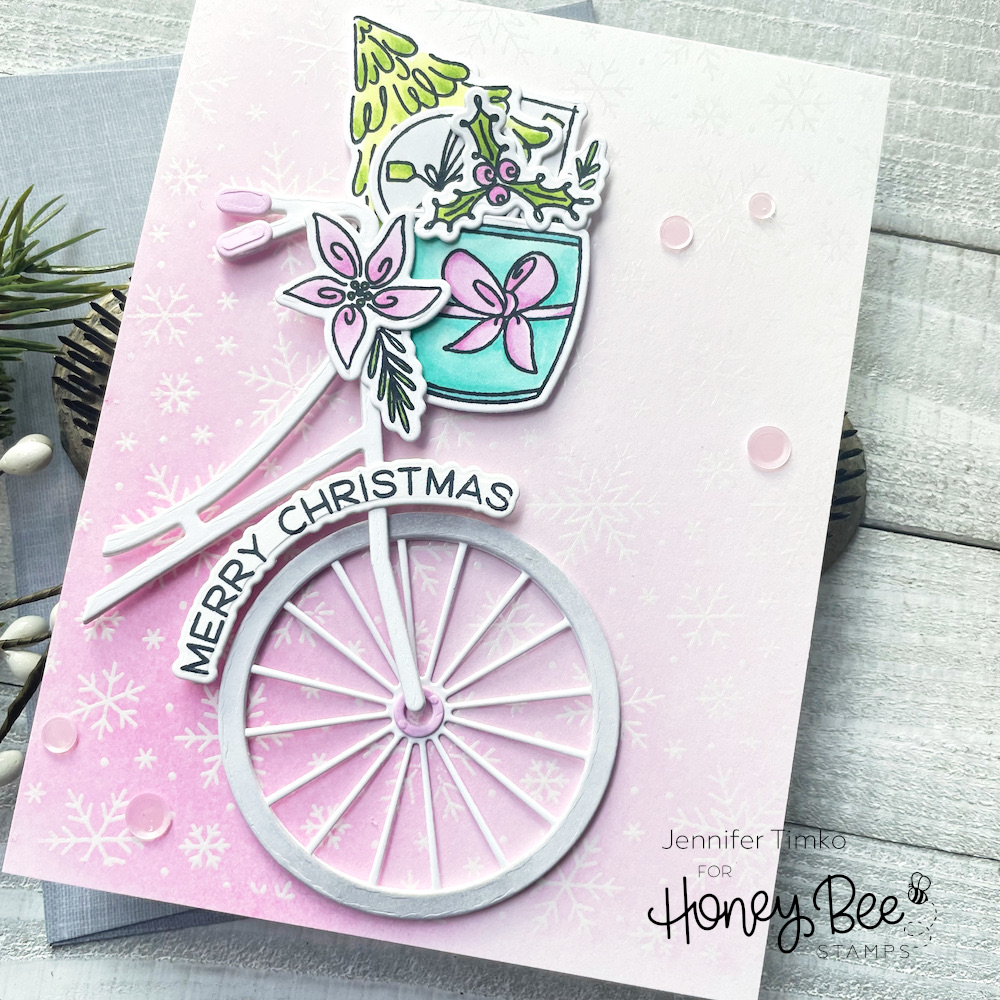
I am so happy to share today’s card with you. I have been wanting to try an edge-to-edge shaker card and this technique does not disappoint. And it is time for the Coffee Lovers Fall/Winter Hop! I knew just what to pull out!

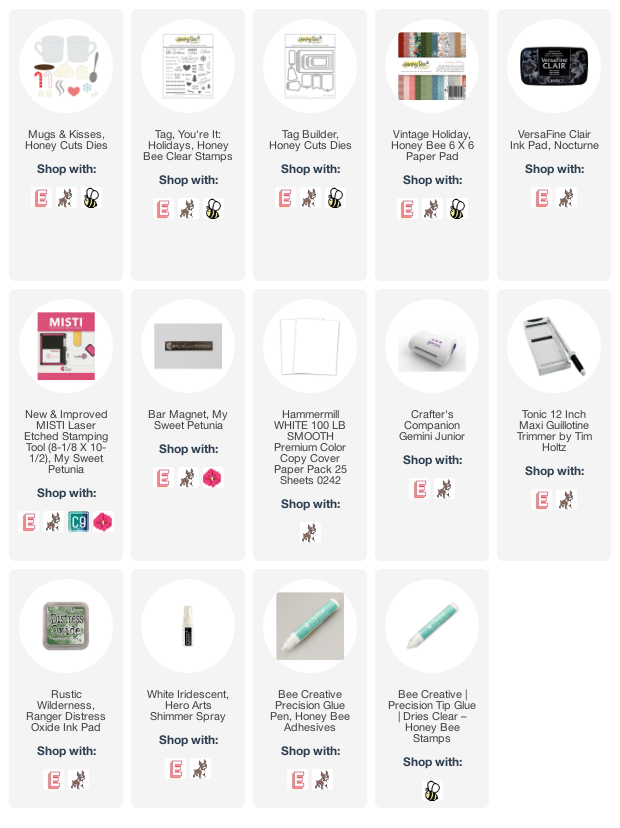
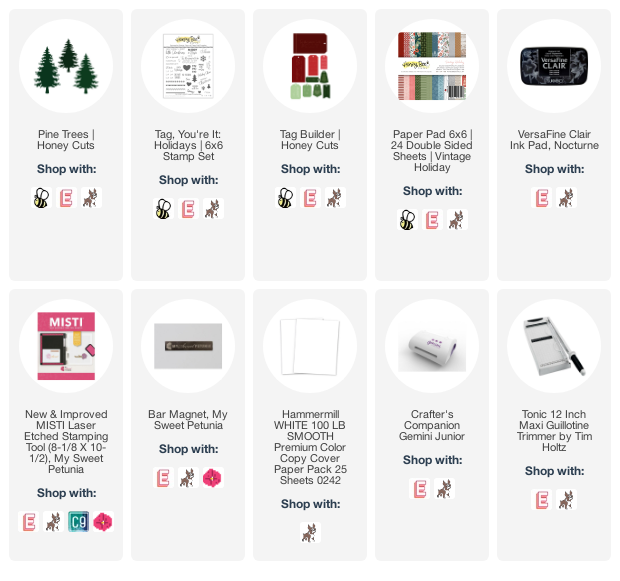
Mug & Kisses is a new die set from the latest release by Honey Bee Stamps. So cute with adorable elements! I opted to make a cup of hot chocolate complete with the candy cane and marshmallows on the side. YUM! I inked the cup with Rustic Wilderness Distress Oxide Ink and added a little Copic shading on the marshmallows. The whipped cream, marshmallows and the snowflake were all spritzed with Hero Arts Shimmer Spray for more sparkle.

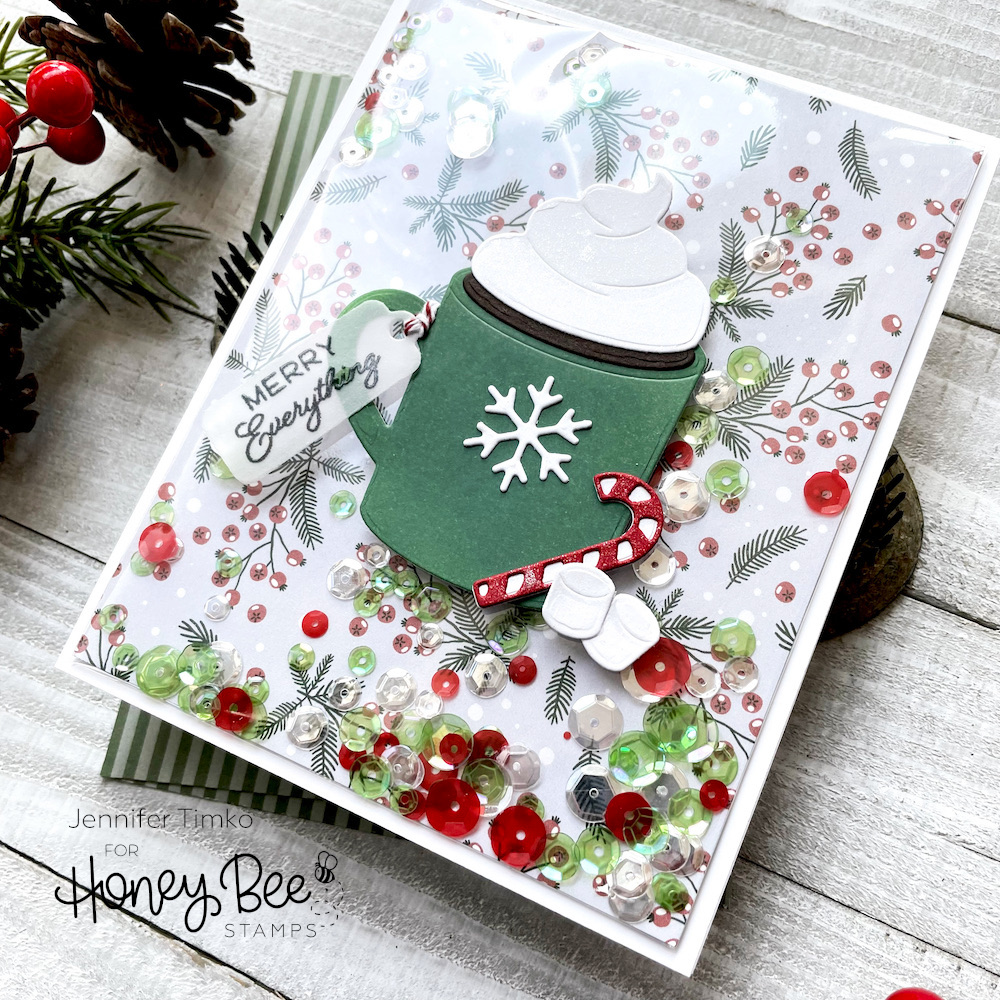
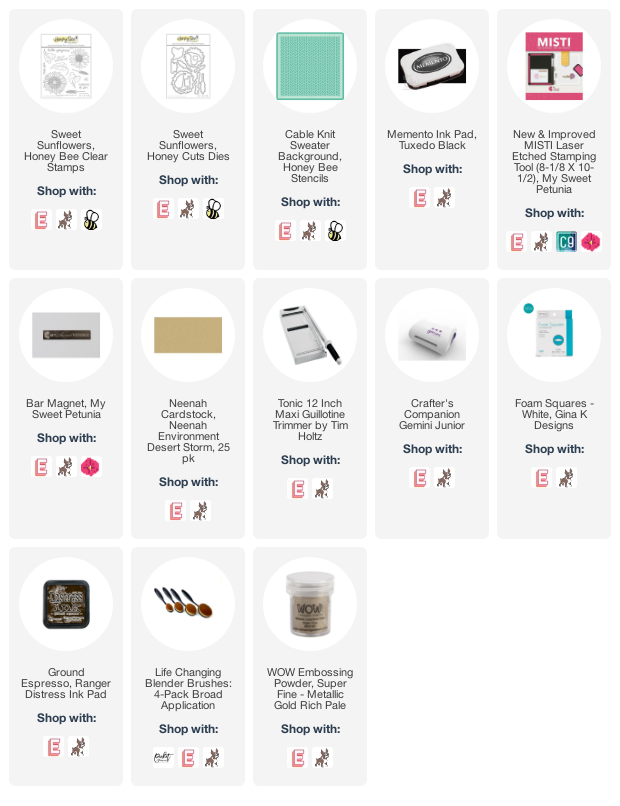
For the shaker portion, I cut down the packaging from a stamp set (which I’m now hoarding for just this reason) to about a half inch bigger than my patterned paper layer all around. Using double sided tape, I attached three sides of cellophane down at the back, leaving the top open to put in the sequins. I chose a random assortment from my stash to match the colors in the paper (which is from the Vintage Holiday Paper Pack). Then you just seal the fourth side with the double sided tape. No foam tape, no drama, just simple! I was so hoping this was true and it is!! I glued on an extra panel behind the shaker layer for stability since the patterned paper is thinner and then attached the whole thing to the base. My mug and other elements were attached using the Honey Bee Stamps Precision Glue. I stamped the sentiment from another new release set, Tag You’re It: Holidays, onto vellum and cut with the Tag Builder Honey Cut Dies.

So glad you stopped in today. I hope you have a wonderful weekend!

Vintage Pine Trees for Honey Bee Stamps

Vintage Pine Trees for Honey Bee Stamps published on No Comments on Vintage Pine Trees for Honey Bee Stamps

A quick post to share a card for social media today (just in case you are not there with me). I am focusing on die cuts and pretty papers, because that makes for quick work on holiday cards!

I used the Pine Trees Honey Cut dies along with the Vintage Holiday Paper Pack from Honey Bee Stamps to make quick work of this. I chose a few patterns that I thought would be pretty together and used the wooden background print as a base. Seriously, I didn’t do anything other than sponge the edges a bit. I added a sentiment from the Tag, You’re It: Holiday set and a twine bow.

I love that I can make a few more of these just using different prints and patterns too. Definitely trying to get serious about finishing my cards this year so I can mail them out a bit earlier than usual.

Thanks so much for stopping in today! You can find me on social media with my buttons on the side bar. Products listed below with my affiliate links (no extra cost to you and I make a little extra to keep all this going).

CASE Me a Christmas Card with Michelle Lupton

CASE Me a Christmas Card with Michelle Lupton published on No Comments on CASE Me a Christmas Card with Michelle Lupton

I am so excited to be sharing a card today as part of Michelle Lupton‘s CASE Me a Christmas Card series. For those not familiar with the term, CASE = Copy and Selectively Edit (or Copy and Share Everything). For this, I have taken a card I chose from Michelle’s amazing array of cards and used it to inspire a new Christmas card. HERE is her card (also shared below with Michelle’s permission).

I completely fell in love with the Faux Tiles and wanted to try something similar. Since she used a pretty cover plate die, I also chose a new favorite of mine, the Fancy Flakes Cover Plate Die by Honey Bee Stamps. I thought that the shine on her card so just so cool so I got to work finding a way to give a similar effect. On my background panel, I brushed on Distress Oxide Inks in Peacock Feathers and Broken China. I used Versamark Ink on top of it all and added clear embossing powder. Just like Michelle, I did that a total of three times to get it evenly embossed and totally shine.

Where Michelle added shimmer to her colored panel, I thought the white needed a bit more, so I sprayed on Hero Arts Shimmer Spray. I am totally addicted to this right now and it is pretty much finding itself on everything! My sentiment is from the Bitty Buzzwords: Holidays set and dies. I inked some more paper with the same colors, cut with the dies. I also stamped with Peacock Feathers for the “Merriest” panel. More shimmer spray on everything, of course! This has so much shine in person with the shimmer spray and the embossed panel! I felt like a few pearls were the perfect finish after positioning my sentiment to mimic Michelle’s.

Here is Michelle’s beautiful Faux Tile Card:

Michelle also CASE’d one of my cards and I cannot wait to see the result! You can see her card HERE. Thanks for coming over to visit today! See you again soon.

Honey Bee Stamps IG Hop + FMS

Honey Bee Stamps IG Hop + FMS published on 6 Comments on Honey Bee Stamps IG Hop + FMS

I’m super excited to share a combination card today. It is Honey Bee Stamps Instagram Hop day (with chances to win!!) and I used the Freshly Made Sketches challenge for my sketch inspiration. Perfect timing for this fabulous sketch designed by the fabulous Jacquie Southas.

When I saw the sketch, I knew just the focal point I wanted to use. Sleigh Bells Ring is a new stamp and die set from Honey Bee Stamps and it is a treat to use. The sled die is so fun and full of details but yet easy to put together. I used some wood grain paper from my stash for the sled. Then I used some of the elements from the stamp set to decorate the sled.

Once I had the sled built, I thought this cool print from the Vintage Holiday paper pack was added wonderful texture and was great for the sketch. I inked a panel with Peeled Paint Distress Oxide Ink and put it all on a taupe base.

Come over to Instagram to hop with us for a chance to win and I hope to see you playing along with the sketch. Thanks for stopping in today!

Honey Bee Stamps Vintage Holiday Release – Sneak Peek Day 4

Honey Bee Stamps Vintage Holiday Release – Sneak Peek Day 4 published on 1 Comment on Honey Bee Stamps Vintage Holiday Release – Sneak Peek Day 4

Welcome to the Honey Bee Stamps Vintage Holiday Release Sneak Peeks! Today is the last day of our peeks at the new release and, as usual, you will be totally wow’d by all the amazing sets.

Today I am introducing new Falling Snow Background Stamp and the Riding By…Holiday Style Stamp Set and coordinating Honey Cut Dies. (These affiliate links will not be live until the release opens for sale TONIGHT, October 14th after the Release Party on IG and FB at 8p CT.)

The Riding By…Holiday Style is an add-on set to the Riding By Set and Bicycle Builder Honey Cut Dies. I love all the options! AND, these images could be used just for tags or without the bike too. Love that. But I used it in the intended way. I stamped a bunch of the images in Momento Tuxedo Black Ink and colored in non-traditional colors of pink, teal and lime green. After cutting them out with the coordinating dies, I started playing with how I’d build my bike. I left the frame white and colored the tire in pale gray. I added a few pink accents too. I did cut two more of the “tire” die (not the spokes part) and the bike frame to give a bit more depth.

I used the Honey Bee Stamps Precision Glue to attach all the parts together. Then, I decided I needed a bit of pop from the background. I stamped the new Falling Snow Background Stamp in Versamark Ink and heat embossed with clear embossing powder. I brushed on a bright pink ink and the emboss resist worked perfectly. I pulled some of the Bubblegum Confetti Mix out as the final accents.

So glad you stopped in today. Remember the release goes live tonight! I hope you will consider shopping with me via the affiliate links highlighted at the top of the post. Have a wonderful day!

Honey Bee Stamps Vintage Holiday Release – Sneak Peek Day 2

Honey Bee Stamps Vintage Holiday Release – Sneak Peek Day 2 published on 1 Comment on Honey Bee Stamps Vintage Holiday Release – Sneak Peek Day 2

Welcome to the Honey Bee Stamps Vintage Holiday Release Sneak Peeks! Today is day twoof our peeks at the new release and, as usual, you will be totally wow’d by all the amazing sets.

Today I am introducing the new Merry Mail stamps and coordinating dies and the Inside: Holiday Sentiments stamps and dies. (These affiliate links will not be live until the release opens for sale on October 14th after the Release Party on IG and FB at 8p CT.)

This was a fun card to make and I love this Merry Mail set for all the options in it. The mailbox is made so it can be open or closed and you have so many extras too. I stamped the images in Momento Tuxedo Black and then colored with Copic Markers. While there are dies for this set, I went for a more realistic look so I fussy cut the images.

I then inked up a dark blue background and stamped on the snowflakes from the set in white ink. Using the Horizon Slimline Borders, I cut a snow bank and then spritzed it with shimmer spray. I positioned the branches on the blue layer where I wanted to put the mailbox and stamped with green ink. Then, using the new Inside: Holiday Sentiments, I stamped the Merry Christmas. I put it all together with Honey Bee Precision glue and popped up the post card and the present on the ground with foam tape.

So glad you stopped in today. Back tomorrow for day two of the peeks! Have a great start to your week.

Honey Bee Stamps Vintage Holiday Release – Sneak Peek Day 1

Honey Bee Stamps Vintage Holiday Release – Sneak Peek Day 1 published on 1 Comment on Honey Bee Stamps Vintage Holiday Release – Sneak Peek Day 1

Welcome to the Honey Bee Stamps Vintage Holiday Release Sneak Peeks! Today is day one of our peeks at the new release and, as usual, you will be totally wow’d by all the amazing sets.

I have twice the inspiration for you today because I just could not help myself. Let’s face it, holiday card making is my absolute favorite!! I am so excited to show you new cover plate dies and a stand alone die set you are sure to love. I am introducing the Fancy Flakes A2 Cover Plate Die, the Pierced Fancy Flakes A2 Cover Plate Die and the Pine Tree Honey Cut Dies. (These affiliate links will not be live until the release opens for sale on October 14th after the Release Party on IG and FB at 8p CT.)

To start, I just had to make a card with the combination of the Fancy Flakes and Pierced Fancy Flakes dies. These are stand alone dies that can also be used together. Fabulous!! I inked a panel with Salvaged Patina Distress Oxide Ink and first cut with the Fancy Flakes die. Then I lined up the Pierced die and ran it though again. Yeah, it is that easy. For a little more interest, I splattered on some Shimmer Mist and Gold ink and then, while I was at it, did the same to a white card base.

I glued the snowflake layer onto the base using the Precision Tip Glue by Honey Bee Stamps. This glue is just awesome. It gives just a bit of time to position the layer and then it holds tight. I used one of the products from the last release to finish the card. The Bitty Buzzwords – Seasons Honey Cut Dies had just the right sentiment. I used more gold paper and then some gold embossing too. Finally, a few gold sequins.

For my next card, I kept to the gold accent theme. The new Pine Trees Honey Cut Dies are going to be seen A LOT around here over the next couple of months. I love the quick simplicity of them! I cut them from white Hammermill card stock and inked them with Rustic Wilderness Distress Oxide Ink. After letting them dry for a bit, I added some anti-stick powder and then inked the edges with Versamark Ink. You can see I did one card with the tops and one with the bottom of the dies. I wasn’t sure which I would like and the answer was both! I added gold embossing powder and heated. Such an easy way to get a lot of extra detail.

For the details behind the trees, I used the Cable Knit Sweater Stencil in a new to me way. I pounced on some Tombow Mono Glue through the stencil. Because it remains sticky, I could then add on Nuvo Guilding Flakes for this cool, not too precise version of shine. The sentiment comes from a set that you will get to see later this week.

So glad you stopped in today. Back tomorrow for day two of the peeks! Have a great start to your week.

Sweet Sunflower for Honey Bee Stamps

Sweet Sunflower for Honey Bee Stamps published on 2 Comments on Sweet Sunflower for Honey Bee Stamps

I’m over on Instagram with this card for Honey Bee Stamps but wanted to share it with you here too. I was in the mood to create a pretty fall card and thought I would pull out the new Cable Knit Stencil and Sweet Sunflowers from Honey Bee Stamps. They are so pretty together!

I played with neutrals on this card and kind of like the end result. First, I inked the stencil in Ground Espresso Distress Ink onto Desert Storm card stock. Then I stamped the flower in a neutral pale in onto the same card stock in my Misti. Just enough color to see the details. I added just a little bit of color with Copic Markers (YR21, YR24, G20, G21). Then I put it back into the Misti.

I re-stamped in Versamark ink and they added gold embossing powder. This prevents your marker tips getting damaged by the embossing and the Misti makes it simple to do. Finally, I added the sentiment with Versamark and more heat embossing. As always, the gold is hard to photograph but it really is pretty in person.

Thanks for stopping in today. Hope you have a wonderful weekend!

SSS Stamptember with Honey Bee Stamps

SSS Stamptember with Honey Bee Stamps published on 2 Comments on SSS Stamptember with Honey Bee Stamps

Happy Stamptember with Simon Says Stamp and Honey Bee Stamps! If you are not familiar with this, Simon Says Stamp has a month long celebration with collaborations and other amazing fun. Today is the collaboration with Honey Bee Stamps!

Honey Bee Stamps has designed the Be a Sunflower Stamp Set with coordinating dies for this exclusive release. And when I say exclusive, I’m not kidding. This will fly out the door and once it is gone, it is gone. Shop early and shop fast!

For my affiliate link to shop at no cost to you: BE A SUNFLOWER STAMP AND HONEY CUT DIES

This set is simply the sweetest and I love the row of sunflowers! And the sentiments really are true keepers! As with all Honey Bee Stamps sets, the sentiment dies help you cut the sentiments close to the words. I stamped my image onto watercolor paper so that I could play with water and distress inks. I love this splattered effect and it is so simple to do.

Using a clear block, I smooshed distress ink onto the block and then spritzed with a little bit of water. Then I just applied to the image where I wanted each color. Not very precise but that is the look. I used Fossilized Amber, Rustic Wilderness and Tumbled Glass Distress Inks.

All of these products are available at Simon Says Stamp and I have included them in my links below (again, at no cost to you). Thanks so much for joining me for this fun event! Hope you enjoy this wonderful reveal!

The blue of the sky that day

The blue of the sky that day published on 11 Comments on The blue of the sky that day

There is a now famous art piece at the the 9/11 Memorial titled “Trying to Remember the Color of the Sky on That September Morning” by Spencer Finch. I have seen it in person and it is moving beyond words. It has 2,983 separate pieces to honor victims. Each is a different color of blue and it represents the idea that each of us has a different memory of that day. And in truth, each of us has a different perception of the color blue.

I have written about 9/11 in varying ways over the years. Each year I think that I have said all I can. But I also don’t feel I can let the day pass without acknowledging it in some way. I have shared stories over the years if you are interested: 9th Anniversary, 10th Anniversary, 11th Anniversary, 12th Anniversary, 13th Anniversary, 14th Anniversary, 15th Anniversary, 18th Anniversary and 19th Anniversary. But this year…this year is bigger. As I look through my previous posts, I find optimism, reflection and last year some sadness over the division that has swept over us. The last year has been one of ups and downs in my United Airlines life (if you will pardon the pun). This time last year, I was heading off to school in a downward movement back to the right seat of the Airbus from a wide body fleet. But in January, I started the process of moving to the Captain seat on the same plane and have been flying as a Captain on the Airbus 319/320 since April. Flying is coming back. There is a long way to go.

This card is very much like the one I shared on Instagram yesterday. But the blue on this is not unlike the art piece. Shades of blue. Different depending on where you look. I used the Wildflowers Stamp Set from Honey Bee Stamps and the new Thinking of You Big Time sentiment set. I added some silver splatters with Hero Arts Glimmer Metallic Ink in Pewter. It is simple but I love that the blue just washes across the panel.

I think maybe we need to consider more the idea of everyone remembering differently. Because then maybe we can give each other the grace to actually process things differently too. We are too quick to judge, too quick to dismiss and, sadly, too quick to assume the worst. I have no idea how to fix it but I do know that it starts with each one of us. Instead of looking at each blue like someone else remembers incorrectly, we look at each blue as a piece of a beautiful larger picture. Each of us brings nuance and something unique to the overall composition. At least for today, join me in enjoying all the colors of blue. We owe it to those lost to remember, each in our own way, but also together so that we have a chance of healing.

In memory of:

United 93:  Jason Dahl, LeRoy Homer Jr., Lorraine Bay, Sandra Bradshaw, Wanda Green, CeeCee Lyles, Deborah Welsh

United 175:  Victor Saracini, Michael Horrocks, Robert Fangman, Amy Jarret, Amy King, Kathryn Laborie, Alfred Marchand, Michael Tarrou, Alicia Titus, Marianne McFarlane, Jesus Sanchez

American 11:  John Ogonowski, Thomas McGuinness, Barbara Arestegui, Jeffrey Collman, Sara Low, Karen Martin, Kathleen Nicosia, Betty Ong, Jean D. Roger, Dianne Snyder, Madeline Sweeney

American 77:  Charles Burlingame III, David Charlebois, Michele Heidenberger, Jennifer Lewis, Kenneth Lewis, Renee May

Primary Sidebar