Skip to content

Freshly Made Sketches #573

Freshly Made Sketches #573 published on 4 Comments on Freshly Made Sketches #573

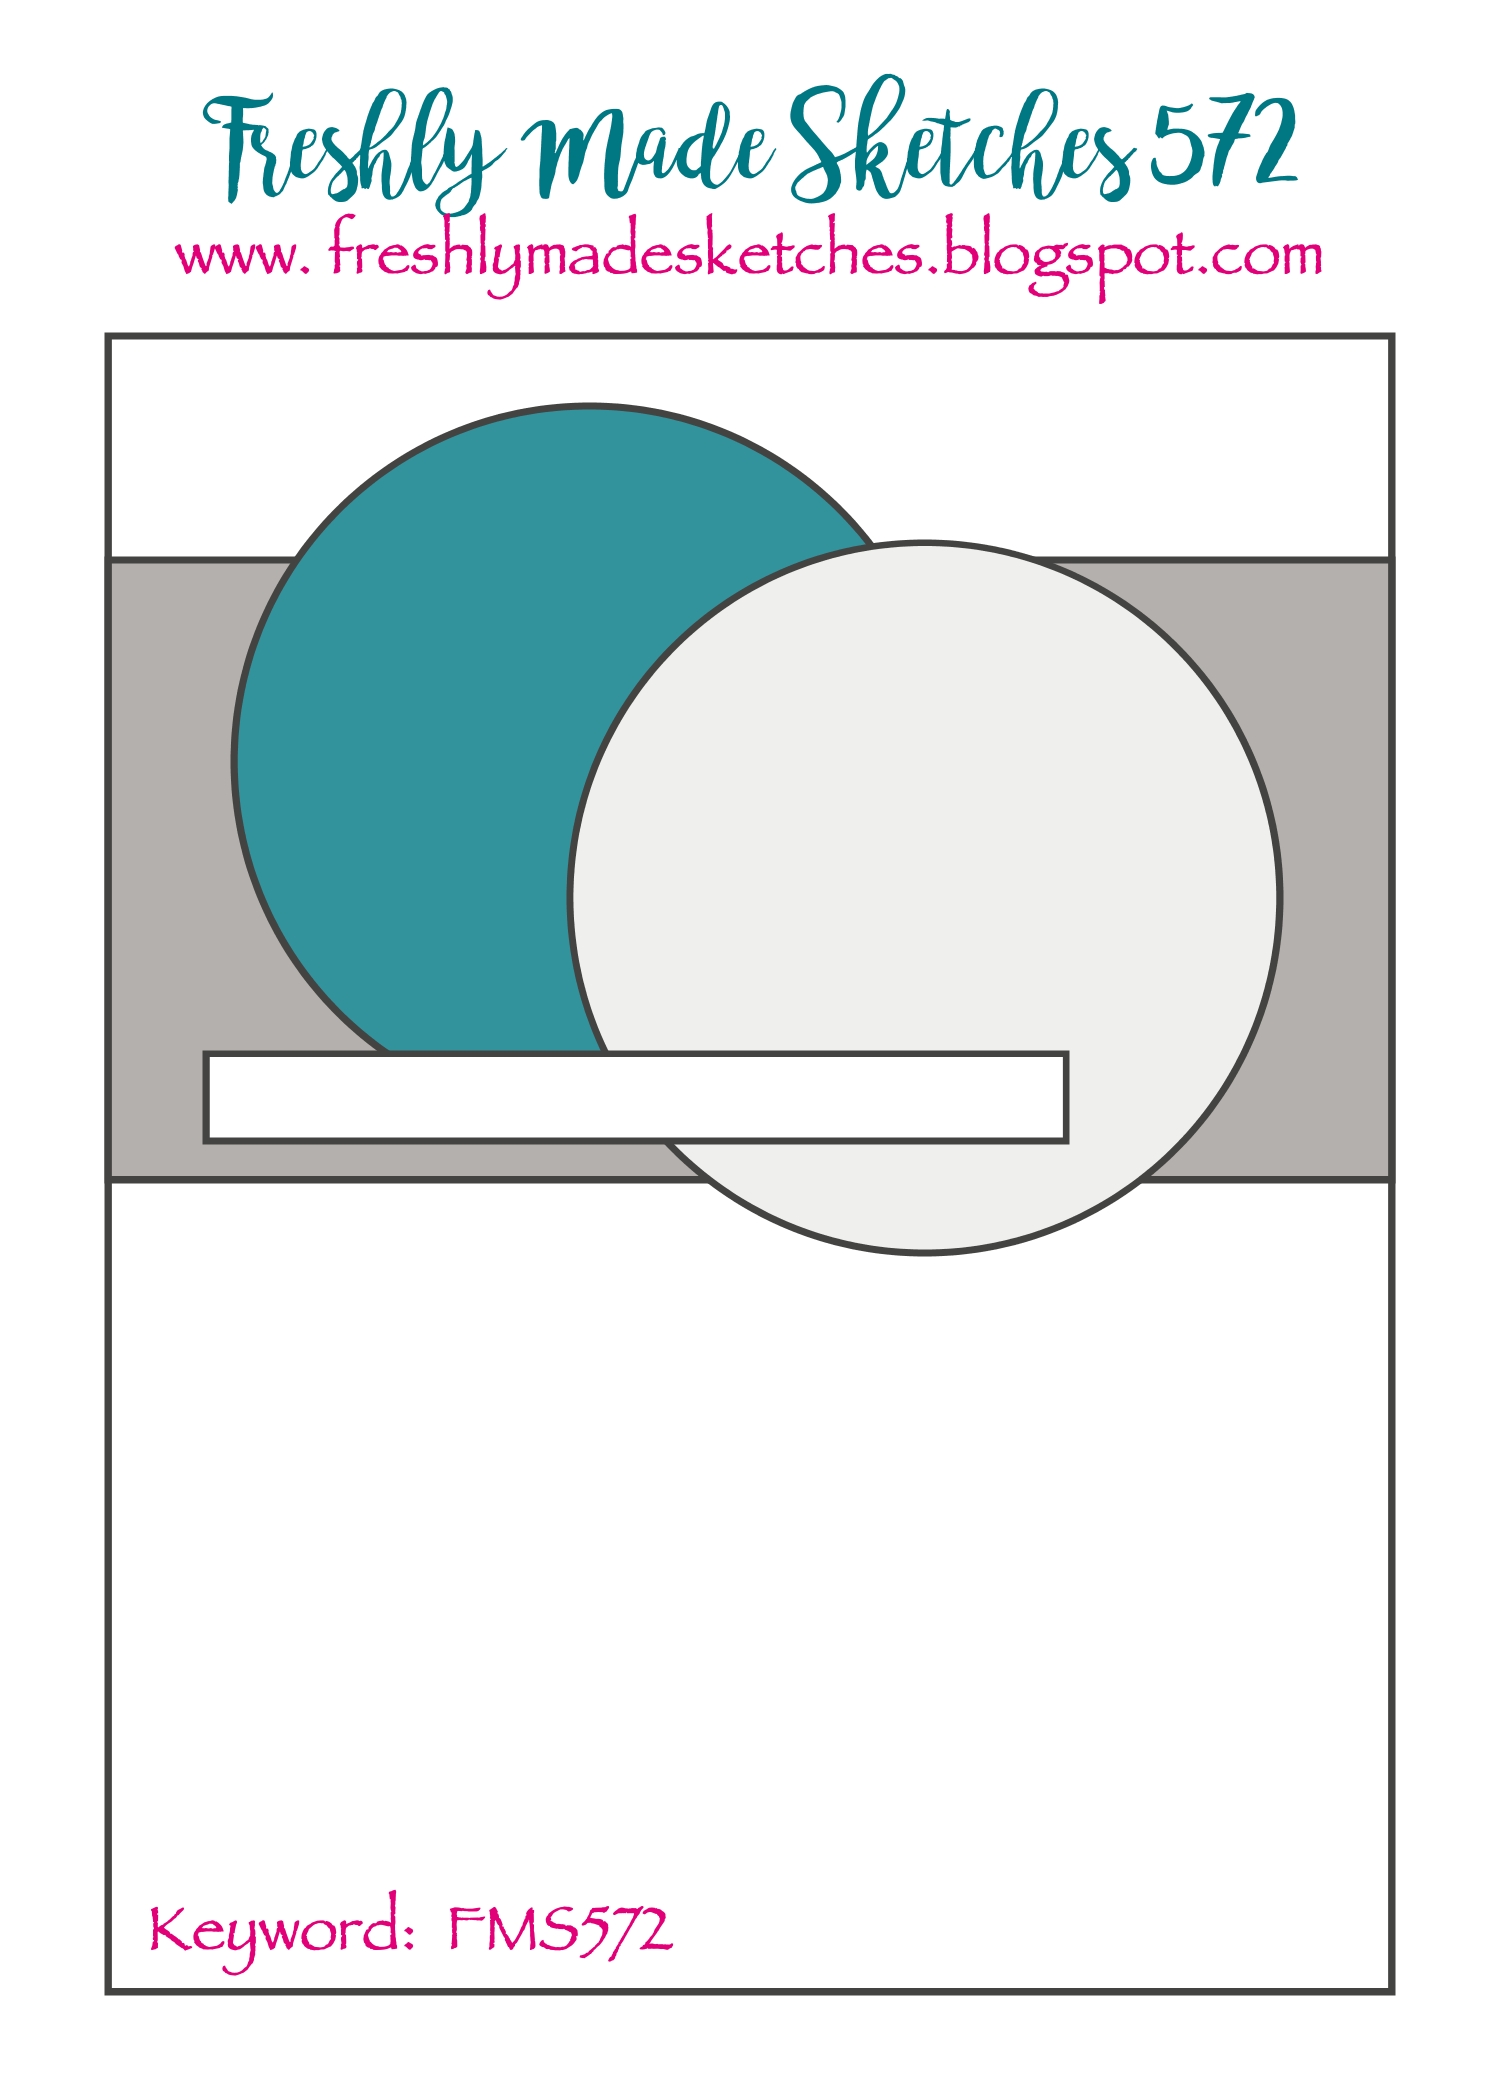
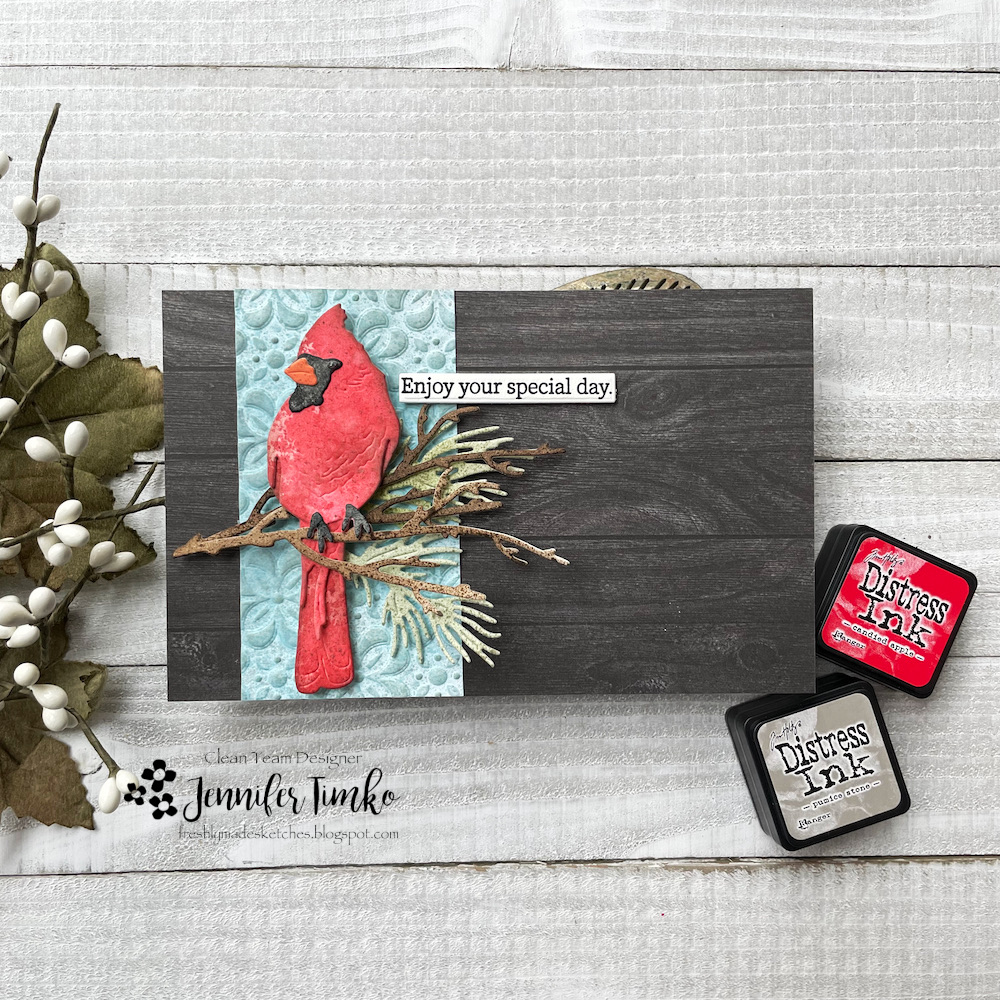
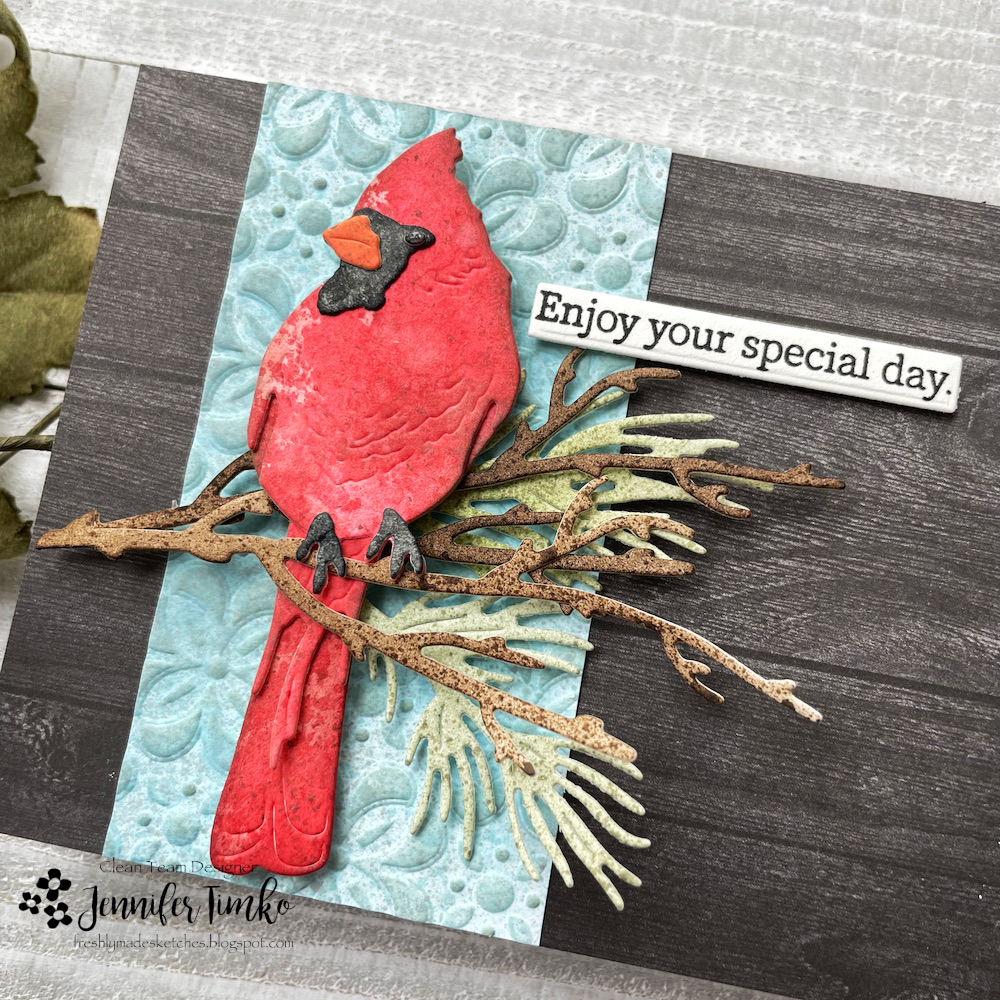
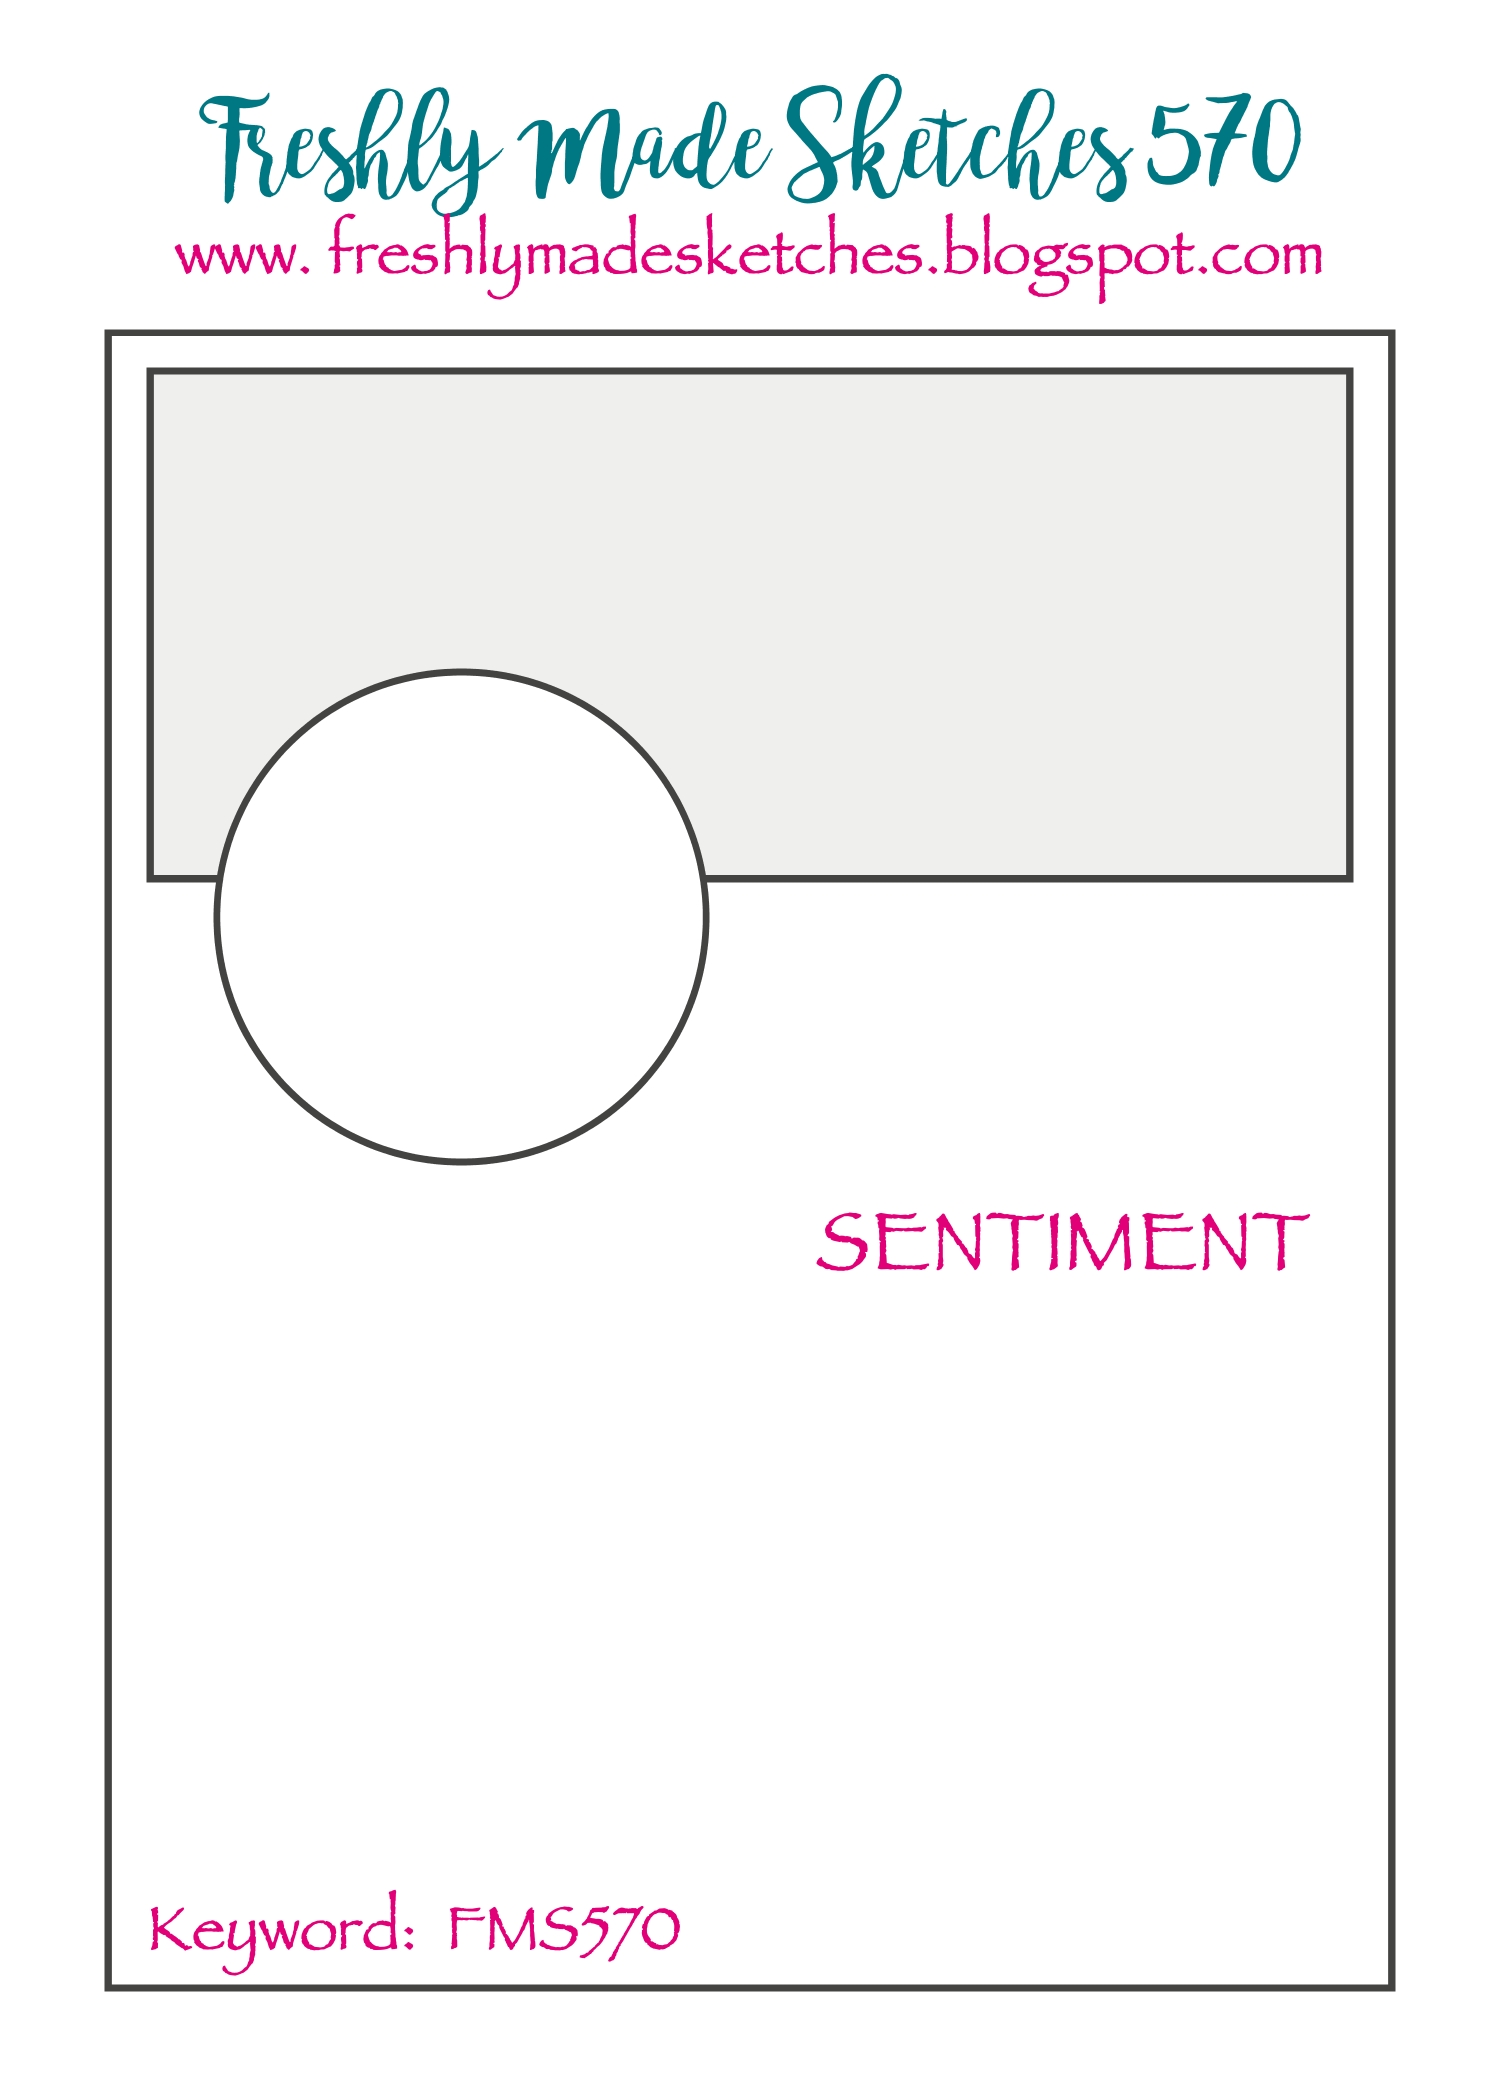
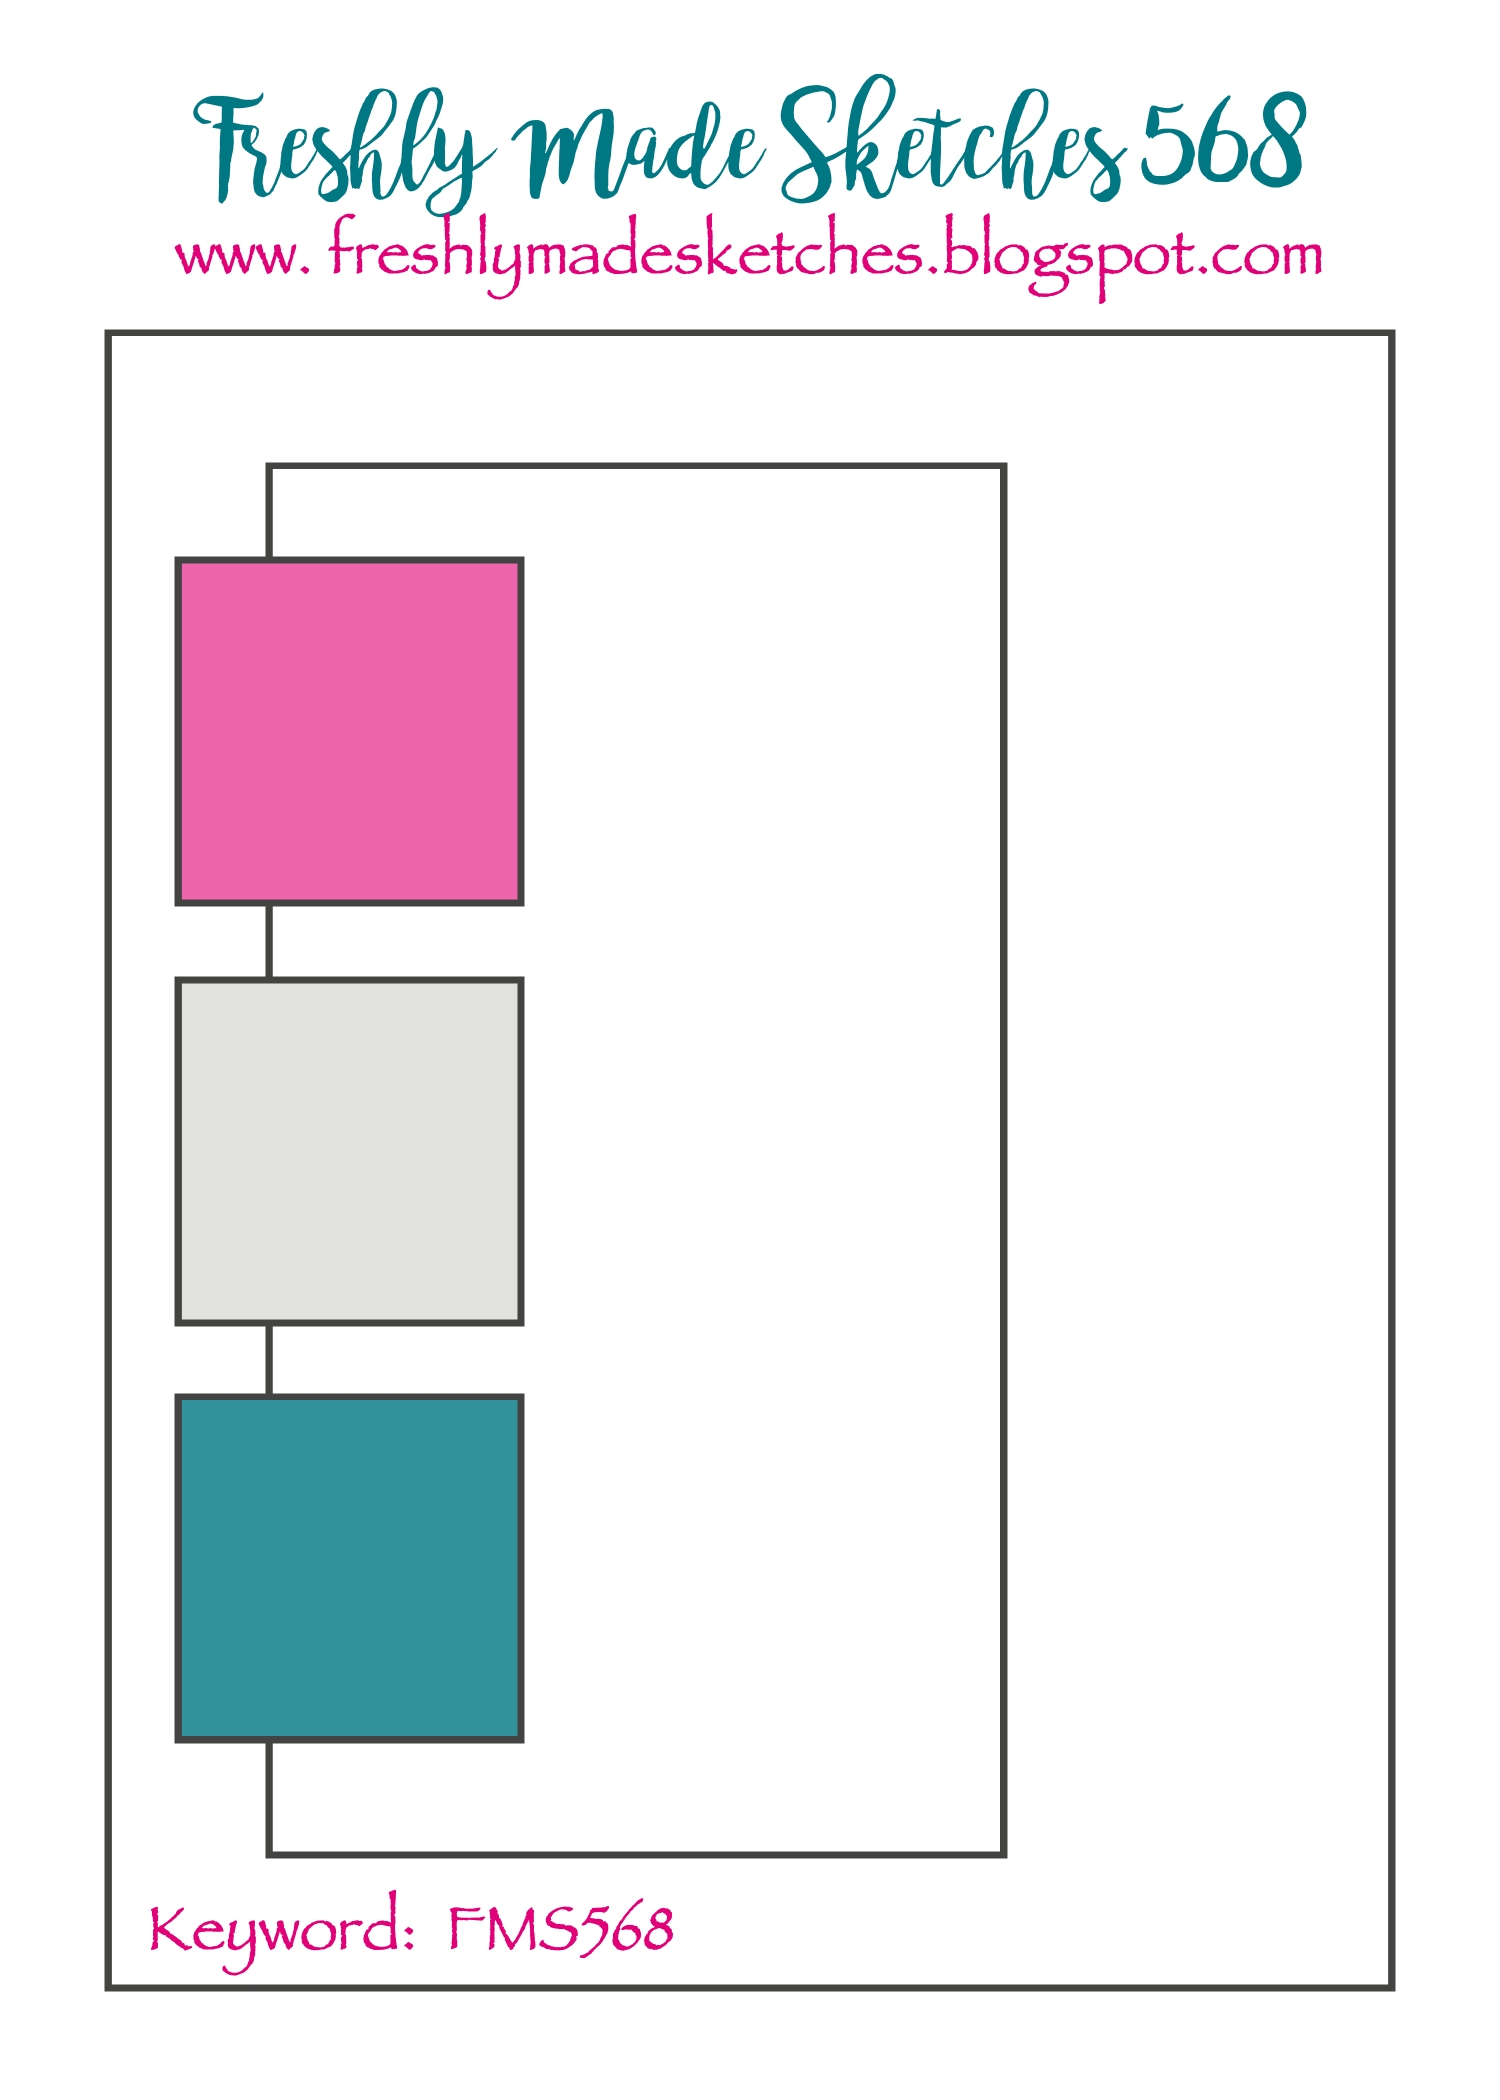
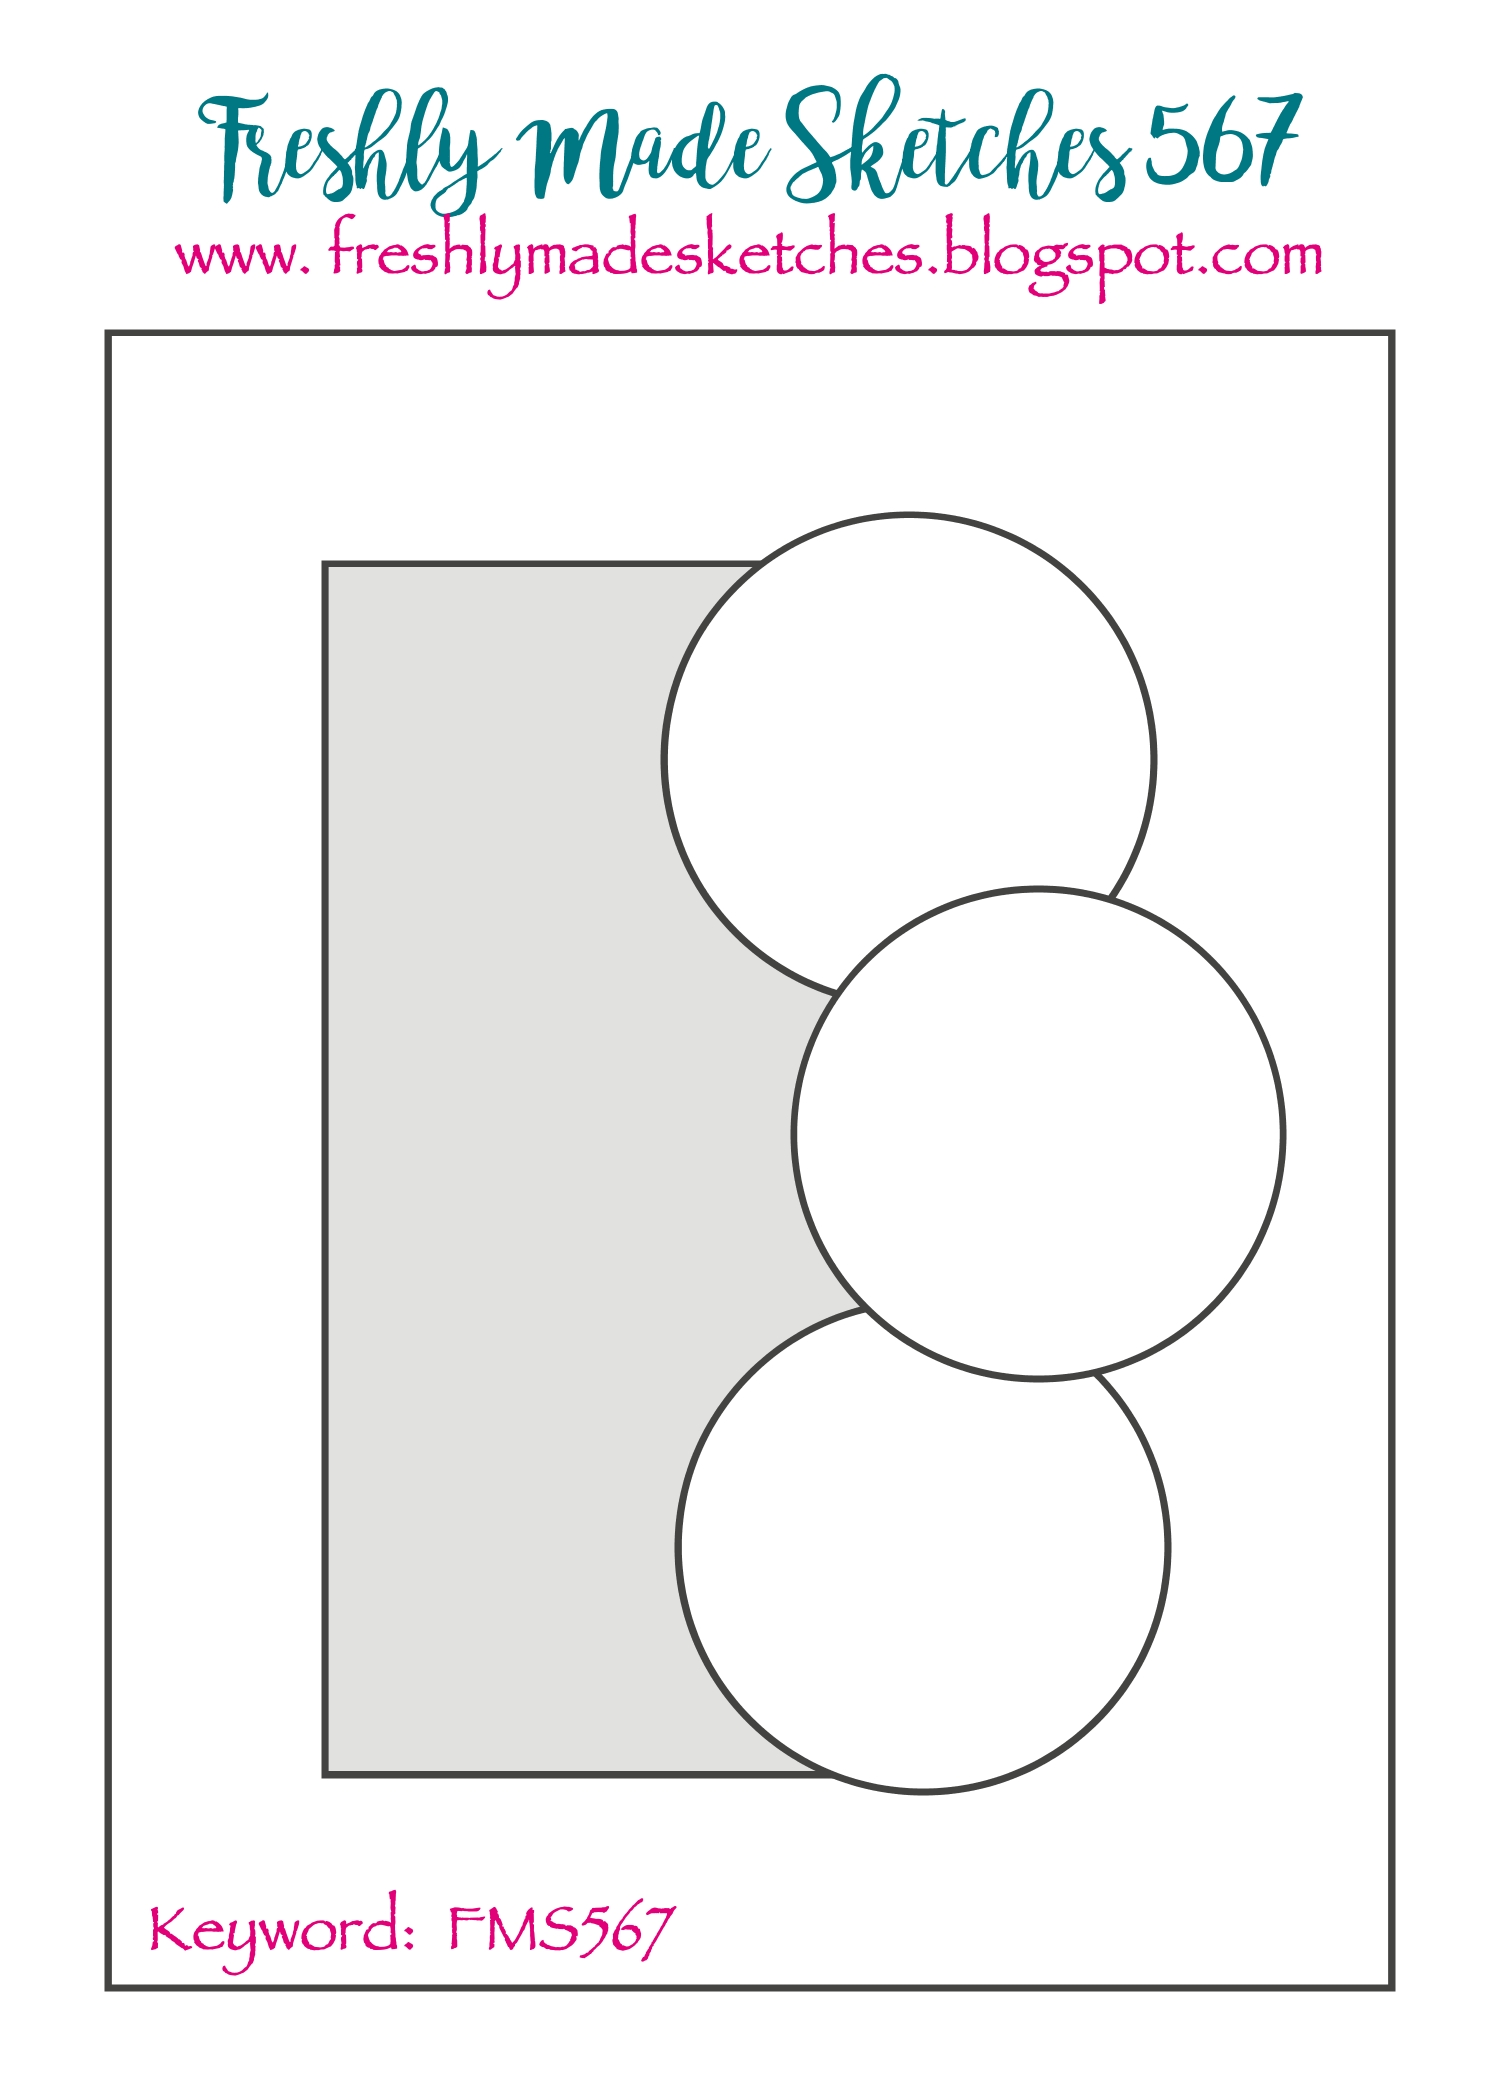
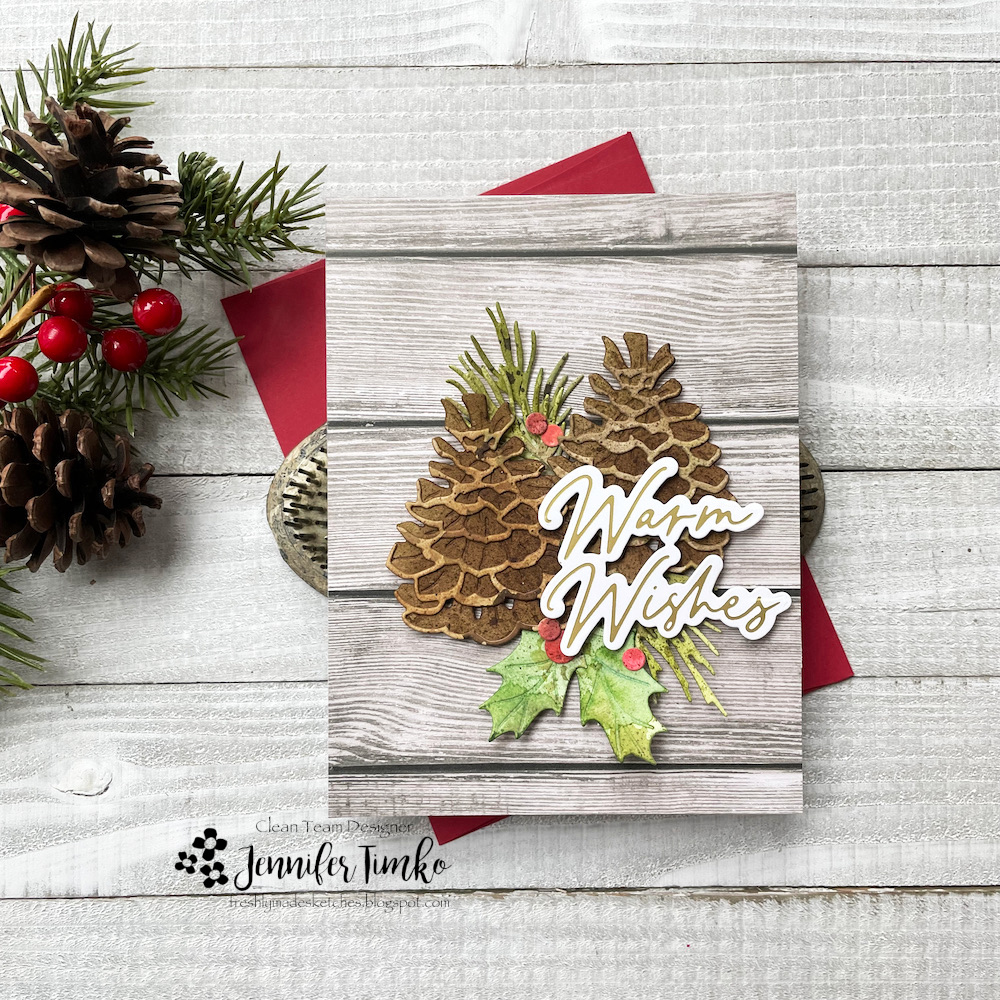
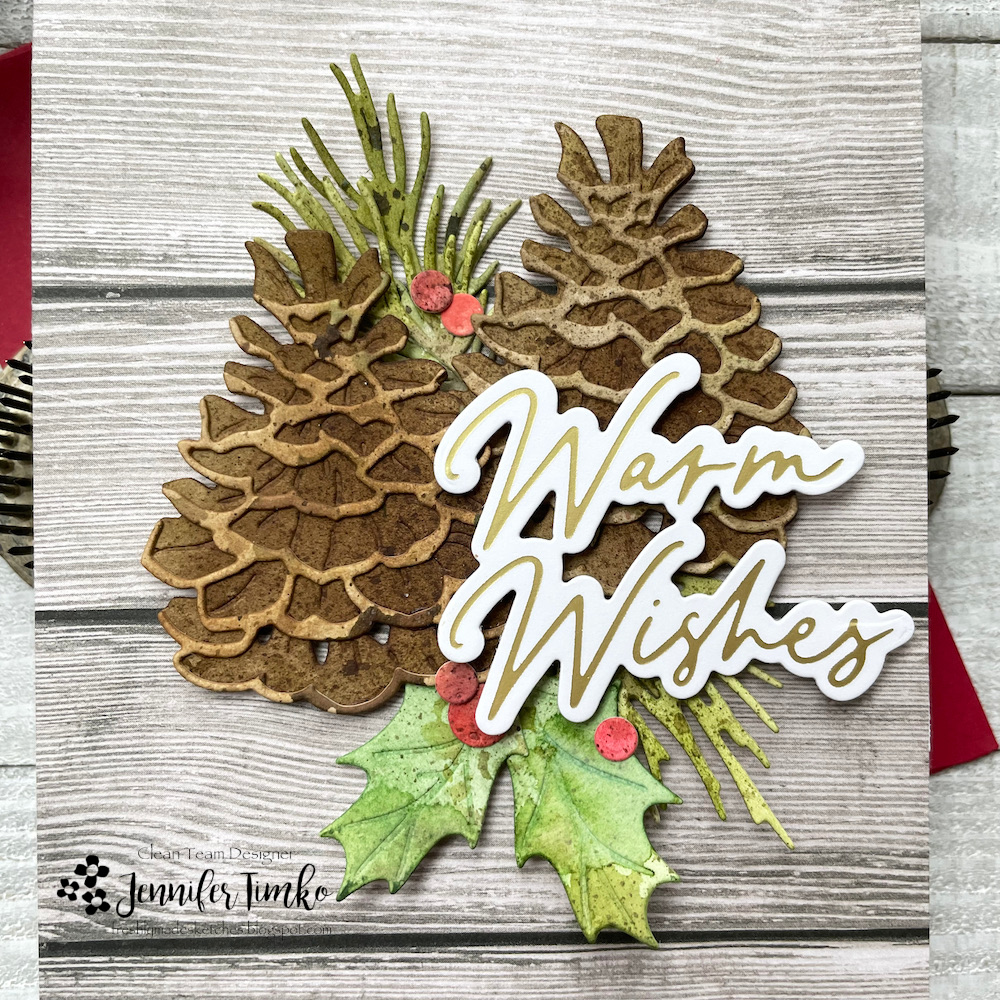
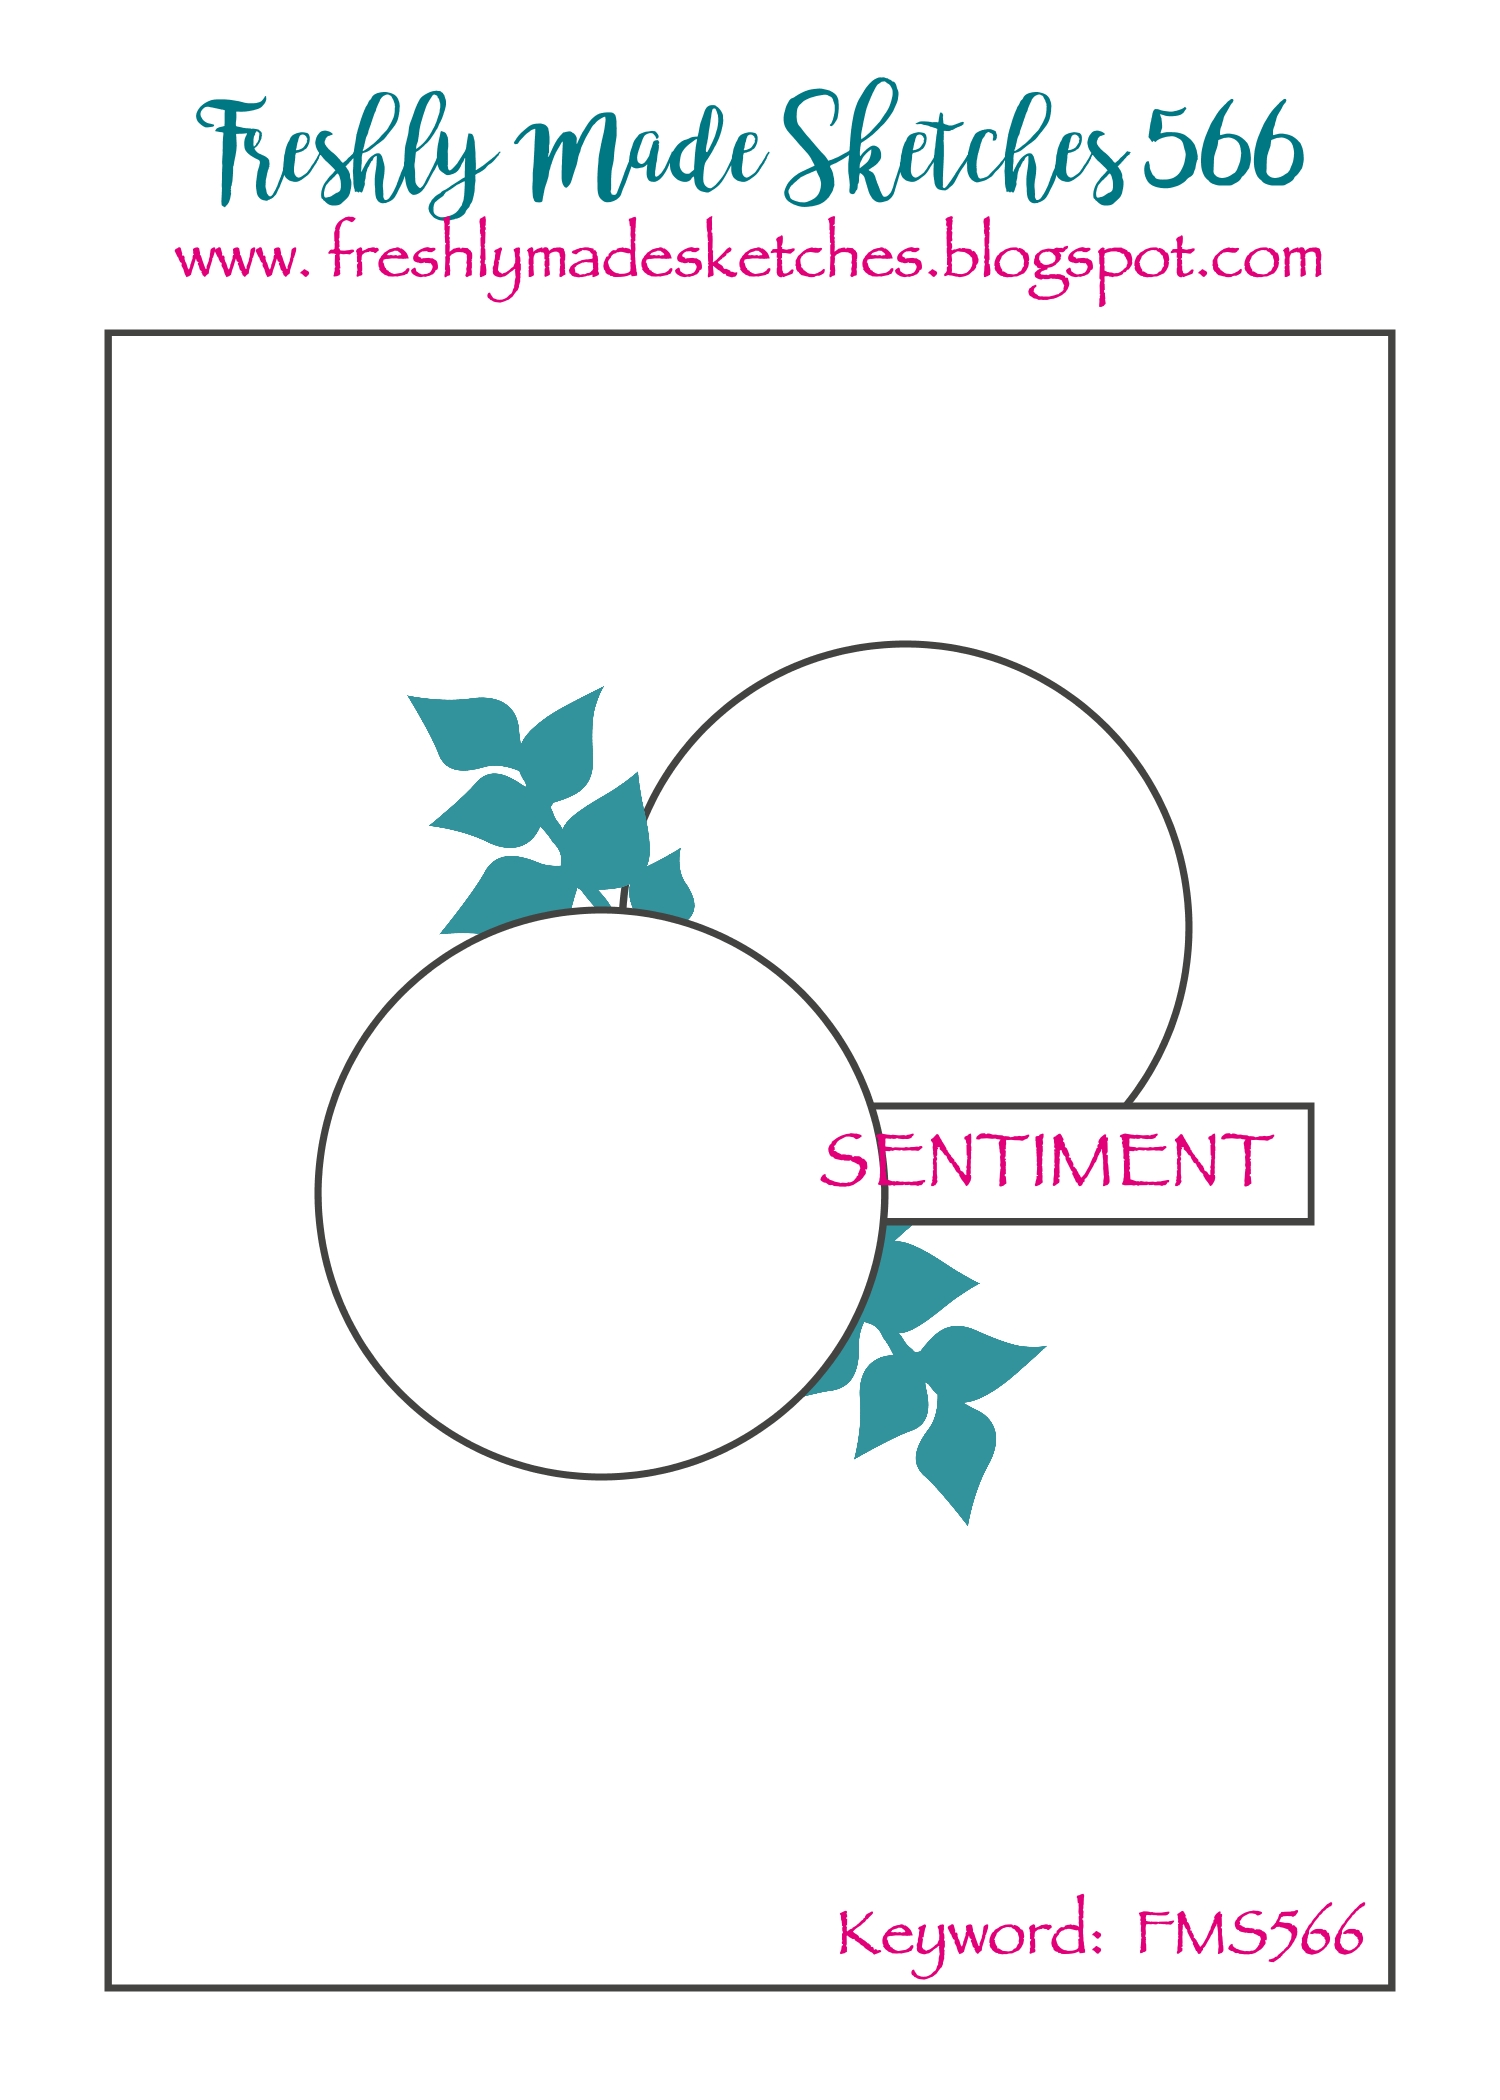
I was in a bit of a time crunch for creating this week’s Freshly Made Sketches card. In fact, I thought I would just have to miss out. But Kim Singdahlsen created a great one and I had an a-ha moment. I thought that her panel could be a wood print and a card was born.

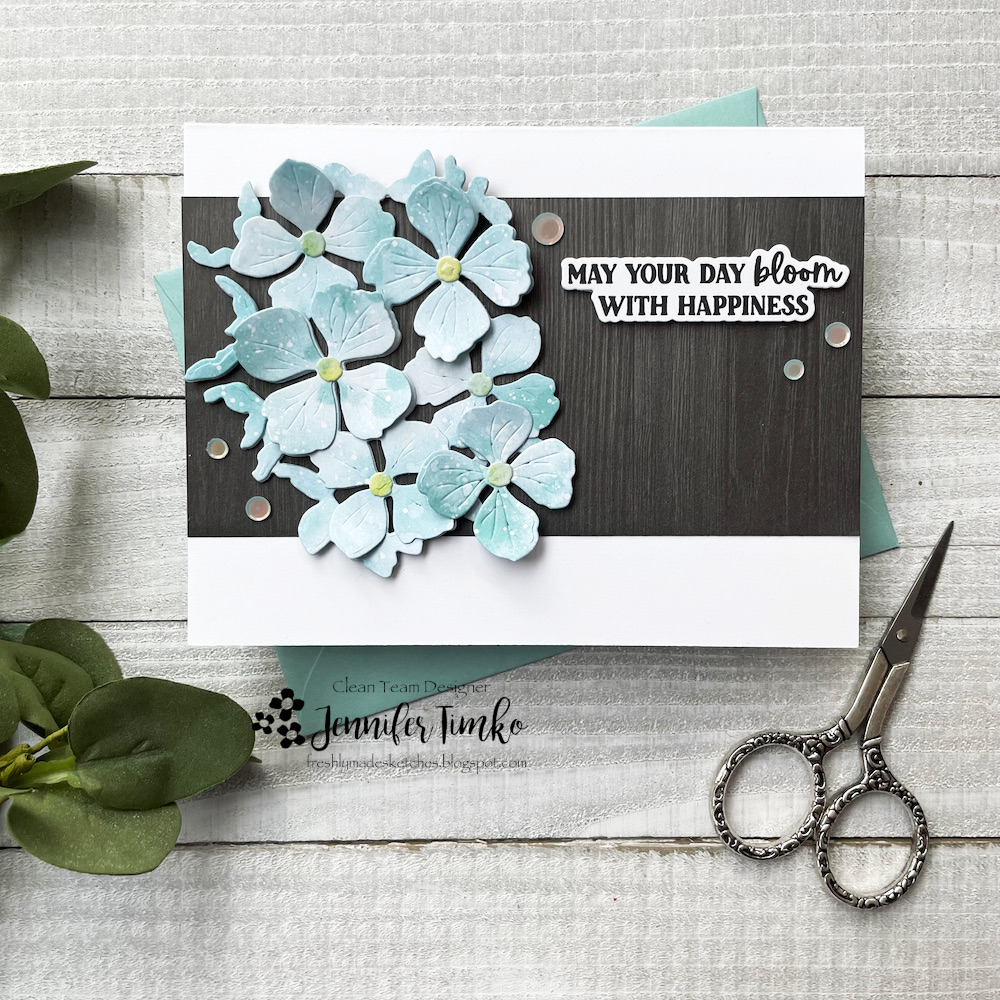
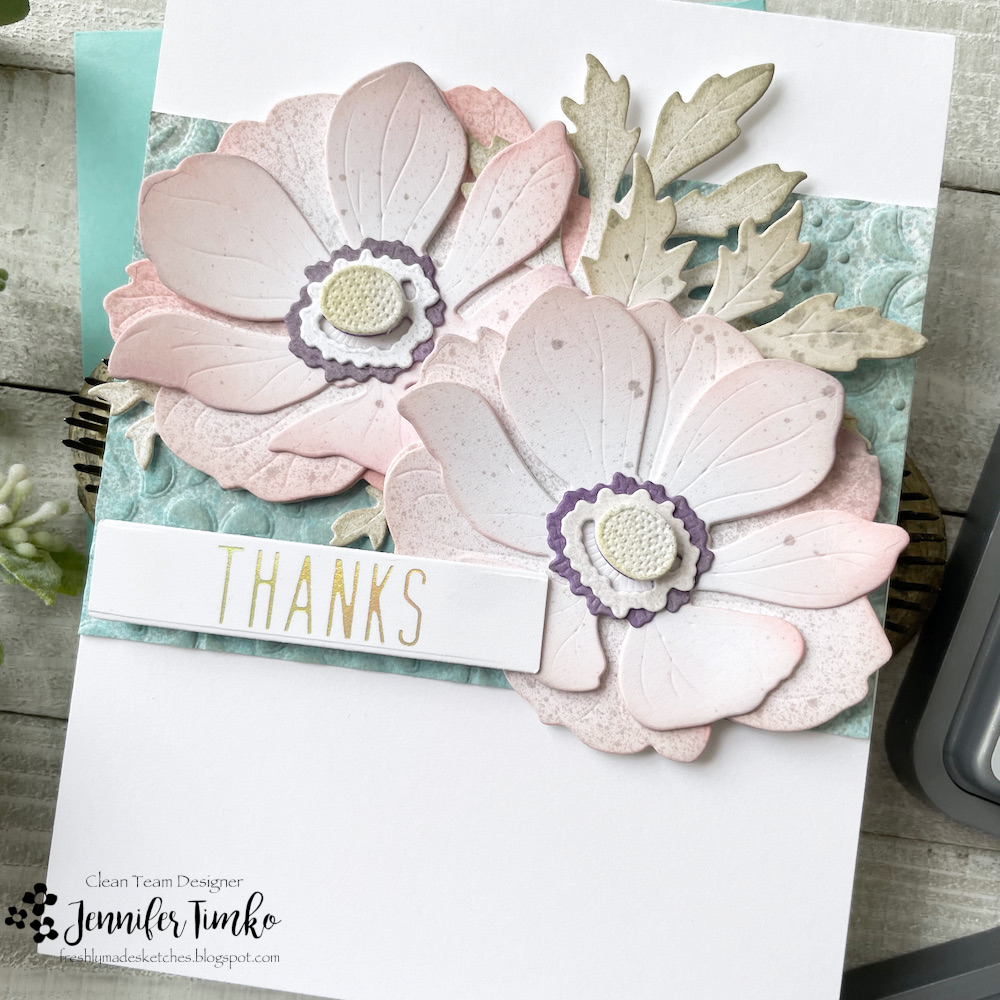
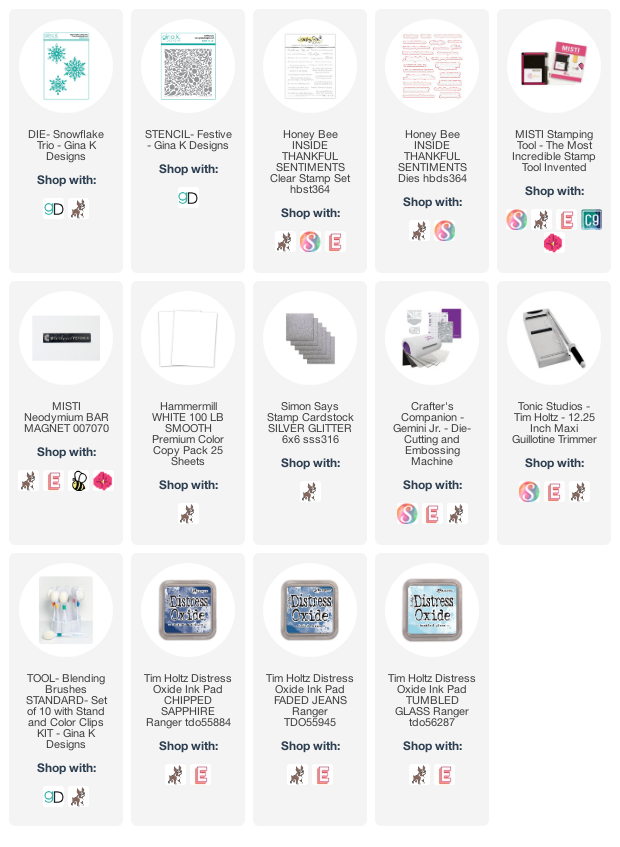
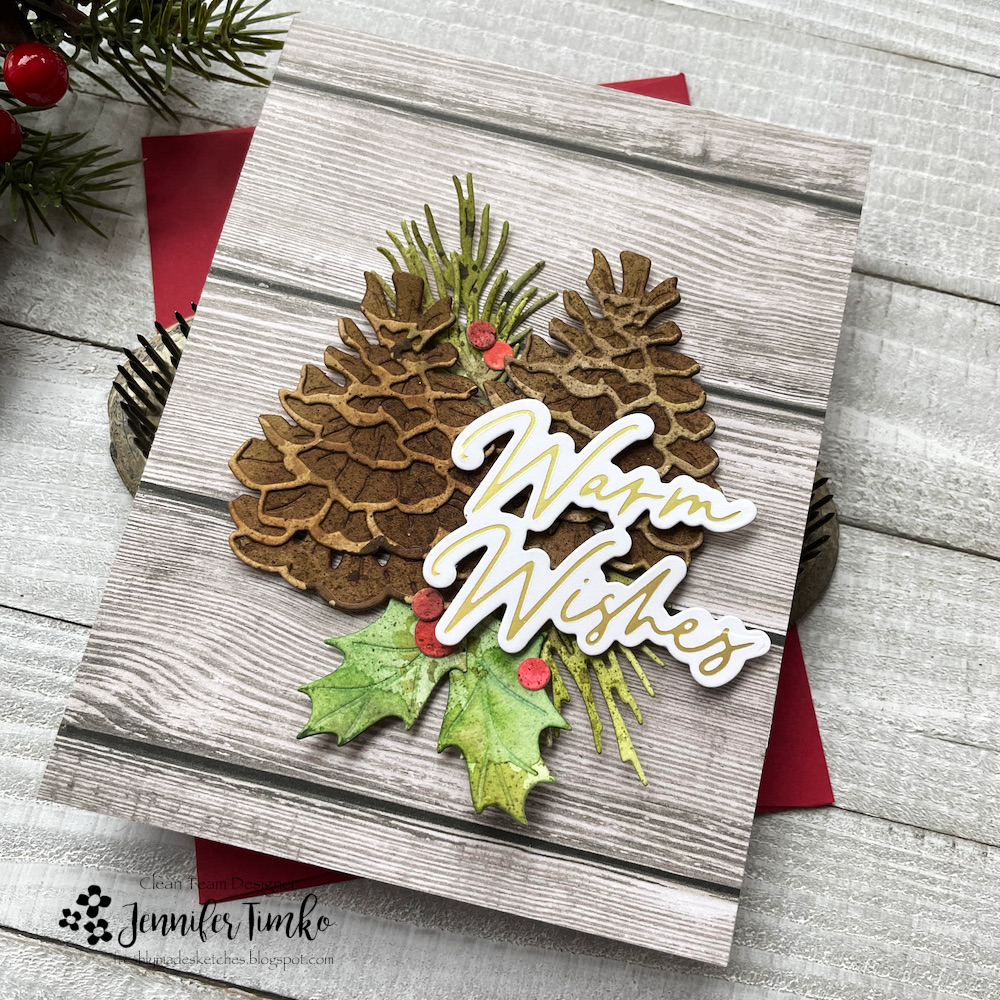
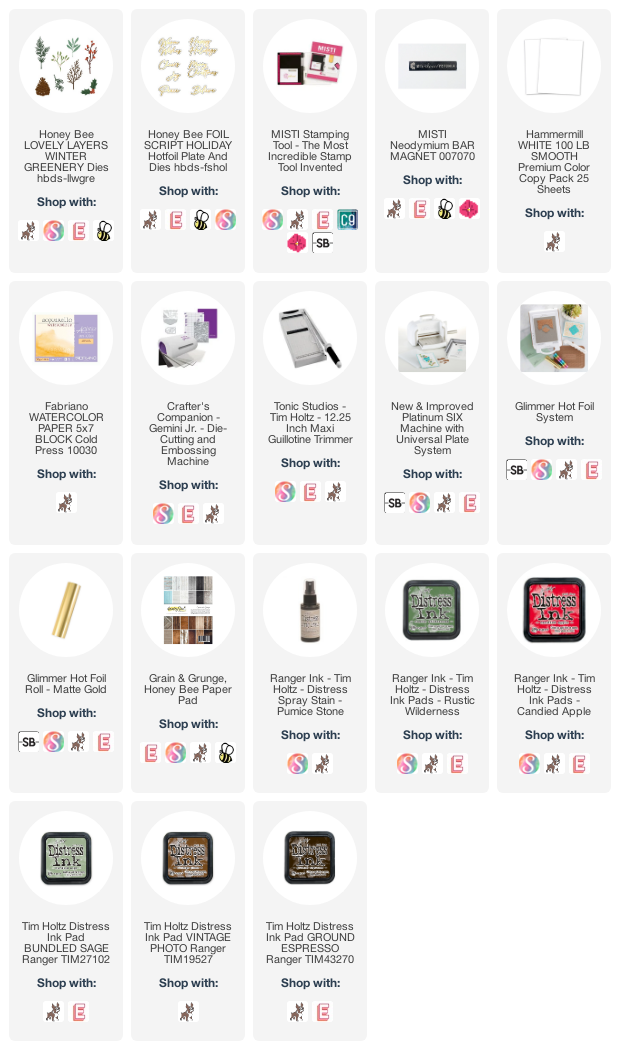
I chose one of the prints from the Grain and Grunge Paper Pack since it looked a bit like the pattern of the sketch. But then what? Yeah, I know it shocks you but I thought flower die cut! I went to one I had not used in a bit, Lovely Layers: Hydrangea. I love this one. As a total shortcut, I used another paper print for the flowers. All that color variation and texture…on the paper. No extra work for me!

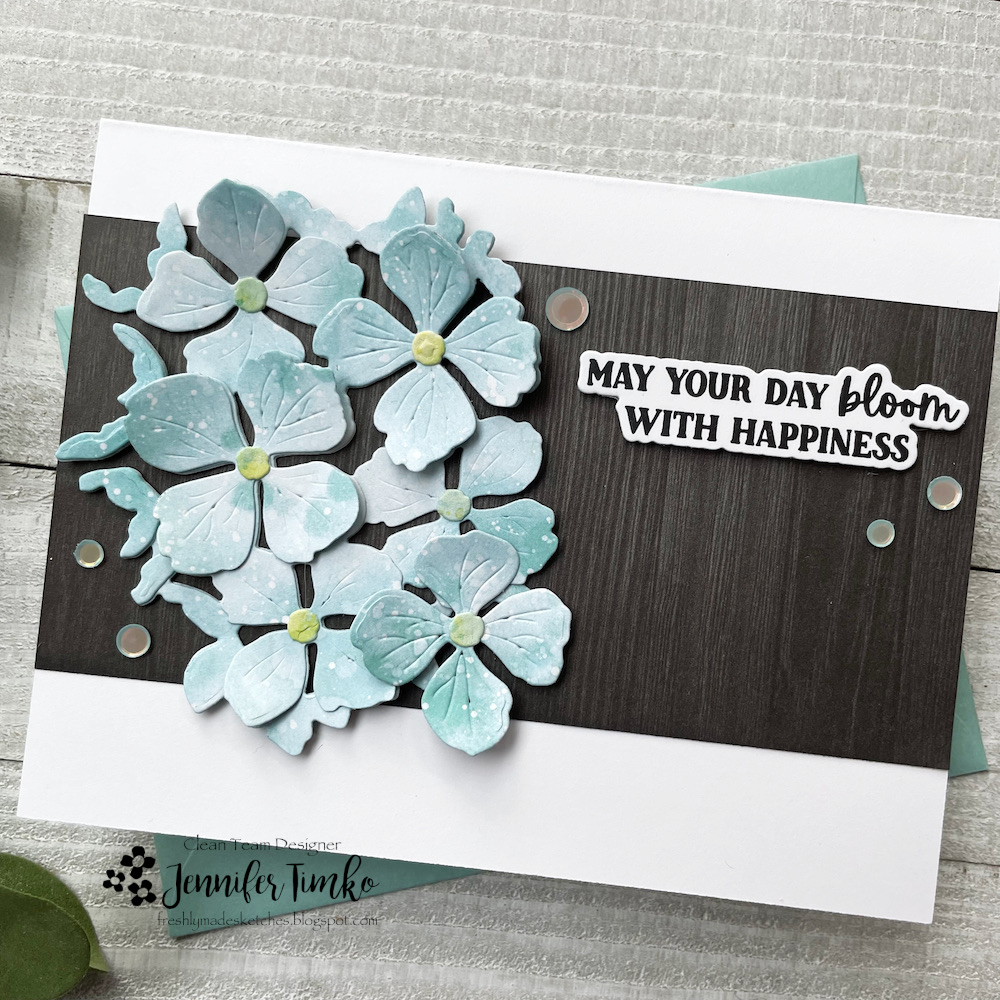
The only thing left was to choose a sentiment. I love this one from the Seeds of Kindness set. It is great for a birthday or just to cheer someone. I added some Trinity Stamps Confetti Embellishments to finish. Simple, but I really love it!

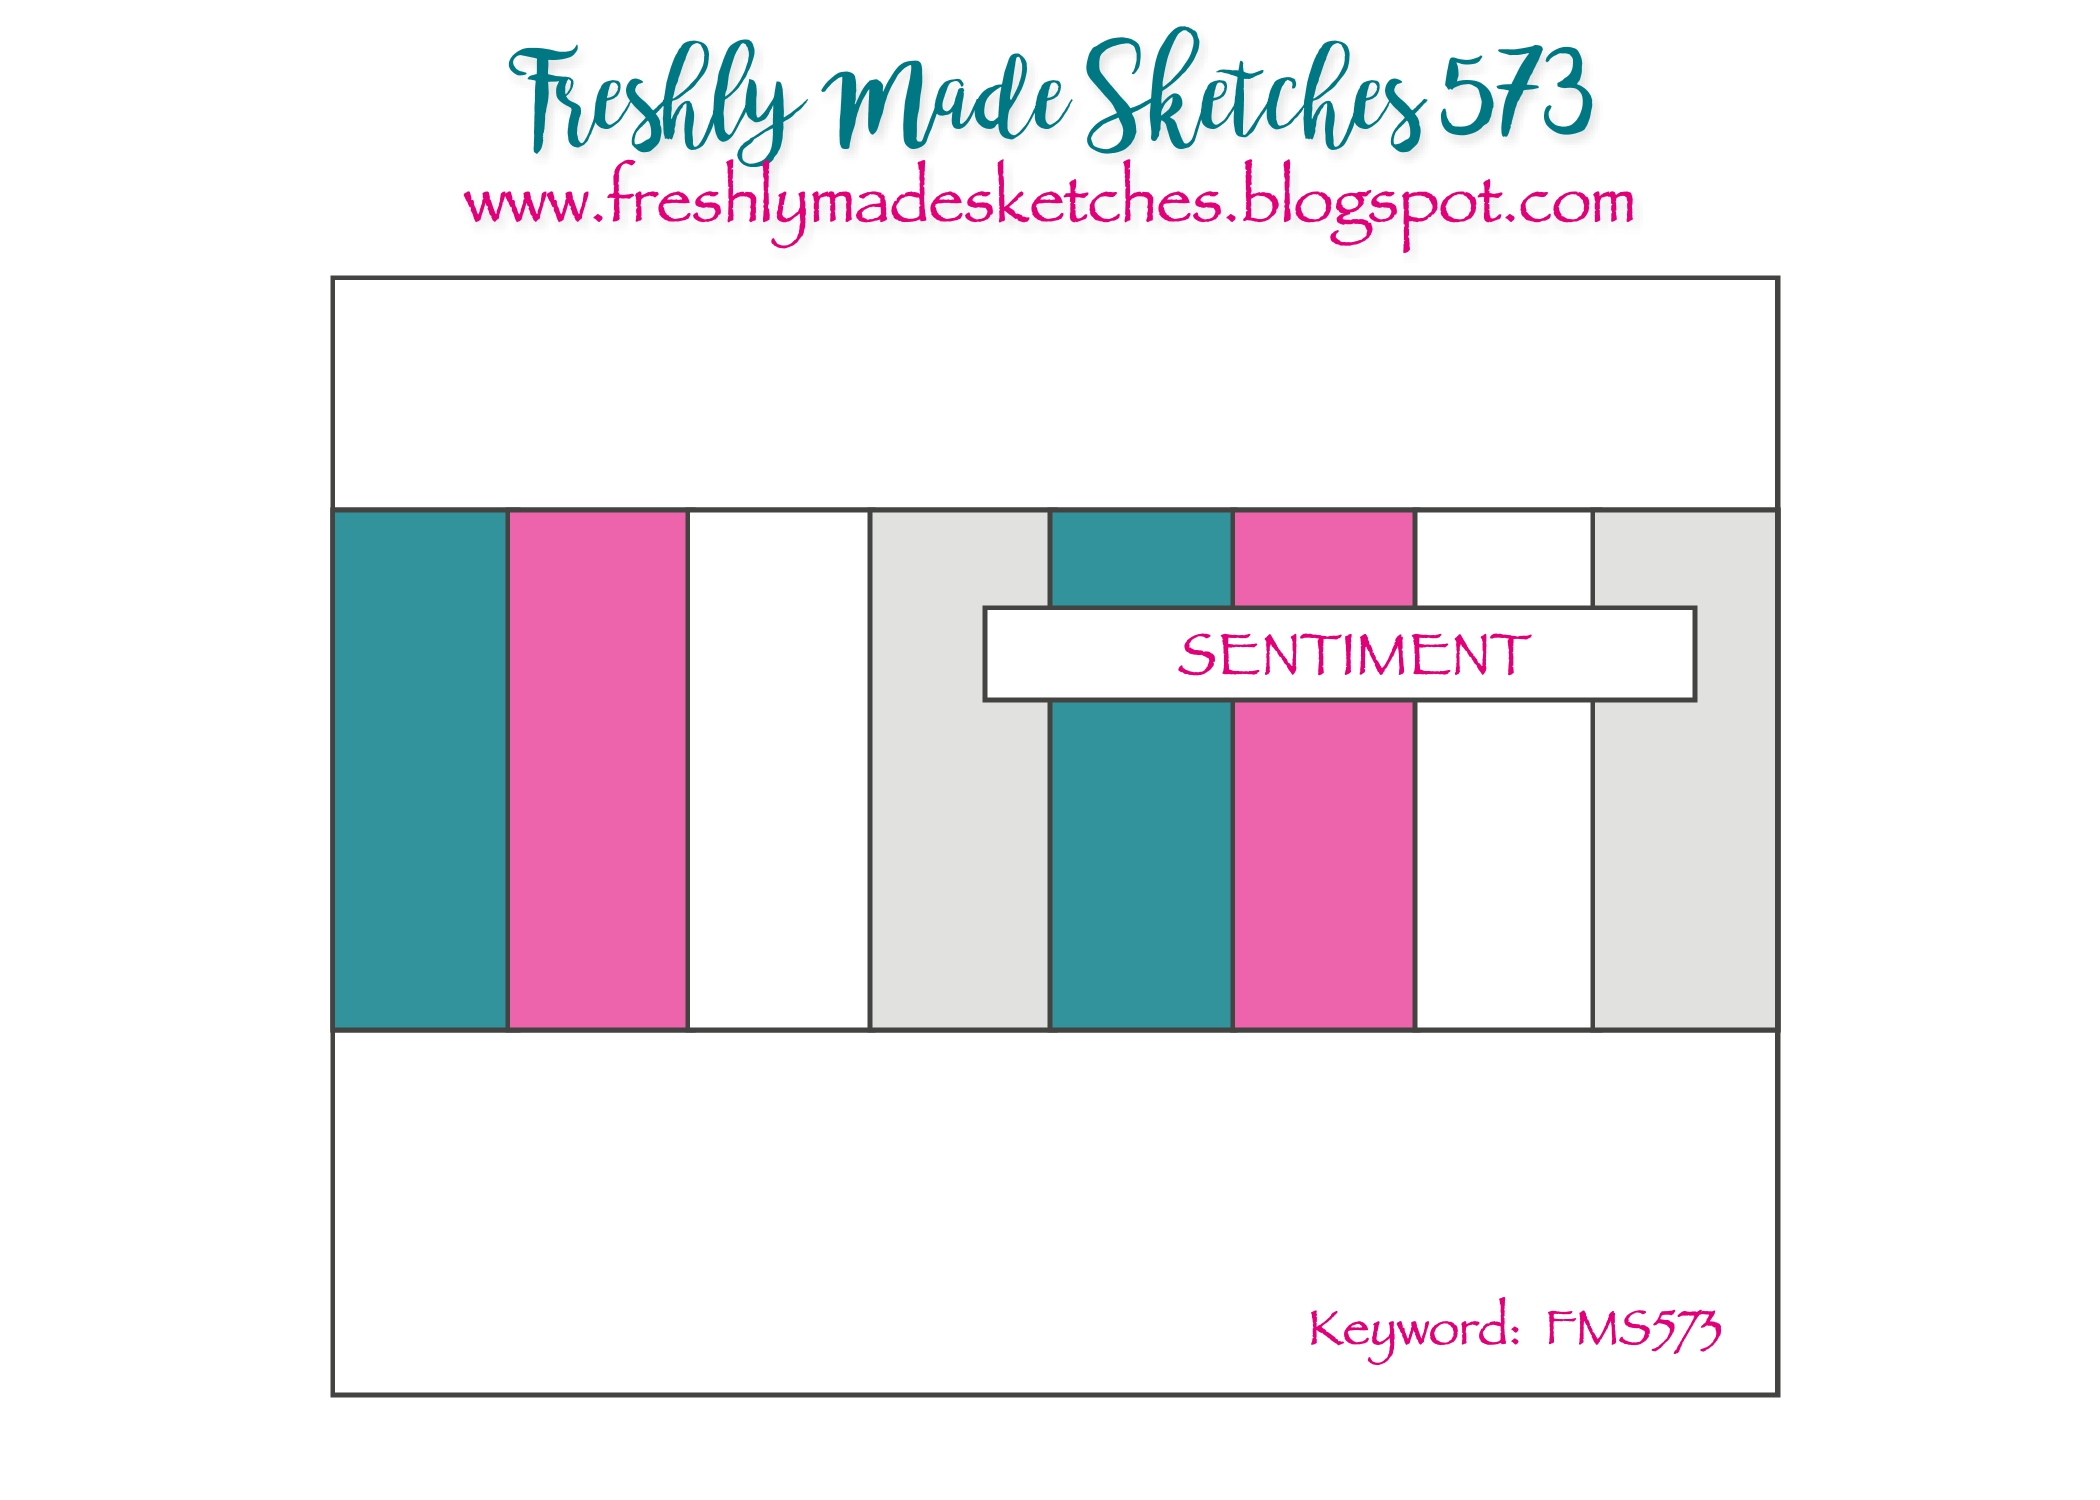
You’ll see that the team has a variety of interpretations and that just means it is a great sketch. Come over and give it a go! Back out to work later today. I hope you have a wonderful rest of your week!

Freshly Made Sketches #572

Freshly Made Sketches #572 published on 5 Comments on Freshly Made Sketches #572

The wonderful Linda Callahan is our sketch designer at Freshly Made Sketches this week and she created a great one! Truly because I had almost no time to create and her sketch “told” me what to make.

I just got the new Lost Shadow Distress Oxide Ink and Distress Spray (and the Saltwater Taffy is new to me as well) so I thought I’d play with those. The Lovely Layers: Anemones seemed like the perfect flower for the sketch. I spritzed some paper with the Lost Shadow Spray, let it dry then cut out the flowers. I brushed on the Saltwater Taffy and then added some Lost Shadow to the edges. A bit more cutting for the centers which I inked with Villainous Potion, some Lost Shadow and a mystery ink that was left over on my little brush but was probably a yellow (on the little ovals). Yep, keeping it real. Not on purpose but I liked it after the color showed up.

For the foliage, I cut the leaves from the set and added some Pumice Stone which skews green next to the Lost Shadow. I was pretty happy with being able to keep them pale and not too green. You may recognize the background panel from last week’s cardinal card. Yep. Same one. And the sentiment was in my stack of already foiled things. Look at me being smart by foiling multiples! All in all this came together pretty quickly.

I hope you’ll come over and join us this week. As always, the team has fabulous inspiration for you! Thanks for stopping in today. I’ll see you soon!

Freshly Made Sketches #571

Freshly Made Sketches #571 published on 6 Comments on Freshly Made Sketches #571

I have another birthday card for you today. This one is for my husband. These are always the hardest for me since I want them to be just right (and he saves them all…so sweet!). Fortunately this awesome sketch at Freshly Made Sketches from the wonderful Jen Mitchell got me moving in just the right direction.

I was a little late to party in ordering these Lovely Layers: Winter Birds dies from Honey Bee Stamps. Somehow I thought I didn’t need them. Hilarious, I know! Well they showed up on Monday and I made this yesterday. I inked a panel of watercolor paper with a combination of red inks, starting with Candied Apple Distress Oxide, adding in some regular Candied Apple Distress and spritzing on some Pumice Stone Distress Spray. I cut the three layers of the cardinal and then sponged on some Pumice Stone Distress Ink at the edges for definition. I took the scrap and layered some black ink on the corner to cut the feet and face piece from it. On the other corner, I added some Crackling Campfire for the beak.

I glued the bird together making sure I left the feet layer with a way to put over the branches. For the branches and leaves, I spritzed watercolor paper with the Pumice Stone Distress Spray for the speckles. Once dry, I brushed on the brown and green Distress Inks and then cut them out with the Winter Greenery die set. Next up was the embossed panel. I have also been late to the party on these 3D embossing folders. Um, wow. This panel was intended as a practice one for just playing. I embossed first, then spritzed with Distress Sprays, then inked with Distress Oxide Ink. Not the order I would choose again but it was just right for this little section I needed. Yay! I placed all of this on a patterned paper piece from the Grain and Grunge Paper Pack and added a sentiment from the Inside: Birthday Sentiments set.

Since the sketch has a slimline look to it, I used a general shape of one. Mine is 6″ x 3 3/4″. A bit non-standard but I chose that to fit the bird (and I don’t have to mail the card). The team has a beautiful variety of cards to share so come over and join us. Thanks so much for stopping in today!

Heart Vine Birthday

Heart Vine Birthday published on 2 Comments on Heart Vine Birthday

There was a big birthday at my house last week. My youngest turned 17. Oh my. I’m not sure how that can even be true! Needless to say, I needed a special card for him. He has another card that has hearts on it and he says it is one of his favorites so I used that as a springboard for my card. I reached for the Lovely Layers: Heart Vine dies from Honey Bee Stamps because I thought it was perfect for what I had in my head.

Using an ombré print from the Funfetti Paper Pack, I cut out two of both the outline and solid heart vines. Then I cut another two of the solid to use for dimension. I put the two full vines together, including the extra white layer and let the glue dry.

Meanwhile, I cut the Quilted A2 background and stamped the birthday sentiment with heat embossing. I attached the center vine using the Bee Creative Glue (LOVE this glue) and then played with where to add the side pieces. I attached the bottom one, let the glue set and then trimmed it off with my trimmer. I then used the remaining part for the top, repeating the process. I added the sentiment (after cutting it with a banner die) and a few gold pearls.

The birthday lad loved the card and I’m still in shock that my baby is 17. Sigh. I hope you have a great start to your week and I’ll be back soon with more. Thanks so much for stopping in today!

Freshly Made Sketches #570

Freshly Made Sketches #570 published on 9 Comments on Freshly Made Sketches #570

It is my turn to be the sketch designer for Freshly Made Sketches this week and I hope you will enjoy this one. In a disclaimer, I originally designed this as a square and then promptly made my card into an A2. I switched up the sketch but some of our team had already made a square. Either version is great to use and let’s face it, there is a lot about guideline over rule for our challenge after all these years.

What I did know was the set I wanted to use for the sketch. This beautiful Grandma’s Garden set from Honey Bee Stamps is a breath of spring. Not that we have really had much winter here but it is fun to color a little bit of spring. I chose a basic pink version of the fuchsias with the inner part of the flower being a pale pink. I played with blending teals and greens on the hummingbird with my Copics.

For the background, I inked on some Tumbled Glass Distress Oxide Ink to start. Then I splattered with a little water and came back over with a little bit of Broken China Distress Oxide to create the darker splatters. The sentiment is from the On The Line: Fall Florals set and I think these sentiments in the set are ones to use over and over. Finally a few green sequins to finish.

Come over to the challenge to see the amazing work by the team and I hope you will play along with us this week. I do have a few cards to share that I have created over the last couple of weeks. My oldest went back to college on Monday and now the “real” world sets back in. How lucky I have been to have the time with him home!! I hope you have a wonderful week.

Freshly Made Sketches #569

Freshly Made Sketches #569 published on 7 Comments on Freshly Made Sketches #569

I seem to be in a one card per week kind of pattern right now. Trying to work on that but between work and the last days of the college kid home, time seems too short. Thankfully, this fabulous new sketch for Freshly Made Sketches “told” me just what to make. The amazing Jacquie Southas gave us this classic vibe for the week and I pulled an older image that fit it perfectly.

This Pretty Postage set from Honey Bee Stamps has been sitting on my desk for a couple of weeks waiting to be used. When I first got the set, I did not get the dies and I recently remedied that so I was ready to use it again. I pulled some pretty spring colors in my Copic Markers and colored it right up. I love those modern flowers!

To add a little more pop to the card, I reached for the Whimsical Hearts Stencil since the hears are similar in shape to the image. I added some Tim Holtz Distress Matte Texture Paste for some tone on tone detail. The sentiment is from the stamp set and I just put it on a banner from the Sentiment Banners set. The pearls are from the Holiday pack.

I’m not one for a lot of Valentine cards but I like that this could be used for other occasions. I hope your week is going well and that you will have a little time to craft. Thanks so much for stopping in today. I might even be back later in the week with another card. See you soon!

Freshly Made Sketches #568

Freshly Made Sketches #568 published on 10 Comments on Freshly Made Sketches #568

Another week has flown by and I’m back with the latest from Freshly Made Sketches. This week our sketch designer is the wonderful Judy Rozema and I love her sketch. I might have played a little loose and fast with it (in my head it was going to be closer) but I love the card it inspired.

I was looking through my stamps to find some sets that I haven’t used much and came upon this Smitten Kittens set from Honey Bee Stamps. It really is SOOO fun and I love how the variety of cats allow for customization to look like different family kitties. Of course, I use my two hooligans as inspiration. I colored using Copic Markers and this kind of coloring always makes me happy.

I found this gingham color in the Gingham Galore Fall paper pack from Honey Bee Stamps. This is one of the packs that are on sale right now and I love having the color varieties in my repertoire. This one matched the “calico orange” so seemed perfect for this. I pulled a sentiment from the Riding By set. Just a nice basic for any occasion and these are the ones I always seem to need most.

I hope you like the fun little card and will come over to join us for the challenge. As things settle down into more of a routine, I hope to have more to share with you too. Thanks so much for stopping by and have a great day!

Freshly Made Sketches #567

Freshly Made Sketches #567 published on 4 Comments on Freshly Made Sketches #567

Happy New Year!! I hope you will excuse the quiet but the truth is that I have not had time to make a thing for the last few weeks. Holiday flying (and the chaos from the weather events didn’t help), oldest home from college, husband finally home from a 4 month deployment (yes, I don’t talk about these until they are all done for safety reasons) plus some time with extended family where it could fit. Frankly, I need a vacation! *smile* Things are quieting down a bit so I’m hoping to find some routine over the next few weeks. I did have time to make a quick card yesterday for this marvelous new sketch by the lovely Amy O’Neill for Freshly Made Sketches. Our first challenge of the year and this is a good one to get the creativity moving.

When I saw the circles, I saw snowflakes and went searching through my pile to find these from Gina K Designs. Aren’t they pretty?! Not sure how these didn’t make it into the holiday card rotation but they are perfect for holiday thank you cards. I cut them out using Simon Says Stamp Silver Glitter Cardstock and they sparkle so much in person.

For the design panel, I blended on Tumbled Glass and Faded Jeans Distress Oxide Inks and then added the Festive Stencil from Gina K Designs and inked with Chipped Sapphire. So pretty! I chose a sentiment from the Honey Bee Stamps Inside: Thankful set and heat embossed in silver. A few gems from my stash to finish the centers of the snowflakes and done.

It was nice to get back to crafting and I hope to fit in a little more this week. I am, however, back to flying and on call. Given the weather, I suspect more flying and less stamping will be on my agenda. I hope your holiday season was good and that the new year is treating you well so far. Thanks so much for stopping in today. As always, stop over to see us at Freshly Made Sketches!

Freshly Made Sketches #566

Freshly Made Sketches #566 published on 4 Comments on Freshly Made Sketches #566

I’m sharing the last Freshly Made Sketches challenge of the year and it is just fabulous for last minute holiday cards or cards made when you are done with holiday cards. The wonderful Narelle has one with tons of possibility, as you can see with the team’s cards.

In a crazy move, I made a card that is NOT a painted tree! I reverted back to some of my favorite dies of the season from Honey Bee Stamps. These Lovely Layers: Winter Greenery elements are just so pretty and I had not used the pinecones yet. I thought they were perfect for the sketch. I started with a piece of watercolor paper that I sprayed with Pumice Stone Distress Spray and added some Rustic Wilderness Distress Ink. I was just neutral with texture as a starting point.

Using that piece of paper, I cut out all of the elements for the card. All the little color textures on the pieces are because of that first layer of ink. Once each piece was cut, I added more Distress Ink to color each one its proper shade. I used Distress Ink because it is more sheer so I kept the other details and splatters.

I played around with the placement of the elements and then went to decide the background. I found this taupe-ish wood grain in my Grain and Grunge Paper Pack that was perfect. The gold foiled sentiment was just the right size for the sketch and I love the bit of shine it adds.

I hope you will come over and join us if you have time to craft during the holidays. You can join multiple times and we love seeing all you create! Thanks for stopping by today. Back soon with a few more cards I’ve been making for the holidays.

Hand painted tree with music

Hand painted tree with music published on 2 Comments on Hand painted tree with music

One more tree. Because the live from Dawn Woleslagle taught three styles and I had to try them all. You can find the links to her page on my post from last week. I hope you will bear with me because this has brought me so much joy in finding success in painting. I may even venture into some tags if I have any time to spend on them over the next couple of weeks.

I will say that I cannot pick a favorite tree to paint but I find this one and the first one I made a little more intuitive. Again, I left the tree simple (mostly for fear of messing it up by adding container) but I like the look. A bit more stitching since I feel it adds the right touch on this.

You can see in this closeup that I also added some white and gold splatters. For the background I chose an old, really old, music print from my stash. I inked it up with Distress Inks to give it a vintage look and added stitching to it too. I knew it needed a bit more shine so I started with the sentiment being gold embossed (and the gold splatters). But it still needed something else. It it hard to see in the photos, but right under the image layer is a layer of gold glitter paper. In person it really adds so much! A button and more gold twine to finish.

Again, thank you for those of you who have left kind words. Let’s face it, trying new things can be a bit intimidating and I’m glad you encourage me with your sweet comments. I’m actually out flying today and will likely be out in the system A LOT over the next couple of weeks. If you are flying for your traveling, please get to the airport early. I mean seriously early. I have already been seeing families completely devastated by the long security lines and the extra stress of risking their flights. Well, I’m off to get ready for another day. I’ll be back tomorrow with a new sketch from FMS (and something other than a tree). See you then!

Primary Sidebar