Skip to content

Freshly Made Sketches #207

Freshly Made Sketches #207 published on 9 Comments on Freshly Made Sketches #207

FMS207 - Glimmer Joy

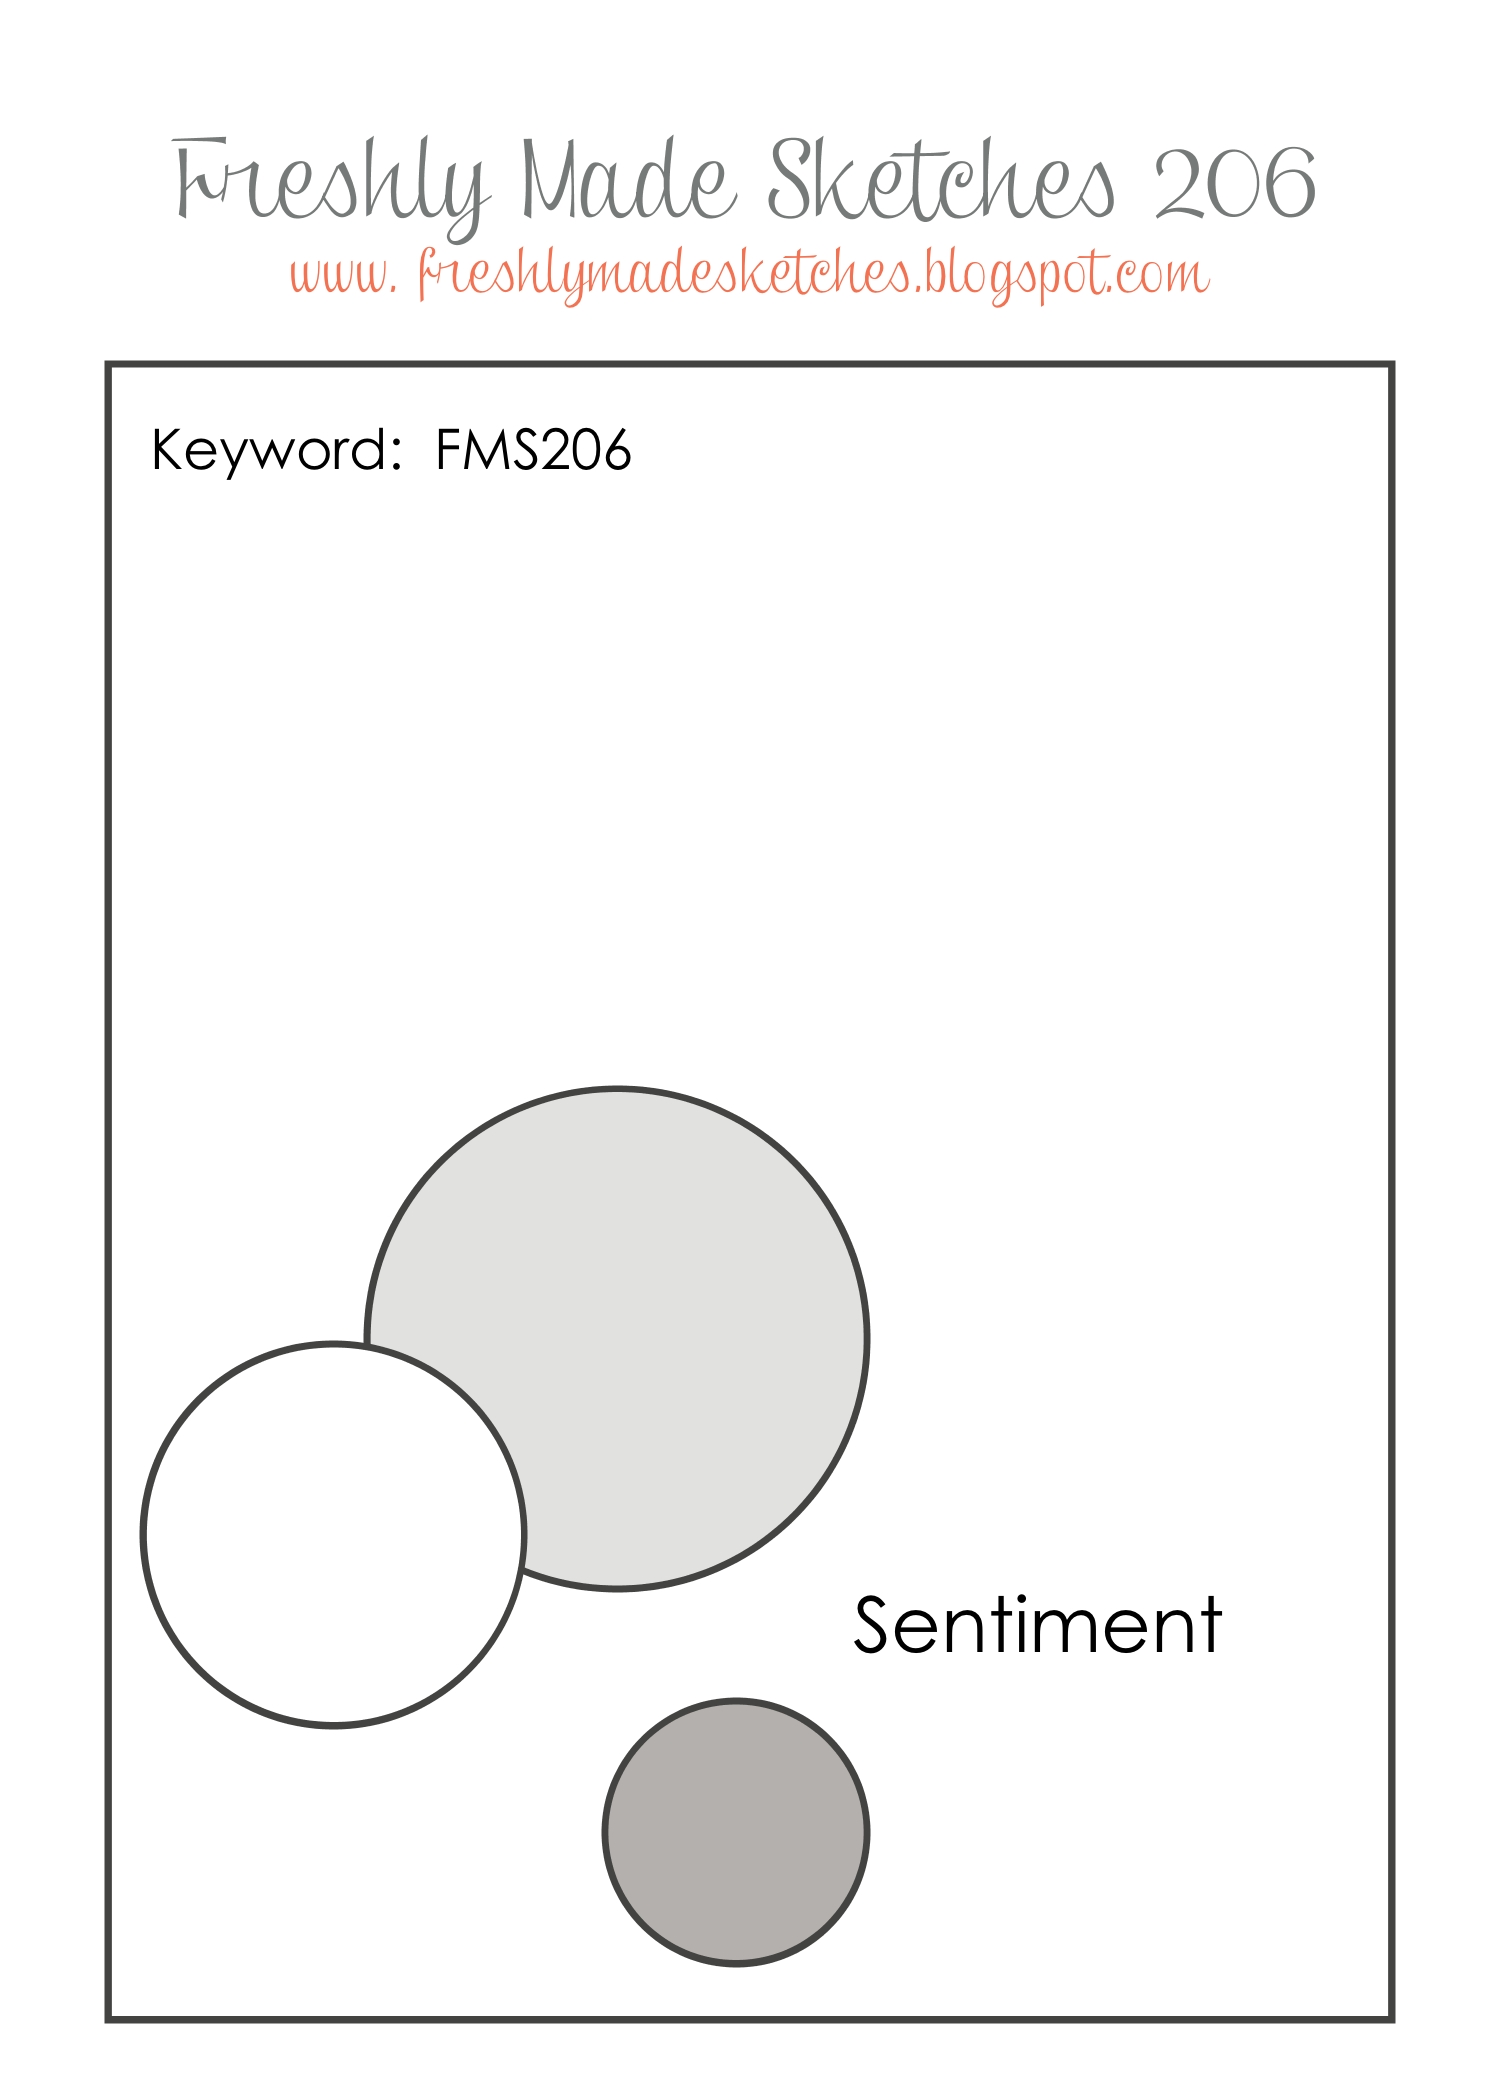
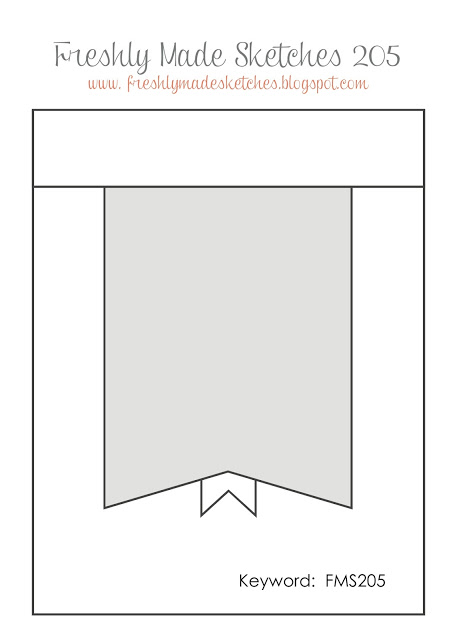
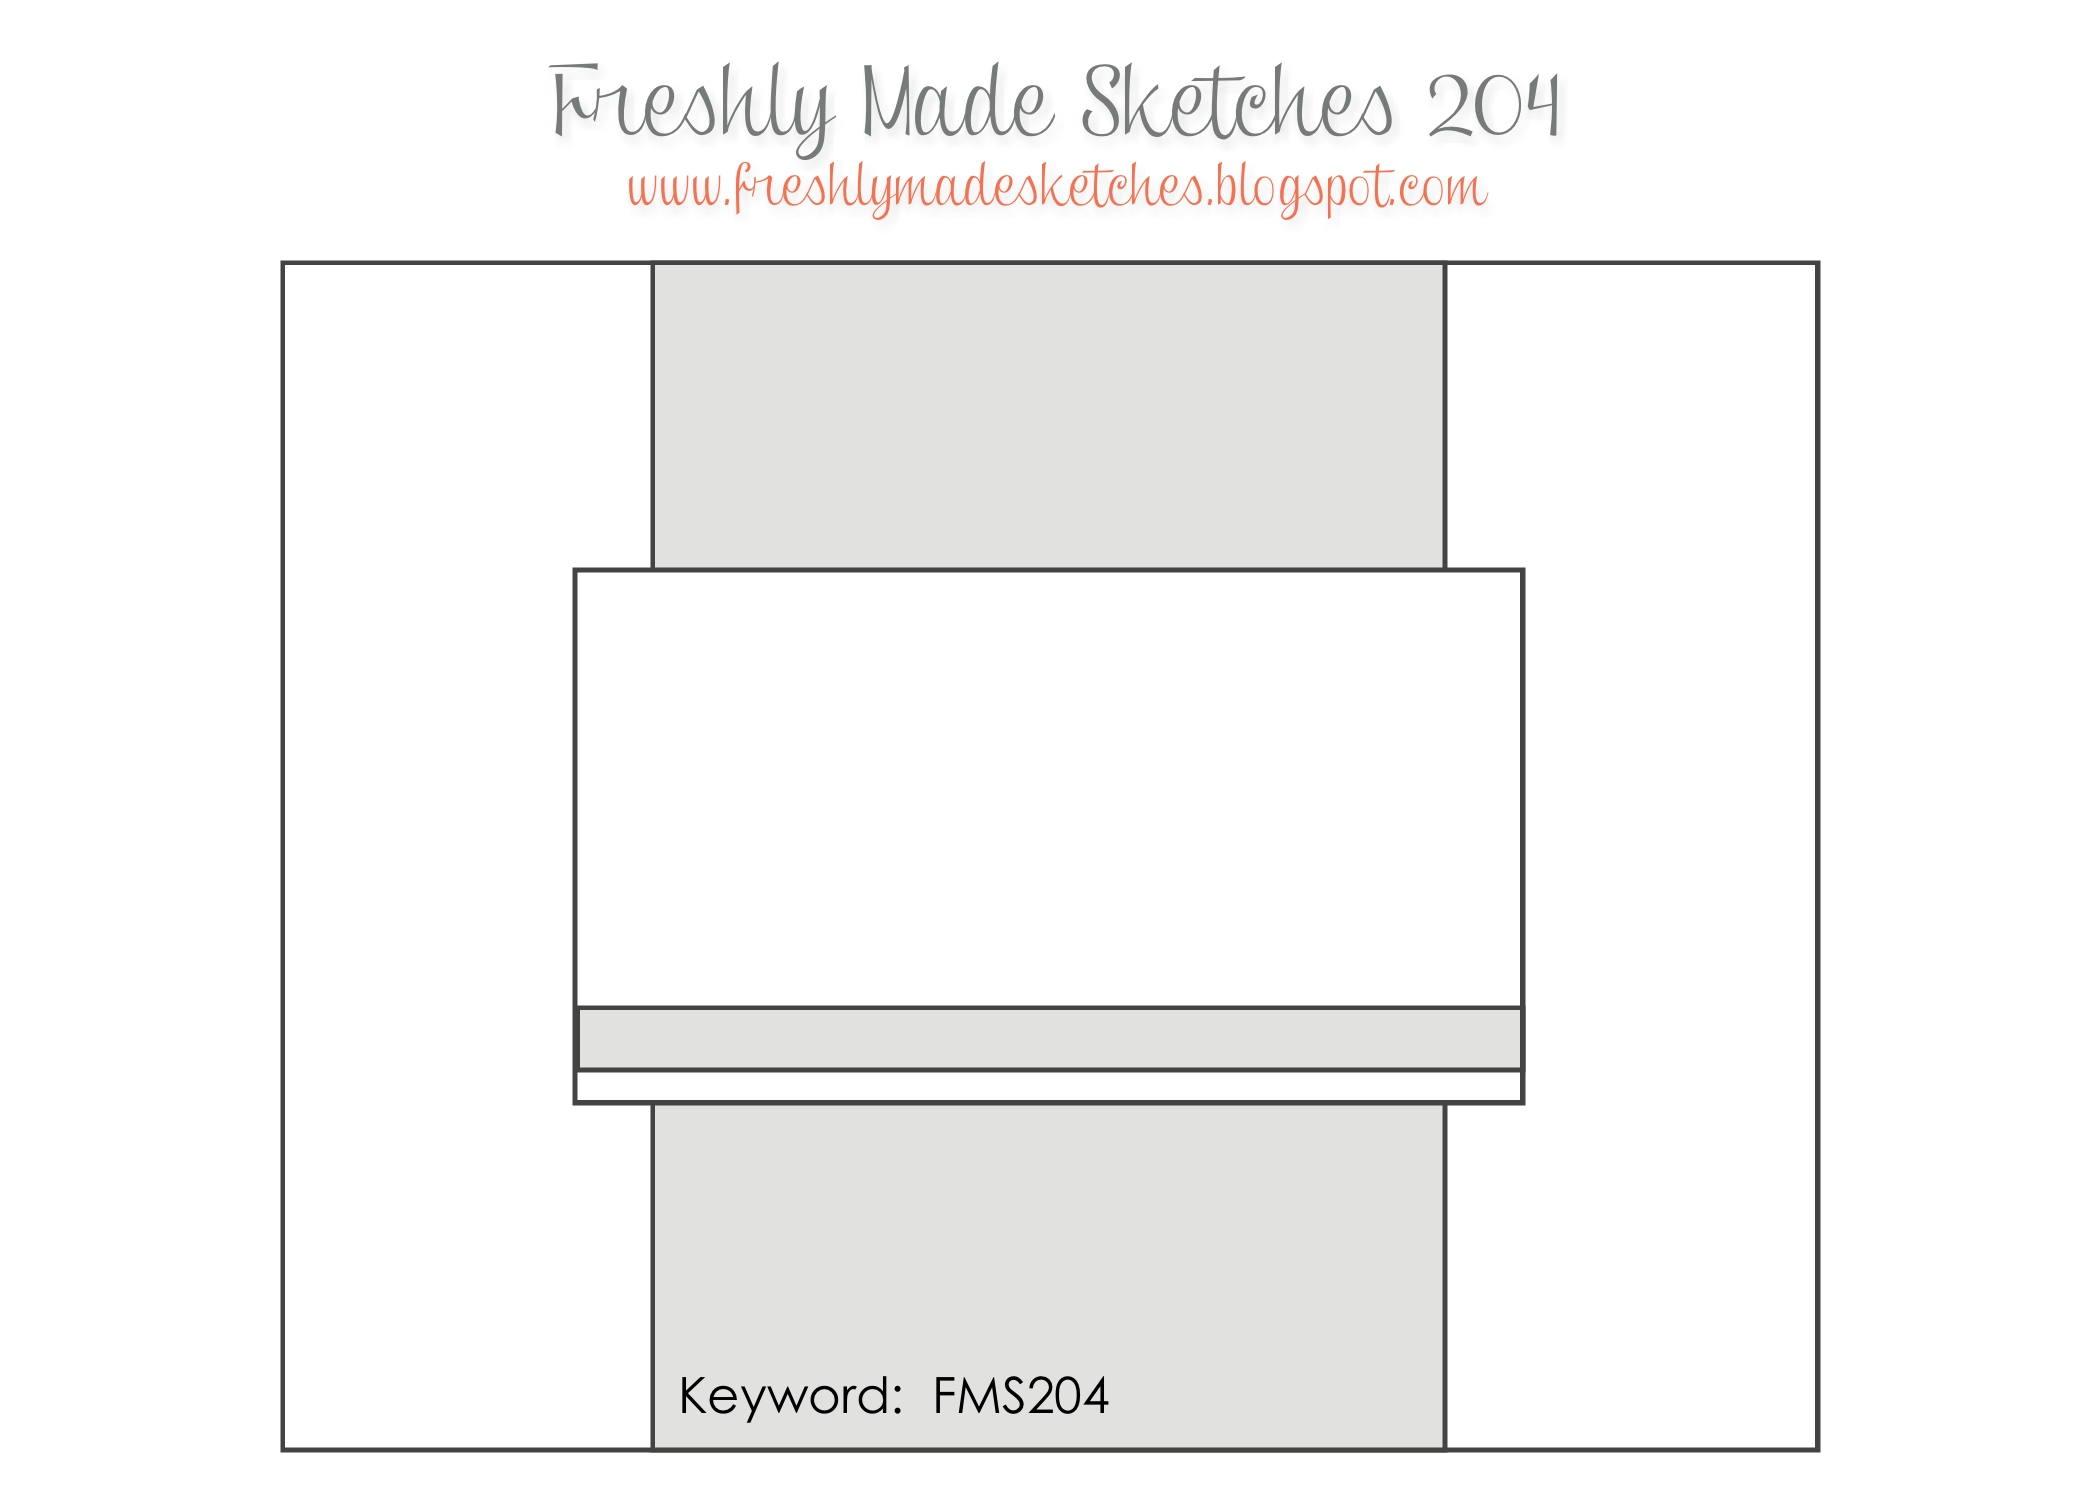
Another Wednesday and another fabulous sketch over at Freshly Made Sketches!  Our sketch hostess this week is the extraordinary Kim Singdahlsen.  She created this sketch as a way to showcase designer papers but, per usual, I broke the rules.  Just goes to show how really flexible this sketch can be!!

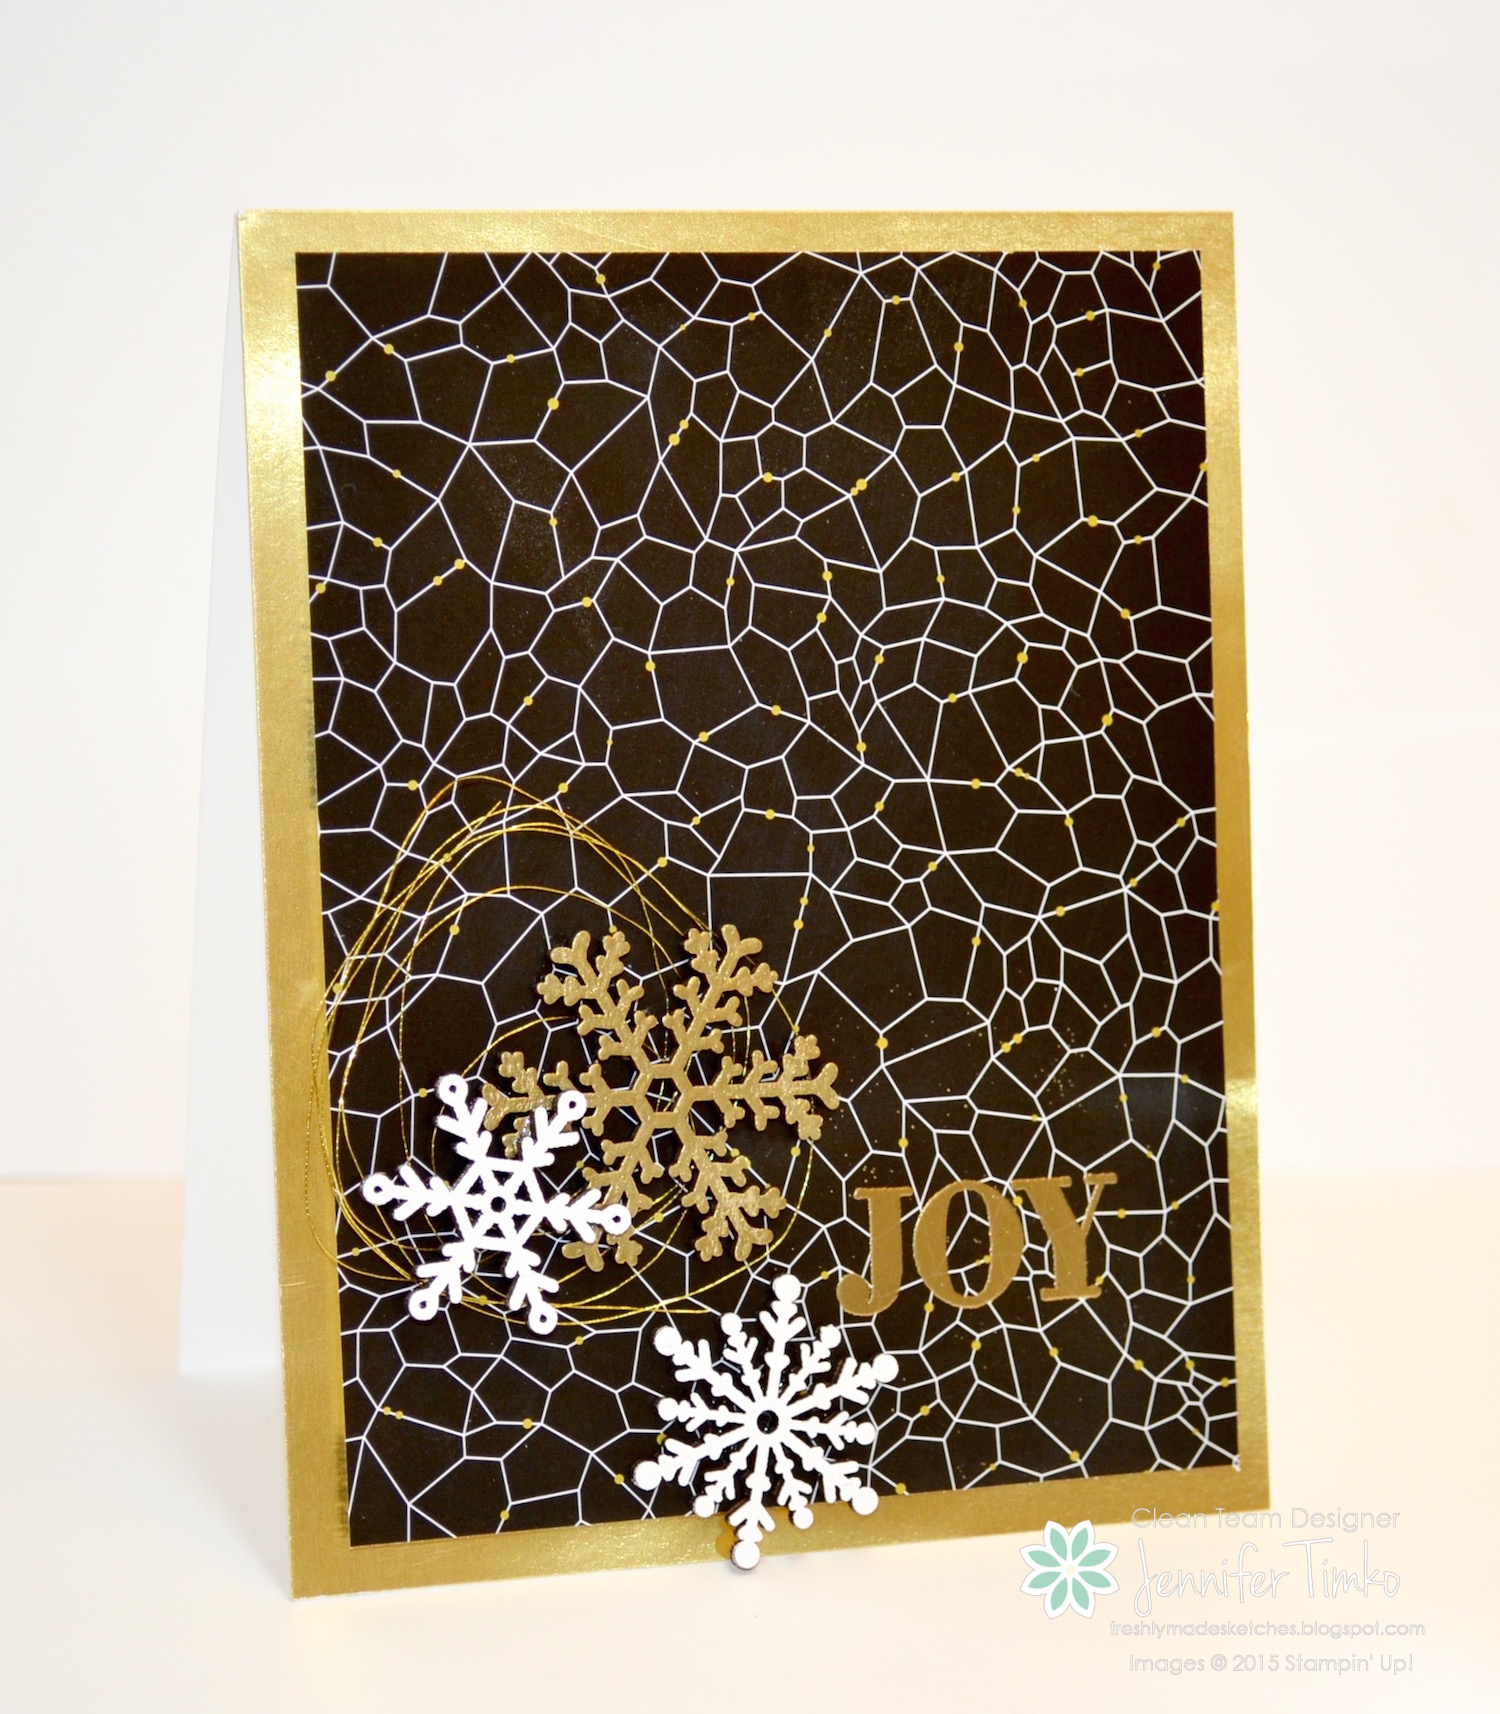
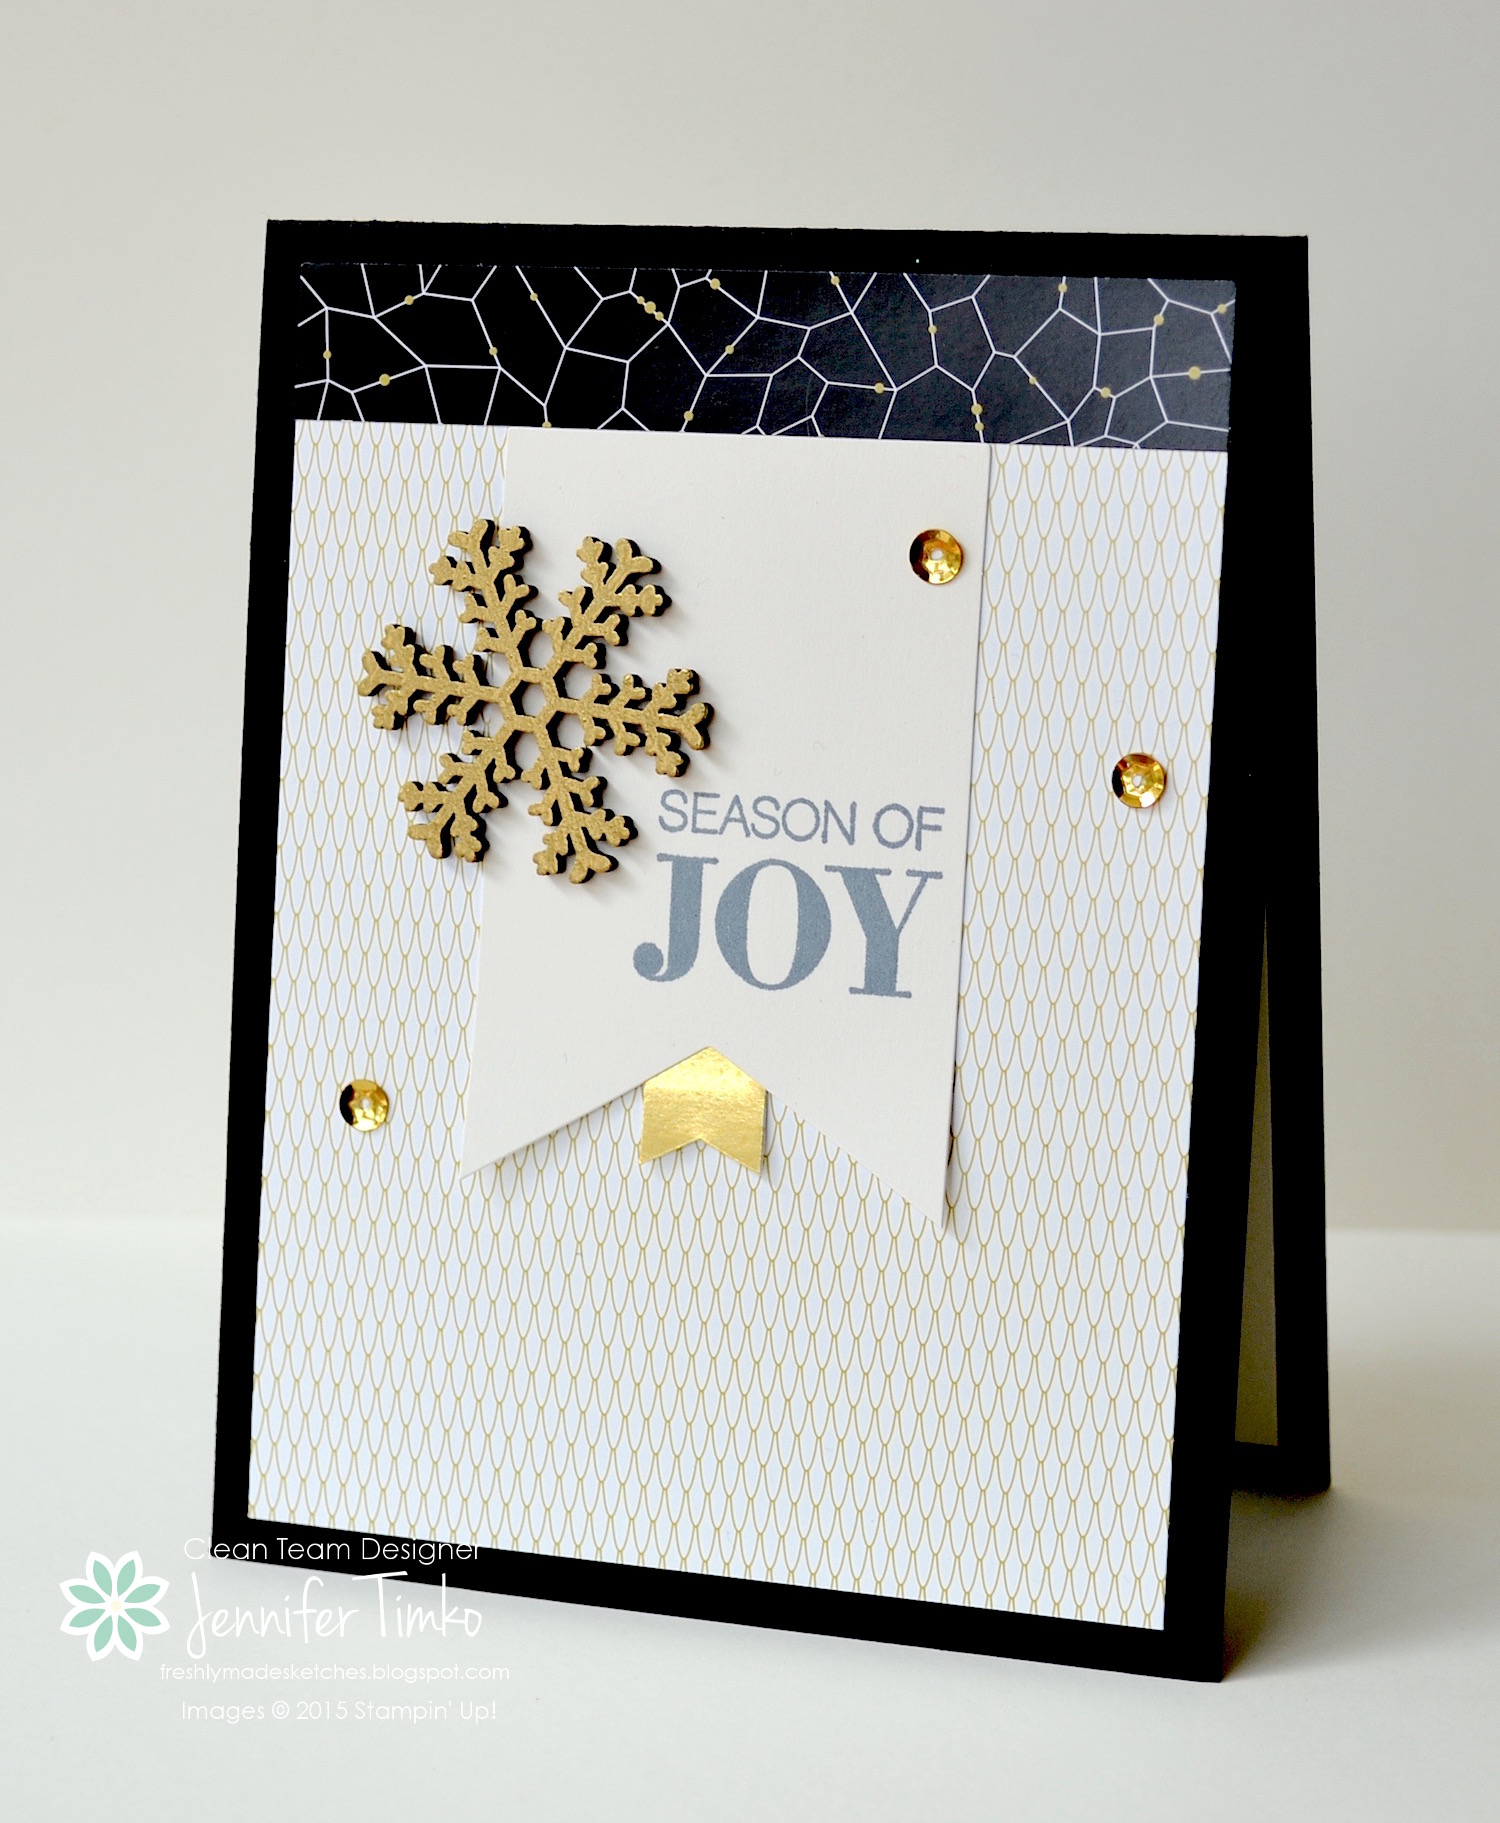
Now where would my week be without using another of these snowflakes?!  I have already admitted my obsession with them so….  Today some silver.  And glitter!  For the base of the image panel, I chose the gorgeous Silver Glimmer paper and then topped it with Thick Whisper White panels that were embossed with the Softly Falling Folder.  I cut the ‘Joy’ from the same paper and then 3 more times from Thick Whisper White.  This one is from the Wonderful Wreath Framelits.  Layering those makes the sentiment pop up but still keeps it easy to adhere to the card.  The big snowflake from Snowflake Elements was heat embossed using Versamark Ink and Silver Stampin’ Emboss Powder.  I added an Iced Rhinestone to the center.  Aren’t they perfect together??  And that is it.  All the work is done by the shimmer and shine!

*Hint*

For the blocked panels.  Don’t make the math hard.  Really.  Don’t!  I don’t know the measurements.  Here is what I did.  I cut the white panel 1/16″ narrower that I would have and normal on the length (I usually use 1/8″ spacing for layers like this).  That little bit extra is what give you the space between.  Next I cut the long panel off the side.  With the remaining (slightly wider panel), I cut it in two with a 1/3 to 2/3 proportion….ish.  I didn’t measure, I just eyeballed it.  Then from the larger of those, I cut an addition 1/16″ off to make room for that little space between them.  Once they were all cut, I laid them on the embossing folder and ran it through the Big Shot.  I found if you try to emboss first and then cut, the paper cutter does not give you super clean edges on those narrow cuts.  To adhere the panels, I used Fast Fuse.  Glue dots work well with the Glimmer Paper too.

FMS Final 207-001

I hope you enjoy this card today.  Have fun with the sketch and make sure you check out what the team has for inspiration!  I’ll be back soon with another of the cards I made for my class last weekend.  Until then, have a great day!  Thanks for stopping in!

Click HERE to purchase wonderful Stampin’ Up products!

Ink: Versamark; Paper:  Thick Whisper White, Silver Shimmer; Accessories:  Big Shot, Wonderful Wreath Framelits, Snowflake Elements, Silver Stampin’ Emboss Powder, Heat Tool, Iced Rhinestone, Dimensionals

Blog Signature 2015

Peace & Joy

Peace & Joy published on 7 Comments on Peace & Joy

Peace & Joy

I am so excited to share with you today.  I got to stamp with some friends over the weekend and it was so much fun.  I even had a new stamper join in.  Four cards, Jen style, and she totally kept up with us!!  This was our technique card of the class and we had more fun with it.  This background is so spectacular and yet SOOO easy.  Really!  Trust me.  Ok….I thought you might not believe me so I made a video.

If it doesn’t show correctly in your email, click here:  Peace & Joy Tutorial

I saw this cool technique last week as shown by the oh so talented Jennifer McGuire.  She used a different medium and I wanted to see what happened when I tried reinkers.  Wow is what happens!  Beyond the background I love how the Sleigh Ride Edgelits can be used to create a pretty scene within the PL Cards & Labels Framelits.  This may be one of my favorite cards so far this season.  Hope you love it too!

I’ll be back tomorrow with a new card for Freshly Made Sketches.  Until then, have a great day!

Click HERE to purchase wonderful Stampin’ Up products!

Stamp:  Holly Jolly Christmas ; Ink:  Night of Navy, Blackberry Bliss; Paper: Watercolor, Thick Whisper White, Dazzling Diamonds Glimmer Paper; Accessories: Big Shot, Sleigh Ride Edgelits, Project Life Card & Labels Framelits, Softly Falling Embossing Folder, Iced Rhinestones, Dimensionals

Blog Signature 2015

HYCCT – Because I Care

HYCCT – Because I Care published on No Comments on HYCCT – Because I Care


HYCCT1501C - Because I CareI told you yesterday about the Hope You Can Cling To Challenges at Splitcoaststampers.  I got to play along yesterday with the challenge from Lori Craig, HYCCT1501C- Split the Difference.  The challenge is to split the image panel with a sentiment.  I’m not sure I completely followed the intent of her challenge but since these cards are for a cause, I’m sure she will give me a little latitude.  *smile*

I colored this beautiful flower from Blended Bloom with my new Zig Clean Color Markers.  I just got them on Friday and I’m already completely obsessed with them.  I’ll have some more about them in the upcoming weeks.  I embossed the flower in gold and then just colored with the two colors.  I added a sentiment from Because I Care (retired) and embossed it in gold too.  A few gold sequins to add a little more detail.

You can play along with these challenges too.  There are fun inspirational themes every day brought by some of my favorite stampers!  All the details on how to mail your cards to MD Anderson Cancer Center can be found there too.  This is one of the best things you can do with your talents so I encourage you to join in where you can!

Click HERE to purchase wonderful Stampin’ Up products!

Stamp: Blended Blooms, Because I Care; Ink:  Versamark, Zig Clean Color Markers; Paper:  Watercolor, Thick Whisper White; Accessories:  Gold Sequin Trim, Heat Tool, Gold Stampin’ Emboss Powder, Dimensionals, Crystal Effects (as glue)

Blog Signature 2015

Grateful for You

Grateful for You published on No Comments on Grateful for You

Jen Timko - Grateful Note CardIn Thursday’s post, I told about some of the things that Splitcoaststampers brings to the crafting world.  One of the things I forgot to mention is the Hope You Can Cling To Challenges.  Throughout the whole month of October, there are daily challenges to help inspire you to create cards for the MD Anderson Cancer Center and to bring hope to those families who are facing cancer. While my post today is not a part of that, I would be remiss not to mention it.  I hope to participate often this year and to share those cards with you.

For today, though, I have two more projects from my product review for Scor-Dies.  The first is this simple yet fabulous note card.  The PocketPenPals Basics C comprises this note card and the coordinating envelope.  Simple and fast for anyone to add to a gift bag!  I created this in such a short time that I went back and made two more for some friends who had helped me with my boys.  I inked up the leaves from For All Things in Tip Top Taupe and then spritzed the stamp with some water.  I cut the card out of Watercolor Paper so when I stamped I got this lovely watercolor effect.  I did the same for the sentiment and then added on a single gold sequin with the new Fine-Tip Glue Pen.  I stamped the same image onto the envelope and tied it up with Gold Metallic Baker’s Twine.  And done!  Cute, huh?

ScorDies - Flowers for you

For the next note card, I used the pretty little flower topped die from the Basics A set and added it to a Night of Navy base.  I cut the white panel from Thick Whisper White and colored the top pieces with my Aquapainter using Rose Red and Pear Pizzazz ink.  I tied on some Crushed Curry Baker’s Twine and added a sentiment from Paper Pumpkin.  I thought the flowers from the hostess set Floral Wings matched the little flower well so I stamped them onto the envelope in the same colors.  I made the envelope using my Envelope Punch Board.

If you want to see my whole review you can go right over to the Product Focus page.  Oh, and you’ll get to see more projects too, of course!

Scor-Dies_300x250_Sept2015


Click HERE to purchase wonderful Stampin’ Up products!

Stamp: For All Things, Paper Pumpkin August, Floral Wings; Ink:  Tip Top Taupe, Night of Navy, Rose Red, Pear Pizzazz; Paper:  Watercolor, Thick Whisper White, Night of Navy; Accessories:  Scor-Dies PocketPenPal Basics Package A and C, Big Shot, Envelope Punch Board, Gold Metallic Baker’s Twine, Metallic Sequins, Crushed Curry Baker’s Twine, Basic Pearls

Blog Signature 2015

A Golden Hello

A Golden Hello published on 2 Comments on A Golden Hello

ScorDies - Golden Hello

From time to time, I feel like I need to make sure you, my awesome readers, know about all that Splitcoaststampers brings to the crafting world.  Challenges – check, tutorials – check, forums full of info – check and product reviews – check, check!  A while ago I shared that I was asked to join the Product Review Team and I had the opportunity to get to play with another new product recently!   On my Project Life page that I showed you in Monday’s post, I shared that I used the PocketPenPals Scor-Dies to add interest to my page.  Well, now I get to share some more of the things I created for the review!!

For today’s card I combined a number of brands that all just seemed to work perfectly together.  I started with the card base from my August Paper Pumpkin and then cut this adorable tag from the PocketPenPals Basics Package B.  I actually cut it twice, once with Very Vanilla and once with Basic Black.  I layered them to allow the black to just sneak out from the bottom.  Then I stamped the sentiment from the same Paper Pumpkin using Momento Tuxedo Black ink.  I used the black ribbon from the kit and wrapped it around the top of the tag and added on some Gold Metallic Baker’s Twine.  For a final wow, I cut this flower from Gold Foil and added a Basic Black center.  This tag is so unique and cool!  Ok, I totally didn’t use it as intended but who cares when it has such versatility!!

Want to see the whole story on these dies?  And a video?  And my whole product review?  And the reviews from some seriously amazing stampers???  Yeah, I thought so!!  Hop right over to the Product Focus page and you can see ALL of that!!  Oh, and you’ll get to see more projects too, of course!

Scor-Dies_300x250_Sept2015

I’ll be back tomorrow with two more projects I made.  I can hardly wait to share!!  Until then, have a great day!

Click HERE to purchase wonderful Stampin’ Up products!

Stamp: Paper Pumpkin August; Ink:  Momento Tuxedo Black; Paper:  Paper Pumpkin August, Very Vanilla, Basic Black, Gold Foil ; Accessories:  Scor-Dies PocketPenPal Basics Package B, Big Shot, Flower Die from Echo Park Paper Co., Gold Metallic Baker’s Twine, Ribbon

Blog Signature 2015

Freshly Made Sketches #206

Freshly Made Sketches #206 published on 9 Comments on Freshly Made Sketches #206

FMS206 - Joy

Oooh, looky!!!  We have another amazing sketch for you this week at Freshly Made Sketches!!  The oh so fabulous Linda Callahan is our sketch hostess and she has come up with something super fun!!

Ok….I have to say it out loud (because you already know it).  My name is Jennifer Timko and I’m seriously addicted to wooden snowflakes.  I apologize in advance but the simple reality is that I love them and will continue to pop them on everything in sight!!  I went back to the Winter Wonderland DSP too….because it is SOOOOO pretty!  Now I did almost talk myself out of using the snowflakes.  But really, they were tailor made for the sketch.  Would I be responsible if I didn’t show you (again) how fabulous they are??  Today, I smooshed them in Versamark and heat embossed them with White and Gold Stampin’ Emboss Powder.  Just look at them in white!  And yet again the gold doesn’t photograph even half as pretty as it is in person.  All I did was add a sentiment with heat embossing onto the DSP to finish the sketch.  It seemed like it needed another something, so I threw on some Gold Thread.  This stuff is really pretty too.  To adhere the snowflakes I used Crystal Effects.  I added a Gold Foil layer onto a Whisper White base and then popped up the snowflake layer on Dimensionals.  Word of warning.  I’m getting ready to order more of these snowflakes.  You may want to order soon before I get them all!  *smile*

Now off to the FMS site to see all the beautiful projects from the team.  Week in and week out, they amaze me!  Can’t wait to see what you do with this sketch…I feel confident that the gallery is going to be chock full of wonderful inspiration!  I’ll be back tomorrow with some really fun projects so plan to stop back in.  See you then!

FMS Final 206-001Click HERE to purchase wonderful Stampin’ Up products!

Stamp:  Holly Jolly Greetings ; Ink: Versamark; Paper:  Winter Wonderland DSP, Gold Foil; Accessories:  Snowflake Elements, White and Gold Stampin’ Emboss Powder, Heat Tool, Gold Thread, Dimensionals

Blog Signature 2015

The Memory of Time

The Memory of Time published on No Comments on The Memory of Time

Jen Timko - Day to remember

Happy Monday to you!  I told you that I was working on some extra stuff finally and I really wanted to share this one with you.  With the anniversary of 9-11 a few weeks ago, I decided that it was time to get some pictures of my trip to the 911 Memorial into my Project Life book.  These are hard pictures to “scrap” because I feel like the pages really have to reflect the tone of the memorial.  I started with this one….this amazing wall.  It is called “Trying To Remember the Color of the Sky on That September Morning” and was created by Spencer Fitch.  What you cannot capture in a picture is the overwhelming nature of this piece.  It is large and encompasses a whole wall.  Each panel is handprinted a different shade of blue and there is such thought and significance to every bit of this piece (you can read a little more here).  But for me, it hit home because when people ask me about that day and flying, one of the things I remember most IS the color of the sky.  A crystal clear, perfect fall blue sky.  I found that standing in front of this was an incredibly moving experience.  And then when I examined the panels closer and realized they were hand painted….wow!

So how to keep this picture in a meaningful way?  Project Life.  I very much wanted the focus to be on the picture itself with simple accents.  I kept to the gold and wooden/natural palette and I’m very happy with the result.  This is a true conglomeration of products and it makes me happy how they work together.  I thought that hearts wold be a good place to start so I pulled this Fancy Foil Gold Vellum with the hearts and cut it out using the Scor-Dies Pocket Pen Pals Dies (Basics A).  I created this envelope that I could fill with things.  After some experimenting, I chose heart sequins from the Metallics Sequins and a heart wooden element.  I used the new Fine Tip Glue Pen to seal it and added some Gold Sequin Trim and Gold Baker’s Twine.  For the next pocket, I cut a card using my PL Cards & Labels Framelits out of the striped pattern of the gold vellum.  Then using a PL card from the Becky Higgins DIY Shop Edition, I cut it further using another of the Scor-Dies (to create that scalloped top).  The sentiment is from PL Remember This (SU) and is gold embossed onto Naturals Ivory card stock.  Finally, for the picture I used an overlay from the PL Desktop Edition by Becky Higgins.

I’m please with the result and I think this picture does actually speak for itself.  I’m sure I’ll journal on some of the other pages when I create them using more pictures from that day but this one seems perfect just as it is.  I hope you enjoy this page and will be inspired to try a combination of products to create just the right Project Life project!  Thanks for stopping in today.  See you soon!

Click HERE to purchase wonderful Stampin’ Up products!

Stamp:  Project Life Remember This ; Ink:  Versamark; Paper: Fancy Foil Vellum – Gold (SU), PL Becky Higgins DIY Shop, Naturals Ivory (SU ret); Accessories: PocketPenPals Basics A Scor-Dies, PL Becky Higgins Desktop Overlays, Metallic Sequins (SU), Gold Sequin Trim (SU), Gold Metallic Baker’s Twine, Wooden Heart (Essentials Wooden Elements – ret)

Blog Signature 2015

Fancy Friday – Fall

Fancy Friday – Fall published on 5 Comments on Fancy Friday – Fall

It is time again for our monthly Fancy Friday hop!  If you just came over from the amazing Jeanna, welcome to the next stop.  My friends and I want to be able to share with you our ideas in a monthly format.  We will use different themes each month – sometimes colors, sometimes a sketch, sometimes a stamp set focus.  The one thing you can count on is that it will be fancy!  Over our year together on the ADT,  “fancy” became our word to describe the best projects, the best new clothes, even the best pedicure colors.  Now we want to share with you our take on “fancy” each month.  This month we have a theme challenge that the whole team will be using as inspiration – Fall!

FF Sep - Grateful

I love Fall!  The colors, the crisp air, pumpkins, apples, did I mention the crisp air?!!!  We are starting to get our first tastes of that in Virginia and I could not be happier!  I pulled out some old favorites for this card today.  I started by stamping the leaf from For All Things onto the grid print from the Typeset DSP with Crushed Curry and Cajun Craze (both were stamped off first).  Then I punched them out with my 2-1/2″ Circle Punch.  I stamped the sentiment from the set using Early Espresso.  Next I lightly inked up Dots for Days (the background stamp) and stamped it off some before stamping onto the Crumb Cake card base.  For some extra interest, I cut a piece of my fall go-to, 1-1/4″ Burlap Ribbon.  I attached it using fast Fuse and it sticks perfectly!  I popped the sentiment panel up on Dimensionals and attached it (I did put another dark punched circle of card stock behind it for stability).  Finally, I pulled out this leftover twine from a kit last year and tied it up with a button.  Ahhh…..fall colors make me almost as happy as the crisp air!

6a00e54f94e01b883401b8d05ef236970c-500wi

I hope you will be inspired by all the lovely creations in our hop this month.  These ladies never cease to make me want to run to the stamp room and create!  I’m so glad you stopped in today!

The amazing Mercedes Weber is up next!   Wait until you see the fancy project she created!

And you can click our logo above to get to the Fancy Friday Pinterest page!

6a00e54f94e01b883401b8d05f0bdc970c-320wi-2

Click HERE to purchase these wonderful Stampin’ Up products!

Stamps:  For All Things, Dots for Days; Paper:  Crumb Cake, Typeset DSP; Ink:  Early Espresso, Crushed Curry, Cajun Craze; Accessories:  Burlap Ribbon, Neutrals Buttons, Twine

Blog Signature 2015

Freshly Made Sketches #205

Freshly Made Sketches #205 published on 10 Comments on Freshly Made Sketches #205

Oh, do I have a treat for you today!  We have an awesome sketch over at Freshly Made Sketches.  The amazingly talented Rita Wright came up with this super fun layout and I think you are going to love it!

FMS205 - Season of Joy

I went all in on products from the Holiday Catalog on this card.  So many pretty things that coordinate perfectly!  Winter Wonderland is a beautiful suite of products that starts with a stunning DSP pack.  The gold and black  in the prints ensures many elegant projects!  I chose two of them  as the background for this card and I just love them.  I pulled the banner from my August Paper Pumpkin (but you can cut one just as easily with your Banner Framelits from Very Vanilla).  Using Momento Black ink, I stamped the sentiment from the Holly Jolly Greetings stamp set.  I love all the combinations that are possible with that set!  I took a snowflake from Snowflake Elements and smooshed it in Versamark ink, poured on some Gold Stampin’ Emboss Powder and heat embossed it.  The picture doesn’t come close to showing how pretty it is!  For finishing details, I cut  strip of Gold Foil and flagged the end with my Banner Punch and added some gold sequins from the Metallic Sequins.  Both the snowflake and the sequins are attached using the new Fine-Tip Glue Pen.  This is already one of my favorite things from this new catalog (I know….yes, I REALLY love having the right glue for each job).

A few little hints.  The paper in this Winter Wonderland has a lighter feel than some.  It makes the paper really usable for so many things but on a large panel, it may feel a little too light.  I simply cut another panel from dark card stock to 1/4″ less than the DSP panel and attached the DSP to it.  This allowed me to pop the decorative panel up on Dimensionals and have it still lay correctly on the card.  Also, with the new glue, a light hand is all that is needed.  I place a little dot of the glue on the paper where I want a sequin and place the sequin down on the dot.  Easy!

You already know that the design team will have tons of inspiration for you so I’ll stop talking now and let you get on to the business of oohing and ahhing over their work!

FMS Final 205-001I’ll be back on Friday with a new Fancy Friday project and next week with some other great stuff I’ve been working on!  Until then, thanks so much for stopping in.

Click HERE to purchase wonderful Stampin’ Up products!

Stamp:  Holly Jolly Greetings ; Ink:  Momento Black, Versamark; Paper:  Winter Wonderland DSP, Basic Black, Very Vanilla, Gold Foil; Accessories:  Paper Pumpkin (August), Snowflake Elements, Gold Stampin’ Emboss Powder, Heat Tool, Metallic Sequins, Dimensionals

Blog Signature 2015

Freshly Made Sketches #204

Freshly Made Sketches #204 published on 9 Comments on Freshly Made Sketches #204

Happy Wednesday, everyone!!  Sorry for the long break….I actually took a vacation.  A real live vacation!  To San Francisco!  Woohoo!  It was a crazy few months around my house so DH and I decided it was a good time to get away.  So now I’m back and ready to create some more.  Hoping to get into the craft room over the next few days and I have some fun stuff coming up for you.  But for today, I am the sketch hostess at Freshly Made Sketches.

FMS204 - Amazing Bloom

I used this awesome new set from the main SU catalog called Garden in Bloom to create this fun and whimsical card.  As the last days of summer have left, I’m still hanging on to the summer color palette.  I’m sure I’ll be all fall soon but I just had to create one more!  These stamps are super easy to use, I just stamped the flowers in Rich Razzleberry, Daffodil Delight and Bermuda Bay by stamping off the first (big) layer and then adding the accent layer full strength.  The leaves are the same using Cucumber Crush.  The outlines are Momento Black and I hand cut the images.  I added some splatters from Gorgeous Grunge to create the “panel” from my sketch and then pulled in a sentiment from a Paper Pumpkin set for my little crossing panel.  The placement of the panel and the flowers allowed me to attach the vellum using Glue Dots and they are perfectly hidden.  I added a few little white sequins to finish.

I hope you enjoy my sketch this week.  I’ll be back soon to share some more.  Until then, have a great day!

FMS Final 204-001Click HERE to purchase wonderful Stampin’ Up products!

Stamp:  Garden in Bloom, Paper Pumpkin sentiment, Gorgeous Grunge ; Ink:  Rich Razzleberry, Daffodil Delight, Bermuda Bay, Cucumber Crush, Momento Black; Paper:  Thick Whisper White, Vellum; Accessories:  Metallic Sequins, Dimensionals, Glue Dots

Blog Signature 2015

Primary Sidebar