I’m thrilled to be able to offer you inspiration forGina K Designs‘ new release! It goes live tonight (when this post goes up) so you can head right over to see all the amazing products.
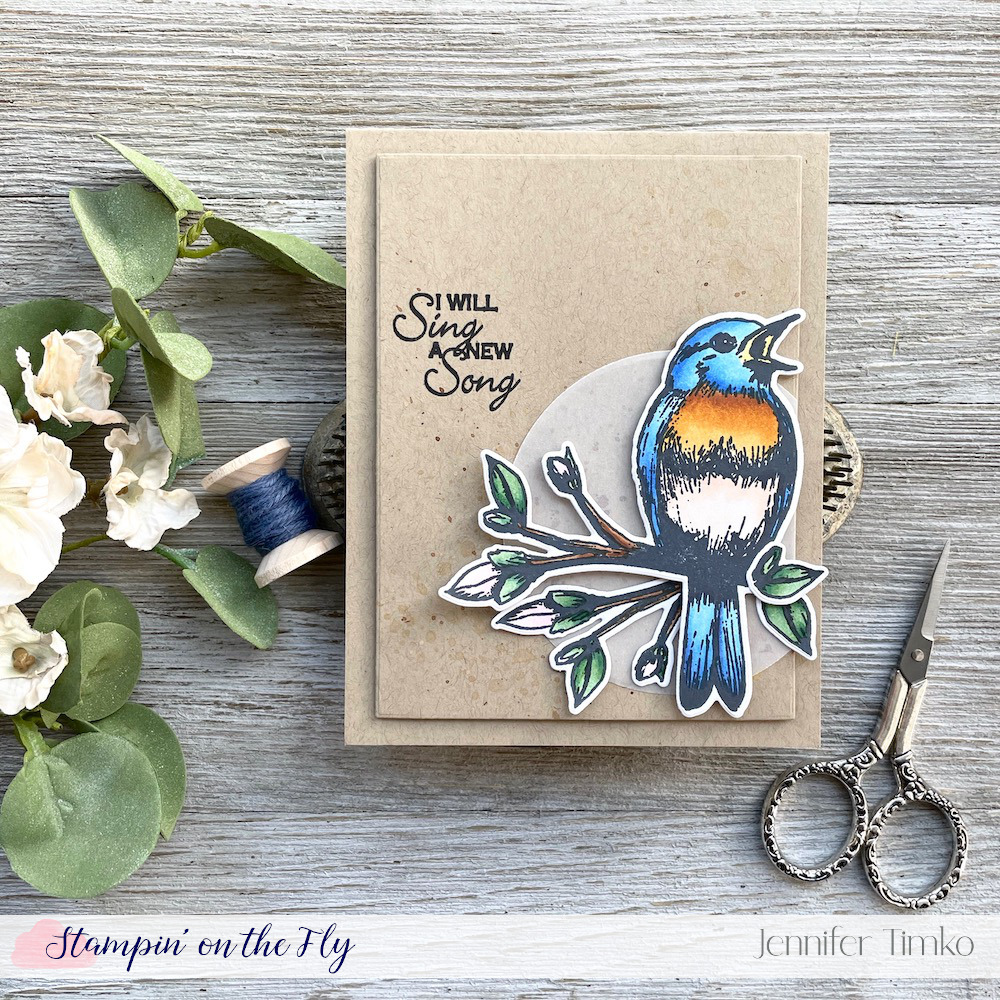
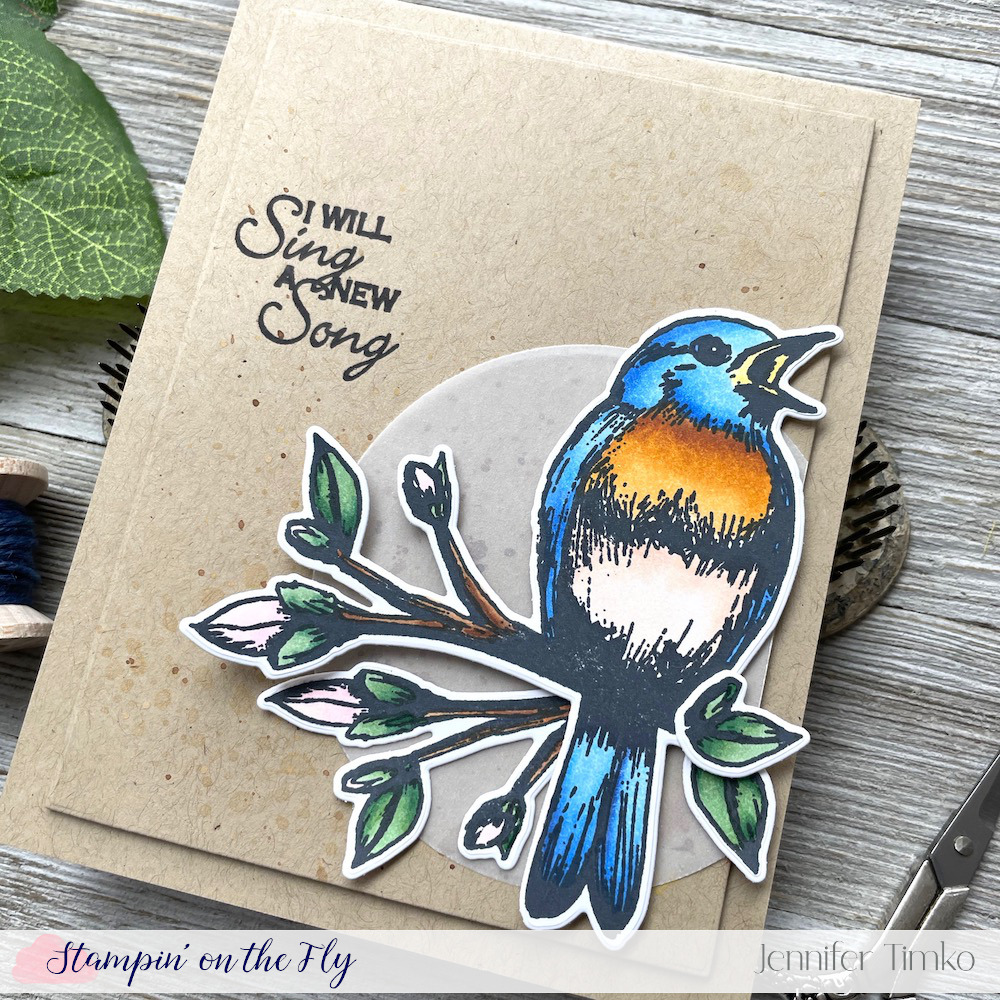
For today, I’ll be showing you Beautiful Birds. And the title says it all. The images are incredible and were designed by Melanie Muenchinger.
I’m sure Melanie had a specific bird in mind when she drew this but I decided it was a bluebird. Because I love them. The image shading is great for showing where colors go and makes it fun to color. I thought my bluebird would be perfect on a cherry tree (I “might” be looking towards spring) so I colored the branch that way and added another branch and leaves from the set too.
After splattering the Kraft card stock with some distress ink, I cut a vellum circle as a layer for the bird. All of the sentiments in the set are beautiful but this one called out to me. And how pretty is the combination of script and print on the fonts?
I hope you enjoy this showcase of the Beautiful Birds set. Again, the shopping is live and I’d very much appreciate you shopping with me here: Shop at Gina K Designs
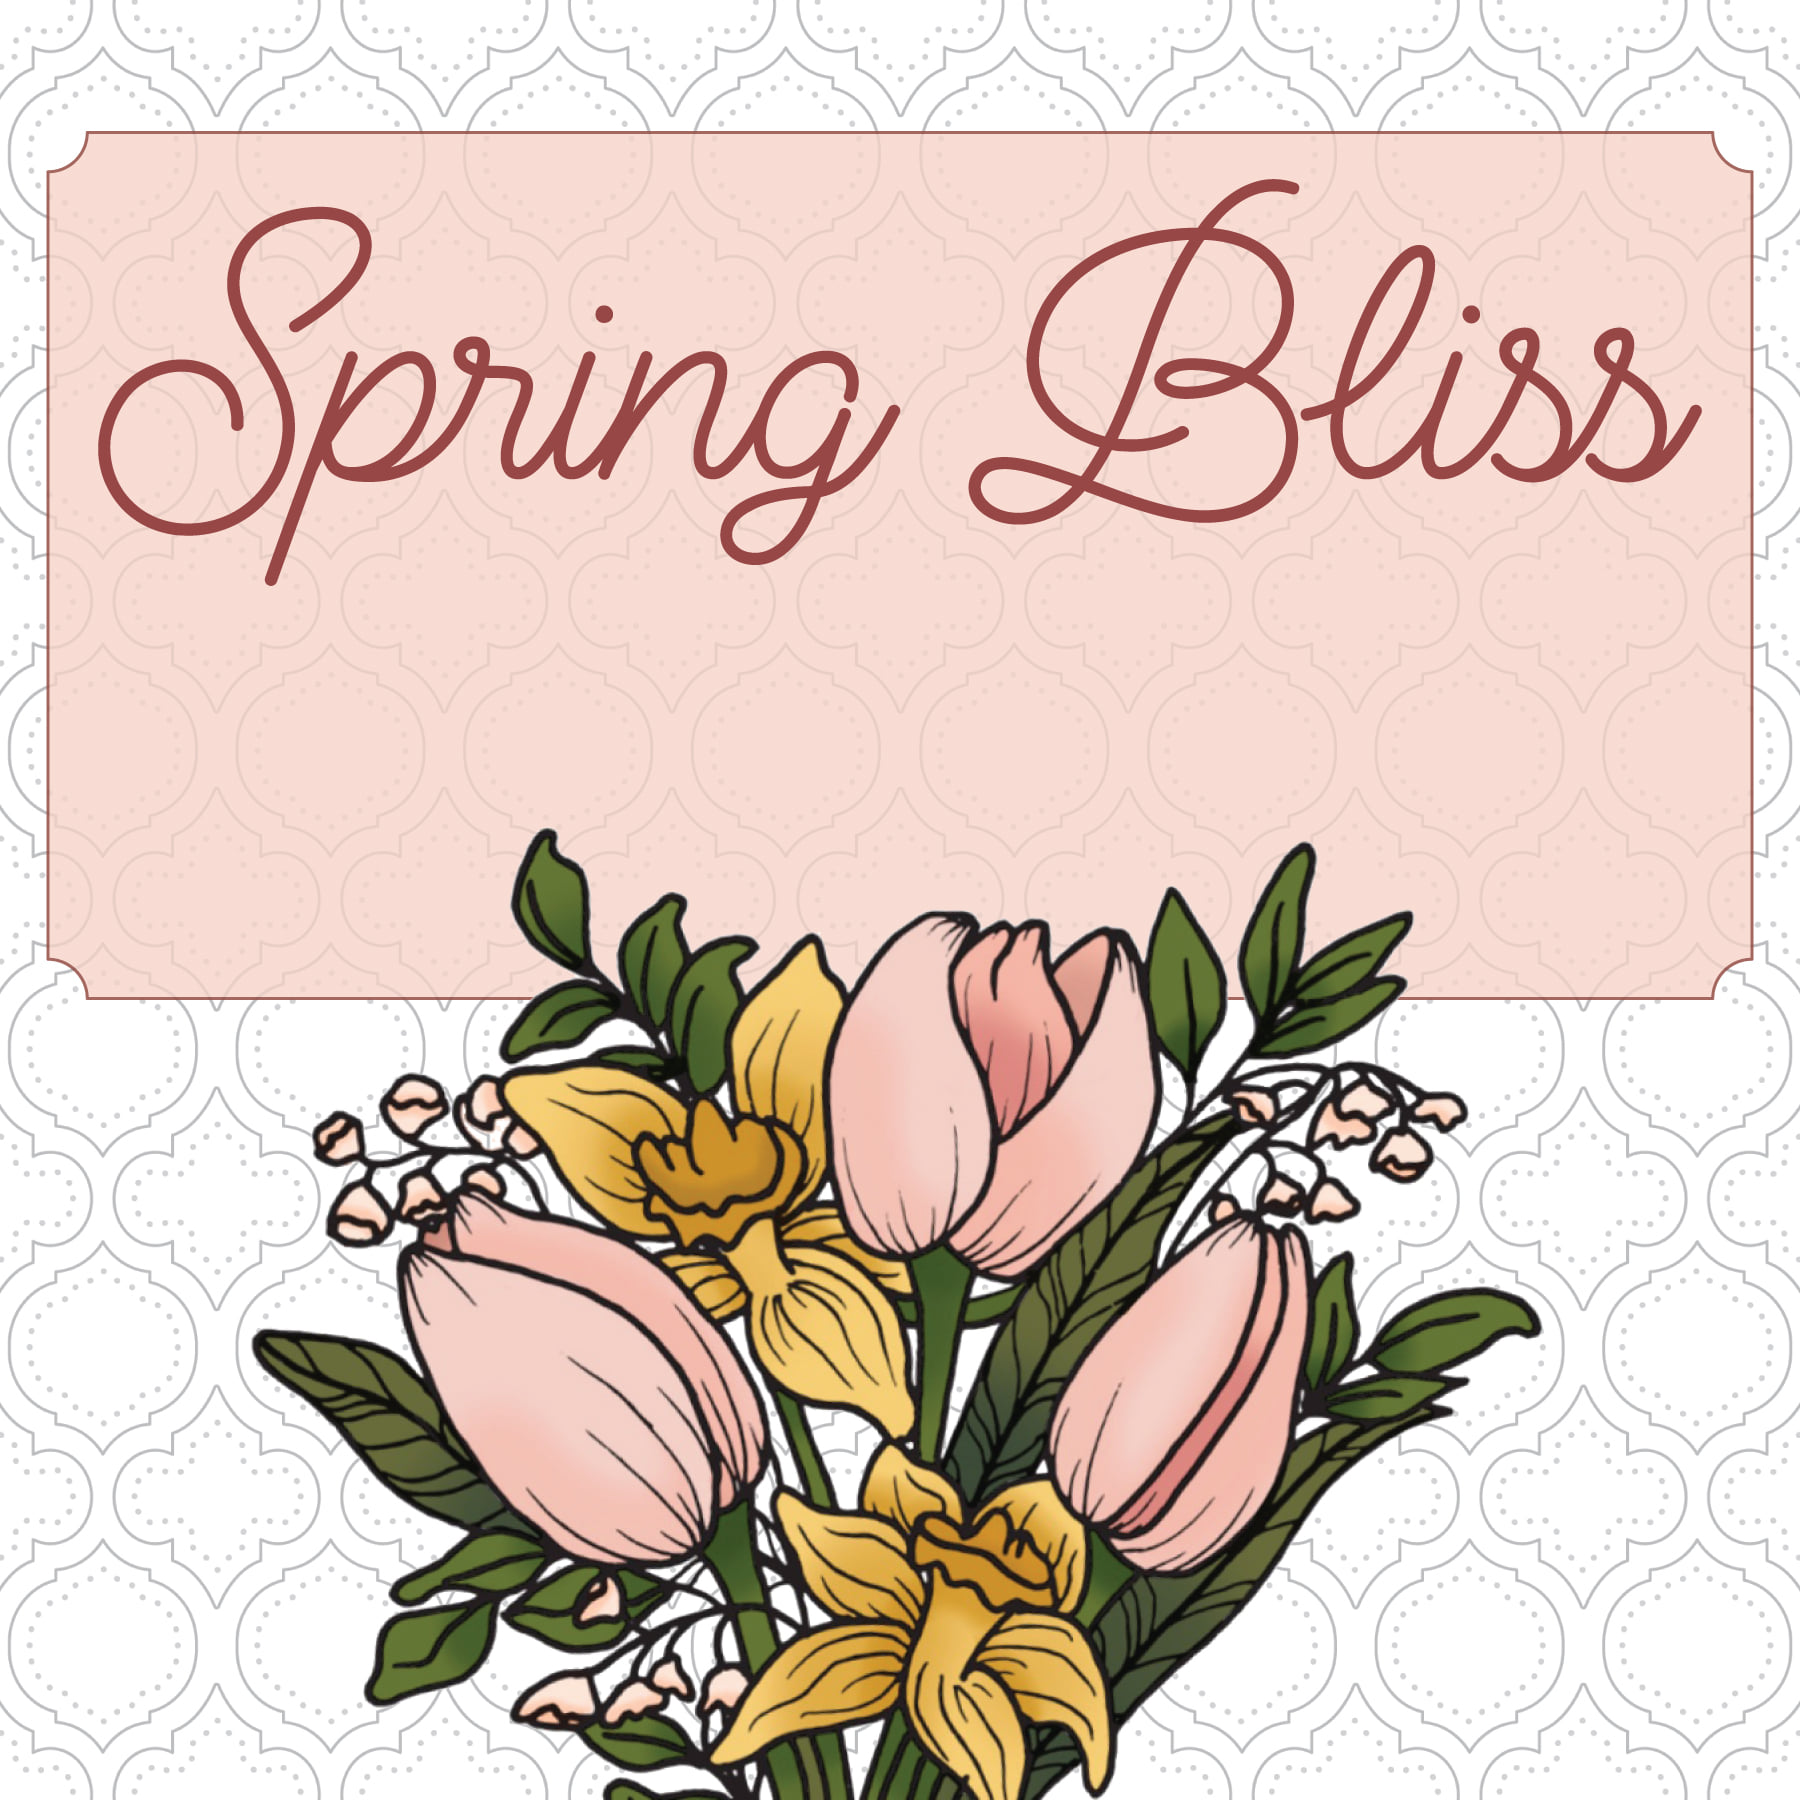
You may have seen that Honey Bee Stamps has started sneak peeks for their Spring Bliss Release. As a member of their social media team, I get to join in on the release fun too! I am sharing today’s Day 3 peeks along with the rest of the team.
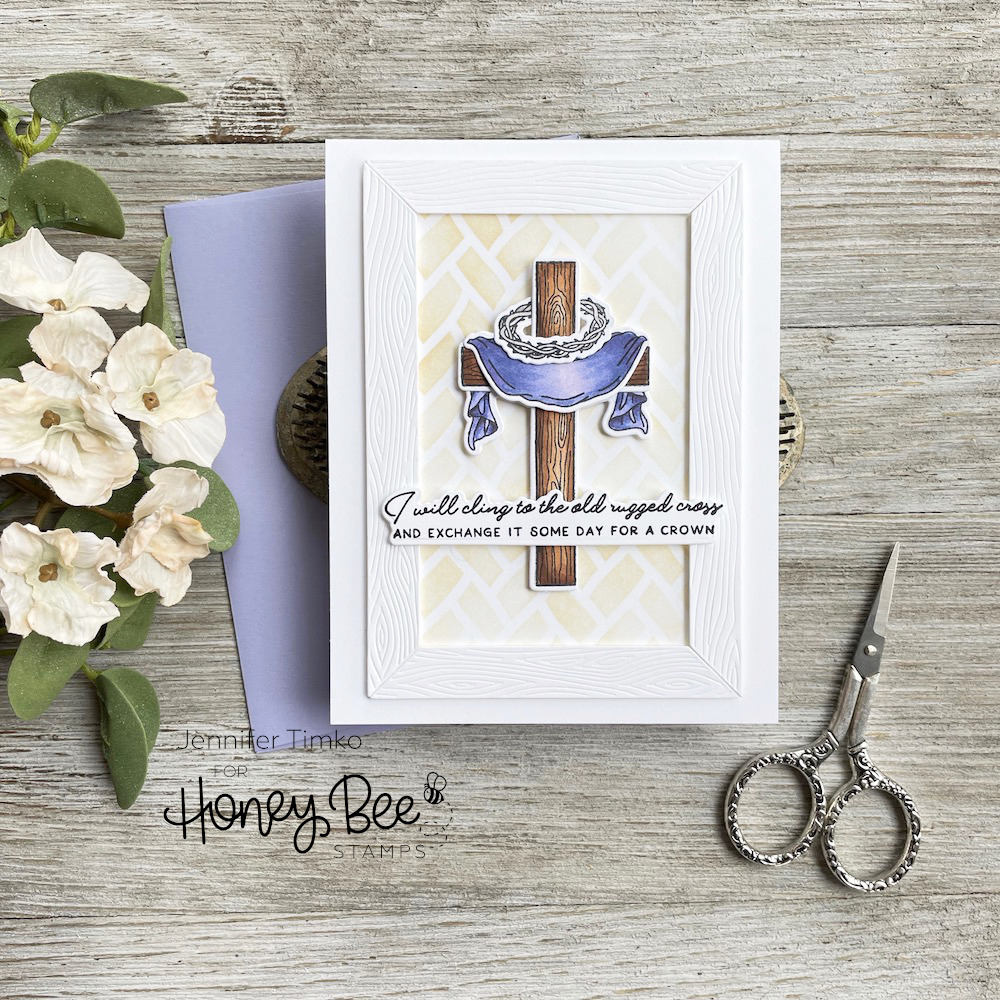
As we approach Lent this week, I was particularly drawn to the Old Rugged Cross set. All of the images and dies combine for many, many variations. This is a multi-purpose set that is wonderful for Easter and Christian holidays but also for sympathy cards. As soon as I saw the set, I knew what I wanted to make. The crown of thorns image is perfectly sized to work with the crosses in the set and the die cuts the center to allow it to hang. The draped banner comes in two images that you can use together or separately to create the layered appearance on the cross.
Once I had the cross built, I wanted to use other products to highlight but not overshadow it. I started with the Frame Builder dies and just cut a white frame to add texture. But the card seemed a little too clean even for me. So I grabbed the new Basketweave Stencil and brushed on some Antique Linen Distress Ink to add more depth behind the cross. Finally, I had to choose a sentiment and this one seemed to be just exactly right. Again, the detail on the dies that cut the sentiment close allow so much more of the rest to show through.
Thanks so much for stopping in today. I’ll be back tomorrow with another peek.
The release will go live tomorrow night (Feb. 16th) at 11p Eastern after a release party at 9p Eastern. You can find the party on Instagram with Honey Bee Stamps!
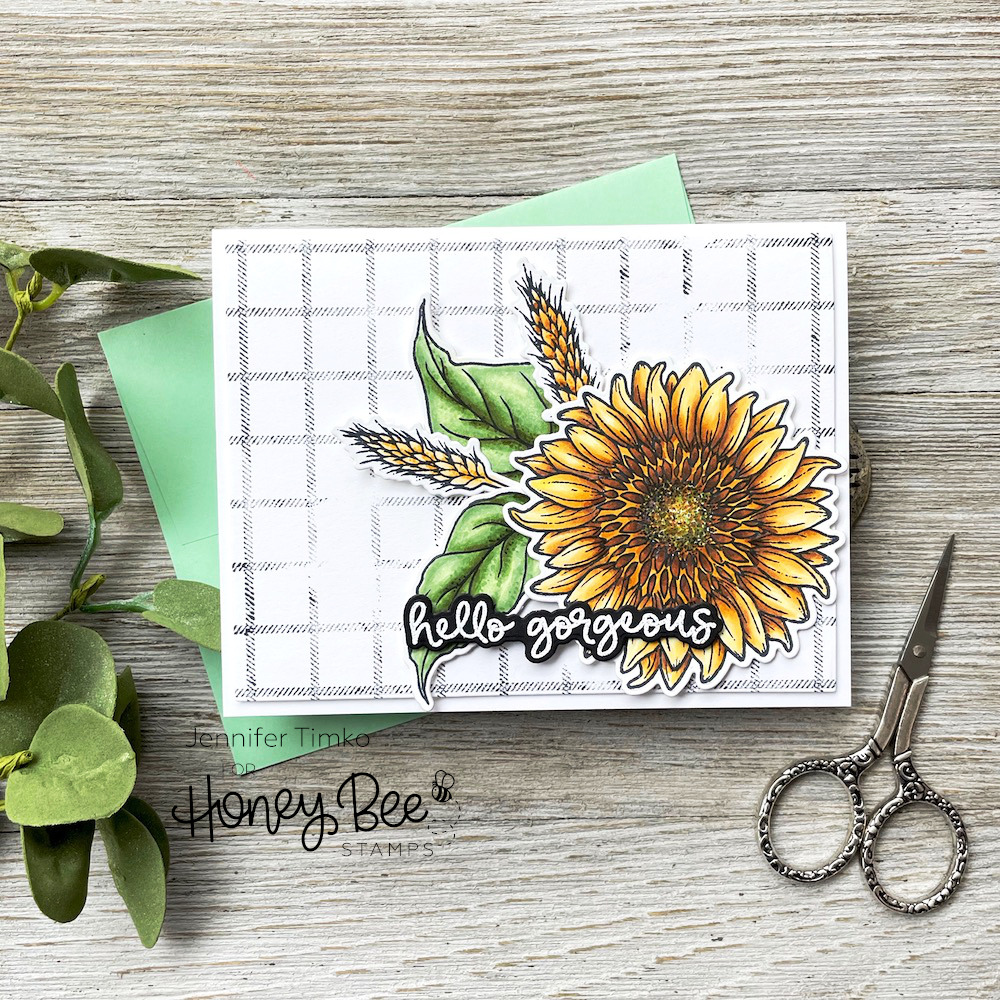
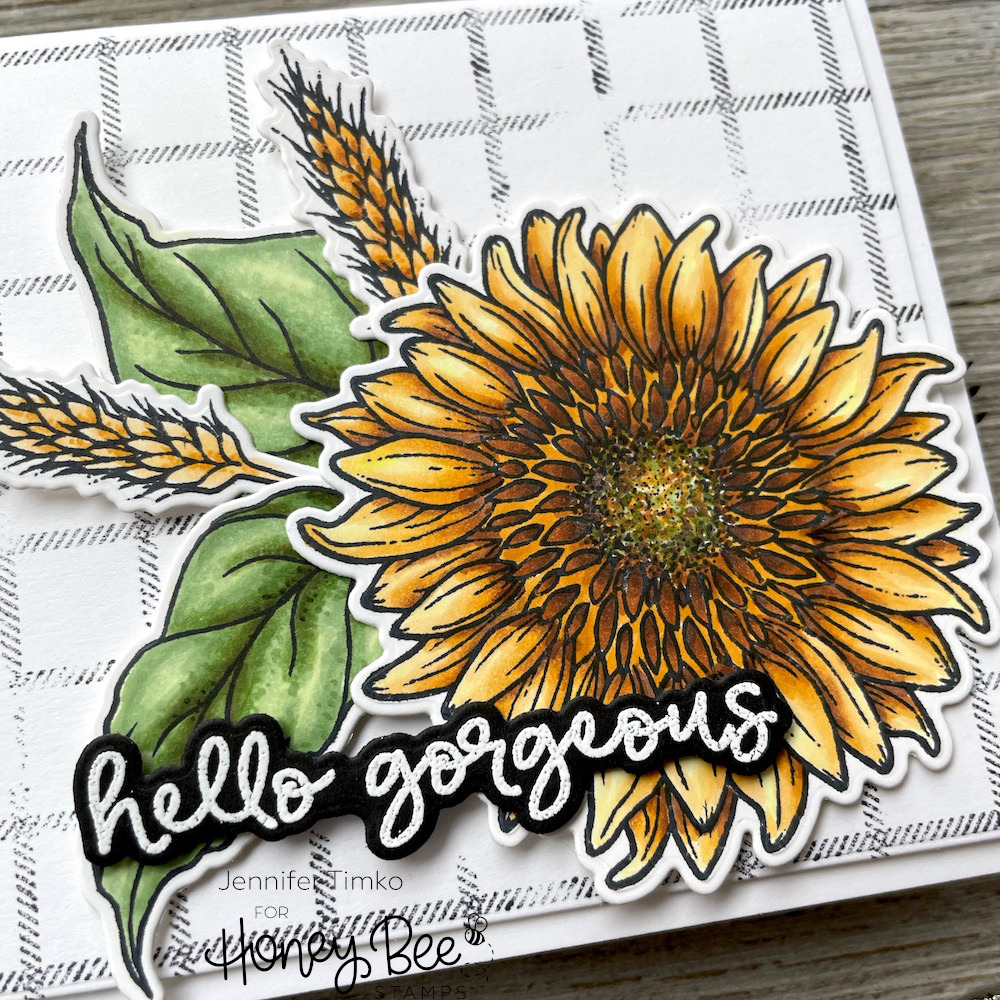
Hello my friends! I hope the week has been good. I’m here to share a card I created for Honey Bee Stamps on Instagram today. Even though I have lots to be doing creatively this week, I just needed to take a moment for some coloring. And what better than a wonderful flower.
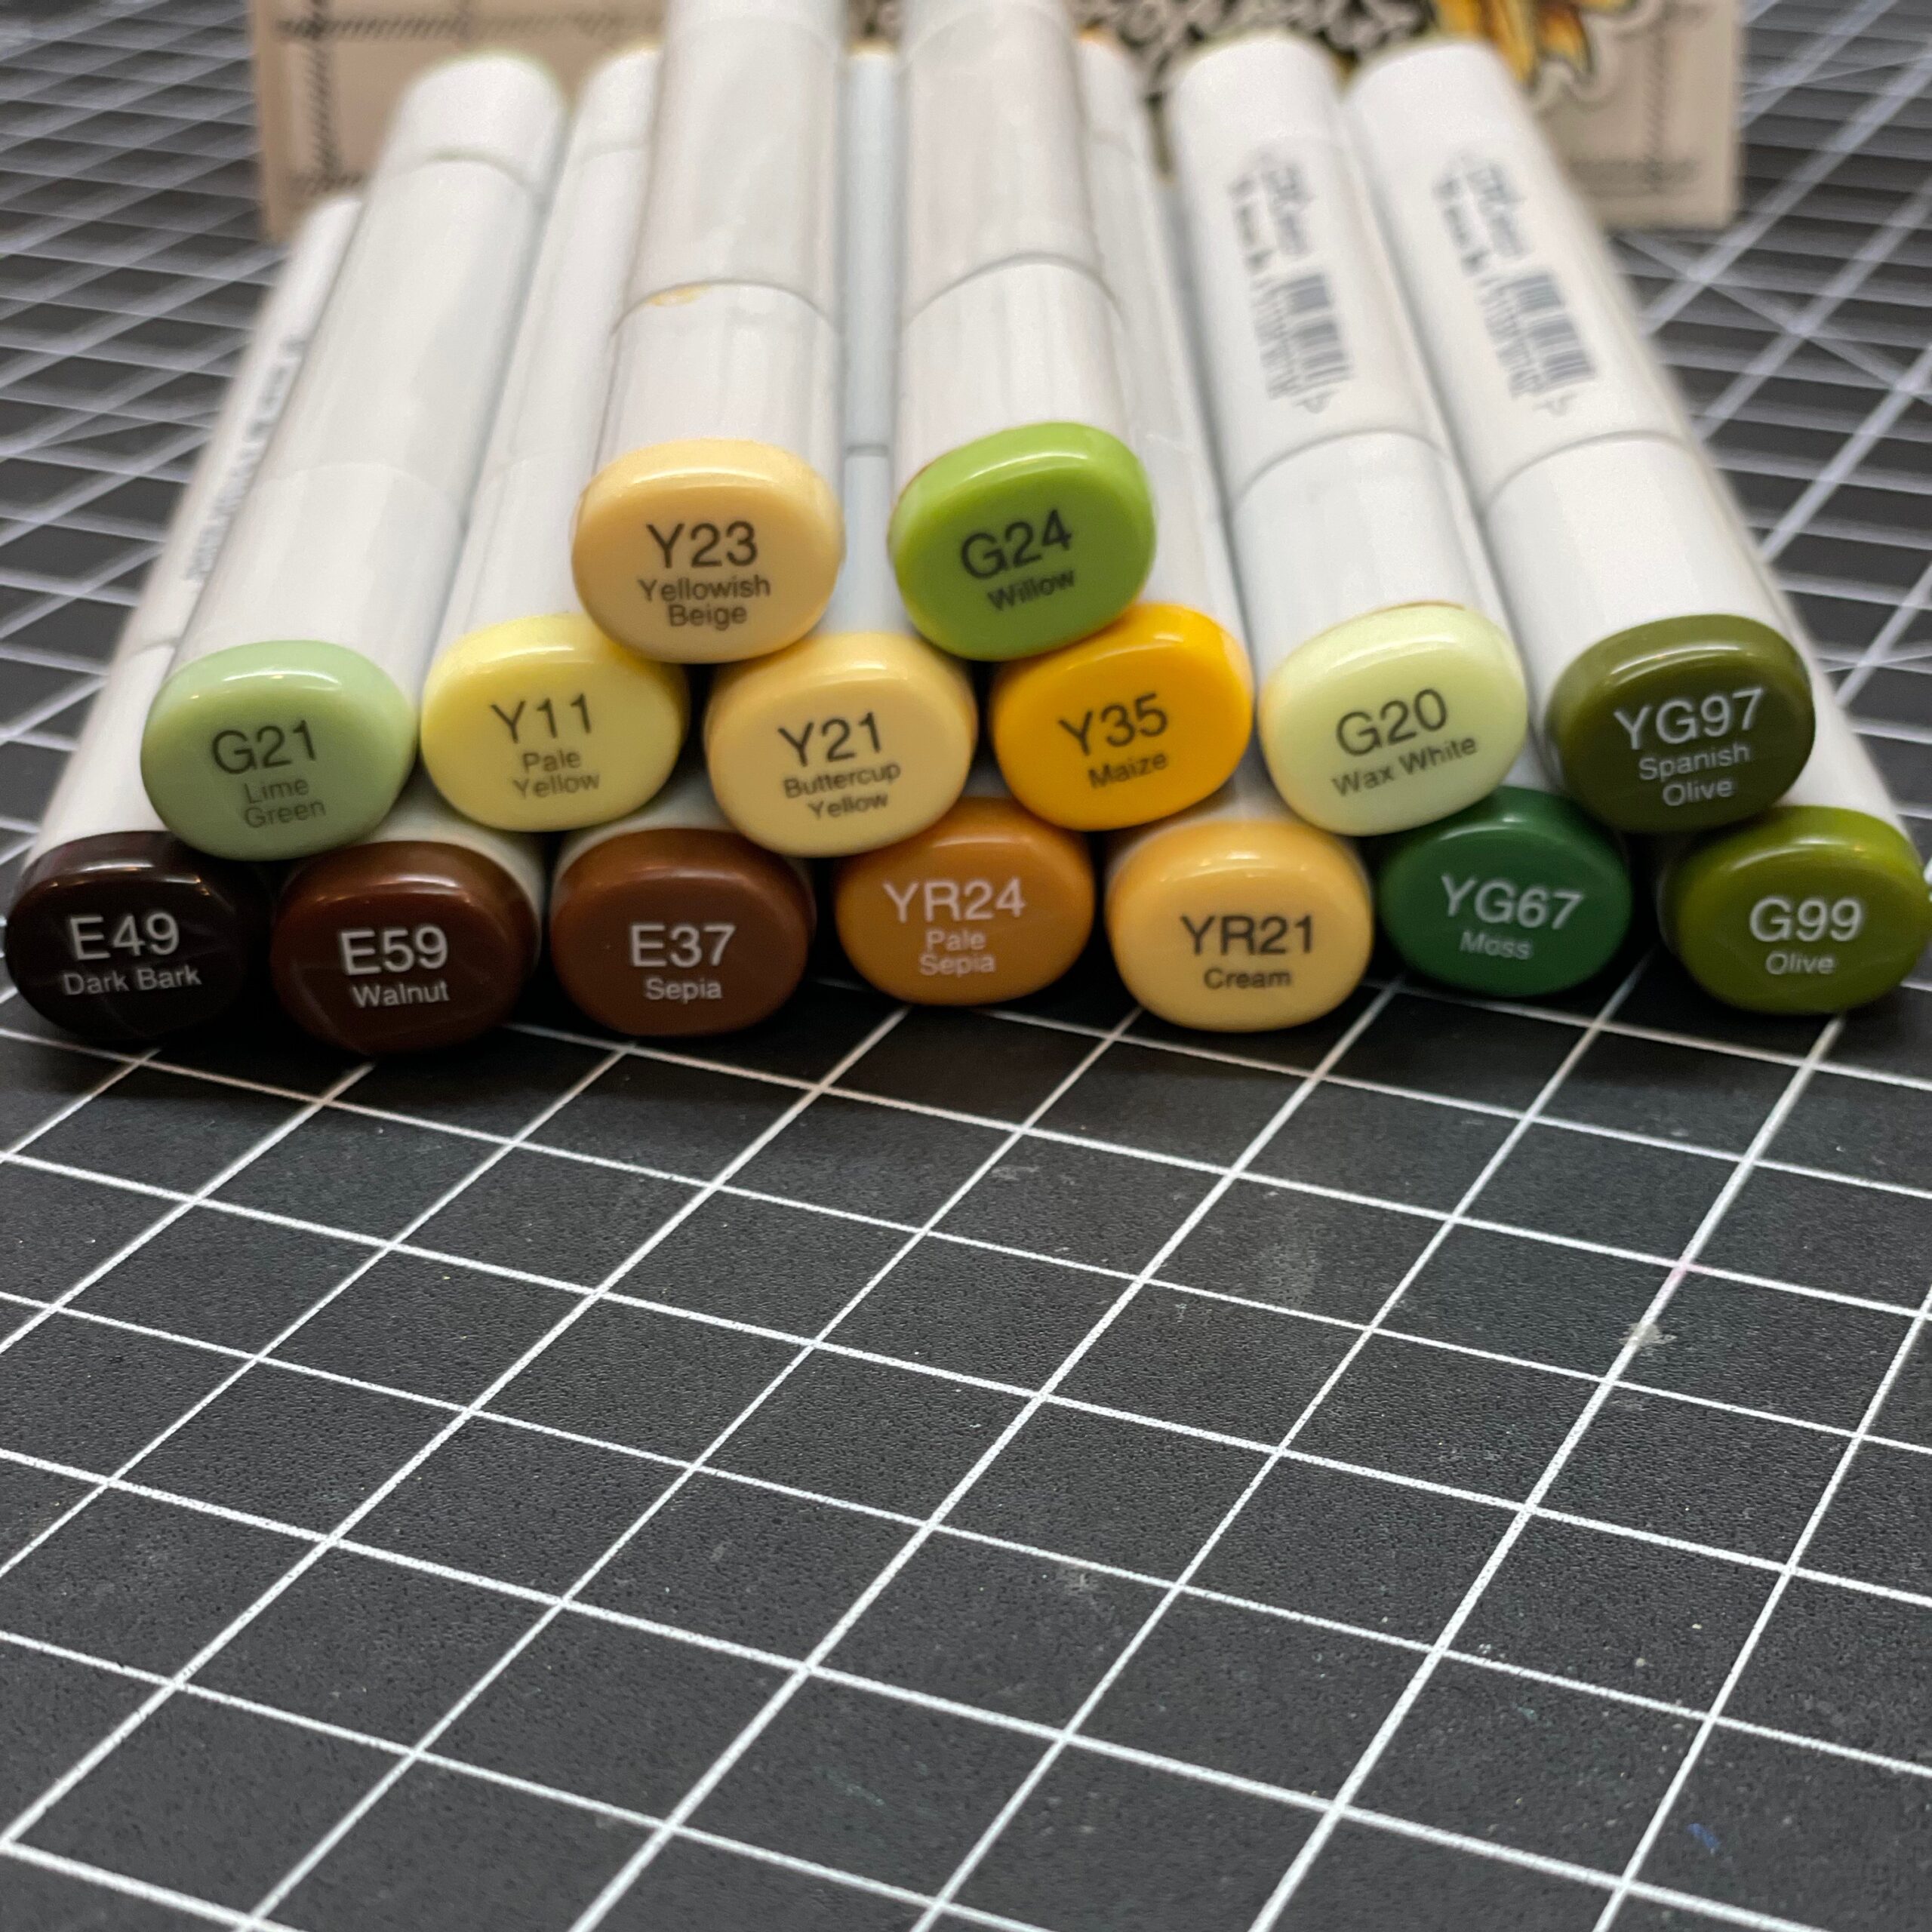
While it isn’t quite sunflower season, it is ever really NOT the time to color one this pretty?! Yeah, I thought the same. I pulled out lots of yellows and browns and got to work (a picture of the colors below). I just played with shading until I was happy.
Next I worked on leaves and then the wheat. The wheat adds a nice texture element with the flower. The Farmhouse Check background stamp is one that I will use over and over. Today I purposely under inked it for a tattered effect. Kind of loving that! And then finally the sentiment from the set. Perfect!
I hope you enjoy this one and that it inspires you just to sit down and color a bit. I didn’t do this all in one sitting and I highly recommend projects that take a bit of time. Thanks for stopping in today. I’ll be back tomorrow with a new card for the latest release by Honey Bee Stamps.
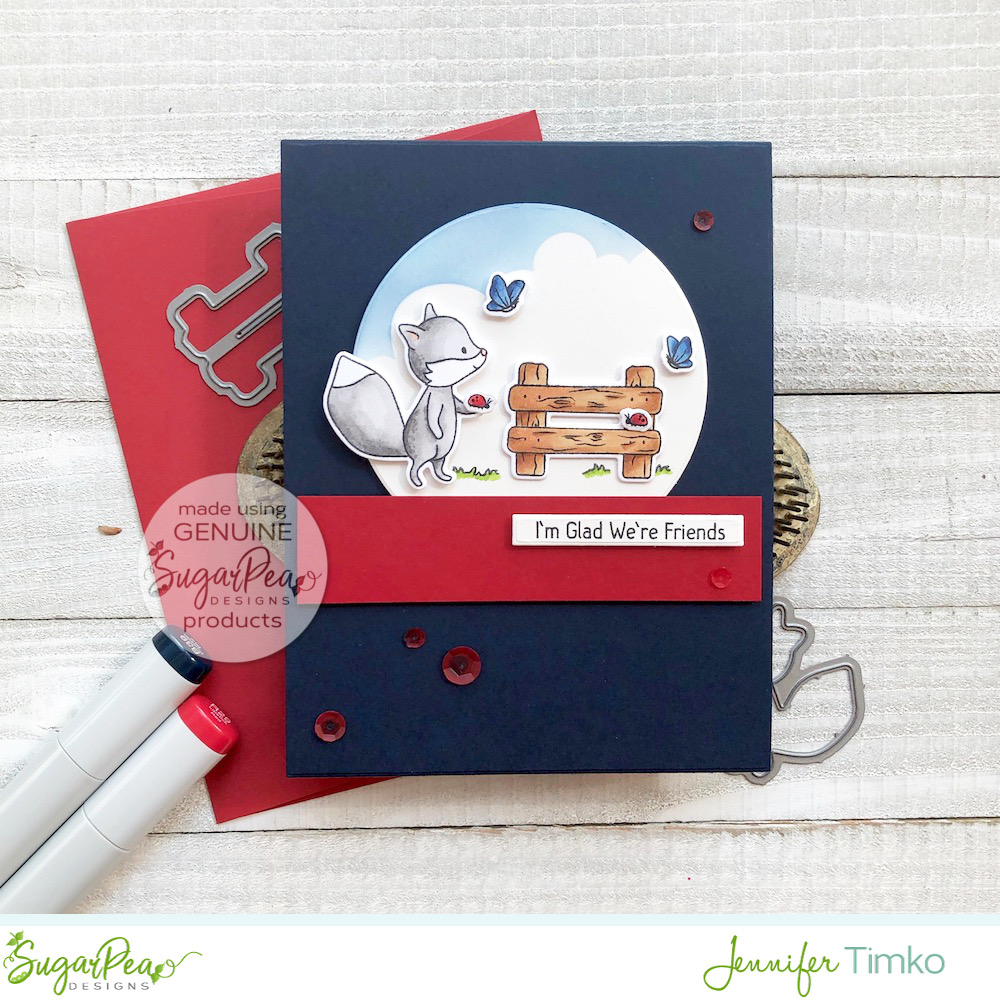
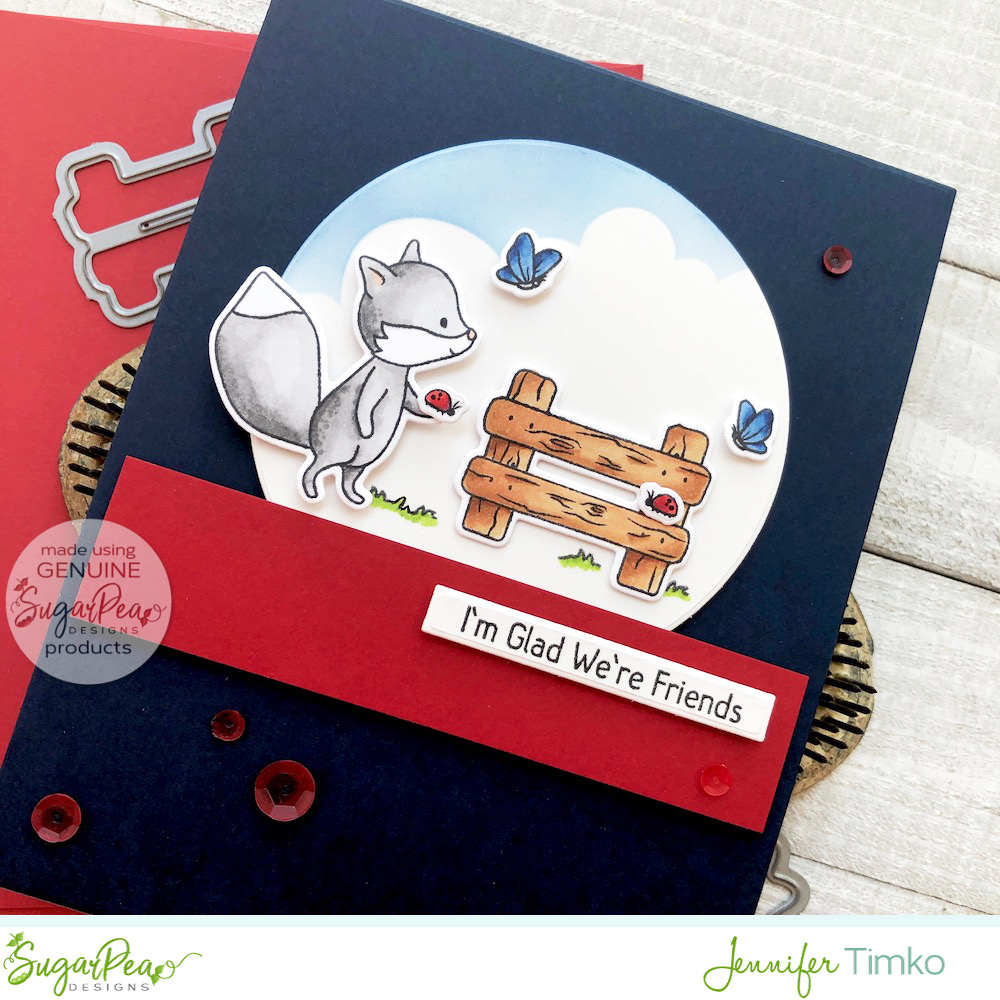
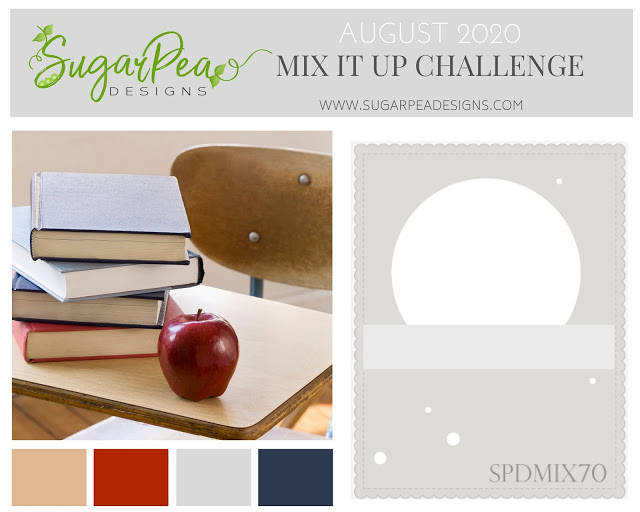
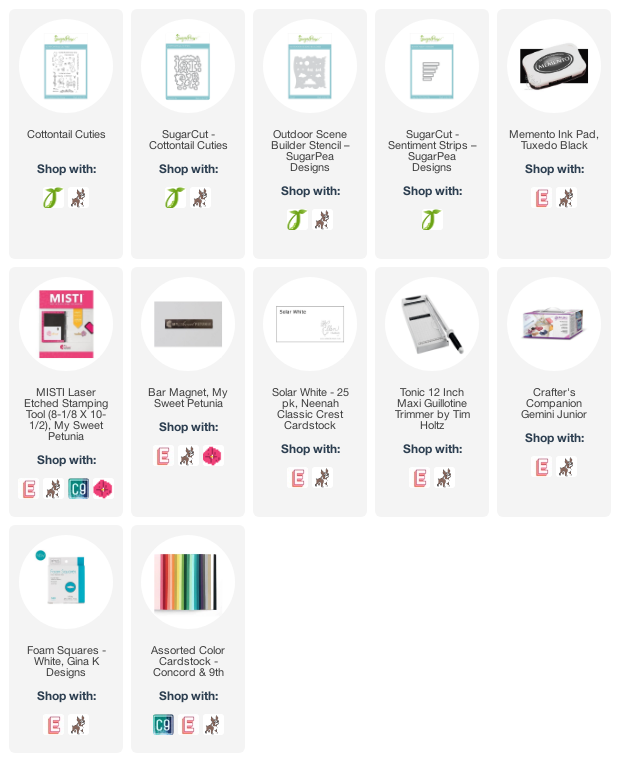
And wow, am I glad! Thank you all for your continued support of my little stamping world. It makes such a difference in helping me stay positive. A quick share of a card I created for the Mix It Up Challenge #70 from SugarPea Designs. You can go join in and play for a chance to win!
I was inspired by both the sketch and the colors. I love these Cottontail Cuties and thought they’d make a fun scene. It is such a joy to color the little images!
I used the Outdoor Scene Builder Stencil to add a bit of a cloud background and then used my favorite little Sentiment Strips to cut a sentiment from the stamp set.
I hope this brightens your day a bit! Remember to come over and join the fun and earn a chance to win. Have a great day!
Welcome to the October hop with my Crafty Friends! I cannot even tell you how excited I am about this month’s featured company. I have been a long time fan of Ellen Hutson and what a thrill to have their team support our hop. For those of you new to this hop, we are a group of friends with a similar beginning in stamping who became friends. Each month on the 20th, we will share inspiration with a focus on one company.
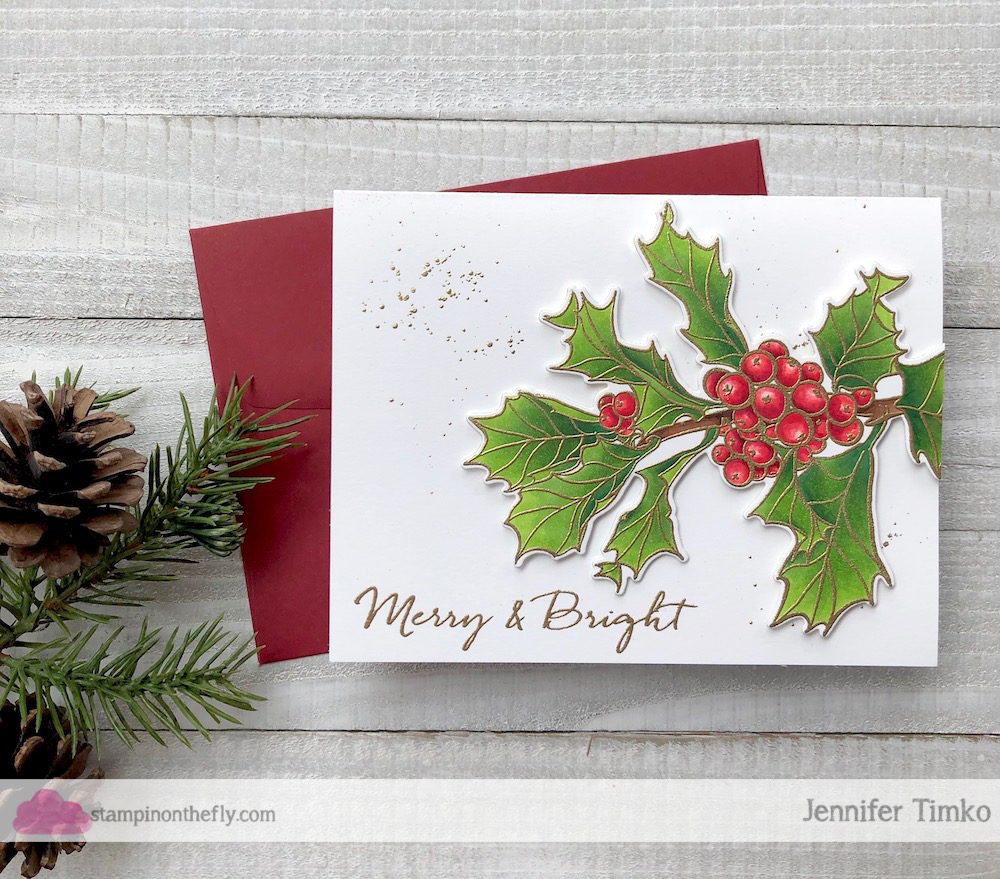
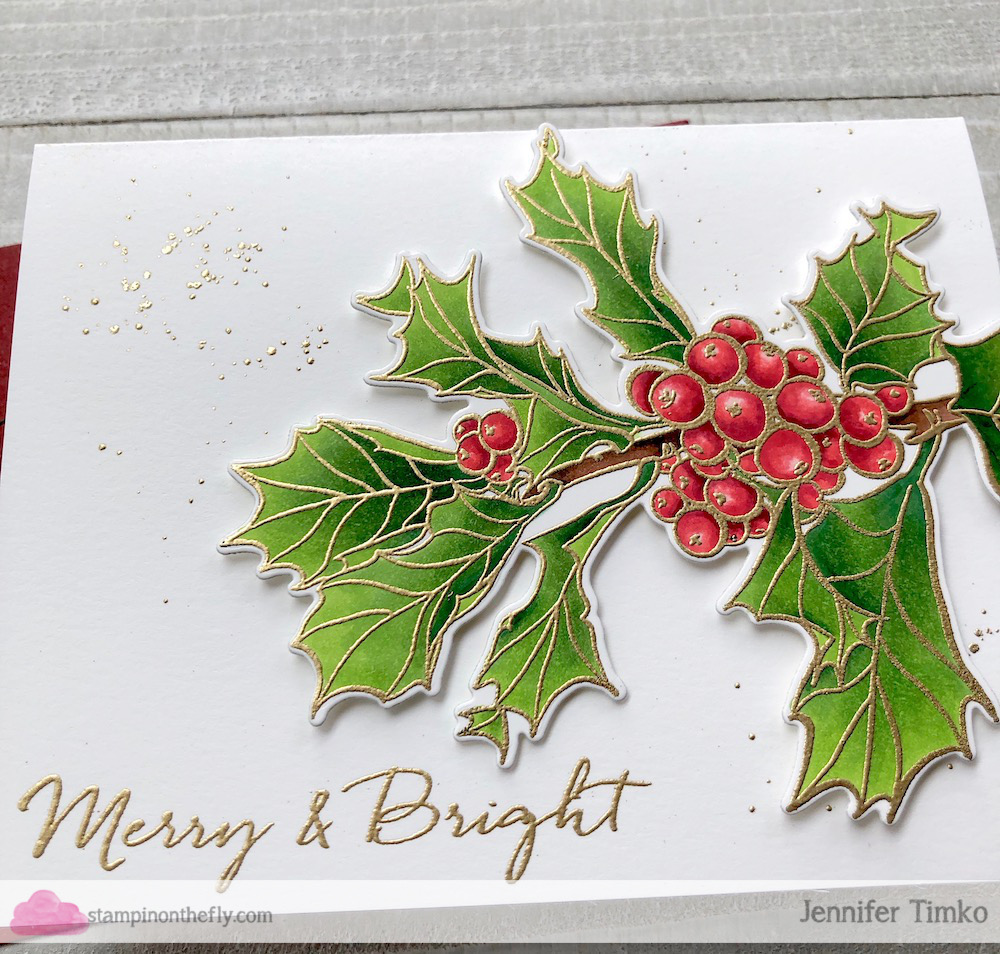
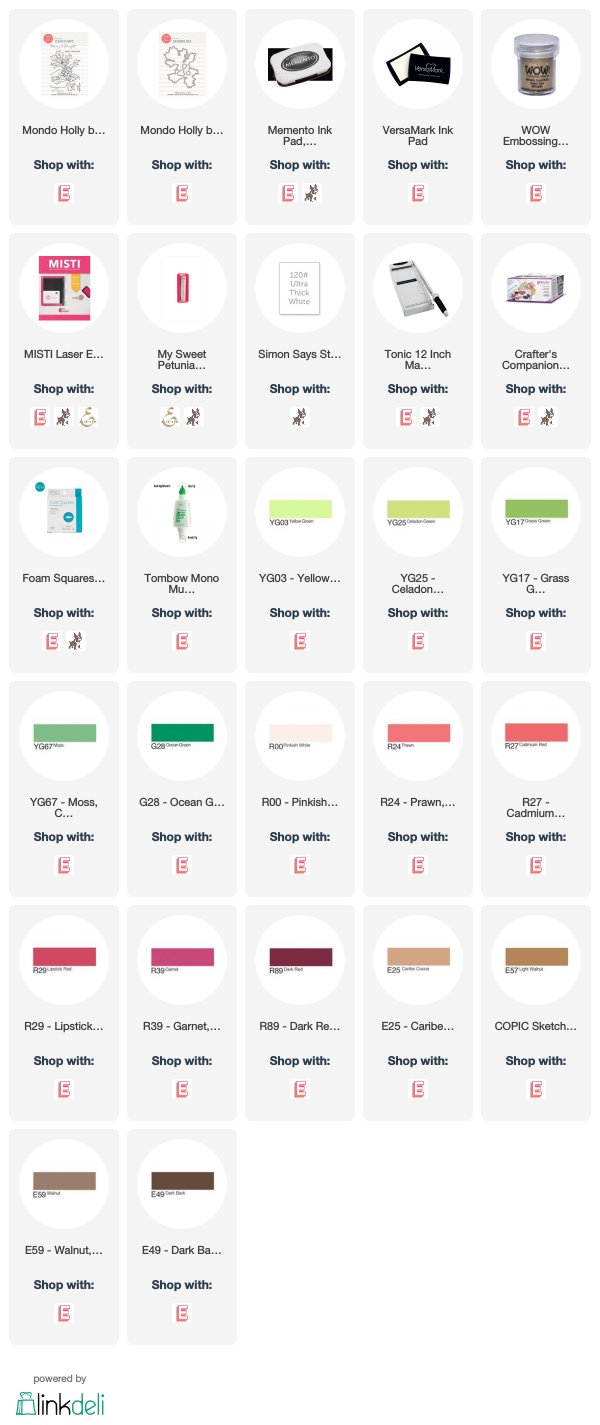
As I mentioned earlier this week, my crafting time this month is pretty much gone due to training on a new plane. But before I left, I just had to pull out the amazing Mondo Holly set to use for this hop. I LOVE this big, gorgeous image! Ok, in truth, I love ALL of the Mondo images from Ellen Hutson. They are so fun to color and are perfect for practicing all kinds of coloring.
I used this coloring as a “brain break” while I was studying leading up to my training. I love just playing with shading! I first stamped the image in Momento Tuxedo Black onto Simon Says Stamp white card stock using my Misti. I always worry about embossing powder with my Copics so it was easy enough just to stamp with a known ink. I started with greens and kept adding richer colors until it had the depth I wanted. They I went to the reds and did the same. Finally a bit of brown for the stem. Then more magic. I went back to the Misti, used some anti-stick powder and over stamped the image with Versamark Ink. Then I heat embossed using Gold Rich Embossing Powder from WOW. Oooooh…..aaaaahh! Using the coordinating die, I cut out the image.
For the card base I stamped the sentiment from the same set in Versamark and heat embossed again but thought it needed a little something else. So I used a technique I learned from a dear friend, Lisa Curcio. As seems to happen in the world of stamping, we were apparently working on similar cards at the same time. She told me about her technique of using watered down liquid glue to create splatters for heat embossing. Well isn’t that smart?! I gave it a go and you can see the result. I used a small paint brush instead of a water pen (an old one used for messy techniques) and it worked perfectly. I did find that it took a little longer to get the powder to set versus using ink but otherwise quite easy.
As you have seen in previous months, we have a Crafty Friends discount code to share with you (what awesome generosity!). Click the button above and use the code CRAFTYFRIENDS20 for a 20% discount on the Ellen Hutson Essentials Line for two days, today and tomorrow (Oct 20-21). There are so many wonderful products in this Essentials Line so happy shopping!
Now on to the rest of the hop. I’m thrilled to send you to Amy Kolling, who is next in the rotation. And here is the list in case you get lost along the way.
Hi everyone! Sorry for the quiet on the blog lately. I’ll explain a bit more at the end of my post. But for today, I get to share with you the latest from Freshly Made Sketches! Our sketch designer is the talented Lee Ann Barrett and she has a winner of a sketch for us this week.
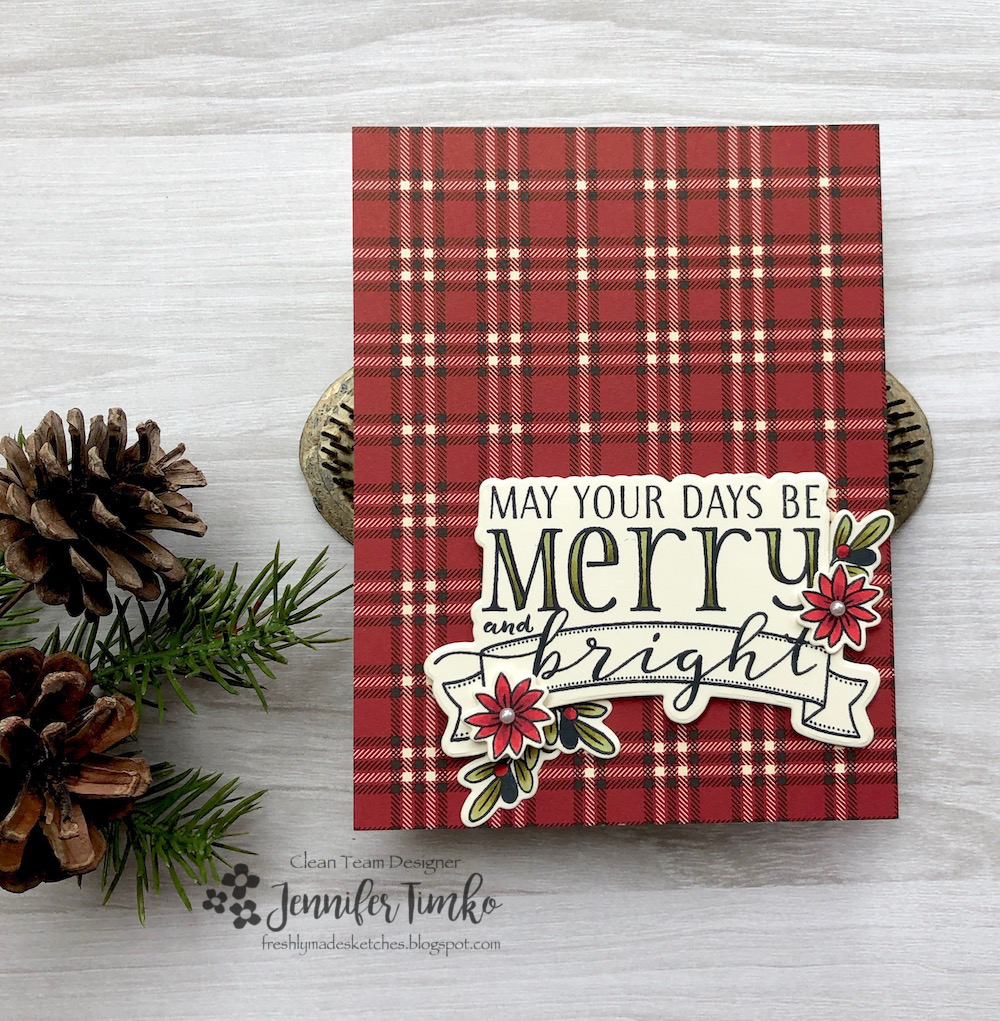
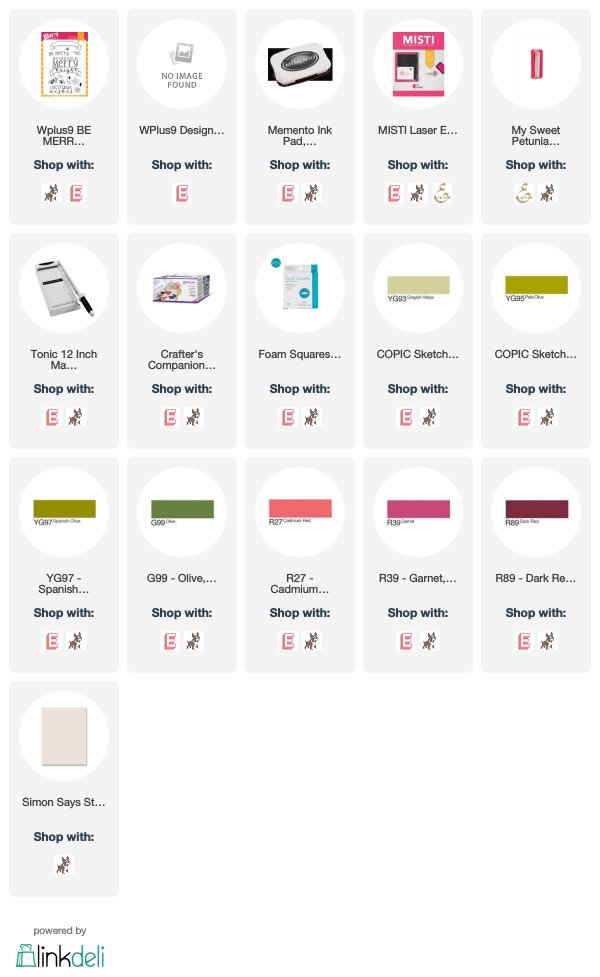
I’m all in on Christmas cards now and I thought it was perfect to pull out an old favorite for this sketch. The Be Merry stamps and dies from WPlus9 are always a winner in my book. I stamped the sentiment onto Ivory card stock and then cut it out with the dies. I stamped some of the accessory images too for layering. I thought the sentiment needed a bit more oomph so I added a bit of the olive ombré on the Merry. The flowers and leaves were quick Copic coloring but they really add so much.
I seem to be drawn to plaid this year and I found this old Stampin’ Up patterned paper in my stash. Perfect! I added a couple of little pearls for flower centers and popped up all the elements with foam squares.
Now for the rest of the story. I never really share too much about my “day job” here but in this case, I wanted to explain my sporadic posting. This picture is from the last day of flying on my beloved Airbus 319/320. I have been in the right seat of that fleet for a long time and I needed to make a change for scheduling. Last week I started training on the Boeing 757/767 fleet. There is a lot that goes into training. Studying, of course, but we also come to our training center in Denver for over a month. Needless to say, I had lots to do to make that happen at home. So I did get a few cards made ahead of time (not as many as I had hoped) and will be posting those over the next couple of weeks. And then you probably won’t hear too much from me until I can get back home and in the craft room. Once I’m back home, I should be able to settle back into the routine quickly and get back to creating.
So with that, back to the Freshly Made Sketches challenge! Make sure you hop over and check out all the inspiration from the team. Thanks so much for stopping in today!
Happy August release day from Picket Fence Studios! I’m so excited to share a couple of projects using two of the new sets. Also, this is my second post of the day. If you are looking for Week 2 of the Freshly Made Sketches #400 Celebration, just scroll down.
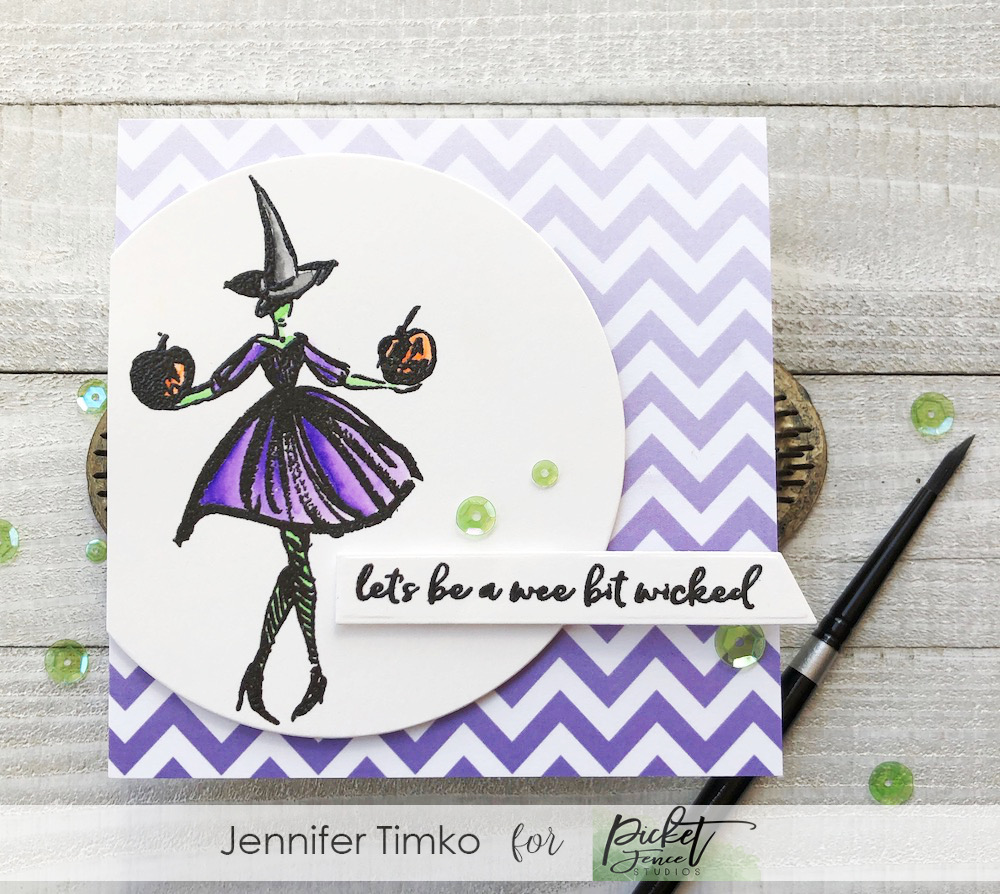
So in that “what did you do on your summer vacation” prompt for blogging, my family did a long weekend in New York City and I finally got to see Wicked. Yep, you can see where I’m going with this. Needless to say, the moment I saw the If You’ve Got It, Haunt It set, I knew I had to create Elphaba. Isn’t she glorious with her green complexion?!
I used my Zig Clean Color Markers to color her on Bristol Smooth Paper and then cut her out using circle die. I found this awesome ombré paper that matched perfectly too. Now this sentiment made me jump for joy! It comes from the Wicked Together stamp set and it was PERFECT! A few green sequins as a finishing touch.
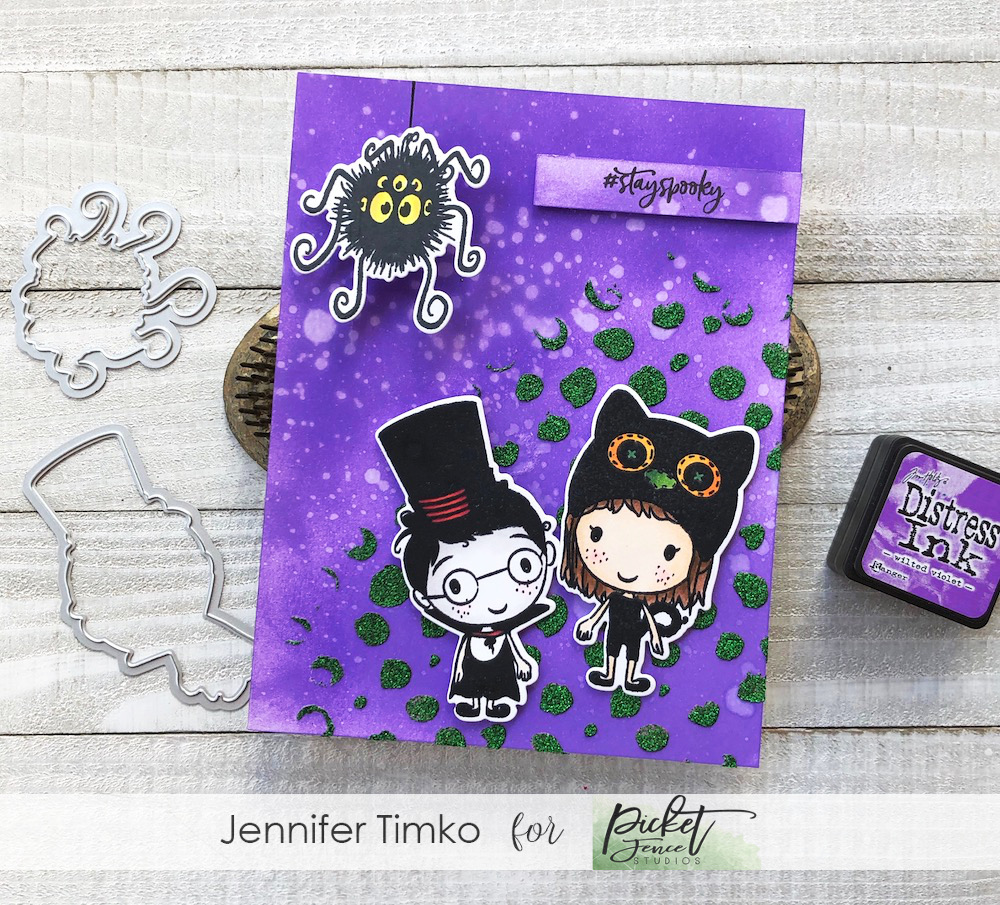
Next up is another adorable Halloween set called Trick or Treaters. This little group of ghouls could not be even a little cuter! And the perfect size for quick coloring. I colored them up using Copic Markers and thought it would be fun to make a wobbler card. Yep, that little spider is on an Action Wobbler and it just makes me chuckle. I’ll have a short video over at Instagram if you care to see it in action. My background was created with Distress Ink in Wilted Violet and I used Tonic Glimmer Paste to add extra dimension with the Random Dots Stencil. The sentiment from the new Witch, Please cracked me up with the spider.
I hope you enjoy these cards and the whole release! Hop on over to Picket Fence Studios to see all the offerings! Thanks so much for stopping in today. And happy shopping…because you are going to want it all!
I’m so happy to share the latest sketch from Freshly Made Sketches today! It is really fun and you are sure going to love how many options you have when creating with it. The amazing Kim Singdahlsen is the sketch designer and she really outdid herself.
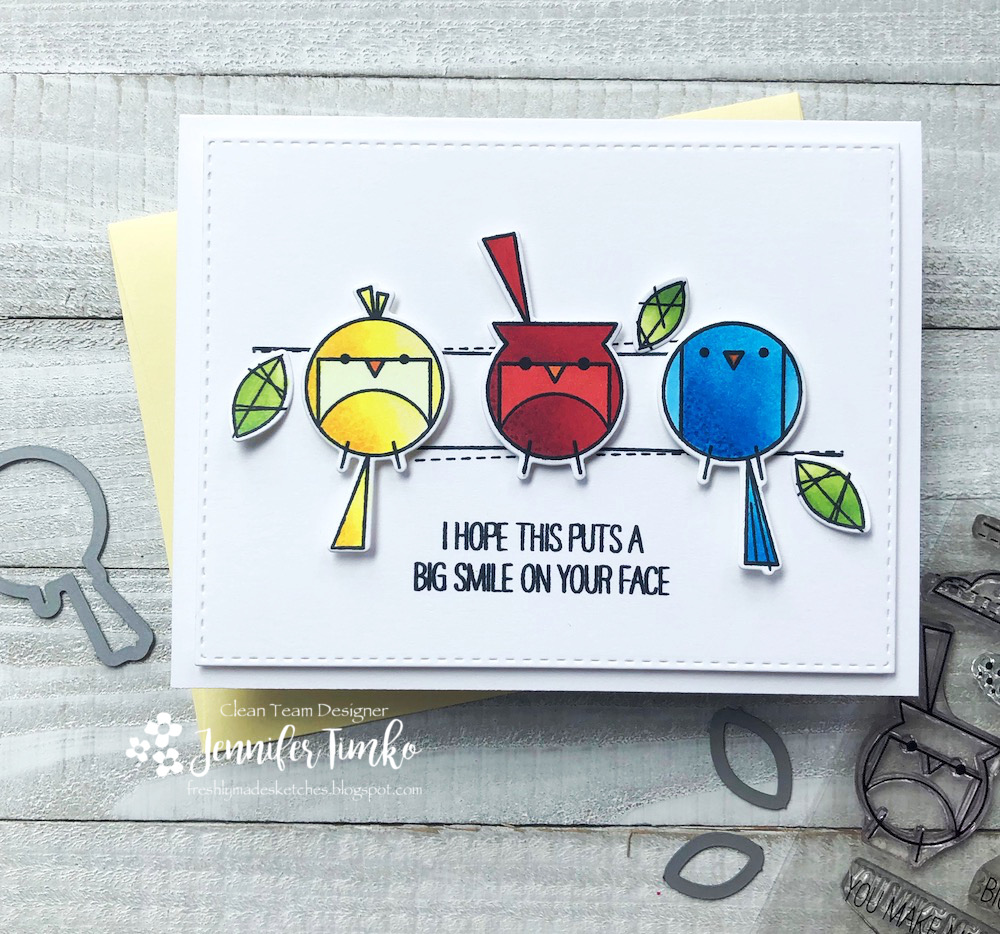
I did try, at first, to make this in the vertical. In fact I had all the elements colored and ready when I realized it was WAY better to go landscape. Now these little Happy Birds from WPlus9. What can I say?! I saw circles and I just knew these birds were perfect. I mean seriously, you just have to love them. I had not pulled out my Copics for a bit so out they came. I admit that I really needed some time just coloring and these were such fun. The little stitched lines were a great way to stick with the sketch and I added some leaves from the set as accents. The sentiment is great with these little guys and I hope this really will bring a smile.
I’m going to share a little bit of a secret with you. Actually kind of a sneak “peek”, if you will. You can see from the number above that we are closing in on a big number sketch at FMS. And we have some fun things planned. Can’t quite let you in on that yet but you need to be ready for some August fun! Keep your eyes out for more details in a few weeks. In the mean time, thanks so much for stopping in today. See you soon!
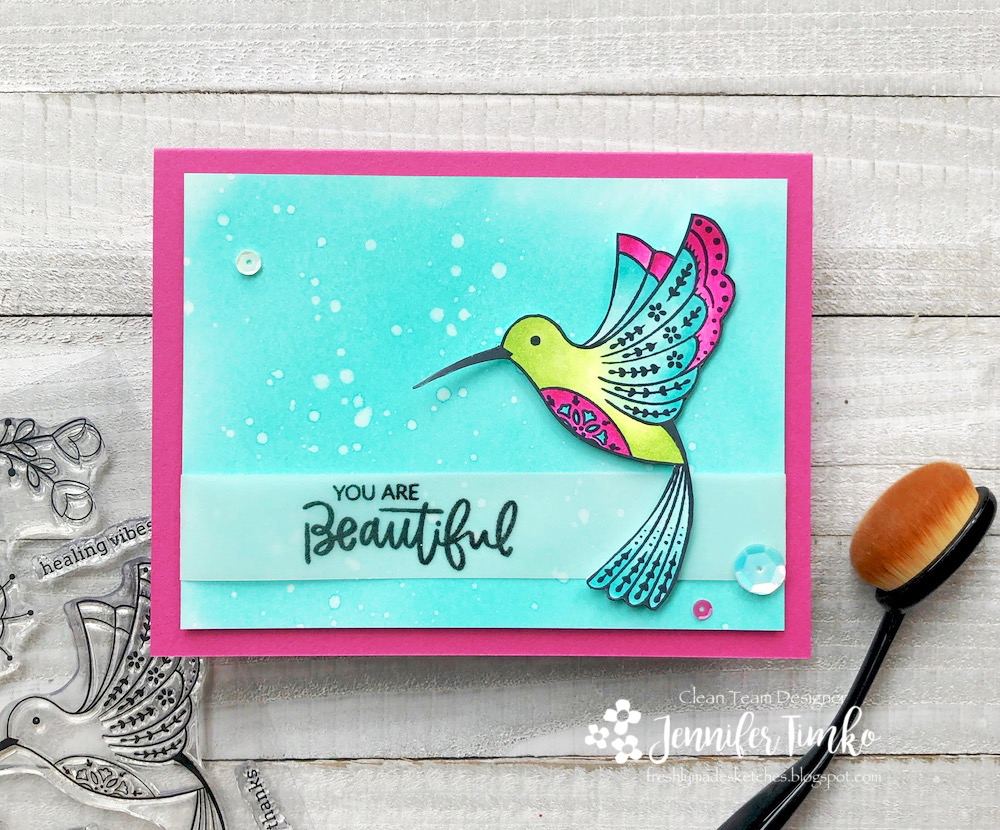
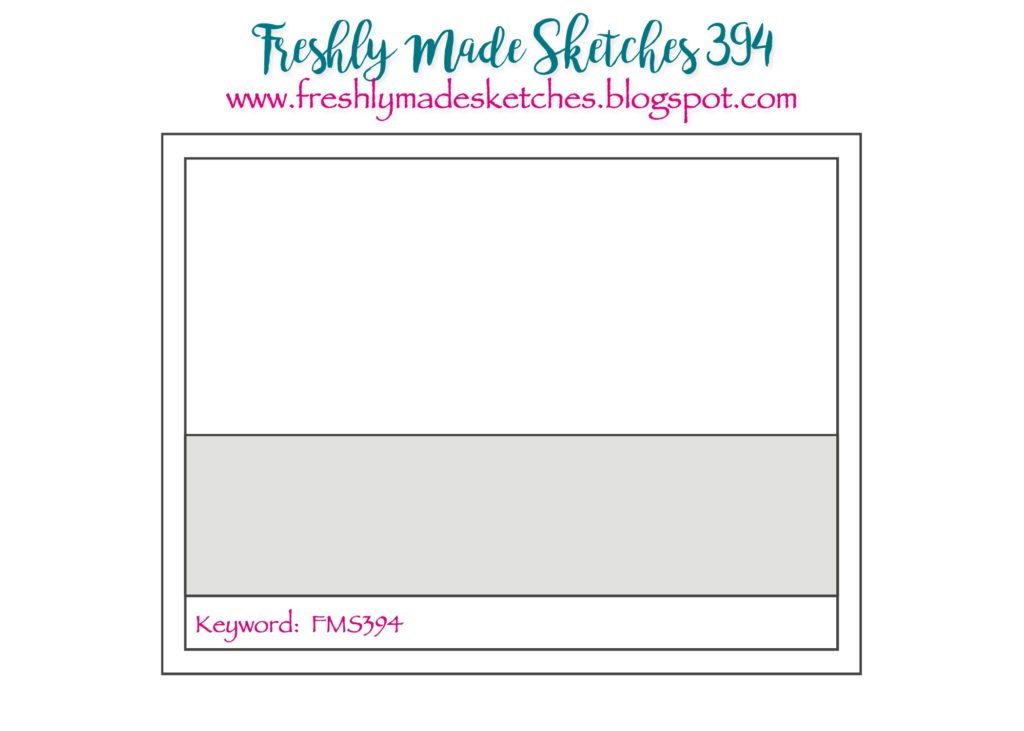
The latest sketch from Freshly Made Sketches is one that I hope you will like. I am the sketch designer this week and I went for a straight-forward look. These are my favorite during the summer since I seem to have limited crafting time (kids home, lots of work, etc).
I could not wait to color this hummingbird from the Folk Hummingbird Stamp Set by Pinkfresh Studios. I had such fun coloring this with my Copic Markers! Then I continued the fun by creating this background with Hero Hues Ink Reactive Ink in Pool Party. It swirls on the Bristol paper like a dream and creates such great texture with just a little water. I found this sentiment in my stash and it is an Ellen Hutson set called Be Strong. I thought the Passionate Pink base was perfect to coordinate with my RV Copics on the bird.
I hope that you will enjoy playing along with us this week! Thanks for stopping in today. See you again soon!
Welcome to the Stamping Friends Trifecta Blog Hop with Picket Fence Studios, Gina K Designs and My Sweet Petunia! This collaboration of artists and friends is sure to inspire and I’m thrilled to be a part of it! I have two cards to share today! See links at the bottom plus how to win one of three $50 gift certificates from our sponsors.
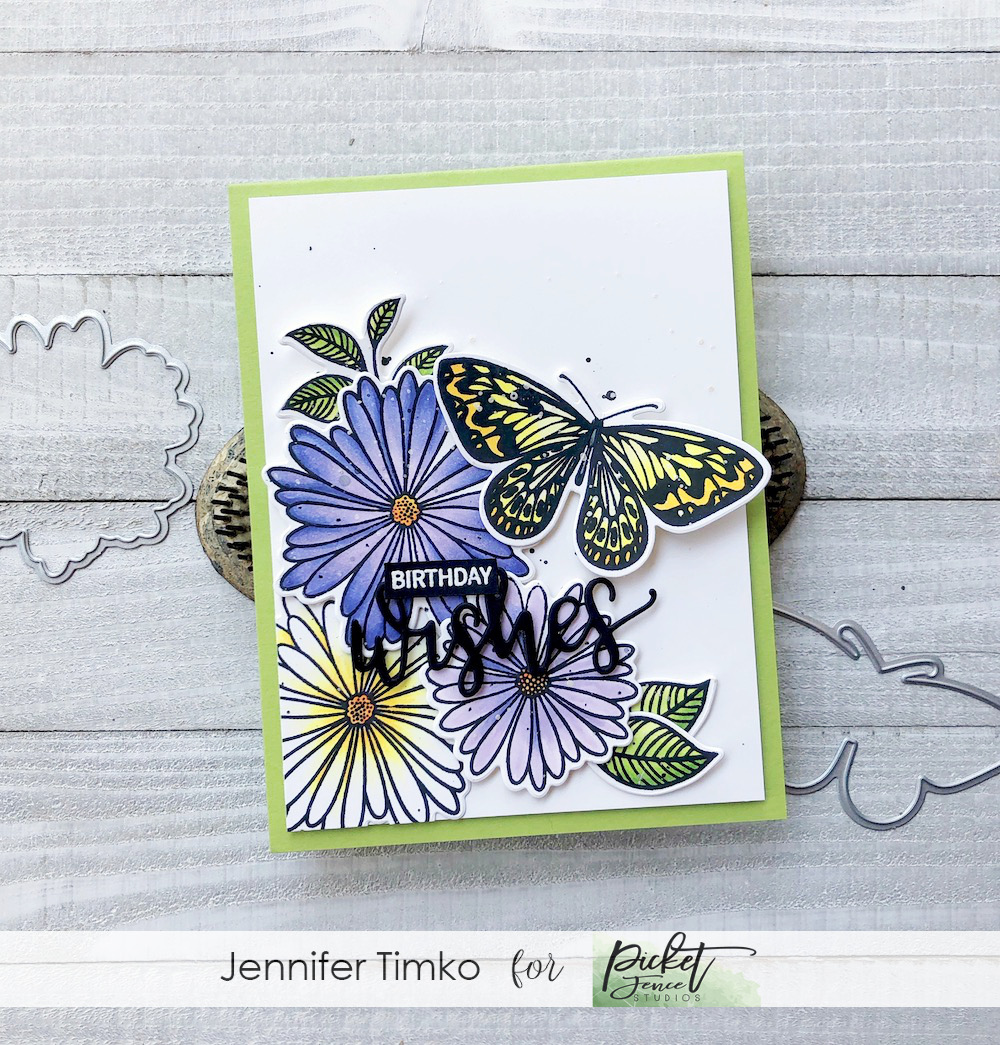
First I have a card that uses the Elegant Asters Stamp Set by Gina K Designs. I stamped the images using my Misti (because I ALWAYS stamp with my Misti) to ensure perfect inking. Then I colored them using Copic Markers. Since they are Asters, I focussed on purples but decided that adding in a yellow flower would be a nice contrast. The butterfly was a must add to this card because, well, it is such a beautiful butterfly!! I used the Wishes Die paired with the Wishes Mini Stamp Set for the sentiment. And here is the kicker…that close cutting with perfect borders on the tiny sentiment?? Yeah, the My Sweet Petunia Cut Align!!! Oh, I’m in LOVE!! I added some splatters using black watercolor paint and Smooch Moonlight Accent Ink.
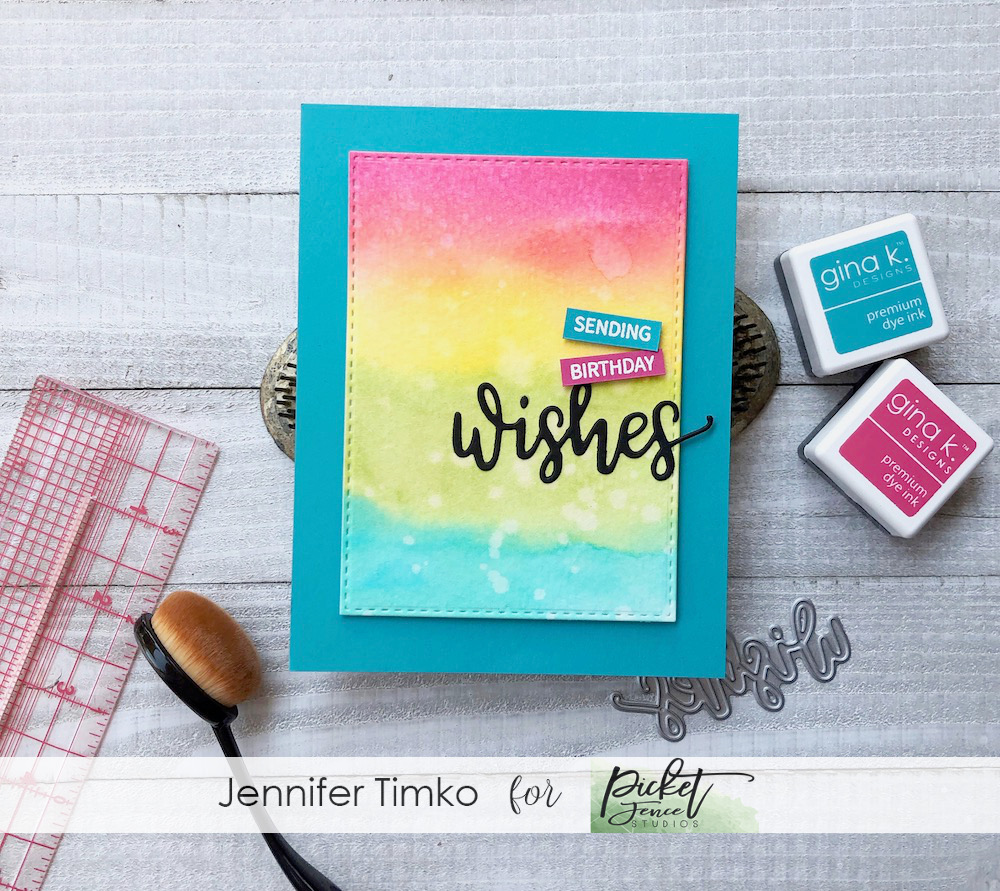
For my second card, I decided to focus on only the sentiment. Same die and stamp but a totally different vibe! I used Gina K Inks with my Life Changing Blender Brushes to add ink to some watercolor paper. I added some water to soften the look and splattered with some water as well. By using the blender brushes, I could control the color placement which made it work easier for me. Again, I used the Cut Align to create the layered tiny sentiments. The Blue Lagoon Card Stock was wonderful for a base to make the colors pop!
I’m so glad you stopped by today! Remember to comment all around the hop. Each store (Picket Fence Studios, Gina K Designs and My Sweet Petunia) will be giving a $50 gift certificate to their store (that is THREE chances for shopping!).
Primary Sidebar
We use cookies on our website to give you the most relevant experience by remembering your preferences and repeat visits. By clicking “Accept”, you consent to the use of ALL the cookies.
This website uses cookies to improve your experience while you navigate through the website. Out of these, the cookies that are categorized as necessary are stored on your browser as they are essential for the working of basic functionalities of the website. We also use third-party cookies that help us analyze and understand how you use this website. These cookies will be stored in your browser only with your consent. You also have the option to opt-out of these cookies. But opting out of some of these cookies may affect your browsing experience.
Necessary cookies are absolutely essential for the website to function properly. This category only includes cookies that ensures basic functionalities and security features of the website. These cookies do not store any personal information.
Any cookies that may not be particularly necessary for the website to function and is used specifically to collect user personal data via analytics, ads, other embedded contents are termed as non-necessary cookies. It is mandatory to procure user consent prior to running these cookies on your website.