Skip to content

More butterflies

More butterflies published on 17 Comments on More butterflies

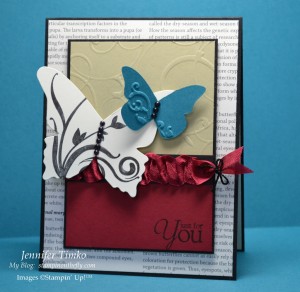
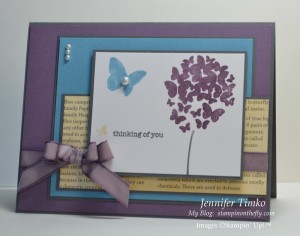
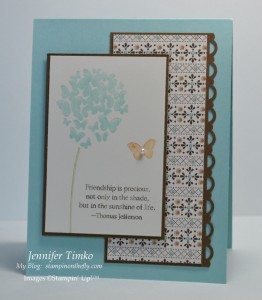
I enjoyed making Monday’s card so much that I didn’t want to put away the Precious Butterflies set.  Lucky for me that The Friday Mashup feels the same way about butterflies this week and they have a “Butterflies and Bling” challenge.  I chose to mash it up and use their colors too.  Marina Mist, Perfect Plum and I added So Saffron plus a neutral of Basic Gray.

 A La Card Monkey has this sketch combined with a “thinking of you” card, both of which I used too.

I did end up using a mirror image of the sketch.  I stamped the image panel with intention of following the sketch exactly but when I started to lay it out, I realized it needed to be switched around.  I really love this butterfly flower.  It lends itself to so many cards!  The So Saffon layer is First Edition Specialty DSP that has been brayered with So Saffron ink.  I added some Basic Pearls as the bling part of the Mashup.  Hopefully it is bling-y enough!

It was fun to sit down and stamp with these challenges!  Don’t forget that you can earn this set (and other fabulous choices) by hostessing a Stampin’ Up workshop.  The new hostess program makes it easier than ever to earn beautiful stamps!  I hope your week is going well.  Thanks for dropping by today.  See you again soon!

Stamps:  Precious Butterflies, Teeny Tiny Wishes; Paper:  Basic Gray, Perfect Plum, Marina Mist, First Edition Specialty DSP, Whisper White; Ink:  Perfect Plum, Marina Mist, Basic Gray, So Saffron; Accessories:  Perfect Plum Taffeta Ribbon, Basic Pearls, Dimensionals, Brayer

All products are Stampin’ Up!

ColorLab 53

ColorLab 53 published on 10 Comments on ColorLab 53

It is Monday….why are you posting the ColorLab Challenge??!!  Well, after one year of color challenges it was time for an update.  The ColorLab Challenge is becoming a monthly challenge posted on the 15th of each month.  See this week’s challenge post for all the details!

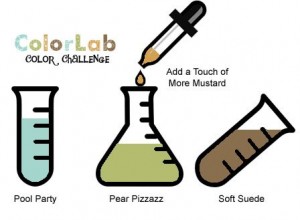
Now to this week’s colors.  Pool Party, Pear Pizzazz, Soft Suede and a touch of More Mustard.  These are inspired by the beautiful Spice Cake DSP from the new Holiday Mini.  I am SOOOO happy I got this paper in my preorder!!  Pool Party and Pear Pizzazz are so nice together and the Soft Suede is a great neutral to add.  More Mustard adds the perfect pop of yellow!

When I looked closer at the colors, I immediately knew I wanted to use the new Hostess Set, Precious Butterflies.  This is such a quick and easy set to use.  I’m in love with the flower made of butterflies!  I stamped off the little More Mustard butterfly to keep him in the same pale palette as the flower.  I chose one of the patterns from Spice Cake DSP and added a Scallop Trim Border with a quick punch.  I popped the image up on Dimensionals but it was still missing something.  Ahhh, a Basic Pearl, of course!

You know (if you have spent any time reading my blog) that I am a huge fan of Baja Breeze but this Pool Party is kind of a summer version.  The more I use it, the more I love it!  Now you have a whole month to play the challenge so no excuses.  I can’t wait to see what you make!

I have been working busily on cards for some upcoming classes and a Holiday Mini Blog Hop starting August 26th.  You’ll get to see them eventually but I might not have much to post this week.  If I can get all my required stamping done, I hope to have some time just to play some challenges.  Thanks for stopping in today.  I will see you again later in the week!

Stamp:  Precious Butterflies; Paper:  Spice Cake DSP, Pool Party, Soft Suede, Very Vanilla; Ink:  Pool Party, Soft Suede, Pear Pizzazz, More Mustard; Accessories:  Scallop Trim Border Punch, Basic Pearls, Dimensionals

All products are Stampin’ Up!


Holiday Mini Sneak Peek

Holiday Mini Sneak Peek published on 12 Comments on Holiday Mini Sneak Peek

Okay…I know that you probably haven’t even had time to find everything you love about the new Idea Book & Catalog and here I am talking about a sneak peek!!   But let’s face it.  We all LOVE a sneak peek!!  I couldn’t resist using some of the new items from my Holiday Mini preorder for the sketch from Stampin’ 411 this week.

The image is from a set called Always Thankful and it has the most beautiful images for coloring.  I chose the milk jug and wheat image since it was perfect for the sketch.  The paper in the background is from the new Spice Cake DSP.  I mean really…is is possible to not love spice cake??!  As always with Stampin’ Up papers, this set of designs is amazing!  The little flower on the side of the milk jug is not a part of the image but actually comes from a different stamp in the set.  I simply stamped it, colored it and cut it out.  It is attached with a Mini Glue Dot that gives it just a little dimension.  Last, I wanted to add some ribbon in keeping with the sketch.  I reached for the new In Color Ruffled Ribbon in Pool Party (which matches the new DSP).  I ruffled it a little more using Sticky Strip and tied it with some Linen Thread.

I hope you like this little peek into the fun things coming to you starting September 1st.  Just wait until you get to see what other fabulous products will be available!!  Thanks for stopping in today.  For those expecting a ColorLab challenge, this is a week off and some fun changes are coming.  Come back next Thursday for more information!!  See you again soon!

Stamp:  Always Thankful; Paper:  Spice Cake DSP, River Rock, Early Espresso, Very Vanilla; Ink:  Early Espresso, River Rock, Soft Suede, Pool Party; Accessories:  Blender Pen, Pool Party Ruffled Ribbon, Linen Thread, Mini Glue Dots

All products are Stampin’ Up!


SUOC25 – Favorite New Stamp Set

SUOC25 – Favorite New Stamp Set published on 10 Comments on SUOC25 – Favorite New Stamp Set

The new 2011-12 Idea Book & Catalog has been available for just over a month and the SU Only Challenge Team wants to see your favorite stamp set!  Oh I know…how can you possible choose??!!  That was my thought when I first saw the challenge!  After sitting down and looking at all my new sets, I finally decided on Creative Elements.  It was one of my first “must have” stamps when I first looked through the catalog.  I love that it has such a variety of images and can be used to create so many different looks.

I started knowing that I wanted to try collage stamping.  In fact, I was really inspired by this card by Jenna Barber.  I had never tried this technique and I was surprised at how easily it came together.  I started with Watercolor Paper (it comes in a new larger size – yea!).  First I sponged on some River Rock, Cajun Craze and Soft Suede ink creating some different colored sections.  Then I stamped on the flourish from Creative Elements in Soft Suede (it was stamped off a bit first).  I realized that I wasn’t completely happy with the base coloring so I took my Aquapainter and blended the colors around.  The paper was still a little damp when I stamped the frame image (Soft Suede) which allowed it to run at the ends a bit.  It needed something else so I pulled out the water spots stamp from French Foliage and added them in River Rock.  I used another piece of Watercolor Paper and created a similar background with my Aquapainter.  After it dried, I stamped the flower on it and cut it out.  I added an Antique Brad to the center and then some new Soft Suede Taffeta Ribbon that uses the pulled thread technique.  Finally I layered the stamped image on a square of the new Well Worn DSP.

I see so many possibilities with this stamp so you can expect many more cards with it!  Shelli Gardner has challenged us to make “Thinking of You” cards this month for those who need a special card to let them know you care.  I added the sentiment from Teeny Tiny Wishes and, thankfully, don’t need this right now.  I find that when sympathy cards are needed there is sometimes no time to stamp.  I try to have a couple of beautiful versions ready just in case.

Thanks for stopping in today.  I can’t wait to see what you create with YOUR favorite stamp set.  Don’t forget, the SU Only Challenge  runs for just under two weeks so there is plenty of time to enter!

Stamps:  Creative Elements, Teeny Tiny Wishes, French Foliage; Paper:  Well Worn DSP, Watercolor Paper, Soft Suede; Ink:  Soft Suede, River Rock, Cajun Craze; Accessories:  Antique Brads, Soft Suede Taffeta Ribbon, Sponges, Aquapainter, Dimensionals

All products are Stampin’ Up!


ColorLab 52

ColorLab 52 published on 8 Comments on ColorLab 52

Take one look at these colors and you’ll feel cooler!  Yep, I continue to be obsessed with the August heat and this palette is refreshing!  Pool Party and Not Quite Navy are a great combination and the addition of So Saffron works perfectly.  When I see blues and yellows together, I tend to think “French Country” so that is what I started with as a foundation for my card.

I stamped the big flower image from Elements of Style in Pool Party onto Very Vanilla card stock.  After some debate on the layout, I opted for a tried and true look.  The Framed Tulips Embossing Folder makes another appearance but as a square (I love how that it can do that!).  I wanted to add a few little touches but not get too fussy.  Victoria Crochet Trim to the rescue along with some Basic Pearls.  I added a additional little pearl to the Antique Brad for continuity.  I guess this is sort of French Country meets Clean & Simple.

I can’t wait to see what you do with the colors this week.  Thanks for stopping by and I will see you again soon!

Stamp:  Elements of Style; Paper:  Not Quite Navy, So Saffron, Very Vanilla; Ink:  Pool Party; Accessories:  Victoria Crochet Trim, Antique Brad, Basic Pearls, Big Shot, Framed Tulips Embossing Folder

All products are Stampin’ Up!

MDS Shadow Box

MDS Shadow Box published on 5 Comments on MDS Shadow Box

I’m back today with more details on the My Digital Studio shadow box project from the blog hop last weekend.  I did find that getting a good picture of this was hard!  The picture to the left gives a better idea of how much dimension there is.

I started in My Digital Studio (MDS) and pulled up the Up, Up and Away digital stamp.  I played around for a while with the colors and sizes of the balloons until I settled on these.  Daffodil Delight is the focal color since it is the color of my youngest son’s walls in his room.

This page shows the basic layout I came up with (without the balloons) and was used as my page for cutting out the clouds.  I created the clouds with the digital Cloud Punch.  The bigger cloud was augmented with a Circle Punch.  I just added circles until it looked right.  I created another page (not shown) that had only the Basic Black elements on a white background.  I did this by copying the page, deleting the clouds and changing the background color (really fast to do).  This was then printed on Marina Mist card stock.

The next page was just the balloons and some additional elements from Big Top Birthday Embellishments that I thought I might use.  I put the Marina Mist circles behind the balloon baskests so that they would blend into the sky when cut out.  All I had to do with this page was cut the balloons and the elements out.  Once everything was cut out, all I had to do was attach them to the Marina Mist base.  I put some things flat, some up on Dimensionals and the big balloon up on a double layer of Dimensionals.

Once I had everything put together inside, I started working on the outside of the frame.  I took the two Daffodil Delight strips and layered them on top of Real Red Wide Grosgrain Ribbon (retired).  The ends were covered with Marina Mist buttons from the Subtles Designer Button Pack.  I attached all those accessories with my trusty Sticky Strip and was done.

I knew I was on to something when my older son complained that he did not have anything this cool in his room.  Guess what I’ll be making again soon??!!  The great thing is that I can change many of the colors in a flash and have a project that matches his room!!

I’ll be back tomorrow with a new ColorLab Challenge.  I hope your day is great.  Thanks for dropping by!

Stamps:  Digital Up, Up and Away; Paper:  Marina Mist, Whisper White; Accessories:  My Digital Studio, Dimensionals, Subtles Buttons, Real Red Wide Grosgrain (retired), Shadow Box (non-SU), Black Thread (non- SU)

All products are Stampin’ Up unless otherwise indicated.


Buy 3, Get 1 FREE!!!

Buy 3, Get 1 FREE!!! published on 1 Comment on Buy 3, Get 1 FREE!!!

If you haven’t already heard, Stampin’ Up is offering a new promotion for the month of August!!  If you buy three packages of our exclusive Designer Series Paper, you will get your choice of a fourth package free (a $10.95 value).  WOW!!

You see, there is no excuse not to get the Well Worn DSP featured in my Vintage Balloon card from last weekend’s blog hop!!  I have to say that this paper is fantastic to use.  Perfect for vintage, perfect for masculine, perfect for fall!!  I am really proud of this card (thanks for all the kind remarks in the hop) and the Well Worn DSP really did a lot of the work.  I will be using this special to run a DSP share so look for the details later this week.  If you are like me and have a hard time sharing, click the banner above and you can purchase all four packs for yourself!!

I hope you are having a great day!  See you tomorrow with more details about my MDS Shadow Box project from the hop.


Triangle Tag

Triangle Tag published on 6 Comments on Triangle Tag

I knew when I got the Perfect Pennants Die for my Big Shot that I was going to love it!  This little tag is just one of the reasons!!  Making this is really easy and I love that it is different.  To make it I started with my die and cut the large and medium triangles out of Basic Black card stock.  I then cut another two large triangles out of the Turquoise and Real Red DSPs.  Finally, I cut two of the small triangles out of Whisper White.  Cut 1/4″ off the bottom of both DSP triangles to make them layer properly (yes, it is that simple!!).  I inked up the pennant stamp using my Stampin’ Write Markers and stamped it on one of the Whisper White triangles.  Using my 1″ Circle Punch, I created a balloon and then popped it up on a Dimensional.  For the words, I inked only part of the sentiment with my marker.

Next, you attach the Real Red DSP to one of the large triangles.  Turn the triangle face down and score like shown in the picture.

**  NOTE:  I scored this way because I like to fold toward the “valley” of the score.

Once scored, turn it back over and put Sticky Strip in the small triangle.  Attach it to the front triangle.  Finish decorating the front if you haven’t already.

Finally, add your little triangles to the inside.  I had to cut them down just a little to make them layer correctly.  I pierced a hole in the top of the tag and attached it to the bag using black thread (non-SU).  I used this same thread as a little bow for the balloon.

I hope you like this project!  Truly, it takes longer to read about it than it does to make!!

Thanks for dropping in today.  Please come back Wednesday for some of the specifics on my MDS Shadow Box project from the hop.  Have a great day!!

Stamp:  Up, Up and Away; Paper:  Brights Designer Paper Pack, Basic Black, Whisper White; Ink:  Tempting Turquoise, Real Red, Daffodil Delight, Basic Black; Accessories:  Big Shot, Perfect Pennants Die, 1″ Circle Punch, Sticky Strip, Dimensionals

All products are Stampin’ Up unless otherwise indicated.


Stampin’ Addicts New Catalog Blog Hop

Stampin’ Addicts New Catalog Blog Hop published on 21 Comments on Stampin’ Addicts New Catalog Blog Hop

Photobucket

Welcome to the Stampin’ Addicts New Catalog Mega Hop!!!  We are celebrating the new Stampin’ Up 2011-12 Catalog Stampin’ Addicts style!  If you just hopped over from Heidi’s blog, RunningwScissorsStamper, I know you have been blown away by her projects with Under the Big Top.  That three ring circus card…fantastic!!  She never ceases to amaze me with her creativity!  I will continue the Big Top Product Suite trend with Up, Up and Away.  Words cannot describe how thrilled I am with this set!!

When I first saw this set, I had a vision of vintage balloons!  Then I saw the unbelievable beautiful Well Worn DSP and I knew that they had to be combined.  I stamped the striped balloon image on the River Rock print and cut it out.  The other balloon comes from stamping on the reverse side of the paper with the solid balloon image and then cutting it out.  I used my Color Spritzer Tool to add a little splatter of River Rock ink on the image panel and the new Soft Suede Taffeta is put together with Linen Thread and an Antique Brad.  This is a card for a college graduation and I love it!

I love the colors on in the Big Top Product Suite (p. 62) and wanted to make a fun and quick project with them.  This is a little triangle gift tag made with my new Perfect Pennants Die for the Big Shot.  I used my 1″ circle punch to create a party balloon and “to you” is inked with a Stampin’ Write Marker.  The inside uses the remainder of the sentiment (“happy birthday”).  This is an easy tag to make and I will provide the instructions next week.

If you have ever worked with Stampin’ Up’s Designer Series Papers, you already know that they are amazing.  I really liked the Berry Blossoms Product Suite in the catalog (p.99) but when I opened the paper in person…WOW!!  This Calypso Coral pattern practically asked to be used with Up, Up and Away and the Early Espresso pattern mimics the polka dots in the balloon.  I used one of the scalloped circles from the Perfect Pennant Die as my frame and the lovely Ruffled Ribbon to add more texture.  This classic layout gets a little wow factor from the banner attached with the Early Espresso Baker’s Twine.

 My final project is probably the one that makes me the happiest!!  This is a My Digital Studio creation made just for my youngest son’s room.  As you can see, his walls are Daffodil Delight so what better than the Big Top Birthday Embellishments Download as a place to start?  I used the digital Up, Up and Away to create the balloons.  The hardest part of this project was taking a picture that shows how cute it is!  I will be back with more specifics on this next week, too!

Clearly, flying is near and dear to my heart and this set has really inspired me!  I hope that you feel just as inspired to make fabulous projects with it!

Now off to your next stop on the hop.  Cindy over at Heart’s Delight Cards has some super projects made with Pennant Parade.  Just wait until you see her golf card, and her Christmas card, and….  Make sure you come back next week for more specifics on my projects.  If you have any questions you really want answered, let me know in a comment.  Enjoy the hop!

Photobucket                Photobucket

ColorLab 51

ColorLab 51 published on 10 Comments on ColorLab 51

It is Thursday and it is time for another ColorLab Challenge!!  In this crazy heat, this color set looks beautifully fresh.  Almost like pink and yellow lemonade by the water.  Yep, the heat has frazzled my brain and all efforts around my house are about keeping cool!  Even the kids don’t want to be outside unless it involves water.  Fortunately, we have a new inflatable water slide that has bought me a little stamping time.  *smile*

I started with a layout from Stampin’ 411 and the card fell into place very quickly.  I knew I wanted to use the Berry Blossoms DSP print for my butterfly.  Isn’t he great??  The Daffodil Delight DSP stripes are from the Brights Designer Paper Pack.  I attached it with the Whisper White base and then ran it through my Big Shot using the Framed Tulips Embossing Folder.  The Baja Breeze Seam Binding and the Basic Pearls are the finishing touches.  This is one of those cards that just feels like summer is SUPPOSED to feel!

Tomorrow is the big day for the Stampin’ Addicts New Catalog Set Blog Hop so plan to drop by after 12p Eastern and then hop through some fantastic projects.  Have a great day and I’ll see you back tomorrow!

Stamp:  Short & Sweet; Paper:  Berry Blossoms DSP, Brights Designer Paper Pack, Whisper White, Daffodil Delight; Ink:  Calypso Coral; Accessories:  Big Shot, Beautiful Butterflies Die, Baja Breeze Seam Binding, Mini Glue Dots, Crystal Effects (as glue for the butterfly), Basic Pearls

All products are Stampin’ Up!
Primary Sidebar