Skip to content

Fancy Friday – Holiday Celebration

Fancy Friday – Holiday Celebration published on 2 Comments on Fancy Friday – Holiday Celebration

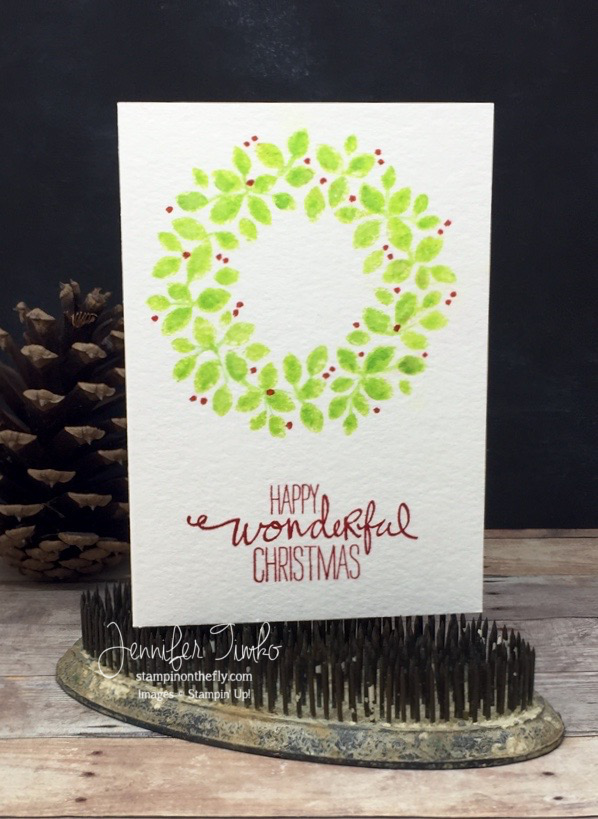
ff-sep-happy-wonderful-christmasWelcome to this month’s Fancy Friday Blog Hop!  Our team is a group of stampers who love to make beautiful things.  Sometimes they are clean, sometimes they are layered but the one thing I can say for sure is that our projects will be fancy!  If you hopped over from the incredible Erica, welcome to the next stop.  For September, our theme is Anything Holiday!  If it is a holiday item from the main catalog or the Holiday catalog, we are celebrating it!

I decided to stick with a set that has actually been around for a while but should not be forgotten.  The Wondrous Wreath stamp set is one I loved from the minute I saw it.  I decided to show its versatility a bit and create a card with only the wreath and the sentiment from the set.  I started with a product I just discovered but already love.  They are Strathmore Watercolor Cards and they really are fabulous.  Very much like the Stampin’ Up Note Cards except made with watercolor paper.  Makes it easy to create a one layer watercolor card and conquer that hoarding tendency that tends to show up around watercolor paper (please tell me I’m not the only one).  I stamped the wreath with Tim Holtz Distress ink in Twisted Citron and then colored in with my Aquapainter with some more Distress Ink in Mowed Lawn.  Using the same inks, I connected the leaves with hand drawn stems which makes the wreath have a subtly different look.  To keep with that watercolor feel, I did not stamp the berries from the set (but you totally could).  Instead I hand drew them in with a Zig Clean Color Pen.  Once I had this like I wanted all that was left was the sentiment.  And then I had to take a deep breath because I didn’t want to mess it up.  So out came my Misti!!  I got the sentiment exactly where I wanted and stamped in Real Red ink.  Because the watercolor paper is rough, I had to overstamp to get the sentiment fully inked.  And yes….the Misti is a total life saver for that!!!  It makes every photopolymer stamp easier to use!!  While this takes a little longer that the average “simple one layer” card, I think the result is worth it.

Fancy-Friday-08

I think you are going to enjoy all the holiday fun from the hop this week!  This talented group never disappoints!!  You are sure to be totally wow’d by Krista at your next stop.  Have fun on the hop!

You can click our logo above to get to the Fancy Friday Pinterest page!

6a00e54f94e01b883401b8d05f0bdc970c-320wi-2

Click HERE to purchase these wonderful Stampin’ Up products!

Stamp:  Wondrous Wreath; Ink:  Tim Holtz Distress Ink, Real Red (SU), Zig Clean Color Pens; Paper:  Strathmore Watercolor Cards; Accessories:  Misti, AquapainterSignature 2016 - 1

Fancy Friday – Pick a Bundle!!

Fancy Friday – Pick a Bundle!! published on 2 Comments on Fancy Friday – Pick a Bundle!!

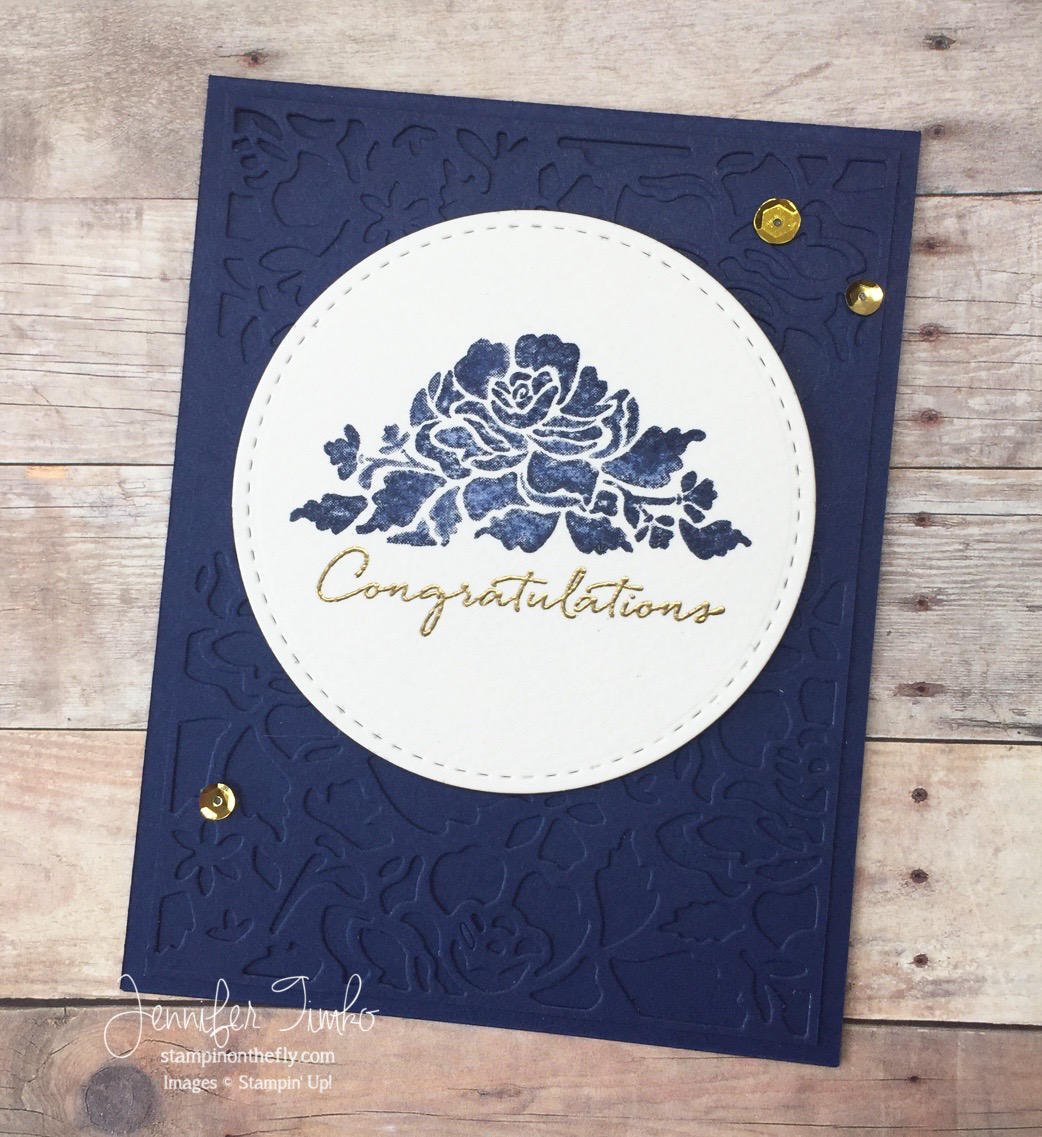
FF Jul - Floral WeddingWelcome to this month’s Fancy Friday Blog Hop!  Our team is a group of demonstrators who love to make beautiful things.  Sometimes they are clean, sometimes they are layered but the one thing I can say for sure is that our projects will be fancy!  If you hopped over from my amazing friend Jeanna, welcome to the next stop.  For July, our theme is Pick a Bundle!  The team is focusing on the amazing bundles in the annual catalog!!

I know it probably won’t come as a big surprise to those of you who follow my blog, but I chose the Floral Boutique bundle.  I am obsessed with this die set and the stamp is equally gorgeous!  Navy is the seems to be the wedding color of the season since I know of at least 2 brides (meaning that I know two brides, lol) who have chosen Navy as one of their colors.  Stampin’ Up sure hit the trend spot on!  I decided to use the dies to create a background for my stamped panel so I went with a tone on tone look.  But cutting a Night of Navy panel to 4″ x 5-1/4″ and then cutting using the top and bottom dies from the Detailed Floral Thinlits, I had a perfect overlay for my card base (also in Night of Navy).  I used the dies similarly in my tutorial here except to create a stencil.  By attaching it directly to the base, it takes on almost an embossed look but with more detail.  I stamped my flower from the coordinating stamp set, Floral Phrases, in Night of Navy onto watercolor paper.  I took an paintbrush and moved the ink around a bit (and added some) to make it look a bit more hand painted.  I added the sentiment from the set by stamping in Versamark and heat embossing with Gold Stampin’ Emboss Powder.  So pretty!!  The image was cut with a Stitched Mat Circle Die and put up on Dimensionals.  A few Gold Metallic Sequins are a nice touch to add a bit more gold.

Fancy-Friday-08

I think you are going to LOVE all the inspiration from the hop this week!  So many beautiful bundles!!  You are sure to be totally wow’d by Erica at your next stop.  Have fun on the hop!  Make sure you come back on Saturday for the start of the Dare To Get Dirty Challenges at Splitcoaststampers!  See you then!

You can click our logo above to get to the Fancy Friday Pinterest page!

6a00e54f94e01b883401b8d05f0bdc970c-320wi-2

Click HERE to purchase these wonderful Stampin’ Up products!

Stamp:  Floral Phrases; Ink:  Night of Navy, Versamark; Paper:  Night of Navy, Fabriano Watercolor Paper; Accessories:  Big Shot, Detailed Floral Thinlits, Stitched Circles Mat Dies (Lil’ Inker Designs), Dimensionals, Paint Brush, Metallic Sequins, Glue Dots, Heat Tool, Gold Stampin’ Emboss Powder

Signature 2016 - 1

Fancy Friday – Back to the 80s!

Fancy Friday – Back to the 80s! published on 7 Comments on Fancy Friday – Back to the 80s!

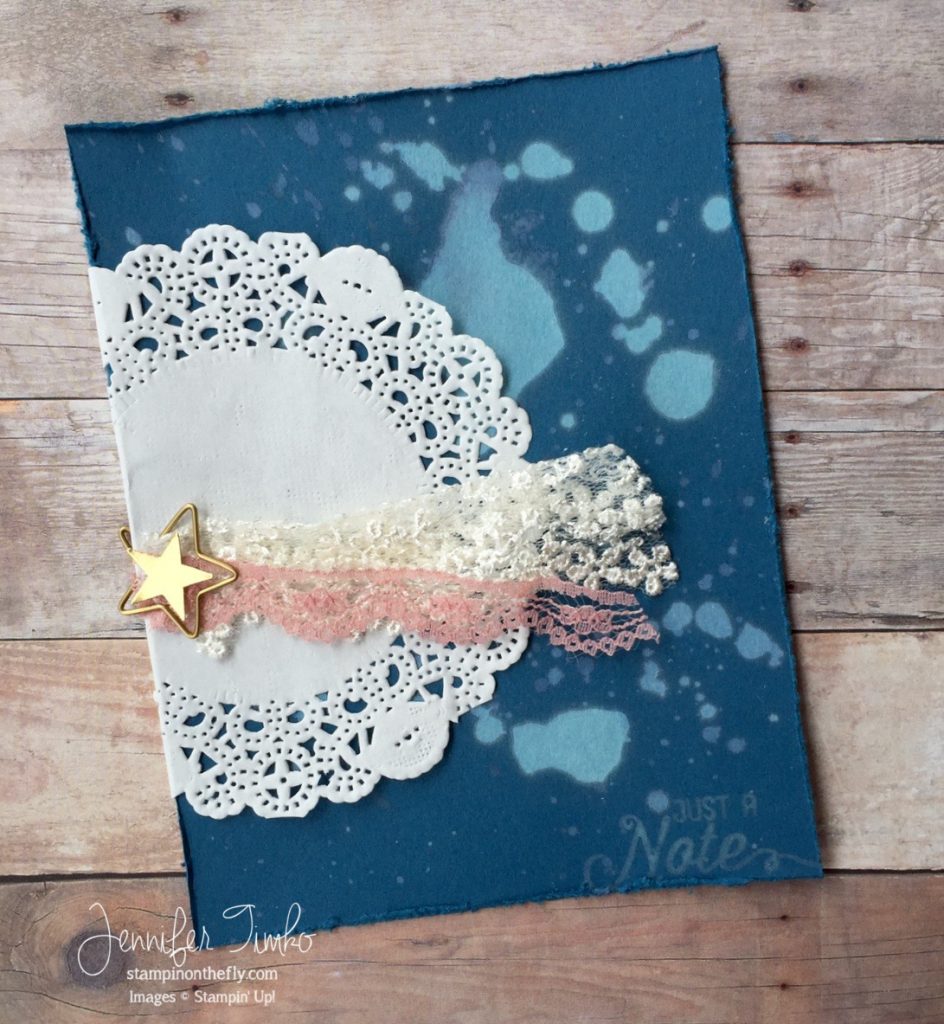
FF Jun - Lucky StarWelcome to this month’s Fancy Friday Blog Hop!  Our team is a group of demonstrators who love to make beautiful things.  Sometimes they are clean, sometimes they are layered but the one thing I can say for sure is that our projects will be fancy!  If you hopped over from my amazing friend Connie, welcome to the next stop.  For May, our theme is Back to the 80s!  Yep, you read that right!  Bright colors, big hair, bigger shoulder pads and, my inspiration for today, Madonna!

14af8df5e7b18380857faee7396d2291Just take a look at this picture of her!  By the time you are done with my post, you too will be singing Lucky Star in your head.  You can thank me any time!! I started off pondering the thought of acid washed jeans.  And I really pondered why we all thought it was a good idea.  But we did.  So why not play around with the new In Color Dapper Denim to see how denim-like it really is.  Well if you add a little bleach in splatters, apparently it is really like denim.  AWESOME!  Then I got a little crazier and actually stamped using bleach too.  The new Flourishing Phrases had a perfect little sentiment to try.  Now this is a red rubber stamp and I’m pretty sure the bleach is tough enough on that.  I strongly discourage you from trying it with a photopolymer stamp.  Pretty sure you would not be happy with the result!  Even still, right after stamping I cleaned it first with water and then with Stampin’ Mist and then again with water.  I kept up the Madonna theme by pulling out lace things from my stash because it was all about lace and pearls and layered accessories if you were going to do the Madonna fashion trend!  These are all retired SU things that I have hoarded kept safe for just the right project and this just had to be it!  The Tea Lace Doily just retired and there is a new even fancier version.  The lace is from a kit (Artisan, I think) and the gold star clip was perfect to complete my Madonna theme.  I added a star punched from Gold Foil to add a little more focus there.  So….how did I do??  Are you singing Lucky Star yet??? Please tell me you know the song so I don’t feel too old!!

Fancy-Friday-08

I hope you have a great time on our ‘flashback’ hop today.  Now you get to head over to the super talented Marisa for our next stop.

And you can click our logo above to get to the Fancy Friday Pinterest page!

6a00e54f94e01b883401b8d05f0bdc970c-320wi-2

Click HERE to purchase these wonderful Stampin’ Up products!

Stamp:  Flourishing Phrases; Paper:  Dapper Denim, Gold Foil; Accessories:  Tea Lace Doily (ret), Artisan Kit Lace (ret), Star Clip (ret), Glue Dots, Bleach

Signature 2016 - 1

May Fancy Friday – Thanks!

May Fancy Friday – Thanks! published on 2 Comments on May Fancy Friday – Thanks!

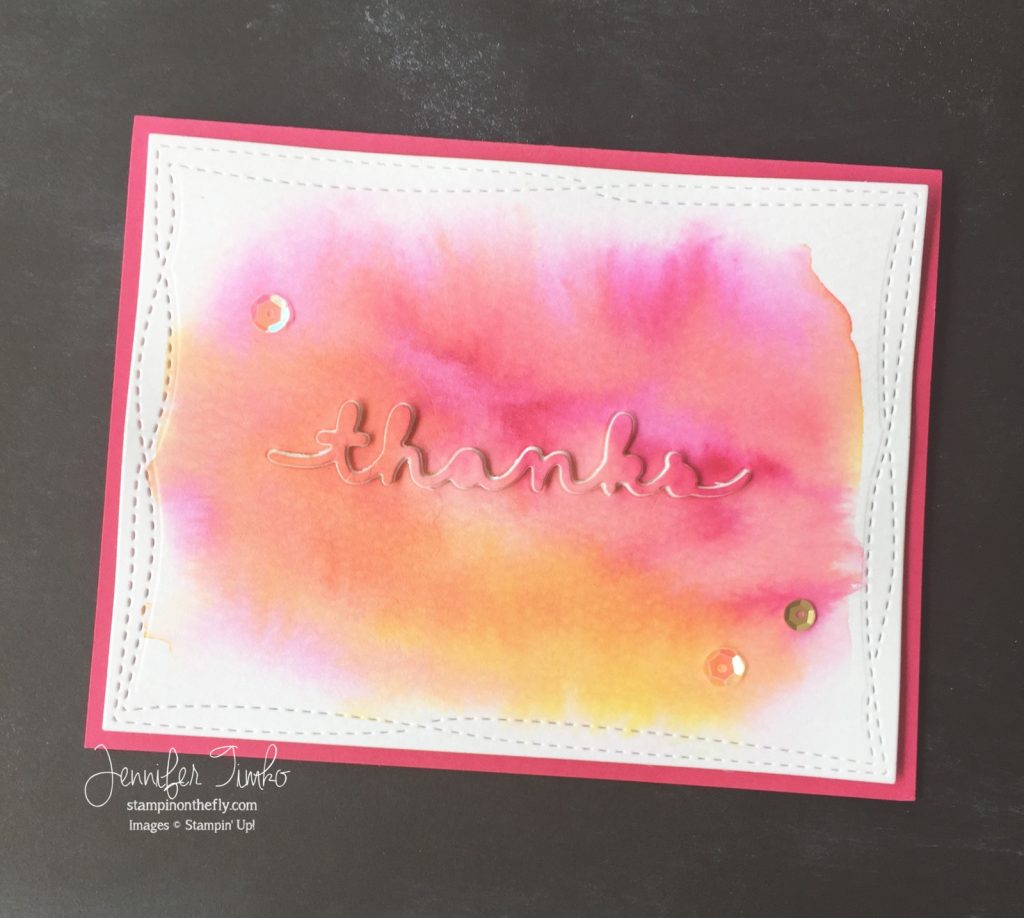
Jen Timko - FF May - ThanksWelcome to this month’s Fancy Friday Blog Hop!  Our team is a group of demonstrators who love to make beautiful things.  Sometimes they are clean, sometimes they are layered but the one thing I can say for sure is that our projects will be fancy!  If you hopped over from the super talented Marisa, welcome to the next stop.  For May, our theme is Never Enough Thanks!  You may have heard of the hashtag fun going around for birthdays (#imbringingbirthdaysback), well we are bringing thanks yous back!  Yep, #imbringingthankyousback !

I think that thank you cards are actually what I make the most but I love them!  Faced with the prospect of the theme, somehow I froze.  What to make?  Who should it be for?  Retiring items or new products?  Oh the pressure!  *smile*  Ok, not really but I did kind of go blank.  So I decided to go a little artsy.  I took some watercolor paper and got it wet where I wanted color and then added some Melon Mambo ink.  At first, I was thinking to make it all one color and use a new suite from the catalog but then I thought that it needed something more.  So I added Daffodil Delight too.  When I say added, I just added a little more water and then smooshed my Aquapainter into the ink and dropped it onto the water.  And it spread around and became totally cool.  I took the same brush (without more ink) and placed it around the pink to add variety.  And then the hardest part, just sit it aside to dry.  I worked on another card…..one of yesterday’s to be exact.  Once it was dry, I sent it through the Big Shot and cut out the sentiment with Greetings Thinlits.  The thick paper had a few of those dots that sometimes happen (from the holes to help free your paper) so I ran it back through the Big Shot between just the two plates to flatten it.  Then I cut out some Thick Whisper White that had foam tape attached to the back with the same thinlet.  Because I wanted the whole panel to pop up onto my card base, I added a white panel behind the sentiment negative to allow a place to attach the positive.  I added a little more detail with a Wonky Stitched Die and then I just stacked the cutouts where the original sentiment had been cut out.  A Melon Mambo base to make it even brighter and some sequins leftover from Paper Pumpkin for more fun!  Just a quick reminder….this die set is retiring.  So make sure you have it before it is gone!!

So, I have a confession to make.  I haven’t mailed this yet.  They may kick me out for not following the rules!  But I can tell you that this is going to an awesome mom who has been the team manager for my younger son’s soccer team this year and, truthfully, it will be hand delivered.  So I only kind of sort of fail in the month’s instructions — we were to make a card and actually send it!  My friend is bright and happy and always keeps the rest of us parents on track.  This card makes me think of her!

Fancy-Friday-08


I hope you will be inspired to make some thank you cards this month and you too can join us with our hashtag!  We’ll be watching for it!  Now you get to go over to my dear friend Jeanna who I just KNOW will make you smile!

And you can click our logo above to get to the Fancy Friday Pinterest page!

6a00e54f94e01b883401b8d05f0bdc970c-320wi-2

Click HERE to purchase these wonderful Stampin’ Up products!

Paper:  Melon Mambo, Thick Whisper White, Tim Holtz Distress Watercolor;  Ink:  Melon Mambo, Daffodil Delight; Accessories:  Big Shot, Greetings Thinlits, Wonky Stitched Dies (My Favorite Things), Aquapainter, Foam Tape (3M), Sequins, Dimensionals

Signature 2016 - 1

April Fancy Friday – Anything but a card!

April Fancy Friday – Anything but a card! published on 2 Comments on April Fancy Friday – Anything but a card!

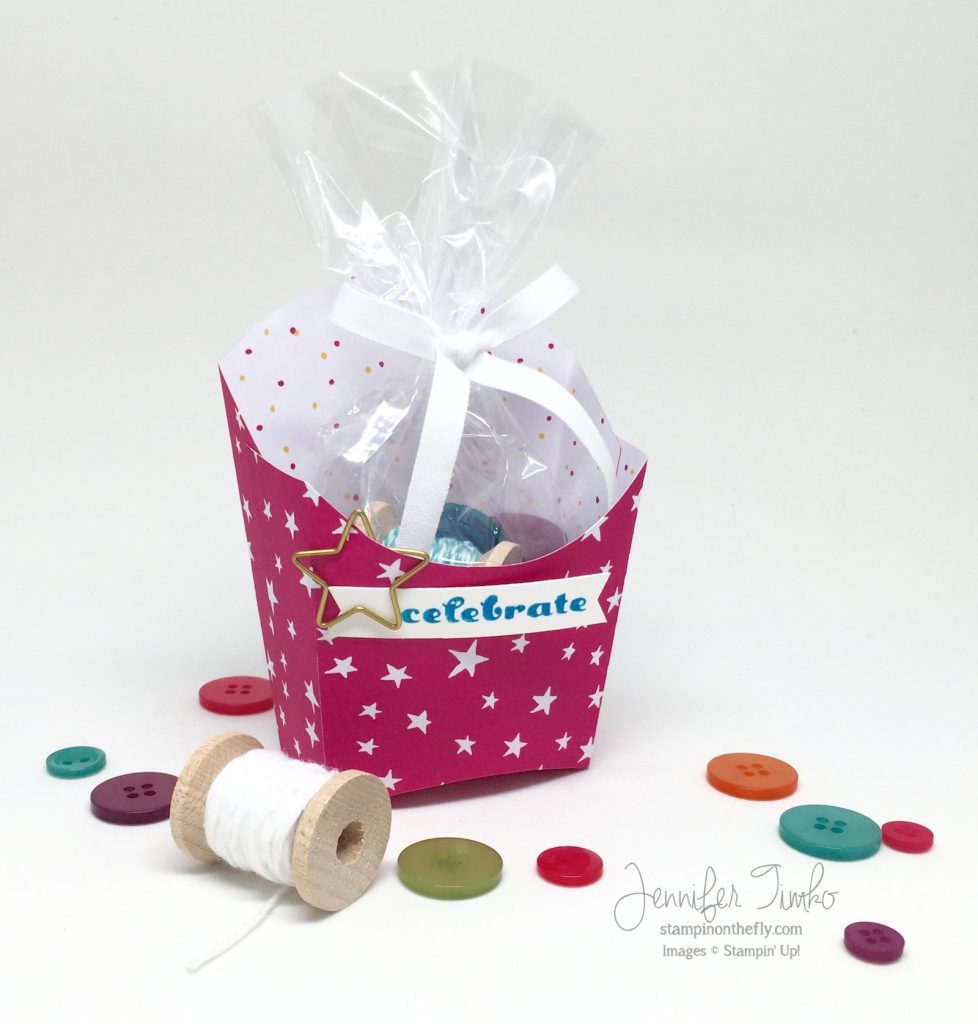
Jen Timko - FF Apr - Party Fry BoxWelcome to this month’s Fancy Friday Blog Hop!  Our team is a group of demonstrators who love to make beautiful things.  Sometimes they are clean, sometimes they are layered but the one thing I can say for sure is that our projects will be fancy!  If you hopped over from the super talented Kaitlyn, welcome to the next stop.  For April, we are creating anything but a card!

Before I sat down to create, I had to take care of the yearly task of assessing the Retirement List from Stampin’ Up.  I went through and started pulling some of the items and it is always a bit bittersweet.  This year, the accessory list is pretty long (as you can see from the link) and there are some “must haves” on it for sure.  Some of them are simply workhorse items that need to be in your stamp room.  Since we are making 3-d items this month, I knew I needed to show you the Fry Box Bigz Die again.  Something about this die is just so adorable!  It is so perfect for creating treat boxes FAST!  All the DSP that you have lying around (yes, you….and me, haha!), the Fry Box is a great way to use it and create party favors or dress up a little gift.  The die does all the work!  I use Fast Fuse Adhesive to secure the sides….easy and, well, fast!  For the inside, I used a 4×6″ Cellophane Bag (also on the list…..just stock up…you need to have these on hand!) and filled it with buttons and twine.  All of the color family buttons are retiring this year and if you love having buttons to match your inks I strongly recommend you stock up!!  The 1/4″ White Cotton Ribbon that I used to tie up the bag?  Yep, also retiring!  Another staple for sure.  The little clip is an already retired item and I added a banner using a Paper Pumpkin sentiment.  I use these Paper Pumpkin stamps all the time.  I hope to show you my storage tips for them soon…..helps me find exactly what I am looking for with those fun sets.  One more retired item that is shown but yet not shown is the Banner Punch….GASP!!!!  Ok, breathe!  That little banner punch that is so perfect for cutting perfect little ends.  It is still in stock but I’m guessing not for long.  Stampin’ Up is keeping the list current but really, just go order it if you love it.  TH_social_retired2016_demo_Apr1816_NA_2Whew…that is a lot of retiring stuff in one project.  Funny enough, I didn’t really sit down with a plan to do that but it just shows how versatile many of these items are.  Many of you know that I’m not much of a 3-d stamper.  Oh, I love the idea of them but my practical side takes over and I often ask “But what will I do with that?”.  This is the kind of project I can see plenty of uses for…maybe not totally “fancy” but definitely fun!

Fancy-Friday-08

So we have some great news for you in this month’s hop.  We have added a new Fancy stamper to our group!!  The oh-so-fabulous Joyce Fowler is joining us.  Yep….she is totally fancy!

We hope you love our “not cards” this month!  Tons of inspiration for sure.  I get the honor of linking to our new team member so off you go to see what Joyce has created!

And you can click our logo above to get to the Fancy Friday Pinterest page!

6a00e54f94e01b883401b8d05f0bdc970c-320wi-2

Click HERE to purchase these wonderful Stampin’ Up products!

Stamp:  Paper Pumpkin; Paper:  It’s My Party DSP, Thick Whisper White;  Ink:  Tempting Turquoise; Accessories:  Big Shot, Fry Box Bigz Die, Fast Fuse Adhesive, Banner Punch, Brights Buttons, 4×6″ Cellophane Bag, 1/4″ White Cotton Ribbon, Star clip (ret),

Signature 2016 - 1

Fancy Friday – Spring Inspiration

Fancy Friday – Spring Inspiration published on 5 Comments on Fancy Friday – Spring Inspiration

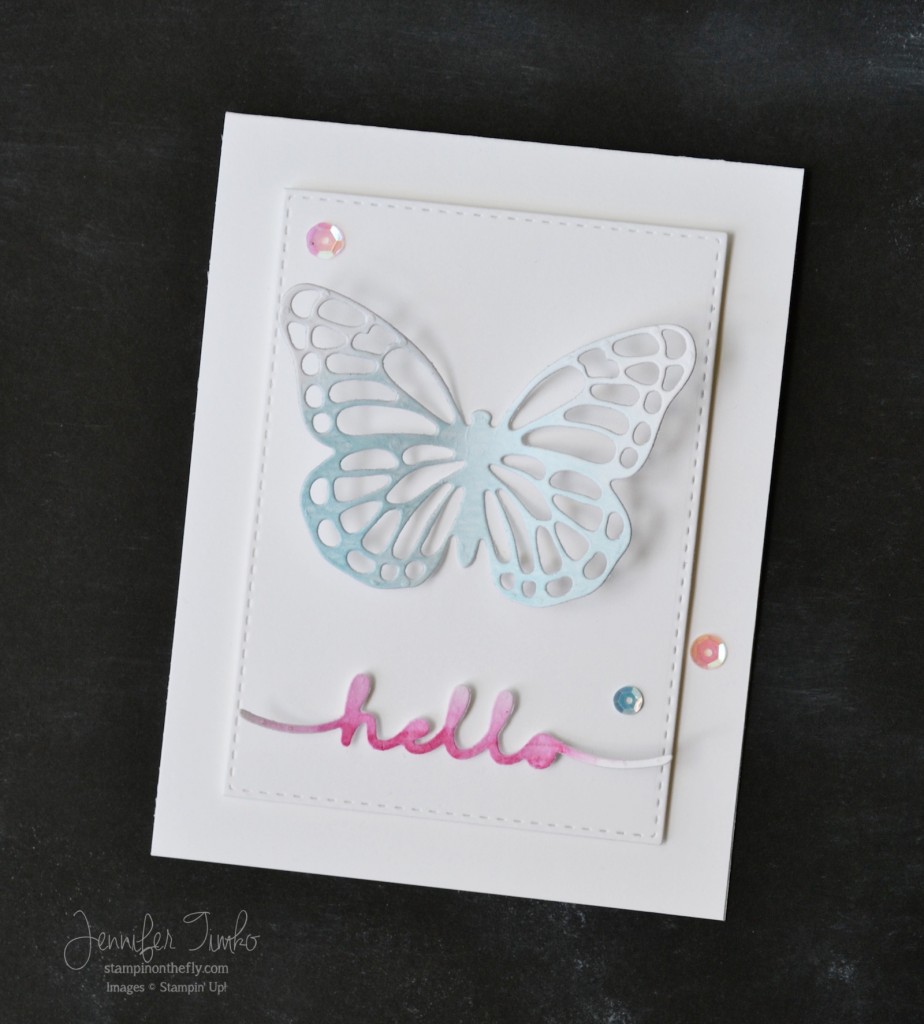
Jen Timko - FF Mar - Butterfly HelloWelcome to this month’s Fancy Friday Blog Hop!  Our team is a group of demonstrators who love to make beautiful things.  Sometimes they are clean, sometimes they are layered but the one thing I can say for sure is that our projects will be fancy!  If you hopped over from my dear friend Cindy, welcome to the next stop.  For March, we decided to have an inspiration challenge.  Wow, inspiration is the word!

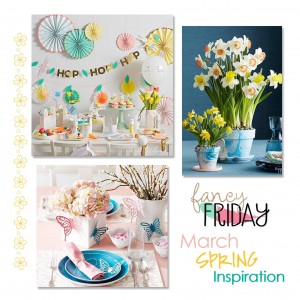
12829361_10205494643597837_8157772420674638890_oIsn’t this gorgeous?!  How to choose what to focus on with all that spring beauty?!!  I know it isn’t any great shock that I was drawn to the butterflies first.  I do love a butterfly!  And the pink and blue setting on the bottom left is just so pretty!  I pulled out watercolor paper and used some Distress Inks to create an ombre effect on the paper.  Then, using my Greetings Thinlits and my Butterfly Thinlets, I positioned the dies on my Big Shot to cut them out.  I made sure on both cuts that I had a little bit of white left to add interest to the cut-outs.  Don’t you love it when a little bit of ink and some dies do all the work?  Yeah, me too.  I used a Stitched Rectangle as a focal layer and then pulled out my sequins.  I have become quite the sequin hoarder and it pays off!  The little blue sequin is from the Watercolor Wishes kit and the pink ones are from the February Paper Pumpkin kit.  I just love the little bit of sparkle and fun that they add!  And these colors are so fabulous together….totally channeling the Pantone colors of the year (a combination of pink and blue).

Fancy-Friday-08

I love using these little sentiment dies and I seem to be obsessed with “hello” on my cards lately….just noticed that as I was scrolling down some of my latest posts.  Just like a “for you”, it is such a workhorse sentiment.  You can make the inside anything from a birthday to a thank you to a thinking of you.

I hope you love all the spring loveliness from the team this month!  If you find yourself inspired by our picture, make sure to let us know!!

My lovely friend Jeanna Bohanon is up next!   As always, she will wow you!

And you can click our logo above to get to the Fancy Friday Pinterest page!

6a00e54f94e01b883401b8d05f0bdc970c-320wi-2

Click HERE to purchase these wonderful Stampin’ Up products!

Paper:  Watercolor (Ranger), Thick Whisper White;  Ink:  Tim Holtz Distress Ink (Picked Raspberry, Spun Sugar, Tumbled Glass, Broken China); Accessories:  Aquapainter, Sequins (Feb Paper Pumpkin and Watercolor Wishes kits), Big Shot, Stitched Rectangles (SSS)

Signature 2016 - 1

Fancy Friday – All the pretty colors

Fancy Friday – All the pretty colors published on 15 Comments on Fancy Friday – All the pretty colors

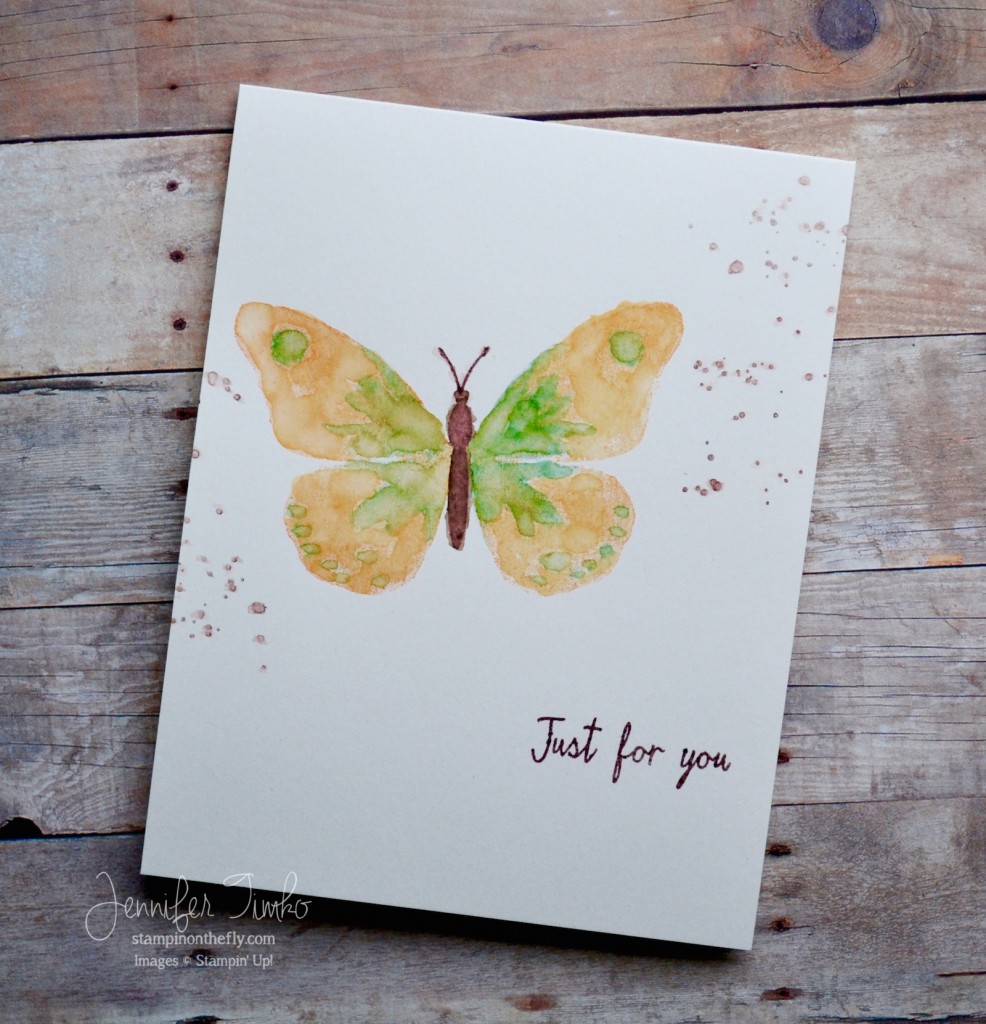
FF Feb - Watercolor ButterflyWelcome to this month’s Fancy Friday Blog Hop!  Our team is a group of demonstrators who love to make beautiful things.  Sometimes they are clean, sometimes they are layered but the one thing I can say for sure is that our projects will be fancy!  If you hopped over from my dear friend Cindy, welcome to the next stop.  For February, we came up with a really unique theme.  Colors.  But not your average color challenge.  Nope, not for us.  We decided to give some love to colors who, frankly, don’t get enough love.  You know the ones.  The sad neglected ink pads that haven’t been opened in, ahem, months (or years).

So as I looked at my papers and my markers and pads, a few colors jumped out.  The first was Chocolate Chip.  There was a day in my early stamping that I was hard pressed to make a card without this color.  I thought it would be my all-time favorite bestie forever.  But then, sigh, Espresso came to town and the shabby chic trend went to the side and…..well, you know the story.  My dear friend was set aside.  I also noticed that Pumpkin Pie and Tempting Turquoise had not seen much love either.  So a card to combine them….possible?  Why yes!!

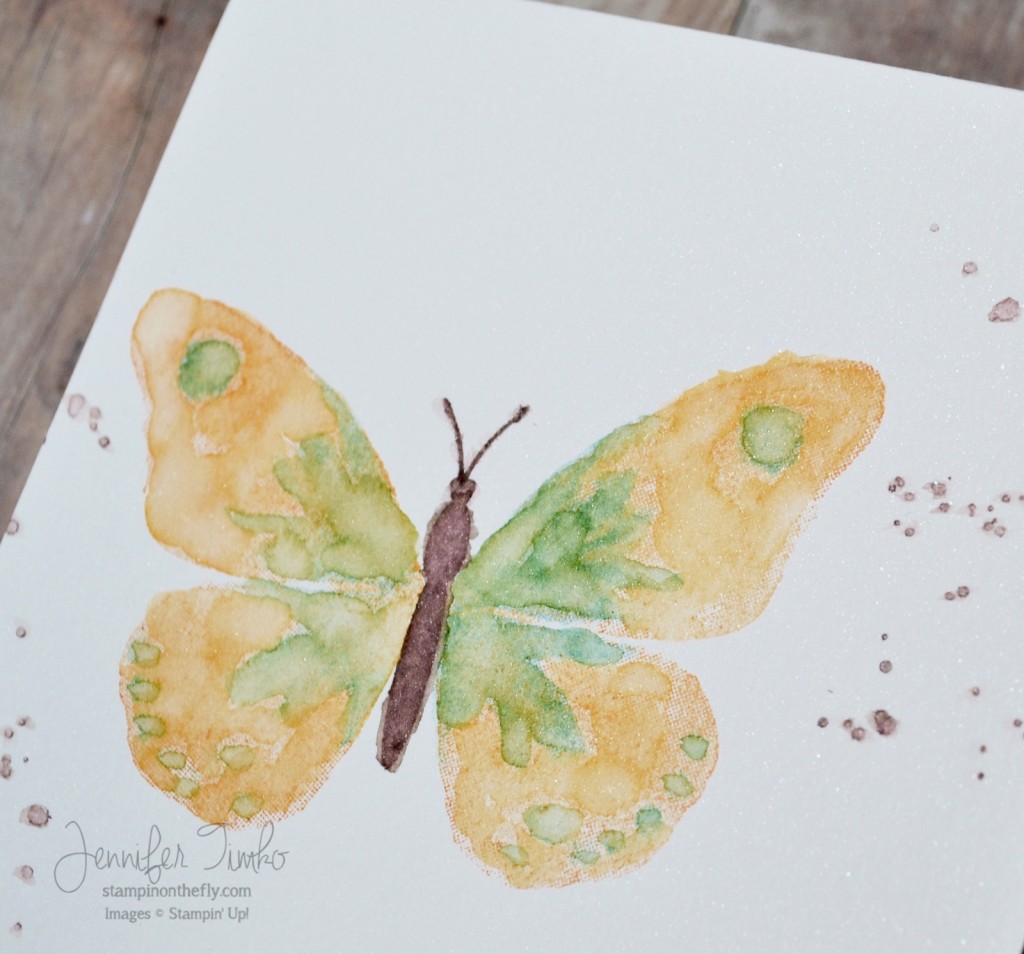
Admittedly, Turquoise has never been on my go-to list but maybe it needs to be.  It really is a pretty color!  In any case, I wanted to make these colors look fun and trendy so my first thought was watercolor.  Specifically Watercolor Wings.  I sponged the Pumpkin Pie onto the big butterfly and stamped it onto Shimmery White card stock.  Then I sponged Tempting Turquoise onto the coordinated “spots” image and stamped it over the orange.  And here is where the magic happens.  I took a dampened Aquapainter (mine did not have water in it, I just dipped into water so you could use a paint brush here too), and started moving the ink around a bit.  Just a little.  Enough to make the edges fuzzy and to create the watercolor look.  Almost like I painted it myself if I was capable of painting it myself!  The body of the butterfly was stamped with Chocolate Chip with more water added.  Then I added a few speckles with my Gorgeous Grunge stamp and added a little water to those too.Here is a closeup.FF Feb - CloseupI’m going to take a moment to give a big shout out to the underutilized workhorse that is Shimmery White paper.  This paper is so pretty.  The subtle sparkle in it makes everything special to start.  But then….who knew….it actually allows for some watercoloring!!  Not tons and tons of water like a true watercolor paper, but certainly perfect for this kind of project.  It makes this one layer card feel complete.  You can see some of the shimmer in the closeup but in person, amazing.

The Fancy-Friday-08sentiment is from the Watercolor Wings set too and is one of my favorite sentiments to put on cards.  Many times I’m not sure of the card’s purpose when I make it and this one allows for the card to used for almost anything!

Ok, it is time for you to continue on our colorful hop.  Hope you will be inspired to pull out some of your old favorites that need a little love!

The fabulous Mercedes Weber is up next!   As always, she will wow you!

And you can click our logo above to get to the Fancy Friday Pinterest page!

6a00e54f94e01b883401b8d05f0bdc970c-320wi-2

Click HERE to purchase these wonderful Stampin’ Up products!

Stamps:  Watercolor Wings, Gorgeous Grunge; Paper:  Shimmery White;  Ink:  Pumpkin Pie, Tempting Turquoise, Chocolate Chip; Accessories:  Aquapainter

Signature 2016 - 1

Fancy Friday – I Heart You

Fancy Friday – I Heart You published on 8 Comments on Fancy Friday – I Heart You

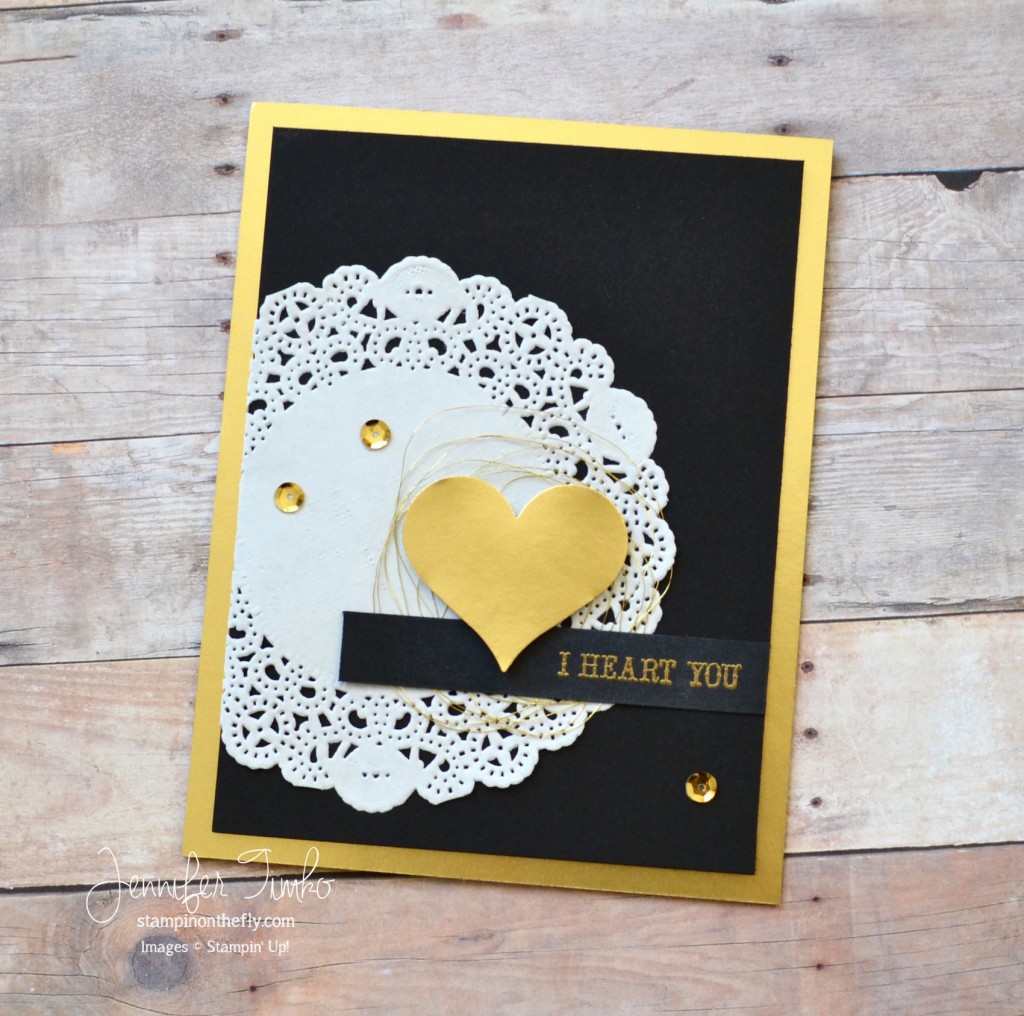
Welcome to this month’s Fancy Friday Blog Hop!  Our team is a group of demonstrators who love to make beautiful things.  Sometimes they are clean, sometimes they are layered but the one thing I can say for sure is that our projects will be fancy!  If you hopped over from my dear friend Cindy, welcome to the next stop.  For January we are creating a Valentines….but very special ones with a twist.  No traditional red or pink!FF Jan - I Heart YouMy first thought when I considered what colors to use was to somehow add in gold.  I went looking for a sketch and found this fun one from Can You Case It.  I also wanted to focus on Valentine’s Day for the CASology Adore Challenge.  I used a Tea Lace Doily against Basic Black and then layered on some Gold Metallic Thread and heart cut from Gold Foil with the Sweetheart Punch.  The sentiment stamped with Versamark and heat embossed with Gold Stampin’ Emboss Powder is from And Many More.  Finally a few gold Metallic Sequins to finish the image layer.  I cut a card base from Basic Black and put on an A2 sized piece of Gold Foil.  I think the color combination is really elegant and just as perfect for Valentine’s Day as red or pink!

Fancy-Friday-08I’ll be back on Sunday with another card that I had time to create.  But for now you need to get to hopping and check out all that the team has created!

The fabulous Kaitlyn Zumbach is up next!   As always, she will wow you!

And you can click our logo above to get to the Fancy Friday Pinterest page!

6a00e54f94e01b883401b8d05f0bdc970c-320wi-2

Click HERE to purchase these wonderful Stampin’ Up products!

Stamps:  And Many More; Paper:  Basic Black, Gold Foil;  Ink:  Versamark; Accessories:  Tea Lace Doily, Heat Tool, Gold Stampin’ Emboss Powder, Sweetheart Punch, Gold Metallic Thread, Metallic Sequins

Signature 2016 - 1


Fancy Friday – Snowflake Tags

Fancy Friday – Snowflake Tags published on 5 Comments on Fancy Friday – Snowflake Tags

I know it isn’t the last Friday of the month yet but, like last month, the Fancy Friday team decided to hop a little early in order to get ahead for the holidays.  Our team is a group of demonstrators who love to make beautiful things.  Sometimes they are clean, sometimes they are layered but the one thing I can say for sure is that our projects will be fancy!  If you hopped over from my dear friend Cindy, welcome to the next stop.  For December we are creating a Fancy Tags.  Always a last minute thing for me so I’m happy to see (and share) some ideas for you!

FF Dec - Snowflake Tags

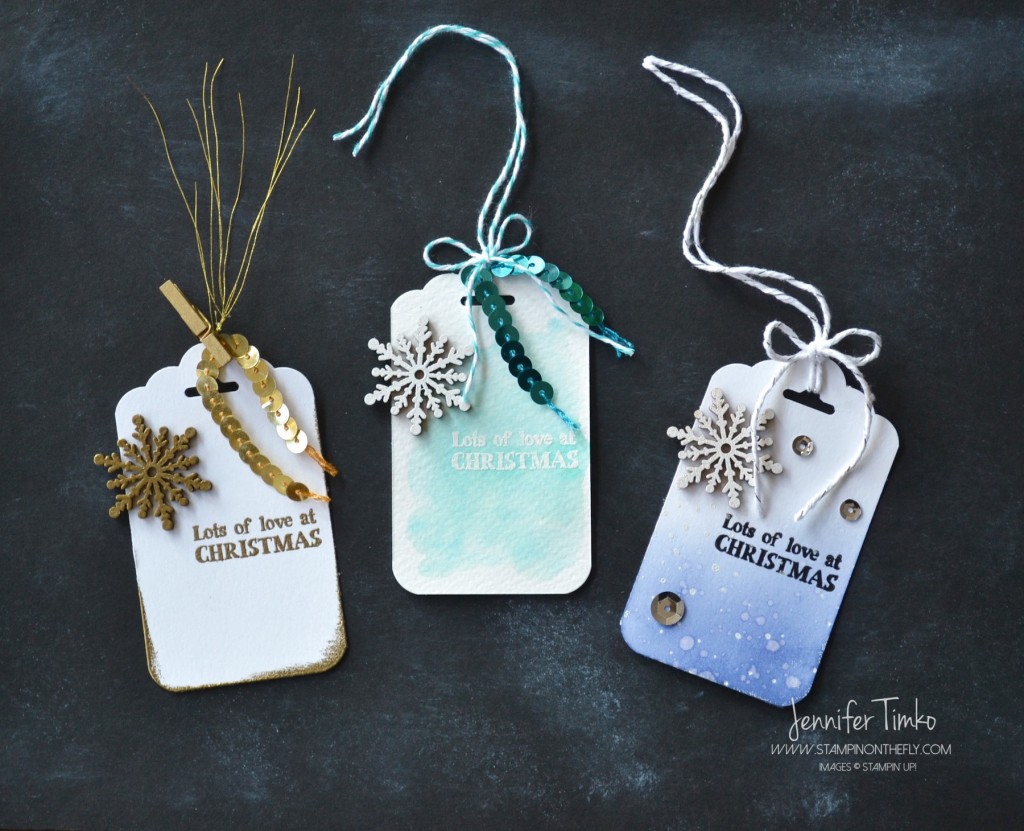
The first thing you may notice about these tags is that they are distinctly different styles.  The second….they are all the same tag.  Just like the two cards I posted last week, at this time of year it is simply too hard for me to come up with totally new sketches and ideas.  So, I just kind of do a riff on one idea.  Totally what I did here.  The tags are created using the Scalloped Tag Topper Punch and the corner rounder from my Envelope Punch Board (but the Project Life Corner Punch works perfectly too).  I cut the paper to 3-1/2″ x 2″ and punched.  The two outside tags are Thick Whisper White and the middle tag is Fabriano Watercolor Paper.

Here are the specifics of each:

Gold Tag – Apply Embossing Buddy to whole tag.  Take your Versamark ink pad and dip the edges of your tag right onto the pad.  Apply Gold Stampin’ Emboss Powder on the inked edges and heat emboss.  Smoosh your Snowflake Element into Versamark and apply more Gold Stampin’ Emboss Powder, heat emboss that too.  Stamp sentiment from Santa’s Gifts with Versamark and add even more embossing powder.  Tie on some Gold Thread, add Gold Sequin Trim holding it on with a Gold Mini Metallic Clothespin.

Watercolor Tag –  Apply Embossing Buddy to whole tag.  Stamp sentiment with Versamark ink and add White Stampin’ Emboss Powder.  Heat Emboss.  Apply a little bit of water to the paper, using an Aquapainter apply Bermuda Bay Ink.  Ink up Snowflake Element with Versamark and add White Stampin’ Emboss Powder then heat emboss.  Tie on Bermuda Bay Sequin Trim with Bermuda Bay Baker’s Twine.

Sequin Tag – Using Tim Holtz Distress Ink in Chipped Sapphire, sponge on ink using the Mini Blending Tool (Tim Holtz).  Spritz on water and let dry.  Ink Softly Falling Embossing Folder with Versamark and stamp onto tag.  Add White Stampin’ Emboss Powder and heat emboss.  Stamp sentiment with Momento Tuxedo Black.  Emboss snowflake with white (like above).  Tie on Silver Baker’s Twine (this came from an old Paper Pumpkin).  Add sequins.

All the snowflakes were attached to the tags using the Fine Tip Glue Pen with a place for the To/From on the back.

6a00e54f94e01b883401b8d05ef236970c-500wi

Along with Allison, Kaitlyn, Krista and Marisa that joined in last month, we are also welcoming Sarah for December.  These ladies are seriously talented and totally fancy!!

The fabulous Mercedes Weber is up next!   Wait until you see what she created!

And you can click our logo above to get to the Fancy Friday Pinterest page!

6a00e54f94e01b883401b8d05f0bdc970c-320wi-2

Click HERE to purchase these wonderful Stampin’ Up products!

Stamp:  Santa’s Gifts; Paper:  Thick Whisper White, Watercolor (Fabriano), Tangerine Tango, Thick Whisper White (base);  Ink:  Bermuda Bay, Versamark, Momento Black, Tim Holtz Distress Ink; Accessories:  Scalloped Tag Topper Punch, Envelope Punch Board, Heat Tool, Gold and White Stampin’ Emboss Powder, Embossing Buddy, Aquapainter, Snowflake Elements, Gold Metallic Thread, Silver and Bermuda Bay Baker’s Twine, Sequins, Fine Tip Glue Pen, Softly Falling Embossing Folder (for stamping), Gold Mini Metallic Clothespin, Gold and Bermuda Bay Sequin Trim

Blog Signature 2015

Fancy Friday – Joy

Fancy Friday – Joy published on 5 Comments on Fancy Friday – Joy

I know it isn’t the last Friday of the month yet but the Fancy Friday team decided to hop a little early this month (and we will next month too) in order to get ahead for the holidays.  And you know what?!  I have some fun news.  This team of amazing designers has just added some new fanciness!!!  Many of you know that Fancy Friday developed after the 2013-14 Artisan Design Team’s tenure was up.  We enjoyed hopping together so much that we wanted to keep sharing with you once a month.  Some of our team has needed to take a hiatus so we thought we should add stampers to the team that you are sure to love!  The one thing I can say for sure is that our projects will be fancy!  If you hopped over from my dear friend Cindy, welcome to the next stop.  For November we are creating a Fancy Christmas, but with a twist.  We are using non-traditional colors and hope to inspire you to try some of them!

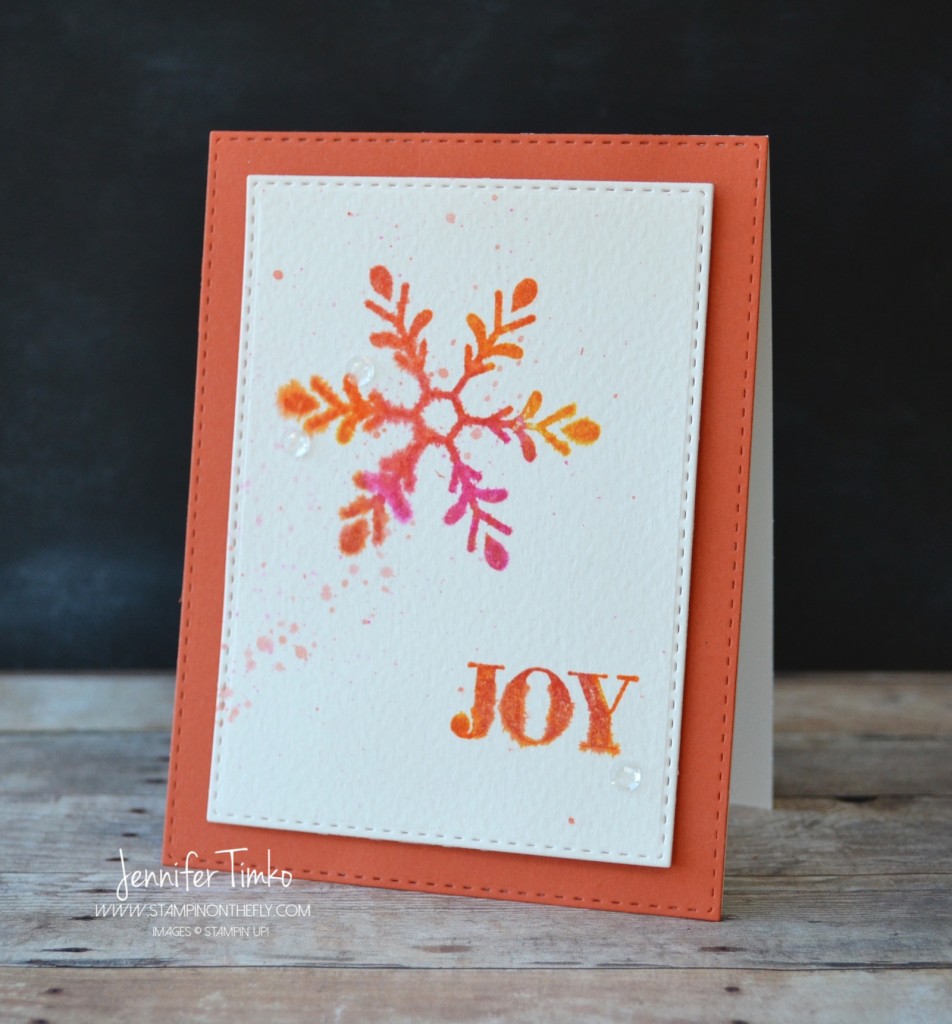
FF Nov - Joy

I have to say that I went pretty far out of my normal Christmas color scheme on this one but I love it so much!  I have told you many times that Holly Jolly Greetings is my favorite stamp of the Holiday Catalog.  This is totally why!  I love the snowflake (a lot) and I love the versatility of the sentiments.  And they will be great sentiments for years to come.  You see, I tend to “collect” Christmas sets.  Especially the ones with great sentiments.  They rarely leave once I have gotten them.  That also makes me picky when it comes to sets because I have so many from previous years.  But this one…..unique and flexible!  And guess what?  It is one of the continued and not retiring sets from the Holiday Catalog so I think Stampin’ Up agrees!

So how did I create this?  Using watercolor paper to start, I placed down some water on the paper.  Then using Distress Inks, I added three different colors (Spiced Marmalade, Ripe Persimmon, Picked Raspberry) to the stamp.  I spritzed the stamp with water and stamped.  I did the same with the “Joy” and then took a wet paint brush and added a little ink then splattered it.  The clear sequins are from the Metallic Sequins pack and I just love the little bit of special something they add!  The panels are cut with Stitched Rectangles Dies (SSS).  The card base is Tangerine Tango and I think it is a nice foundation for these crazy colors.  This is a fun card to make and I may play around with some other color combinations as I get more serious in my Christmas card production.

6a00e54f94e01b883401b8d05ef236970c-500wi

As you hop around, please make sure you add a special welcome to Allison, Kaitlyn, Krista and Marisa.  These ladies are seriously talented and totally fancy!!

The fabulous Mercedes Weber is up next!   Wait until you see what she created!

And you can click our logo above to get to the Fancy Friday Pinterest page!

6a00e54f94e01b883401b8d05f0bdc970c-320wi-2

Click HERE to purchase these wonderful Stampin’ Up products!

Stamps:  Holly Jolly Greetings; Paper:  Watercolor (Fabriano), Tangerine Tango, Thick Whisper White (base);  Ink:  Tim Holtz Distress Ink; Accessories:  Big Shot, Stitched Rectangles (SSS), Metallic Sequins, Dimensionals, paint brush

Blog Signature 2015

Primary Sidebar