Skip to content

Heart Vine Birthday

Heart Vine Birthday published on 2 Comments on Heart Vine Birthday

There was a big birthday at my house last week. My youngest turned 17. Oh my. I’m not sure how that can even be true! Needless to say, I needed a special card for him. He has another card that has hearts on it and he says it is one of his favorites so I used that as a springboard for my card. I reached for the Lovely Layers: Heart Vine dies from Honey Bee Stamps because I thought it was perfect for what I had in my head.

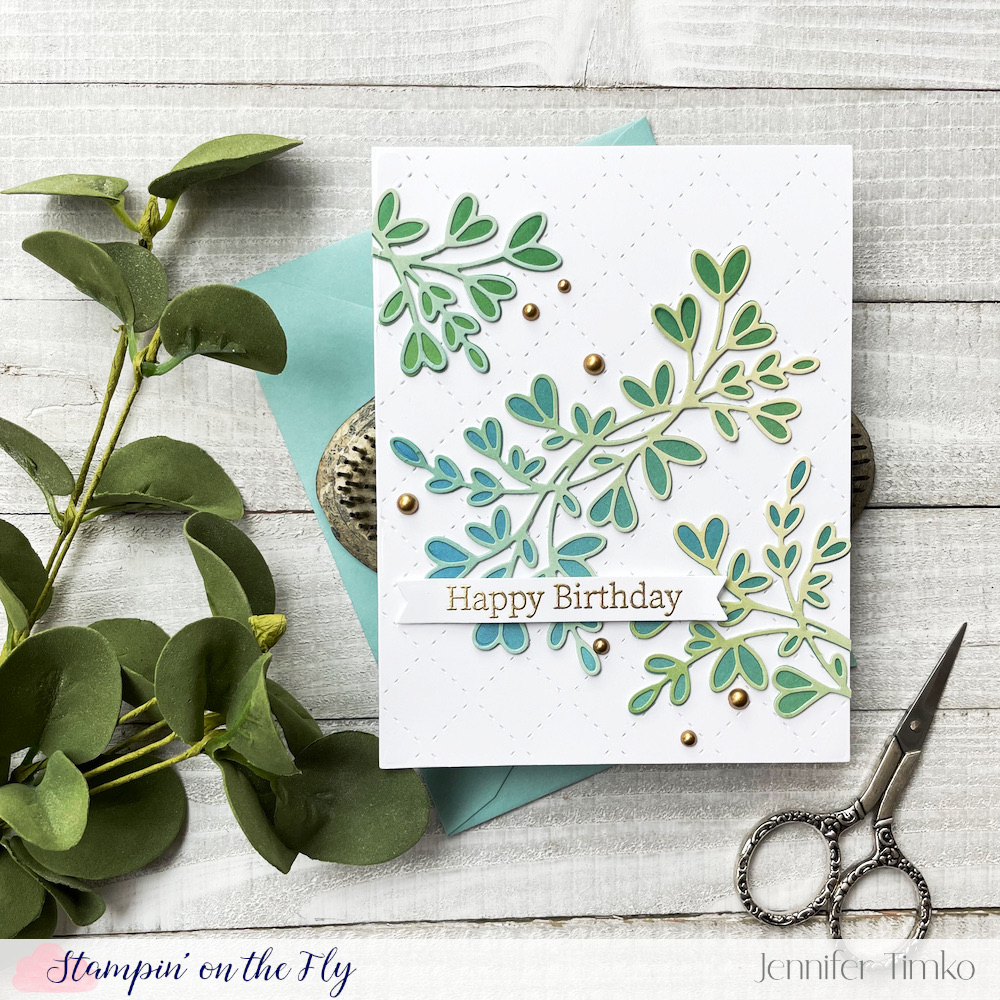
Using an ombré print from the Funfetti Paper Pack, I cut out two of both the outline and solid heart vines. Then I cut another two of the solid to use for dimension. I put the two full vines together, including the extra white layer and let the glue dry.

Meanwhile, I cut the Quilted A2 background and stamped the birthday sentiment with heat embossing. I attached the center vine using the Bee Creative Glue (LOVE this glue) and then played with where to add the side pieces. I attached the bottom one, let the glue set and then trimmed it off with my trimmer. I then used the remaining part for the top, repeating the process. I added the sentiment (after cutting it with a banner die) and a few gold pearls.

The birthday lad loved the card and I’m still in shock that my baby is 17. Sigh. I hope you have a great start to your week and I’ll be back soon with more. Thanks so much for stopping in today!

Freshly Made Sketches #570

Freshly Made Sketches #570 published on 9 Comments on Freshly Made Sketches #570

It is my turn to be the sketch designer for Freshly Made Sketches this week and I hope you will enjoy this one. In a disclaimer, I originally designed this as a square and then promptly made my card into an A2. I switched up the sketch but some of our team had already made a square. Either version is great to use and let’s face it, there is a lot about guideline over rule for our challenge after all these years.

What I did know was the set I wanted to use for the sketch. This beautiful Grandma’s Garden set from Honey Bee Stamps is a breath of spring. Not that we have really had much winter here but it is fun to color a little bit of spring. I chose a basic pink version of the fuchsias with the inner part of the flower being a pale pink. I played with blending teals and greens on the hummingbird with my Copics.

For the background, I inked on some Tumbled Glass Distress Oxide Ink to start. Then I splattered with a little water and came back over with a little bit of Broken China Distress Oxide to create the darker splatters. The sentiment is from the On The Line: Fall Florals set and I think these sentiments in the set are ones to use over and over. Finally a few green sequins to finish.

Come over to the challenge to see the amazing work by the team and I hope you will play along with us this week. I do have a few cards to share that I have created over the last couple of weeks. My oldest went back to college on Monday and now the “real” world sets back in. How lucky I have been to have the time with him home!! I hope you have a wonderful week.

Freshly Made Sketches #569

Freshly Made Sketches #569 published on 7 Comments on Freshly Made Sketches #569

I seem to be in a one card per week kind of pattern right now. Trying to work on that but between work and the last days of the college kid home, time seems too short. Thankfully, this fabulous new sketch for Freshly Made Sketches “told” me just what to make. The amazing Jacquie Southas gave us this classic vibe for the week and I pulled an older image that fit it perfectly.

This Pretty Postage set from Honey Bee Stamps has been sitting on my desk for a couple of weeks waiting to be used. When I first got the set, I did not get the dies and I recently remedied that so I was ready to use it again. I pulled some pretty spring colors in my Copic Markers and colored it right up. I love those modern flowers!

To add a little more pop to the card, I reached for the Whimsical Hearts Stencil since the hears are similar in shape to the image. I added some Tim Holtz Distress Matte Texture Paste for some tone on tone detail. The sentiment is from the stamp set and I just put it on a banner from the Sentiment Banners set. The pearls are from the Holiday pack.

I’m not one for a lot of Valentine cards but I like that this could be used for other occasions. I hope your week is going well and that you will have a little time to craft. Thanks so much for stopping in today. I might even be back later in the week with another card. See you soon!

Freshly Made Sketches #568

Freshly Made Sketches #568 published on 10 Comments on Freshly Made Sketches #568

Another week has flown by and I’m back with the latest from Freshly Made Sketches. This week our sketch designer is the wonderful Judy Rozema and I love her sketch. I might have played a little loose and fast with it (in my head it was going to be closer) but I love the card it inspired.

I was looking through my stamps to find some sets that I haven’t used much and came upon this Smitten Kittens set from Honey Bee Stamps. It really is SOOO fun and I love how the variety of cats allow for customization to look like different family kitties. Of course, I use my two hooligans as inspiration. I colored using Copic Markers and this kind of coloring always makes me happy.

I found this gingham color in the Gingham Galore Fall paper pack from Honey Bee Stamps. This is one of the packs that are on sale right now and I love having the color varieties in my repertoire. This one matched the “calico orange” so seemed perfect for this. I pulled a sentiment from the Riding By set. Just a nice basic for any occasion and these are the ones I always seem to need most.

I hope you like the fun little card and will come over to join us for the challenge. As things settle down into more of a routine, I hope to have more to share with you too. Thanks so much for stopping by and have a great day!

Freshly Made Sketches #567

Freshly Made Sketches #567 published on 4 Comments on Freshly Made Sketches #567

Happy New Year!! I hope you will excuse the quiet but the truth is that I have not had time to make a thing for the last few weeks. Holiday flying (and the chaos from the weather events didn’t help), oldest home from college, husband finally home from a 4 month deployment (yes, I don’t talk about these until they are all done for safety reasons) plus some time with extended family where it could fit. Frankly, I need a vacation! *smile* Things are quieting down a bit so I’m hoping to find some routine over the next few weeks. I did have time to make a quick card yesterday for this marvelous new sketch by the lovely Amy O’Neill for Freshly Made Sketches. Our first challenge of the year and this is a good one to get the creativity moving.

When I saw the circles, I saw snowflakes and went searching through my pile to find these from Gina K Designs. Aren’t they pretty?! Not sure how these didn’t make it into the holiday card rotation but they are perfect for holiday thank you cards. I cut them out using Simon Says Stamp Silver Glitter Cardstock and they sparkle so much in person.

For the design panel, I blended on Tumbled Glass and Faded Jeans Distress Oxide Inks and then added the Festive Stencil from Gina K Designs and inked with Chipped Sapphire. So pretty! I chose a sentiment from the Honey Bee Stamps Inside: Thankful set and heat embossed in silver. A few gems from my stash to finish the centers of the snowflakes and done.

It was nice to get back to crafting and I hope to fit in a little more this week. I am, however, back to flying and on call. Given the weather, I suspect more flying and less stamping will be on my agenda. I hope your holiday season was good and that the new year is treating you well so far. Thanks so much for stopping in today. As always, stop over to see us at Freshly Made Sketches!

Freshly Made Sketches #566

Freshly Made Sketches #566 published on 4 Comments on Freshly Made Sketches #566

I’m sharing the last Freshly Made Sketches challenge of the year and it is just fabulous for last minute holiday cards or cards made when you are done with holiday cards. The wonderful Narelle has one with tons of possibility, as you can see with the team’s cards.

In a crazy move, I made a card that is NOT a painted tree! I reverted back to some of my favorite dies of the season from Honey Bee Stamps. These Lovely Layers: Winter Greenery elements are just so pretty and I had not used the pinecones yet. I thought they were perfect for the sketch. I started with a piece of watercolor paper that I sprayed with Pumice Stone Distress Spray and added some Rustic Wilderness Distress Ink. I was just neutral with texture as a starting point.

Using that piece of paper, I cut out all of the elements for the card. All the little color textures on the pieces are because of that first layer of ink. Once each piece was cut, I added more Distress Ink to color each one its proper shade. I used Distress Ink because it is more sheer so I kept the other details and splatters.

I played around with the placement of the elements and then went to decide the background. I found this taupe-ish wood grain in my Grain and Grunge Paper Pack that was perfect. The gold foiled sentiment was just the right size for the sketch and I love the bit of shine it adds.

I hope you will come over and join us if you have time to craft during the holidays. You can join multiple times and we love seeing all you create! Thanks for stopping by today. Back soon with a few more cards I’ve been making for the holidays.

Hand painted tree with music

Hand painted tree with music published on 2 Comments on Hand painted tree with music

One more tree. Because the live from Dawn Woleslagle taught three styles and I had to try them all. You can find the links to her page on my post from last week. I hope you will bear with me because this has brought me so much joy in finding success in painting. I may even venture into some tags if I have any time to spend on them over the next couple of weeks.

I will say that I cannot pick a favorite tree to paint but I find this one and the first one I made a little more intuitive. Again, I left the tree simple (mostly for fear of messing it up by adding container) but I like the look. A bit more stitching since I feel it adds the right touch on this.

You can see in this closeup that I also added some white and gold splatters. For the background I chose an old, really old, music print from my stash. I inked it up with Distress Inks to give it a vintage look and added stitching to it too. I knew it needed a bit more shine so I started with the sentiment being gold embossed (and the gold splatters). But it still needed something else. It it hard to see in the photos, but right under the image layer is a layer of gold glitter paper. In person it really adds so much! A button and more gold twine to finish.

Again, thank you for those of you who have left kind words. Let’s face it, trying new things can be a bit intimidating and I’m glad you encourage me with your sweet comments. I’m actually out flying today and will likely be out in the system A LOT over the next couple of weeks. If you are flying for your traveling, please get to the airport early. I mean seriously early. I have already been seeing families completely devastated by the long security lines and the extra stress of risking their flights. Well, I’m off to get ready for another day. I’ll be back tomorrow with a new sketch from FMS (and something other than a tree). See you then!

Freshly Made Sketches #565

Freshly Made Sketches #565 published on 5 Comments on Freshly Made Sketches #565

Happy Wednesday! I am back today with the latest sketch from Freshly Made Sketches and another watercolor tree. Truly, I’m obsessed. I did get a question on the tutorial on the watercolor trees. Dawn has a group on Facebook called WPlus9 Encourage Creativity where she has lives twice a week or so. The tree painting was on November 15th. Now, on to the latest sketch from the incredible Karren Johnson.

Armed with my confidence from the last watercolor tree, I attempted another style and, oh my word, it worked! I wanted to use it with the sketch this week and had to play around with backgrounds that worked. I finally settled on some patterned paper from Honey Bee Stamps.

I love this traditional plaid behind the tree and thought the dark wood print grounded the card nicely. In keeping with the sketch (loosely, at least) I chose a sentiment from Inside: Holiday Sentiments (Honey Bee Stamps). I had added a few gouache splatters to the tree after painting but still thought it needed a little something extra. A twine bow seemed to be just the right amount of detail.

I hope you’ll come over to join us for this week’s challenge. This sketch is perfect for those last minute holiday cards! I appreciate you dropping by. See you again soon!

Hand painted tree for Christmas

Hand painted tree for Christmas published on 4 Comments on Hand painted tree for Christmas

My crafting lately has been a bit hit and miss. In order to preserve some of my days off needed, I have been on reserve (on call) for flying. It makes for a chaotic pattern and I have a hard time creating without a good schedule. Some days, I just watch videos of my talented friends and learn. Recently, the incredible Dawn Woleslagle (WPlus9) showed how to paint trees. And I don’t just mean color, but actually paint. Now I like to pretend I’m a painter sometimes but this is next level. I like to color OTHER people’s art! But she made this look easy so I gave it a go.

Using my Daniel Smith watercolors, I followed along with Dawn basically mimicking her every move. And you know what, I got a tree! I’m pretty excited about this tree, not going to lie. Enough that I’m going to try some more. We’ll see how that goes. I cut down the panel, in retrospect I wish I had left it longer for the sentiment, to create a card. In keeping with Dawn’s unique and truly special style, I even pulled out my sewing machine. I stitched around the edges of the colored panel and a paper print panel (from Honey Bee Stamps). My sewing is intentionally a bit wonky but if I tried to make it perfect, it would be wonky anyway.

I thought it needed a bit more so I added gold splatters to the back panel and a layer of vellum underneath. The sentiment is gold embossed (Honey Bee Stamps) and I pulled a gold button and thread from my stash.

So the lesson here is never say never. It takes a bit of courage to make art. A little of yourself is in every piece and you have to face “messing up”. I hope this encourages you to take a chance and try something new. And please go follow Dawn on all her social platforms. She is generous with her talents and a skilled instructor! Thanks so much for stopping in today. Wishing you a wonderful rest of your week.

Freshly Made Sketches #563

Freshly Made Sketches #563 published on 3 Comments on Freshly Made Sketches #563

Super quick for today since I’m in the middle of a trip (typing from a hotel room and I’m TIRED!). I created this for the latest awesome sketch. This one was designed by our hiker extraordinaire, Jen Brum!

I saw this design from the free paper pack that came in my Honey Bee Stamps order (instant quick cards if you want and oh so cute). Thought it would be pretty for the sketch. I inked up some paper and cut these holly leaves and berries. So fast but so fun! I told you in Monday’s post about the Holly Jolly Background Stamp and the sentiment I cut out. This one was all ready to go and popped it right onto the card.

I think I will use more of these little cards in similar ways to create a stack of cards. I love when quick cards can still feel special. Hope you’ll come over and join us for the sketch this week.

For all of you in the US, wishing you a happy Thanksgiving holiday. If you are traveling, so am I! Keep an eye out in Houston, Charlotte, Chicago! See you again soon.

Primary Sidebar