Skip to content

Artisan Wednesday Wow – Ampersand

Artisan Wednesday Wow – Ampersand published on 13 Comments on Artisan Wednesday Wow – Ampersand

02-Feb-Blog-Hop-Button

The Artisan Design Team’s February box of products is fantastic.  Were you as wowed by last week’s projects as I was?  We are continuing to use some of the latest and greatest from the Occasions Catalog.  If you have come over from amazing Jeanna, welcome to the next stop.  If you are starting here, just continue around using the next buttons until you get back to me.

AWW Feb - Ampersand

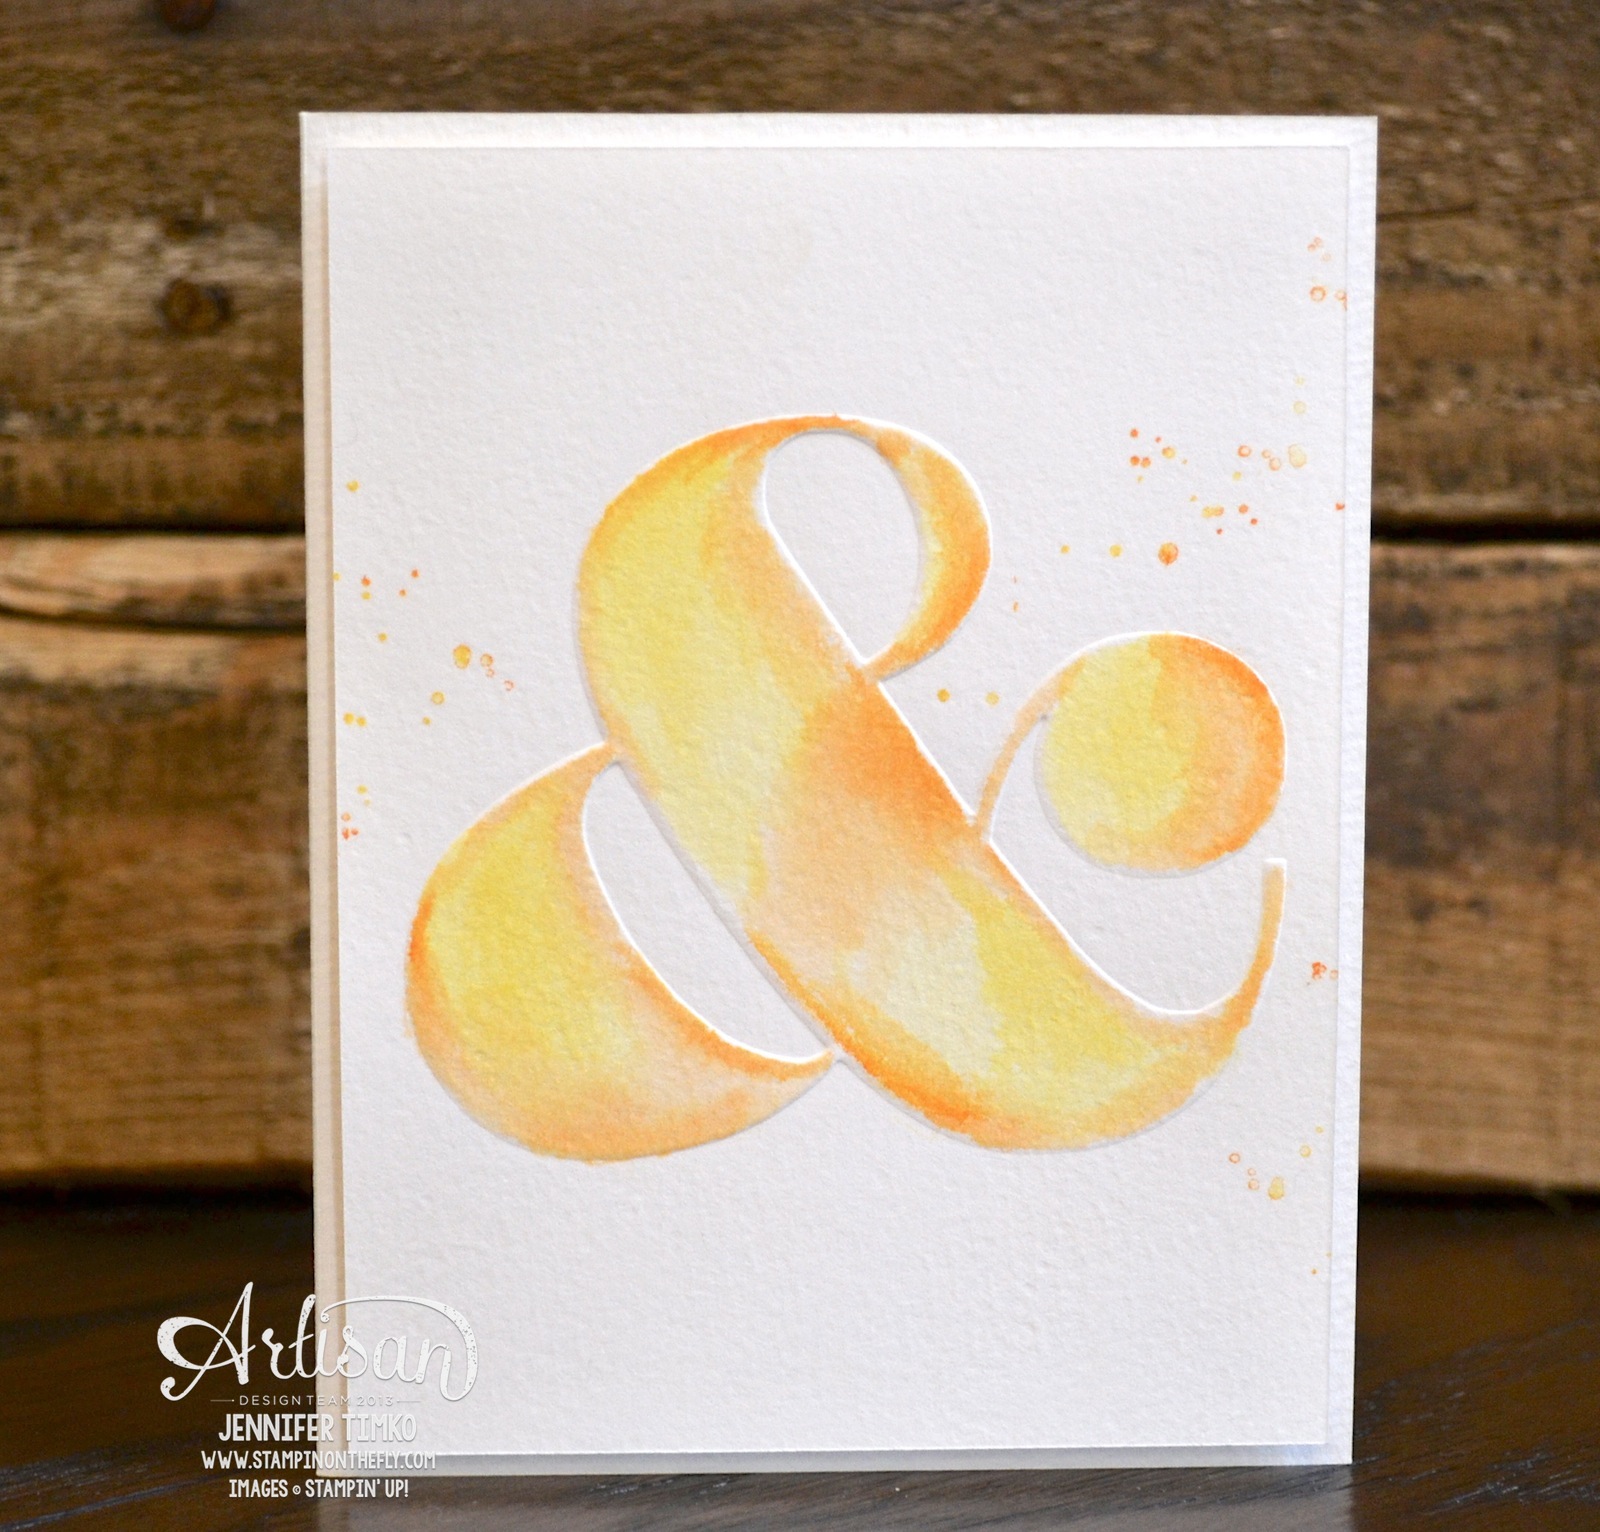
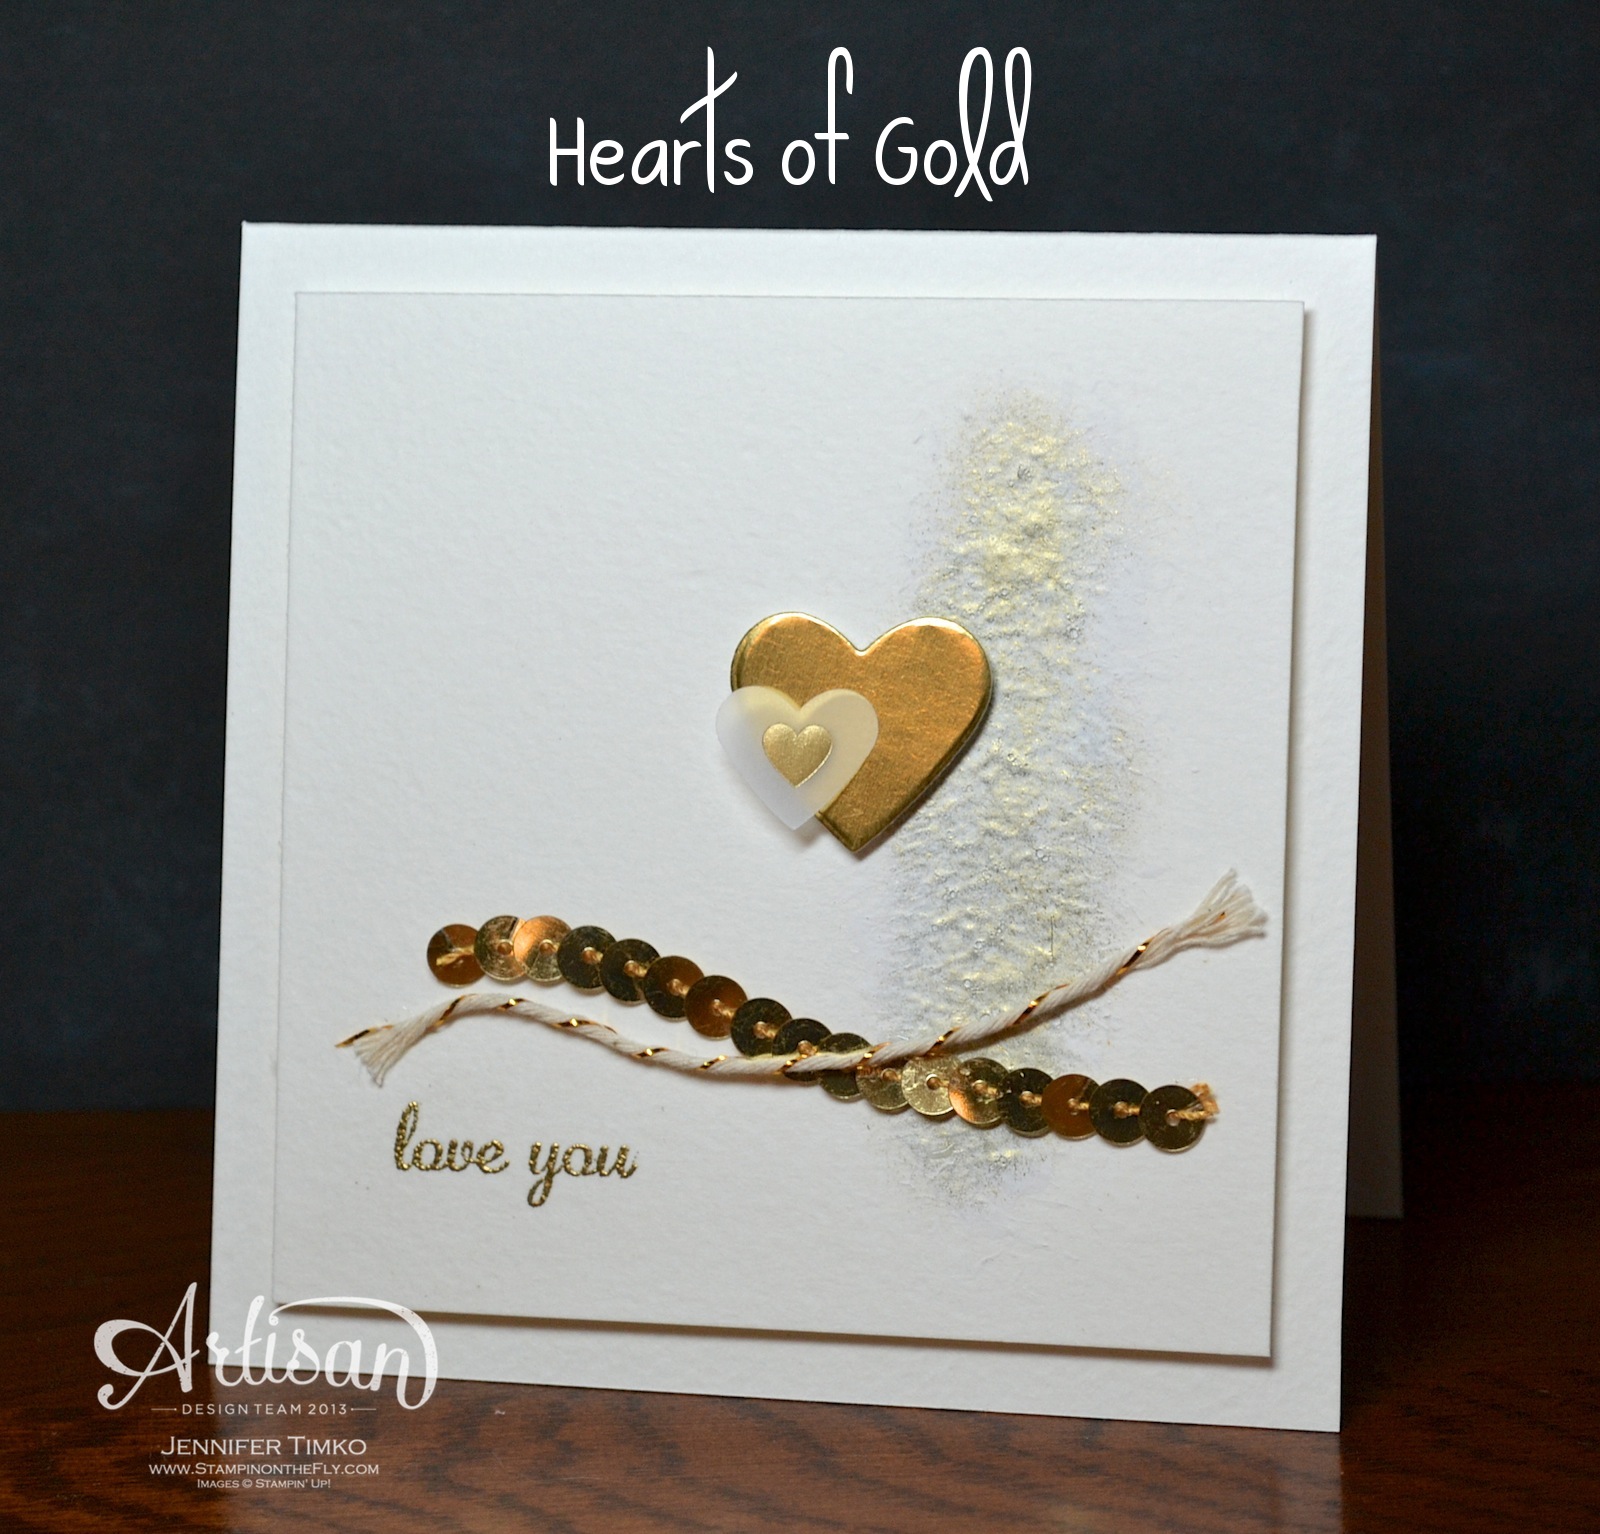
So, the Ampersand Embossing Folder.  I know these little symbols are incredibly trendy (yea, Stampin’ Up!) but what to show you?  One of my favorite suites in the new Occasions Catalog is the Watercolor Wonder Suite.  The DSP (just got it and wow), the notecards (ditto) and the pretty stamps.  So that was my inspiration.  I took Watercolor Paper and cut a panel to emboss (4″ x 5-1/2″) and ran it through the Big Shot with the Ampersand Embossing Folder.  Then I grabbed Daffodil Delight and Pumpkin Pie Classic Ink Pads.  I squished the lids (that is the official term) and then opened the pads to get the ink from the inside of the lids.  Using my Aquapainter, I picked up the ink and started coloring.  Just let the ink run out and keep the colors a bit uneven and imperfect.  When I was happy with the coloring, I took some splotches from Gorgeous Grunge and inked first in Daffodil Delight and then touched on a little Pumpkin Pie.  I stamped off a little and then added the splotches randomly.  The whole panel was popped up on Dimensionals and put on a card base made of Watercolor Paper.

AWW Feb - Ampersand inside

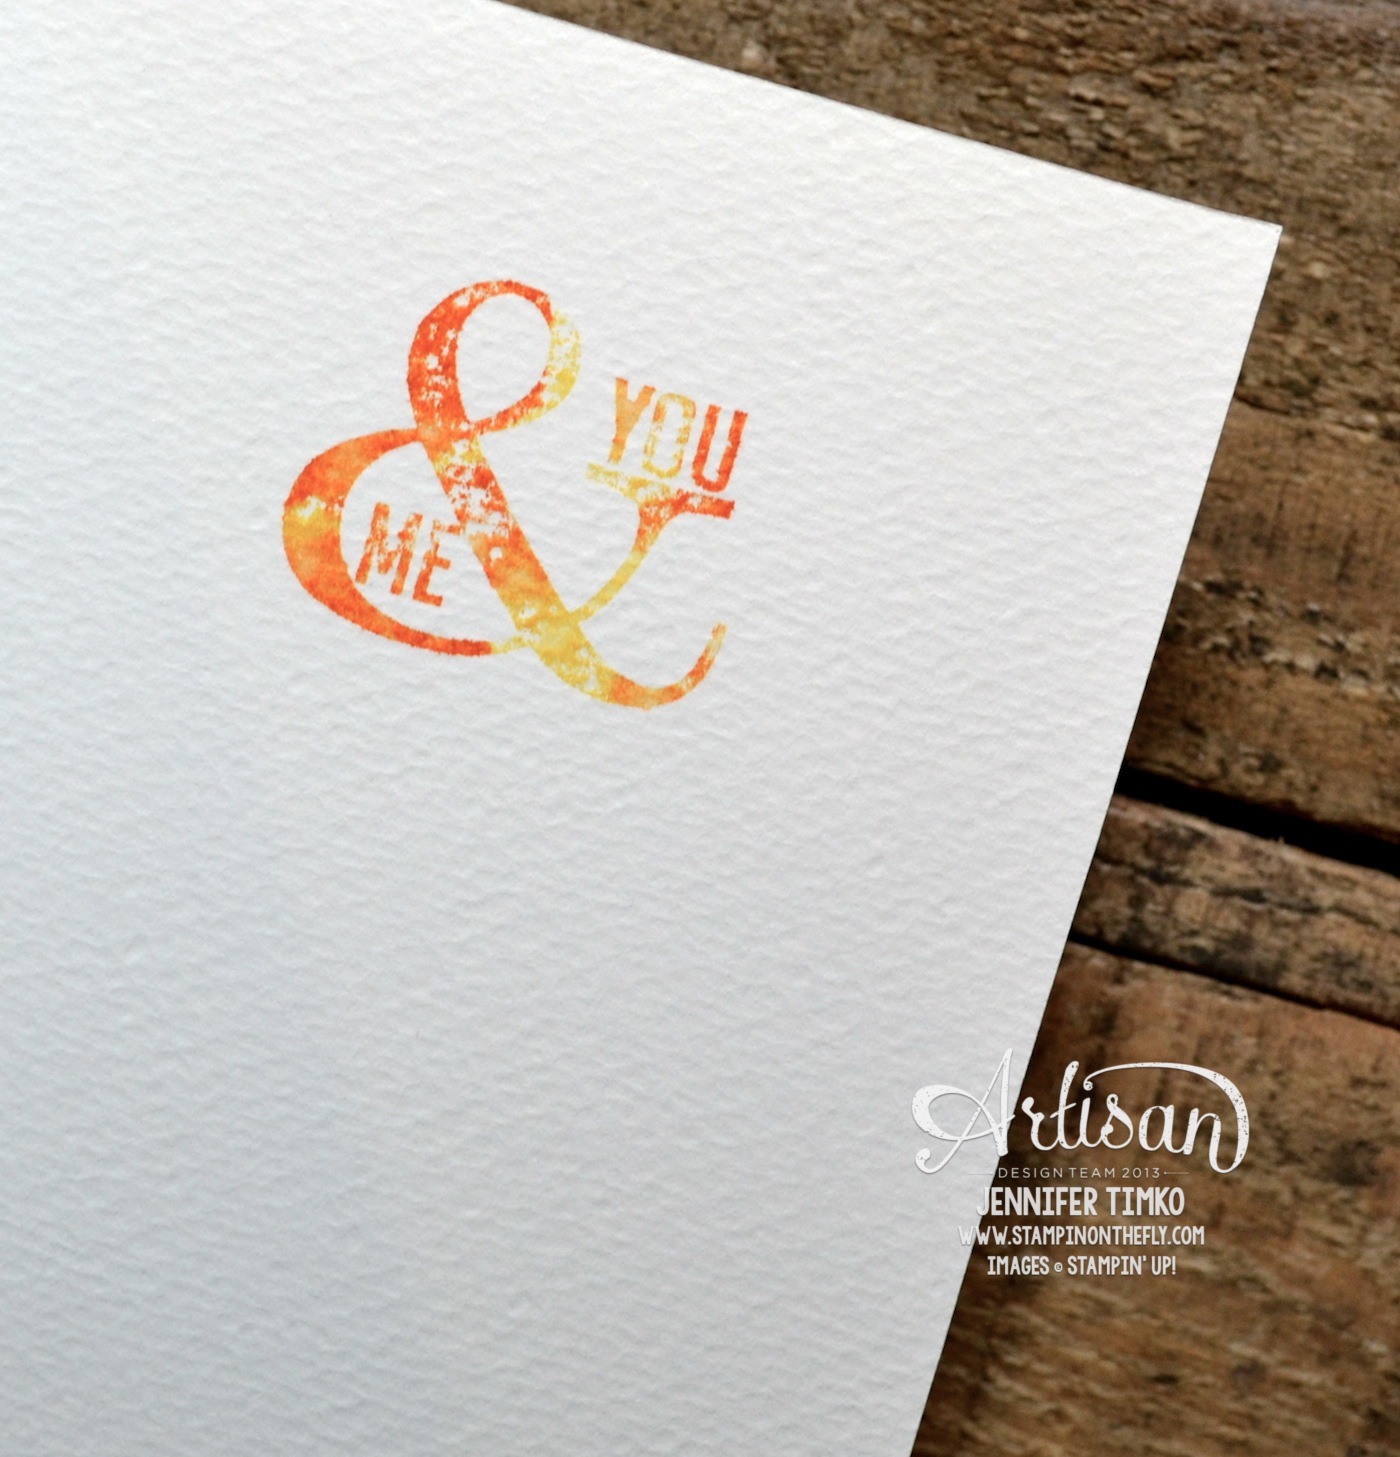
So I told you yesterday that this would be a non-standard Valentine.  On the inside of the card, I chose the stamp from Perfect Pennants that has another ampersand in it.  Again I inked first with Daffodil Delight and the rolled on some Pumpkin Pie (always use the lightest color first).  I spritzed the inked stamp with water so that the stamped image would mimic the look of the front (I practiced a few times first to make sure I had it down – clean off the stamp before each reinking).

I think this will be my DH’s Valentine so shhhh….don’t tell him!  Making a whole card of Watercolor Paper is not for every day cards but perfect for special ones…he’s worth it!!

I’ll be back tomorrow with the latest from Freshly Made Sketches and then later in the week with more Leadership Display projects.

Okay, off to go visit the awesome Mercedes Weber.  I can’t wait for you to see what she has created!  Make sure you hop around the whole loop to take a look at beautiful creations by the whole team…you’ll be happy you did!

02-Feb-Blog-Hop-NEXT-Button

Click HERE to purchase any of these wonderful Stampin’ Up products.

Stamps:  Perfect Pennants, Gorgeous Grunge; Ink:  Daffodil Delight, Pumpkin Pie; Paper:  Watercolor; Accessories:  Big Shot, Ampersand Embossing Folder, Aquapainter, Water Spritzer

Blog Signature 2014-001


Perfect Pennants – You & Me

Perfect Pennants – You & Me published on No Comments on Perfect Pennants – You & Me

I hope your weekend was wonderful!  Mine was full of de-icing, instrument approaches and all the challenges that winter flying can bring.  I’m grateful for passengers who were patient with the winter delays (de-icing and large headwinds) and said kind things as they deplaned.  A couple more days before I get home…

I have another Leadership project to share today and this one is fun to make.  Need a Valentine card that isn’t too girly?  This might be the one for you!

Perfect Pennants - You & Me

Since the Occasions Catalog showed the Perfect Pennants stamp set and the Kaleidescope DSP on the same page, it seemed natural to pair them up for a card.  I started with a Bermuda Bay card base then cut different sized pennants out of the DSP.  I just used the size of each print to decide the size.  The sentiment was inked with Stampin’ Write Markers in Bermuda Bay and Strawberry Slush.  I punched it out with my circle punch (1-3/8″ I think but I forgot to write it down).  After layering all the pennants and attaching the circle with a Dimensional, I still felt like something was missing.  So, out came the Basic Rhinestones and a Sharpie marker.  The little gems added the touch I wanted.

Tomorrow is the day for our next Artisan Wednesday Wow hop and I have another non-traditional Valentine for you.  Until then, I hope your day is fantastic!

The rest of the team is showing their Leadership Display Board projects as well so make sure you take a look!

Here is the rest of the Artisan Design Team:


Click HERE to purchase wonderful Stampin’ Up products.

Blog Signature 2014-001


See Ya’ Later – Heart Box

See Ya’ Later – Heart Box published on 1 Comment on See Ya’ Later – Heart Box

Sorry that I missed my promised post yesterday.  Between reserve with United and snow/ice days for the boys, things have been a little crazy.  But in a good way….

In any case, here is a little Valentine’s project that is quick to make and so sweet to hold a special treat.

See Ya' Later - Heart Box

I found this little paper mache box at a craft store and thought it would be perfect for this sentiment from See Ya’ Later.  I painted the top with an acrylic paint (Vanilla) and covered the bottom of the box with this fun print from Modern Medley DSP (I used Multipurpose Adhesive to seal it down.  Using the Small Heart Punch, I popped out a couple of hearts from the Real Red print in Polka Dot Parade DSP, folded them in half, glued the sides together and fanned.  Cute accent that is easy to make!  I stamped the sentiment on Very Vanilla and created the banner then stamped again in Real Red.  Cutting the letters individually is a fun and easy way to add texture.  Another little banner underneath and done!

Quick post today since I’m out to fly tomorrow.  I’ll try to be back on Monday (hotel internets allowing) and back for sure on Tuesday with the next project from our Artisan Wednesday Wow series.  Hope your weekend is fantastic!!

The rest of the team is showing their Leadership Display Board projects as well so make sure you take a look!

Here is the rest of the Artisan Design Team:


Click HERE to purchase wonderful Stampin’ Up products.

Blog Signature 2014-001

Freshly Made Sketches #122

Freshly Made Sketches #122 published on 9 Comments on Freshly Made Sketches #122

FMS Final 122-001


Just take a look at this fantastic sketch from Freshly Made Sketches this week!  A classic look with loads of possibilities from the wonderful Cindy Hall.  I knew what I wanted to make the minute I saw it…and I love a sketch where that happens!

 FMS122 - Gingham Stems

So I got this awesome set, Simple Stems, from the Occasions Catalog and it is so fantastic.  Kind of a “build a flower” set.  I stamped the flower top in Strawberry Slush and the stem in Pear Pizzazz.  The sentiment is from the hostess set Express Yourself and I love that pretty font.  I pulled out some paper from Gingham Garden DSP and it seemed so spring-like.  Perfect to improve my attitude about all the winter yuck we’ve been having!!  After I had everything together I thought it still needed a little something.  You KNOW that my go-to solution was ribbon of some kind but as I was sifting through, I came across this little paper clip with a bow on it.  It is the Simply Styled Embellishment that was in the Holiday Catalog.  It seemed to be just what I was looking for.  Still have some left from your holiday cards??  Just pull them out and use them for spring!

The team over at Freshly Made Sketches has some fantastic inspiration for you (I know…they always do!).  Make sure you hop over and check out their work.  I hope you’ll play along too!

Back tomorrow with another project from the Leadership Display Boards.  Until then, so glad that you dropped by.  See you soon!

Click HERE to purchase wonderful Stampin’ Up products.

Blog Signature 2014-001

Artisan Wednesday Wow – Bliss

Artisan Wednesday Wow – Bliss published on 10 Comments on Artisan Wednesday Wow – Bliss

02-Feb-Blog-Hop-Button

The Artisan Design Team’s February box of products is fantastic and I’m so happy to finally get to show you what I have been making with it.  We are continuing to use some of the latest and greatest from the Occasions Catalog.  If you have come over from amazing Jeanna, welcome to the next stop.  If you are starting here, just continue around using the next buttons until you get back to me.

AWW Feb - Bliss

I will tell you now that I am completely in love with the new Hexagon Hive Thinlit (expect to see more this month using it!).  There is so much to do with it but for today’s project I chose to use it as a stencil.  Using stencils is really popular right now and many of SU’s dies are great for creating those stencils.  I also pulled out the Gesso again…just like on my project for the SU blog last week.  This time I used it a bit more.  To create the tag, I started with a larger piece of Watercolor Paper and painted on a layer of Gesso.  Once dry, I used my Aquapainter to add in some ink, Smoky Slate.  Again after drying, I stamped on the flower from Petal Parade (SAB) in Rose Red ink and then pulled out a piece of card stock that had been cut using the Hexagon Hive Thinlit.  I placed it over the paper and stippled on more Gesso.  When everything was dry, I chose a section I liked, cut a 2″ strip then cut one end with the Angled Tag Topper Punch.  The sentiment from Quite the Pair was stamped in Smoky Slate.  Using the same stencil, I stippled more Gesso onto a Smoky Slate card base (4-1/2″ sq.).  I distressed a long piece (30″ or so) of Rose Red Seam Binding by spritzing it with water and then crumpling.  Once dry, I looped the ribbon and tied on a Vintage Faceted Button using thread and added a Basic Pearl to the top of the button.  I trimmed the extra ribbon and used the rest for the top of the tag, tying on an additional button.

I had a lot of fun making a bit of a mess with this one.  Gesso is something you just kind of have to play with and there are lots of tutorials on the web to show you different uses.  Just allow that everything you make will be unique and that imperfection is part of the look.

I’ll be back tomorrow with the latest from Freshly Made Sketches and then later in the week with more Leadership Display projects.

Okay, off to go visit the awesome Mercedes Weber.  I can’t wait for you to see what she has created!  Make sure you hop around the whole loop to take a look at beautiful creations by the whole team…you’ll be happy you did!

02-Feb-Blog-Hop-NEXT-Button

Click HERE to purchase any of these wonderful Stampin’ Up products.

Stamps:  Petal Parade (SAB), Quite the Pair; Paper:  Watercolor, Smoky Slate; Accessories:  Angled Tag Topper Punch, Big Shot, Hexagon Hive Thinlit, Vintage Faceted Button, Rose Red Seam Binding, Basic Pearls, Dimensionals

Blog Signature 2014-001


Petal Parade – Trio of Flowers

Petal Parade – Trio of Flowers published on 2 Comments on Petal Parade – Trio of Flowers

Happy Monday!  I hope your weekend was great!  Now that Sale-a-bration is in full swing, I am so happy to be sharing these projects from the Leadership Display Boards.  I have another project made with Petal Parade to show you today.

Petal Parade - Trio of Flowers

I chose this pattern from the SAB paper Sweet Sorbet and the color and print lends itself to so many cards.  I thought I’d use one of my favorite color pairings on this.  Sahara Sand, Daffodil Delight and Basic Gray are so cool together.  All I did was stamp the flowers a bit off center on each panel.  It keeps the stamping simple.  The sentiment is from Regarding Dahlias and the little metal button from the Occasions Catalog is wonderful tied with Linen Thread.  While there are lots of layers here, the card itself is pretty quick to come together.  Another one that would be great in a variety of colors/DSPs.

I’ll be back tomorrow with my first card with the February Artisan box.  It is a great one and the team is excited to get going with this one.

The rest of the team is showing their Leadership Display Board projects as well so make sure you take a look!

Here is the rest of the Artisan Design Team:


Click HERE to purchase wonderful Stampin’ Up products.

Blog Signature 2014-001

Banner Blast – Awesome

Banner Blast – Awesome published on 1 Comment on Banner Blast – Awesome

Almost the weekend and I wanted to show you another of my favorites from my Leadership Display projects.  This is one of those cards that isn’t hard to make but something about it makes me really happy.

Banner Blast - Awesome

I think maybe that it is because, as usual, I found that the products from Stampin’ Up coordinated perfectly.  This fun print from the Kaleidescope DSP and the triangle in the banners of Banner Blast seem meant to go together!  I cut the little strip of DSP and then stamped the banners in coordinating colors (Crushed Curry and Strawberry Slush).  The sentiment is from Yippee-Skippee and these fonts are so fun.  The DSP and the banners are popped up on Dimensionals and I added in a few Basic Rhinestones to finish.

I hope your week has been going well and that you are enjoying the display projects.  I’m actually getting some stamping time today and working on my Artisan projects for next month.  Another fun box!!  I’ll be back on Monday with another Leadership project.

Like many of you, things have been a little crazy around here.  My kids keep having random days off from school due to weather which adds a special form of chaos.  *smile*  At least they had enough snow last week to get in some sledding!  Fortunately I was still able to hold some stamp classes in between that and flying.  I love when I get to stamp with my friends!  Wishing you a wonderful weekend.  Thanks so much for stopping by!!

The rest of the team is showing their Leadership Display Board projects as well so make sure you take a look!

Here is the rest of the Artisan Design Team:


Click HERE to purchase wonderful Stampin’ Up products.

Blog Signature 2014-001

Freshly Made Sketches #121

Freshly Made Sketches #121 published on 10 Comments on Freshly Made Sketches #121

FMS Final 121-001


I know what you are thinking already.  What an awesome sketch we have this week at Freshly Made Sketches!!  Yep…I could not agree more.  The amazing Linda Callahan has given us this uber trendy looking design and the team has created some amazing projects!

FMS121 - Elemental Valentine

A sketch like this tends to make my imagination run a bit and I just decided it was ok to run with it.  Something about the Essentials Wooden Elements just seemed like a perfect fit.  These little things are crazy cool and I had such fun with them.  So what can you do with them?  Apparently just about anything.  I colored the heart with my Real Red Stampin’ Write Marker.  Then I colored the starburst with a Basic Black Stampin’ Write Marker and cut out a coordinating shape with the Starburst Framelits out of Polka Dot Parade DSP to layer on.  Finally I applied some Multipurpose Adhesive to the arrow and loaded on some Silver Stampin’ Glitter.  The background paper is from Kaleidescope DSP and the little xoxo is from the Circle Card Thinlits.

Those of you who hopped over from the challenge may notice that I have a new look to my blog but I know my email subscribers may not have seen it yet.  I’d love to hear what you think so just click on over and let me know.  I designed it (and my shopping and signature buttons) using My Digital Studio.  It is so fun to be able to change up the look when I feel like it!!

The team has some fun stuff to show you this week and I’m certain the gallery is going to have a fabulous flair to it!  Hope you’ll be able to join in this week.

I’m taking tomorrow off (out flying today) so I’ll be back on Friday with some more from my Leadership Display work.  Hope your day is fantastic!

Click HERE to purchase wonderful Stampin’ Up products.

Blog Signature 2014-001

Artisan Wednesday Wow – Scalloped Tag Topper Box

Artisan Wednesday Wow – Scalloped Tag Topper Box published on 4 Comments on Artisan Wednesday Wow – Scalloped Tag Topper Box

01-Jan-Blog-Hop-Button

I am so excited to show you the last project from the Artisan Design Team’s January box of products.  We are so thrilled to be sharing ideas using some of the latest and greatest from the Occasions Catalog.  These are the projects that were featured on Stampin’ Up’s Facebook Page.  If you have come over from amazing Jeanna, welcome to the next stop.  If you are starting here, just continue around using the next buttons until you get back to me.

Jan FB - Scalloped Tag Topper Box

When I got my Sale-a-bration flyer, one of the things that stuck out was the statement to use the cute DSP to make fun little boxes.  Well who am I to argue with a great idea?!  It seems that the rest of the team agrees since there have been some amazing boxes (with instructions) in the hops this month.  Mine is a modification of a gable box.  The idea has been around for a while and I just modified measurements to meet my needs.

Scalloped Tag Template 1

Start with a piece of paper (DSP is fantastic for this!) that is 8-1/2″ wide by 8″ deep.  Score the 8-1/2″ side at 1/2″, 2-1/2″ 4-1/2″ and 6-1/2″.  Turn the paper clockwise and score the 8″ side at 2″ and 5-1/2″.  Cut down the vertical score line until you reach each horizontal score line.

Scalloped Tag Template 2

Then trim off the top and bottom tabs in the 1/2″ score section.  This will leave you with one tab in the center that will help you glue the box together.  On alternating top sections, use your Scalloped Tag Topper Punch to create the pretty tops.  Fold the unpunched sections down and glue down to the center section.  This gives your box a little more stability.  Apply Sticky Strip to the outside of the 1/2″ tab and attach it to the inside of the opposing side.  Fold your bottom sections up to form the bottom of the box attaching with Sticky Strip at each layer.

All that is left is decorating the box.  I cut out some flowers using the Fun Flowers Die.  All the designer papers on the box are from the Sweet Sorbet DSP pack..a Sale-a-bration offering.  Did I mention that Sale-a-bration starts today??!!  YEA!!  Ok..back to the box.  I created a belly band out of Pistachio Pudding card stock.  I spritzed the flowers with water and formed them over the top of a Multipurpose Glue bottle.  This gives them a little extra dimension.  Glued together with Sticky Strip and I added on a Vintage Faceted Button tied with the Sweet Sorbet Accessory Pack twine.  To close the box, I created a faux bow.  Wrap the twine a 2-3 times around your fingers then tie on a button that has been threaded with another piece of twine.  Knot in the center behind the “bow”.  Take the ends of the piece you just knotted and thread through the punched holes.  Tie another little bow to secure the top and make it easy to open.

This box is fast to make and perfect for even new stampers.  I had some try this at a class and their projects were perfect!

Okay, off to go visit the awesome Mercedes Weber.  I can’t wait for you to see what she has created!  Make sure you hop around the whole loop to take a look at beautiful creations by the whole team…you’ll be happy you did!

01-Jan-Blog-Hop-NEXT-Button

Click HERE to purchase any of these wonderful Stampin’ Up products.

Paper:  Sweet Sorget DSP, Pistachio Pudding; Accessories:  Scalloped Tag Topper Punch, Big Shot, Fun Flowers Die, Vintage Faceted Button, Sweet Sorbet Accessory Pack, Sticky Strip

Blog Signature 2014-001

Hearts of Gold

Hearts of Gold published on 1 Comment on Hearts of Gold

My promised bonus post of the day!

SU Jan Blog

I created this for the Stampin’ Up Blog.  I love all the gold in this new catalog so I combined some of the beautiful products to create this.  Please go check the corporate blog to see all the how-to’s!

Stampin’ Up’s Blog

I’ll see you tomorrow for the next Artisan Wednesday Wow!

Blog Signature 2014-001

Primary Sidebar