So when I saw Banner Blast and the cute matching punch, I knew they had to come to my stamp room right away! I was so happy when I got them to create projects for Leadership.
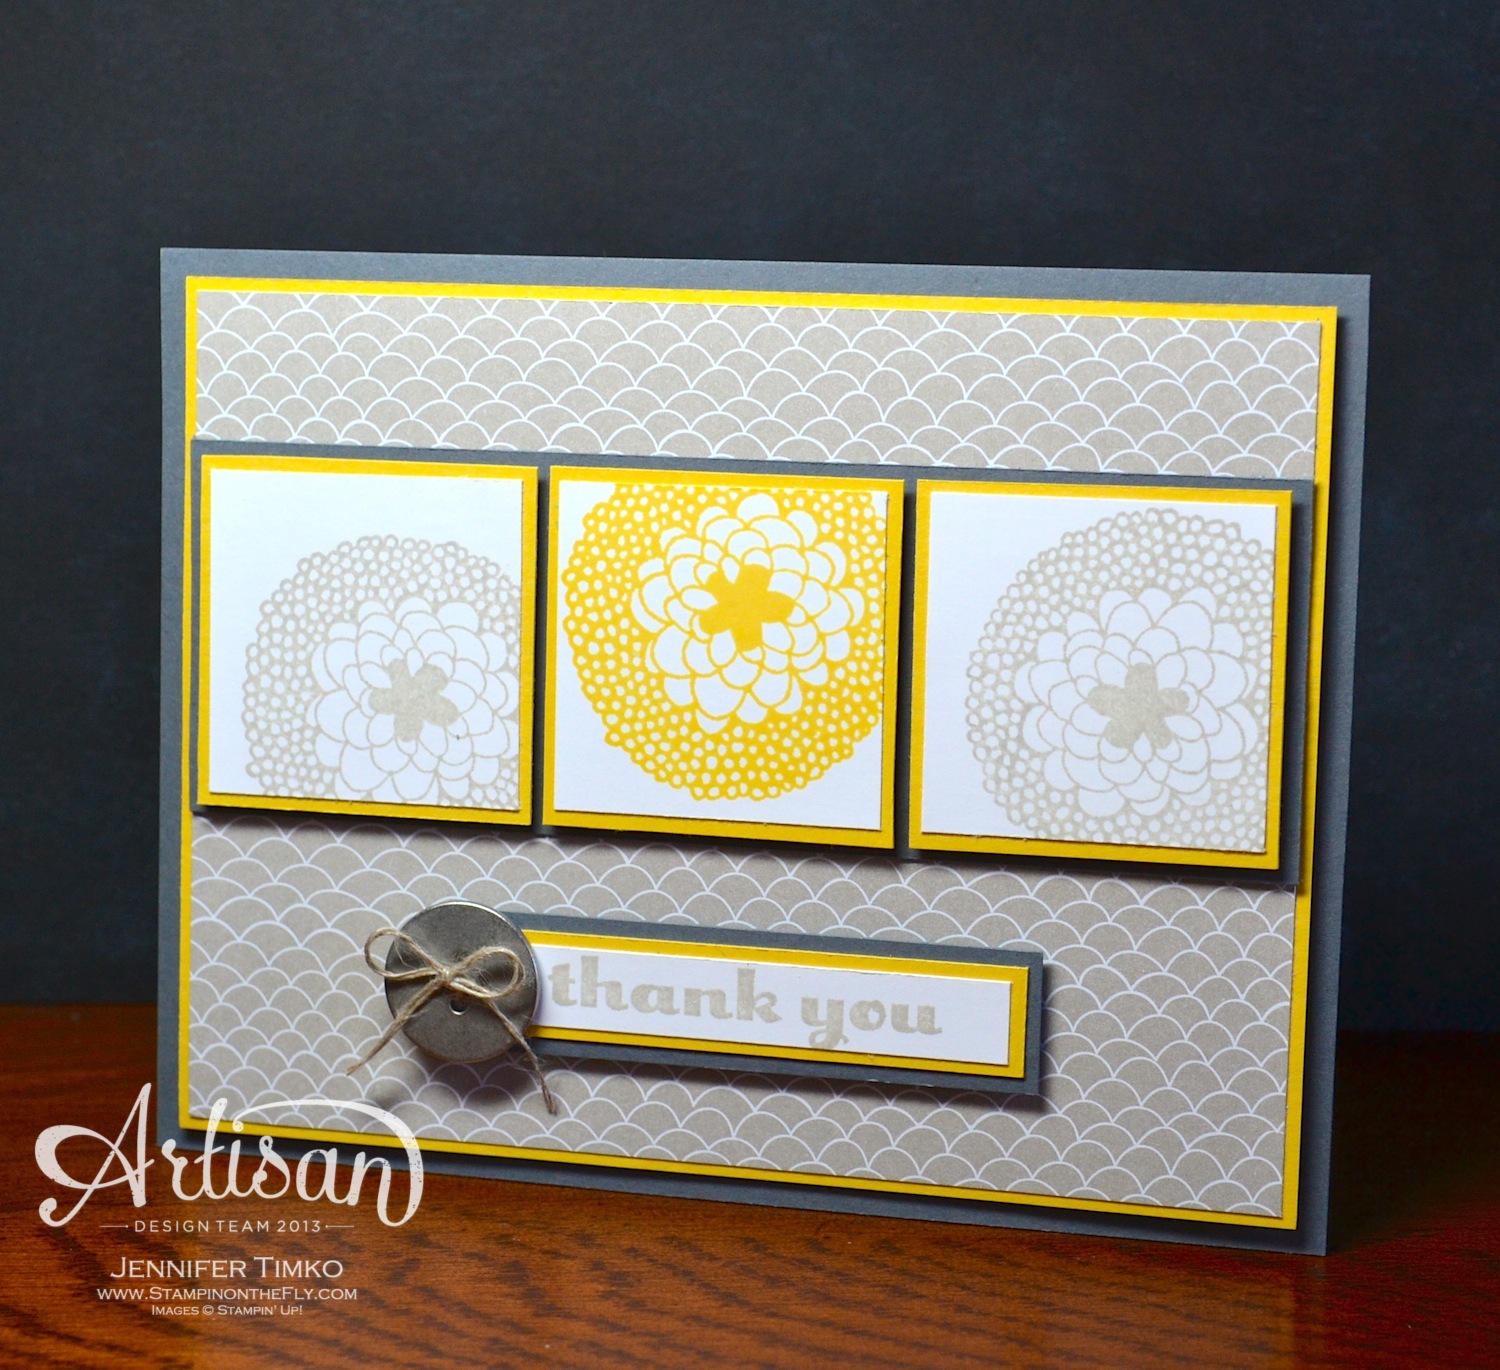
I thought it would be fun to combine the prints in the stamp with the prints in the Gingham Garden DSP (from the main catalog). They seem like a natural combination don’t they? I stamped in the colors from the DSP — Daffodil Delight, Island Indigo and Melon Mambo – and punched out some DSP with the punch too. I lined them all up and put a little Melon Mambo strip on time wrapped with Baker’s Twine. This is perfect for a quick and easy note or thank you!
I have been making stuff all week so a bit short on the post. Looking forward to presenting tomorrow at the Northern Virginia Regional Styled Event hosted by the lovely Rose-Ellen Eastman. I’ll be sharing that card with you next week! Hope your weekend is wonderful. Thanks for stopping in today!
The rest of the team is showing their Leadership Display Board projects as well so make sure you take a look!
The Artisan Design Team’s March box of products is all about spring! Thank goodness because I could use a little spring. I can’t even wait to see what everyone has to show you this week. If you have come over from amazing Jeanna, welcome to the next stop. If you are starting here, just continue around using the next buttons until you get back to me.
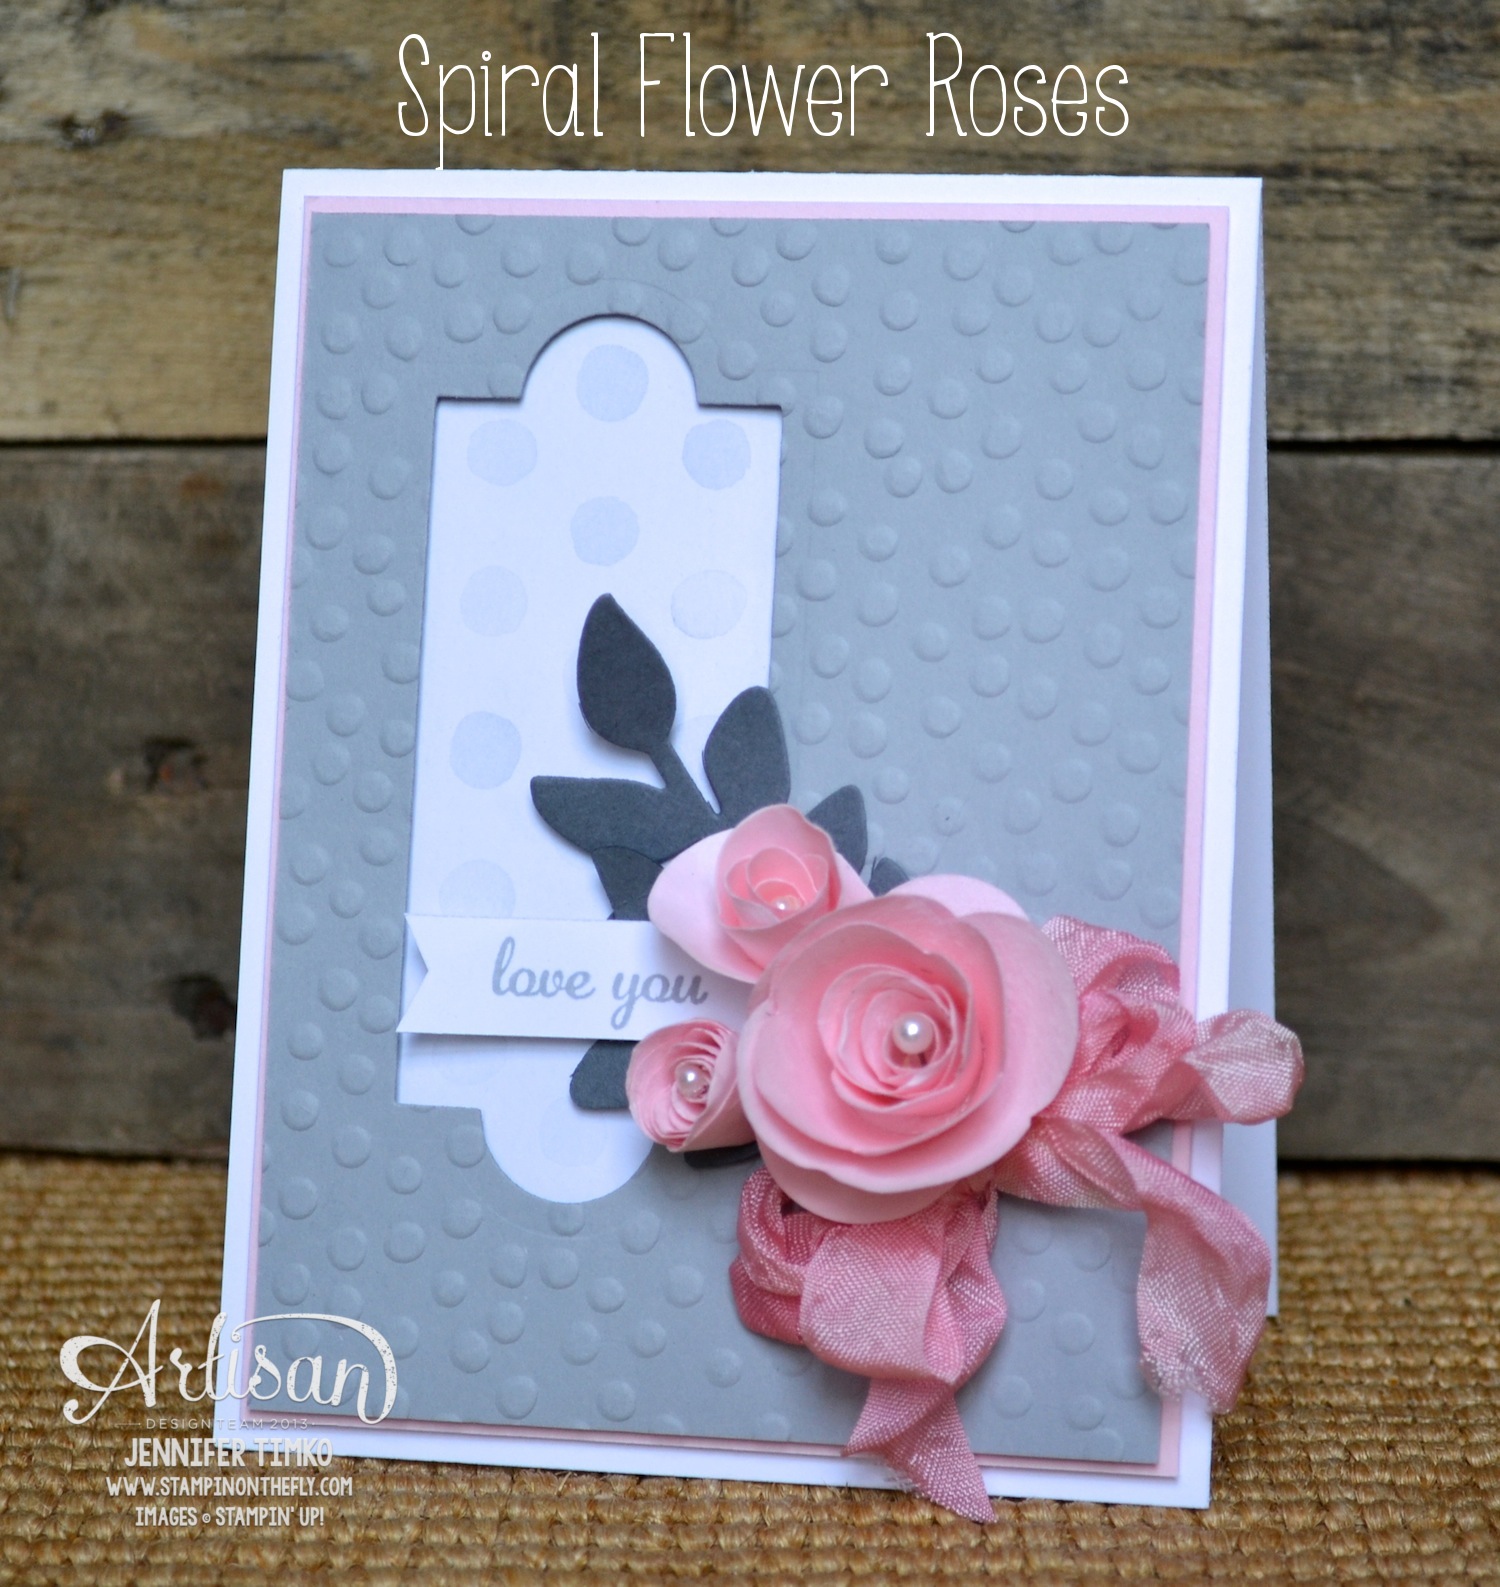
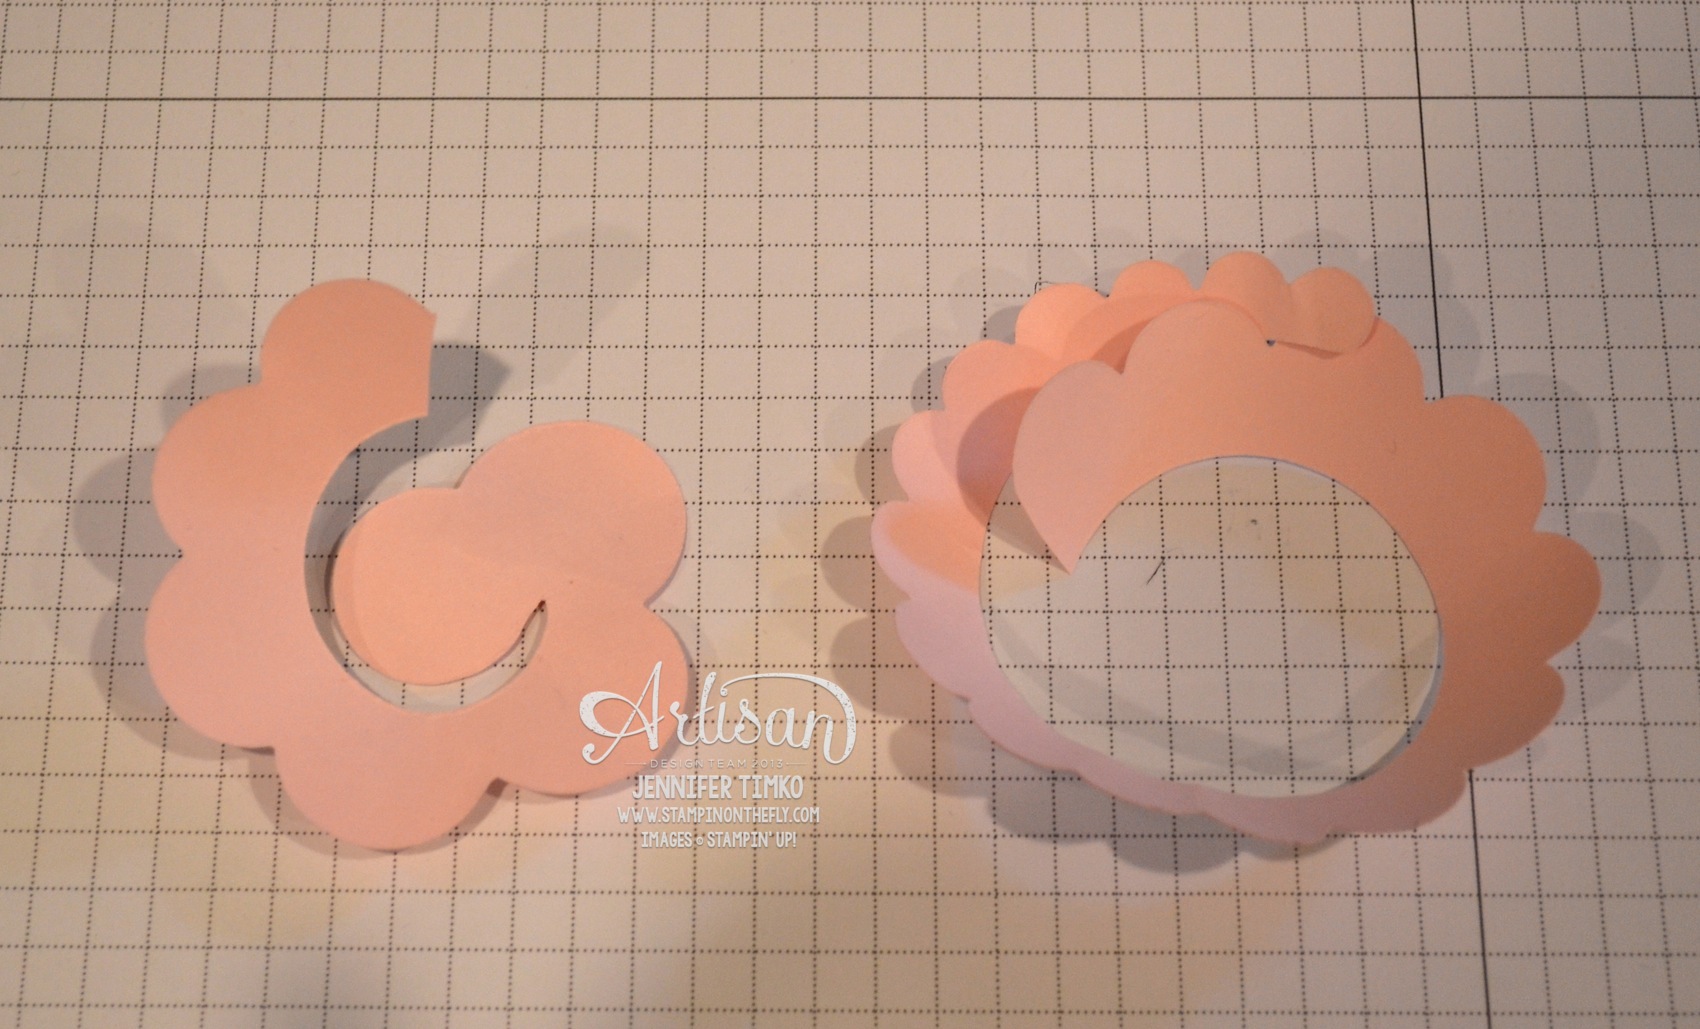
When Jeanna was designing this month’s hop buttons (cute, aren’t they?) she must have been inspired by some of the same things I was. I just had to play with the Spiral Flower Die as soon as I got it and I love it! I have seen a number of ways to use it and thought I should create one of my own. I wanted a card with three flowers of different sizes but how to do that? Pretty simple actually. I made the largest flower with the full spiral from the die. Then I cut a second and cut it into two pieces to create the other two flowers (see below). To lighten up the card stock a little for easier rolling, I “sueded” the paper first. Before cutting (trust me…I tried it after and it is much harder), take a piece of card stock and distress it with your bone folder or over a counter top edge. By rolling one way and then the other, the paper will start to separate and you can pull the layers apart. Then just cut with your Big Shot and the die. I used Pink Pirouette Card Stock and paired it with Smoky Slate. The little window is cut using the Apothecary Accents Framelits and then the layer was embossed with the Sale-a-bration Decorative Dots Embossing Folder. The DSP in the window is from Watercolor Wonder DSP. I cut some leaves out of Basic Gray card stock with the Secret Garden Framelits. It was still missing something so I wanted to add a shabby bow. But which color? I decided on pink but there isn’t one….so I made it. It is super easy. Add a few drops of Rose Red Reinker to some water and drop in Very Vanilla Seam Binding. Let soak for a bit and then let dry. If the color isn’t strong enough you can re-soak or add a little more ink to the water. This color happened on my first try and it is a perfect match. YEA! I tied the bow and attached it with hot glue (the flowers use the hot glue too). The sentiment comes from the hostess set Express Yourself and I thought this would be pretty for a Mother’s Day card or a special birthday. Finally the pearls. The little flowers have Basic Pearls attached and for the larger one, I used a pearl topped straight pin that I clipped with wire cutters (hot glued down to the center).
You can see to the left how I cut my spiral. It doesn’t have to be precise, just adjust the size as needed. You see the bit of curl on them? That is because I gently curled them with my Bone Folder (much like curling ribbon). That helps them roll easier.
I’ll be back tomorrow with the latest from Freshly Made Sketches and then later in the week with more Leadership Display projects. Sorry I missed the project on Monday. Snow days are seriously getting in the way of my blogging time, lol!
Okay, off to go visit the awesome Mercedes Weber. I can’t wait for you to see what she has created! Make sure you hop around the whole loop to take a look at beautiful creations by the whole team…you’ll be happy you did!
Click HERE to purchase any of these wonderful Stampin’ Up products.
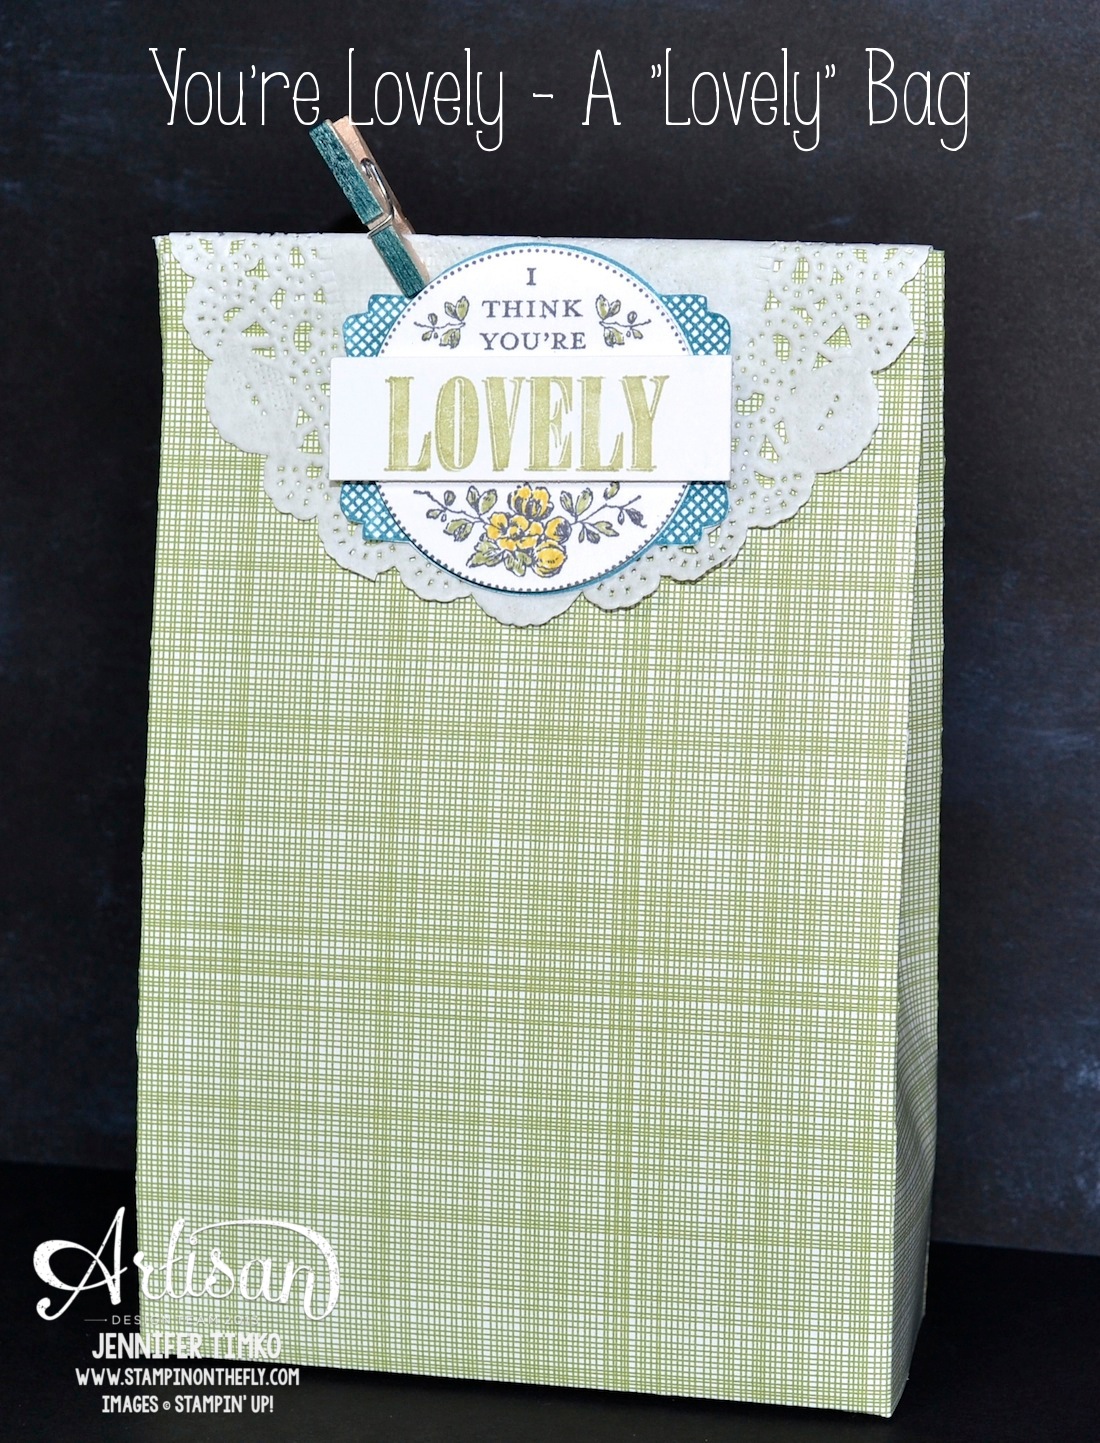
I don’t know about you but I love fun bags. I particularly love them when I can make them out of Stampin’ Up’s amazing designer series papers! My project for today does just that!
The focus is on the oh-so-pretty stamp set You’re Lovely (a Sale-a-bration offering) but the bag provides just the right base for it. First the bag:
Start with 8-1/2″ x 11″ pieces of DSP
On the long side, score at 2-1/4″, 3-3/4″, 7-3/4″ and 9-1/4″
On the short side, score at 1/2″ and 2″
Below 2″ score line, add additional score on long side at 3-1/4″ and 8-1/2″
Cut out rectangles as shown below
Cut along score lines as shown below
Fold bag together and secure with Sticky Strip
If you need more specifics, I used this video by Mercedes Weber to assist me so I really recommend you take a look. She did the hard work on the measurements!!
To decorate the bag, I stamped the image using a few different colors. First, Island Indigo, then Basic Gray and finally Pear Pizzazz. I hand cut the Island Indigo Layer. I used the 1-3/4″ Circle Punch for the center and colors direct to paper on those images with Pear Pizzazz and So Saffron Markers. Then I cut the “Lovely” out using my Paper Cutter. The Mini Clothespin is from the Tag a Bag Accessory Kit and I just colored the outsides with my Island Indigo Marker. Cute way to make the little pin match, don’t you think? I put a Doily underneath to add some more fun detail.
Hope you like this one! Glad you were able to stop in today. I’ll be back on Monday with another project from Leadership! See you then!
The rest of the team is showing their Leadership Display Board projects as well so make sure you take a look!
Just a quick post today to share another card from Leadership.
The set You’re Lovely is, well, lovely! What a wonderful choice for Sale-a-bration! I thought I’d make a bit of a shabby chic card for one of the examples. I cut out the oval using the Oval Framelit (Naturals Ivory card stock) and distressed all the edges with the Stampin’ Distress Tool and Crumb Cake ink. I inked the words and some of the images using my Stampin’ Write Markers in Calypso Coral, Pool Party and Wild Wasabi. When you stamp on the Natural Ivory, the image will not be as crisp but that was the look I intended. I added a shabby bow made from the Pool Party Seam Binding and topped it off with a Very Vintage button.
I hope to be back tomorrow with a cool bag but it may be Monday if United calls me to fly. Until then, so glad you stopped in!!
The rest of the team is showing their Leadership Display Board projects as well so make sure you take a look!
I realized that I hadn’t shown you any of my scrapbook pages made for the Leadership Display Board and thought that would be a fun way to end the week. I’ll start with a little background. My boys are Lego boys…all three of them!! Sometimes I feel as if the Legos will take over the house but they love playing and creating and building, so I accept it and move along. Since the day it opened the boys have been talking about Legoland Florida and have wanted to go there. When we took our vacation in October, we were finally able to go. They were crazy, ecstatically, ridiculously happy!! Thus this page.
The primary colors from the Legoland sign and the red in the boys shirts told me what colors to use for this. I tried to keep the feel of the page fun and kind of silly, just like the day. I used a base of Crumb Cake mounted on Real Red and started building. The triangles from Geometrical create fun arrows and the designs go so well with Polka Dot Parade DSP and the Gingham Garden Washi Tape. I created some strips from those and added them at angles then stapled to add detail. The dates were added using the Remember This Rotary Stamp. I love this stamp. So great for so many scrapping projects! The little arrow from Hung Up Cute Clips makes sure the date gets emphasis. Finally the sentiment from See Ya’ Later captured the feeling!
I had to send this one off of course but made duplicate pictures so I can build a series of matching pages from all the adventures of the day. I hope your week has been wonderful! Happy Valentine’s Day to you all and I will see you again on Monday. Thanks for stopping in!
The rest of the team is showing their Leadership Display Board projects as well so make sure you take a look!
Sorry that I missed my promised post yesterday. Between reserve with United and snow/ice days for the boys, things have been a little crazy. But in a good way….
In any case, here is a little Valentine’s project that is quick to make and so sweet to hold a special treat.
I found this little paper mache box at a craft store and thought it would be perfect for this sentiment from See Ya’ Later. I painted the top with an acrylic paint (Vanilla) and covered the bottom of the box with this fun print from Modern Medley DSP (I used Multipurpose Adhesive to seal it down. Using the Small Heart Punch, I popped out a couple of hearts from the Real Red print in Polka Dot Parade DSP, folded them in half, glued the sides together and fanned. Cute accent that is easy to make! I stamped the sentiment on Very Vanilla and created the banner then stamped again in Real Red. Cutting the letters individually is a fun and easy way to add texture. Another little banner underneath and done!
Quick post today since I’m out to fly tomorrow. I’ll try to be back on Monday (hotel internets allowing) and back for sure on Tuesday with the next project from our Artisan Wednesday Wow series. Hope your weekend is fantastic!!
The rest of the team is showing their Leadership Display Board projects as well so make sure you take a look!
The Artisan Design Team’s February box of products is fantastic and I’m so happy to finally get to show you what I have been making with it. We are continuing to use some of the latest and greatest from the Occasions Catalog. If you have come over from amazing Jeanna, welcome to the next stop. If you are starting here, just continue around using the next buttons until you get back to me.
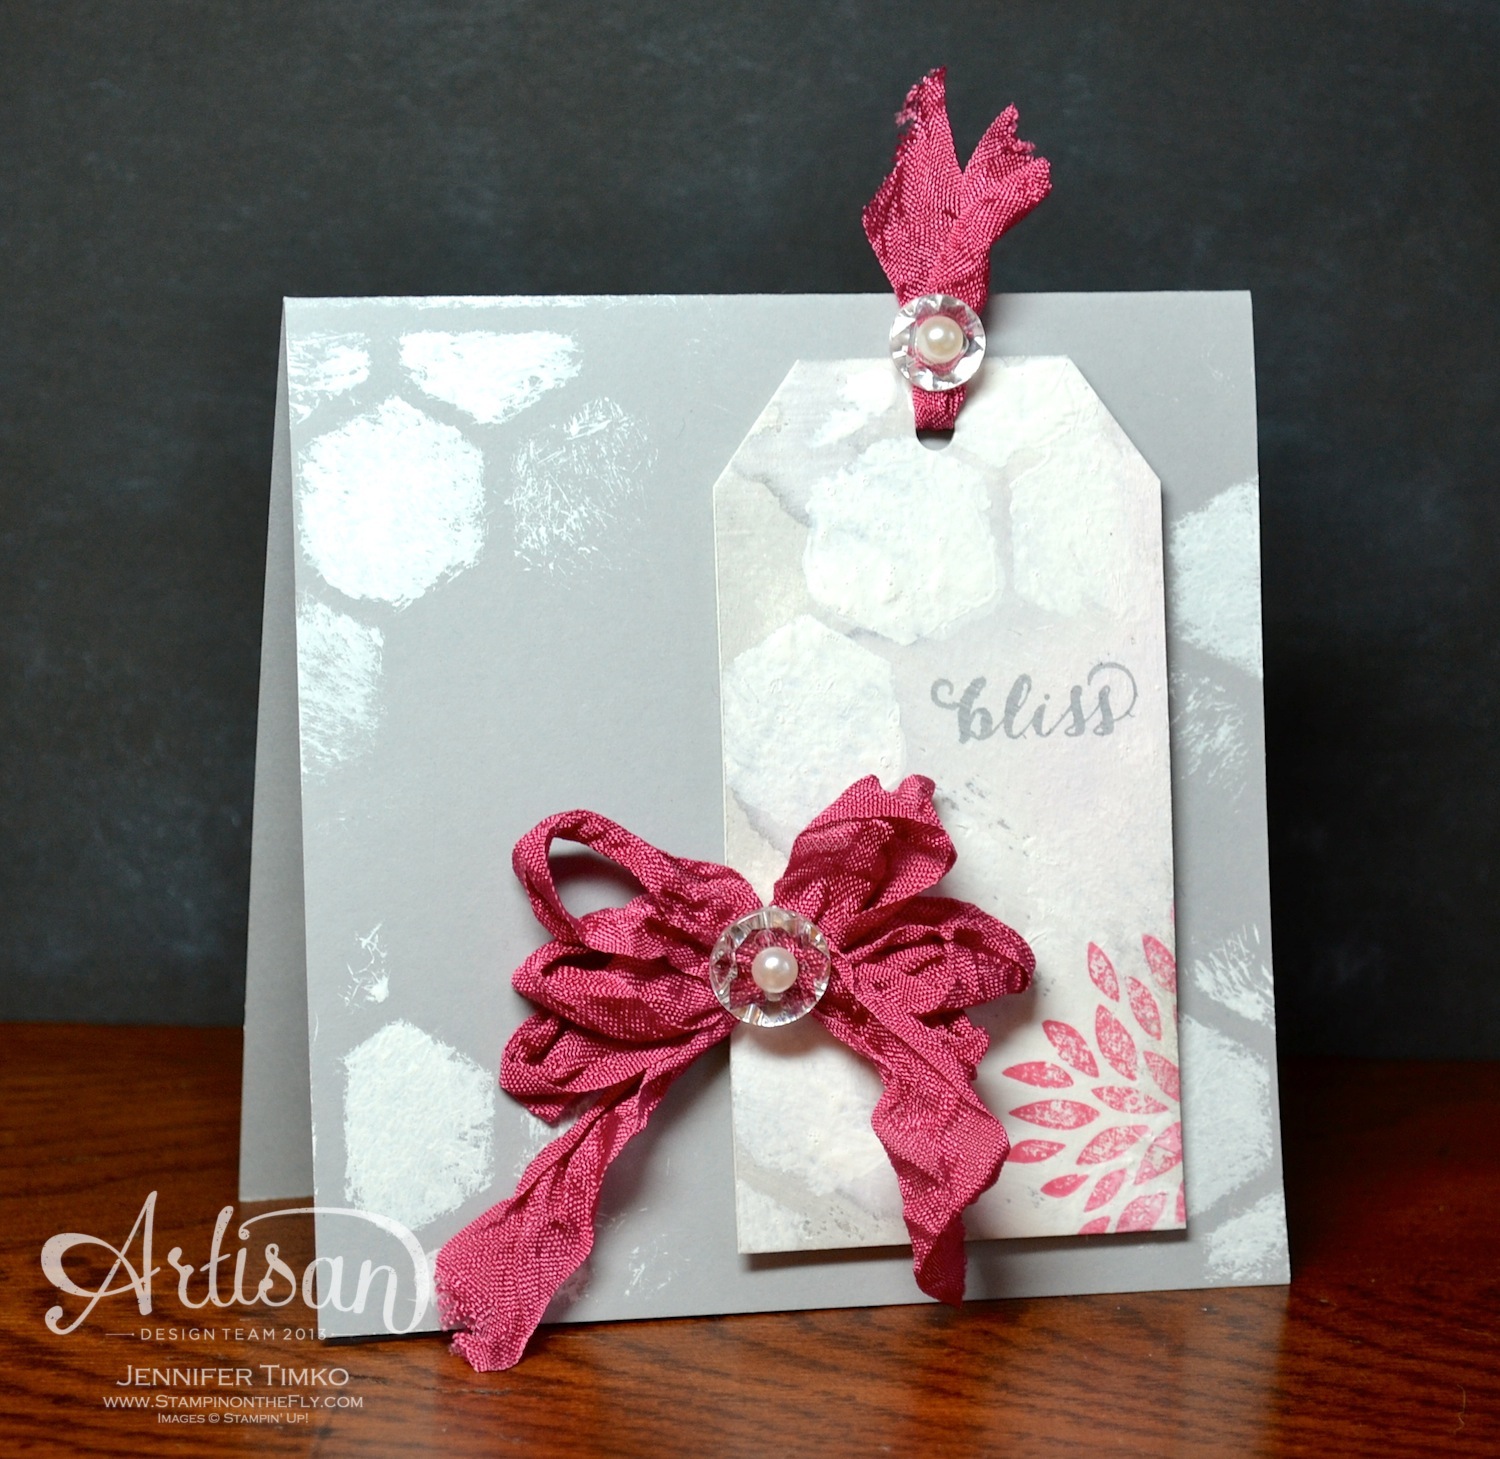
I will tell you now that I am completely in love with the new Hexagon Hive Thinlit (expect to see more this month using it!). There is so much to do with it but for today’s project I chose to use it as a stencil. Using stencils is really popular right now and many of SU’s dies are great for creating those stencils. I also pulled out the Gesso again…just like on my project for the SU blog last week. This time I used it a bit more. To create the tag, I started with a larger piece of Watercolor Paper and painted on a layer of Gesso. Once dry, I used my Aquapainter to add in some ink, Smoky Slate. Again after drying, I stamped on the flower from Petal Parade (SAB) in Rose Red ink and then pulled out a piece of card stock that had been cut using the Hexagon Hive Thinlit. I placed it over the paper and stippled on more Gesso. When everything was dry, I chose a section I liked, cut a 2″ strip then cut one end with the Angled Tag Topper Punch. The sentiment from Quite the Pair was stamped in Smoky Slate. Using the same stencil, I stippled more Gesso onto a Smoky Slate card base (4-1/2″ sq.). I distressed a long piece (30″ or so) of Rose Red Seam Binding by spritzing it with water and then crumpling. Once dry, I looped the ribbon and tied on a Vintage Faceted Button using thread and added a Basic Pearl to the top of the button. I trimmed the extra ribbon and used the rest for the top of the tag, tying on an additional button.
I had a lot of fun making a bit of a mess with this one. Gesso is something you just kind of have to play with and there are lots of tutorials on the web to show you different uses. Just allow that everything you make will be unique and that imperfection is part of the look.
I’ll be back tomorrow with the latest from Freshly Made Sketches and then later in the week with more Leadership Display projects.
Okay, off to go visit the awesome Mercedes Weber. I can’t wait for you to see what she has created! Make sure you hop around the whole loop to take a look at beautiful creations by the whole team…you’ll be happy you did!
Click HERE to purchase any of these wonderful Stampin’ Up products.
Stamps: Petal Parade (SAB), Quite the Pair; Paper: Watercolor, Smoky Slate; Accessories: Angled Tag Topper Punch, Big Shot, Hexagon Hive Thinlit, Vintage Faceted Button, Rose Red Seam Binding, Basic Pearls, Dimensionals
Happy Monday! I hope your weekend was great! Now that Sale-a-bration is in full swing, I am so happy to be sharing these projects from the Leadership Display Boards. I have another project made with Petal Parade to show you today.
I chose this pattern from the SAB paper Sweet Sorbet and the color and print lends itself to so many cards. I thought I’d use one of my favorite color pairings on this. Sahara Sand, Daffodil Delight and Basic Gray are so cool together. All I did was stamp the flowers a bit off center on each panel. It keeps the stamping simple. The sentiment is from Regarding Dahlias and the little metal button from the Occasions Catalog is wonderful tied with Linen Thread. While there are lots of layers here, the card itself is pretty quick to come together. Another one that would be great in a variety of colors/DSPs.
I’ll be back tomorrow with my first card with the February Artisan box. It is a great one and the team is excited to get going with this one.
The rest of the team is showing their Leadership Display Board projects as well so make sure you take a look!
Almost the weekend and I wanted to show you another of my favorites from my Leadership Display projects. This is one of those cards that isn’t hard to make but something about it makes me really happy.
I think maybe that it is because, as usual, I found that the products from Stampin’ Up coordinated perfectly. This fun print from the Kaleidescope DSP and the triangle in the banners of Banner Blast seem meant to go together! I cut the little strip of DSP and then stamped the banners in coordinating colors (Crushed Curry and Strawberry Slush). The sentiment is from Yippee-Skippee and these fonts are so fun. The DSP and the banners are popped up on Dimensionals and I added in a few Basic Rhinestones to finish.
I hope your week has been going well and that you are enjoying the display projects. I’m actually getting some stamping time today and working on my Artisan projects for next month. Another fun box!! I’ll be back on Monday with another Leadership project.
Like many of you, things have been a little crazy around here. My kids keep having random days off from school due to weather which adds a special form of chaos. *smile* At least they had enough snow last week to get in some sledding! Fortunately I was still able to hold some stamp classes in between that and flying. I love when I get to stamp with my friends! Wishing you a wonderful weekend. Thanks so much for stopping by!!
The rest of the team is showing their Leadership Display Board projects as well so make sure you take a look!
I am so excited to show you the last project from the Artisan Design Team’s January box of products. We are so thrilled to be sharing ideas using some of the latest and greatest from the Occasions Catalog. These are the projects that were featured on Stampin’ Up’s Facebook Page. If you have come over from amazing Jeanna, welcome to the next stop. If you are starting here, just continue around using the next buttons until you get back to me.
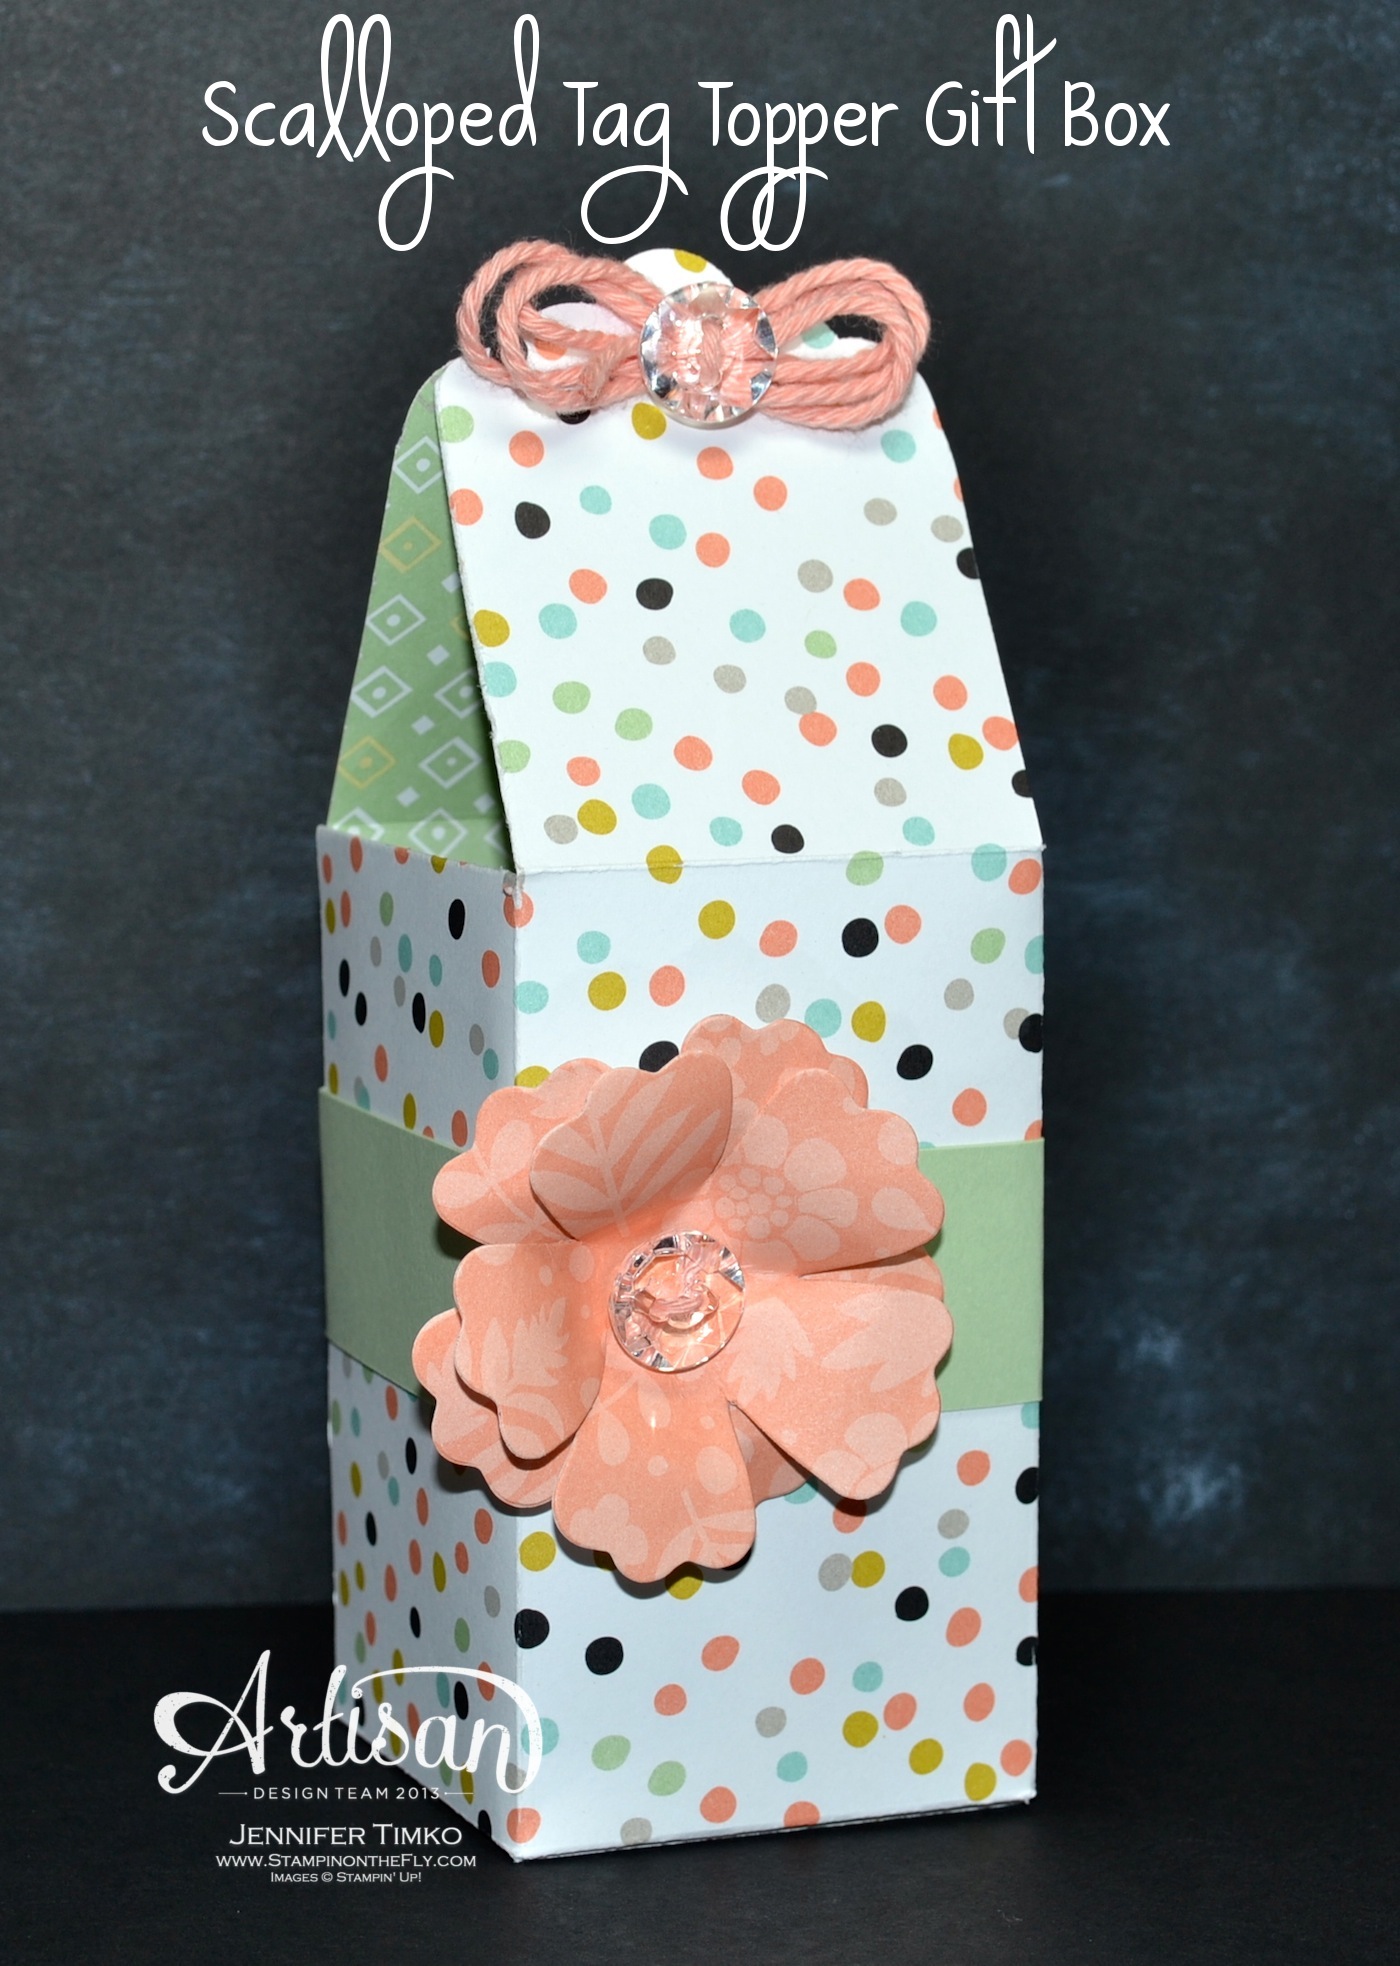
When I got my Sale-a-bration flyer, one of the things that stuck out was the statement to use the cute DSP to make fun little boxes. Well who am I to argue with a great idea?! It seems that the rest of the team agrees since there have been some amazing boxes (with instructions) in the hops this month. Mine is a modification of a gable box. The idea has been around for a while and I just modified measurements to meet my needs.
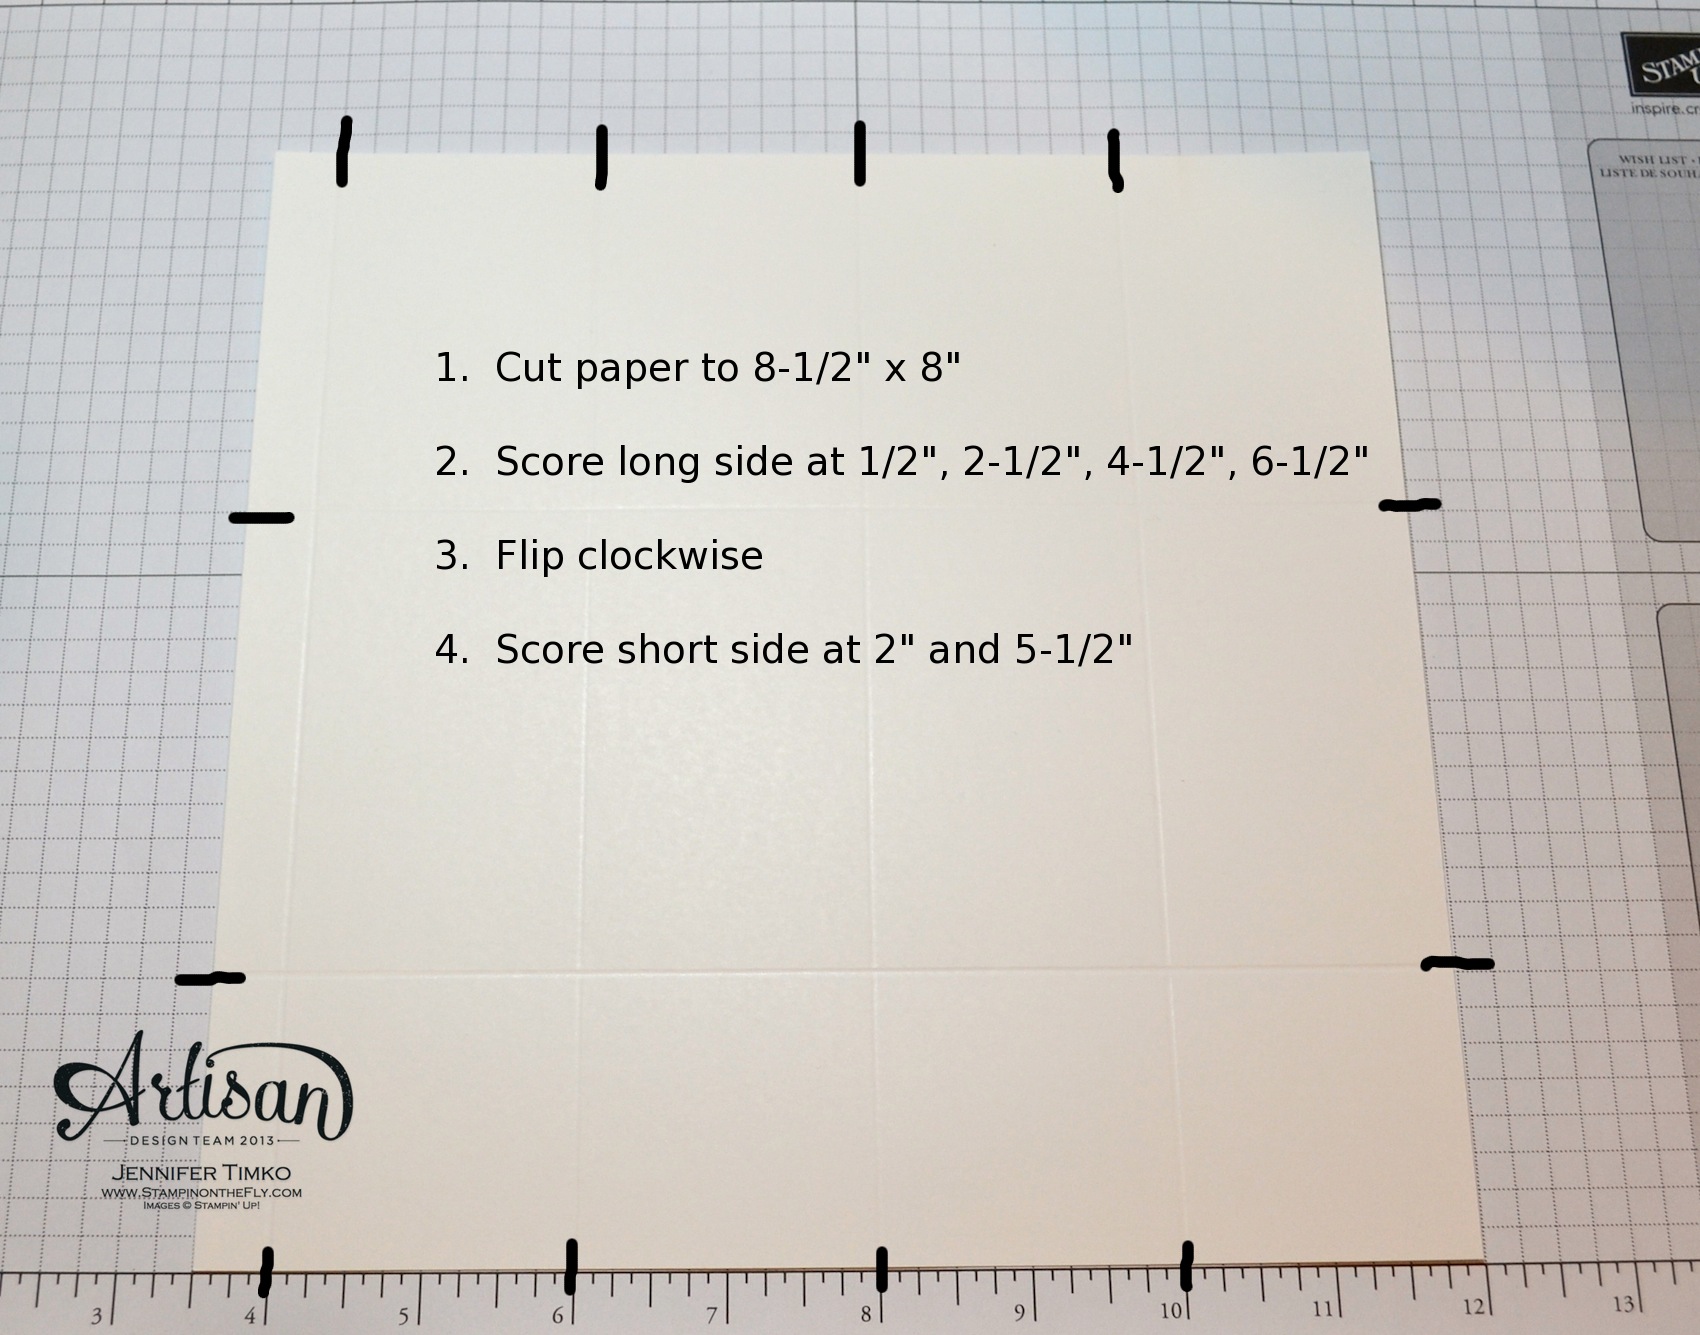
Start with a piece of paper (DSP is fantastic for this!) that is 8-1/2″ wide by 8″ deep. Score the 8-1/2″ side at 1/2″, 2-1/2″ 4-1/2″ and 6-1/2″. Turn the paper clockwise and score the 8″ side at 2″ and 5-1/2″. Cut down the vertical score line until you reach each horizontal score line.
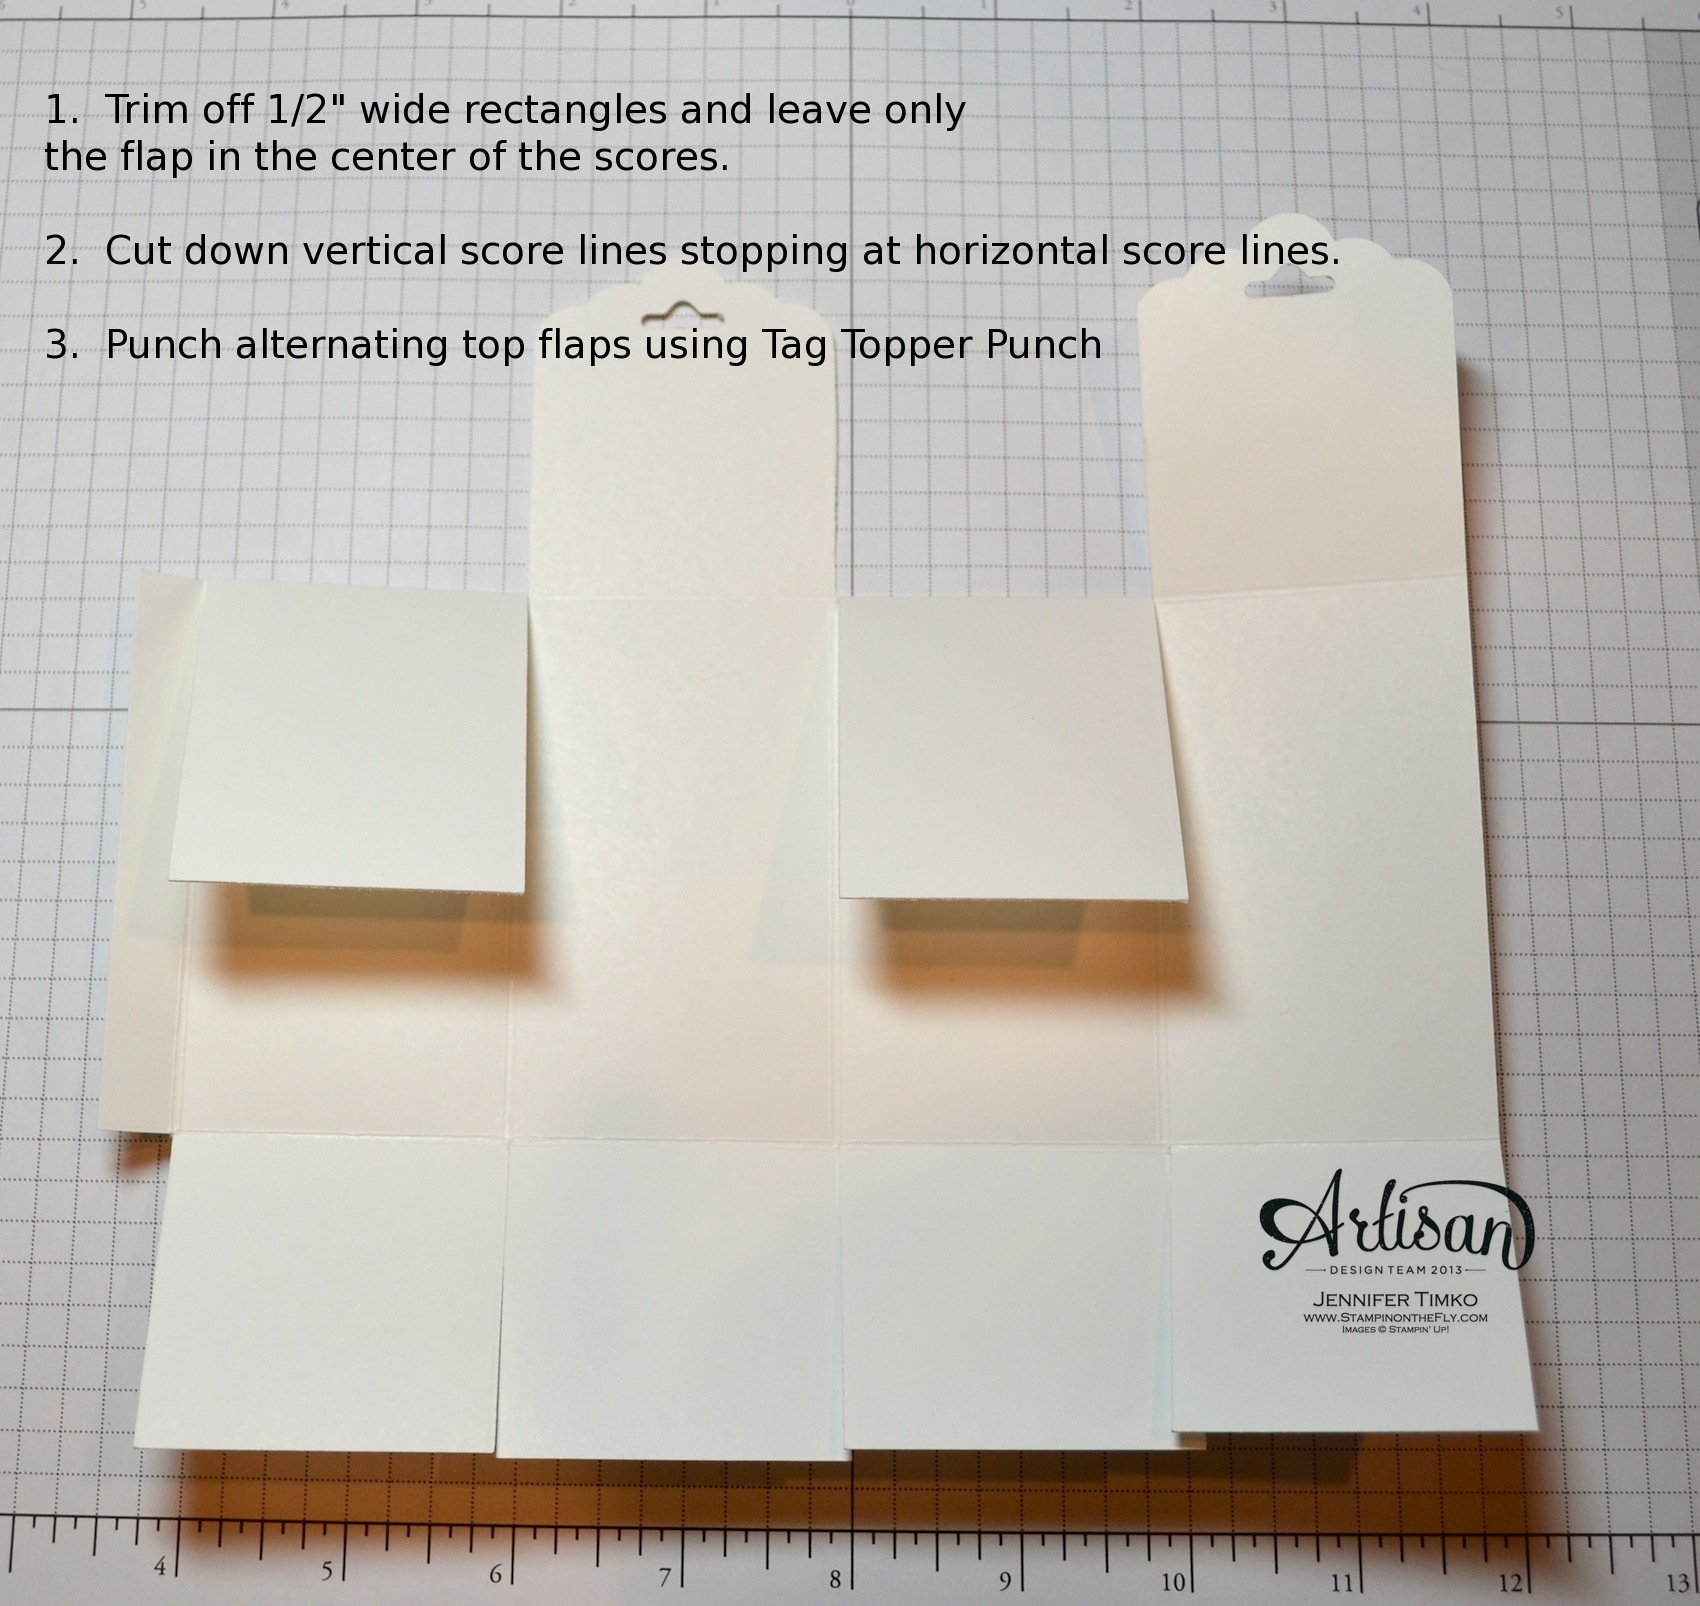
Then trim off the top and bottom tabs in the 1/2″ score section. This will leave you with one tab in the center that will help you glue the box together. On alternating top sections, use your Scalloped Tag Topper Punch to create the pretty tops. Fold the unpunched sections down and glue down to the center section. This gives your box a little more stability. Apply Sticky Strip to the outside of the 1/2″ tab and attach it to the inside of the opposing side. Fold your bottom sections up to form the bottom of the box attaching with Sticky Strip at each layer.
All that is left is decorating the box. I cut out some flowers using the Fun Flowers Die. All the designer papers on the box are from the Sweet Sorbet DSP pack..a Sale-a-bration offering. Did I mention that Sale-a-bration starts today??!! YEA!! Ok..back to the box. I created a belly band out of Pistachio Pudding card stock. I spritzed the flowers with water and formed them over the top of a Multipurpose Glue bottle. This gives them a little extra dimension. Glued together with Sticky Strip and I added on a Vintage Faceted Button tied with the Sweet Sorbet Accessory Pack twine. To close the box, I created a faux bow. Wrap the twine a 2-3 times around your fingers then tie on a button that has been threaded with another piece of twine. Knot in the center behind the “bow”. Take the ends of the piece you just knotted and thread through the punched holes. Tie another little bow to secure the top and make it easy to open.
This box is fast to make and perfect for even new stampers. I had some try this at a class and their projects were perfect!
Okay, off to go visit the awesome Mercedes Weber. I can’t wait for you to see what she has created! Make sure you hop around the whole loop to take a look at beautiful creations by the whole team…you’ll be happy you did!
Click HERE to purchase any of these wonderful Stampin’ Up products.
Paper: Sweet Sorget DSP, Pistachio Pudding; Accessories: Scalloped Tag Topper Punch, Big Shot, Fun Flowers Die, Vintage Faceted Button, Sweet Sorbet Accessory Pack, Sticky Strip
Primary Sidebar
We use cookies on our website to give you the most relevant experience by remembering your preferences and repeat visits. By clicking “Accept”, you consent to the use of ALL the cookies.
This website uses cookies to improve your experience while you navigate through the website. Out of these, the cookies that are categorized as necessary are stored on your browser as they are essential for the working of basic functionalities of the website. We also use third-party cookies that help us analyze and understand how you use this website. These cookies will be stored in your browser only with your consent. You also have the option to opt-out of these cookies. But opting out of some of these cookies may affect your browsing experience.
Necessary cookies are absolutely essential for the website to function properly. This category only includes cookies that ensures basic functionalities and security features of the website. These cookies do not store any personal information.
Any cookies that may not be particularly necessary for the website to function and is used specifically to collect user personal data via analytics, ads, other embedded contents are termed as non-necessary cookies. It is mandatory to procure user consent prior to running these cookies on your website.