Skip to content

ColorLab 23

ColorLab 23 published on 11 Comments on ColorLab 23

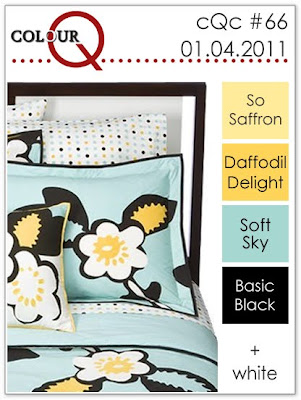
Welcome to the first ColorLab Challenge of the new year!  Our first color combination is so beautiful, so spring-like, so….well you get the point.  I love it!  Take a look:

The new focus this year for the color challenges is to use the actual ColorLab as the inspiration.  If you ever wonder “what goes with ____ (color of choice)”, then this is the place for you!  We all have our go-to palettes but struggle with certain others.  This will help you put colors together that are sure to work! 

My card today was one of the last thank-yous that I needed post-Christmas.  I told you that my stamping resolution was to try to get cards out on time and I only needed one more.  Pretty good, given my normal track record.  I’ll say that this one came together quickly since I was definitely ready for a change of pace. 

Marina Mist is really a fantastic blue.  I admit that I hadn’t take a serious look at it until recently.  I was so excited to see Baja Breeze come back in the Color Revolution and then I was straight into Christmas stamping.  I can’t wait to use this one more (and to get more coordinating accessories…translated, taffeta and satin ribbon).  The grosgrain I used was a gift from my upline who knew I would fall in love with it.  The background paper is the Playdate DSP and the Pear Paper comes from Greenhouse Gala.  I inked up the flower from Friends Never Fade using my Stampin’ Write markers and used the sentiment from Say It Simply (Occasions Mini).  I love that the DSPs do all of the work and make the most of a basic layout! 

Don’t forget to go over to the ColorLab Challenge and see the fantastic work of the other designers!  I’m going to be un-decorating my house for the next few days but I have another fantastic project planned for Tuesday and the next SUO Challenge.  Thanks for stopping by…see you soon!

Stamps:  Friends Never Fade, Say It Simply (Occasions Mini); Paper:  Play Date DSP, Greenhouse Gala DSP, Marina Mist, Whisper White; Ink:  Marina Mist, So Saffron, Pear Pizzazz; Accessories:  Marina Mist Narrow Grosgrain, Neutrals Designer Buttons, Dimensionals

All products are Stampin’ Up!

Fabulous Wishes

Fabulous Wishes published on 13 Comments on Fabulous Wishes

Today I was inspired by all kinds of challenges and actually managed to group three of them together!  You may notice that I have been using a lot of hostess sets with my cards and today is no different.  This is to remind you of how many amazing sets are available FREE!  Oh, I love free!  With Sale-a-bration right around the corner and the new Occasions Mini already available, now is a great time to become a hostess. 

I am sending out the last of my thank-you cards today (so far, so good on the resolution!) and now want to get ahead on some upcoming birthdays.  Perfect timing since Stampin’ Royalty is celebrating their birthday with a birthday card challenge.  Arielle is their new Goddess so I thought it fitting to use her ColourQ Challenge #66:


Beautiful colors, aren’t they??  Finally, I used the Splitcoaststampers Sketch Challenge 314 for my layout.

I don’t have any Soft Sky so I substituted with Baja Breeze.  I think it has the same feel to it.  I used the Framed Tulips Embossing Folder again but created a rectangle using a similar method as Sharon Field did at Created By You.  My rectangle is 2 1/2″ x 4 1/8″.  I simply used the short side of the folder instead of the long one.  My flowers are one of the two-step stamps from Fast & Fabulous (hostess level 2).  I started by inking with So Saffron and Daffodil Delight and then added Baja Breeze (these were all Stampin’ Write markers).  I took a sponge dauber to the stamp to soften any edges to the colors.  The outline was stamped in Basic Black.  A little “flag” was created by snipping a rectangle and tucking the still square end under a black button (Neutrals Designer Buttons).  I colored my thread with the Baja Breeze marker.  The image panel is popped up on dimensionals and another dimensional tucked under the raised section of the flag.  The beautiful paper is from the main catalog’s Greenhouse Gala DSP.

I’ll be back tomorrow with another beautiful color combination from the ColorLab Color Challenge.  Thanks for stopping in…see you soon!

Stamps:  Teeny Tiny Wishes, Fast & Fabulous; Paper:  Daffodil Delight, Basic Black, Greenhouse Gala DSP, Whisper White; Ink:  So Saffron, Daffodil Delight, Baja Breeze, Basic Black; Accessories:  Neutrals Designer Buttons, Stamp-a-ma-jig, Sponge Dauber, Dimensionals, Thread (non-SU)

All products Stampin’ Up unless otherwise indicated.

Say it with Style!

Say it with Style! published on 18 Comments on Say it with Style!

Happy New Year and welcome to my new followers!  I was so motivated by the weekend’s Stampin’ Addicts Occasions Mini Blog Hop and couldn’t wait to get stamping this week.  My first job this year to show you how to make the square frame from my hop cards.  While I would love to take credit for the idea, Sharon Field over at Created By You is the originator of the technique I used.  I had been playing around with ways to do this but she figured it out first!  I simply modified her instructions to make the square.  Since many people are visual learners, I have taken pictures of what I did.

Start with a 4 1/8″ x 4 1/8″ square and line it up so that you have equal spacing on three sides.  Roll it through the Big Shot and it will look like this:

Next, take the card stock and slide it down so that the bottom lines up with the bottom design of the folder.  You should be able to feel the design slide into the “grooves” and it will match up with the folder (except the unembossed bottom, of course).

It will look like this from the other side and you can check your placement.

As Sharon specifies, start to roll it through your Big Shot but only a little bit.  Estimate how much roll it takes to emboss only the bottom design (she says about 3/4 of a turn).  Then back the design out.  And here is the final square.  The pressure of the Big Shot flattens the previous design and forms the corners nicely!

My card from the Blog Hop was given away as a card set for Christmas so I “had” to create a new one, of course. 

I inked up part of the image from the Elements of Style stamp and then colored it in with Pink Pirouette, Rose Red and Basic Gray.  The sentiment is from the new set Say It Simply.  I brought in an Antique Brad because it went so well with the gray.  The ribbon, I must confess, is retired Basic Gray Taffeta.  Given that I have a ribbon “collecting” (okay, hoarding) problem, I am trying to use up some of my retired items.  To save you some time, the Basic Gray piece of the inner square is 3″ x 3″. 

This is also for the Creative Crew Catalog Focus Challenge over at Splitcoaststampers.  It is a challenge to use new items from the Mini.  Check out the link to see more fabulous projects from the Creative Crew.

Thanks for stopping in today.  I wish you a safe and happy new year filled with loads of creativity!

Stamps:  Say It Simply, Elements of Style; Paper:  Basic Gray, Pink Pirouette, Whisper White; Ink:  Basic Black, Pink Pirouette, Rose Red, Basic Gray; Accessories:  Big Shot, Framed Tulips Embossing Folder, Antique Brads, Basic Gray Taffeta (retired), Blender Pen, Dimensionals

All products are Stampin’ Up!

Stampin’ Addicts Occasions Mini Blog Hop

Stampin’ Addicts Occasions Mini Blog Hop published on 32 Comments on Stampin’ Addicts Occasions Mini Blog Hop

Welcome to your next stop on the Stampin’ Addicts Occasions Mini Blog Hop!  I am so thrilled to have you drop by!  Didn’t you love Twila’s use of the new Eat Chocolate set over at Stamp A Little Longer?  I’ll completely understand if you need to go take a little chocolate break right now.  My job today is to give you a bit of an accessories preview.  I will be showing you the new Framed Tulips Textured Impressions Embossing Folder and the new Beveled Windowpanes, along with the new word set Say It Simply.  I’ll start with two cards that show the beautiful framing capacity of the Framed Tulips Folder.

On the first card, I used the debossed side.  I love that the embossing folder takes a basic card and simple layout and gives it a wow factor!  The words from the Say It Simply set use a font that has a great deal of flexibility and the words are the perfect size.  I finished it off with the new Baja Breeze Seam Binding (oh, yes…more colors of this lovely ribbon!) and a Crumb Cake button from the Neutrals pack.

Next is card that creates a more distinctive frame effect.  I love how this stamp from Elements of Style has a tulip shape in the flowers.  And yes, the frame is a square instead of the original rectangle.  Cool, huh?  I’ll give more details on that next week.  Crumb Cake Seam Binding this time to finish the card.

You’ll have to see these Beveled Windowpanes in person to understand how really cool they are.  They come in three different sizes and add such dimension.  For the first card, I used another hostess set (Silhouette Sentiments) on a small rectangle cut to match the inner raised part of the Windowpane.  I created a frame with the addition of a Baja Breeze piece cut to the same size as the full Windopane.  This was layered on Daffodil Delight stock and attached using the Daffodil Delight 1/8″ Taffeta Ribbon.

I fell in love with the Play Date DSP because of the feature of being able to highlight numbers.  The little square Windowpane is conveniently the same size as the number so I just had to play with that!  I added Pear Pizzazz ribbon to attach it and left the rest of the card basic to leave the focus on the number (the inside is a birthday sentiment, of course).

I hope you like my projects with the new accessories and don’t overlook Say It Simply.  At $7.95, it is a must have!  Next up is an Oh Sew Suite look at the In Stitches Wheel and Sweet Stitches DSP with Sara over at Lily’s Ink Pad.  Thanks for stopping in and I hope to see you again soon!

<—— PREVIOUS BLOG ——        ——NEXT BLOG——>

SUOC9 – A shiny new resolution

SUOC9 – A shiny new resolution published on 16 Comments on SUOC9 – A shiny new resolution

The challenge from SUO Challenges today…Bring on the Bling!  Like many of you, the last week has been a bit time-pressed and the upcoming week promises more of the same.  With my children happily playing with the new Legos (that I spent much of the weekend building), I managed to get this card done.  Now, technically the challenge wanted us to put on the bling with our New Year’s card.  My first thought, though, was that I need to keep working toward my stamping new year’s resolution.  Yes, I am committing myself to actually SENDING cards….on time.  Oh, I know that is just crazy talk but I really want to make a go of it!  *smile*  So here is my not-so-New Year’s card complete with bling! 

Yes, those cool shimmery flower centers are my In-Color Glimmer Brads!  I was lucky enough to get these at the Stampin’ Up Regionals I attended in early October and they were demanding some attention.  These are the Peach Parfait brads and they sort of have a coppery feel to them.  Love them!  I put on my Early Espresso Satin Ribbon to add another layer of shine to the card.  It was great to pull out the Vintage Vogue set and to use decidedly un-holiday colors (although I did use a piece of Deck the Halls DSP)!  The sketch is courtesy of the Operators over at Stampin’ 411, another fantastic layout to work with!

I will be back on Friday for the Stampin’ Addicts Occasions Mini Blog Hop.  I can promise you won’t want to miss all the exciting projects sure to be on this hop!  Until then, I hope you have a wonderful week and are enjoying time with family and friends!

Stamp:  Vintage Vogue; Paper:  Peach Parfait, Early Espresso, Whisper White, Deck the Halls DSP; Ink:  Peach Parfait, Early Espresso; Accessories:  In Color Glimmer Brads, Espresso Satin Ribon, Neutrals Buttons, Sticky Strip (to bunch ribbon), Dimensionals, Sponge Daubers

ColorLab 22

ColorLab 22 published on 10 Comments on ColorLab 22

Beautiful blues!!  That pretty much sums up the color challenge from ColorLab this week.  Take a look at this wonderful inspiration:

While I have to admit that it was really tempting to be literal with the challenge and use snowflakes (and I am certain that it would be pretty together), I really need a birthday card.  I also “needed” to finally pull out my new things from the upcoming Occasions Mini to put them through their paces.  I opted for the beautiful flowers from Fast & Fabulous (Hostess Level 2).  I initially inked the filler stamp with Baja Breeze and then sponged on Marina Mist and Pacific Point.  Then I inked the outline stamp with Night of Navy.  The new Framed Tulips Impressions Folder was used for the side panels.  Finally, I layered the Night of Navy Satin Ribbon with the new Baja Breeze Seam Binding and cinched the bow with a button.  The layout come from the Sweet Sunday Sketch Challenge 97

I hope the birthday girl enjoys this because she is a special niece.  I will be back next Tuesday with a new card from the SUO Challenges.  Until then, I hope that you enjoy a peaceful and joyous holiday season.  Thanks for stopping in today!

Stamps:  Fast & Fabulous, Elements of Style; Paper:  Baja Breeze, Night of Navy, Whisper White; Ink:  Baja Breeze, Marina Mist, Pacific Point, Night of Navy; Accessories:  Night of Navy Satin Ribbon, Baja Breeze Seam Binding (Occasions Mini), Neutrals Buttons, Framed Tulips Impressions Folder (Occasions Mini), Big Shot, Thread

All products are Stampin’ Up!

Color Lab 21

Color Lab 21 published on 10 Comments on Color Lab 21

There was great cause to celebrate when River Rock came back during the Color Renovation!!  I was down to the last of my stash and could only use it sparingly.  I love how it changes with different pairing of color!  Imagine how happy I was to see this week’s Color Lab colors…take a look:

River Rock is great with Soft Suede (and Early Espresso, for that matter) and adding Cherry Cobbler, awesome!!  I went a little different route as I continue prepping for Christmas and made a tag.  I may have gone a little pearl crazy on this one but who can stop once you get going on those fun little things??!!  Admittedly, this will have to be for a VERY special package…good thing my husband doesn’t read this very often!!  Enough typing…here is the tag:

I’m in love with this little tree from Holiday Hoopla and the pearls just went where the ornaments are on the stamp.  I even added a pearl to the Antique Brad to finish the look.  The base of the tag is the Two Tags Die for my Big Shot.  I can’t wait to see this one on the package.  I found some Cherry Cobbler wrapping paper (yes, I took my card stock with me) and this will be perfect!

I hope the rest of your week goes well.  I have a lot to do to finish getting ready for my family’s Christmas so I probably won’t post again until next week.  Thanks for stopping in today!!

You may have noticed that the colors this week include Real Red and not Cherry Cobbler.  Apparently in my Christmas chaos, I missed that fact.  I hope you like the tag with the Cherry instead…sorry about that!

Stamp:  Holiday Hoopla; Paper:  Deck the Halls DSP, River Rock, Soft Suede, Very Vanilla; Ink:  River Rock, Soft Suede, Cherry Cobbler; Accessories:  Basic Pearls, Cherry Cobbler Seam Binding, Shimmer Paint (sponged on image panel), Big Shot, Two Tags Die, Antique Brads

All products are Stampin’ Up!

Delightfully Dazzling

Delightfully Dazzling published on No Comments on Delightfully Dazzling

As promised, today’s card is actually not made by me but came all the way from Australia to my little mailbox in Virginia.  What a lovely, lovely treat!!  Monica made this beauty and I must say that, while it is stunning in the picture, it is spectacular in person!  The camera simply can’t capture the sparkle of the Dazzling Diamonds on the ornament.

I just love how that ornament from Delightful Decorations is suspended in the oval.  Make sure you go over and check out the other wonderful things she has made on Monica’s Blog and don’t forget to leave her some comments about this card. 

I’ll be back tomorrow with a new color challenge from ColorLab that uses one of my all time favorite colors (it returned because I think I wasn’t the only one!)…hint, hint!  Have a great Wednesday!

SUOC8 – Garnet and Gold

SUOC8 – Garnet and Gold published on 9 Comments on SUOC8 – Garnet and Gold

Ok, it isn’t really Garnet and Gold but when you went to The Florida State University that is what Bravo Burgandy and More Mustard look like to you!!  While it wasn’t an auspicious football year, at least we beat the Gators and that is something to cheer for (Gators, please hold your comments…it has been quite a while since we have won!). 

Alright, back on task…the challenge this week for the SUO Challenges is Embossing with a Color Challenge:  Bravo Burgandy, More Mustard and Very Vanilla.  The easiest way I know of to add dry embossing to a project is to pull out the Big Shot and there is no better way to add dimension to a simple layout than using the Square Lattice Embossing Folder!  For any new readers, this had been my favorite embossing folder and I have used it heavily since I bought it.  You just can’t go wrong with it!  I stamped out some leaves from my Day of Gratitude set and stamped them in Mustard and Burgandy.  I cut one out and popped it up on Dimesionals and put on a sentiment from the same set. 

I tied on the button from the Regals Collection with some thread.  I took the thread and colored it with my Burgandy marker to give it that finished look.  Amazing how such a small (and easy) detail can complete the coordination!

I don’t know about you but I get so focused on making all my Christmas cards that I forget about all the thank you cards I’m going to need after the holidays!  At least one is done now!  Don’t forget to go see all the fantastic projects from the rest of the team at SUO Challenges…you’ll be impressed with the wide variety of styles with this color set!  The challenge is open for two weeks so you should have plenty of time to join in.  Can’t wait to see what you make!

I’ll be back later this week with a beautiful card that I received Australia (imagine my excitement!)!!  Until then, have a great week!

Stamp:  Day of Gratitude (Holiday Mini); Paper:  Bravo Burgandy, More Mustard, Very Vanilla; Ink:  Bravo Burgandy, More Mustard; Accessories:  Vanilla Satin Ribbon, Regals Designer Buttons, Thread (non-SU)

All products are Stampin’ Up unless otherwise indicated.

Rejoice!

Rejoice! published on 14 Comments on Rejoice!

Yesterday was Gaudete Sunday, the third Sunday of Advent.  Gaudete is taken from Phillipians 4:4,5 which says, “Gaudete in Domino semper” or “Rejoice in the Lord always”.  The third candle in the Advent Wreath is rose instead of purple to signify this attitude of joy.  I thought it appropriate, therefore, to make a card expressing this simple feeling.  I will post the card first but please continue on to see another wonderful reason for me to celebrate.

This uses the Mojo Monday 169 sketch.  It has been forever since I have done this challenge and the rounded corners really step up the layout!  I am also participating in The Paper Players Challenge 28 to use a favorite color combination.  I’m not sure how to really choose a favorite but I have to say that Early Espresso and Cherry Cobbler have been my go-to colors as I make my Christmas cards this year.  Today I added in Crumb Cake but I also love Soft Suede with them.  I should be making “easy to duplicate” cards right now but this is what I was inspired to do this morning.  I cut the flowers from the Deck the Halls DSP and used more of it as the layers.  The Cherry Cobbler Seam Binding makes another appearance and may have a lot to do with my choosing Cherry Cobbler as a favorite!  Finally, I used the Splitcoaststamper TLC303 challenge to sponge.  I sponged around the flowers and the DSP layers to add some dimension.

Now for the rest of my reason to rejoice.  Last week, my oldest son was busy on something when I asked him what he was up to.  He said that he was making an Advent Wreath for his room and to wait until he was finished to look.  Candles in a little boy’s room concerned me but I waited.  Take a look at what he made:

As you can see, he tucked the “flame” behind the candle so that each one could be lit during the correct week.  Now why didn’t I think of that??!!  Yesterday morning, he came in to tell my husband and I that we needed to come to the lighting ceremony for the third candle in his room.  This is what he wrote for the ceremony:  “This week is the week of joy.  We want to have joy in our hearts.  And if you see someone that is lonely, play with them.  Why, because they will have joy.” (Printed with his permission)  So you see, in this season where it is easy to lose focus on why we celebrate, my son has given me reason to rejoice!!  I celebrate the kindness in his heart! 

Thanks for joining me today.  I’ll be back tomorrow with my first challenge as a design team member with SUO Challenges!  I hope that you, too, have many reasons to rejoice this week!

Card:  Stamp:  All Holidays; Paper:  Deck the Halls DSP, Early Espresso, Cherry Cobbler, Whisper White (inside); Ink:  Early Espresso; Accessories:  Cherry Cobbler Seam Binding, Neutrals Buttons, Linen Thread, Dimensionals, Corner Punch, Sponges

Wreath:  Non-SU construction paper (yes, now I wish I had given him some of my good paper)

All products are Stampin’ Up unless otherwise indicated.

Primary Sidebar