Skip to content

Geometrical – Cheer Up Buttercup Bag

Geometrical – Cheer Up Buttercup Bag published on No Comments on Geometrical – Cheer Up Buttercup Bag

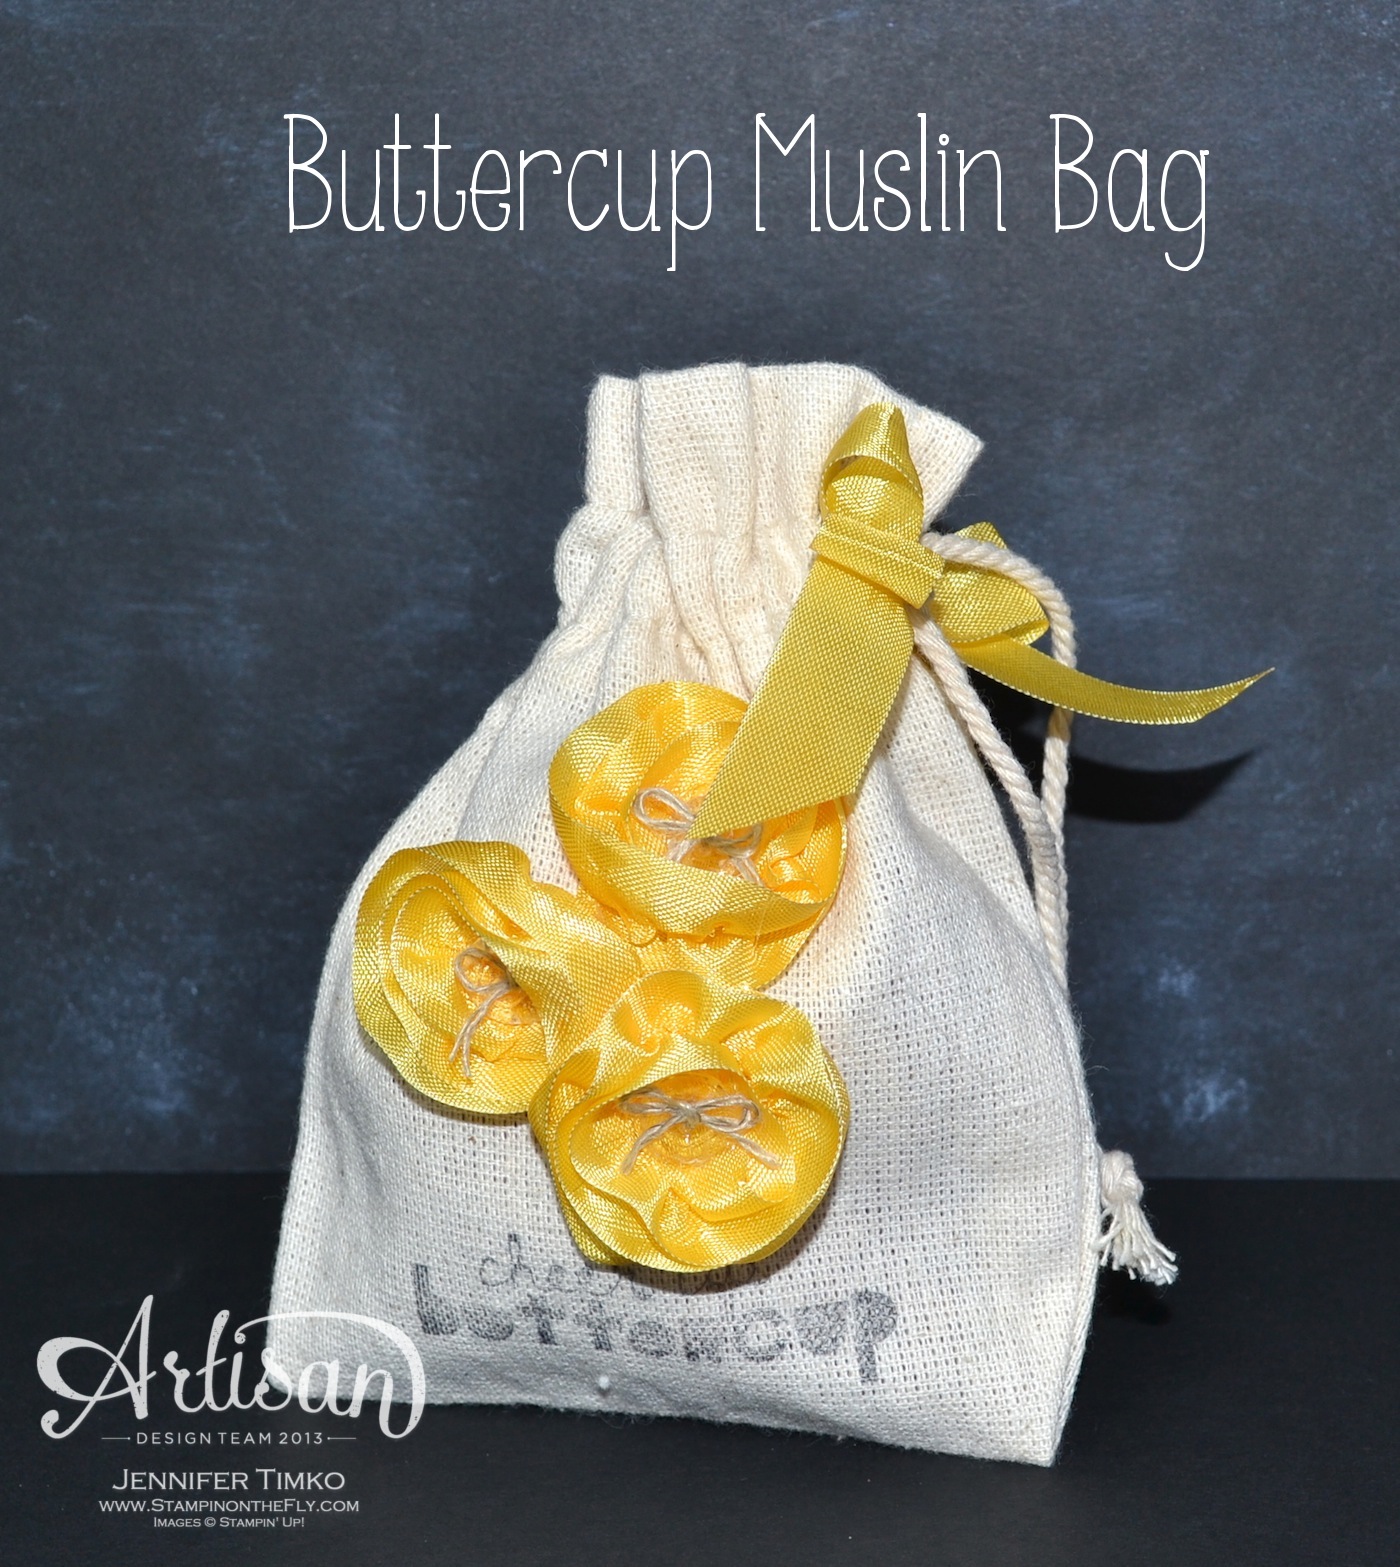
I am back on track showing you a project made with the Occasions Catalog set Geometrical today.  When Stampin’ Up asked the Artisan Design Team to be display stampers, the gave us a list of how many cards, scrapbook pages and 3-d projects they needed from us.  I have to say that the first time I saw the sentiment “Cheer Up Buttercup” I knew I would have to figure out how to make some buttercups.

Geometrical - Buttercup bag

Give that I love Stampin’ Up’s ribbons so much, I immediately went to my Daffodil Delight Seam Binding to see what I could do.  While still on the roll, I took one of the threads near the edge of the end of the ribbon and started pulling gently.  This starts to scrunch up the ribbon and gives it a natural curling action that helps you form a flower.  Just keep pulling until you have enough to make a flower of the size you want.

*Hint:  It is so much easier to leave the ribbon on the roll as you do this.  First it saves ribbon because it is hard to judge how much you will need.  Second, it keep the thread from being pulled though. *

Geometrical - Buttercup closeup

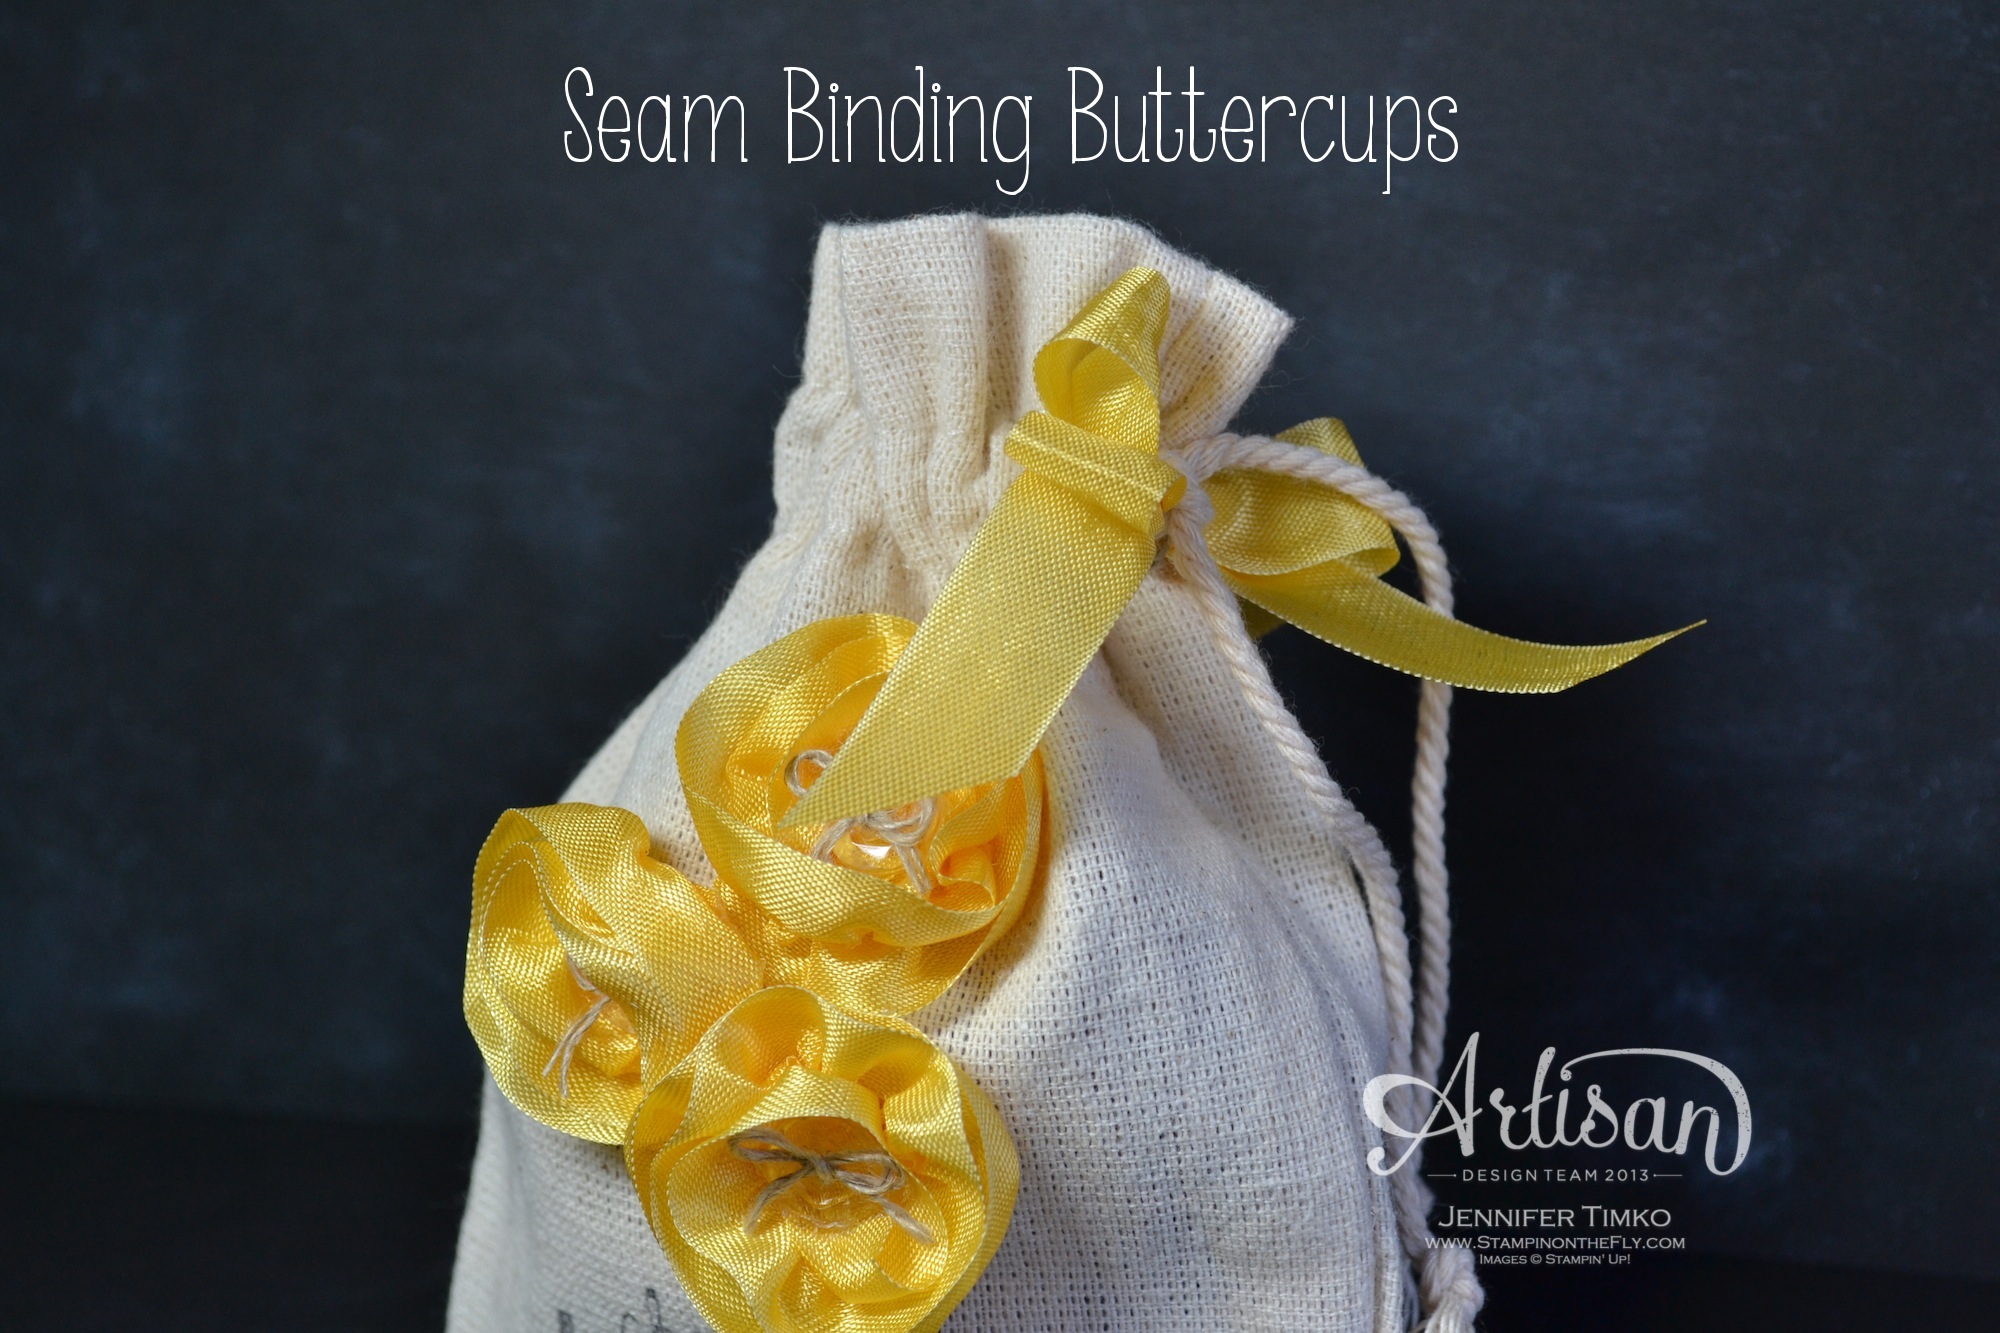
Once you have enough, tuck the “ugly” end (where you started pulling the thread) under and then just wrap in a circle.  Place a blob (yep, that is the official term) of hot glue on the Silicone Craft Sheet and stick the bottom of the flower in it.  Let dry.  I put a Vintage Faceted Button tied with Linen Thread in the center of the flower (again with just a touch of hot glue).  To finish the bag I stamped the sentiment in Basic Gray ink onto the Mini Muslin Bag and then attach the flowers with hot glue.

*Another hint – Stick your Silicone Craft Sheet inside the bag as you hot glue the flowers on.  This prevents the bag from getting glued together as the glue seeps through the weave of the fabric.*

I filled my bag with a flowered potpourri but you could put just about anything in it.  Once the bag is cinched, I pinned on a bow made from Daffodil Delight Seam Binding using a Vintage Trinkets safety pin.  Such a pretty gift to lift someone’s day!

The rest of the team is showing their Leadership Display Board projects as well so make sure you take a look!

Here is the rest of the Artisan Design Team:


I will be back on Monday to continue with my Leadership Display projects.  Until then, thanks for stopping in and I hope you day is great!

Click HERE to purchase wonderful Stampin’ Up products.

Blog signature 2013-001

See Ya’ Later — Sale-a-bration preview

See Ya’ Later — Sale-a-bration preview published on 7 Comments on See Ya’ Later — Sale-a-bration preview

Yep, there is more Leadership fun to share today!  In fact, I’m going to share two!  I changed up what I am posting (I promised Geometrical) because I thought you’d enjoy seeing a preview of a set that will be available during Sale-a-bration (otherwise known as the most wonderful time of the year for stampers!).  The set I am using today is called See Ya’ Later and it has wonderful sentiments.

See Ya' Later - AlligatorI have to say that since I went to Florida State University, I haven’t ever spent a lot of energy on “Gator” things (the Florida Gators are a big rival) but when faced with a sentiment this cute I could not resist.  I had one of those moments of inspiration and realized that a triangle from my Perfect Pennants Die would make an adorable alligator.  I cut out two of them out of Gumball Green (I used the medium sized one) to start.  My Envelope Punch Board was sitting on my table at the time and I used the corner rounder on that to round off all the corners.  Then, I ran the triangles through my Big Shot with the Decorative Dots Embossing Folder (another Sale-a-bration product). On the bottom triangle, I scored it with my Simply Scored Tool 1/2″ from the wide end and then, using Sticky Strip, attached the two triangles.  This scoring allows a bit of a hinge so his mouth can open some.  I cut another triangle out with the Big Shot from Whisper White then hand cut the little triangle on the edges.

See Ya' Later - Alligator side

After trimming off the wide end a bit, I positioned it inside his mouth and attached.  Put a Dimensional in between the layer of his mouth to help it stay open.  Finally for his eyes, I used a 1/2″ Circle Punch and attached some googly eyes.  The alligator goes up on Dimensionals to allow his mouth to be open on the card.  The DSP is from Epic Day and the back panel is Pool Party Card Stock.  The inks match and I used a Pool Party button and some White Baker’s Twine to finish it off.

See Ya' Later - Sun and Clouds

Since you already saw my Artisan Wednesday Wow using this concept, I thought I’d share my sunshine card too.  I started with a base of Sahara Sand and added grass using the Sale-a-bration DSP Sweet Sorbet.  I used the 1-3/8″ Circle Punch and Quatrefancy DSP for the sun center and the Banner Punch (Sale-a-bration) on Daffodil Delight for the sun rays.  Because I didn’t have the Word Bubble Framelit yet, I hand cut the clouds but it is so much easier with the framelit!!  They are embossed with the Decorative Dots Embossing Folder.  The sentiment was stamped on Whisper White and cut out using the Chalk Talk Framelits.  I shortened the length and the rounded the corners again with the Envelope Punch Board rounder.  I stamped the word Happy in Daffodil Delight ink and hand cut the letters apart and attached with Glue Dots to give a little more texture to the sentiment.

I hope you like these and that you will enjoy the Sale-a-bration products as much as I already have!  The promotion begins on January 28th so start making your lists.  For every $50 you spend, you can get one of these SAB items FREE!

The rest of the team is showing their Leadership Display Board projects as well so make sure you take a look!

Here is the rest of the Artisan Design Team:


I’ll be back tomorrow with another project from Leadership.  So glad you stopped in today.  See you again soon!

Click HERE to purchase wonderful Stampin’ Up products.

Blog signature 2013-001

Freshly Made Sketches #119

Freshly Made Sketches #119 published on 8 Comments on Freshly Made Sketches #119

FMS Final 119-001I’m back with the latest sketch from Freshly Made Sketches.  Our new designer Cindy Lovell has designed her very first sketch and it is so cool!  Playing with the angles is a challenge at first but the results are so fun!

FMS119 - Fancy Foil in Gold


I continued on with my gold theme from yesterday’s post for this one.  Let’s face it, gold is incredibly trendy and I’m pretty happy that Stampin’ Up has so many “toys” to play with in this great metallic.  I used the Fancy Foil Vellum and backed it with the Gold Foil and I love the two together.  Attaching vellum can always be a challenge since you want to conceal the adhesive.  The Fancy Foil allows you to hide it behind stripes (and dots and hearts) which makes it pretty easy to use.  Now, I went a step further and actually sewed it on but this is completely makable without the machine.  I added on a butterfly from Beautiful Butterflies cut from the foil then stamped and embossed a regular White Vellum sheet with the sentiment from Regarding Dahlias (stamped in Gold Encore and embossed with Gold Stampin’ Emboss Powder).  I added a little bit of the new  Gold Sequin Trim to the butterfly to fancy him up.  The whole whole thing is attached to a White Vellum card base.

I am really excited to see what you will come up with for this sketch.  The design team has such a variety of amazing cards and it is fun to see the different interpretations!

If you missed it, I started posting my projects for the Leadership Display Boards on Monday.  I will be back tomorrow and Friday with some more!  Can’t wait to show you!  Until then, thanks so much for stopping by and I look forward to see you soon!

Stamp:  Regarding Dahlias; Paper:  Fancy Foil Gold, Gold Foil, White Vellum Card Stock; Ink:  Gold Encore; Accessories:  Big Shot, Beautiful Butterflies Die, Gold Sequin Trim, Heat Tool, Gold Stampin’ Emboss Powder, Glue Dots

Click HERE to shop my Stampin’ Up Store.

Blog signature 2013-001

Artisan Wednesday Wow – Hearts of Gold

Artisan Wednesday Wow – Hearts of Gold published on 5 Comments on Artisan Wednesday Wow – Hearts of Gold

01-Jan-Blog-Hop-Button


I am so excited to continue showing projects from the Artisan Design Teams January box of products.  We are so thrilled to be sharing ideas using some of the latest and greatest from the Occasions Catalog.  If you have come over from amazing Jeanna, welcome to the next stop.  If you are starting here, just continue around using the next buttons until you get back to me.

AWW Jan - Gold xoxo

I started by pulling out the Fancy Foil Designer Vellum in Gold.  It is so amazing and even more so when paired with the Gold Foil Sheets!  Using a collection of heart framelits and punches (Hearts a Flutter, Circle Card Thinlits, Small Heart Punch), I created a collection of hearts that I simply sewed together into a little banner.  Then using the Banners Framelits, I cut out a piece of the diagonal strip vellum and sewed it onto some Crumb Cake card stock.  I took my Gorgeous Grunge stamp set and added some splatters with Gold Encore Ink and embossed it with Gold Stampin’ Emboss Powder.  Finally I cut the xoxo with the Circle Card Thinlit Die and added it as a sentiment.  This was such a fun card to put together and I am loving the gold…you’ll even see more of it in tomorrow’s post!

Okay, off to go visit the awesome Mercedes Weber.  I can’t wait for you to see what she has created!  Make sure you hop around the whole loop to take a look at beautiful creations by the whole team…you’ll be happy you did!

01-Jan-Blog-Hop-NEXT-Button

Click HERE to purchase any of these wonderful Stampin’ Up products.

Stamp: Gorgeous Grunge; Paper:  Crumb Cake, Gold Foil Sheets, Gold Fancy Foil Vellum; Ink:  Encore Gold Metallic; Accessories:  Big Shot, Circle Card Thinlits, Hearts a Flutter Framelits, Small Heart Punch, Gold Stampin’ Emboss Powder, Heat Tool

Blog signature 2013-001

Geometrical – Heart You So

Geometrical – Heart You So published on 2 Comments on Geometrical – Heart You So

I am so excited to finally be able to share with you my projects made for Stampin’ Up’s Leadership Conference.  This is a meeting of top demonstrators where they share business ideas and, of course, new creative projects.  One of the many perks of being on the Artisan Design Team is that we were asked to make display samples to inspire these demonstrators…and of course the whole team said yes!  Now that the conference is over, we will be sharing the projects with you on our individual blogs.  Everyone will be posting at separate times and my best advice is to stop by often (or simply subscribe to their blogs!).  I will have a blog roll at the end of each Leadership sample post to make this easy.

I thought that the easiest way to show you my projects was to work by stamp set.  Each of us were given different sets from the Occasions Catalog to use and we were all given Geometrical since it was a set given out at the conference.  I love this set so I thought it was a great place to start!

Geometrical - Heart you so

I think the sentiments in this set are super fun and trendy so I wanted one card to capture that a bit.  I chose a background of the chevrons from Modern Medley DSP because it was so bold and graphic…in the same style as the stamp set.  I took a Very Vanilla panel and stamped the arrow in Basic Black and then inked only the two words with my Basic Black.  I punched a heart out of Cherry Cobbler with my Small Heart Punch and added it over the arrow.  A little tab from Cherry Cobbler Seam Binding and Rhinestones to finish.  This is such a quick card to make but I love how it came out.  Hope you do too!

Here is the rest of the Artisan Design Team:

We are all working on creating links that take you specifically to these samples but bear with us.  Since we are working on different schedules, some links might not be specific for a couple of days.

I’ll be back tomorrow with the latest Artisan Wednesday Wow post, here Wednesday with a new FMS sketch and then back on Thursday and Friday with more from Geometrical!  So glad you stopped in today.  See you again soon!

Stamp:  Geometrical; Paper:  Modern Medley DSP, Basic Black, Very Vanilla; Ink:  Basic Black Stampin’ Write Marker; Accessories:  Small Heart Punch, Basic Rhinestones, Cherry Cobbler Seam Binding

Click HERE to purchase any of these wonderful Stampin’ Up products.

Blog signature 2013-001

Freshly Made Sketches #118

Freshly Made Sketches #118 published on 15 Comments on Freshly Made Sketches #118

FMS Final 118-001


Freshly Made Sketches is off and running with our new challenges for the new year.  The extraordinary Jen Mitchell is our sketch hostess this week and this one should have everyone playing along!  We also have the privilege of welcoming a new Design Team member this week!  Karren Johnson has been a gallery favorite for a long time and we are thrilled she will be joining us to inspire you.

FMS118 - Oh Happy Day

I’m continuing on with my Retro Fresh theme of the week.  Make sure you check out yesterday’s card (it is one of my favorites in a while and has Sale-a-bration peeks).  I love that this DSP can take on a more masculine flair.  I thought the sketch made it perfect to show you the new Starburst Sayings stamp set and its matching Starburst Framelits.  They are so awesome!!  This stamp particularly is so great since it can be used for so many occasions (birthday, promotion, graduation).  Yep, I think a stack of these in varying colors/DSPs will be added to my stash for those times when I need a last minute card.

The team obviously recharged their creative batteries because the DT samples this week are so fantastic!  I know you will love them too so make sure you go on over and take a look.

Starting next Monday, I will begin sharing projects I made for Stampin’ Up’s Leadership Conference.  I can’t wait to show you all that I was working on at the end of November!  Until then…have a great rest of your week!

Click HERE to shop my Stampin’ Up Store.

Blog signature 2013-001

Artisan Wednesday Wow – Retro Fresh Sun and Clouds

Artisan Wednesday Wow – Retro Fresh Sun and Clouds published on 6 Comments on Artisan Wednesday Wow – Retro Fresh Sun and Clouds

01-Jan-Blog-Hop-Button


Happy New Year from Stampin’ Up’s Artisan Design Team!  We are so thrilled to be sharing projects using some of the latest and greatest from the Occasions Catalog.  If you have come over from amazing Jeanna, welcome to the next stop.  If you are starting here, just continue around using the next buttons until you get back to me.

AWW Jan - Sunshine

I am so thrilled with the products in this new catalog.  They look so fresh and fun!  In fact…Retro Fresh!  That is the DSP used here.  Aren’t the colors great?!  I combined it with some items from the upcoming Sale-a-bration (SAB) promotion.  What is that?  Well, on January 28th the most marvelous thing happens.  For every $50 (US) you spend, you get to choose a FREE item from the SAB catalog!!  See those little banners I used to make the sun…Banner Punch…free!  See the texture on the clouds?  Decorative Dots Embossing Folder…free!!  You get the point!  It is awesome!  Ok, for the rest of the details.  I cut the print from Retro Fresh to 4-1/4″ x 4-1/4″ to make it the same size as my Pool Party card base.  Then I punched a circle out of the Tangerine Tango striped print with my 1-3/8″ Circle Punch.  A bunch of banners with the Banner Punch out of Tangerine Tango Card Stock and arrange until you are happy with your sun.  The clouds?  The shape is one of the Word Bubbles Framelits and then I ran it through with the Decorative Dots Embossing Folder to give it a little more dimension.  The sentiment is from Gifts of Kindness (a main catalog set) and it just seemed perfect with the sun and clouds.  A few buttons threaded with Pool Party Twine (from the Sweet Sorbet Accessory Pack…also from SAB and free) to finish it off.

There are lots of ways to use this idea.  Spoiler alert…some of you going to Leadership Conference may see it again on the display boards.  *smile*  I know that I will be using it again for sure.  Nothing like punches and framelits to make cute things quickly!

Starting next Monday, I will begin sharing projects I made for Stampin’ Up’s Leadership Conference.  I can’t wait to show you all that I was working on at the end of November!  The entire Artisan Design Team created projects for the display boards so keep an eye on all of our blogs for the details…yep, we’ll be showing you the how-to’s!

Okay, off to go visit the awesome Mercedes Weber.  I can’t wait for you to see what she has created!  Make sure you hop around the whole loop to take a look at beautiful creations by the whole team…you’ll be happy you did!

01-Jan-Blog-Hop-NEXT-Button

Click HERE to purchase any of these wonderful Stampin’ Up products.

Stamp:  Gifts of Kindness; Paper:  Whisper White, Pool Party, Tangerine Tango, Retro Fresh DSP; Ink:  Tangerine Tango; Accessories:  Banner Punch (SAB), 1-3/8″ Circle Punch, Big Shot, Word Bubbles Framelits, Decorative Dots Embossing Folder (SAB), Sweet Sorbet Accessory Pack (SAB), Buttons, Dimensionals

Blog signature 2013-001

FM141- Dahlia On Film

FM141- Dahlia On Film published on 4 Comments on FM141- Dahlia On Film

I had a little extra time to play today so I joined in with the team over at The Friday Mashup.  They have a fun sketch and a theme of “Tic, Tock”.  Hmmm….

fm141I had to really think about the theme and I’m pretty sure I stretched it right to the limit but hey, it is for fun right?  I think about photos capturing moments in time and the new On Film Framelits make anything look like a photo.

FM141 - Dahlia On FilmI chose one of my favorite flowers to “capture” and used the fun prints from the Kaleidescope DSP to complete the look.  Yep, I love that black and white striped paper and it makes for a fun frame, don’t you think?  The Bermuda Bay polka dots add a little touch of whimsy and of course I need some buttons to finish it off.  The flower and the sentiment are from Regarding Dahlias (a set from the main catalog that I just love).  So did I stretch the theme too much?!  At least I followed the sketch, lol!

So glad I got a little extra time to play this weekend.  The weather here in Virginia is drippy and cold today…a perfect day for stamping and watching some football.  Tomorrow is my BIG football day though.  I went to Florida State University and will be cheering on my Seminoles tomorrow night in the BCS Championship!  Go ‘Noles!!

Hope the weekend has been great for you.  My kids are back to school tomorrow and I have two new projects to share with you on Tuesday night and Wednesday.  Can’t wait!  Thanks so much for stopping in today.  If you have any questions about the new Occasions Catalog, just let me know!  It really is fun!  Until Tuesday night, have a great start of your week.

Stamp:  Regarding Dahlias; Paper:  Kaleidescope DSP, Basic Black, Daffodil Delight, Whisper White; Ink:  Strawberry Slush; Accessories:  Big Shot, On Film Framelits, Buttons, White Baker’s Twine, Dimensionals

Shop for these and other amazing Stampin’ Up products at Jennifer’s Online Store!

Blog signature 2013-001


Primary Sidebar