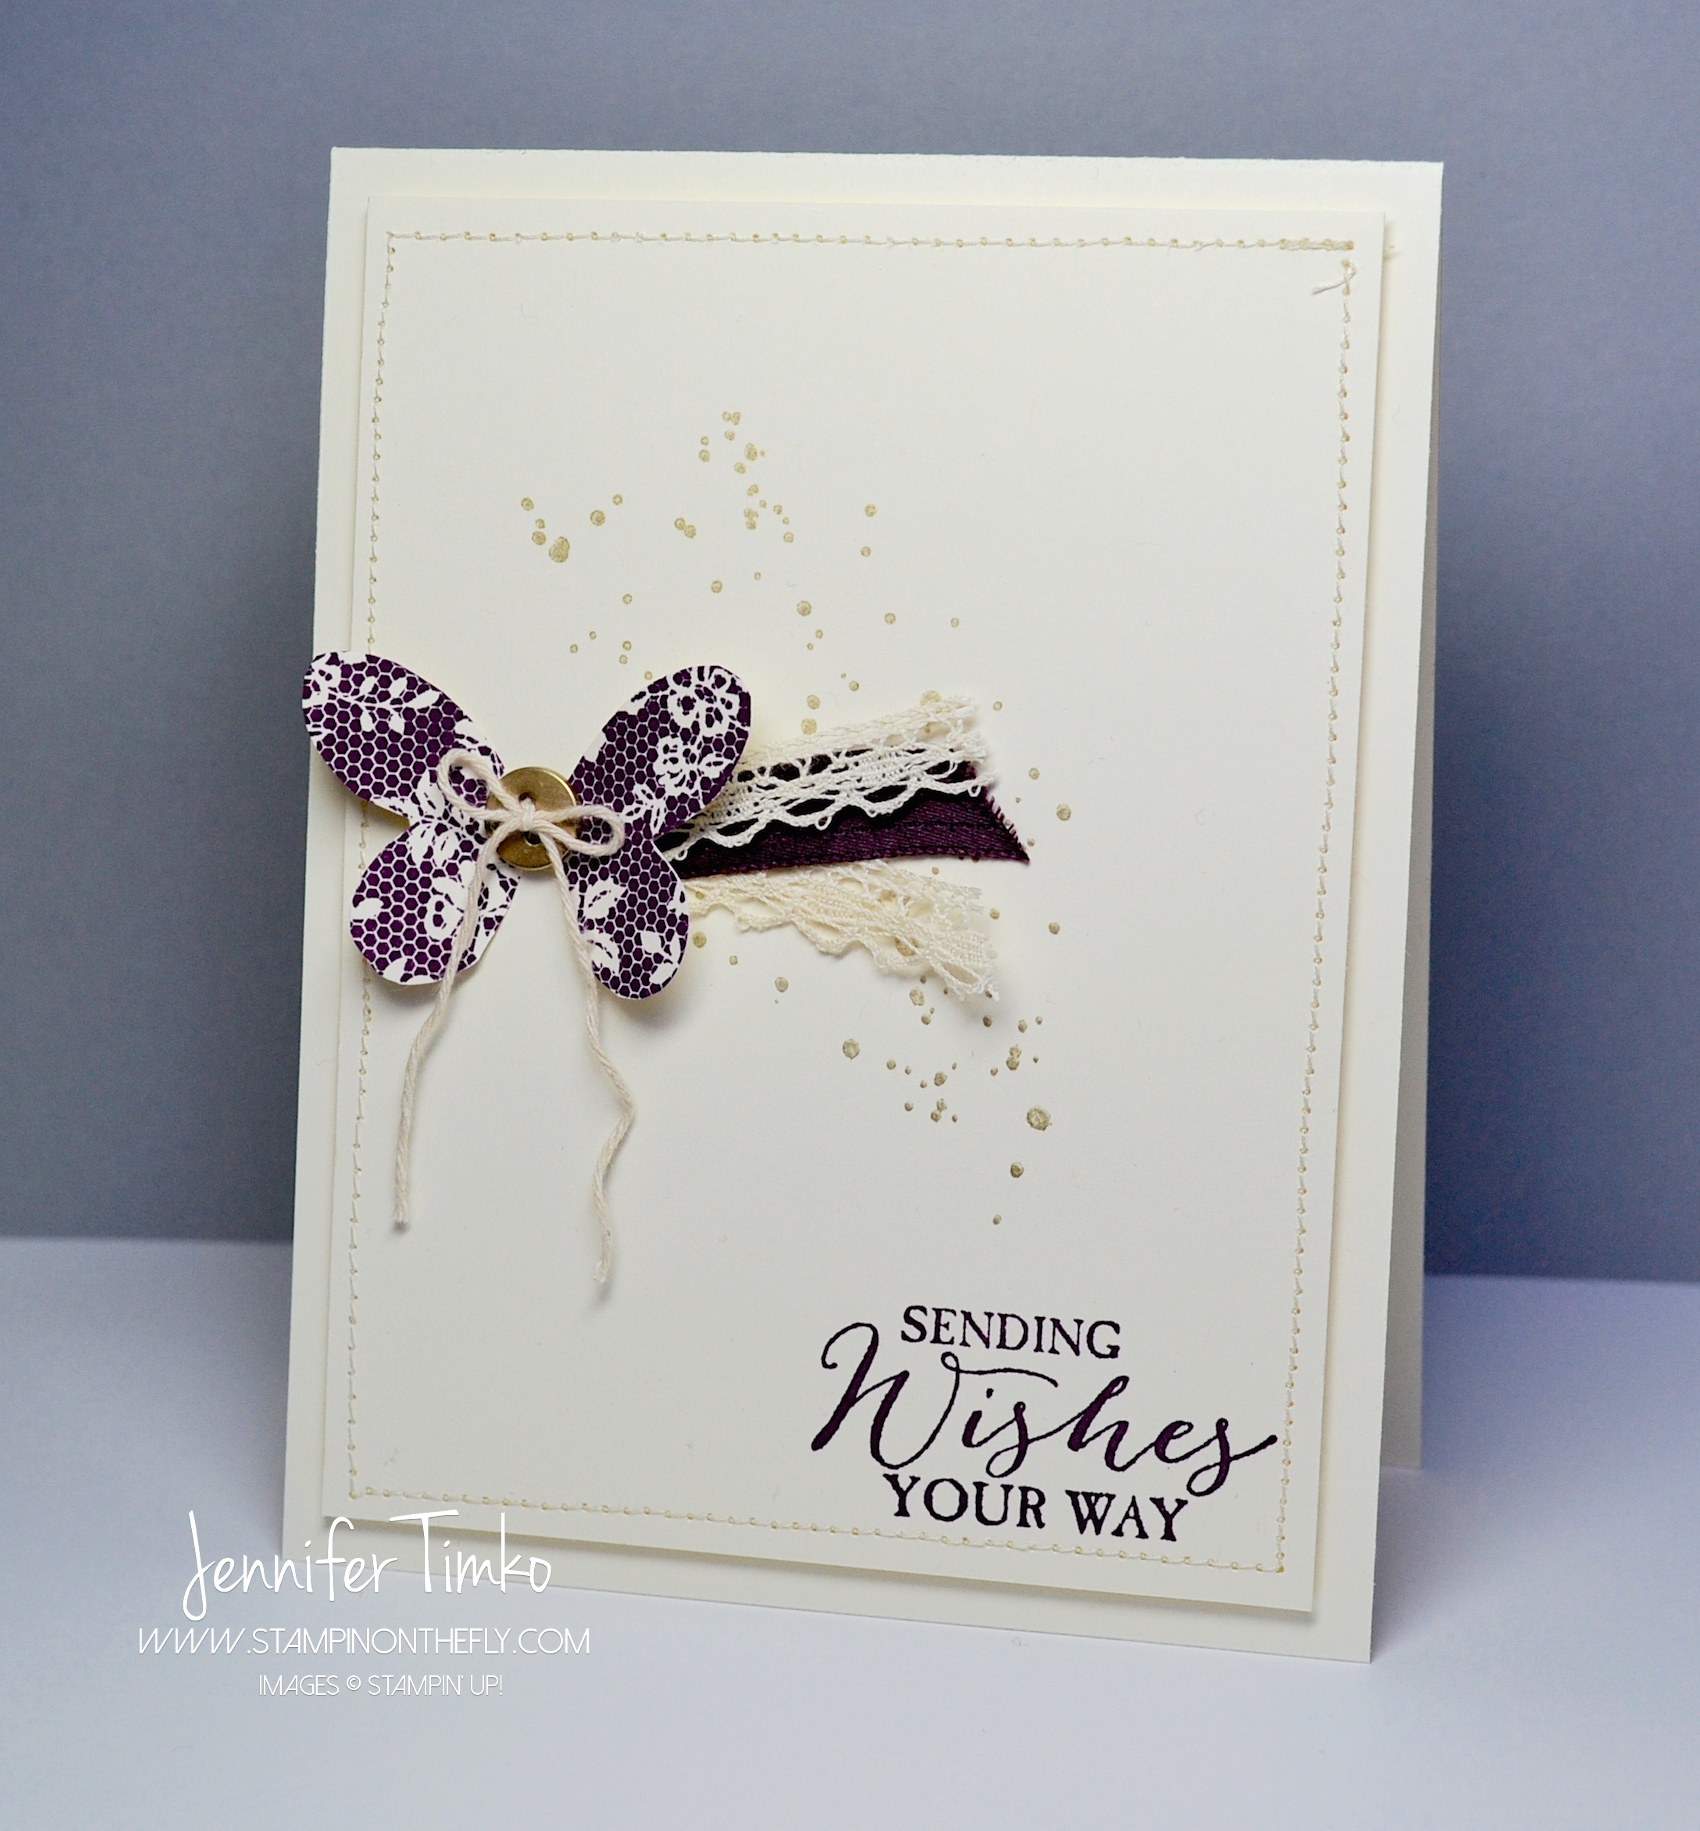
Well, my card was ready for yesterday but not my post. Hmmm… Well, it happens, I guess. My boys and I had a quick get away this weekend to Orlando. Unknown to my mom who lives there, we had a surprise birthday party planned for her on Saturday!! It was such fun and we managed to keep the surprise. My boys were so worried they would give something away but they did great! I made my mom a special card too, of course. She love purple and she is the one who gave me my sewing machine so naturally I created this.
I had a tough time with the light getting a good picture before we had to leave but I think you can see the idea. It seems prettier in person though. The background splatter is from Gorgeous Grunge and is stamped in Gold Encore Ink. Then I inked the butterfly from Butterfly Basics in Blackberry Bliss. I hand cut this one out and then added on a gold metal button tied with a Vanilla Baker’s Twine that came in a Christmas card kit (these kits just keep giving). I added some Venetian Crochet Trim and Blackberry Bliss Stitched Satin Ribbon underneath the butterfly. The sentiment is from the same stamp set.
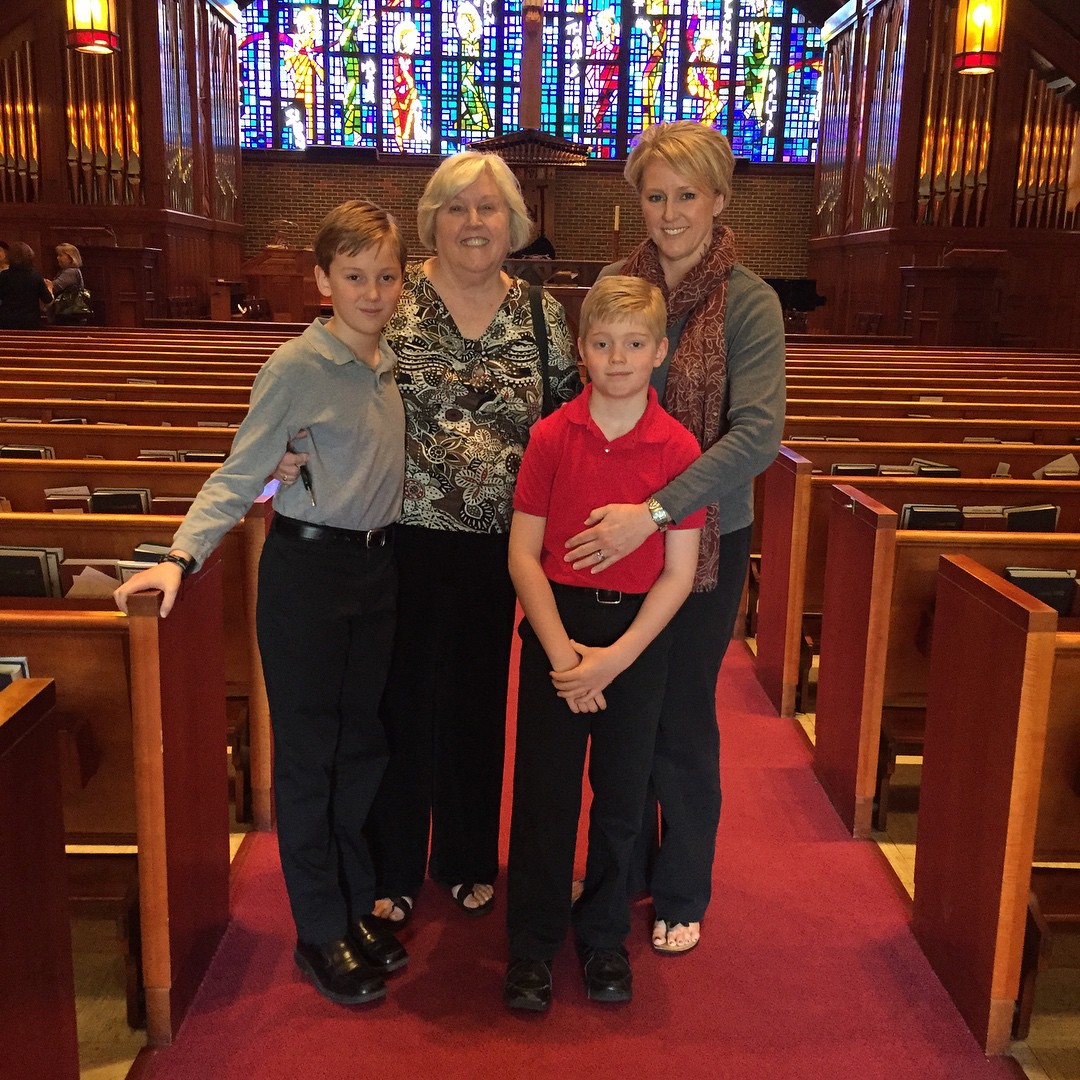
Quick post today but I thought I’d share a picture from our weekend. This was taken at my mom’s church and I thought it was really nice.
So glad you stopped in today. I’ll be back tomorrow with the latest from Freshly Made Sketches. Hope your day is great!
Click HERE to purchase these wonderful Stampin’ Up products!
You know sometimes you just need a quick thank you note. Or a whole stack of quick thank you notes. But quick doesn’t necessarily mean that they can’t be special now, does it?! As I was working on my card for last Wednesday’s Freshly Made Sketches challenge, my youngest son was working on some thank you notes for his birthday presents. With all the the winter weather days (I’d call them snow days but sometimes they come without snow…like today….again….), I have had no choice but to create with the kids “helping”. In this case, he decided that he liked the colors I was using and oh, by the way, he needed some extra note cards. So I made a few of these lickety-split.
I took the already inky sponge daubers and created the ombre look on this fabulous sentiment. Then I stamped right onto the ever-so-handy Note Cards. If you don’t have a pack of these in your craft room, you just need to fix that. Like now! I cannot tell you how many time they have saved me. Many times I hand them to the kids and they stamp happily and create amazing cards. Or in this case, it provided a quick way to make sure we didn’t lose the momentum of writing thank you cards. When you capture a 9 year old boy and get him writing, you just don’t let him stop until he is done!!
Ok, so I’m still typing but you could have like 10 of these done by now. I think that I may make a pack of them in different colors to have on hand. And another pack to have on hand as a gift. Crazy how much I am liking something that is really so simple. I hope you love this idea as much as I do. Let me know what you think and then let me know what colors YOU think would be awesome together on this.
I have a really fabulous card all ready to share for you on Monday and I can hardly wait for you to see it. So glad you stopped in today. Hope you have a great weekend!
Click HERE to purchase these wonderful Stampin’ Up products!
Stamps: Watercolor Thank You; Paper: Whisper White Note Cards; Ink: Pool Party, Bermuda Bay, Midnight Muse (ret); Accessories: Sponge Daubers
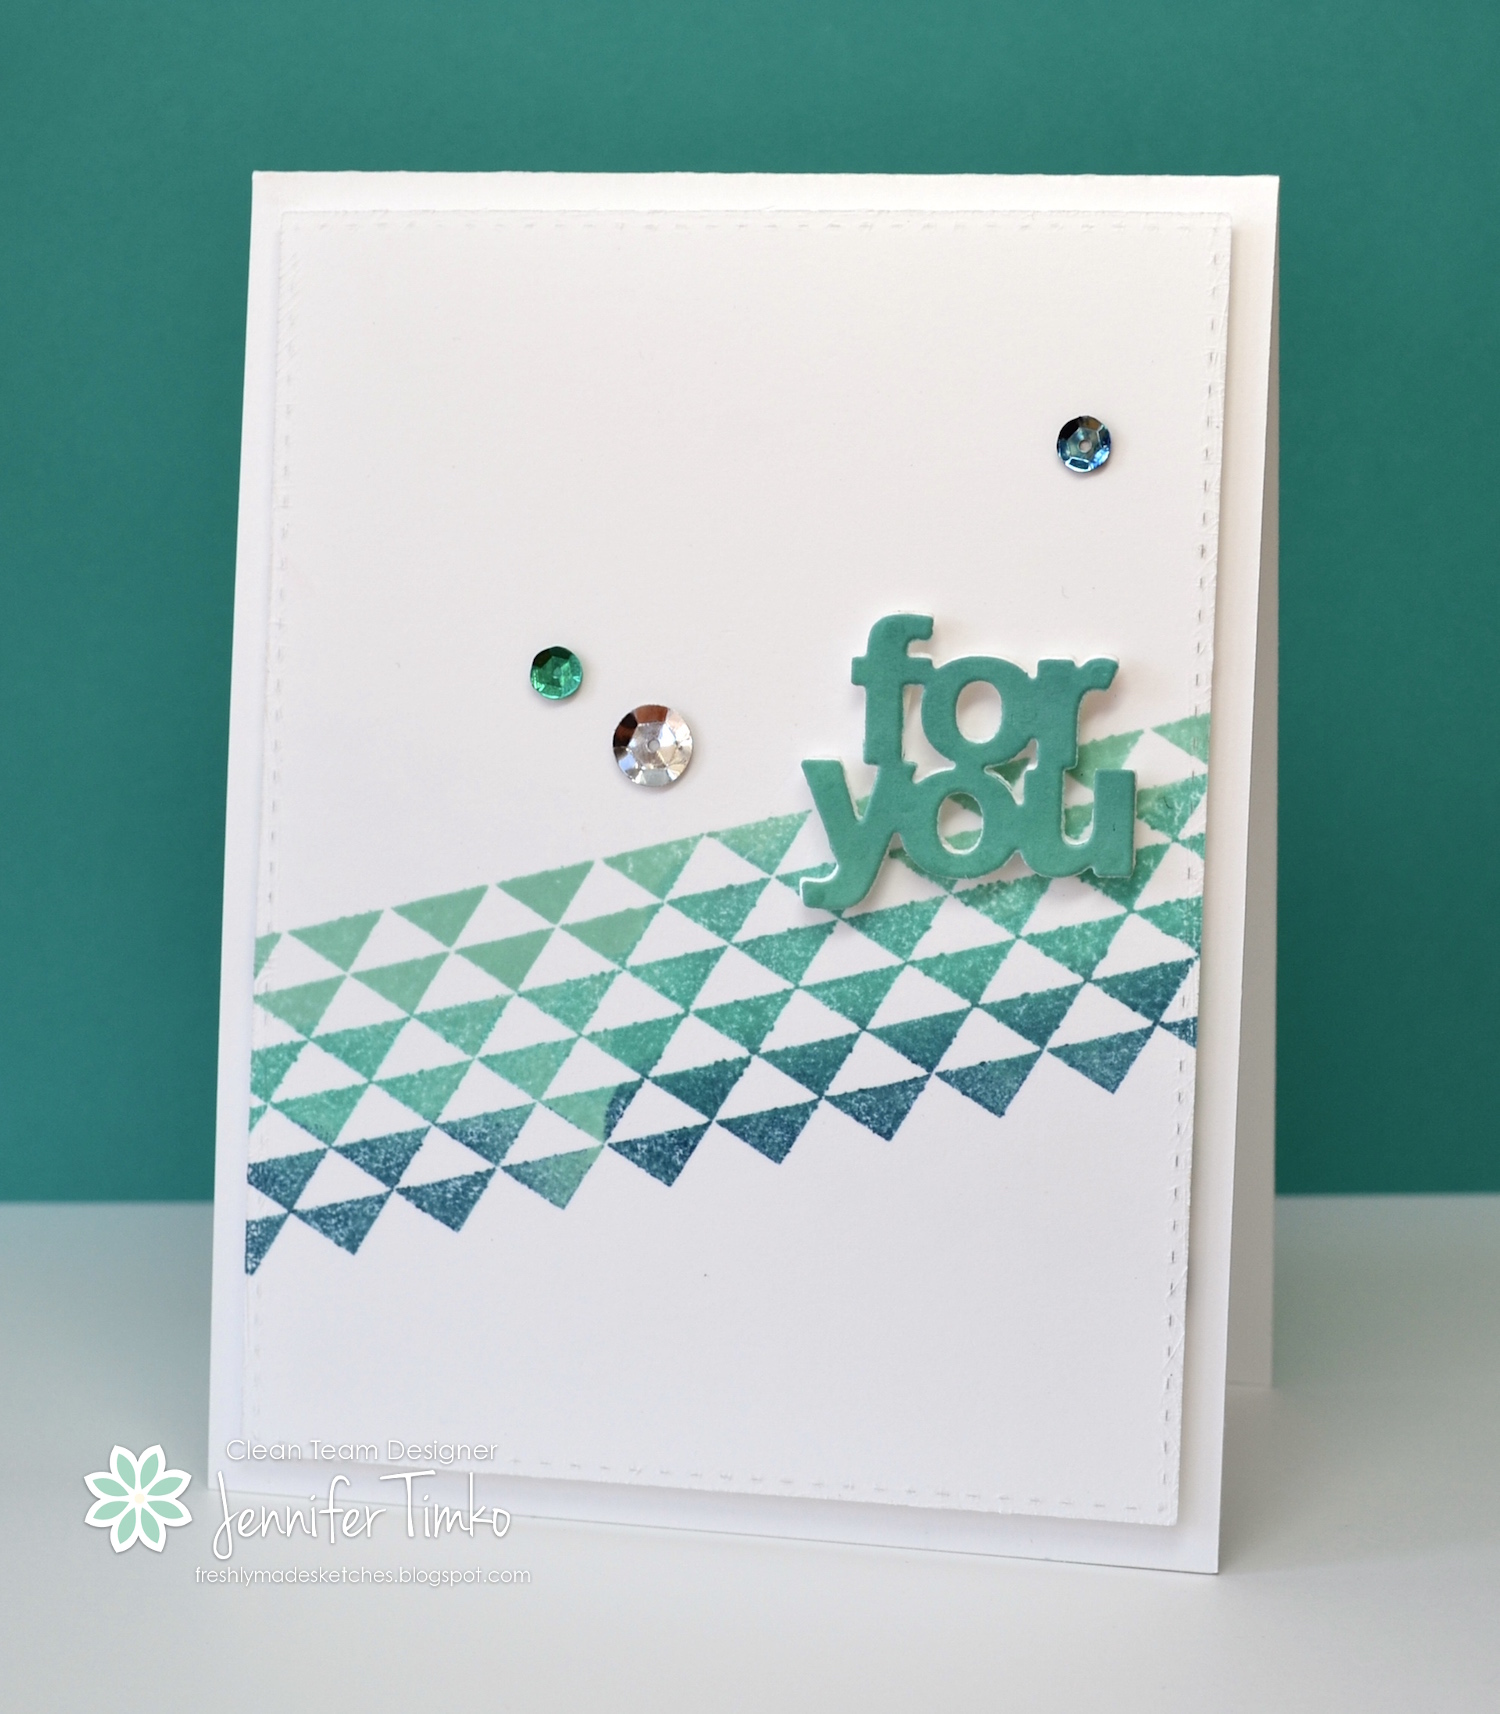
This week over at Freshly Made Sketches, the incredible Cindy Lovell is our sketch hostess. Cindy has the most fabulous eye for design and detail. I love her cards! Of course it is no surprise that her design is perfect for lots of interpretations. It is fantastic!
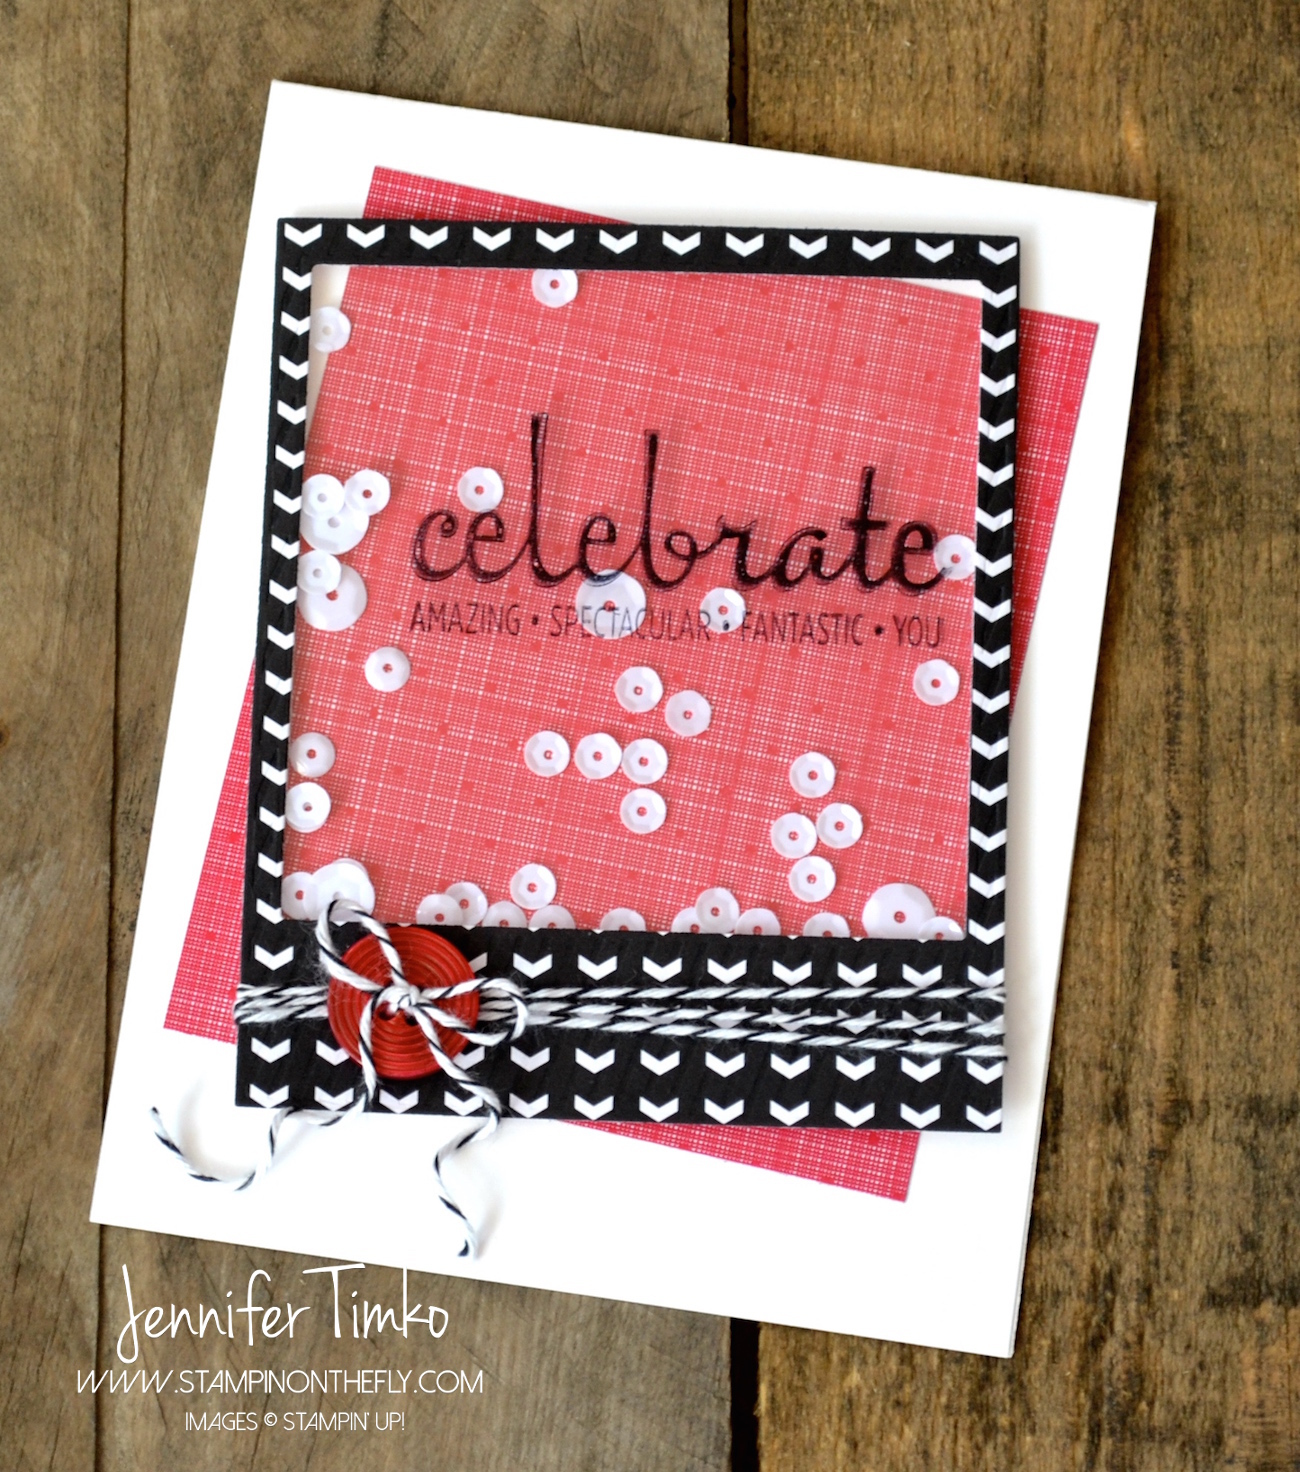
I knew I wanted to use this graphic and fun stamp Dotty Angles when I saw the sketch. But what to do with it? And which shape, triangles or circles? After playing with it a bit, I thought I do a take on ombre stamping. I sponged Pool Party, Bermuda Bay and Midnight Muse (retired In Color) inks onto the triangle stamp. Makes for a pretty cool effect, don’t you think? I chose the sentiment die from the Mini Treat Bag Thinlits and cut out a few from white card stock. I used the inky sponge dauber already loaded with Bermuda Bay (from inking the stamp) to sponge color on the top layer. You could used colored card stock but this effect is a little softer. The sequins are from the Holiday Catalog (silver) and from Paper Pumpkin. The darkest one is colored with a Night of Navy Blendabilities marker to make it match.
I think you are going to have fun with this sketch. So many great ways to create with the angled panel and circle element. The team does its usual magic and you will love their work! I’ll be back Friday with a quick and easy card you are sure to like. So glad you stopped in today. Hope your day is great!
Click HERE to purchase these wonderful Stampin’ Up products!
Stamps: Dotty Angles; Paper: Neenah White; Ink: Pool Party, Bermuda Bay, Midnight Muse (ret); Accessories: Big Shot, Mini Treat Bag Thinlits, Sponge Daubers, Sequins, SSS Stitched Rectangles Die
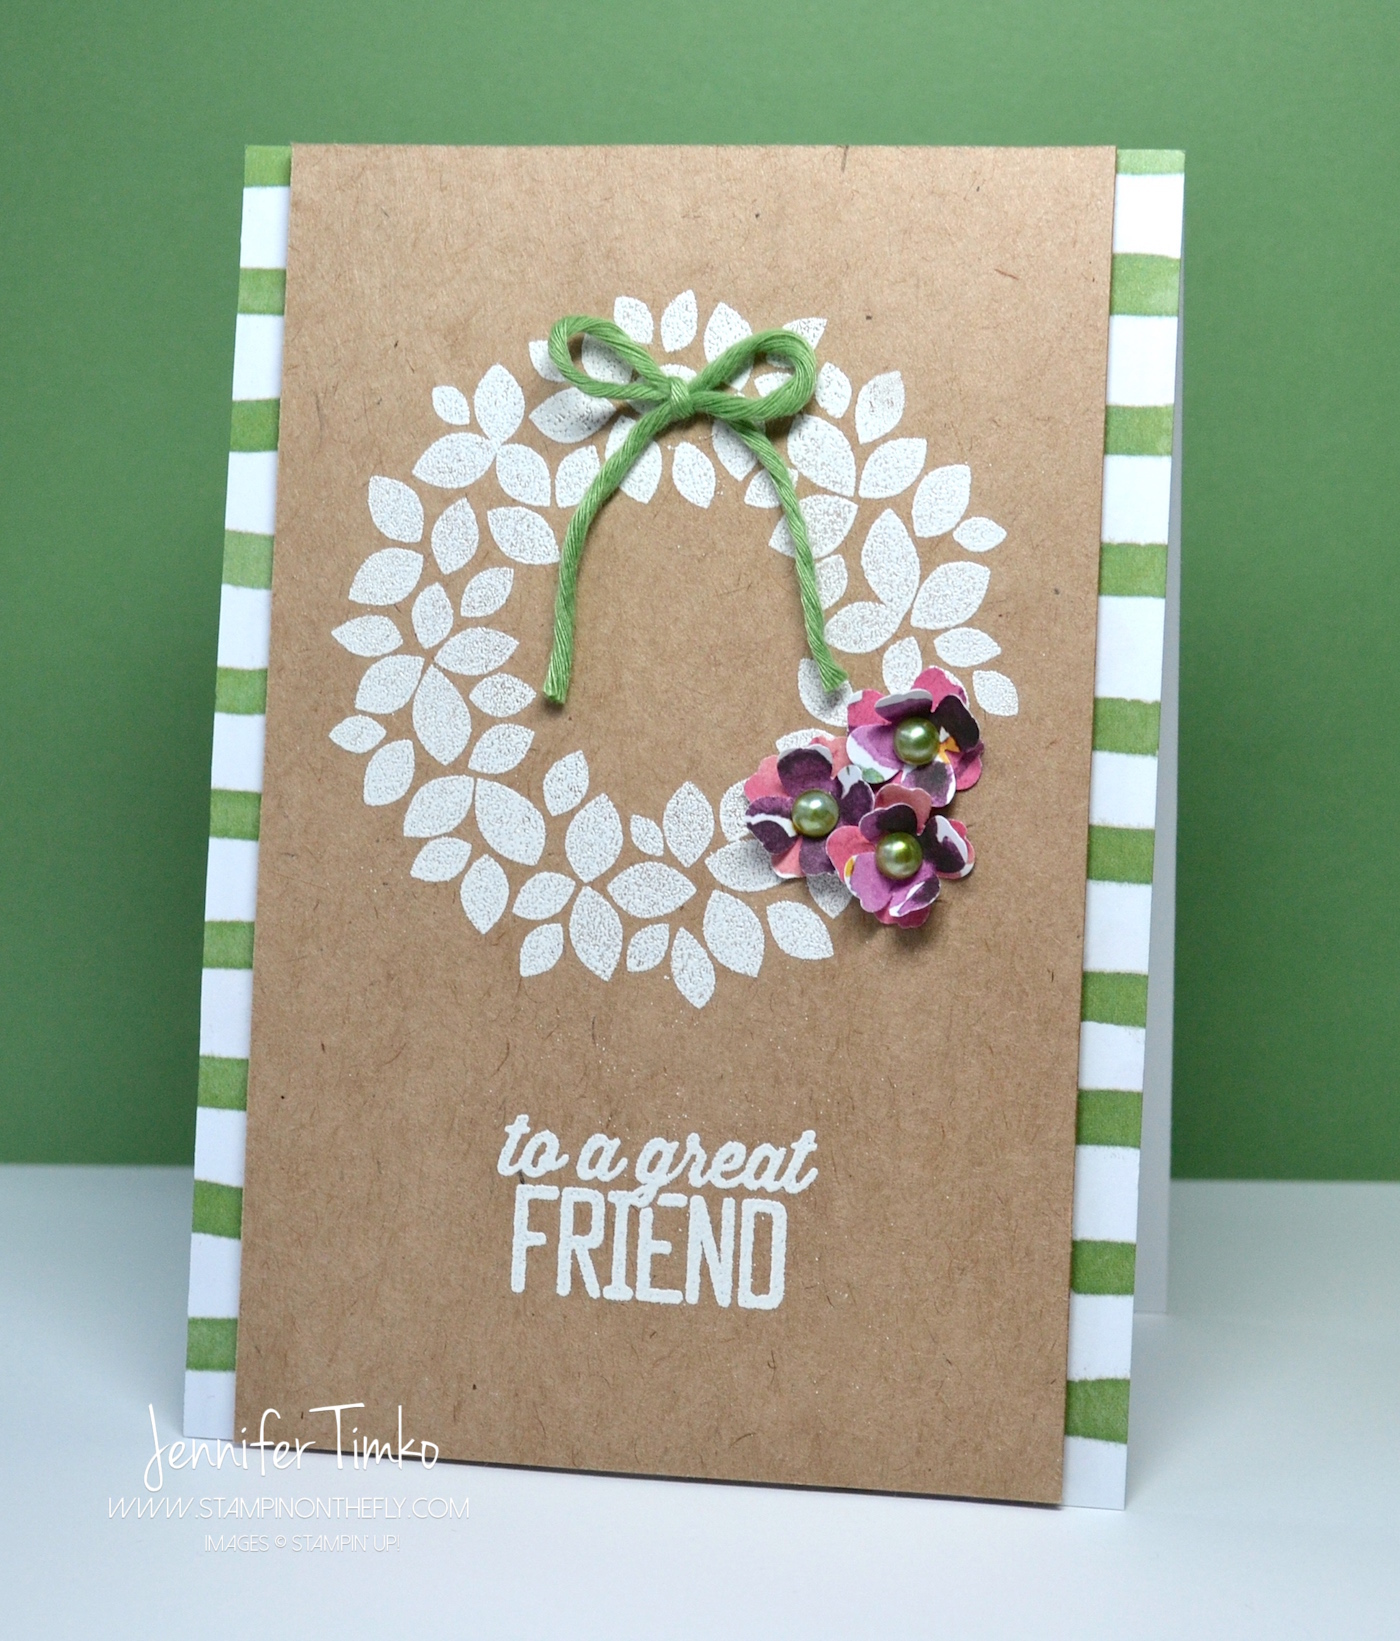
I am so excited to be a part of this amazing group of Stampin’ Up demonstrators! If you haven’t heard of “The Crew” yet, you are going to be so thrilled with this. We are here to show you the versatility of one stamp set every time we hop (the 1st and 3rd Monday of each month). We have a whole team of people and different stampers participate each time. Like you, we look to find ways to maximize our investments and the single focus on one set allows you to see all the possibilities! This week, our featured stamp is Wondrous Wreath. Let me repeat that…Wondrous Wreath. Yes, the one from the Holiday Catalog! Did you know it is on the Returning Favorites List in the Occasions Catalog? Good news if you missed it before in all the holiday madness!
If you just came over from the lovely Yapha Mason, I’m so glad you are here! If you want to see everyone who is hopping or if you get lost along the way, just click over to The Stamp Review Crew blog.
The best part about this stamp is the versatility! It is not just for Christmas, that is for sure! Just look at this adorable spring wreath and you can start to see how many variations you can make. I stamped the wreath in Whisper White Craft Ink and embossed it with White Stampin’ Emboss Powder. I added a sentiment from the Sale-a-bration set Simply Wonderful in the same way. Then using the Painted Blooms DSP suite, I added the embellishments. The Kraft card stock is cut to 3-1/2″ x 5-1/2″ and the striped DSP in the background is cut to 4″ x 5-1/2″. That allows a practical cutting pattern for the 12″ x 12″ DSP and you can get 6 of these from one sheet. Love that! I punched the little flowers out of some scraps of a flower print from the DSP (like the arrow from last week’s FMS card) and doubled them up for these cute add-ons. The Wild Wasabi twine is from the Painted Blooms Cotton Twine Pack and I colored the pearls to match with Blendabilities. Just take the middle green from the Old Olive blendies and color first. Then go back over the pearl with a touch of the darkest marker from the Soft Sky blendies pack. You can custom blend with these!! Oh how I adore this feature! The striped DSP is attached to a white base then the Kraft layer is up on Dimensionals. I attached the bow and the flowers using Crystal Effects as glue. Super secure and dries fast! Perfect for people like me with no patience!
I hope you like today’s card. Like you, I can’t wait to see all that the others have for inspiration! Hop on over to Rochelle Blok to continue on your way around. So glad you dropped in today. See you again soon!
Click HERE to purchase these wonderful Stampin’ Up products!
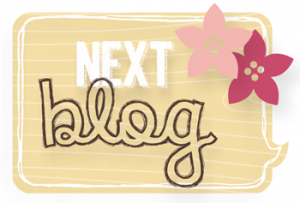
I had the privilege of going to a wonderful gathering of Stampin’ Up demonstrators last Saturday and wow was it fun! My friend Rose-Ellen Eastman puts on an event that mimics the style of Stampin’ Up corporate events and it is always a treat to go! She puts in a lot of work to make it happen. This time I offered to help by creating a Make-n-Take. Everyone seemed to like it and I hope you will too. I also got to make other designers’ projects as make-n-takes and thought it would be fun to share!
My card shows how easy it is to incorporate stencils into a cute design. I just love these little hearts from the Hearts and Stars Mask set. I sponged on Soft Sky ink with a sponge dauber. Then I punched a piece of the heart print from the Fancy Foil vellum and a piece of Soft Sky card stock using the Note Tag Punch. I tied the Painted Blooms Twine onto a Mini Metallic Clothespin and cinched the two tags together. The sentiment comes from the FREE Sale-a-bration set Simply Wonderful. How do you get that set?? Easy. Order the stuff used to make this card and you’ll have gifts that keep on giving in your craft stash. AND you’ll get to choose the free stamp.
Note Tag Punch
Painted Blooms Twine
Fancy Foil Vellum (Silver)
Hearts & Stars Mask
Mini Metallic Clothespins
Sponge Daubers
Stampin’ Dimensionals
All this together comes to $50.65 and then you just choose the stamp set for free. And all of these products can be used to make loads of other things!! AWESOME!
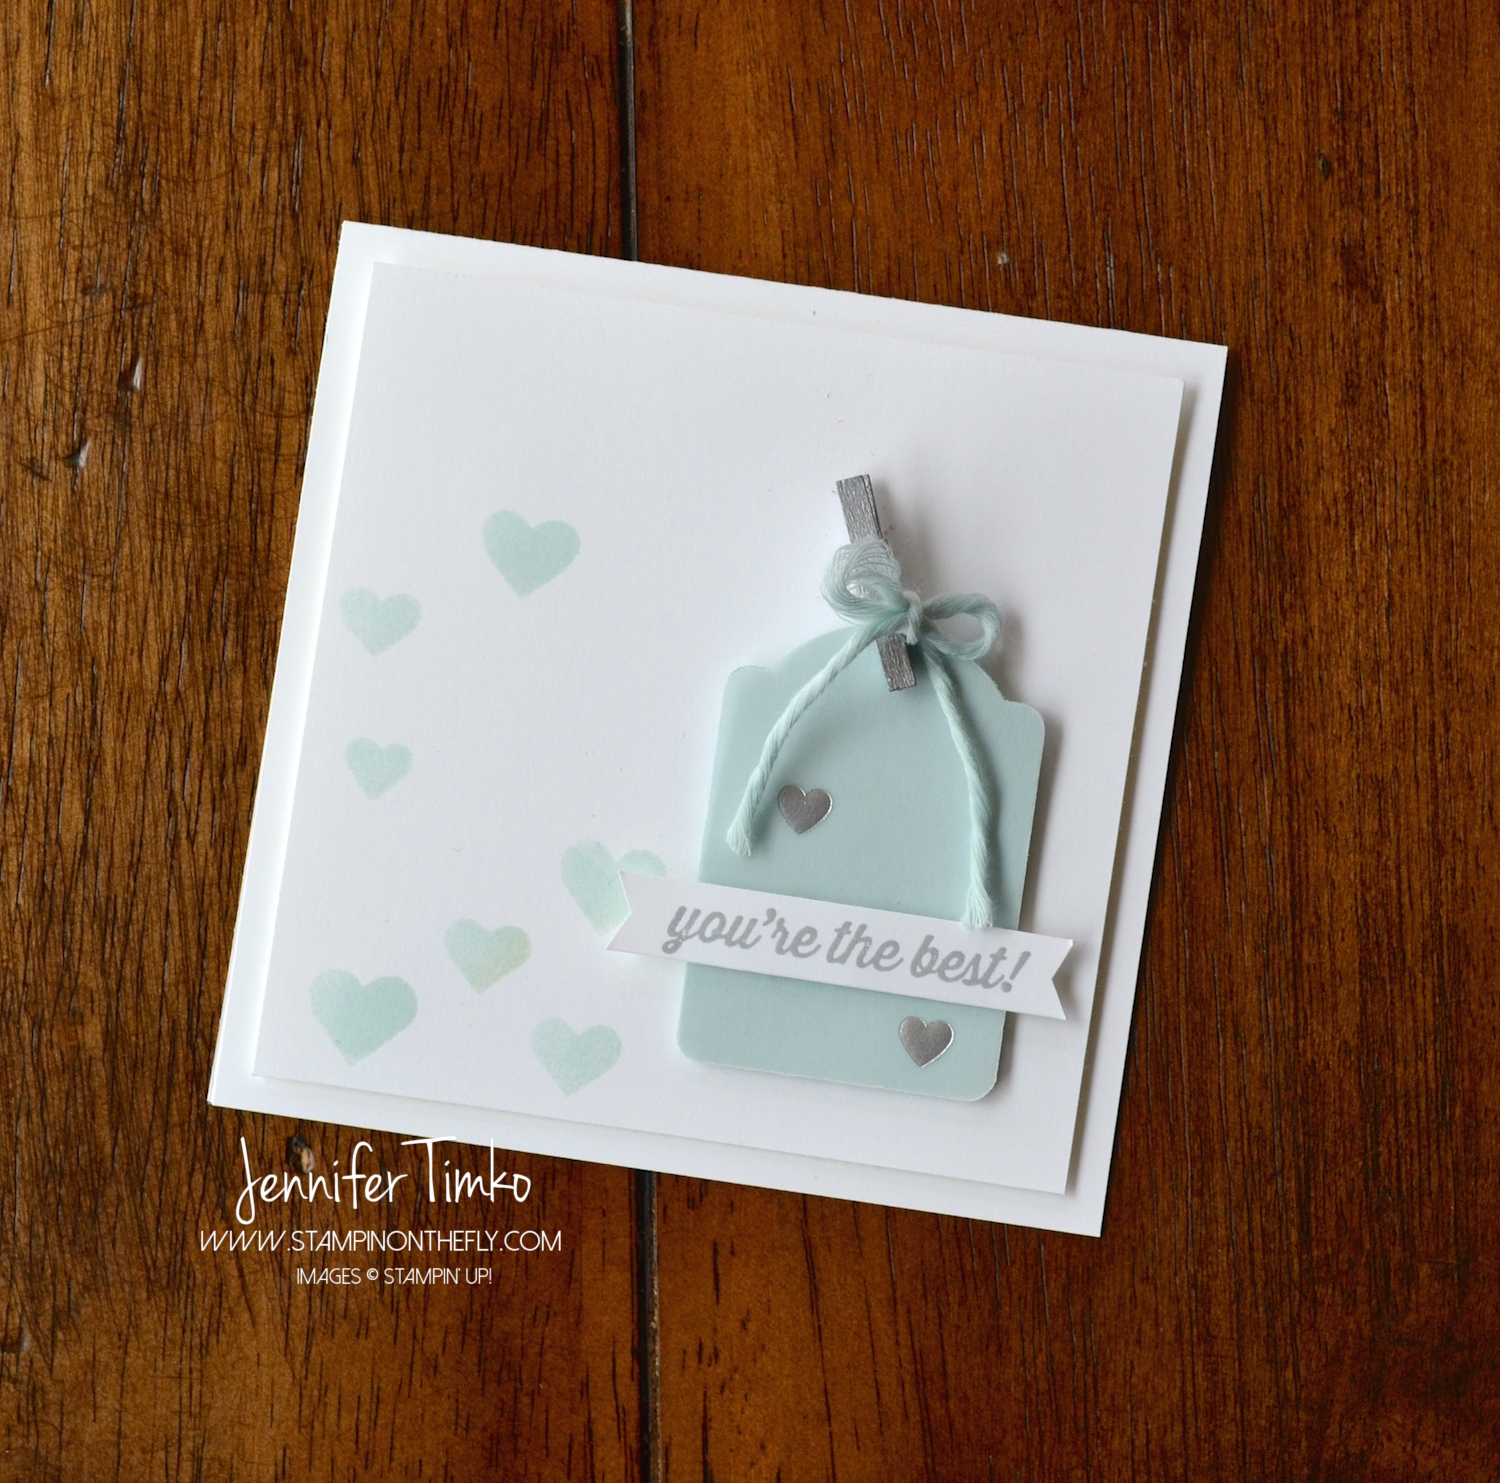
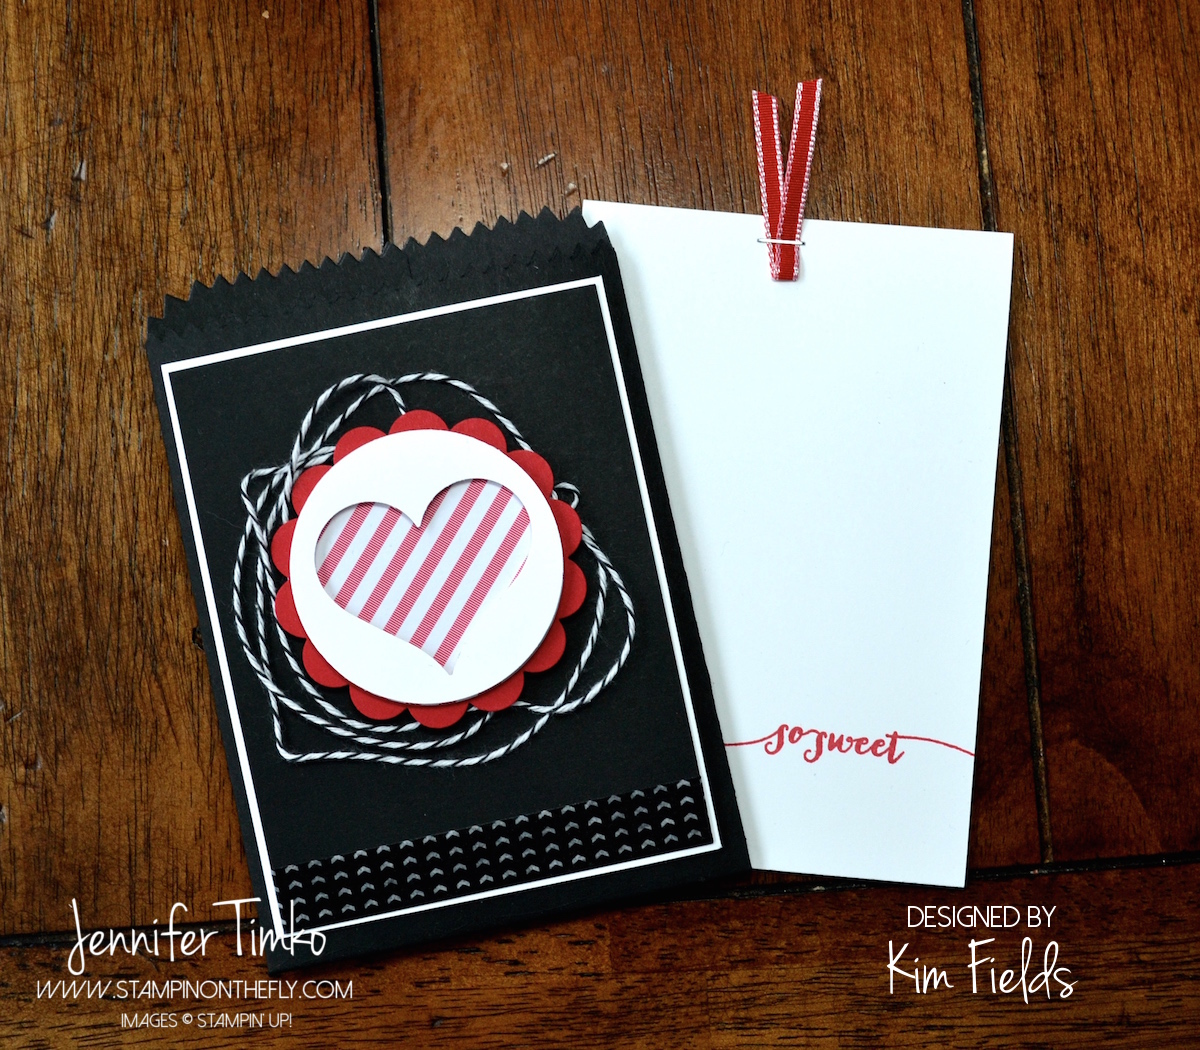
One of the best things about demonstrator events is that we, of course, just have to make things while we are together. This adorable little valentine treat bag was designed by the very talented Kim Fields for all of us to make. I was privileged enough to see her original design. Do to time constraints the twine was left off the project for the event (we made tons of stuff) but I could not resist adding it. So I brought my bag home and finished it here so that I could copy Kim’s version completely. Is this not totally fantastic??!!
Our hostess Rose-Ellen really outdid herself with other projects and I just had to show you another favorite. This adorable little lollipop holder was designed by her for us to make based on a project she saw at Leadership. What was that?? Yes, you DO still have time to make a few of these before the 14th!!
I hope these were worth the wait! If you have any questions about any of the projects, just drop me a note and I’ll be happy to get you the info. Want to participate in events like this one?? I’d love for you to join my team! Send me an email or simply click on the tab at the top for more info. Sale-A-Bration is such a great time to join and I’d love to have you take advantage of all the perks being a demonstrator can give!!
I’m so glad you stopped in today to visit. I’m working on a project for a blog hop next week and I can’t wait to show you. Until then, have a great day!
Click HERE to purchase these wonderful Stampin’ Up products!
Stamps: Simply Wonderful (SAB), Hello Life, Hey Valentine; Paper: Whisper White, Fancy Foil Silver Vellum, Stacked with Love DSP Pack, Basic Black, Real Red; Ink: Soft Sky, Momento Black, Blendabilities – Coastal Cabana, Real Red, Pumpkin Pie; Accessories: Note Tag Punch, Mini Metallic Clothespins, Painted Petals Twine, Hearts and Stars Mask, Sponge Daubers, Big Shot, Mini Gift Bag Thinlit, 2″ Circle Punch, Scalloped Circle Punch, Heart Punch, Black Baker’s Twine, Stacked with Love Washi Tape, Scalloped Tag Punch, Happy Heart Embossing Folder, 1/8″ Real Red Taffeta Ribbon
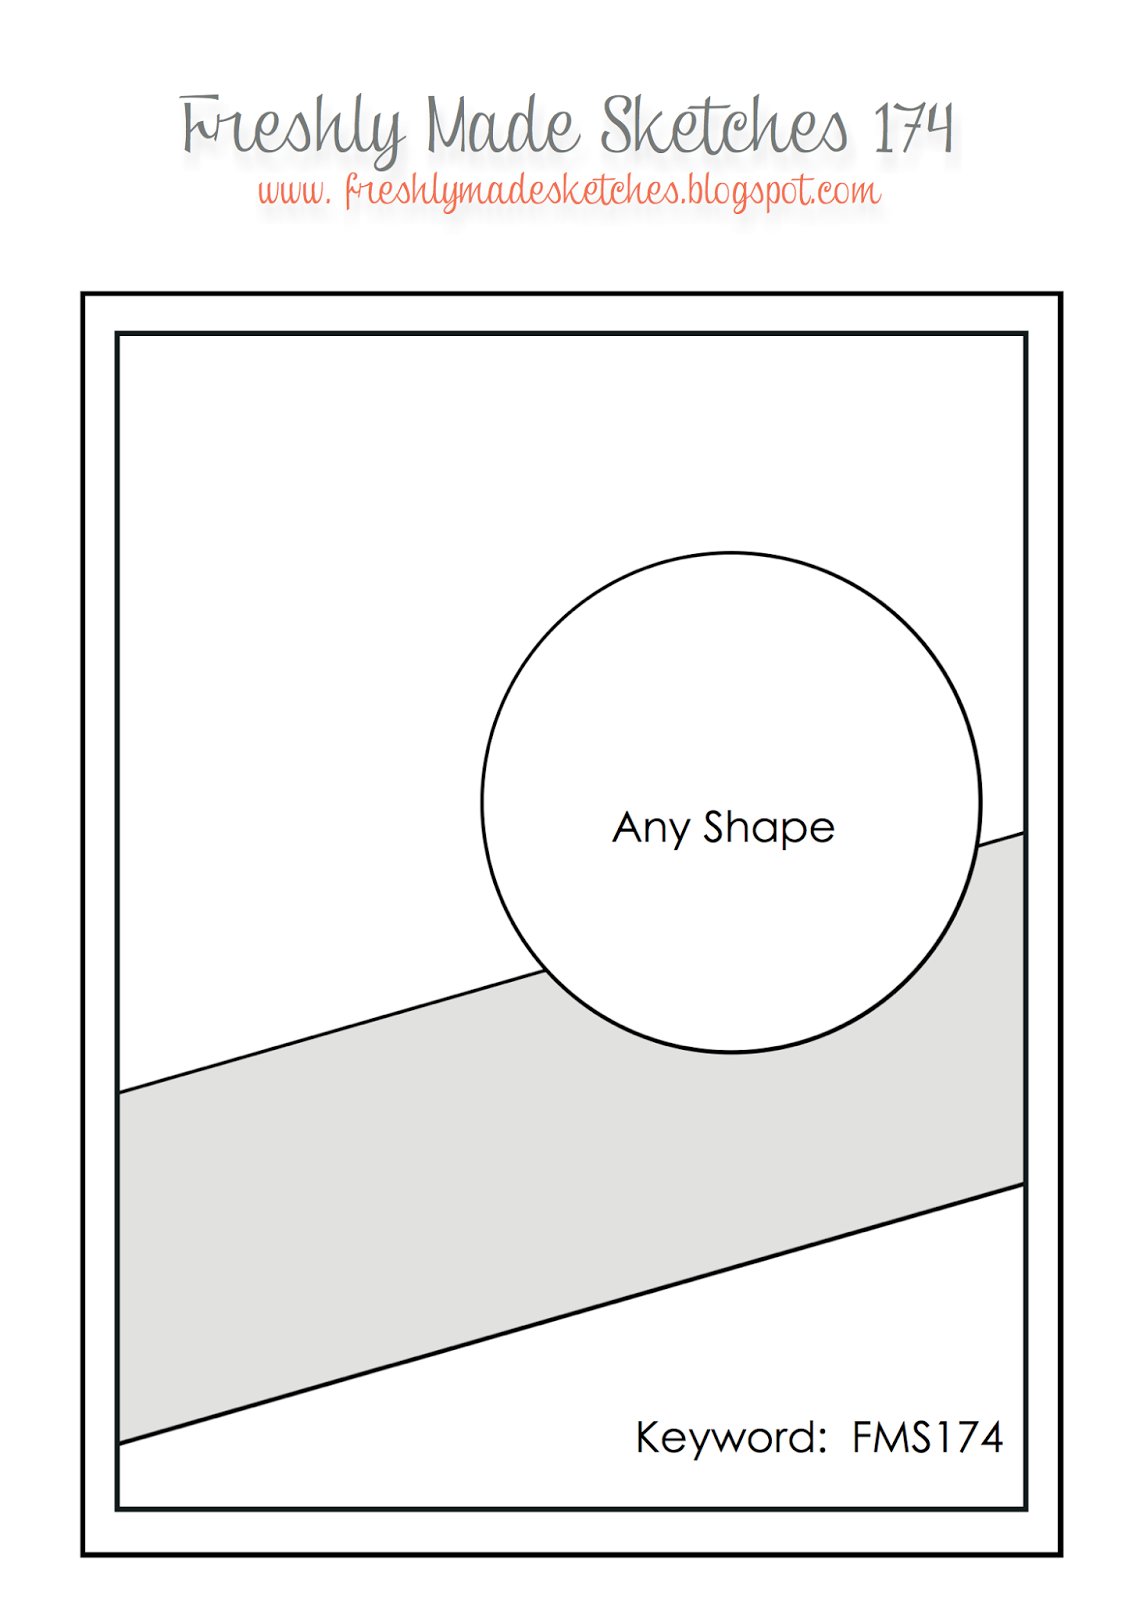
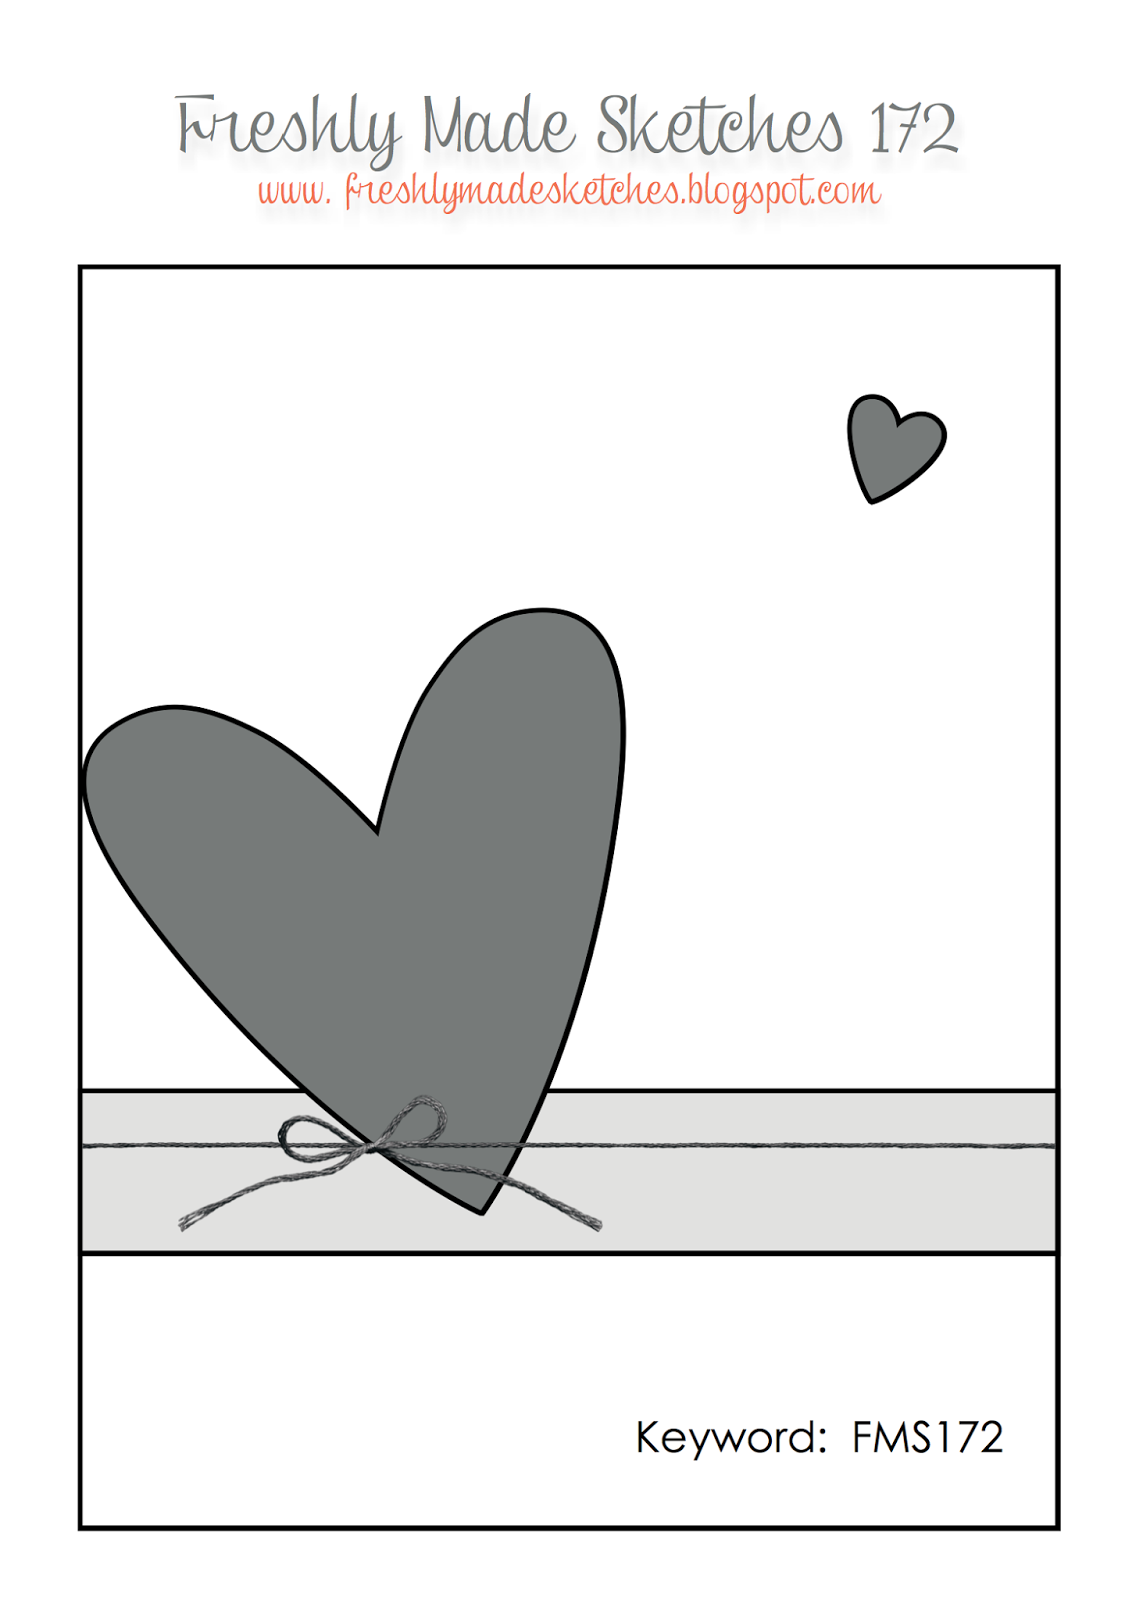
So a funny thing happened on the way to this week’s sketch. Like many design teams, our Freshly Made Sketches team has a separate blog where we can upload sketches and challenges cards early in order to make the weekly challenge happen. Kind of the magic behind of the scenes. The team loads in their latest sketches and I convert them to final form in My Digital Studio. Well, when Kim Singdahlsen uploaded her sketch, I got to work on getting it drawn. After I got everything done and loaded on the DT page, I looked at the sketch and it was crooked. Surely, I thought, I hadn’t mistakenly hit rotate?? Seriously?? So I went back to the sketch and no, I hadn’t. I pulled out a real straight edge and held it to my screen and yep, it is straight. So apparently Kim is so creative that she can not only concoct great sketches, she can invent optical illusions!!! We all know she is a card making genius and now we just know that she is a multi-faceted genius!
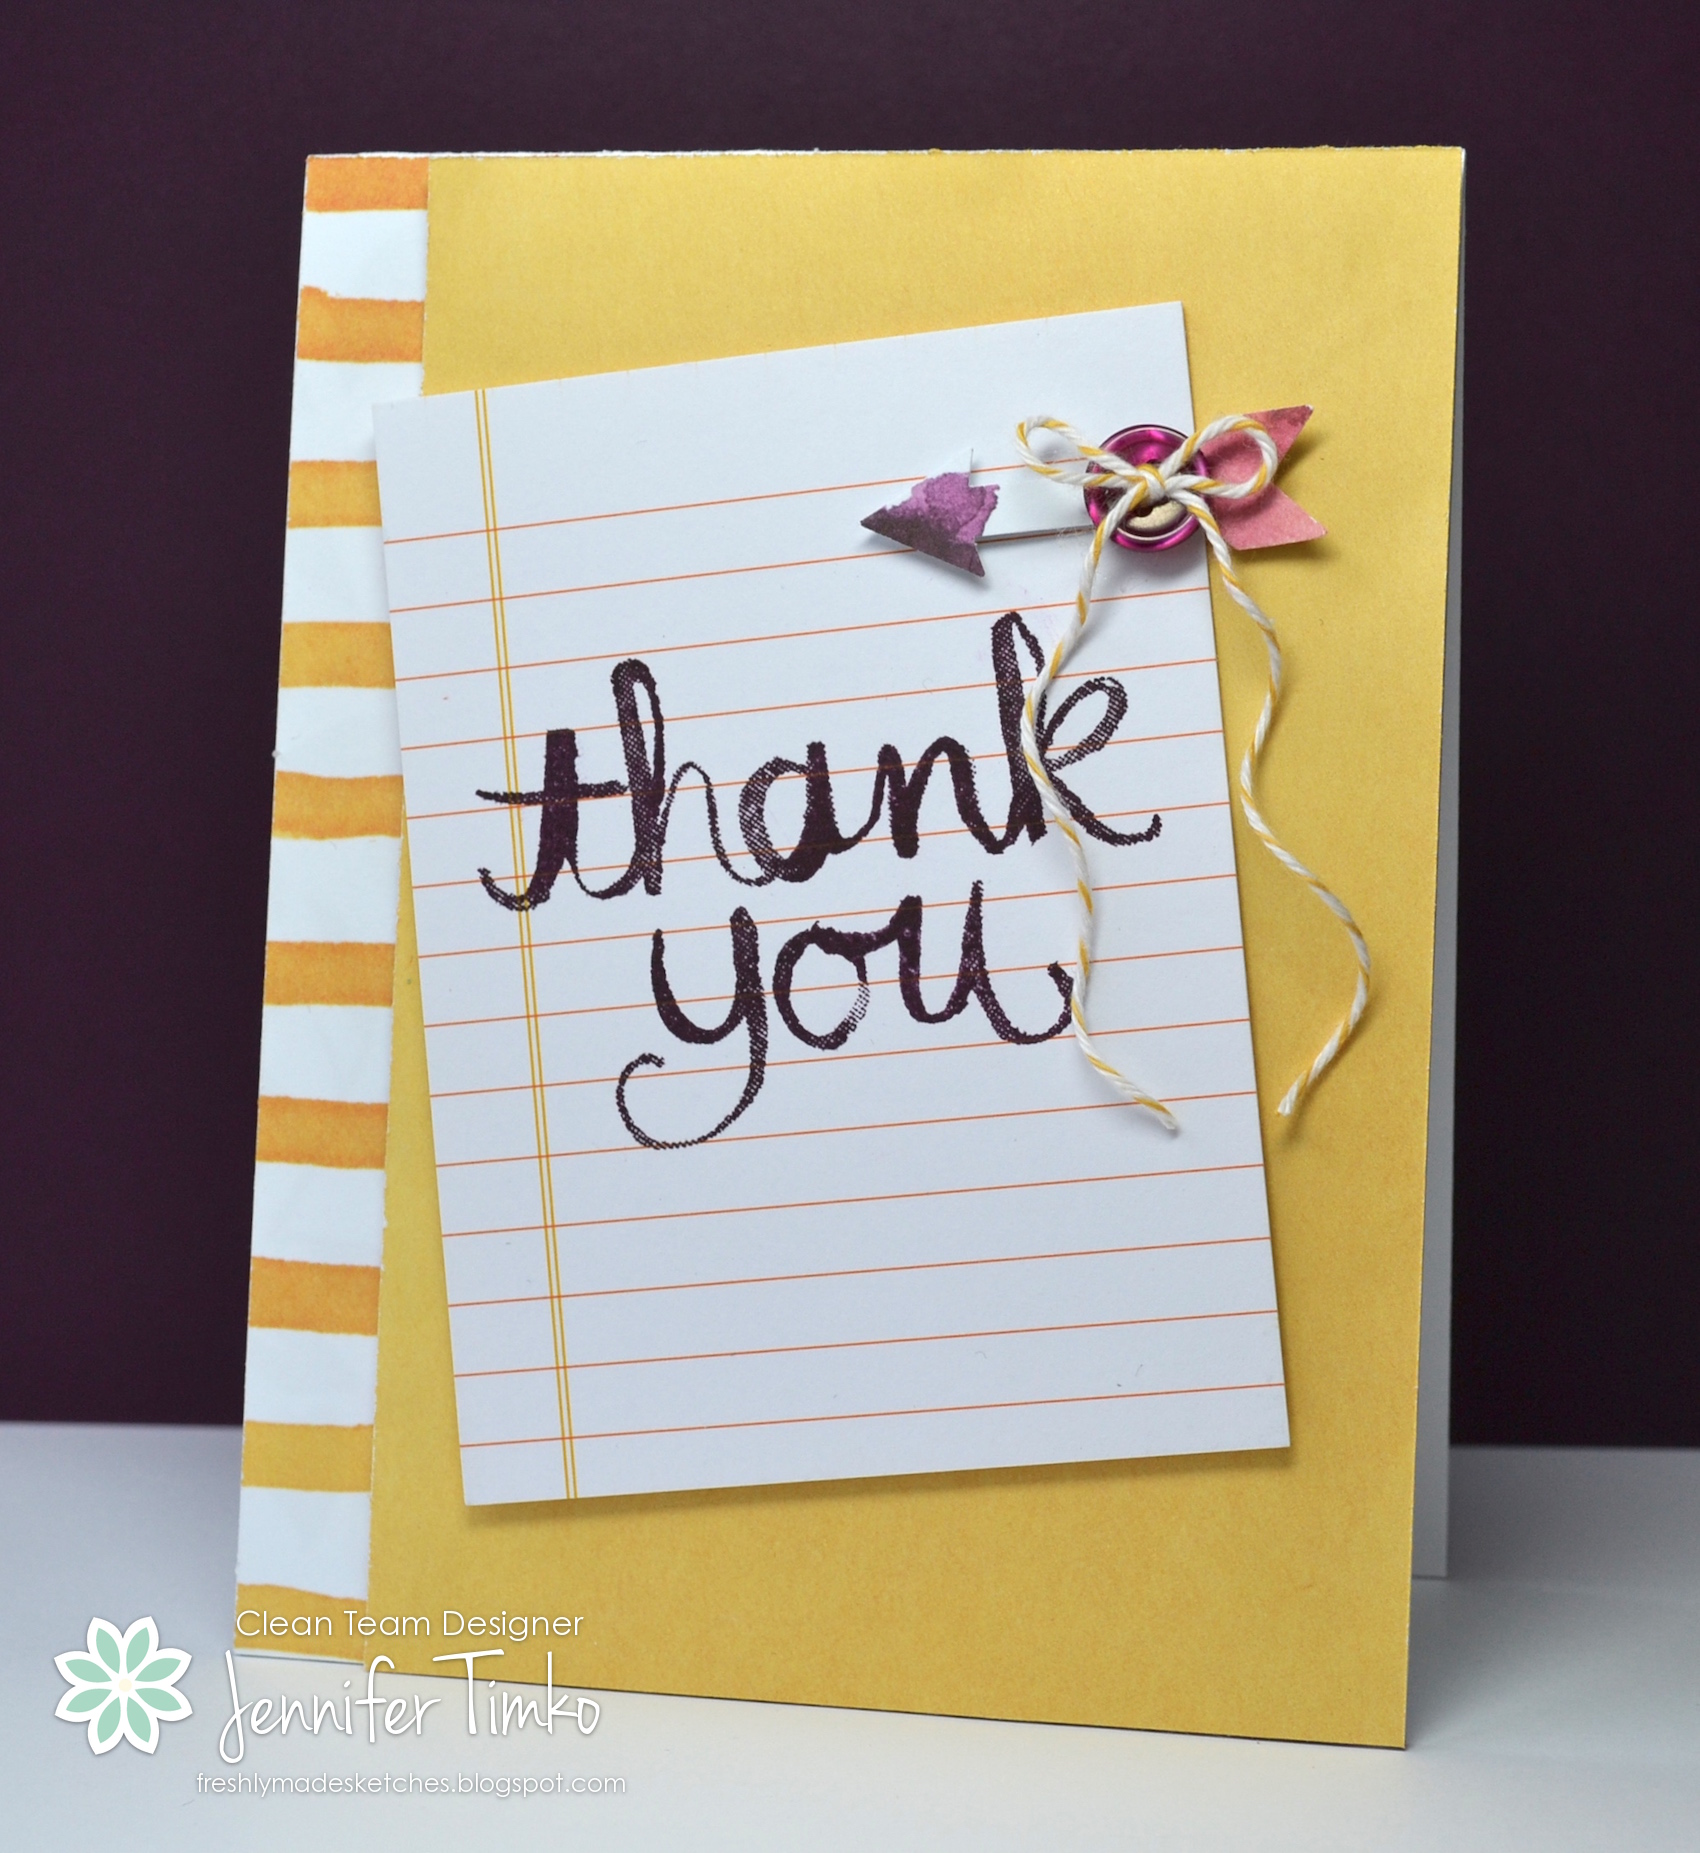
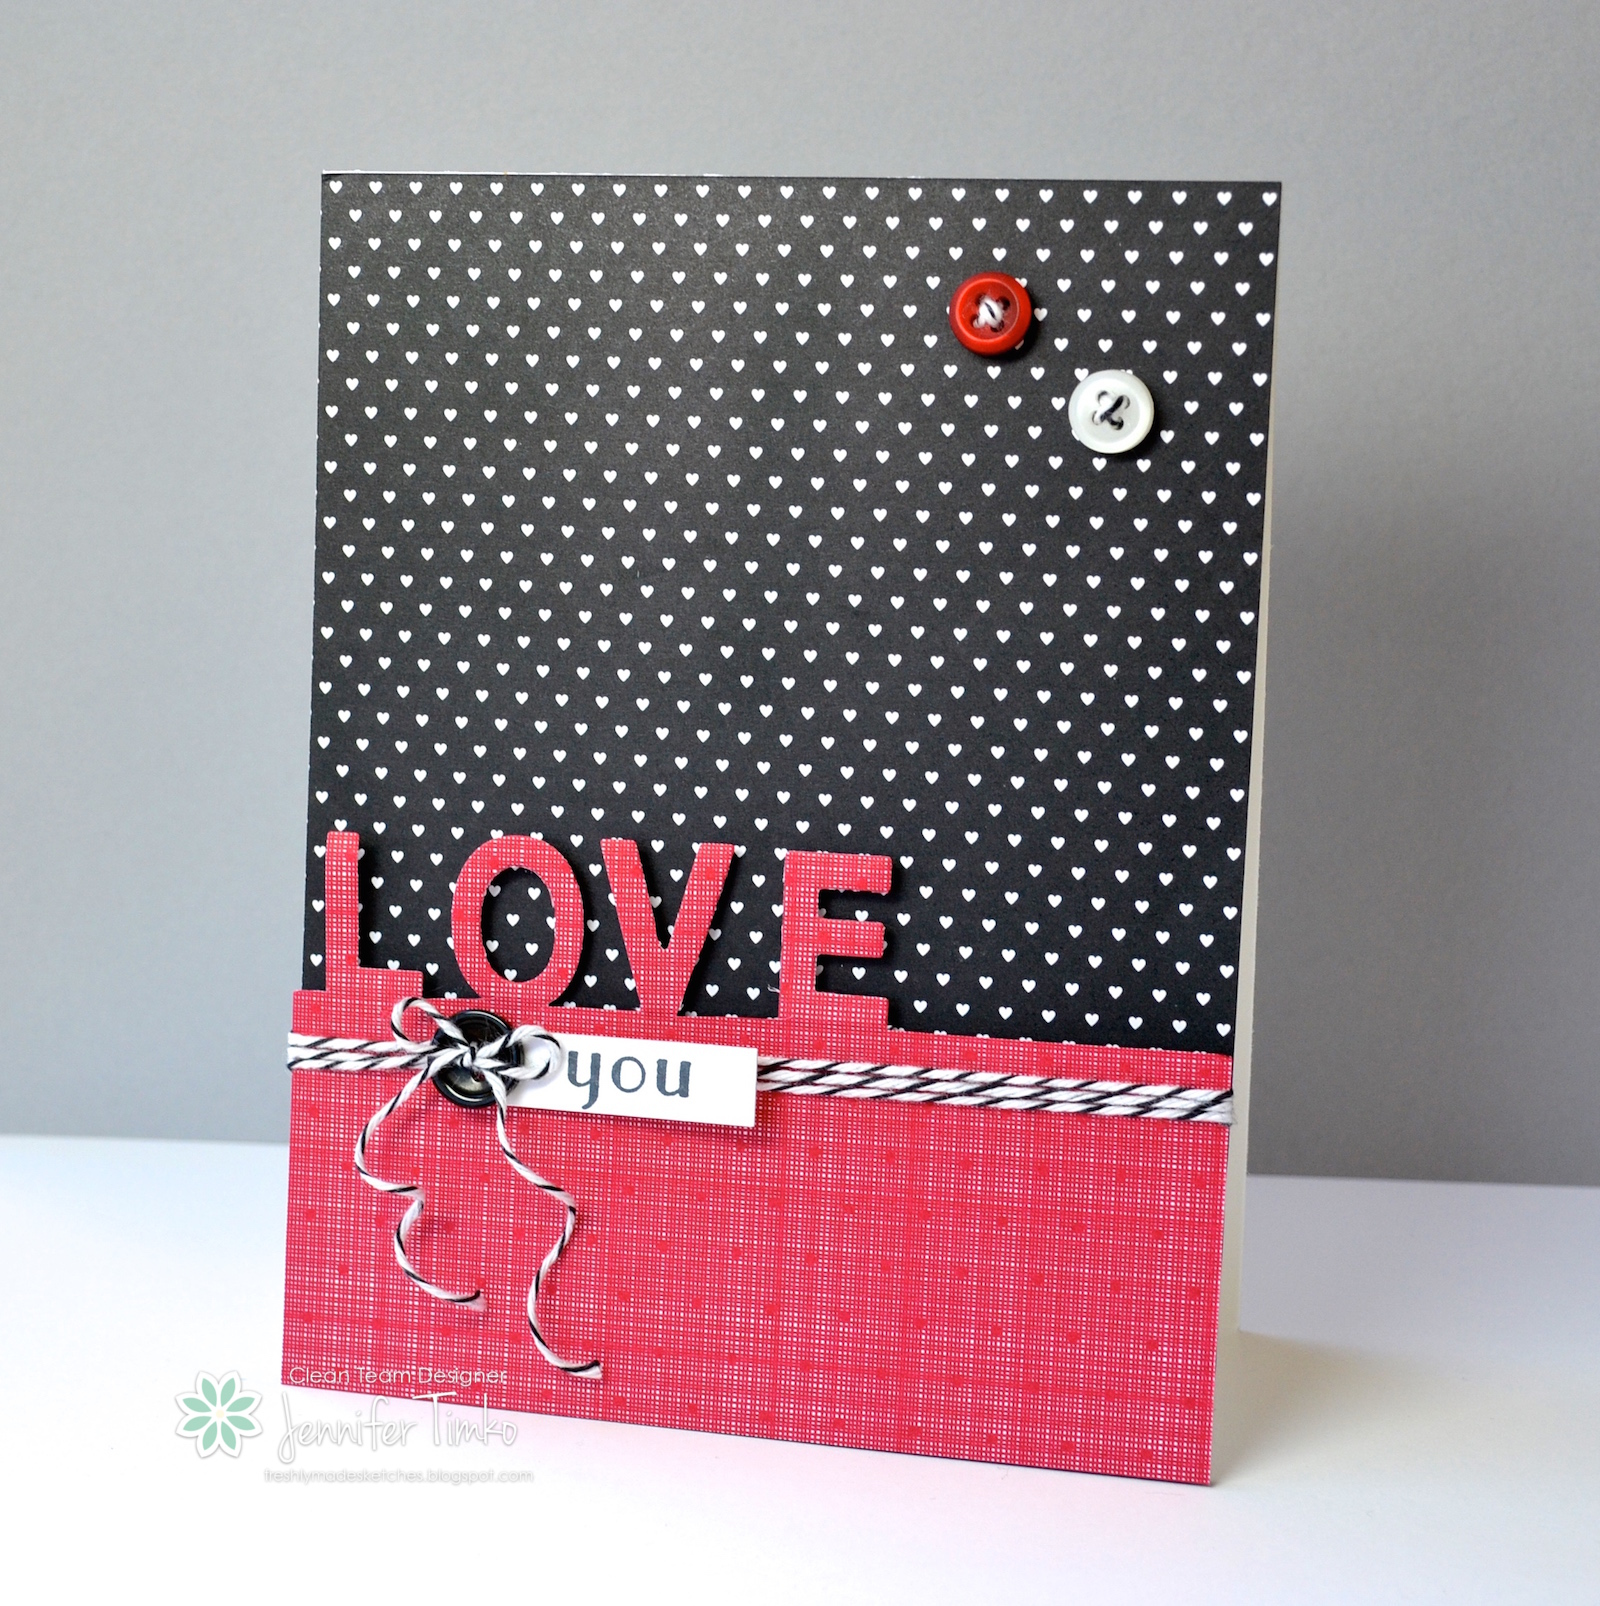
I started my card with the awesome new Painted Blooms DSP. Both the stripe print and the Daffodil Delight background paper are from that pack. Aren’t they pretty?! I love the ombre variation in the stripes! I decided to pair it up with a card out of the Project Life Everyday Adventure Kit. That awesome little notebook paper print goes perfectly with the DSP and I didn’t have to cut a thing. I stamped on the Watercolor Thank You stamp (a single) in Blackberry Bliss. Then I added an arrow punched with the What’s Up Punch out of a flower print from the Painted Blooms DSP. A Razzleberry button tied with Crushed Curry Baker’s Twine to finish. I just love the look of this card….clean but with a sense of fun.
And here is our funny optical illusion sketch for the week. I was relieved that the card itself didn’t take on the illusion of the sketch illustration!! Ok, you KNOW you want to check it yourself. Go ahead. The outside rectangle is straight, I promise!!
The team has some fun inspiration for you and I think you are going to have a ball with this one….again. I have to say (with only a little too much of a bragging voice) that the team has been on fire with the sketches lately! And the gallery has been incredible as a result. I am grateful for all the cool stuff I get to see every week as I see what you share.
Ok….so I have my make and take AND some cool samples from the Northern Virginia Regional Event I went to last week. I finally got some pictures and have them edited so I really will have them up tomorrow. Life just got away from me over the last couple of days and I could not seem to get the posts up. But I did teach some awesome kids in 6th grade about the Women’s Airforce Service Pilots and did some other stuff for my boys. Like working on Valentine’s! I hope your week is going well and I look forward to having you stop in again tomorrow. Until then, have a great day!
Click HERE to purchase these wonderful Stampin’ Up products!
A quick and fun card for you today! This was a card for my husband’s birthday last week. Shaker cards are so great because they have an extra element of interest without being all “girly”. While I love a girly card for sure, around my house I have a need for cards that skew to the masculine side. I think this one hit the mark!
I used the Stacked with Love DSP Stack again. Love these prints! Again, interesting but not too feminine. I cut the frame out with the On Film Framelits and then cut a matching size out of the Window Sheets to fill the square. I stamped the sentiment from Fabulous Four in Stazon Black Ink. A little Black Baker’s Twine, a Cherry Cobbler Button and a fun bow (just like the one in my video tutorial from Wednesday). Then I added some leftover white sequins from my December Paper Pumpkin and attached the frame with foam tape. This is one of those cards that you could really tailor to the age and color preferences of the recipient.
Now….I’m off today to see my friend Rose-Ellen Eastman. She is hosting a Northern Virginia demonstrator event tomorrow and I can’t wait. I can’t wait enough that I’m going to go see what she is up to today. *smile* I’ll be back Sunday or Monday with one of the make and take cards from the event that I designed. Until then, I hope you have a great weekend. I appreciate you stopping in today!
Click HERE to purchase these wonderful Stampin’ Up products!
Stamp: Fabulous Four; Paper: Whisper White, Stacked with Love DSP Pack; Ink: Stazon Black; Accessories: Black Baker’s Twine, Cherry Cobbler Button, Big Shot, On Film Framelits, Sequins, Foam Tape
Well, didn’t I tell you that the sketch for this week at Freshly Made Sketches was great?! My friend Linda Callahan created this one for us and I love it. The minute she sent it to me I knew we had yet another winner on our hands. And we have so many cool variations this week from our team.
Have you ever had a technique that you’ve been wanting to try but somehow it keeps going to the back burner? That is how I felt about partial die cutting with letter thinlits. I know that there are products out there with certain words that create something like this but with this technique, you can use whatever word you want. The Little Letter Thinlit Dies are PERFECT for this one! I seem to have a bit of a theme going this week using the Stacked with Love DSP Stack. I find that crafting seems to go like that for me sometimes. I find something that works and I stick with it!! As I was starting to figure out how to explain this technique I realized it was just easier to make a video tutorial. So that is what I did!
As I said in the video, it took me a couple of tries to get the letters lined up just right so that I didn’t cut them out completely. I recommend you practice once or twice with scrap paper before going to your DSP. Having the thinnest held together with washi tape make it easy to repeat this and play with the idea. Once you get the cutting part, the rest is easy and quick.
I have another card ready to share with you on Friday that uses this great paper again. And then this weekend I’ll be going to a local demonstrator event and I’m sure I have fun things to share from there. I have helped design a card for the get-together and plan to share with you on Sunday. I seem to be getting back into the groove of stamping again and look forward to more this week. Until Friday, I hope you have a great week! Thanks for stopping in.
Click HERE to purchase these wonderful Stampin’ Up products!
Stamps: Forever Florals (sentiment); Paper: Stacked with Love DSP Stack, Whisper White; Ink: Momento Tuxedo Black; Accessories: Big Shot, Little Letters Thinlits, Black Baker’s Twine, Buttons
I told you last Wednesday that I was working on a card trying to make it fit the sketch when I just had to abandon it and try another path. Well, I loved the FMS card I made but still needed to finish the one I was fighting with. So I thought I should share it with you today! Without the constraint of the sketch, I was able to just add a simple sentiment and not worry about the extra circle element.
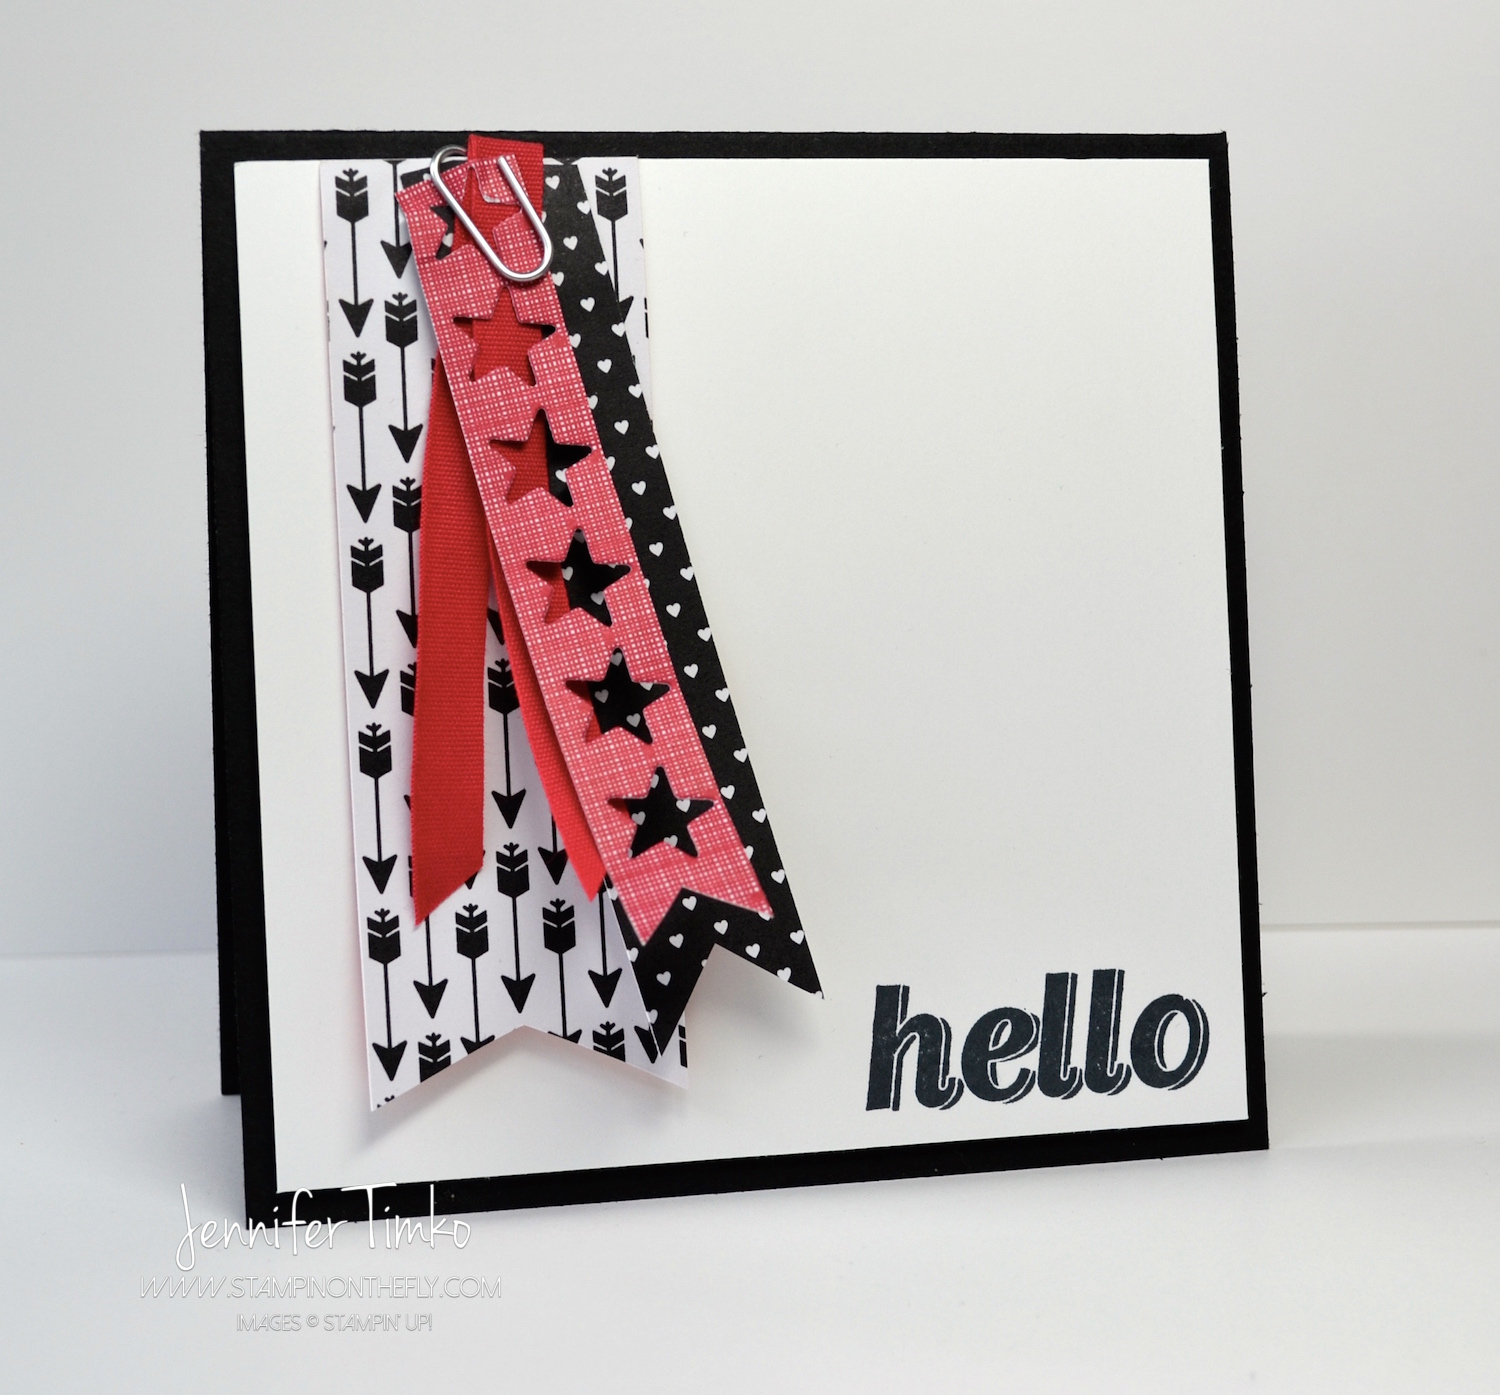
Looks like Amy O’Neill and I were on the same wavelength for the sketch using the stars from the Mini Treat Bag Thinlits on the Stacked with Love DSP pack papers. I used a little clip from the Basics Hodgepodge Clips to hold together the banners and the piece of Real Red Cotton Ribbon. The sentiment is from a retired set but seemed perfect to finish this off. Any number of current bold words could be used instead (Four You, for example)!
Quick post today. Off to the gym and then the grocery store. Yep….a big day planned. Hoping for a little stamping time too.
Back on Wednesday with the latest from Freshly Made Sketches. We have a fun sketch from Linda Callahan this week. Until then, I hope your week starts off great! Thanks for stopping in!
Click HERE to purchase these wonderful Stampin’ Up products!
Stamp: Simply Celebrate; Paper: Whisper White, Stacked with Love DSP Pack; Ink: Momento Tuxedo Black; Accessories: Real Red 1/4″ Cotton Ribbon, Basics Hodgepodge Clips, Mini Treat Bag Thinlits, Big Shot
I am so excited to share with you this month’s project with for our Fancy Friday monthly hop! If you just came over from the amazing Jeanna, welcome to the next stop. My friends and I want to be able to share with you our ideas in a monthly format. We will use different themes each month – sometimes colors, sometimes a sketch, sometimes a stamp set focus. The one thing you can count on is that it will be fancy! Over our year on the 2013 Artisan Design Team, “fancy” became our word to describe the best projects, the best new clothes, even the best pedicure colors. Now we want to share with you our take on “fancy” each month. This month our theme is “Fancy Flashback”! We are pulling some of our favorites our of retirement and showing you how they work with new products! A great stamp set is a gift that keeps on giving!
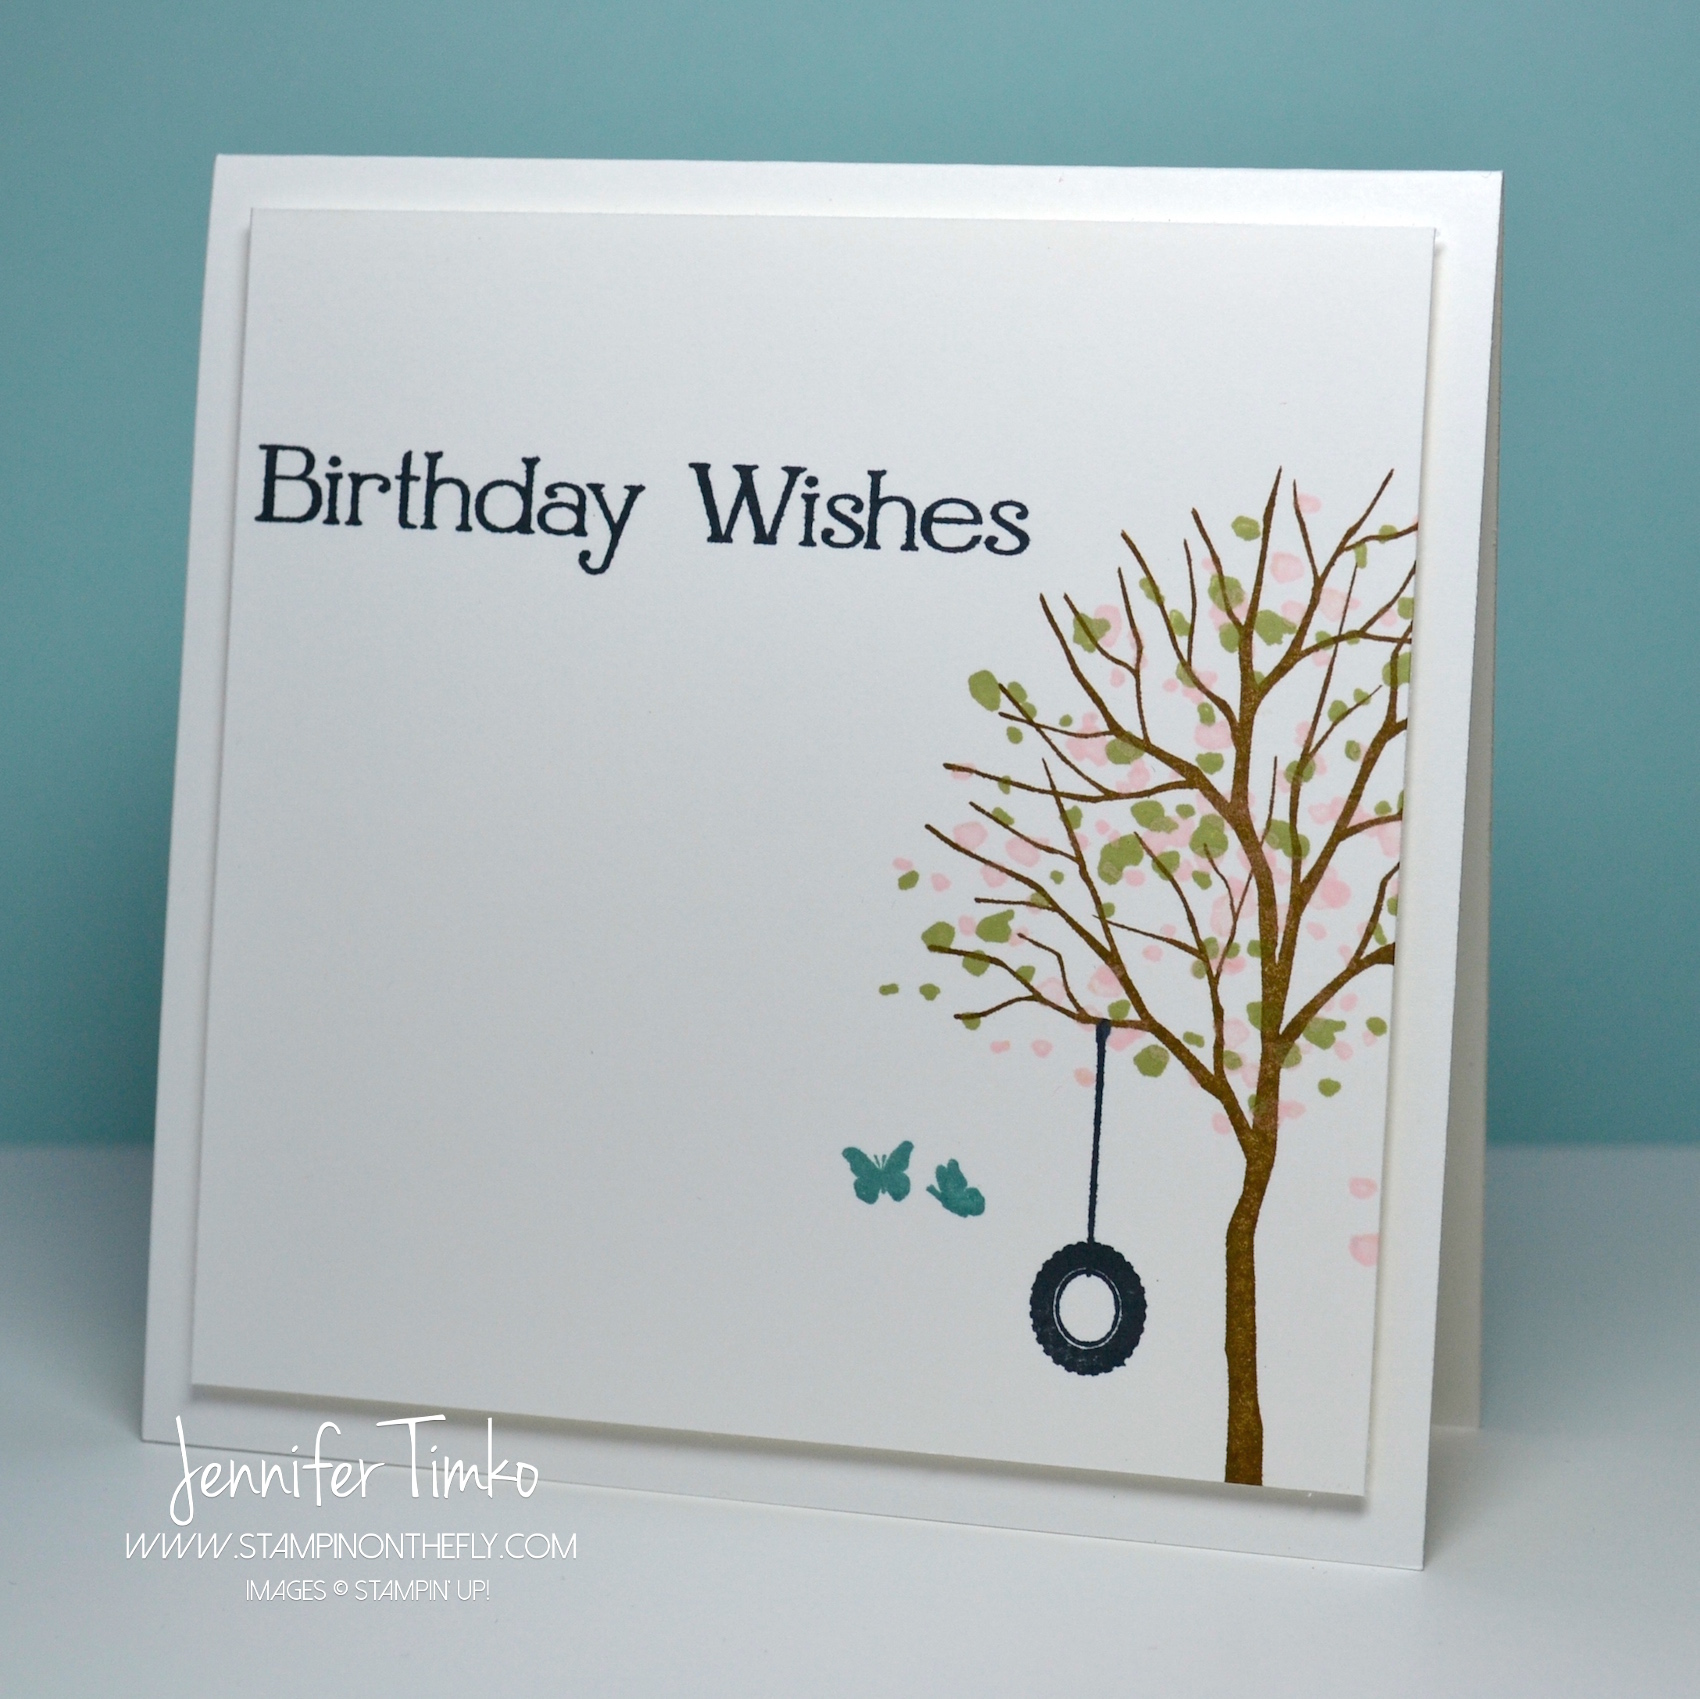
So one of my favorite stamp sets of all time is Branch Out. This is a set that can be used for almost any kind of card and never disappoints! I love it so much. And yet sadly it has languished in a stack for much too long. For those of you who shop on Ebay, you may have even seen this stamp selling for crazy prices. I wanted to see if I could make it look current and so I used it to create this super clean birthday card. All the focus is on the beautiful image!! Cards with white space are so popular now and a set like really shines. I stamped the tree in Soft Suede and then added leaves and flowers using Pear Pizzazz and Pink Pirouette. The tire swing is stamped in Momento Black (because this is the BEST black ink!) and so is the sentiment. The butterflies are Lost Lagoon and that color is really pretty with this palette. My sentiment is from a work horse set called Four You that is a must have.
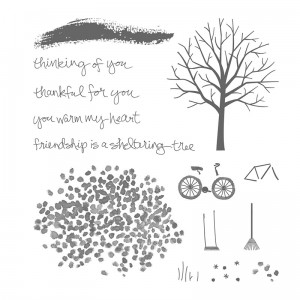
I know what you are thinking… “Great Jen, I don’t have the set and I’m not willing to spend a billion dollars to get it. What do I do?” I have a solution that you will LOVE. In the latest Occasions catalog there is a new stamp set called Sheltering Tree. Wanna see??
So it has the tree, an adorable swing, replace the butterflies with a bike and…just look at that….add a sentiment from the same set! Yeah. I know. And, NOT a billion dollars, lol! All of these together are just $24.95 US. So cool!
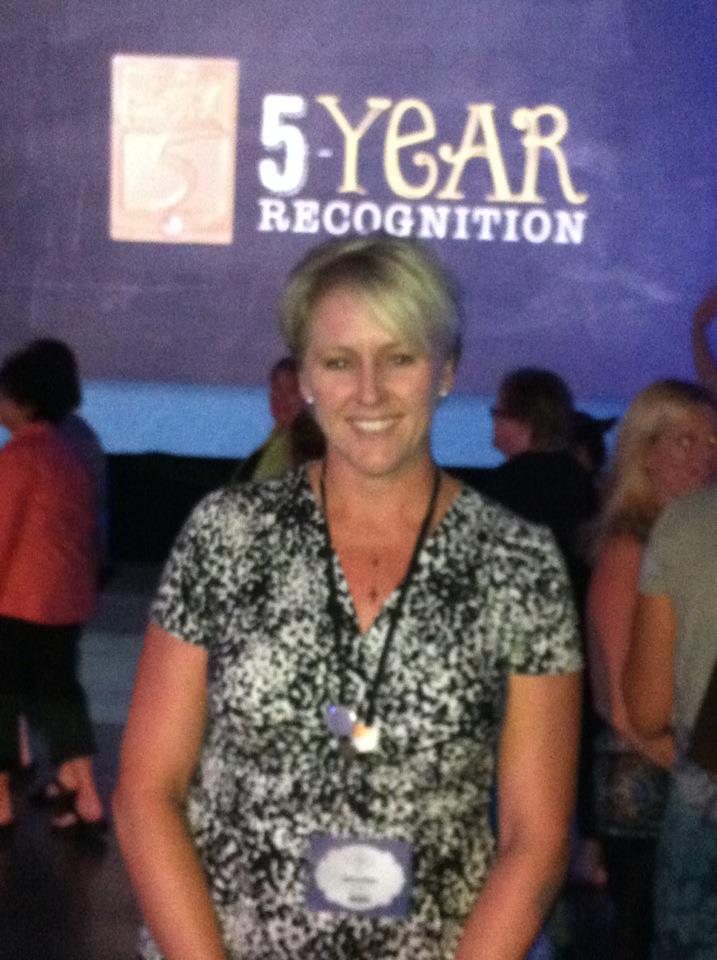
Now we are supposed to pull out a throwback picture of ourselves. Hmmm……. I thought it would be fun to show you where my journey to the Artisan Team began in earnest. This is a picture from my first Stampin’ Up Convention. It is here that I got to know my second level supervisor, Lisa Curcio. Lisa and my upline Brandi were the ones that I told first about considering entering the Artisan competition. They, along with some of my local stamping friends gave me the courage to submit my projects. I cannot even give words to how grateful I am for their support and for the many, many gifts that Stampin’ Up has brought to my life.
I have some cards all ready for you over the next few days. I’ve been getting to work in the stamp room and hoping to get back into a better routine of posting. I’m so glad you stopped by today and I look forward to seeing again soon!
Okay, off to go visit the awesome Mercedes Weber! You will be wow’d, as always!
Click HERE to purchase these wonderful Stampin’ Up products!
Stamps: Branch Out; Paper: Whisper White; Ink: Soft Suede, Pear Pizzazz, Pink Pirouette, Lost Lagoon, Momento Black
Primary Sidebar
We use cookies on our website to give you the most relevant experience by remembering your preferences and repeat visits. By clicking “Accept”, you consent to the use of ALL the cookies.
This website uses cookies to improve your experience while you navigate through the website. Out of these, the cookies that are categorized as necessary are stored on your browser as they are essential for the working of basic functionalities of the website. We also use third-party cookies that help us analyze and understand how you use this website. These cookies will be stored in your browser only with your consent. You also have the option to opt-out of these cookies. But opting out of some of these cookies may affect your browsing experience.
Necessary cookies are absolutely essential for the website to function properly. This category only includes cookies that ensures basic functionalities and security features of the website. These cookies do not store any personal information.
Any cookies that may not be particularly necessary for the website to function and is used specifically to collect user personal data via analytics, ads, other embedded contents are termed as non-necessary cookies. It is mandatory to procure user consent prior to running these cookies on your website.

 I had a tough time with the light getting a good picture before we had to leave but I think you can see the idea. It seems prettier in person though. The background splatter is from Gorgeous Grunge and is stamped in Gold Encore Ink. Then I inked the butterfly from Butterfly Basics in Blackberry Bliss. I hand cut this one out and then added on a gold metal button tied with a Vanilla Baker’s Twine that came in a Christmas card kit (these kits just keep giving). I added some Venetian Crochet Trim and Blackberry Bliss Stitched Satin Ribbon underneath the butterfly. The sentiment is from the same stamp set.