Skip to content

Freshly Made Sketches #566

Freshly Made Sketches #566 published on 4 Comments on Freshly Made Sketches #566

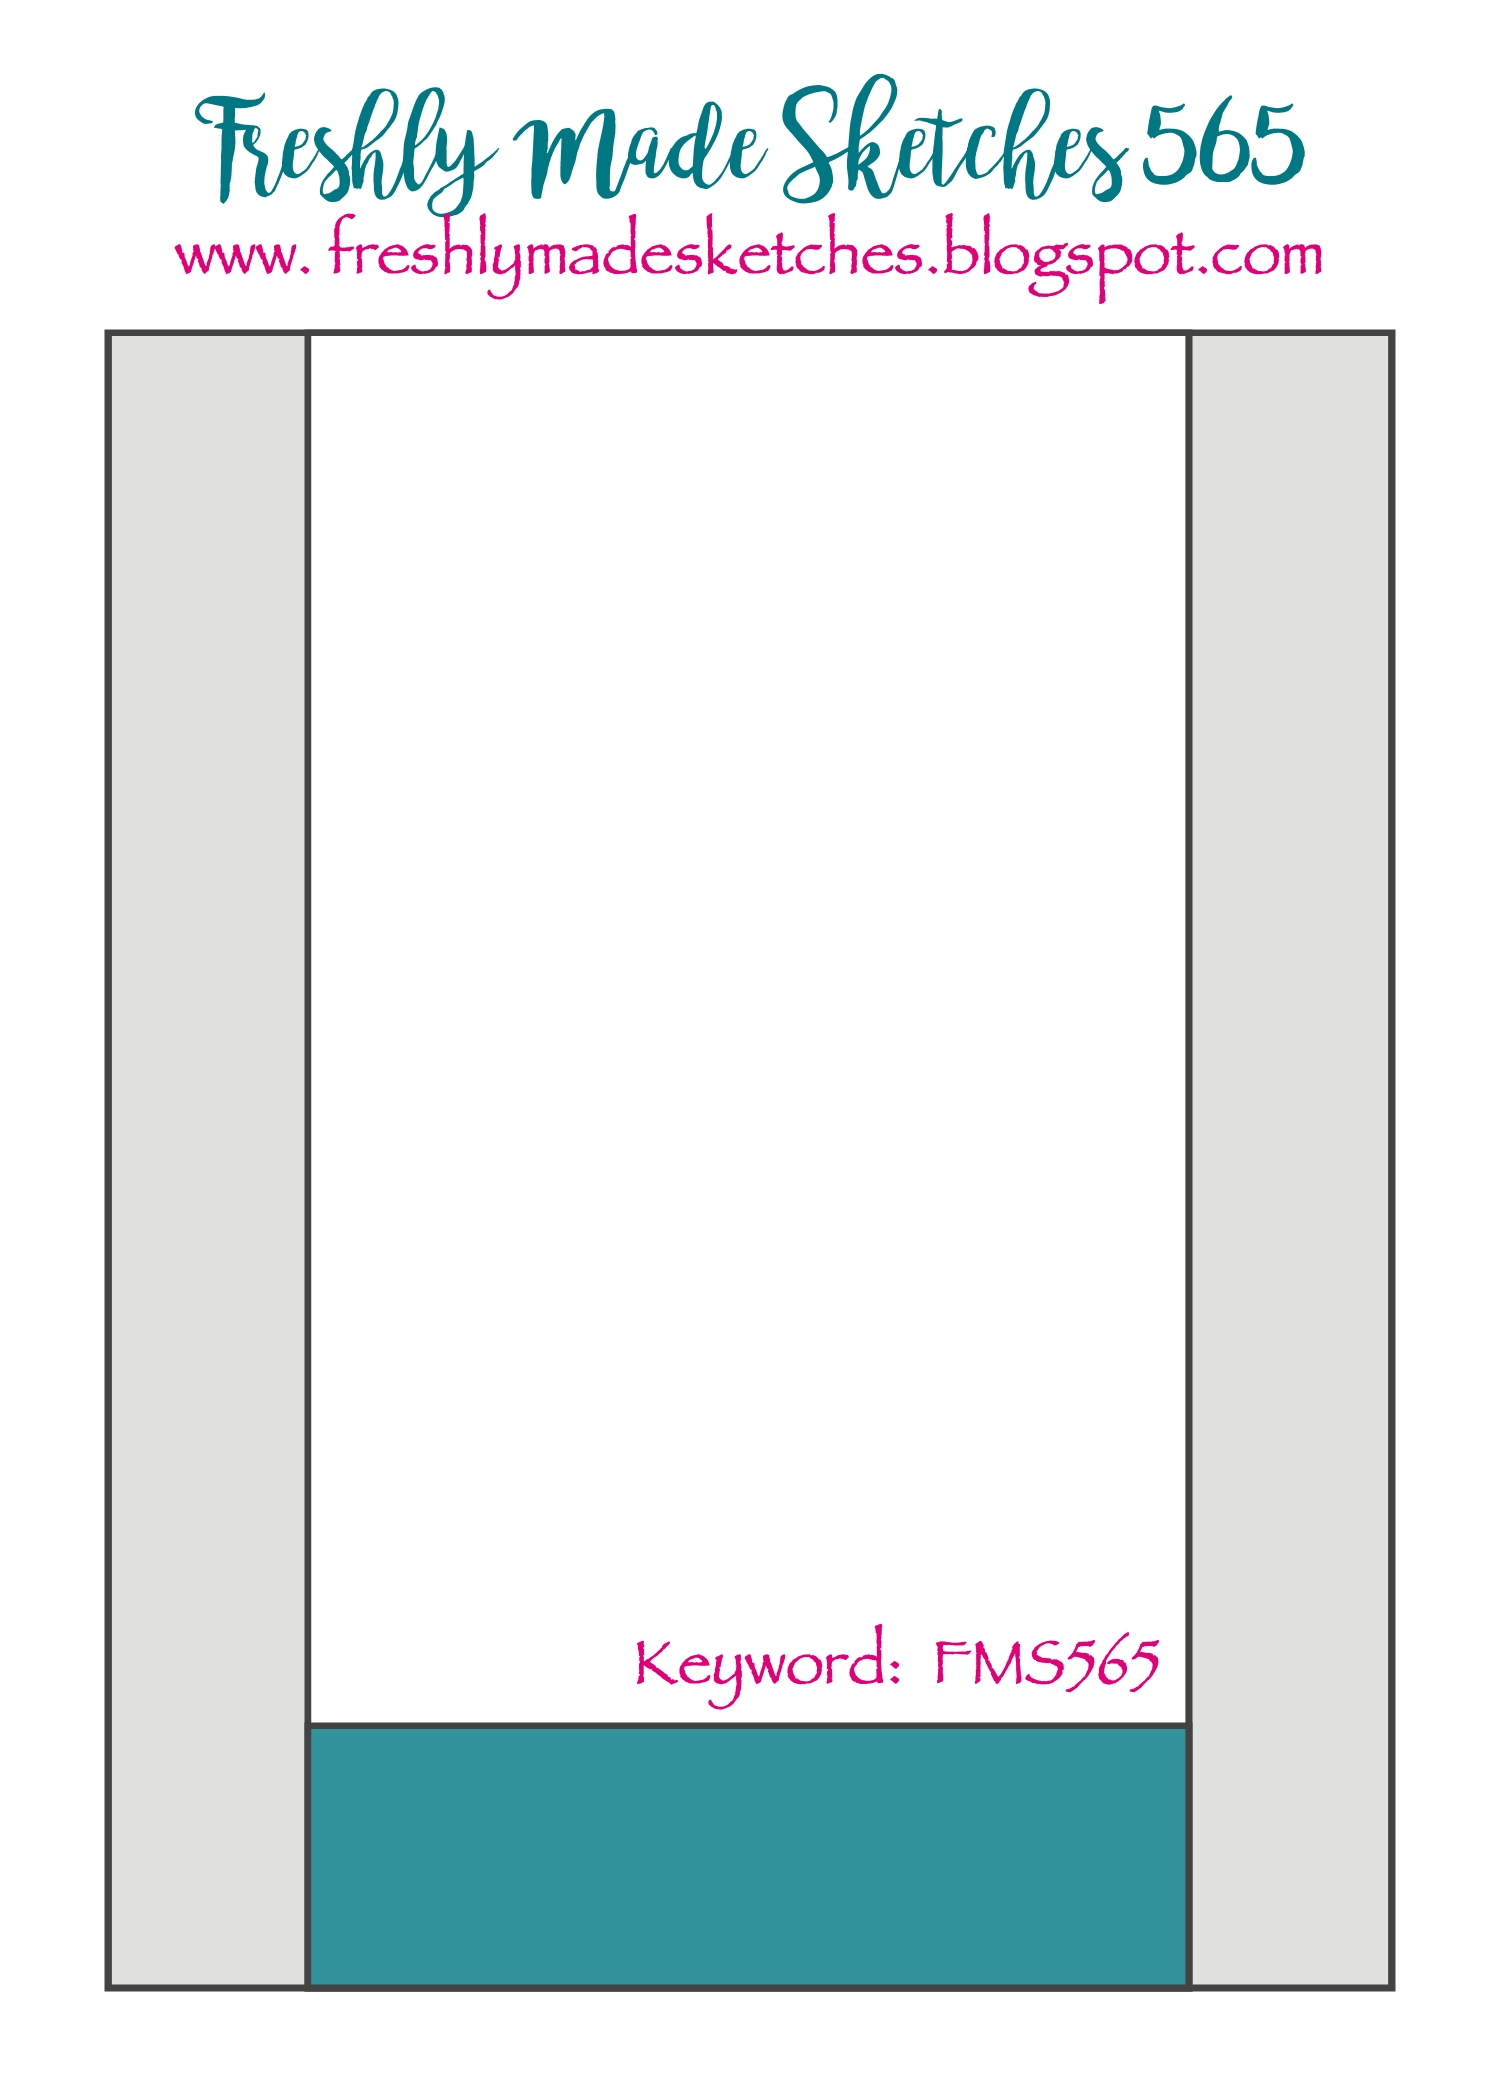
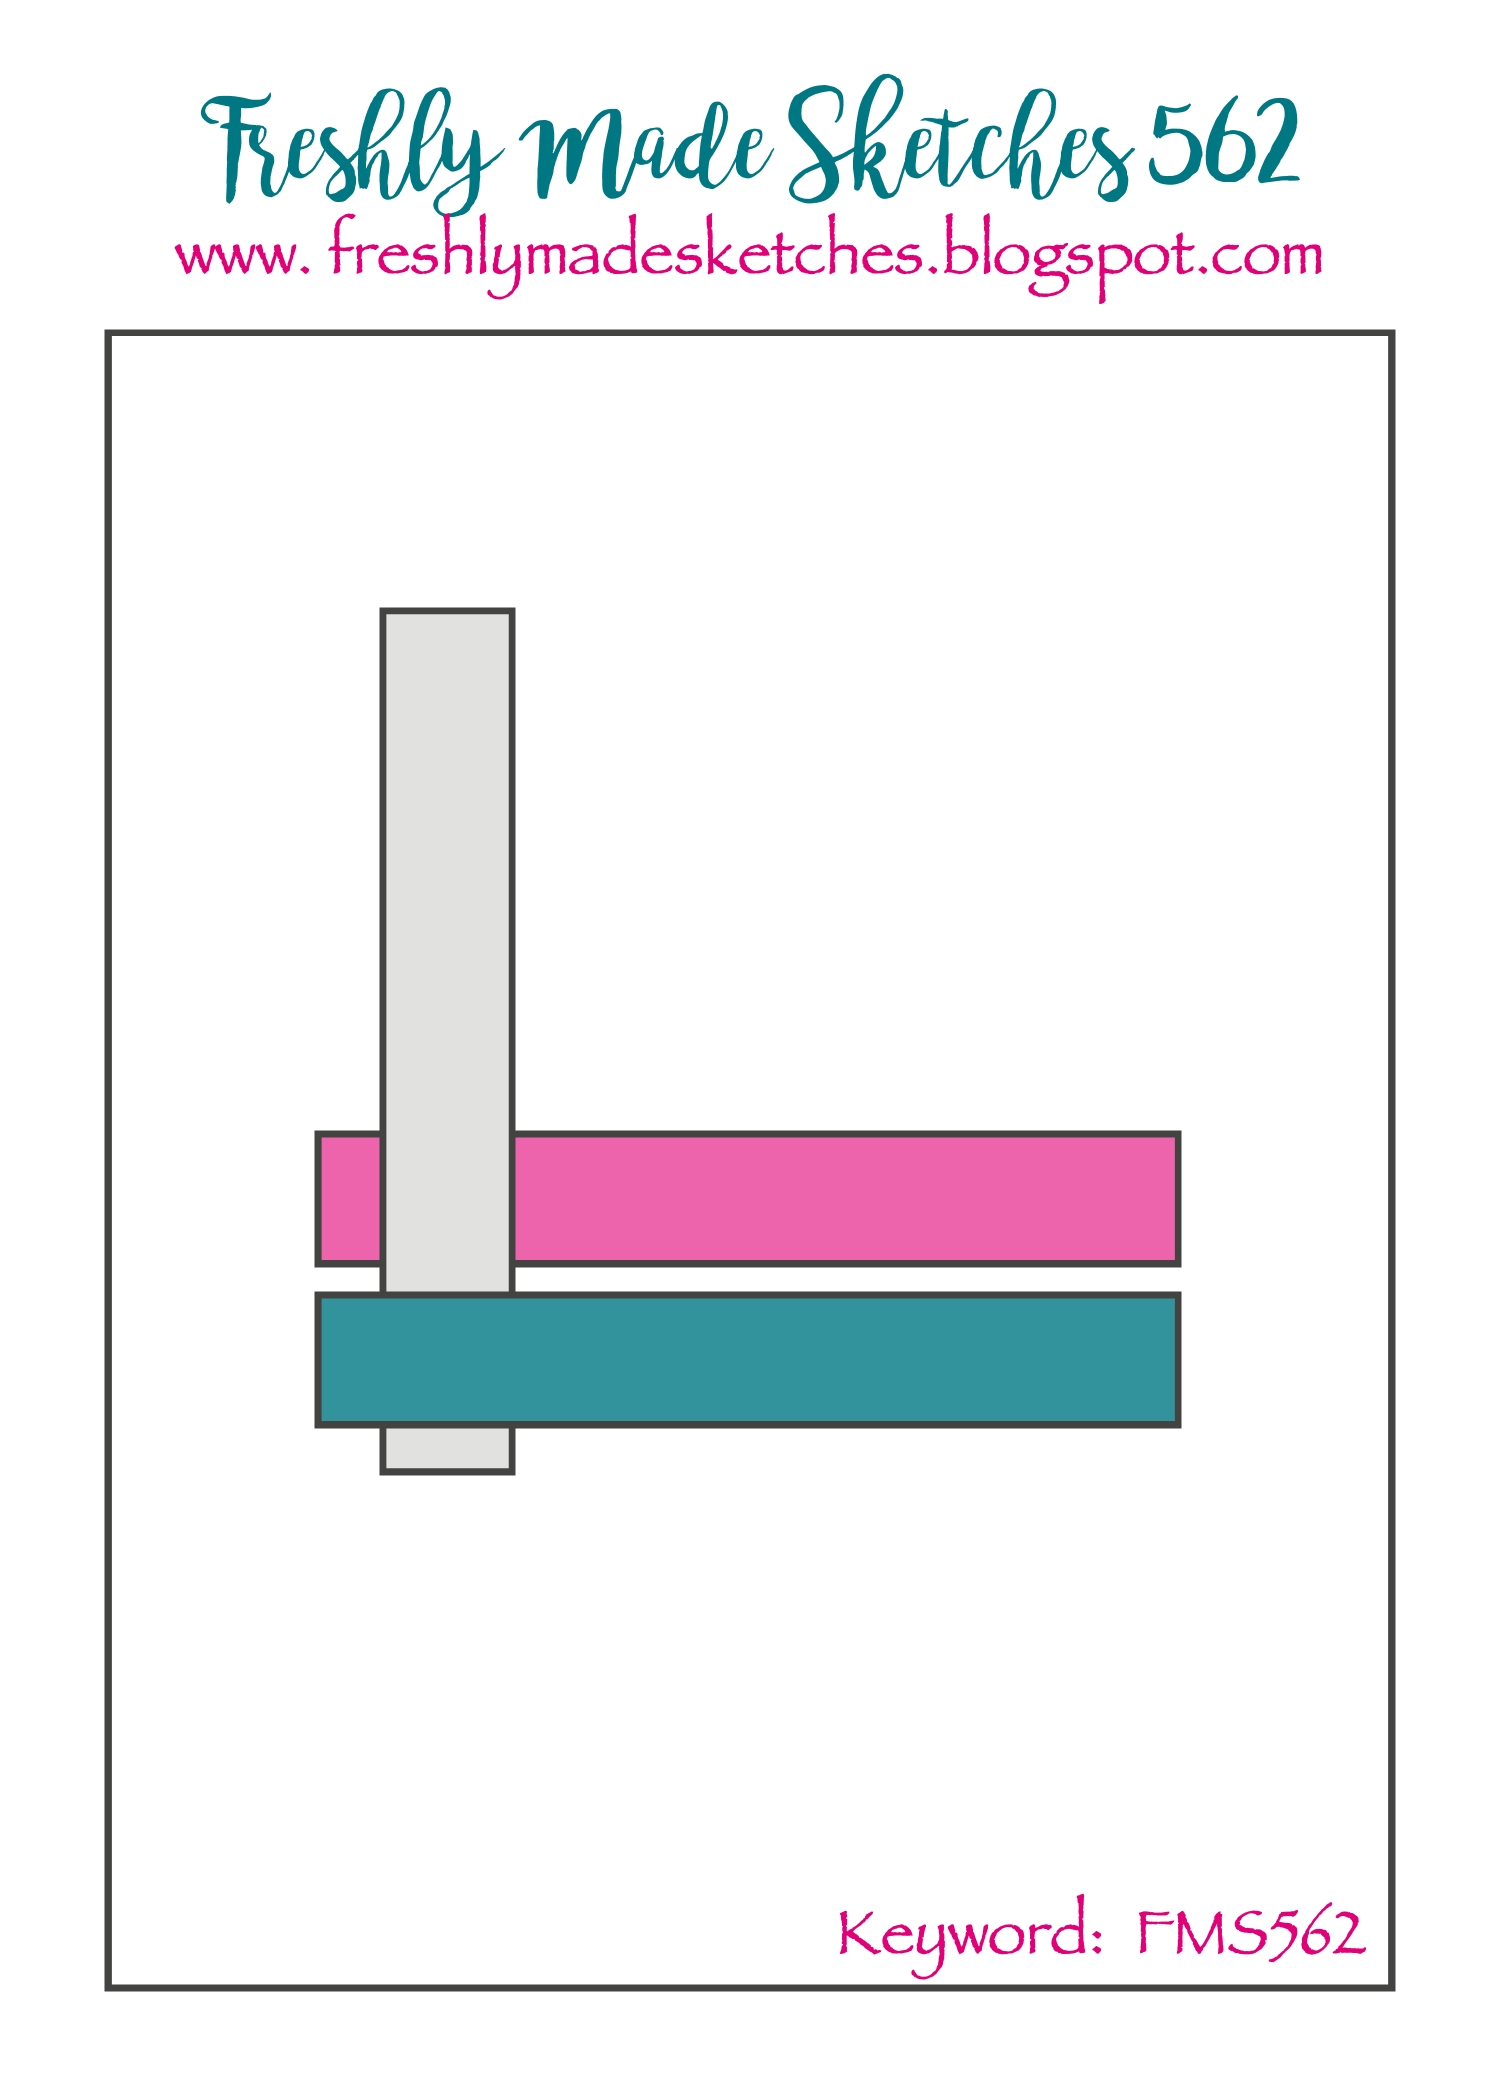
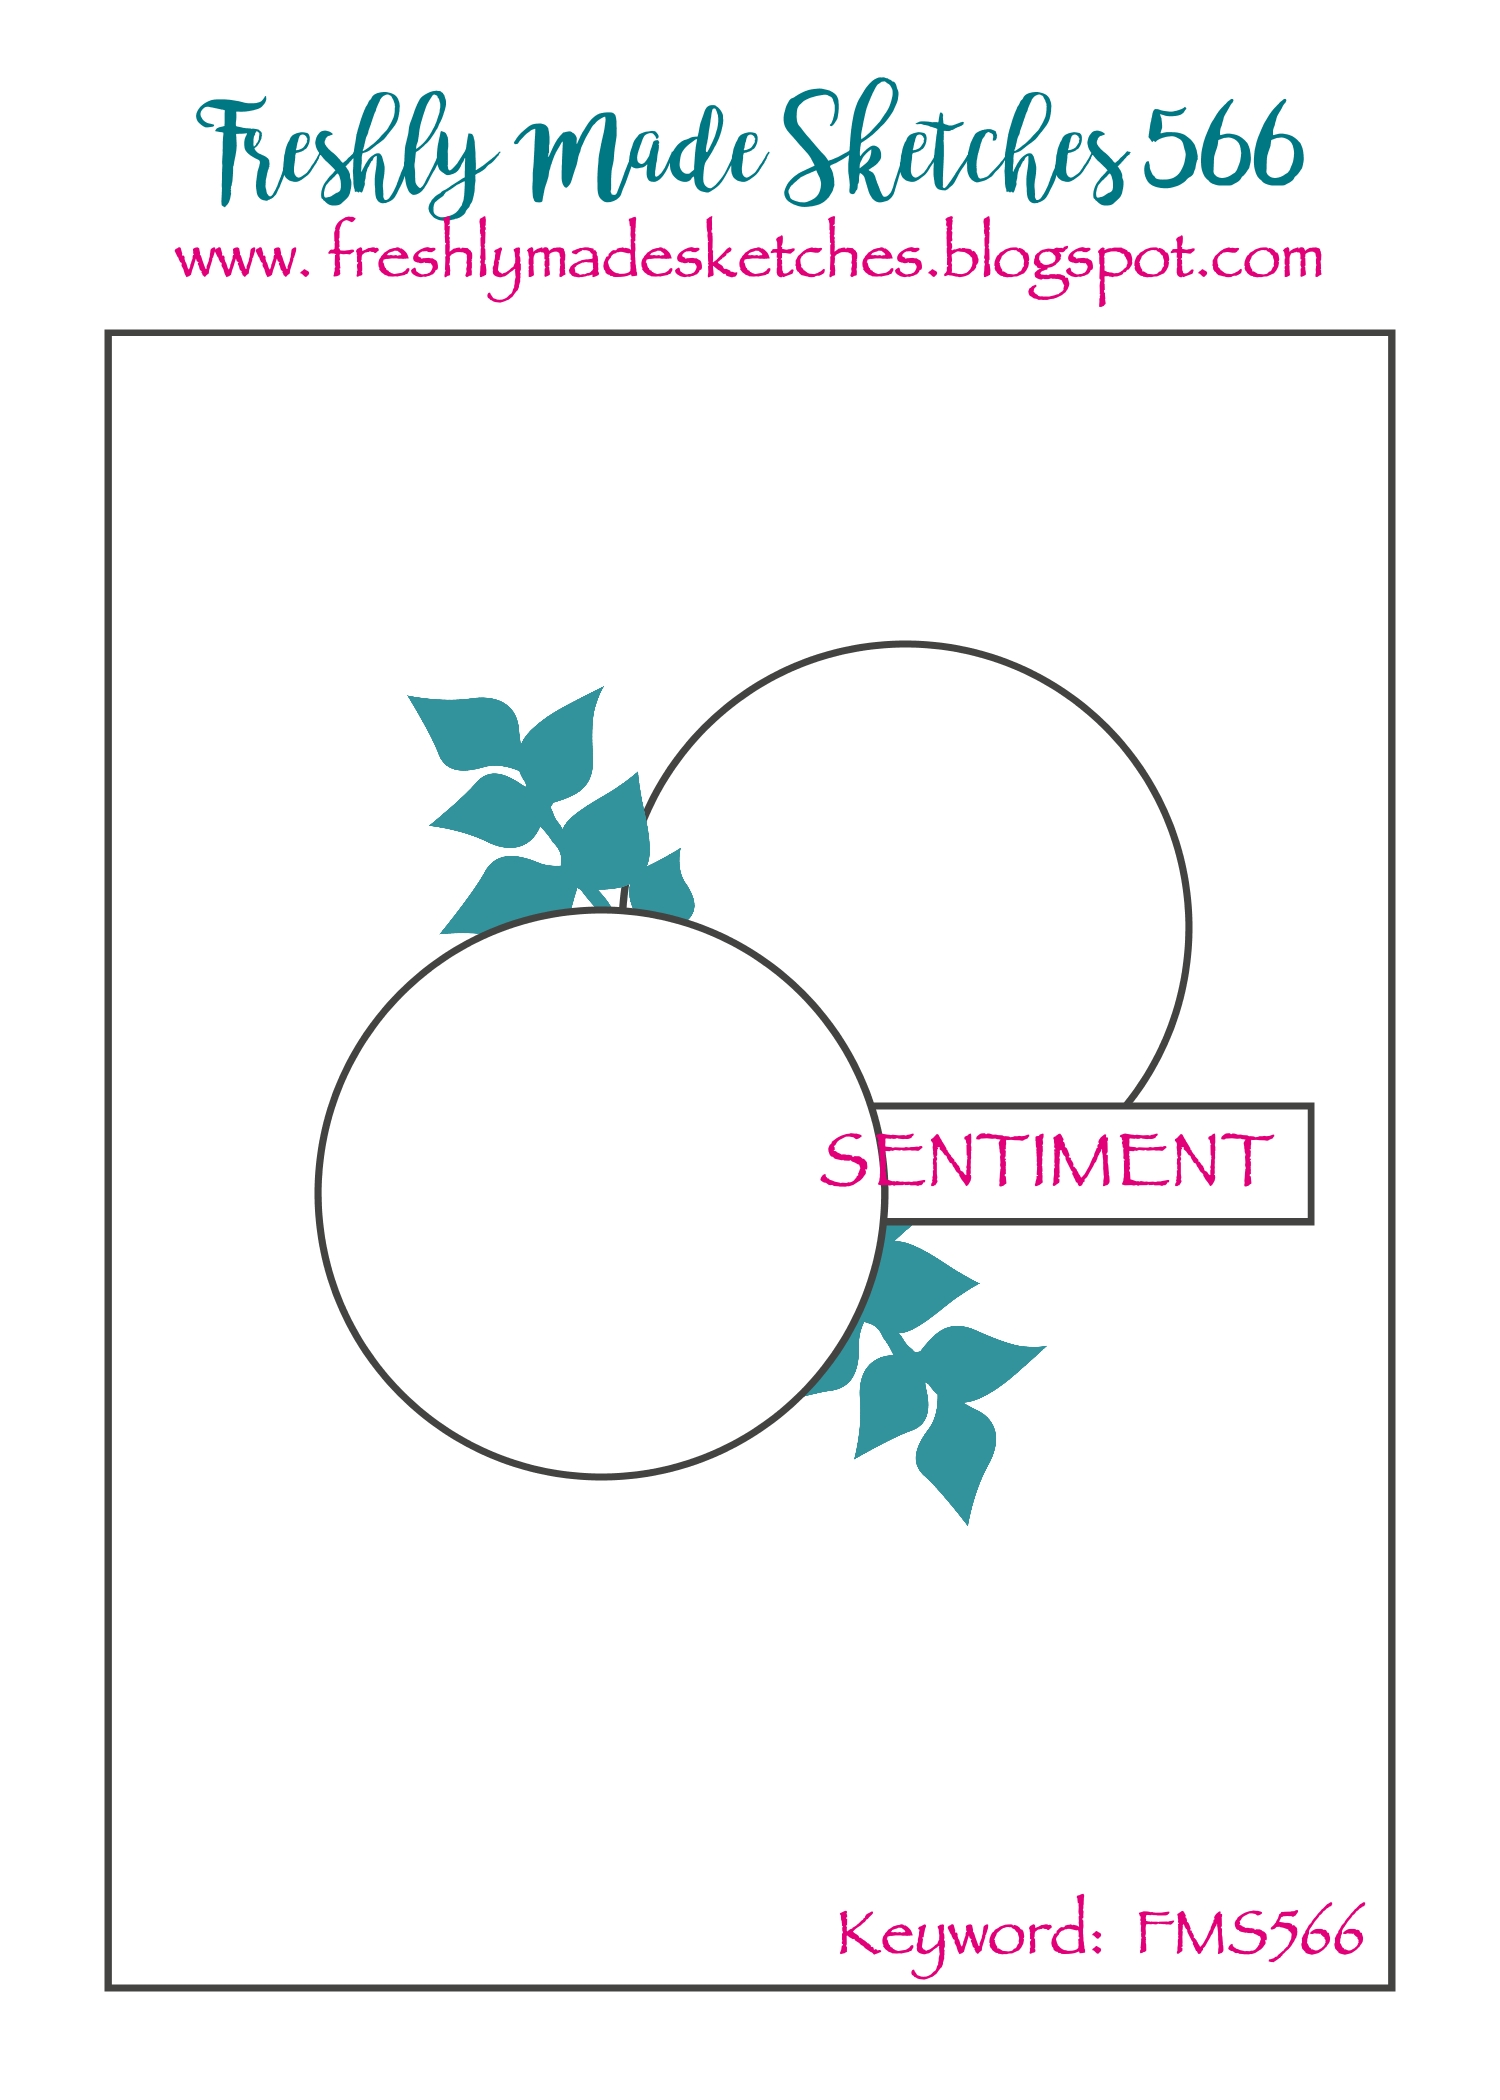
I’m sharing the last Freshly Made Sketches challenge of the year and it is just fabulous for last minute holiday cards or cards made when you are done with holiday cards. The wonderful Narelle has one with tons of possibility, as you can see with the team’s cards.

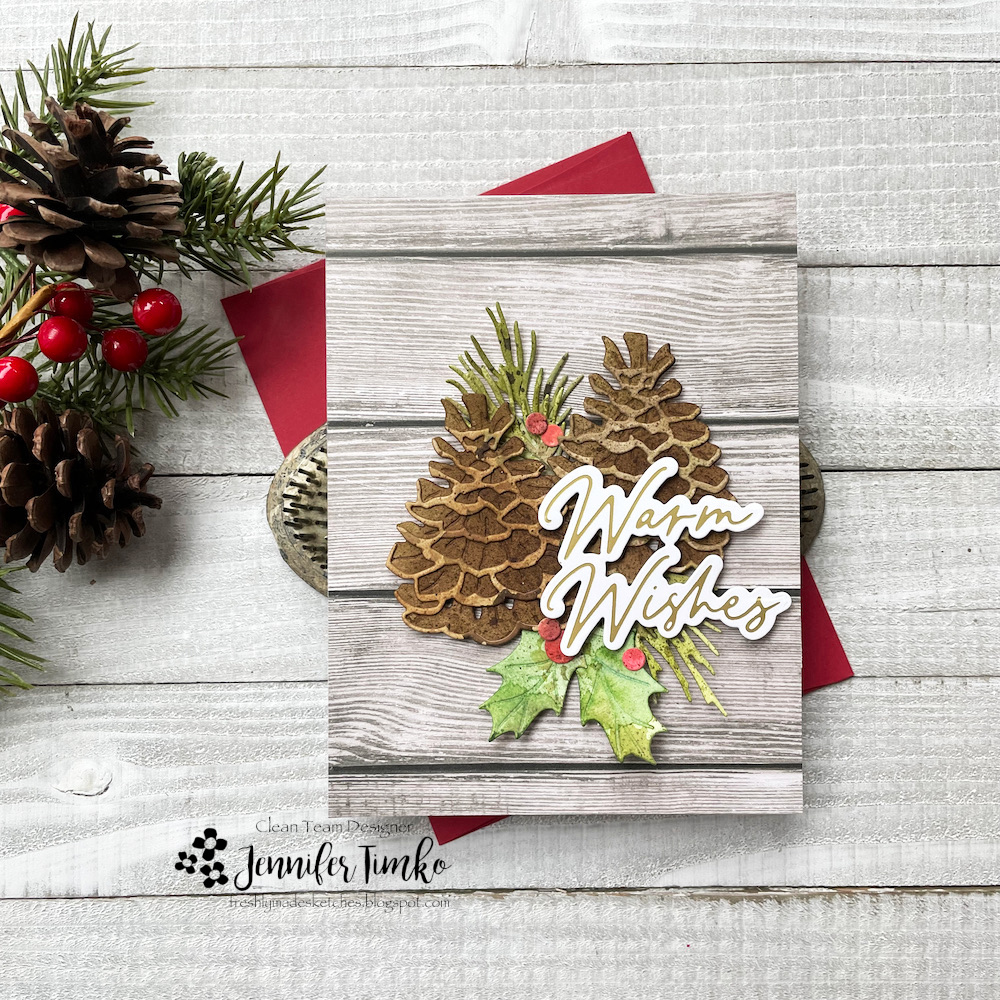
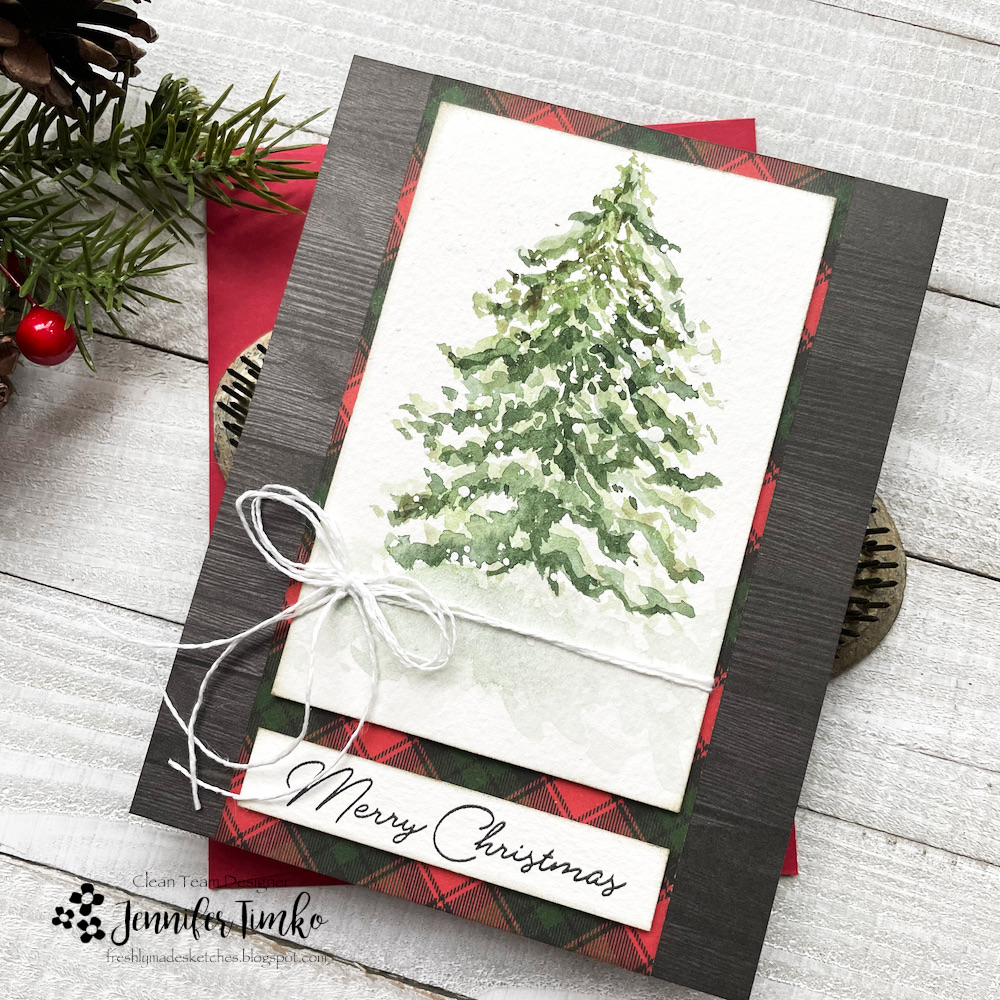
In a crazy move, I made a card that is NOT a painted tree! I reverted back to some of my favorite dies of the season from Honey Bee Stamps. These Lovely Layers: Winter Greenery elements are just so pretty and I had not used the pinecones yet. I thought they were perfect for the sketch. I started with a piece of watercolor paper that I sprayed with Pumice Stone Distress Spray and added some Rustic Wilderness Distress Ink. I was just neutral with texture as a starting point.

Using that piece of paper, I cut out all of the elements for the card. All the little color textures on the pieces are because of that first layer of ink. Once each piece was cut, I added more Distress Ink to color each one its proper shade. I used Distress Ink because it is more sheer so I kept the other details and splatters.

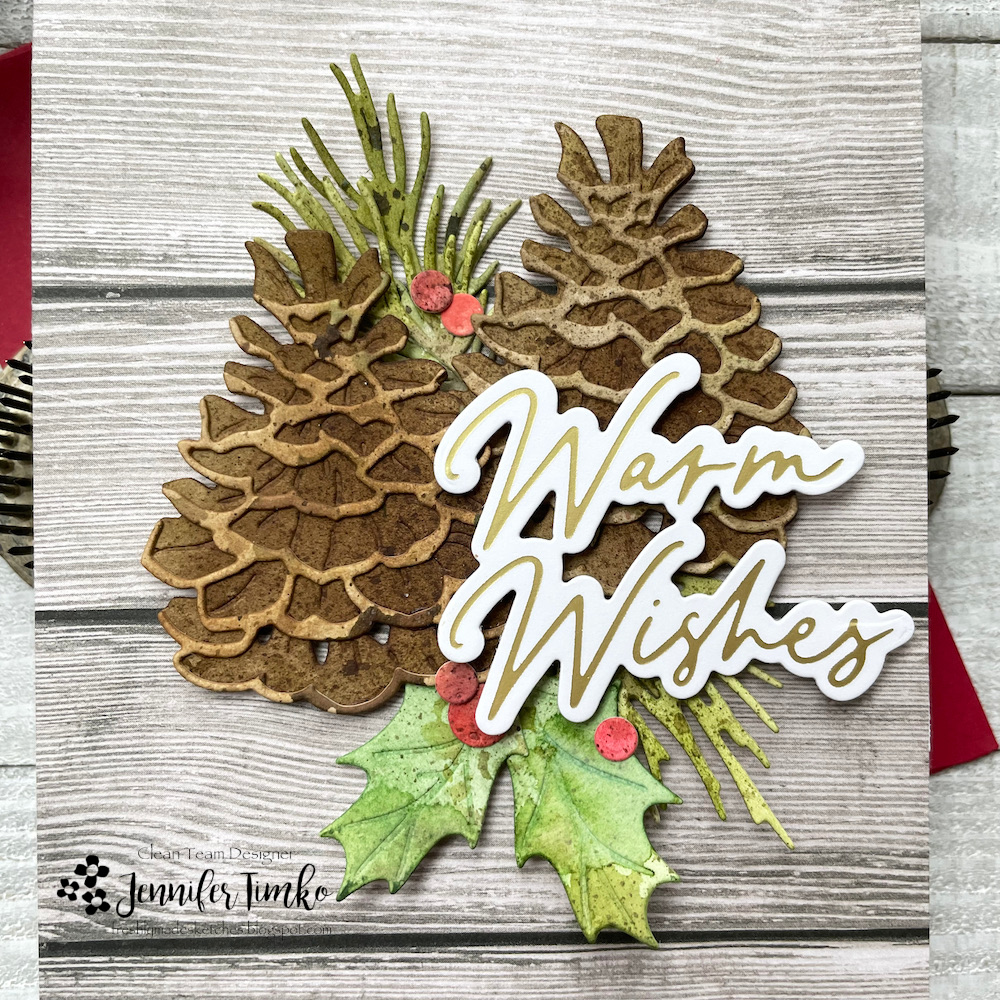
I played around with the placement of the elements and then went to decide the background. I found this taupe-ish wood grain in my Grain and Grunge Paper Pack that was perfect. The gold foiled sentiment was just the right size for the sketch and I love the bit of shine it adds.

I hope you will come over and join us if you have time to craft during the holidays. You can join multiple times and we love seeing all you create! Thanks for stopping by today. Back soon with a few more cards I’ve been making for the holidays.

Hand painted tree with music

Hand painted tree with music published on 2 Comments on Hand painted tree with music

One more tree. Because the live from Dawn Woleslagle taught three styles and I had to try them all. You can find the links to her page on my post from last week. I hope you will bear with me because this has brought me so much joy in finding success in painting. I may even venture into some tags if I have any time to spend on them over the next couple of weeks.

I will say that I cannot pick a favorite tree to paint but I find this one and the first one I made a little more intuitive. Again, I left the tree simple (mostly for fear of messing it up by adding container) but I like the look. A bit more stitching since I feel it adds the right touch on this.

You can see in this closeup that I also added some white and gold splatters. For the background I chose an old, really old, music print from my stash. I inked it up with Distress Inks to give it a vintage look and added stitching to it too. I knew it needed a bit more shine so I started with the sentiment being gold embossed (and the gold splatters). But it still needed something else. It it hard to see in the photos, but right under the image layer is a layer of gold glitter paper. In person it really adds so much! A button and more gold twine to finish.

Again, thank you for those of you who have left kind words. Let’s face it, trying new things can be a bit intimidating and I’m glad you encourage me with your sweet comments. I’m actually out flying today and will likely be out in the system A LOT over the next couple of weeks. If you are flying for your traveling, please get to the airport early. I mean seriously early. I have already been seeing families completely devastated by the long security lines and the extra stress of risking their flights. Well, I’m off to get ready for another day. I’ll be back tomorrow with a new sketch from FMS (and something other than a tree). See you then!

Deck the Halls with Inky Paws Hop 2022

Deck the Halls with Inky Paws Hop 2022 published on 23 Comments on Deck the Halls with Inky Paws Hop 2022

I’m so excited to be joining in with Newton’s Nook Designs for the Deck the Halls with Inky Paws Blog Hop. So many designers are in on the fun so make sure you check the list below to see all the projects. If you came over from the Newton’s Nook Designs Blog, welcome!

I created a tag some of the same products as I used on my card for Monday’s post. This Holiday Heights set is just so cute! I let my girls off the hook and colored some other kitties in this fun pink tree.

I used my Karin Markers for this easy watercolor look and had some fun using non-traditional colors. I used the Christmas Time paper pad for this great green polka dot print and chose a sentiment from the stamp set to put on a flag made with the Frames and Flags die set. I plan to use this on a kraft gift bag so the happy colors will be just right for brightening it up.

Make sure you click through to see all the designers and see below for your chance to win. Next up is the incomparable Jenn Shurkus!

Deck the Halls with Inky Paws SALE!
$5 off every $30 You Spend!
That means $5 off $30, $10 off $60…up to $25 off $150!*
No Coupon Needed
Now through Sunday, December 11th!
*Maximum $25 discount per order.

Enter to Win! Deck the Halls with Inky Paws Hop Prizes!
We will be choosing two lucky winners to win a $25 store credit for Newton’s Nook Designs online shop! To enter, just leave comments on the Design Team Member and Guest blogs (see list below)! Two winners will be chosen at random from the collective blogs in the blog hop. Make sure to check out each of their blogs and comment for your chance to win. You will not know which blog has been chosen so the more you comment on the better your chances are of winning! You have until Sunday, December 11th at 9 pm EST to comment — winners will be announced on the NND blog on Monday, December 12th.


Deck the Halls with Inky Paws Blog Hop List:

Newton’s Nook Designs
Jennifer Timko << You are Here
Jenn Shurkus
Jennifer Ingle
Amy Tsuruta
Donna Idlet
Ellen Haxelmans
Tina Herbeck
Larissa Heskett
Samantha Mann
Zsofia Molnar
Maria Russell
Farhana Sarker
Tatiana Trafimovich
Amanda Wilcox

Freshly Made Sketches #565

Freshly Made Sketches #565 published on 5 Comments on Freshly Made Sketches #565

Happy Wednesday! I am back today with the latest sketch from Freshly Made Sketches and another watercolor tree. Truly, I’m obsessed. I did get a question on the tutorial on the watercolor trees. Dawn has a group on Facebook called WPlus9 Encourage Creativity where she has lives twice a week or so. The tree painting was on November 15th. Now, on to the latest sketch from the incredible Karren Johnson.

Armed with my confidence from the last watercolor tree, I attempted another style and, oh my word, it worked! I wanted to use it with the sketch this week and had to play around with backgrounds that worked. I finally settled on some patterned paper from Honey Bee Stamps.

I love this traditional plaid behind the tree and thought the dark wood print grounded the card nicely. In keeping with the sketch (loosely, at least) I chose a sentiment from Inside: Holiday Sentiments (Honey Bee Stamps). I had added a few gouache splatters to the tree after painting but still thought it needed a little something extra. A twine bow seemed to be just the right amount of detail.

I hope you’ll come over to join us for this week’s challenge. This sketch is perfect for those last minute holiday cards! I appreciate you dropping by. See you again soon!

Deck the Halls with Inky Paws with Newton’s Nook Designs

Deck the Halls with Inky Paws with Newton’s Nook Designs published on 2 Comments on Deck the Halls with Inky Paws with Newton’s Nook Designs

I’m super excited to be sharing for this year’s Deck the Halls with Inky Paws over at Newton’s Nook Designs. I have a card using the super fun Holiday Heights stamps set and dies that may or may not resemble two cats I know. Kate and Meg, I’m looking at you…

Using my Copic Markers, I colored this sweet image and added some details to match the colors on my girls. The background paper is the Christmas Time paper pad and I like how much texture it adds.

The sentiment comes from the same stamp set and all I needed to do was add a bit of ribbon from my stash. They have inspiration all week so make sure you check out the different designer features each day!

Hand painted tree for Christmas

Hand painted tree for Christmas published on 4 Comments on Hand painted tree for Christmas

My crafting lately has been a bit hit and miss. In order to preserve some of my days off needed, I have been on reserve (on call) for flying. It makes for a chaotic pattern and I have a hard time creating without a good schedule. Some days, I just watch videos of my talented friends and learn. Recently, the incredible Dawn Woleslagle (WPlus9) showed how to paint trees. And I don’t just mean color, but actually paint. Now I like to pretend I’m a painter sometimes but this is next level. I like to color OTHER people’s art! But she made this look easy so I gave it a go.

Using my Daniel Smith watercolors, I followed along with Dawn basically mimicking her every move. And you know what, I got a tree! I’m pretty excited about this tree, not going to lie. Enough that I’m going to try some more. We’ll see how that goes. I cut down the panel, in retrospect I wish I had left it longer for the sentiment, to create a card. In keeping with Dawn’s unique and truly special style, I even pulled out my sewing machine. I stitched around the edges of the colored panel and a paper print panel (from Honey Bee Stamps). My sewing is intentionally a bit wonky but if I tried to make it perfect, it would be wonky anyway.

I thought it needed a bit more so I added gold splatters to the back panel and a layer of vellum underneath. The sentiment is gold embossed (Honey Bee Stamps) and I pulled a gold button and thread from my stash.

So the lesson here is never say never. It takes a bit of courage to make art. A little of yourself is in every piece and you have to face “messing up”. I hope this encourages you to take a chance and try something new. And please go follow Dawn on all her social platforms. She is generous with her talents and a skilled instructor! Thanks so much for stopping in today. Wishing you a wonderful rest of your week.

Freshly Made Sketches #563

Freshly Made Sketches #563 published on 3 Comments on Freshly Made Sketches #563

Super quick for today since I’m in the middle of a trip (typing from a hotel room and I’m TIRED!). I created this for the latest awesome sketch. This one was designed by our hiker extraordinaire, Jen Brum!

I saw this design from the free paper pack that came in my Honey Bee Stamps order (instant quick cards if you want and oh so cute). Thought it would be pretty for the sketch. I inked up some paper and cut these holly leaves and berries. So fast but so fun! I told you in Monday’s post about the Holly Jolly Background Stamp and the sentiment I cut out. This one was all ready to go and popped it right onto the card.

I think I will use more of these little cards in similar ways to create a stack of cards. I love when quick cards can still feel special. Hope you’ll come over and join us for the sketch this week.

For all of you in the US, wishing you a happy Thanksgiving holiday. If you are traveling, so am I! Keep an eye out in Houston, Charlotte, Chicago! See you again soon.

Holly Jolly from Honey Bee Stamps

Holly Jolly from Honey Bee Stamps published on No Comments on Holly Jolly from Honey Bee Stamps

I have been working away on Christmas cards and trying some new techniques. I find that watching “lives” with my stamping friends inspires me to try things I would never otherwise do. This card is the result of one I watched with the queen of artsy, inky goodness – Lydia Fiedler.

Last week, Lydia was showing how to add color and depth to a background stamp and I was inspired to try it with the Holly Jolly background stamp from Honey Bee Stamps. There is nothing particularly hard about the process, it just takes a bit of time and patience. I started with a piece of Bristol Smooth paper larger than the image and put it in my Misti. The Misti is key to the technique since you stamp the image over and over again. Using my Mini Distress Inks, I started adding colors selectively on the image. I kind of went around and around the image adding and layering the inks. This gives you an idea of the work in progress. After this point I added some Peacock Feathers and Villainous Potion. It is kind of an experiment which is what makes it fun.

Once I had the panel inked, I decided I wanted it to take on a vintage vibe so I added Distress Oxide Ink in Antique Linen and some Vintage Photo Distress Ink on the edges. Next I splattered on some Early Espresso ink. I chose a section that seemed the most balanced and cut it with a rectangle die. Separately, I inked the big image in black ink and used the coordinating dies to cut all the sentiments out…such a great way to have a bunch of fun font sentiments on hand. I used the script Holly Jolly and matched the distress inking from the main panel.

Using the Make It Merry paper pack, I chose a plaid for the base layer and some of the red/green prints for my poinsettia. I little gold center to add some elegance.

This inking technique has made me look at some background stamps differently and I look forward to using this again. If you are every needing some inspiration to try new things, go visit my friend Lydia. She is amazing and truly her tutorials will just make your day happier. Hope you have a wonderful day!

Freshly Made Sketches #562

Freshly Made Sketches #562 published on 8 Comments on Freshly Made Sketches #562

I had a bit of a break from the craft room and was out flying but managed to work in a quick card for this week’s Freshly Made Sketches. Our sketch designer, the awesome Kim Singdahlsen, has given us an interesting design that is open to so many options. I also wanted to work in a design for the 2022 Fall/Winter Coffee Lovers Blog Hop and I found just the right image!

I love this little mouse from the Merry Little Mice stamp set (Honey Bee Stamps) and when I pulled him out, I realized it had been a minute since I had done any Copic coloring. It was nice to use simple images that were not too fussy. And who can resist this little guy?! I added some presents and snowflakes from the same set and I love how the snowflakes from the stamp set (a set from last year) coordinate with this newly release patterned paper!

As I was looking at sentiments, this one made me chuckle. Not the classic cup of cheer but a fun one! It comes from the Hug in a Mug set which is meant to coordinate with a mug die. And I mentioned the paper, all the prints here (included the ombré green) are from the new Make It Merry Paper Pack. I heat embossed part of the sentiment on the top panel and turned the sister panel the opposite way for a little interest.

I have lots of excitement coming for the rest of the week…. Jury duty today, a little on call for United but then I get to go capture my college kid! Definitely moving in the right direction. Probably not much crafting time over the next week but I’m guessing a lot of flying time. If you are traveling out and about in airports, look for me! Thanks for stopping in today. Hope you have a great rest of your week.

Freshly Made Sketches #561

Freshly Made Sketches #561 published on 4 Comments on Freshly Made Sketches #561

This is a record of sorts lately…3 posts in 3 days! I know….crazy! I really am trying to get into gear with holiday crafting and have been spending a bit more time in the craft room where I can. Our sketch designer at Freshly Made Sketches this week is our ever humorous and always amazing Linda Callahan. I won’t lie when I said that at first I was a little stumped on the sketch. And then…..

Then I wasn’t. This card was put together in 15 minutes. I kid you not! In fairness, I had the pieces all done and laying on the table when I had the a-ha moment. I pulled out the scalloped rectangles dies and the rest was just adhesives! Now to the pieces. The background Plaid A2 Foil Plate (Honey Bee Stamps) came about from a foil fail. I was working on another card and rushed the foiling. Patience is not always my strong suit. I do find with background plates that I need to give them just a bit more time to evenly heat up. But I kind of liked the foil distress look and put it aside. Leaning on that idea, I pulled out some Distress Oxide Ink in Tumbled Glass. Yep, I love it.

For the bouquet of greenery, I had already put this together using the leftovers from the other card mentioned before. All these Lovely Layers: Winter Greenery pieces are so pretty!! The green pieces are cut from the Make It Merry paper pad (the berries from another lighter paper) and the gold cardstock goes perfectly with the foil. The sentiment is from the Foil Script: Holiday Hot Foil set. I foiled the sentiment all at once so I had this one sitting ready to go. So yeah, I made it in 15 min but only because I had already done the work while goofing around in the craft room.

I’m glad you stopped in today. Take a look around your stamp table and see if you can put some of those unfinished objects (UFOs) to work. And join us over at Freshly Made Sketches too! See you soon!

Primary Sidebar