Skip to content

New Year, big changes!

New Year, big changes! published on 16 Comments on New Year, big changes!

Happy New Year to all of you!  I hope that the beginning of your 2012 is off to a great start.  I do not have a card for you today but wanted to share some exciting news.  Most of you know that I am a pilot for United Airlines.  I have been on leave for over three years.  This is partly because United Airlines has many pilots still laid off and my schedule would be less than wonderful.  It is partly because my husband is in the Air National Guard and flies long trips.  The time has come for United to ask me to return to flying.  As of today, I am back on the books at the company.  With three years off I have lots of training to do, of course, and some of that will start on Wednesday.  I will be flying the Airbus 319/320 (which I was flying when I took my leave of absence) with mostly domestic US flying (some Canadian, Mexican and Caribbean routes).

What does this mean for my stamping??  Not much really.  You haven’t seen much in the way of posting over the last couple of weeks.  Some of that is the typical holiday schedule with little time to post.  Much of it though is that I have been getting ahead.  I will continue my design team work with both SUO Challenges and Freshly Made Sketches.  I will continue to be a Stampin’ Up demonstrator as well.  I love the products from Stampin’ Up and my stamping customers are so supportive of my non-stamping work.  I have a one-month training period starting on Jan. 17th that will be academically intensive so you can expect to see nothing other than design team work during that time.  I hope to “sneak” in something here and there but it is hard to predict when.

Thanks for all the support you give me in my creative efforts.  I find that my stamping and  the people in this crafting community bring such joy to my life.  I look forward to continuing these “adventures in stamping” with you.

Oh, I almost forgot…I also got a brand new computer for Christmas…a MacBook Pro!!  I have always been a Windows user so my learning curve is steep.  Bear with me as I learn how to edit photos with my new toy!  Happy and safe new year to all of you!  I’m stamping today so with any luck, I’ll have a card to show you with some of Stampin’ Up’s latest products tomorrow!

Merry Christmas!

Merry Christmas! published on 5 Comments on Merry Christmas!

As I sit here on Christmas Eve I realize that I haven’t posted in over a week.  I, like many of you, have been running around getting everything ready for Christmas.  My cards are finally all sent and most of the presents are wrapped.  My children are doing a bit of arts and crafts for final decorations.  My mother is here enjoying the chaos of two little boys as they get more and more excited for the big day.  In short…not much time for posting.  I have been working on some projects for the new year so I will have lots for you as we get into January.

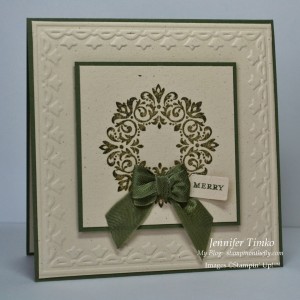
I thought it appropriate to show you two final cards using Bright Hopes.  I might as well have called these “A few of my favorite things”.  My favorite Christmas set this year, my favorite color combination (Vanilla/Always Artichoke), my favorite embossing folder (Framed Tulips) and my favorite ribbon (Seam Binding).  This first version doesn’t photograph as pretty as it is in person.  I used Naturals Ivory paper and embossed the wreath with Clear Embossing Powder (over Versamark/Always Artichoke).  I didn’t make lots of them but enough to share with some close family and my club members.

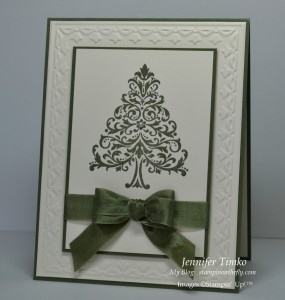
The second version was a bit quicker with no heat embossing.  I used the lovely tree and Very Vanilla card stock on this one.

I hope that all of you have a happy holiday season.  Whether it be Christmas, Hanukkah, or Kwanzaa, I hope that you are surrounded by family and friends.  I feel blessed to share my stamping adventures with you and I thank you for sharing your thoughts back with me.  I wish you peace and joy!

See you next week with some new challenges and maybe (I really hope I can get one done) a preview of the new Occasions Mini.

Dasher found a friend!

Dasher found a friend! published on 7 Comments on Dasher found a friend!

Big post disclaimer…I did none of the work for this post other than taking the picture (my watermark is simply there as protection)!!  But I was so excited about this that I had to show you!

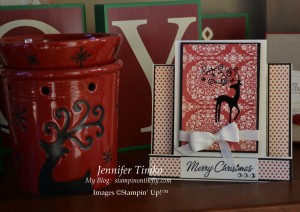
One of my dear stamping friends Brenda came over yesterday to stamp and she brought me the most lovely surprise!  Now it is no secret that I think Dasher is one of the best stamps ever created by Stampin’ Up.  That little reindeer has worked hard for me since the day he showed up on the big brown truck.  My stampers know this too, of course, since they get to make things with him every year.  Brenda found Dasher a friend for me and then packaged them together.  Yes…I was jumping up and down.

Brenda found Prancer from a company called Scentsy and knew how much I would love him too.  I mean really, look at him and the colors of his warmer (this company sells warmers that melt scented wax).  So not only did Brenda get this for me, she then went and created a card to go with it.  Seriously, how amazing is that??!!  Just look at the two together!

She made this gorgeous center step card with Dasher embossed in Black.  It is even more striking in person!  And the rhinestones add the perfect sparkle!  How lucky am I to have such a talented and generous friend??!!  I knew you would all love seeing this so thanks for letting me share.

Hope you have a wonderful weekend.  More Christmas cards will be coming your way next week (and maybe a sneak peek of the new Occasions Mini).  Thanks for stopping by today!


Online Extravaganza is here!!

Online Extravaganza is here!! published on No Comments on Online Extravaganza is here!!

All the information about Stampin’ Up’s Online Extravaganza is available at my Online Store .  You can save 20% to 60% off of selected items.  For TODAY ONLY, you can save 20% off of the Simply Scored Scoring Tool and the Sweet Pressed Cookie Stamps!  Click here or on my “Shop Online” airplane to see all the details!!


Snowman Easel Card

Snowman Easel Card published on 6 Comments on Snowman Easel Card

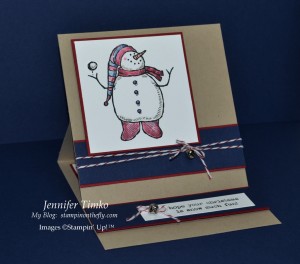
All this week I have had a Christmas Wow Class for my local stampers.  We made three cards that are a bit more over the top with details.  When I am planning a Wow Class, I look to techniques or folds in addition to more accessories.  The first card we made was an easel card.  Until I made the one for the Creative Crew, I had no idea how easy they are (and with such impact)!

Last Wednesday I talked to you a little about the pros and cons of feet on a snowman.  In this card, the feet work perfectly so here they are.  I stamped this fellow in Stazon Black onto Whisper White paper.  With my blender pen I followed the shading lines using Crumb Cake ink on the snowman’s body and face.  Then I added his Tangerine Tango nose and went to work on the rest.  Don’t forget to use light and dark shading to add visual depth!  I tied the little Mini Jingle Bells onto Cherry Cobbler Baker’s Twine to add more texture.  Since this is an easel card it can fold closed.  The jingle bell on the bottom could present a bit of a problem if mailing so just use a plain bow if you want the postal service to handle it.  I think mine is likely to go in a package or gift bag so I am set.  The final little thing to do was add a little extra dimension to that snowball.  I cut out a second one and popped it up on a Mini Glue Dot that was rolled up.

A wow card doesn’t have to be overly busy.  It just has a lot of little details that make it special.  You might not want to make 60 of them but 5-10 might be lots of fun.  For the record…my five year old son who is really taking off on his reading looked at the sentiment and found it hilarious because the snowman was throwing snow.  What better gift for a card maker than to have someone find so much humor in it??!!

I should be back on Monday with another of my projects but also be on the lookout for an early post with the details about the Online Extravaganza!!  Have a great weekend!

Stamp:  Snow Much Fun; Paper:  Crumb Cake, Cherry Cobbler, Night of Navy, Whisper White; Ink:  Crumb Cake, Cherry Cobbler, Night of Navy, Tangerine Tango; Accessories:  Simply Scored Scoring Tool, Blender Pen, Cherry Cobbler Baker’s Twine, Mini Jingle Bells, Mini Glue Dots, Dimensionals

All products are Stampin’ Up!

Get ready to shop!!

Get ready to shop!! published on No Comments on Get ready to shop!!

Sorry that I didn’t post my promised card yesterday.  School activities for my children have taken more time than I expected.  But the Kindergarten Feast was great and a fun run/fundraiser went really well!  I don’t have the pictures ready so I will try to get them up tomorrow.  Instead, I have great news from Stampin’ Up that I want everyone to know about!!

Online Extravaganza is coming to Stampin’ Up on Monday.  How do you take advantage??  Just log into my online store by clicking here or on my shop online airplane icon on Monday, November 21st.  There will be all kinds of things like free Digital Downloads valued at $40 with you purchase of MDS Express, 60% off select designer fabrics, and 30% off an exclusive ribbon bundle.  Additionally, there will be two items on sale for 24 hours only (Nov. 21st from 12:01a – 11:59p).  I don’t know the details until Monday but be on the lookout.  I’m sure they will be great!!

Ok, off to see if I can get some pictures ready for posting!  Have a great Friday!

Outside the box

Outside the box published on 8 Comments on Outside the box

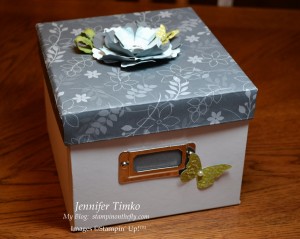
Ok, I suppose this really should be named “Decorating the outside of the box”!!  The new Card Keeper box, that is.  My hostess club got together yesterday and this was one of our projects.

You may recognize the paper on top as the retired Walk in the Park DSP.  Stampin’ Up used to have a bulk buy feature for demonstrators and this was one of those paper sets.  Using the bulk buy paper allowed all of us to make the same design with the box.  The box comes with the lid already assembled.  The box is folded neatly within along with the hardware, templates and instructions.  I chose to only cover the top although there are template available for the covering the whole box.  Here are the tips that will help you:

  1. You have to make sure that the box is folded so that the tabs are inside.  They come folded the opposite way of the direction they need to go and you need to give them a firm fold the other way so that the seams lie correctly.
  2. The glue on the tabs is very strong!  Once in place, it it in place.  Practice putting together the box (complete with lid) before you glue it down.
  3. The lid has a snug fit.  When putting the box together it is important that the seams are really straight (especially near the top).
  4. Cut out the template you intend to use and then trace onto the back side of your DSP (or covering material).  Then cut out.
  5. The Simply Scored Tool is really helpful to score the lines as indicated on the template.
  6. Because of cutting variations and manufacturing tolerences, the template may need to be trimmed a bit.  Just put it up to your lid and check the folds before you glue.
  7. The Anywhere Glue Stick worked great with the DSP.  Apply the glue to the lid instead of the paper for even coverage.

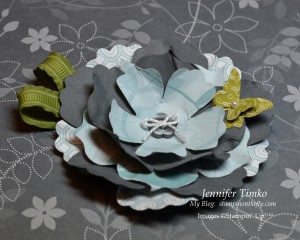
The flower was made using the Fun Flowers Die.  I made one cut with the DSP and one with Basic Gray card stock.  I alternated the DSP.  Crystal Effects was used as my glue.  It has the added benefit of adding some substance to the base of the flower which is helpful when attaching it to the box.  I thought the addition of some Beautiful Wings butterflies added a little something special (the Kiwi Kiss paper is the back side of the Basic Gray design).  I found that the Lucky Limeade Ruffled Ribbon was a nice go-with to the Kiwi Kiss paper and used it to make the leaves.  Of course a couple of Basic Pearls were “needed” to finish off the butterflies.  The label for the front is a piece of 1″x2″ Basic Gray paper.  Once I commit to how I am using this, I will complete the label.

I initially thought that I would use this as a card organizer.  But as I mentioned a while ago, I had lost one of my Embossing Folders.  This may become the home for those and some other Big Shot items like the little Embosslits and I guess I’ll have to make a second one for cards.

Glad you were able to stop in today.  I am working on Christmas card for a class next week and the next Creative Crew Challenges.  The paper is flying and the ribbon is out of control.  I’ll be back next week to share some of these creations!  Have a great weekend!


You can be a Big Shot, too!

You can be a Big Shot, too! published on No Comments on You can be a Big Shot, too!

I am a little late on announcing this (and I am sure many of you already know) but Stampin’ Up is offering an amazing opportunity during the month of October.  If you sign up to be a demonstrator, you get a FREE Big Shot (or $100 worth of SU products).  Wow!  What an amazing special!  The Big Shot is a go-to tool for making your crafting easier and faster than ever.

Just to tempt you further, the talented stampers over at Stampin’ Addicts have put together a Big Shot Blog Hop to show you how to use our many fabulous Big Shot items.  One warning…these people are terrific enablers and you will find things you cannot resist!!  After seeing their work, if you want to sign up for the promotion and become a demonstrator yourself, I will be happy to answer any questions and get you on your way to your free Big Shot!

Click on any of these links to see the Blog Hop projects:

  1. Designer Frames – The Stampin’ Bunny
  2. Leaves #2 – Rubber Redneck
  3. Fancy Favor Die – Sarah’s Ink Spot
  4. Matchbox Die – Rubber Stamping & Cardmaking with Yapha
  5. Box #2 – Add Ink and Stamp
  6. Petite Pocket Die – InkPaperStamps
  7. Bitty Box and Envelope Die – Created by You
  8. Perfect Pennants – Stampin’ with Paula
  9. Blossom Box – Kitty Stamp
  10. Candy Wrapper Die – Stamping Addiction
  11. Milk Carton Die – Lily’s Ink Pad
  12. Petal Cone Die – Heartfelt Inkspiration
  13. Beautiful Butterflies – Miss Mad Stamper
  14. Two Tags Die – Stamp A Little Longer
  15. Buttons #5 Die – Tinkerin’ In Ink
  16. Holiday Stocking Die – Heart’s Delight Cards
  17. Stocking Accents Die – Escape2Stamp
  18. Peek-a-boo Frames Die – Stitchin’ n Stampin’ on Paper

Click in anywhere and then you can hop around the loop.  I hope they have inspired you to become a Big Shot too!

I’m back to stamping today after a bit of a break and should have lots of fun things to post next week.  Can’t wait to see you then!  Thanks for the many comforting words for my family about my kitty.  Your thoughts have been very helpful and I feel so blessed for your kindness.


Goodbye to a friend

Goodbye to a friend published on 19 Comments on Goodbye to a friend

Last April, during the SUO Challenge 16, I showed you some pictures of my dear old kitty and my boys.  A week ago today, I had to say goodbye to my old friend of over 19 years.  As you can imagine, it has been a hard week for the family.  My creativity has been a bit out of focus and I hope you can understand.  My posts for the next couple of weeks may be a bit sporadic.  Fortunately, I had done a flurry of activity before this happened and will be showing you some of those projects.

My sweet Pito’s time had come and I am thankful I was there with my friend until the end.  I miss the old fellow terribly but I am thankful for the many years that I was his person.  I look to the day I meet him again at the Rainbow Bridge.

Buy 3, Get 1 FREE!!!

Buy 3, Get 1 FREE!!! published on 1 Comment on Buy 3, Get 1 FREE!!!

If you haven’t already heard, Stampin’ Up is offering a new promotion for the month of August!!  If you buy three packages of our exclusive Designer Series Paper, you will get your choice of a fourth package free (a $10.95 value).  WOW!!

You see, there is no excuse not to get the Well Worn DSP featured in my Vintage Balloon card from last weekend’s blog hop!!  I have to say that this paper is fantastic to use.  Perfect for vintage, perfect for masculine, perfect for fall!!  I am really proud of this card (thanks for all the kind remarks in the hop) and the Well Worn DSP really did a lot of the work.  I will be using this special to run a DSP share so look for the details later this week.  If you are like me and have a hard time sharing, click the banner above and you can purchase all four packs for yourself!!

I hope you are having a great day!  See you tomorrow with more details about my MDS Shadow Box project from the hop.


Primary Sidebar