Skip to content

Amazing Birthday in Gold

Amazing Birthday in Gold published on 1 Comment on Amazing Birthday in Gold

10494554_10152594044857329_7043287500476660222_n

As I was working through editing some pictures, I realized that I had forgotten to share some of my Convention Display Board Samples.  So I thought it might be fun to pull one out and show you.  I am on “the road” right now (and most of the rest of the month) but don’t think I have forgotten about posting.  *smile*

Amazing Birthday - Amazing Gold
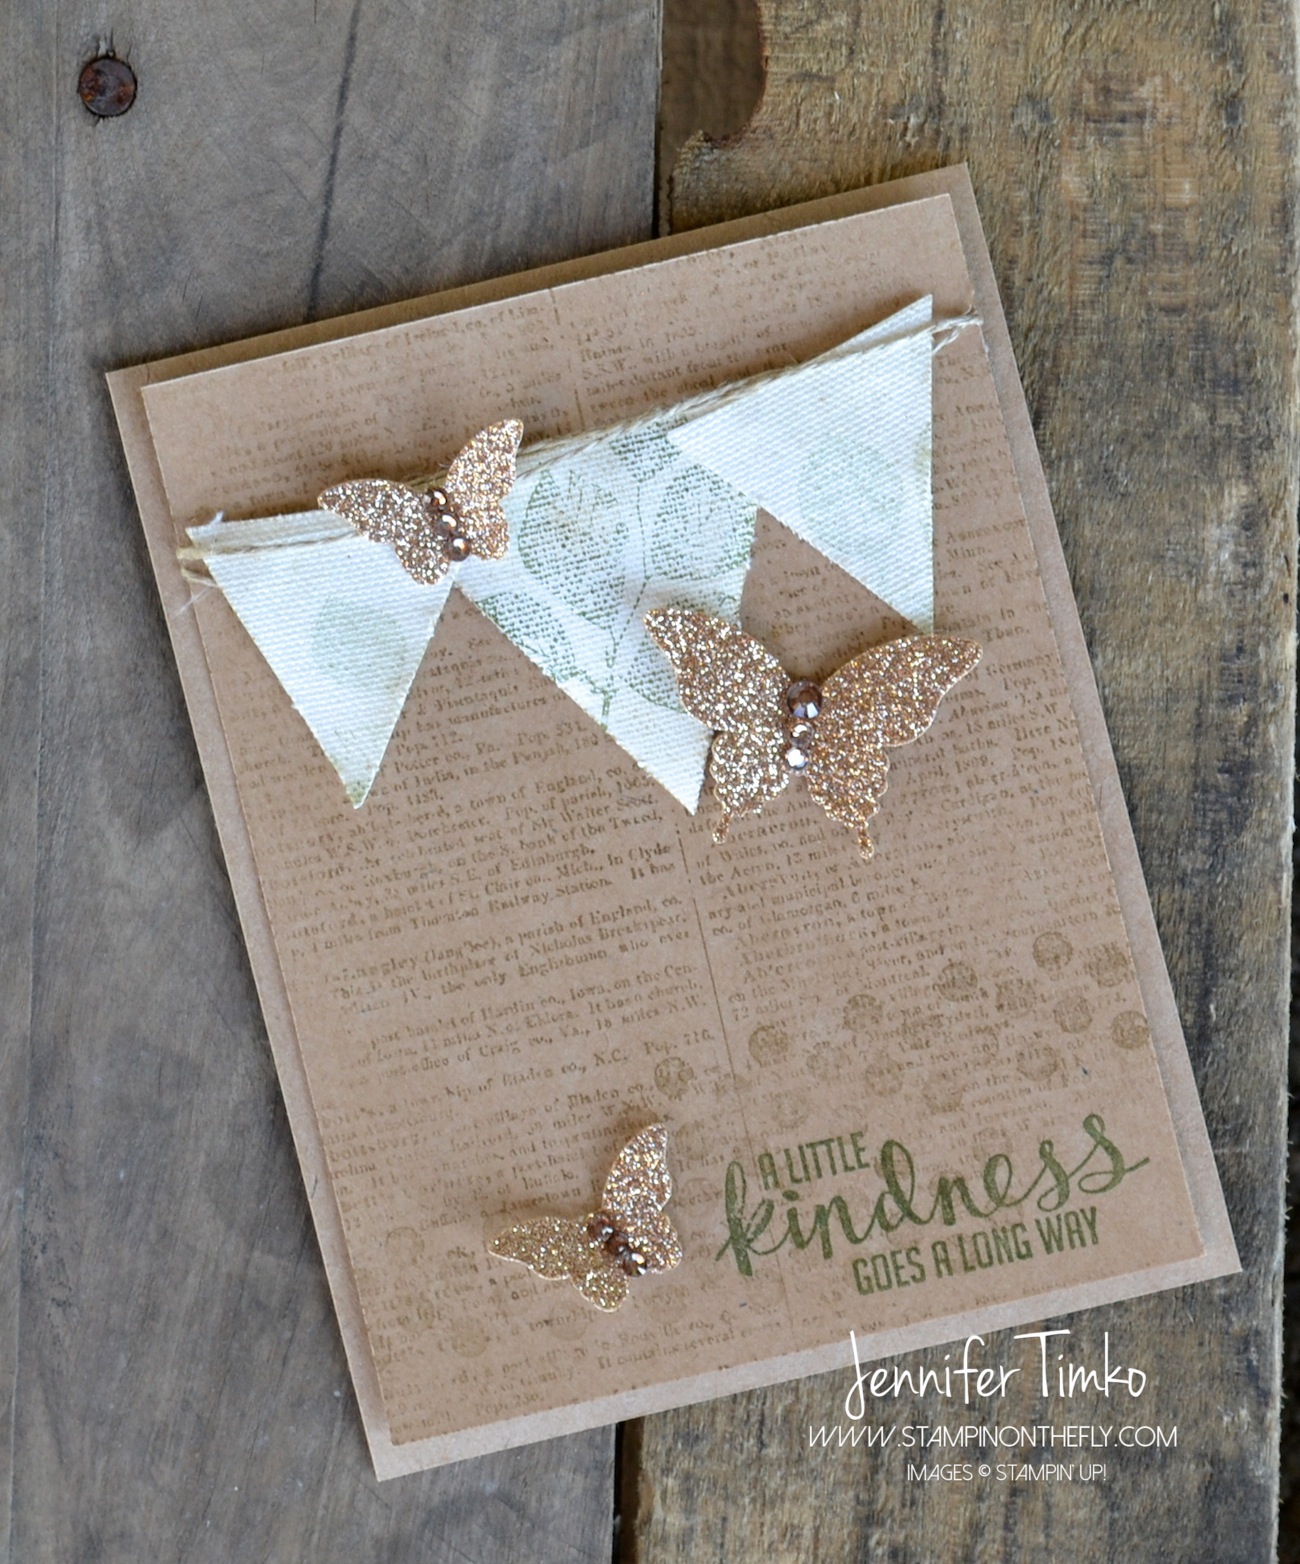
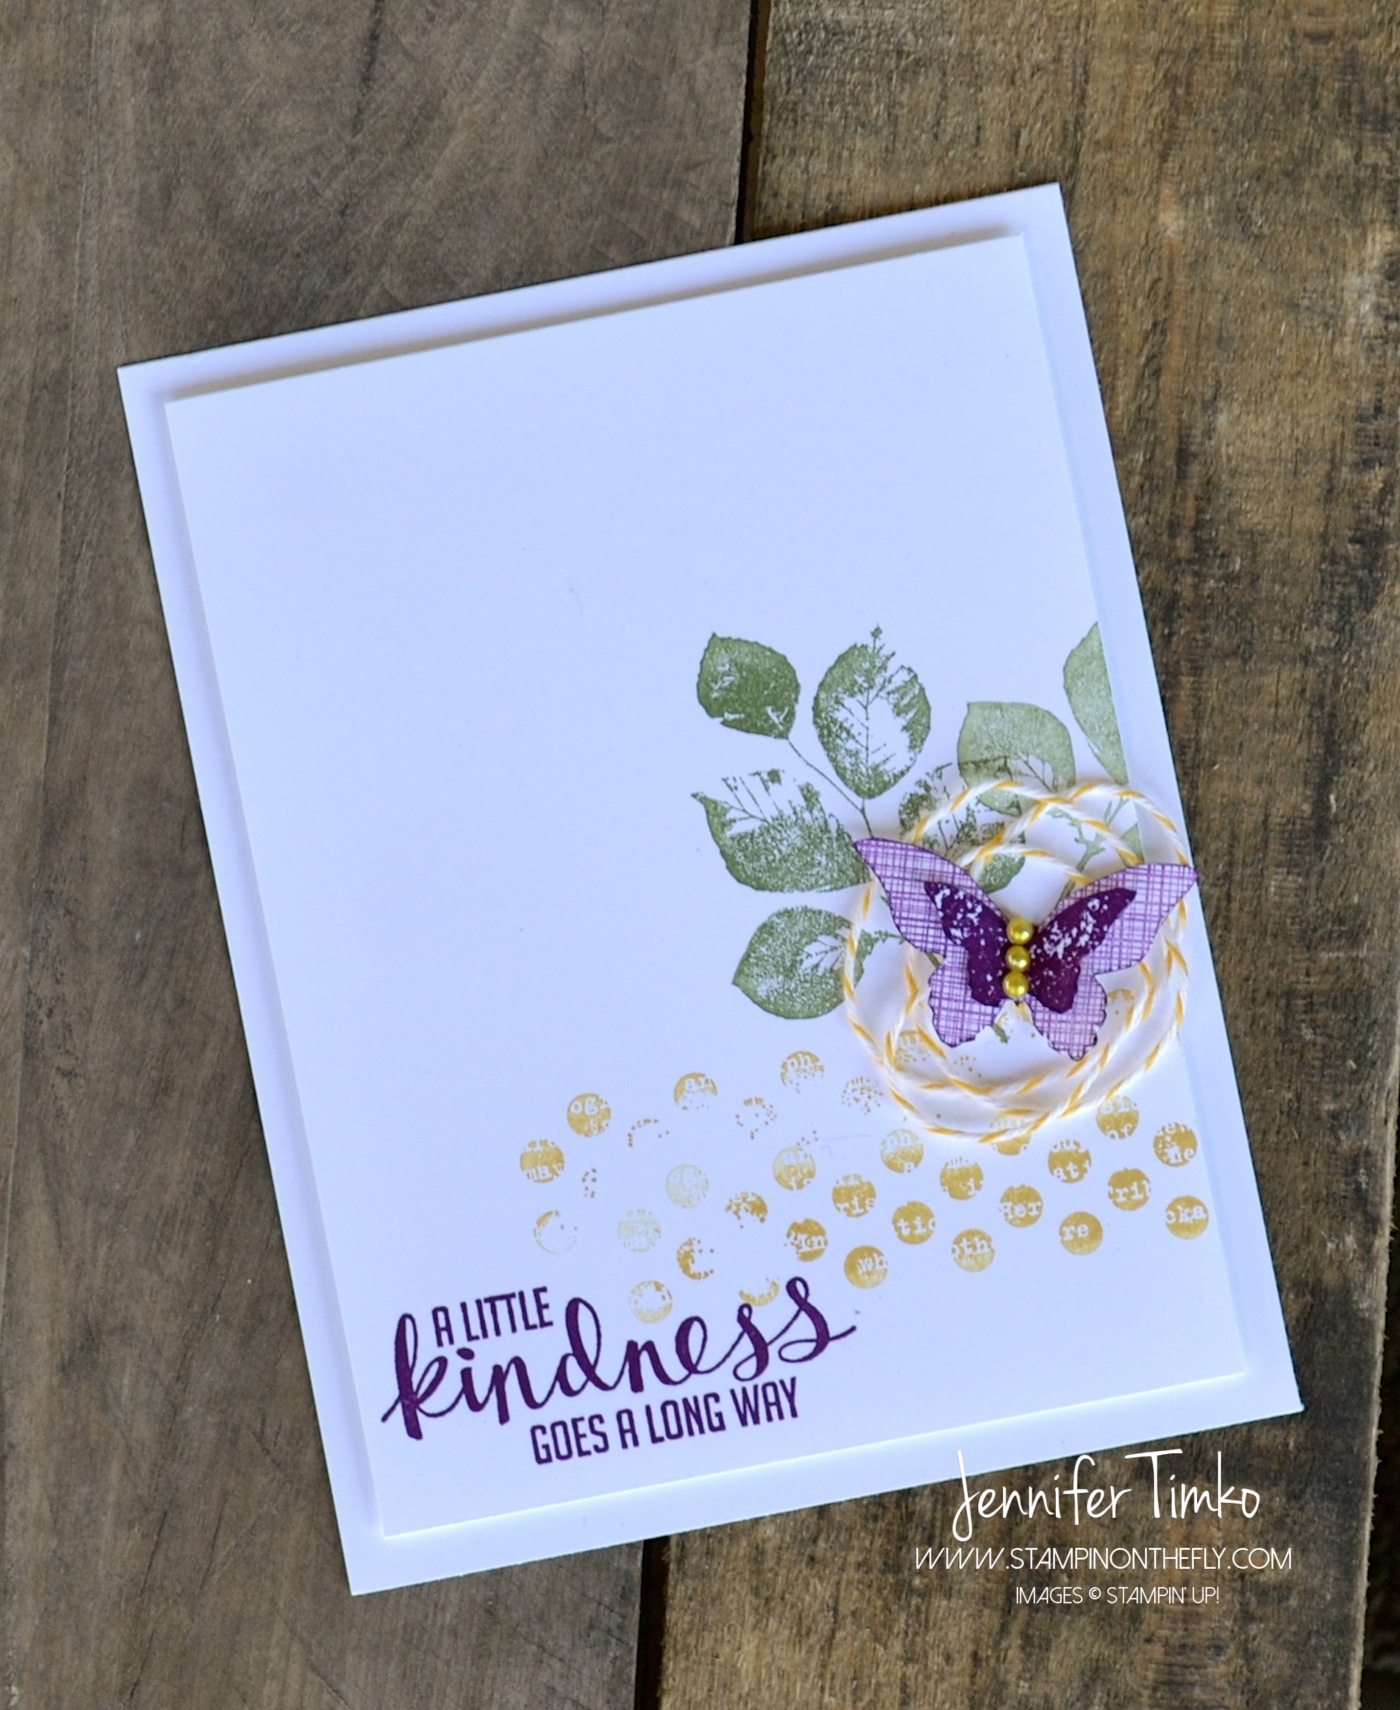
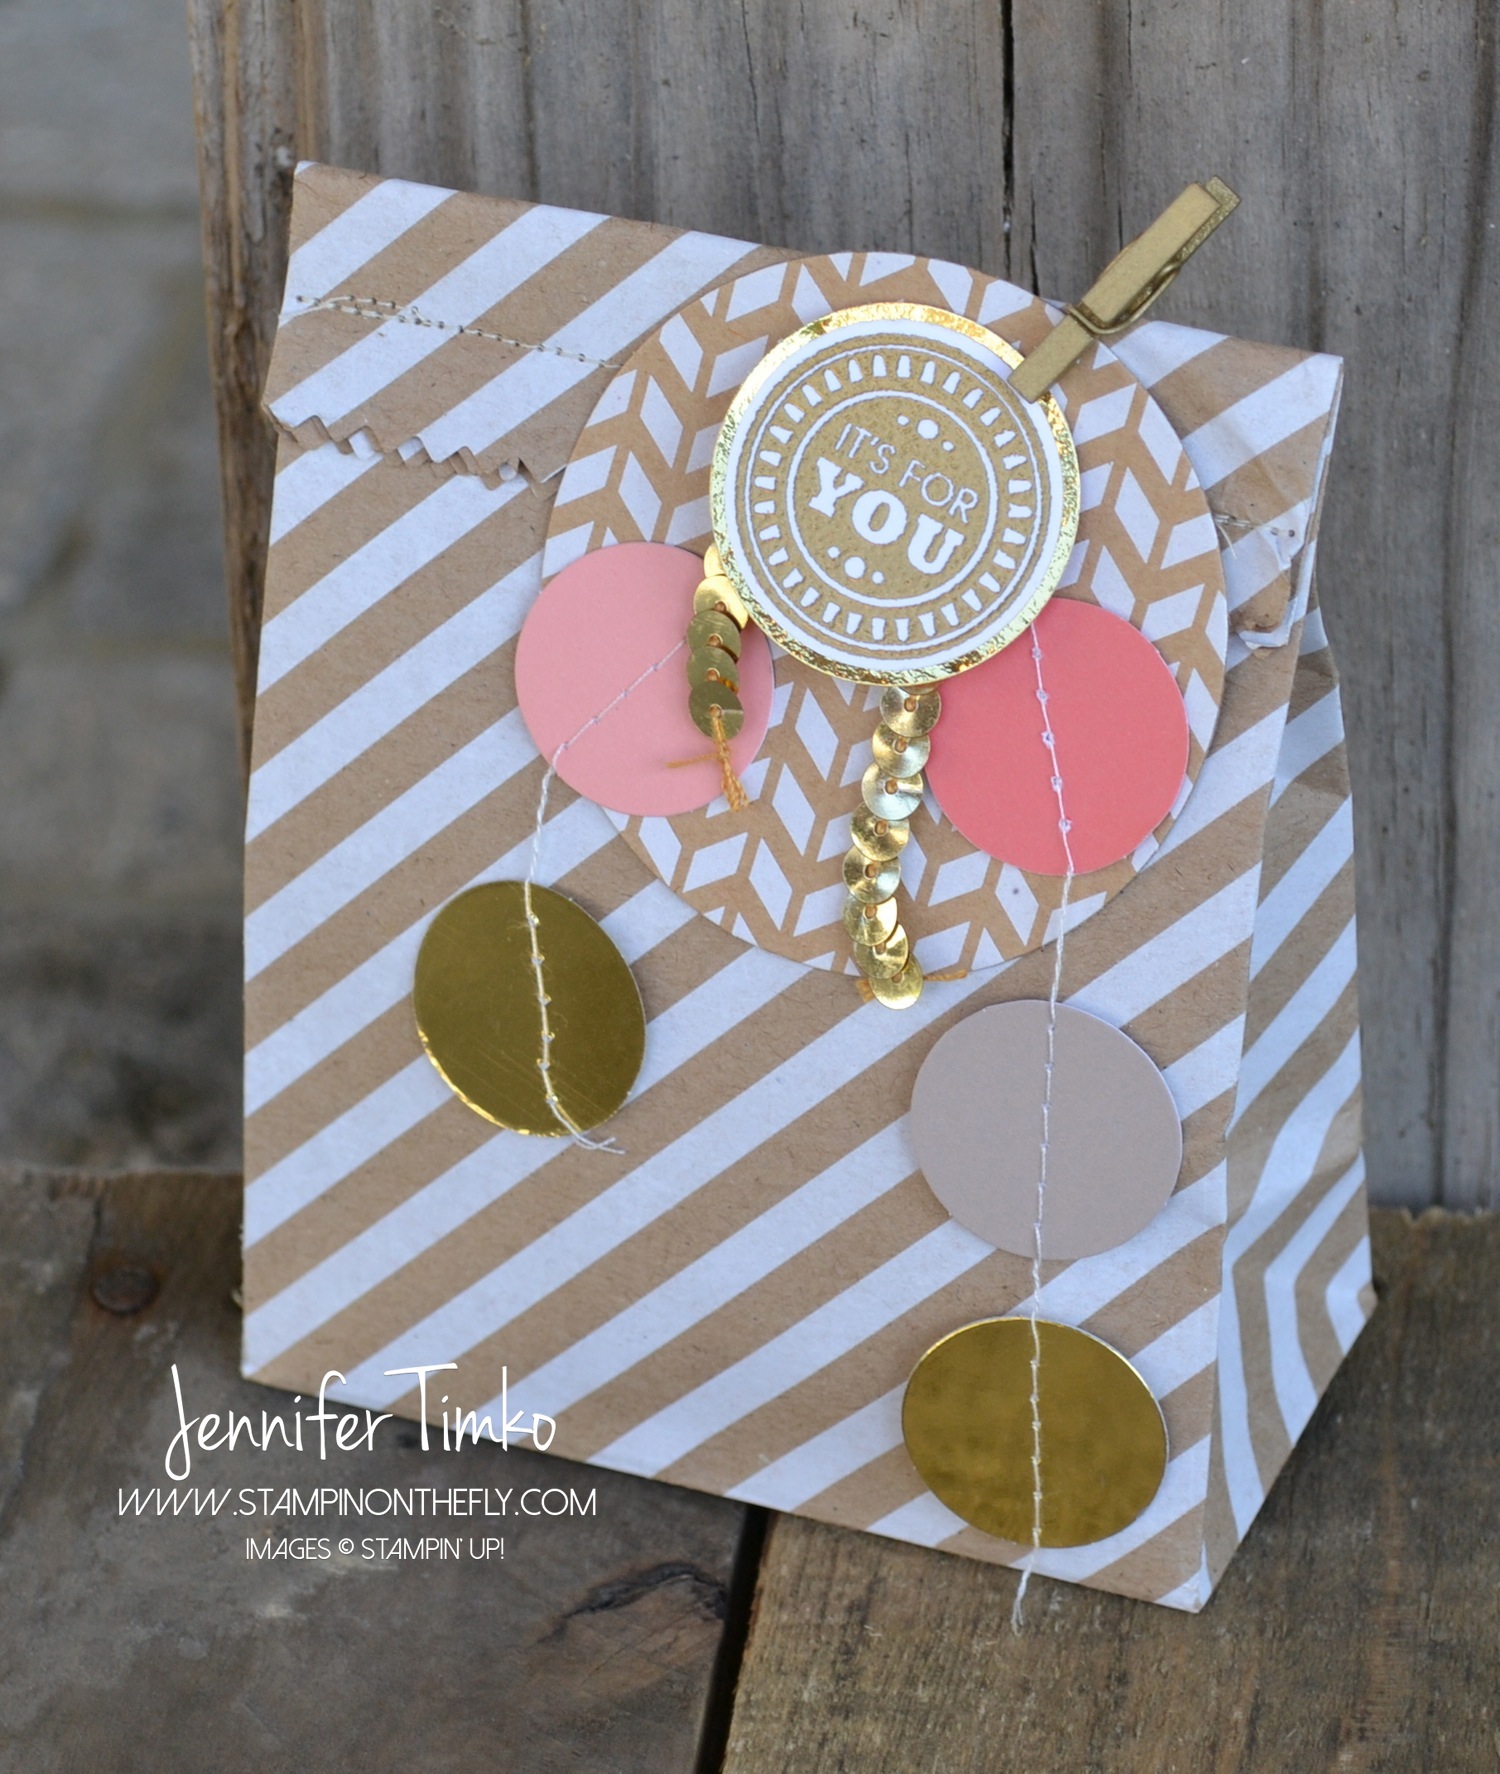
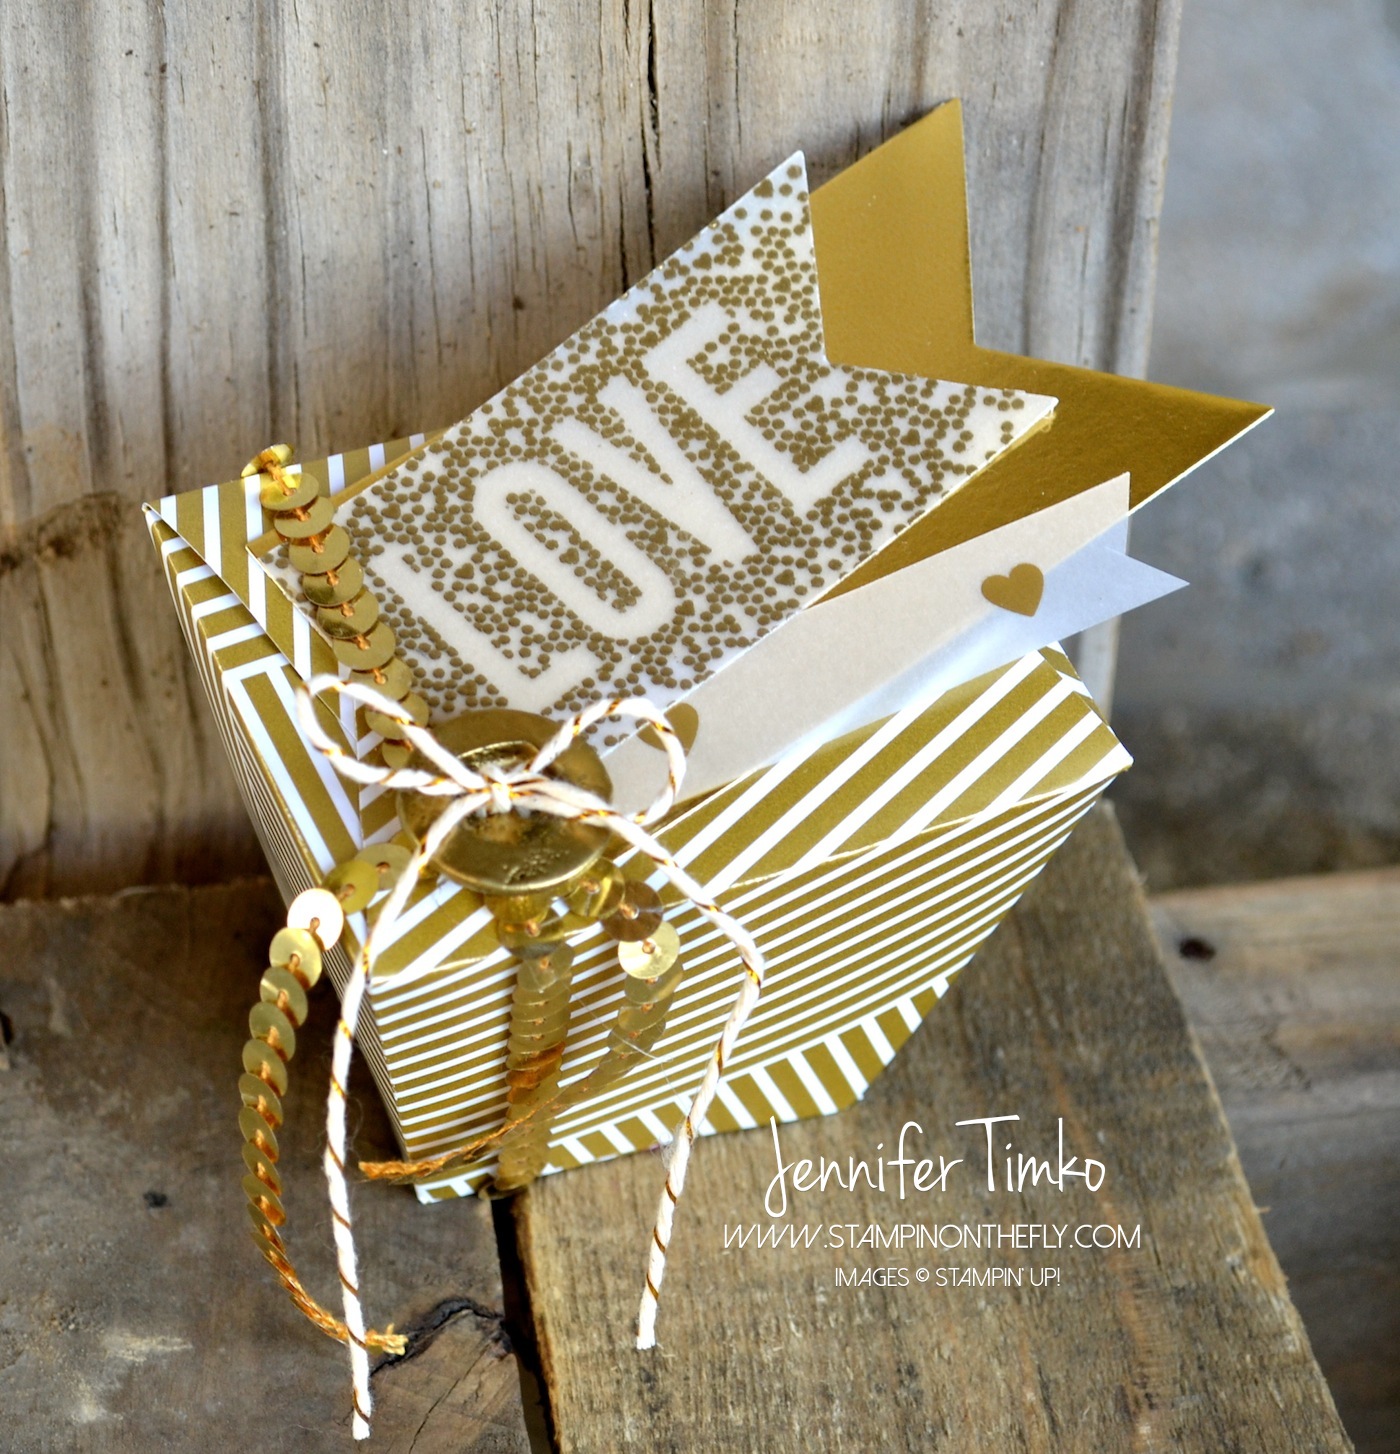
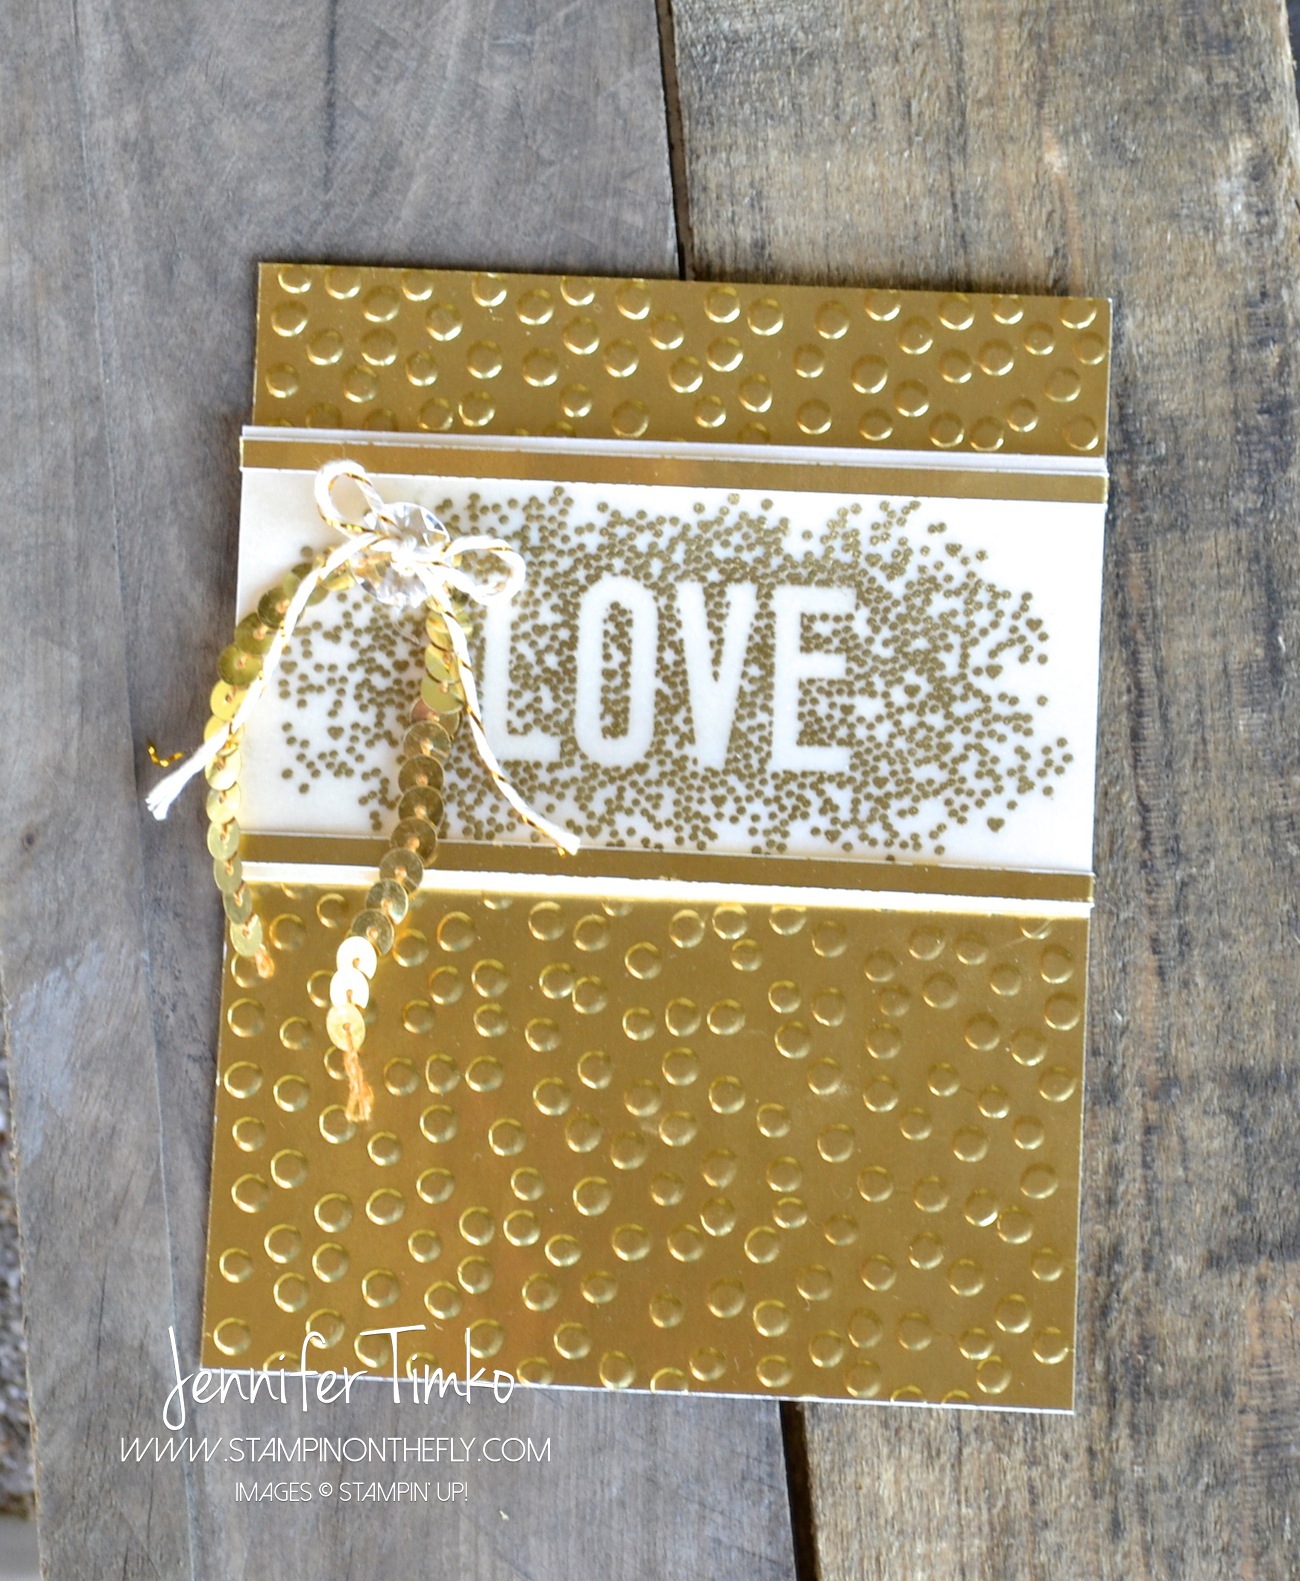
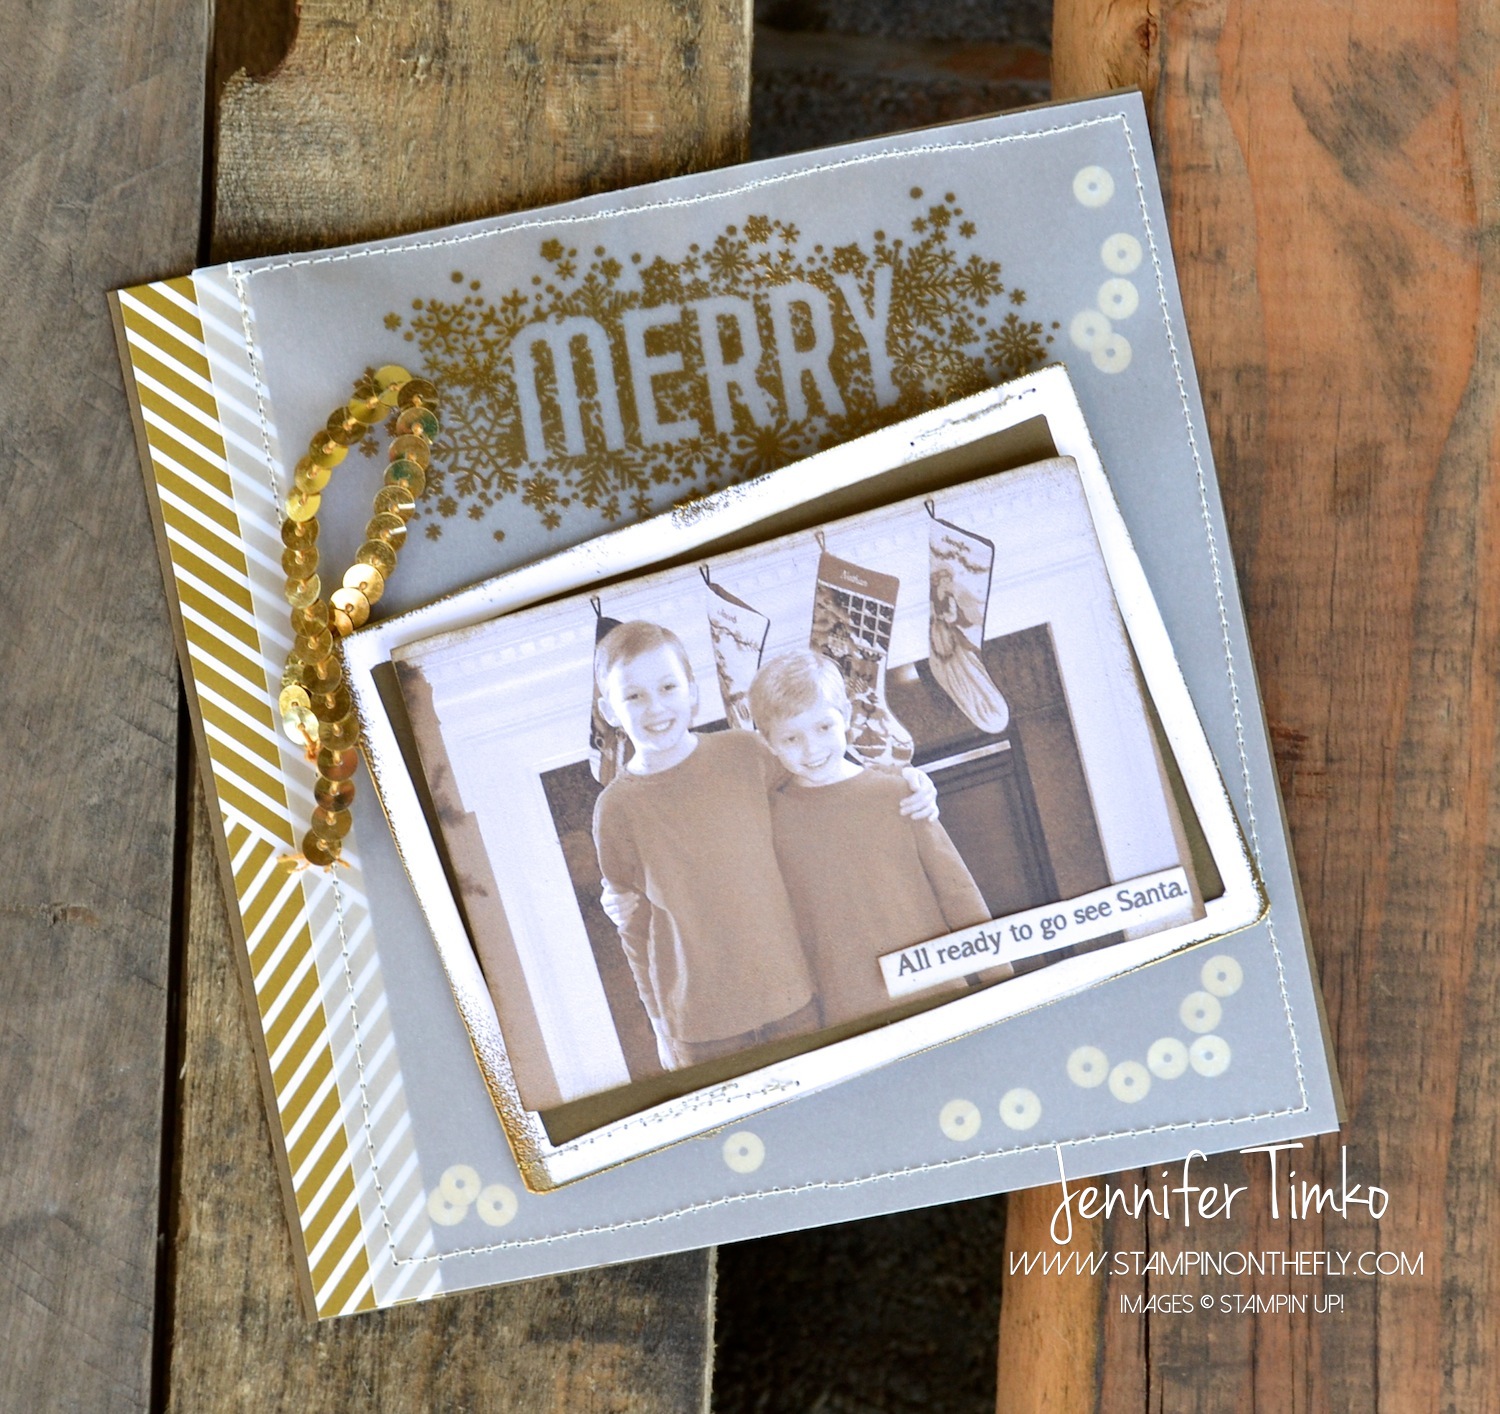
I just love the gold on this!  I used Gold Soiree DSP as the starting point for inspiration and attached it to a Whisper White card base.  Then I stamped this awesome sentiment in Gold Encore Ink onto Whisper White and heat embossed it with Gold Stampin’ Emboss Powder.  The result is so pretty and much more dramatic in person!  I framed the sentiment with Gold Foil and added on Gold Sequin Trim and a Vintage Faceted Button tied with the gold filaments from the Gold Baker’s Twine.  Simple to make and so striking because of the gold shine!

I have gotten pretty luck with weather in the system over the last few days and have had some great flights!  I love seeing families reunited at the end of a day when I walk to our hotel transportation.  This is a magical time of year to be an airline pilot.  If you are traveling during this season I do have a selfish favor to ask of you.  Please, please be patient if there are weather, maintenance or system delays.  All of the airlines are flying full schedules and there are LOTS of crews who will not be home with their families on special holidays.  Even though we really know how important it is for you to get to your destination, we also know that the most important gift WE can give to you is safety.  So we will make hard decisions that might delay flights or even cancel them.  We do this because you matter!  I know that I have a simple criteria for flying.  If I would not put my family on the plane, I will not allow YOUR family to fly on it.  So I ask you patience if you encounter issues.  Really…we want everything to go on time too!  It gets us home sooner to our families!  I cannot tell you how much it means when people thank us for a safe flight.  We care about on time and we strive for no bumps or issues but mostly we want you safe.

Ok…back to your regularly scheduled stamping blog.  Thanks for humoring me!  I’ll be back on Wednesday with our last Freshly Made Sketches challenge of this year.  You are going to love our sketch!  And I’ll be here Friday with a Fancy Friday hop.  We have a great theme for you this month.  Thanks so much for stopping in.  See you again sooN!

Click HERE to purchase these amazing products from Stampin’ Up!

Stamp:  Amazing Birthday; Paper:  Gold Soiree DSP, Whisper White, Gold Foil, ; Ink:  Gold Encore Ink; Accessories:  Gold Stampin’ Emboss Powder, Heat Tool, Gold Sequin Trim, Gold Metallic Baker’s Twine, Vintage Faceted Buttons, Dimensionals

Blog Signature 2014-001


Follow my blog with Bloglovin

Seasonally Scattered – Fall Thanks

Seasonally Scattered – Fall Thanks published on 5 Comments on Seasonally Scattered – Fall Thanks

10494554_10152594044857329_7043287500476660222_n

Today I have another card to show you from my Convention Display Board projects!  (Remember to click on the button above to link to all the other display stampers on our Pinterest board)

Seasonally Scattered - Fall ThanksI thought you would enjoy the fall colors of this card as we get more into fall mode.  These are such great ones too!  I started with my new In Colors and chose Mossy Meadow, Tangelo Twist and Hello Honey then added in some Early Espresso.  I markered up the stamp putting colors where they seemed to make sense.  Then I lightly spritzed the stamp with water to get the colors to bleed just a little.  The image was stamped onto Naturals Ivory paper and then cut with an Oval Framelit.  I good a piece of Mossy Meadow Card Stock and embossed it with the Honeycomb folder then layered some Burlap Ribbon and a Tea Lace Doily behind the image.  A button tied with Linen Thread completes it.

I am a little late on my post today.  It has been soccer madness for my family this weekend!  Two games for the oldest and one for the youngest.  Great playing and fun watching for all!  But whew…we are tired.  I hope your weekend was equally wonderful!  Until next time, thanks so much for stopping in!

Don’t forget….signs up are open now for Stamps on the Fly Bright & Beautiful Edition

Stamps on the Fly - Sep 14-001


Click HERE to purchase these amazing products from Stampin’ Up!

Stamp:  Seasonally Scattered; Paper:  Mossy Meadow, Naturals Ivory; Ink: Mossy Meadow, Tangelo Twist, Hello Honey, Early Espresso; Accessories:  Big Shot, Ovals Framelits, Honeycomb TIEF, Burlap Ribbon, Tea Lace Doily, Dimensionals, Linen Thread, Neutrals Button

Blog Signature 2014-001


Because I’m Happy….

Because I’m Happy…. published on 2 Comments on Because I’m Happy….

Why am I happy??!!!  In case you’ve been hiding, I need to remind you that the new Holiday Catalog is now live.  Yes…oh and the Big Shot special is still ongoing.  But today is the last day for that!  What does that mean?  You need to order and now!  I have links below to the Big Shot and the bundles so check them out.

Amazing Birthday - Happy happy

I’m also happy to share this card from my Display Stamper collection.  Can I confess that the Pharrell Williams song was in my head while I was making this?  And then I made variations of it as a swap card for the other display stampers.  That was a LOT of happy going on!  So I took the stamp from Amazing Birthday and inked the words with Real Red, Bermuda Bay, Daffodil Delight and Rich Razzleberry.  Then I just cut them apart.  Finally, I took the markers back to the edges to clean up my cutting.  They are up on Dimensionals with a background of Moonlight DSP.  Add in a Vintage Faceted Button and some Crushed Curry Baker’s Twine and you have a fun card!

Don’t forget….signs up are open now for Stamps on the Fly Bright & Beautiful Edition

Stamps on the Fly - Sep 14-001

And….I’m REALLY happy that you can get the Big Shot bundle (either the Big Shot with the Bright & Beautiful Stars Bundle or simply the Bright & Beautiful Bundle at the 15% discount) and still get the discount on my Stamps on the Fly program.  You can read about the whole thing HERE if you missed it.

Click HERE to purchase these wonderful Stampin’ Up products!

Stamp:  Amazing Birthday; Paper:  Whisper White, Moonlight DSP; Ink:  Real Red, Bermuda Bay, Daffodil Delight, Rich Razzleberry; Accessories:  Vintage Faceted Button, Crushed Curry Baker’s Twine, Dimsensionals

Blog Signature 2014-001


Display Stamper Scrapbook Pages

Display Stamper Scrapbook Pages published on 1 Comment on Display Stamper Scrapbook Pages

10494554_10152594044857329_7043287500476660222_n

More Convention Display Board projects for today!  (Remember to click on the button above to link to all the other display stampers on our Pinterest board)

This is not my normal Wednesday post.  I’m taking a week off from Freshly Made Sketches but please stop over and see all that the team has created.  The sketch from Rita is fabulous too!

I hope you excuse my absence over the last few days.  I finally took a little down time for the summer.  The family and I went on a small vacation last week and then I rolled right back into a trip for work.  I thought it best to take week off from the challenge and stamp for all kinds of upcoming things.  More on that in the next few days.  Until then, I have some of my projects from the Display Boards to continue sharing.

Amazing Birthday - Ridiculously Amazing

I have two scrapbook pages for you today.  And I love them both!!  The first one is done in the style of my Artisan 2013 friend Cathy Caines.  I love her use of patterns and colors on white so I tried to see what I could do with that.  You know what?  I found it really freeing to just start layering patterns until things seemed right!  I started with the stencils from the Build a Banner SImply Created Kit (the new Dots & Stripes would work great too).  I sponged on Bermuda Bay into the circles.  Then using the Dotty Angles triangles stamp, I stamped on Real Red.  I purposely didn’t fully ink them to match the look of the stenciling.  Then some bits and pieces just started to get put on.  A piece of card stock.  A banner from Amazing Birthday.  Sequins (LOVE these).  The date using the Alphabet Rotary Stamp.  And finally the sentiment using the big one from Amazing Birthday.  The banner part is hand cut and the arrow is from the On Film Framelits.  I added a little pop of gold DSP (Gold Soiree) behind the picture and then added this picture of my oldest.  Needless to say the color palette came from the colors in the picture!  It is from Sea World a few years ago and I love this one!

Kinda Eclectic - Butterflies

Again on this one I started with the picture (that is truthfully the only way I can create scrapbook pages).  This one was taken in the Butterfly Pavilion at the Museum of Natural History.  This butterfly came and landed on my youngest’s head and just stayed there.  So the Kinda Eclectic set seemed like the perfect accent.  I used prints from the Moonlight Paper Stack and again just started layering.  I stamped the butterflies onto White Filter Paper and also some of the the circles from the set.  The butterflies were punched out using the Elegant Butterfly and Bitty Butterfly Punches (put a piece of card stock behind to make the punching easier).  The I tore the edges of the circle piece for extra texture.  The sentiment uses the Alphabet Rotary Stamp again (I know I have said it but it bears repeating….this rotary stamp is awesome!).

I hope you like these sweet pages as much as I do.  Both different but put together in much the same way.  I will be back later this week.  Until then, hope your day is great!

Click HERE to purchase these amazing products from Stampin’ Up!

Blog Signature 2014-001


Kinda Eclectic – An Eclectic Display

Kinda Eclectic – An Eclectic Display published on 1 Comment on Kinda Eclectic – An Eclectic Display

10494554_10152594044857329_7043287500476660222_n

More Convention Display Board projects for today!  (Remember to click on the button above to link to all the other display stampers on our Pinterest board)

Today I am showing you some projects using the new stamp set Kinda Eclectic.  This was the set I was most excited to get with display stamping and it did not disappoint!  So many beautiful things to create with it!

Kinda Eclectic - Glimmer Banners

My first card was all about that lovely new Kraft Card Stock.  Wow it is pretty!  I hand cute the little banners out of  Canvas Creations and stamped the leaves on with Mossy Meadow after having stamped them off a bit.  The focal layer of the card was first stamped with the Dictionary background in Soft Suede (also stamped off) and then the dots from Kinda Eclectic.  I added the sentiment in Mossy Meadow.  The Elegant Butterfly and Bitty Butterfly Punches (which also coordinate with the set) were used to punch Champagne Glimmer Paper.  I added Linen Thread to create the banner feel and the added the butterflies.  It didn’t seem complete so I put on some Basic Rhinestones that I had colored with the Skin Tone Assortment of Blendabilities.

Kinda Eclectic - Soft Leaves

My next card stayed with the neutrals feel but with a pop of color.  The card base is Crumb Cake.  I stamped the leaves in Versamark and embossed with White Stampin’ Emboss Powder onto Soft Sky Card Stock.  Then, using the Skin Tone and Coastal Cabana Blendabilities, I added the color details in the leaves.  Patience and a light touch were all that were required to get this added dimension to the stamping.  The sentiment  was stamped in Crumb Cake.  I frayed one edge of the 1-1/4″ Burlap Ribbon and added it to the side of the panel.  A Very Vintage Button tied on with Linen Thread finishes the card.  I love the look of this one!

Kinda Eclectic - In color Eclectic

Finally a card that I do not think make the boards at Convention.  And I know why!  After seeing the Make & Take using this set, I realized that mine was really similar.  I would have sworn mine was a CASE if I didn’t know I made it before seeing the cards, lol!  In any case, you can see that I used three of the new In Colors for this and love the result.  Hello Honey, Blackberry Bliss and Mossy Meadow….gorgeous together.  There is Crushed Curry Baker’s Twine looped behind and the pearls are colored with the darkest of the Daffodil Delight Blendabilities.

I hope you enjoy seeing these projects as much as I enjoy sharing them.  Back tomorrow with a new card for Freshly Made Sketches.  Until then, have a great day and thanks so much for stopping in!

Click HERE to purchase these amazing products from Stampin’ Up!

Blog Signature 2014-001


Kinda Eclectic – Banner Frame

Kinda Eclectic – Banner Frame published on 3 Comments on Kinda Eclectic – Banner Frame

10494554_10152594044857329_7043287500476660222_n

Today I have one of my 3-d items to show you from my Convention Display Board projects!  (Remember to click on the button above to link to all the other display stampers on our Pinterest board)

The featured stamp set today is Kinda Eclectic with a side focus on the Big Shot.  Why the Big Shot?  Because it makes this little frame EASY to make!!  See more about a new Big Shot special below!

Kinda Eclectic - Framed Banners

I had this little frame from Ikea sitting around for a long time just waiting for the right project (please tell me I’m not the only one who does this?!).  Finally the right idea hit!  I cut the banners with my Big Shot using the Banners Framelits out of the Moonlight DSP Pack.  I stamped on images from Kinda Eclectic using Mossy Meadow Ink (this new In Color is one of my faves….along with the Blackberry Bliss).  Then I started adding little details.  A Tea Lace Doily, the “xoxo” from the Circle Card Framelit, the new 2014-16 In Color Clothespins….all perfect add-ons!  For the background I lightly stamped the Dictionary stamp in Smoky Slate onto Smoky Slate Card Stock.  The butterfly was stamped in Mossy Meadow again and punched out with the Bitty Butterfly Punch.  I attached all the banners to Crushed Curry Baker’s Twine and secured the twine behind my piece of card stock.  Some strategically placed dabs of hot glue hold things in place.  I added these black and white photos (recolored in MDS) of my two cuties all dressed up and LOVED the result.  Thinking I’m going to do this one as a class.  Because I need another one!

It’s a BIG deal!!

You know how much I love my Big Shot.  Pretty much can’t create without it!!  Now is the time.  If you do not have one, you NEED to have one.  And Stampin’ Up is making it oh so easy to do.

  1. Buy a Big Shot and get a FREE bundle (listed below)…..that is a FREE stamp AND framelit set with purchase of a Big Shot.  OH WOW!!
  2. Ok…you already have a Big Shot.  What now?  You are covered too!  Purchase any of these bundles below at a 15% discount.

Special runs from Aug 1st – Aug 31st (yes that is now!).

While I love all the bundles, I REALLY love the new Bright & Beautiful stamp and matching star framelits!  I have some things in the works for this one and if you purchase option 1 or 2 from me using the Bright & Beautiful option, you will get a special deal in the future!!  *** Hint – Click on the Bright & Beautiful Bundle and page through the pictures to see what the new stamp looks like! ***

Thanks so much for dropping in today.  Hope to get some stamping in today so I’ll look to post again in the next couple of days!!  Until then, have a great day!

Click HERE to purchase these amazing products from Stampin’ Up!

Stamp:  Kinda Eclectic; Paper:  Moonlight DSP Pack, Smoky Slate; Ink: Mossy Meadow; Accessories:  Big Shot, Banners Framelits, Circle Card Framelits, Tea Lace Doilies, 2014-16 In Color Clothespins, Crushed Curry Baker’s Twine, Itty Bitty Butterfly Punch

Blog Signature 2014-001


Frequent Flyer Program and more news…

Frequent Flyer Program and more news… published on No Comments on Frequent Flyer Program and more news…

You know I had to do it.  It was too obvious, don’t you think?!  As I was ending my Artisan year and looking to the future, the first thing I wanted to add in was a loyalty program.  To say thank you to my customers for all their support of my business!  Was there really any other name I could choose??!!  I think not!  I am also adding some new product based class offerings.  Today I tell you about one for my local customers but no fear.  I have something in the works for those of you who don’t live near me.  I’ll be revealing the details on that one later this month because it involves the upcoming Holiday Catalog.  I am working busily behind the scenes to get it ready for you and can’t wait to share….  But enough on that.  Today the things I CAN tell you!

Frequent Flyer Points Program

This program is courtesy of me as a thank you for your loyalty.  Points are only redeemable from Jen Timko.

Download your point tracker here: Frequent Flyer Points Card

Details:

  • Place an Online Order or email me your order at jentimko@gmail.com
  • You earn one (1) Frequent Flyer Point for every $25 spent on product (before shipping and tax). This is done in full increments of $25. For Instance, an order of $24.95 does not qualify you to earn a point and an order of $50.25 would get you Two (2) points. Points do not carry from order to order.
  • For every ten (10) points, you will receive $15 in Free merchandise of your choice (I pay the shipping and tax).
  • You are responsible for tracking your points and orders but I will keep a card for you too for verification. When your card is full, simply send me your completed sheet along with your product choices.
  • One customer per sheet only and must be redeemed within 60 days of qualification. Twenty (20) points maximum per redemption.
  • Points retire two years after purchase.
  • Hostess products and product shares do not count towards points.

Product Based Class Offerings

I have so many ideas I want to share that it was hard to know where to start.  I think many of you are like me and you don’t like “one trick ponies”.  You know…products that look great at first but have limited usefulness.  I have to say that Stampin’ Up does a great job with the flexibility of their products but I want to show you how to get the most out of some of the latest offerings.  So I’m starting with Blendabilities!  Because I love them!

*****Blendabilities “on the Fly” *****

We will created 3 projects demonstrating different techniques with the Stampin’ Blendabilities Markers.  You will receive a FREE Cherry Cobbler Assortment of the markers and a Memento Tuxedo Black Ink Pad with the class.  If you already own this color, substitution is allowed but you will need Cherry Cobbler for the class.  I will provide all the pre-cut materials, accessories and additional colors of Blendabilities to complete your projects.  Class fee is $25. Prepayment required no later than August 14, 2014.

Class in Jen’s Stamp Room on Saturday, August 23rd at 2p.  Prepayment is your RSVP.

I can’t wait to get going with my new class and project ideas this month.  Looking forward to sharing what I love with both my local customers and those of you who live a bit further away.

And since I can’t leave without showing you a card, how about this one?

Seasonally Scattered - ThanksThis is another of my Display Stamper projects for Convention using the Seasonally Scattered stamp set.  The beautiful Moonlight DSP Stack does most of the work with the lovely prints and I just stamped on the image with Blackberry Bliss ink.  The Basic Metal Button was tied with Baker’s Twine colored with a marker.

Back soon with more projects from the Display Boards.  Until then…I hope your weekend is great!  Thanks so much for stopping in!

Click HERE to purchase these amazing products from Stampin’ Up!

Stamp:  Seasonally Scattered; Paper:  Blackberry Bliss, Moonlight DSP Pack; Ink:  Blackberry Bliss; Accessories:  Basic Metal Button, White Baker’s Twine

Blog Signature 2014-001


Amazing Birthday – A Display Variety

Amazing Birthday – A Display Variety published on 2 Comments on Amazing Birthday – A Display Variety

10494554_10152594044857329_7043287500476660222_n

As promised, another post about my Convention Display Board projects!  (Remember to click on the button above to link to all the other display stampers on our Pinterest board)

Today I am showing you some projects using the new stamp set Amazing Birthday.  And amazing is right.  This set is so flexible!!  I think the projects today show the versatility!

Amazing Birthday - Moonlight Banner

First up, on of my favorite cards that I created.  Can I just say for the record (pretty sure I have already but just in case) this new Kraft Card Stock is the BEST!  I love it!  I combined it with the new Moonlight Paper Stack to create this pretty card.  The banner was stamped with Soft Suede and the cut out.  I cut the end a little long so I could roll it around the end of a toothpick.  I tucked the banner behind a bow made out of the new Blackberry Bliss Stitched Satin Ribbon.  The little flowers are the new Itty Bitty Accents Punch Pack (set of three!). I punched two and layered them, adding on a Basic Pearl colored with the Razzleberry Blendabilities.  A doily behind it all…because they are so pretty!

Amazing Birthday - Celebration Bag

This bag came together so fast and I love it!  I turned to the Celebration Basics Kit and the Calypso Coral Celebration Add-On Kit for this one. I was happy to see those return!  The banner of circles, the bag and the round tag all come from that set.  I stamped the sentiment in Gold Encore Ink and embossed with Gold Stampin’ Emboss Powder.  I added in some of the Gold Sequin Trim and a Mini Metallic Clothespin for more gold goodness.  The top is sewed closed since it was going to the display boards but some twine or just the clothespin would do the job in “real life”.

Amazing Birthday - Sweet Taffy Amazing

Finally, a card with a completely different color palette!  Brights!  Using the Sweet Taffy DSP.  Pretty self explanatory with that awesome sentiment set! Super fun and the DSP does all the work.  I added some Candy Dots and a button to match along with Crushed Curry Baker’s Twine for finishing details.

I hope you enjoy these!  I’ll be back tomorrow with a great new announcement.  Looking forward to sharing the details with you!  Until then….have a great day and happy stamping!

Click HERE to purchase these amazing products from Stampin’ Up!

Blog Signature 2014-001


Adventures for the Display Boards

Adventures for the Display Boards published on 3 Comments on Adventures for the Display Boards

10494554_10152594044857329_7043287500476660222_n

As promised, another post about my Convention Display Board projects!  (Remember to click on the button above to link to all the other display stampers on our Pinterest board)

What am I up to today?  Project Life by Stampin’ Up!  While some of our focus was on three specific stamp sets, we also had the option to include some projects made with Project Life.  What is this?  It is a memory keeping system that is super simple and fun.  No stressing about layouts and lots of design elements and hard stuff and…..  Nope.  No stressing.  The key is keeping it simple.  Pictures and some fun printed cards and journaling the story with the pictures.  But me being me, I had to make some cards with it too.  Because this system is versatile.  So you will actually use it! (Click any pictures to see them larger)

Project Life - Every day note cards

So it started by accident.  I thought the biggest of the cards (4″ x 6″)  from the Everyday Adventures PL x SU set would be super cute folded in half to make 4″ x 3″ note cards.  So I started looking through the stack to figure out which ones worked best with the folding.  Many of them it seems.  So I chose a color variety.  And then I started adding on things from the Everyday Adventures Accessory Pack.  And buttons, staples, a little ribbon, Baker’s Twine….whatever worked.  Then I pulled out the Project Life Corner Punch and went wild with it too.  It was fun, it was quick and I LOVE how they turned out.  It was hard to send them in.  Of course they needed little envelopes so I pulled out the Envelope Punch Board to make them out of coordinating card stock in just the right size.

Project Life - Note card box

And then I made them a special box.  A little tin I had (from the Container Store, I think).  Another card and some more fun doodads (that is the official term I will now use for the accessories) and a little bit of card stock behind the see-through top and some more ribbon.  Fun, huh?  Conveniently the right size.  I’d like to say I planned it but I wasn’t that smart.  I was lucky!  And you could always build them a box out of the new box punchboard (you KNOW that will be awesome – it is in the new Holiday Catalog and you will get to see it soon!).

Project Life - Love u

And because all the PL x SU stuff was all over my desk by this time, I started on a more traditional card.  Again just playing and layering with cards big and small and all the cool doodads.  Because Project Life is all about fun and did I mention no stress?  Yes, no stress.  Layouts are simple because the cards fit the special Project Lifepages.  Just add pictures.  Want to see all of the products available so far?  Click here:

Project Life by Stampin’ Up!

I’ll be back soon with more projects.  Maybe even tomorrow if I have time to edit some more pictures.  Out flying around this weekend so keep an eye out for me!  Until then…happy stamping!

Click HERE to purchase these amazing products from Stampin’ Up!

Stamps:  PL Remember This, Lots of Thanks, Paper:  Crushed Curry, Strawberry Slush, Bermuda Bay, Basic Black (card base); Ink:  Strawberry Slush, Bermuda Bay; Accessories:  Project Life by Stampin’ Up Everyday Adventures Kit, PLxSU Everyday Adventures Accessories, Buttons, Baker’s Twine, Hello Honey Stitched Satin Ribbon, Project Life Corner Punch

Blog Signature 2014-001


Seasonally Scattered in Gold

Seasonally Scattered in Gold published on 2 Comments on Seasonally Scattered in Gold

10494554_10152594044857329_7043287500476660222_n

The day is finally here!  I can start sharing projects I created for the display boards at Stampin’ Up’s Annual Convention in Salt Lake City.  While I was not able to go this year (and yes, I am really missing out on lots of fun), at least some of my work is there.  So without further ado…I introduce to you…..Seasonally Scattered!

Seasonally Scattered - Take out box

Today I am sharing a group of projects all made with this fun stamp and the suite of gold products that Stampin’ Up has available.  While this stamp won’t be available for customers until August 28th, the rest of the products are in the new 2014-15 Catalog.  This takeout box is just the same as last week’s Artisan Team project.  I printed the template onto the back side and cut it out of Gold Soiree DSP.  Super easy.  But guess what, in the new Holiday Catalog, there are new (and even EASIER) box options for DSP (takeout boxes, a box punchboard, and more!).  Yep…no excuses not to create boxes with your DSP!  I stamped with Gold Encore Ink onto White Vellum Card Stock and then embossed with Gold Stampin’ Emboss Powder.  I used my Banners Framelits to cut it into a tag.  Using Gold Foil, I cut a bigger banner with the framelits and then hand cut a little one out of Fancy Foil Designer Vellum.  I took a Vintage Faceted Button and inked it up then embossed it with Gold Stampin’ Emboss Powder too.  (Be careful on that one…trust me)  I tied some Gold Sequin Trim around the box and then added on the button tied with Gold Metallic Baker’s Twine.  Cute, shiny and fun!

Seasonally Scattered - Gold Love

Next up a “sister” card to the box.  I created the image panel the same way as the tag above.  I layered it onto a Gold Foil panel and wrapped the narrow gold pieces around the back to help hide glue and keep it together (it is all about concealing with Vellum).  Then I tied up the Vintage Faceted Button with Baker’s Twine again and added it to the sequin trim.  The main panel is embossed with Decorative Dots.  Perfect card to go with your little gift!

Seasonally Scattered - Merry Scrapbook

Finally a fun scrapbook page.  Yes, it is a shaker page.  Because why not?!  I stamped the sentiment in gold and embossed again.  Using an 8″ x 8″ base of Soft Suede Card Stock, I added a strip of Gold Soiree DSP  Then attached the vellum panel but starting to sew around the edges.  Before finishing I added some sequins loosened from the Gold Sequin Trim and finished the pocket part of the page.  I cut a frame from Whisper White and “distressed” it with gold ink and embossing then added some extra stitching.  I added a picture of my boys that I had edited in My Digital Studio and threw on a little more of the sequin trim.  I love this page.  I had a hard time sending it in.  Good thing it isn’t too hard to duplicate!

Now for more info on display stamping.  While we were all hard at work making our samples, this amazing group of stampers cheered on each other’s progress.  We eventually decided to create a group Pinterest page so that you could see all this stamping goodness in one place.  We will use the logo above (at the top of my post…linked to the page too) to help you find us and also link our work to the page as we post on our blogs.  I recommend you just follow that board.  Seriously.  You are going to be in awe!!

I’ll be back soon with more projects and stay tuned for my last two weeks of Artisan team work. Until then…see you soon and happy stamping!

Click HERE to purchase these amazing products from Stampin’ Up!

Stamp:  Seasonally Scattered; Paper:  Gold Soiree DSP, White Vellum Card Stock, Gold Foil, Whisper White, Soft Suede, Gold Fancy Foil Designer Vellum; Ink:  Gold Encore Ink; Accessories:  Gold Stampin’ Emboss Powder, Heat Tool, Gold Sequin Trim, Gold Metallic Baker’s Twine, Vintage Faceted Buttons, Big Shot, Banners Framelits, Decorative Dots Embossing Folder

Blog Signature 2014-001


Primary Sidebar