Skip to content

Quilted Bow

Quilted Bow published on 21 Comments on Quilted Bow

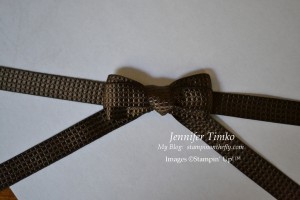
Guess what our theme is over at SU Only Challenges this week??!!!  RIBBONS AND BOWS!!!!!  Sorry to shout but I think we can agree that ribbon is one of the best ever accessories from Stampin’ Up!!  I love them all.  So then I was presented with a dilemma.  How do I choose which ribbon??!!  After much debate I simply went with the newest ribbon to my “collection”…Early Espresso Quilted Satin Ribbon.
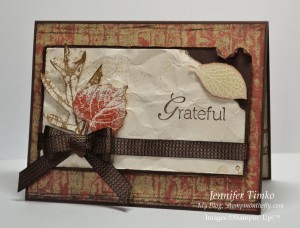
I made the bow here using the same method as some previous cards and I will give you all the details further down in the post.  The card started with the new-to-me set French Foliage.  It was first introduced in last year’s Holiday Mini and when it made the big catalog went on my first order.  I looked to the Well Worn DSP and found this wood print.  Perfect background for the leaves!  The Early Espresso lines on the bottom of the DSP are part of the print and I created a matching top by running the edge of my ink pad along the DSP.  The leaves were inked in Cajun Craze, River Rock and Soft Suede with a bit of Early Espresso added to the edges with a sponge dauber.  Now to the bow…
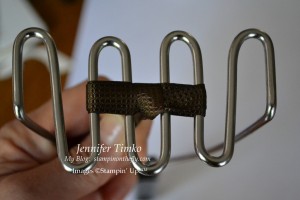
You saw my previous tutorial on the fork bow and this is another variation using a potato masher.  It happens to make just the right size bow!!  The bow I made today is a triple bow but you can also use this for a single or double version.  Since it is so similar to the fork bow, the picture above shows it wrapped three times, one tail pulled down and the other pulled over (if you need to see the first steps better, click to the fork bow tutorial).
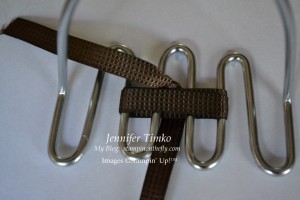
Turn over the potato masher and put it down on the table.
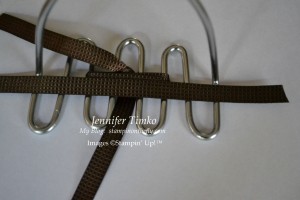
Add an additional piece of ribbon that long enough to go across the panel and wrap around a little to the back.  Position it so that the bow is in the correct place for your card.
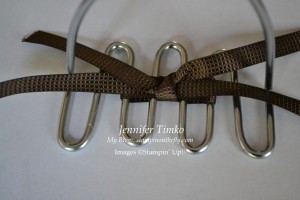
Tie the first half of a know and position the tails of your bow to hang correctly.  Make any adjustments to your wrap-around piece before further tightening (this is especially important with Seam Binding).  Tighten knot as much as you can then pull off the tines of the masher.   Hold the sides of the bow as you do any final tightening.

Here is your final bow.  If it is a triple version, pull one of the inner loops to the top and one to the bottom to make it look like this.  I used a double version of this on the Always Artichoke Bright Hopes Card from the SA Blog Hop.  I do recommend that you try this with Seam Binding first and get the feel of the technique.  The Quilted Satin Ribbon is a bit thicker and you have to work a little bit to get the knot tight.  It is definitely worth the effort though!!

This is part of my continuing search for the “perfect” bow.  I love how consistent these are and the more you do, the faster they get!  I can’t wait to see what you make with the Stampin’ Up ribbons this week.  Make sure you get right over and see what the rest of the design team has made…I’m in love with the ribbon flowers, the poofy bows, the scrunching…well, all of them!

Thanks for stopping in today.  I hope you had a wonderful weekend!!

Stamps:  French Foliage, Always Thankful; Paper:  Well Worn DSP, Early Espresso, Naturals Ivory; Ink:  Cajun Craze, River Rock, Soft Suede, Early Espresso; Accessories:  Espresso Quilted Satin Ribbon, Color Spritzer Tool, Sponge Daubers

All products are Stampin’ Up!

SUOC26 – Come join the party

SUOC26 – Come join the party published on 8 Comments on SUOC26 – Come join the party

It is time for another SU Only Challenge and we are asking to see your invitations!  Whatever your occasion, we can’t wait to see how you invite people to join you.

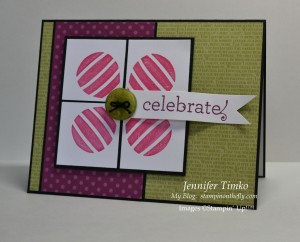
I knew I wanted to make an invitation using the Up, Up and Away set.  Of course I love the set as balloons but it can also make flowers!!!  Using a sketch from the Pals Paper Arts Challenge designed by the talented Margaret Moody, I stamped the striped balloons on the angle and put them together to look like a flower.  My Brights Designer Paper Pack provided the DSP and I added an Old Olive button as the flower center.  The sentiment comes from Inviting which is one of those great to have, all purpose word sets!

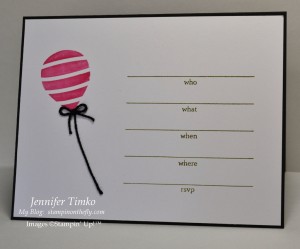
I decorated the inside of the card with another kind of balloon and a place to put all the party details.

I hope you can come over and join the fun on this challenge.  Don’t forget that you have almost two weeks to complete your entry!

Thanks so much for stopping by today.   I will be back on Friday for a Stampin’ Addicts Holiday Mini Blog Hop.  You won’t want to miss it!!

Stamps:  Up, Up and Away, Inviting; Paper:  Brights Designer Paper Pack, Basic Black, Whisper White; Ink:  Melon Mambo, Old Olive (inside); Accessories:  Brights Designer Buttons, Dimensionals, Black Thread

SUOC25 – Favorite New Stamp Set

SUOC25 – Favorite New Stamp Set published on 10 Comments on SUOC25 – Favorite New Stamp Set

The new 2011-12 Idea Book & Catalog has been available for just over a month and the SU Only Challenge Team wants to see your favorite stamp set!  Oh I know…how can you possible choose??!!  That was my thought when I first saw the challenge!  After sitting down and looking at all my new sets, I finally decided on Creative Elements.  It was one of my first “must have” stamps when I first looked through the catalog.  I love that it has such a variety of images and can be used to create so many different looks.

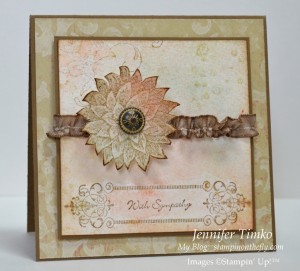
I started knowing that I wanted to try collage stamping.  In fact, I was really inspired by this card by Jenna Barber.  I had never tried this technique and I was surprised at how easily it came together.  I started with Watercolor Paper (it comes in a new larger size – yea!).  First I sponged on some River Rock, Cajun Craze and Soft Suede ink creating some different colored sections.  Then I stamped on the flourish from Creative Elements in Soft Suede (it was stamped off a bit first).  I realized that I wasn’t completely happy with the base coloring so I took my Aquapainter and blended the colors around.  The paper was still a little damp when I stamped the frame image (Soft Suede) which allowed it to run at the ends a bit.  It needed something else so I pulled out the water spots stamp from French Foliage and added them in River Rock.  I used another piece of Watercolor Paper and created a similar background with my Aquapainter.  After it dried, I stamped the flower on it and cut it out.  I added an Antique Brad to the center and then some new Soft Suede Taffeta Ribbon that uses the pulled thread technique.  Finally I layered the stamped image on a square of the new Well Worn DSP.

I see so many possibilities with this stamp so you can expect many more cards with it!  Shelli Gardner has challenged us to make “Thinking of You” cards this month for those who need a special card to let them know you care.  I added the sentiment from Teeny Tiny Wishes and, thankfully, don’t need this right now.  I find that when sympathy cards are needed there is sometimes no time to stamp.  I try to have a couple of beautiful versions ready just in case.

Thanks for stopping in today.  I can’t wait to see what you create with YOUR favorite stamp set.  Don’t forget, the SU Only Challenge  runs for just under two weeks so there is plenty of time to enter!

Stamps:  Creative Elements, Teeny Tiny Wishes, French Foliage; Paper:  Well Worn DSP, Watercolor Paper, Soft Suede; Ink:  Soft Suede, River Rock, Cajun Craze; Accessories:  Antique Brads, Soft Suede Taffeta Ribbon, Sponges, Aquapainter, Dimensionals

All products are Stampin’ Up!
 

Get Well Wishes

Get Well Wishes published on 10 Comments on Get Well Wishes

The team at SU Only Challenges is looking to brighten someone’s day.  As card makers, we have the opportunity to make someone know they are loved with a beautiful handmade creation.  For the next two weeks we are challenging you to show us your Get Well cards.  Show us your elegant wonders or show us your humor…we love them all!

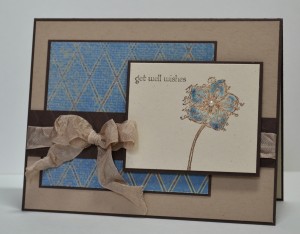
I chose the beautiful new hostess set Faith in Nature as the basis for my card today.  Wow, do I love this set!!  You can only get it by hostessing so get that workshop scheduled as soon as you can!  I inked my flower stamp with Versamark and then with an Early Espresso ink pad, stamping it on Naturals Ivory paper.  I quickly heat embossed it with with Clear Stampin’ Emboss Powder and my Heat Tool.  This allows easy watercoloring and no ink smearing!  I colored the flower with Crumb Cake, Not Quite Navy and a touch of Night of Navy ink and then stamped on a sentiment from Teeny Tiny Wishes.  The DSP layer is from the Well Worn DSP set.  It is hard to see but I embossed the Early Espresso layer with my Big Shot and the Backgrounds 1 Texturz Plate (diamond pattern).  Finally, I spritzed some water on some Crumb Cake Seam Binding, crumpled it up to let it dry and tied it into a bow.  A Basic Pearl is the finishing touch for the flower.  This fabulous sketch is courtesy of Inkspirations!

The rest of the team at SU Only Challenges has made some amazing cards so make sure you go take a look (and leave them some love on their blogs)!  I can’t wait to see what you make.

I’ll take a little break tomorrow and will be back Thursday for the ColorLab and on Friday with a new catalog blog hop…you don’t want to miss it!  Hope your day is great!

Stamps:  Faith in Nature, Teeny Tiny Wishes; Paper:  Well Worn DSP, Early Espresso, Crumb Cake, Naturals Ivory; Ink:  Crumb Cake, Not Quite Navy, Night of Navy, Early Espresso, Versamark; Accessories:  Blender Pen, Heat Tool, Clear Stampin’ Emboss Powder, Big Shot, Backgrounds 1 Texturz Plates, Crumb Cake Seam Binding, Dimensionals

All products are Stampin’ Up!
Celebrating the kids!

Celebrating the kids! published on 8 Comments on Celebrating the kids!

Over at SU Only Challenges, we are celebrating the kids!  So whether it is for the kids or for someone who is a kid at heart, we can’t wait to see what you make this week!  I have been busily making things with my NEW sets and today is the first reveal.

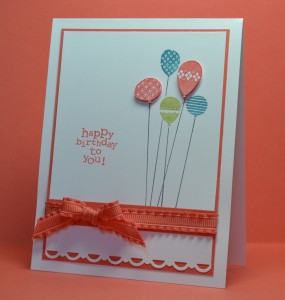
One of the first sets that called out to me from the new Stampin’ Up catalog was Patterned Party.  I am forever making birthday cards for the boys’ friends and this set has so much versatility!  I combined it with the new 2011-13 In Colors to make a fun card.  Calypso Coral, Island Indigo and Lucky Limeade were used to color the balloons and then I re-inked the Calypso Coral balloons to re-stamp them.  I cut those out and popped them up on Dimensionals.  Now to the ribbon.  I think you all know that I love a pretty ribbon.  Yep, pretty much can’t resist one.  This Ruffled Ribbon (available in the new In Colors) is even better that I anticipated!  It ties beautifully and adds so much dimension.  Adding more colors to my next order!!  The Creative Crew over at Splitcoaststampers is celebrating the new In Colors and stamps so I am posting this there too.

I hope you like this fun card!  I’ll be featuring a card tomorrow using one of the new hostess sets (and another new ribbon) so make sure you stop back by!  Don’t forget that you have about 2 weeks to participate in the SUO Challenge so all of you demonstrators going to Convention in Salt Lake City will still have time to play next week.  See you tomorrow!

Stamps:  Patterned Party, Up, Up and Away; Paper:  Calypso Coral, Whisper White; Ink:  In Color Stampin’ Write Marker Pack (Calypso Coral, Island Indigo, Lucky Limeade), Basic Gray; Accessories:  Calypso Coral 3/8″ Ruffled Ribbon, Scallop Trim Border Punch, Dimensionals

All products are Stampin’ Up!
 

Happy Anniversary

Happy Anniversary published on 9 Comments on Happy Anniversary

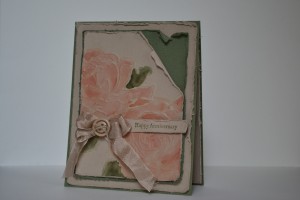
This week’s theme over at SU Only Challenges is Summer Anniversaries.  As I mentioned in the last challenge, I was married in June and just celebrated my 10th Anniversary.  Today’s card is the one I made for my husband.

If you are already a proud owner of the new 2011-12 Idea Book & Catalog, this technique may look familiar to you (p. 181).  If you don’t have one yet, contact your demonstrator as soon as you can to get one!!  If you don’t have a demonstrator, I will be happy to help you.  This is an excellent example of why the book is as much for ideas as it is for showcasing new products!  I started with Crumb Cake card stock and embossed it with my Big Shot and the Manhattan Flower Embossing Folder.  Then, using my Aquapainter, I watercolored with Cajun Craze and Always Artichoke ink (from the top of the ink pads).  It was so fast and I LOVE the results!  I distressed and tore the layer to show some Always Artichoke Textured Card Stock beneath.  The Crumb Cake Seam Binding was crumpled and then tied using a Neutrals Button and Linen Thread.  I created my own tag with a sentiment from Teeny Tiny Wishes.

Sorry I was absent last week from much posting, our family was on vacation at the beach and stamping just didn’t fit in (too much wave jumping and boogie boarding to do!!).  I hope to get back in the groove a bit this week.  At a minimum, I will be back on Thursday with another ColorLab Challenge.  Until then, I hope you are enjoying your summer too!

Stamp:  Teeny Tiny Wishes; Paper:  Crumb Cake, Always Artichoke (Smooth and Textured); Ink:  Always Artichoke, Cajun Craze; Accessories:  Big Shot, Manhattan Flower Embossing Folder, Crumb Cake Seam Binding, Linen Thread, Neutrals Designer Buttons, Aquapainter

All products are Stampin’ Up!
SU Only Challenge 21 – Weddings

SU Only Challenge 21 – Weddings published on 8 Comments on SU Only Challenge 21 – Weddings

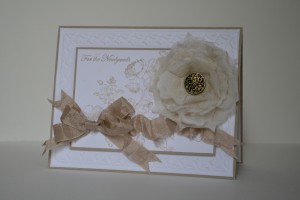
I love June weddings (in fact, I had one!) so this is such a wonderful time to make wedding cards.  For the next two weeks at SU Only Challenges, we want to see your wedding themed cards.

Conveniently enough, we have some friends that just got married and I needed this one!  Her dress was vintage inspired so I wanted to have that feel.  I struggle with pure vintage but I think this captures it pretty well.  I turned to my Elements of Style stamp and inked it in Crumb Cake.  The same in for the sentiment from Teeny Tiny Wishes.  I then took some wrapping tissue paper and ran it through my Big Shot with the Fun Flowers Die.  I sponged the tissue flowers with Soft Suede ink (lightly), crumpled them up and the put them together with an Antique Brad.  Next I took some Crumb Cake Seam Binding and crumpled it up too.  I tied a bow and kept the long tail a little scrunched using some Sticky Strip behind it.  The back panel used the Big Shot again with the Framed Tulips Embossing Folder on Whisper White.  Finally, the image panel was popped up on Dimensionals.

This is one of two posts today since I am also participating in a Flag Day Giveaway.  Roll down for more details.  I’ll be back on Thursday with another ColorLab Challenge.  Until then, hope you have a great week!!

Stamps:  Elements of Style, Teeny Tiny Wishes; Paper:  Crumb Cake, Whisper White; Ink:  Crumb Cake, Soft Suede; Accessories:  Big Shot, Fun Flowers Die, Framed Tulips Embossing Folder, Antique Brads, Sticky Strip, Dimensionals, Wrapping Tissue Paper


SUOC20 – All about Dad

SUOC20 – All about Dad published on 5 Comments on SUOC20 – All about Dad

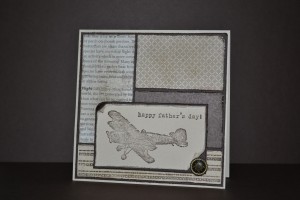
For the next two weeks at SU Only Challenges, it is all about Dad!  In my house Dad (and Mom) are all about airplanes so my Plane & Simple set was the obvious choice.  It wasn’t carried over from the Occasions Mini so isn’t available right now but sometimes a set just has to be used!!  I also pulled out some retired DSP, Deck the Halls, left over from the Holiday Mini.  The First Edition DSP was carried over, though, and is still available.  I am working to use up some left over papers to get ready for the new catalog launch coming on July 1st.  Tomorrow, the Last Chance lists will be available so be sure to check back to hear more about what is retiring!  The sketch for today’s card comes from the Inkspirations Challenge and it is a fun one.  I went for a distressed look and used Early Espresso ink for stamping and sponging.  Thank goodness my husband never looks at my blog so this should still be a surprise for him.

I can’t wait to see all the fabulous Father’s Day cards you will make over the next two weeks.  Make sure to link your SU Only creations back to the challenge!  Don’t forget to go see the fabulous projects from the rest of the design team…more amazing stamping!

I’ll be back tomorrow with retiring product information and back Thursday with another ColorLab Challenge.  Have a great Tuesday!

Stamp:  Plane & Simple; Paper:  First Edition DSP, Deck the Halls DSP (retired), Naturals Ivory, Early Espresso; Ink:  Early Espresso; Accessories:  Antique Brads, Dimensionals, Stamp-a-ma-jig

All products are Stampin’ Up!


SUOC19 – Decorate it with flowers

SUOC19 – Decorate it with flowers published on 7 Comments on SUOC19 – Decorate it with flowers

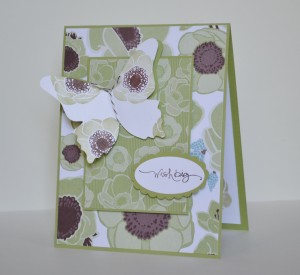
I guess I took the SU Only Challenge pretty literally today!  This card is really covered with flowers.  I started with my Greenhouse Gala DSP and used pieces containing the same flower.  Then I cut out two butterflies from Pear Pizzazz and Whisper White, stamping the same flower on the Whisper White butterfly in Pear Pizzazz and Chocolate Chip ink.  I created the butterfly’s body with the new Baker’s Twine from the Summer Mini.

This was a card we made in my Mother/Daughter stamping class last Friday.  We took two layouts and made them each two ways – a mom version and a teen version.  It was such fun and the girls really showed their creativity!!

Fighting a stomach thing in my house so this is short and sweet!  Hope your week is going well!

Stamps:  Friends Never Fade, Short & Sweet; Paper:  Greenhouse Gala DSP, Pear Pizzazz, Whisper White; Ink:  Pear Pizzazz, Chocolate Chip; Accessories:  Espresso/White Baker’s Twine, Large Oval Punch, Scallop Oval Punch, Big Shot, Beautiful Butterflies Die, Dimensionals

All products are Stampin’ Up!

SUOC18 – Butterflies for you

SUOC18 – Butterflies for you published on 7 Comments on SUOC18 – Butterflies for you

For the next two weeks, SU Only Challenges is all about butterflies!

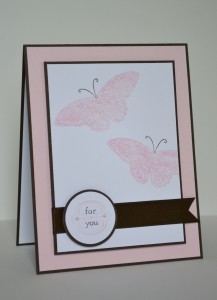
No better time than now to show you the new Strength & Hope set from the Summer Mini!  This butterfly image is beautiful!!  I inked him up with Pink Pirouette and Early Espresso Stampin’ Write Markers and stamped him on Whisper White card stock.  A little pearl from the Basic Pearls adds just the right touch!  The sentiment comes from Elements of Style and is inked in the same colors.  Of course, a couple more pearls “had” to be added!  This layout comes from my Stampin’ Success magazine.  Stampin’ Success is a monthly publication that is sent to every demonstrator and is full of ideas, techniques and sneak peeks of new products!  One of the many perks of being a demonstrator!

During the month of May, I will be using a version of this layout to make donation cards in support of Breast Cancer Awareness.  It is hard to find anyone who hasn’t been touched by this dreadful disease and I’m so proud to be part of a company who is doing so much to erradicate it!  Come back tomorrow and I will show you my donation card and give you more information about Stampin’ Up’s campaign.

For today, just enjoy the beautiful butterflies over at the SU Only Challenges site and then go create your own butterfly magic.  I can’t wait to see what everyone makes!  Thanks for stopping in today!

Stamps:  Strength & Hope, Elements of Style; Paper:  Pink Pirouette, Early Espresso, Whisper White; Ink:  Pink Pirouette, Early Espresso; Accessories:  Circle Punches (1 1/4″ and 1 3/8″), Early Espresso Satin Ribbon, Basic Pearls

All products are Stampin’ Up!


Primary Sidebar