Skip to content

Nordic Tree Shaker Cards and Extras

Nordic Tree Shaker Cards and Extras published on 1 Comment on Nordic Tree Shaker Cards and Extras

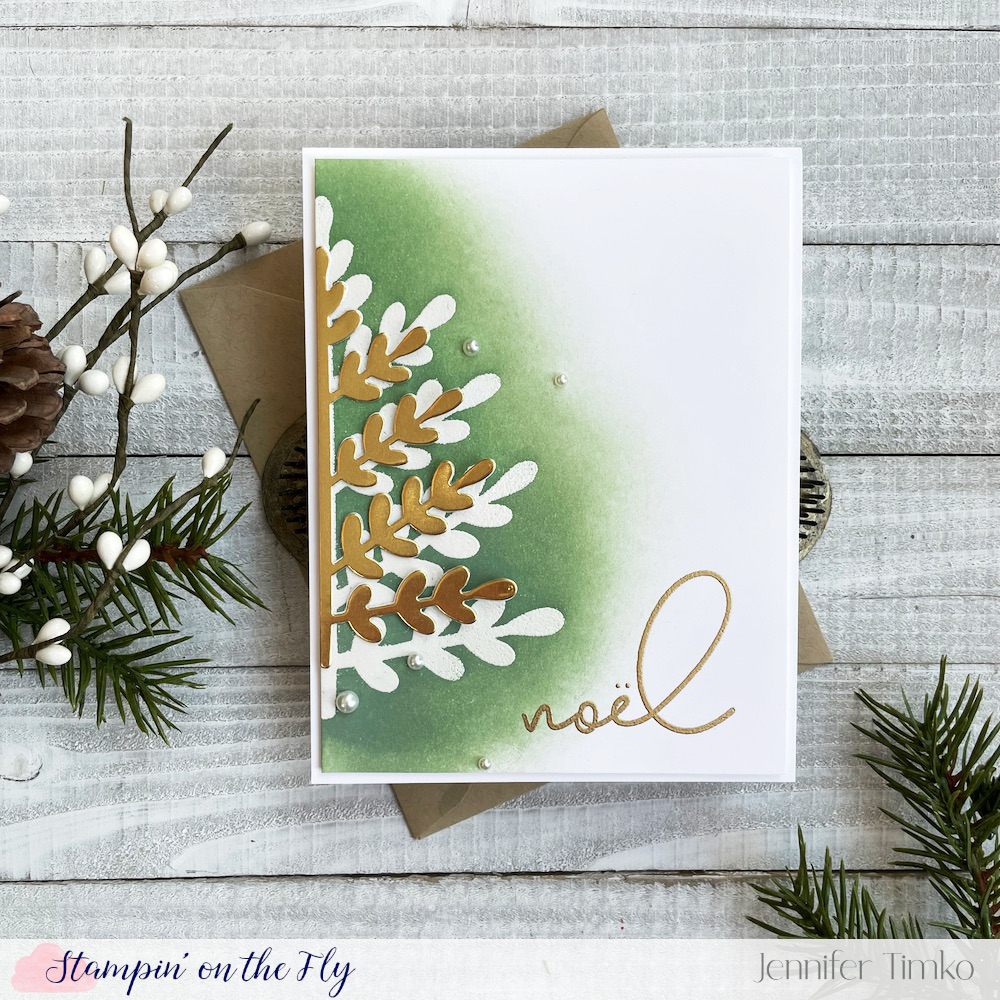
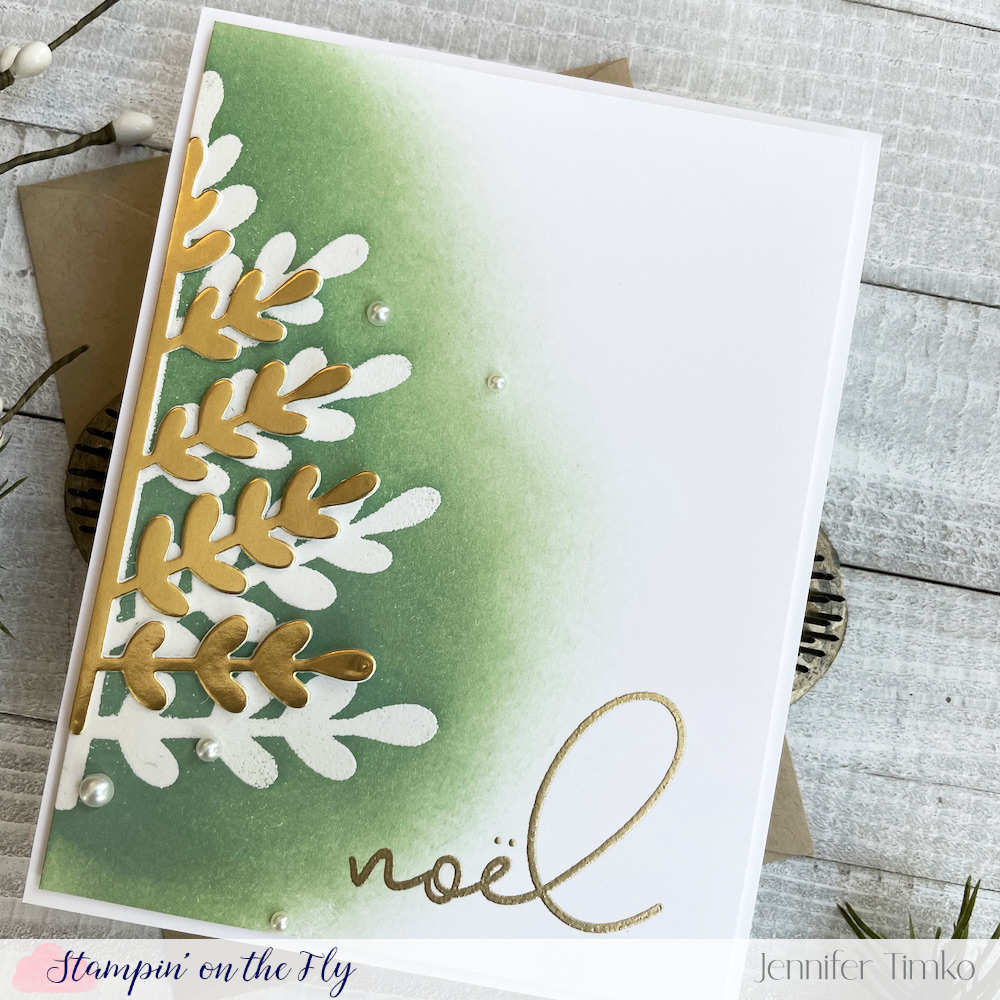
I have decided that I better start getting more serious about Christmas cards. November is bound to fly by and I’ll be woefully behind! While I’m not a big fan of mass production, I actually made 4 cards for today (all a little different) by using positive and negative die cuts.

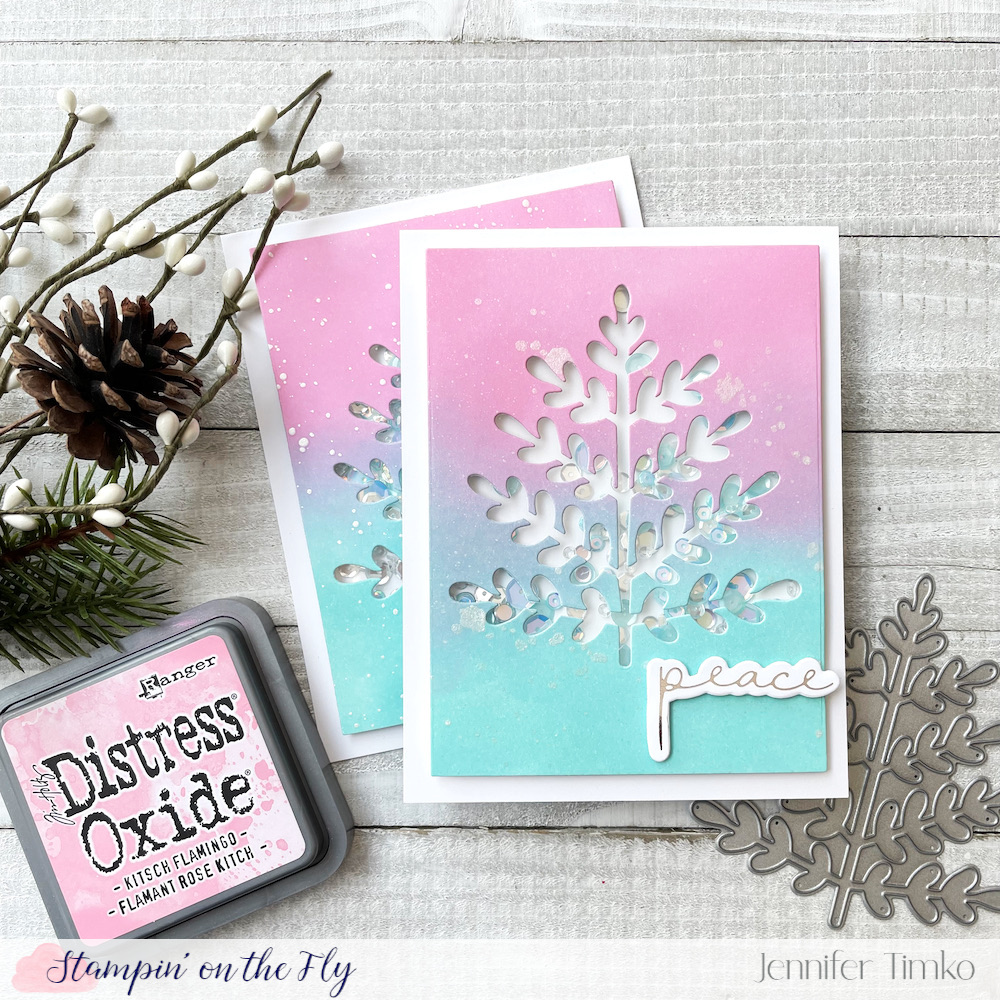
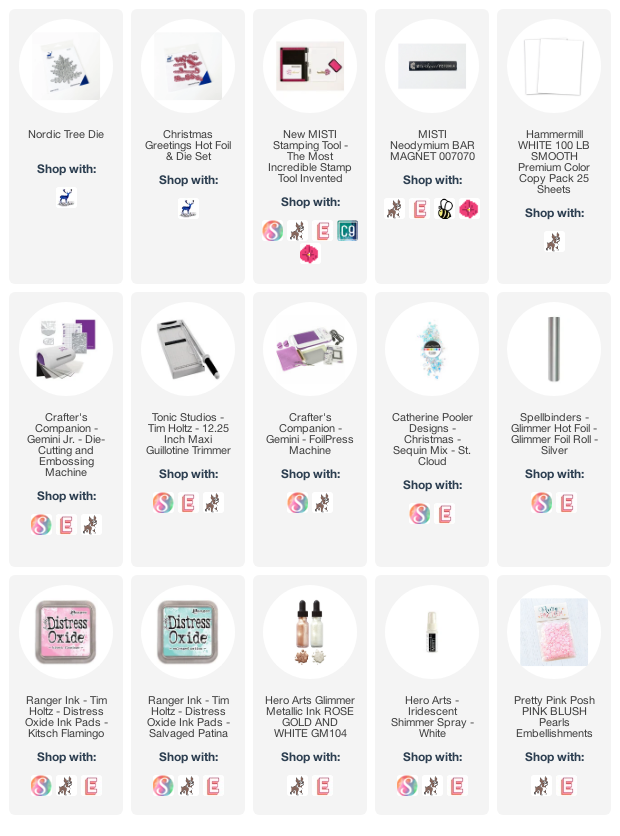
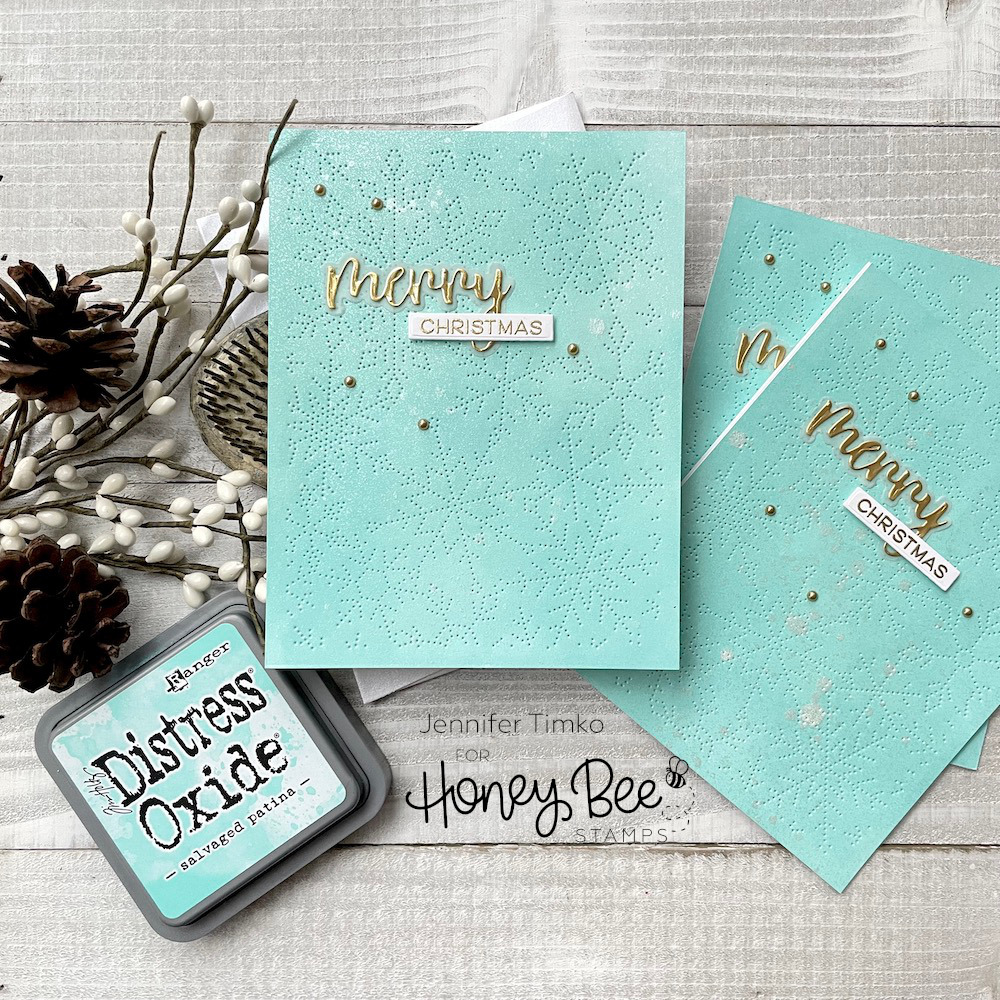
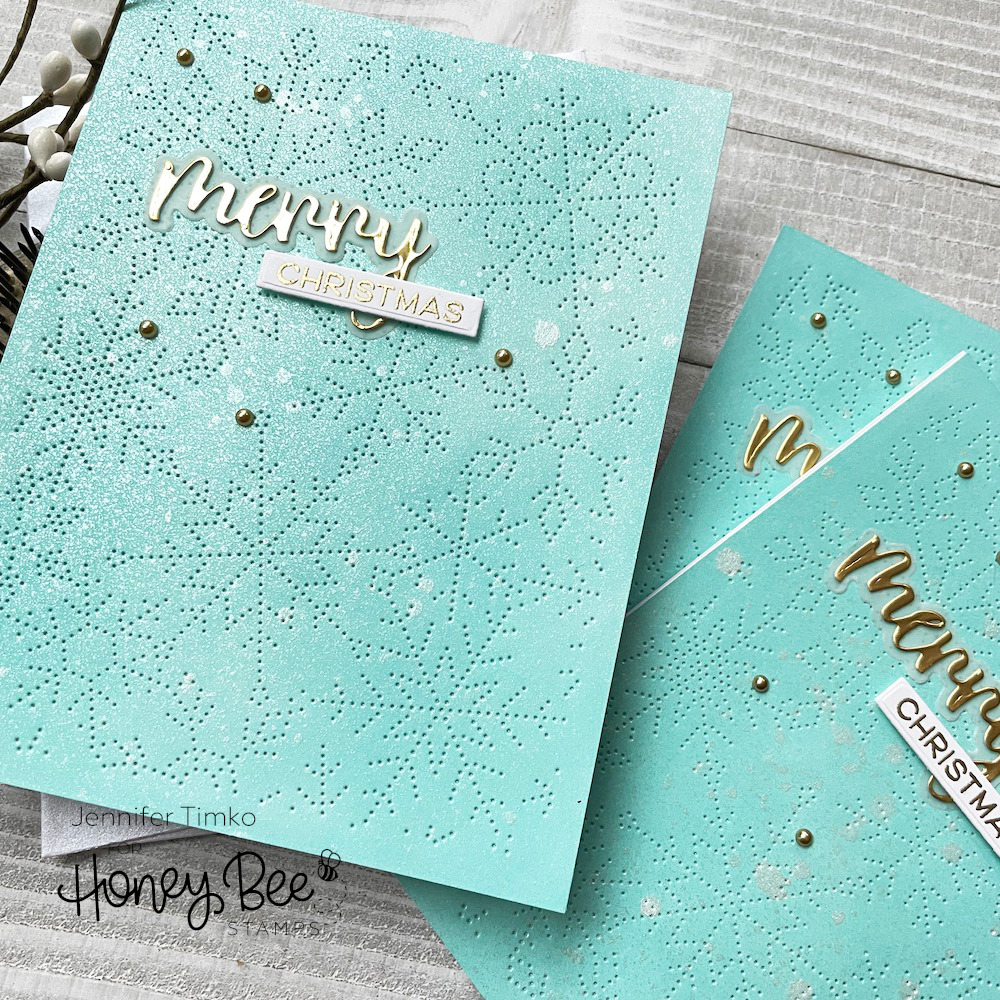
I started by inking to A2 sized panels in a blend I have used before – Kitsch Flamingo and Salvaged Patina Distress Oxide Inks. I told you then that you would likely see it again and I’m truly obsessed with this color combination. I cut both panels with the Nordic Tree Die from Erin Lee Creative and then used a rectangle die to center and cut down the panels. I splattered one with Hero Arts Iridescent Shimmer Spray and one with Hero Arts White Glimmer Metallic Ink. The ink is a bit more opaque while the shimmer spray has a more subtle effect. Both are awesome!

I created shaker cards using the Catherine Pooler St. Cloud blend of sequins (they have the blue and clear and pink-ish colors that match the ink blend perfectly). Then using Silver Glimmer Hot Foil used the Christmas Greetings Hot Foil and Dies set from Erin Lee Creative for the sentiment.

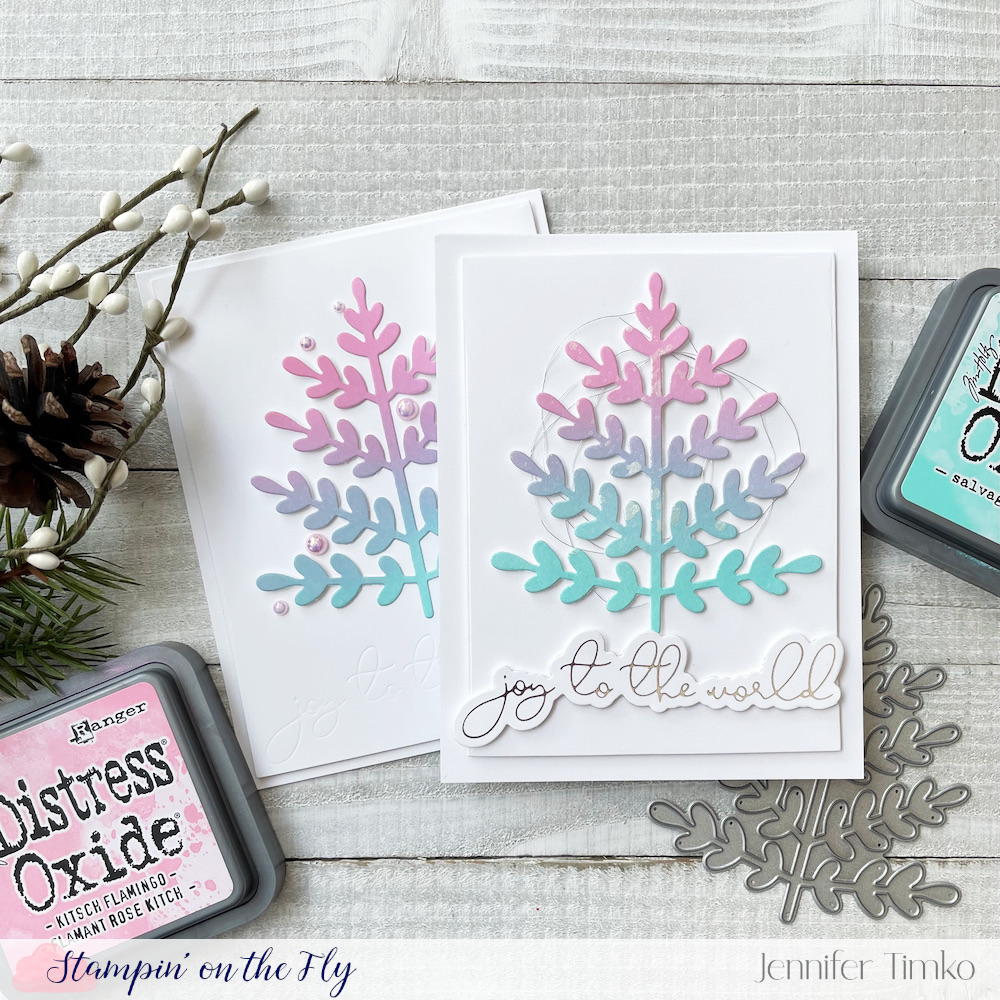
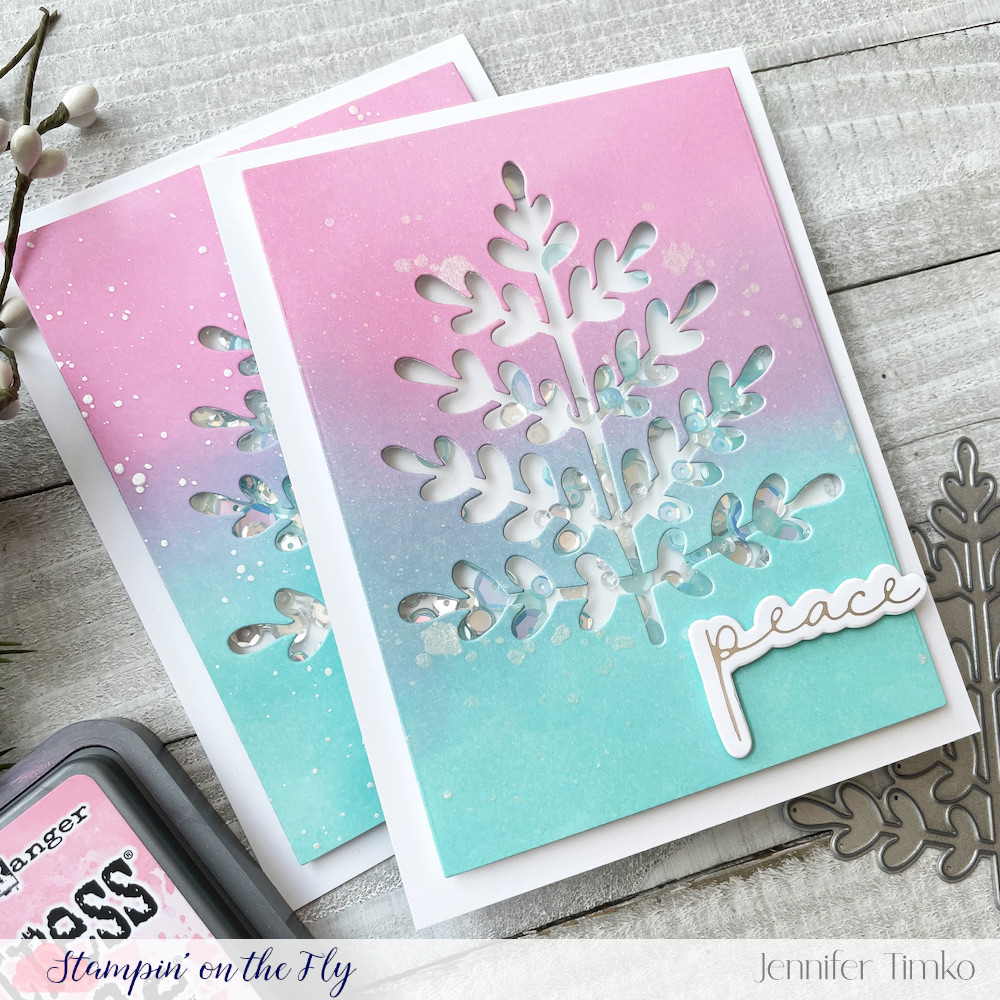
Using the trees that I cut out (because why would I not?), I created two more cards. For the first, I sprayed again with Shimmer Spray and added some silver thread behind the tree for a little more shine. I used another of the sentiments from the Christmas Greetings set. **Tip: I actually foiled all the sentiment from the set at the same time so that I had them ready to go for these and other cards. **

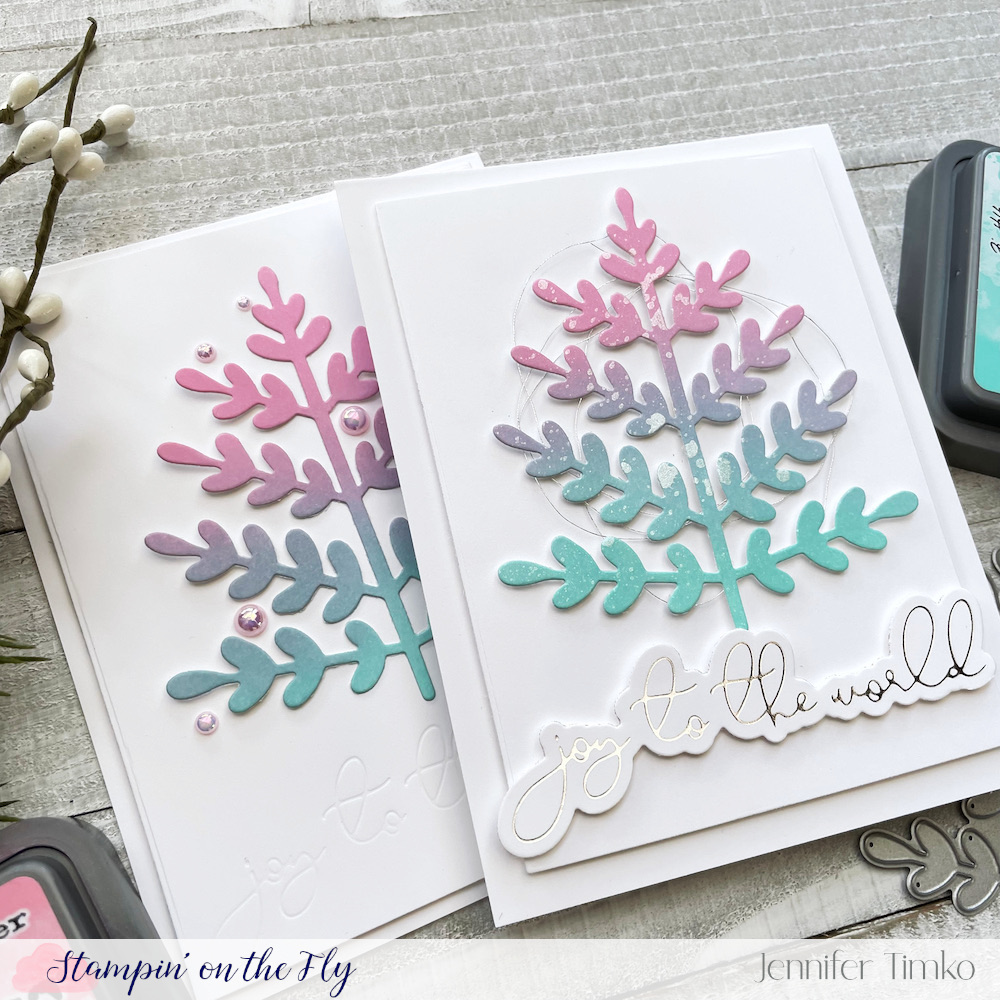
On the bottom card here, I did not splatter and went for a cleaner look. In my attempt to foil the sentiment directly onto the panel, I had my foil backwards (seriously….those who have, those who will) and ended up with a letterpress look along with a pretty silver on my hot foil plate. It doesn’t hurt the plate, for the record. I kind of like the look so went with it. I added the tree but gluing the middle straight down but putting a bit of foam tape under the branches for dimension. I thought the Pink Blush Pearls from Pretty Pink Posh were the right add, almost like a free form ornament.

So there you have it. Four cards, all a little different but the same. WIN!! This pretty tree from Erin Lee Creative will stay in heavy rotation as I create. I love the modern look and clearly it allows for some diversity of design. Thanks so much for stopping in today. Back tomorrow with a fun new product!

CASE Me a Christmas Card with Michelle Lupton

CASE Me a Christmas Card with Michelle Lupton published on 3 Comments on CASE Me a Christmas Card with Michelle Lupton

I’m so happy to be back today for a very special post! My friend Michelle Lupton has graciously invited me to join her CASE Me a Christmas Card series again this year. I love all the inspiration that comes from her collaborations each year and, let’s face it, I’ll take any excuse to CASE one of her cards.

Truly the hardest part about this is choosing what to CASE. I mean….just go look at her gallery of work and you’ll understand. I finally settled on a card from May that was full of rainbow goodness (you can see it below). In the rules of CASEing, as I have always done it, you change 3 things but keep the overall feel of the original. Things I kept: the side placement of the focal elements, the big sentiment, the scattered pearls. Things I changed: more monochromatic, stencil plus die cut, no background stamped image.

The products on this card are new from Erin Lee Creative and I love them! I started by inking through the Nordic Tree Stencil with Versamark Ink and then heat embossed with a pearl powder. Much more subtle shimmer in person! Using the Nordic Tree Die, I did an edge cut on the Gold Cardstock (also from Erin Lee). Before layering it on, I blended on Rustic Wilderness and Iced Spruce Distress Oxide Inks. The sentiment is from the new Christmas Greetings stamp set (which has coordinating hot foil plates and dies).

This is the card by Michelle and you can see more HERE about how she made it. Now part of the fun is that she also uses one of my cards to create a Christmas card and her new card is here: Michelle’s New CASE Me a Christmas Card.

Thanks so much for joining us for this fun series! Go follow Michelle to see all of her beautiful work!

Freshly Made Sketches #557

Freshly Made Sketches #557 published on 5 Comments on Freshly Made Sketches #557

My leaves are starting to change and I’m all in on fall. Went to the apple orchard on Monday, made apple butter yesterday…I love fall in Virginia! Pretty much no matter what the sketch was this week, I was planning on using leaves and the sketch from our fabulous Judy Rozema is perfect!!!

The Lovely Layers: Fall Foliage dies from Honey Bee Stamps are simple glorious for perfect (and easy) leaf creating. I cut them out from Hammermill white paper and then blended on Distress Ink with my Bitty Blending Brushes. I love these little brushes for controlling where the color goes. I pulled a couple of leaves from my yard as color muses, as you can see. I added a few paint splatters to mimic the spots on my leaves.

I chose a sentiment from the new On The Line Fall Florals stamp set (Honey Bee Stamps) and I love how close the coordinating die cuts it. The background paper is from the Grain and Grunge Paper Pack and the gems are from the coordinating gem pack.

I hope you will come over to Freshly Made Sketches to check the gorgeous work from the team and play along. Thanks for stopping by today. I hope you have a beautiful day!

Freshly Made Sketches #555

Freshly Made Sketches #555 published on 6 Comments on Freshly Made Sketches #555

A sweet new sketch from our queen of flowers and fussy cutting, Narelle! (and you need to see her card for today!) I immediately thought fall when I saw the sketch and knew just what to pull out.

I knew this Patchwork Pumpkin stamp and die set from Honey Bee Stamps would be super fun. I inked up a panel with orange and pink Distress Inks and then stamped and cut the pumpkin. Pink you say?? Yes! Because it is a running joke with my sister and I. My mom made a super fun wall hanging quilt with pink pumpkins that I LOVE! And my sister rebels against the color choice. So there is a good chance this card will go to her…because, sisters!

That gorgeous textured background?? I’d love to take credit but it is from the Spooktacular Paper Pack from Honey Bee Stamps. The whole pack is awesome!

I hope to see you this week at Freshly Made Sketches. Thanks so much for stopping in today. See you soon!

Merry Christmas

Merry Christmas published on 2 Comments on Merry Christmas

I am over on Instagram for Honey Bee Stamps today but a quick share here as well. I created these as a simplified version of a card I did during the Vintage Holiday release. A bit better for mass production, which is inevitably where I end up this time of year.

I inked up a panel of Hammermill white card stock with Salvaged Patina Oxide Ink and then ran it though with the Pierced Fancy Flakes Cover Plate. I love the piercing detail! After I got a few of them done, I took them over to my splatter box (just a cardboard box) and sprayed with Hero Arts Iridescent Shimmer Spray. This shine takes this to a new level!

I cut the “merry” using the Bitty Buzzwords: Holiday Honey Cuts and added the “Christmas” from the Tag You’re It: Holiday Stamp Set. I love the gold with the Salvaged Patina!! A few gold pearls from my stash to finish.

Thank you for stopping in today! I suspect this will be my last post until after Christmas. I’m going to pick up my oldest from college today and then next week starts the busy season for my flying! Lots and lots of holiday flying! Normally, that is hard but I’m happy to see people traveling to their families this year.

I appreciate each of you so much and sending you best wishes for a very happy holiday season!!

Freshly Made Sketches #510

Freshly Made Sketches #510 published on 4 Comments on Freshly Made Sketches #510

I am so excited to share my latest card with you today. Sorry for being so quiet. I’ve been flying a lot more (a good thing) but that seriously cuts into my creative time (not so good thing). I got home from a trip yesterday morning and decided to give this sketch a go because I love it so much. The incomparable Jen Mitchell is the sketch designer at Freshly Made Sketches this week and I love her take on a classic!

For the circle element, I pulled out my Gina K Designs Snowflake Trio dies and cut two of them from Glitter Cardstock (it was part of a kit with the dies). I stamped the sentiment from the coordinating Sparkle and Shine Stamp Set and heat embossed with gold embossing powder.

I chose to use an unexpected color for the crossing panel and pulled out my new Villianous Potion Oxide Ink. This is a beautiful color!! I brushed in on and then sprayed the panel with my Hero Arts Shimmer Spray. So much shine, so little effort! I added a gem from my stash for the middle of the snowflake for one last bit of shine.

Hope you will come over and join us this week. Thank you so much for stopping in today. See you tomorrow for a SugarPea Designs feature.

Framed: Anenomes for Honey Bee Stamps

Framed: Anenomes for Honey Bee Stamps published on 3 Comments on Framed: Anenomes for Honey Bee Stamps

Sharing today for Honey Bee Stamps! I needed a day just to “play” in the stamp room and I thought I should pull out this new Framed: Anenomes stamp set. It is a gorgeous image and one that can be colored with so many mediums. I chose a very loose watercolor look with Distress Ink.

I stamped the image using Versamark Ink onto Tim Holtz Heavystock paper. It is made for distress ink techniques. For each color, I simply “smooshed” the ink from a mini pad onto a small clear block then added water with a paint brush. I took the block direct to paper to apply the color. Using a small block help you keep a little more control on where the color goes but still leaves it loose. If you need a bit more color in a specific place, you can add it with a paint brush. This is a layering process so leave time to allow drying to happen in between adding colors or additional ink.

Because I love the look of pale anemones, I made the leaves and the background bold and kept the flowers in muted tones of Tattered Rose and Antique Linen. For the sentiment, I stamped and heat embossed it onto more of the Heavystock paper. Then I colored it with the Chipped Sapphire in the same way as I did the flower except I made sure there was a bit more solid coverage as a base.

I hope you enjoy this card! Let me know if this makes sense or if you would rather see a video on how to create this look. Thanks so much for dropping in today!

SugarPea Designs Sweet Peek Week – Day 2

SugarPea Designs Sweet Peek Week – Day 2 published on 26 Comments on SugarPea Designs Sweet Peek Week – Day 2

I am so happy to be here all week for the SugarPea Designs Summer Release Sweet Peek Week!! This summer release is full of fun products that are perfect for every stamper. And we have team hop, of course, to share inspiration. The release goes live on Friday, July 2nd at 2p Eastern.

Today we are sharing three new products: SugarCut – Life is a Picnic, Sunshine Sentiments Stamp Set, SugarCut – Sunshine Word.

The starting point for me was this absolutely incredible Life is a Picnic die set. It is so well designed. I love die sets that make it easy to create layers and are not overly complicated. This is just that! Because the dies cut the separate layers, it is easy to color them in different inks and create dimension and detail. I cut the whole set out of Tim Holtz Distress White Heavystock paper. It is great for coloring with Distress Inks. Then I got to getting inky.

You can see how I was able to color the layers with different inks to create real looking items for the basket. Once I had all the pieces colored, I glued them together and thought about a “scene”. Using the Outdoor Scene Stencil for the grass and sky. You even get a little peek into a product that will be revealed tomorrow. For my sentiment, I used the new Sunshine word die and coordinating sentiment set. I hope you like my little summer scene and can’t wait to see what you think about the new products.

Would you like to win a $50 Gift Voucher to our store? Leave a comment below for your chance to win. TWO lucky commenters will be randomly selected from the Sweet Peek Week comments to win a $50 Gift Voucher! Winners will be announced on our blog: Monday, July 5th.

SugarPea Designs
Amy Kolling
Becky Pearce
Francesca Vignoli
Jennifer Timko <<—- You Are Here
Tatiana Trafimovich
Tricia Barber
Vera Yates

Thanks for joining me today. I hope you love today’s new products and I cannot wait to continue sharing with you all week. See you tomorrow!

Freshly Made Sketches #489

Freshly Made Sketches #489 published on 6 Comments on Freshly Made Sketches #489

Today is a fun new sketch from Freshly Made Sketches! I love what designer Linda Callahan has given us and I think there will be lots of ways to be creative with this one.

I was playing in the stamp room the other day and decided to pull out my Tim Holtz Alcohol Inks in Stream, Purple Twilight and Wild Plum plus Gold Mixative. I had this panel left over from another project and thought it might be perfect for today’s sketch. The bold colors with the gold really do all the work. I had made a larger panel to start. With a rectangle die, I cut out a part of the panel and then used another section for the sentiment, the Thanks SugarCut die from SugarPea Designs.

I wanted the sentiment to jump out a bit more, so I smooshed on some Versamark and added clear embossing powder to add some shine. I will say that this is one of those cards that is much prettier in person! To keep with the sketch, I added sequins in the proper placement choosing gold to accent the gold in the panel.

I hope you enjoy this card today and all the inspiration from the team at FMS! Come over and join the fun! Back on Friday with a new card.

Vintage Branches for SugarPea Designs

Vintage Branches for SugarPea Designs published on 2 Comments on Vintage Branches for SugarPea Designs

A couple of weeks ago, during Sweet Peek Week, I shared a card showing the SugarCut – Botanical Branches from SugarPea Designs. It was a card that came together quickly with the help of these beautiful dies plus a new word die and stencil. I was inspired to use exactly the same layout to create a totally different card and I hope you like this concept.

It started when I first saw the Splash of Color Stamp Set. While my first use of it was bold and clean, I immediately thought that it could be used for vintage style cards too. So that is what I made. I started with brushing Antique Linen and Vintage Photo Distress Ink onto Distress White Heavyweight Card Stock. Next I added some of the new Salvaged Patina Distress Oxide to finish the foundation. I partially inked up the Handwritten Letter Stamp Set with Vintage Photo Distress Ink and stamped it onto the based. Next up, Spash of Color! I chose one of the splatters and added it by partially inking with Antique Linen and Vintage Photo. I liked it but thought it needed just a little more so I added a bit more of the splatter inked with Versamark and embossed with copper embossing powder.

Next, I inked some more of the paper with the same ink combination and used the SugarCut Botanical Branches and the SugarCut Thanks Word to cut my elements. Once I had them cut, I added a bit more ink in places and then touched on some Versamark for more copper embossing. On the vellum shadow for the sentiment I sponged Vintage Photo on the back side to make it not so bright. I placed a few sequins exactly the way I had on my original card to finish.

I hope this inspires you to use your own creations as inspiration to try something new. Vintage is not my normal style but having the basics already designed, it left me room to play outside the box. Thanks so much for stopping in today! Have a sweet day!

Primary Sidebar