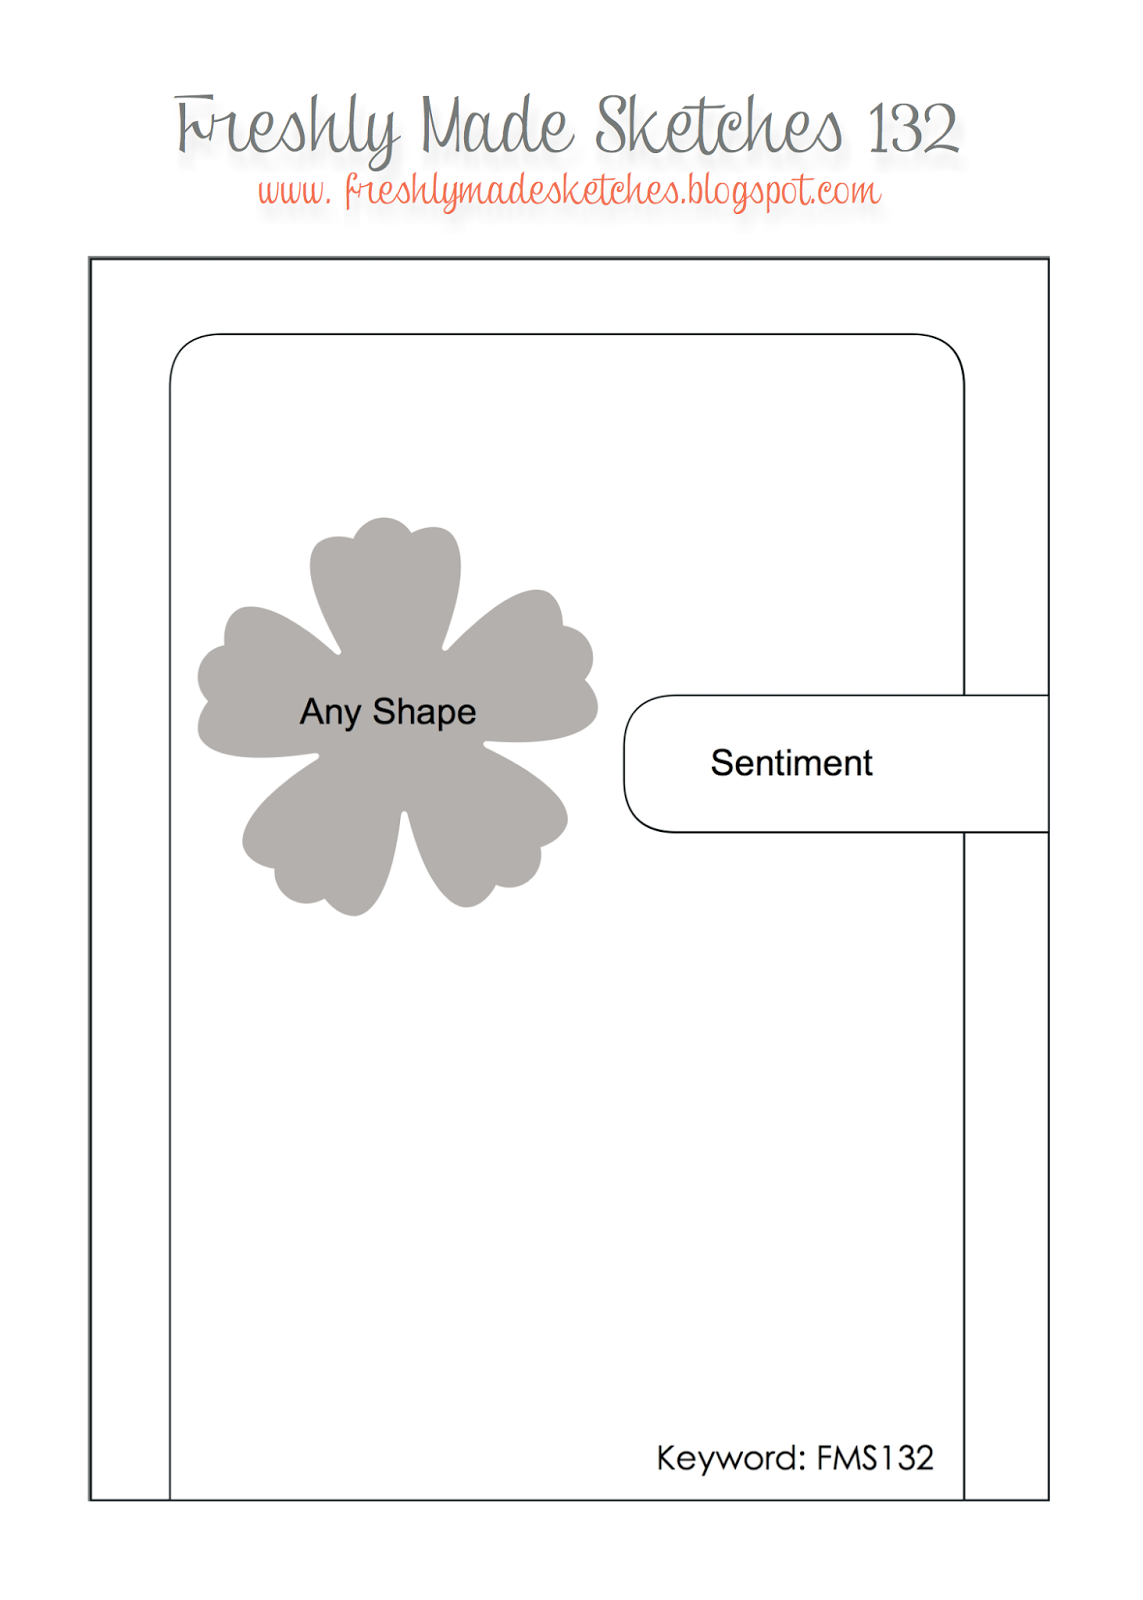
Another Wednesday is here so fast! Where does the time go?? The amazing Jennifer Brum is bringing us the sketch this week and I think it is so fun! There are so many ways to take this one. The sure sign of a great sketch!
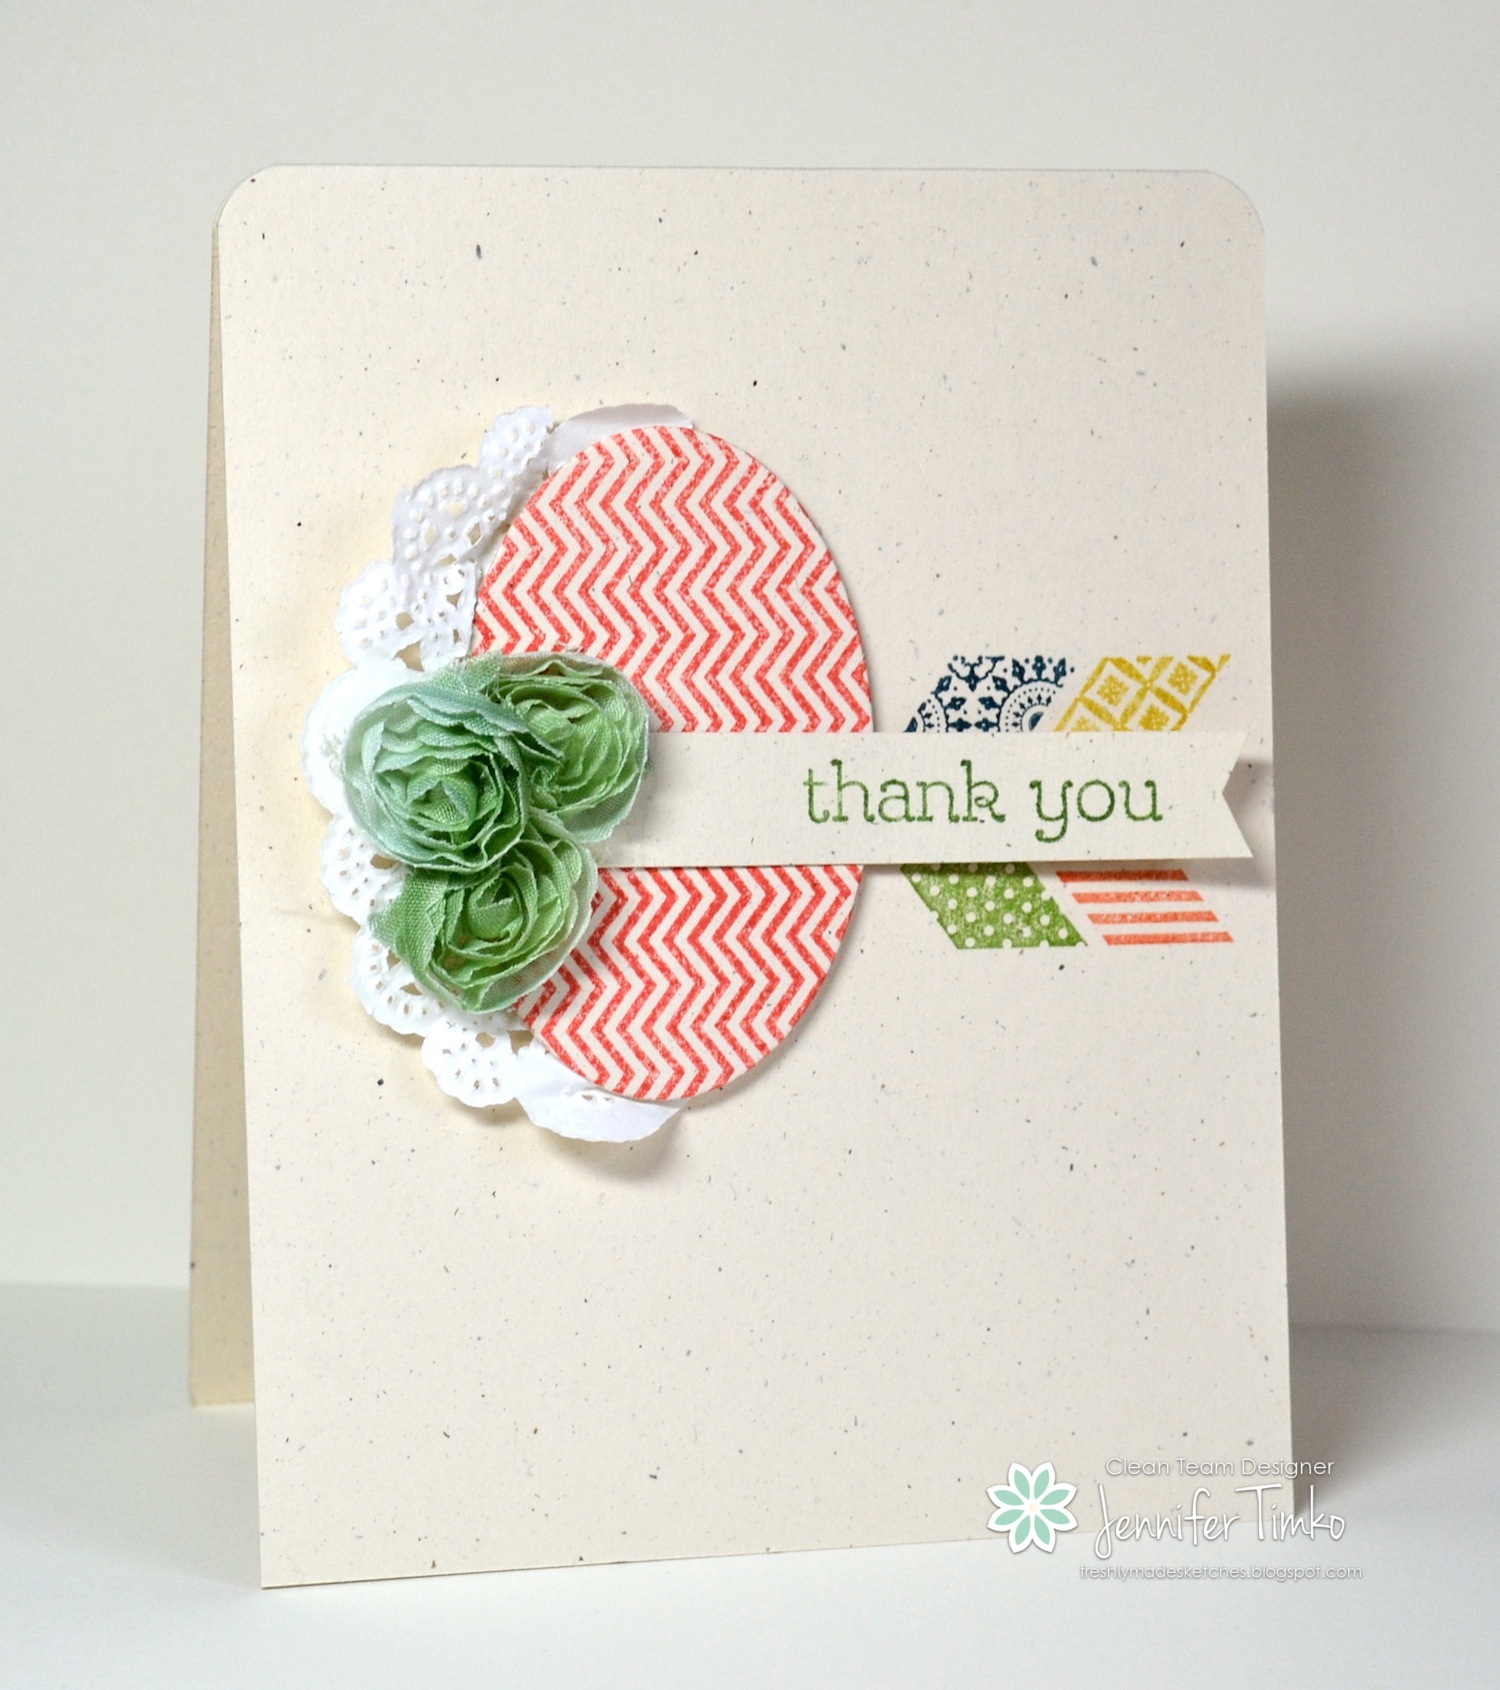
I went back to another favorite from the main catalog for this one. Hello, Lovely is such a great set. Love those chevrons. They seemed to be perfect for the sketch so I inked them up with some of the older In Colors plus Calypso Coral using markers. Then I inked the oval in Calypso Coral again and cut it out with an Ovals Framelit. Remember the old flower trim from last spring? Well, I hoarded some of it. It is so pretty that it just had to be used! I colored it Gumball Green and put a doily behind everything. The sentiment is from Happy Watercolor. The base of the card and the oval are created using Naturals Ivory Card Stock.
I definitely went for a cleaner version of the sketch but the team has shown all kinds of ideas with it. I hope you’ll be able to join us this week.
Click HERE to purchase wonderful Stampin’ Up products.
The Artisan Design Team’s April box of products is a celebration of the Occasions Catalog. This catalog really has something for everyone! Just like last week, we have a great variety for you. If you have come over from amazing Jeanna, welcome to the next stop. If you are starting here, just continue around using the next buttons until you get back to me.
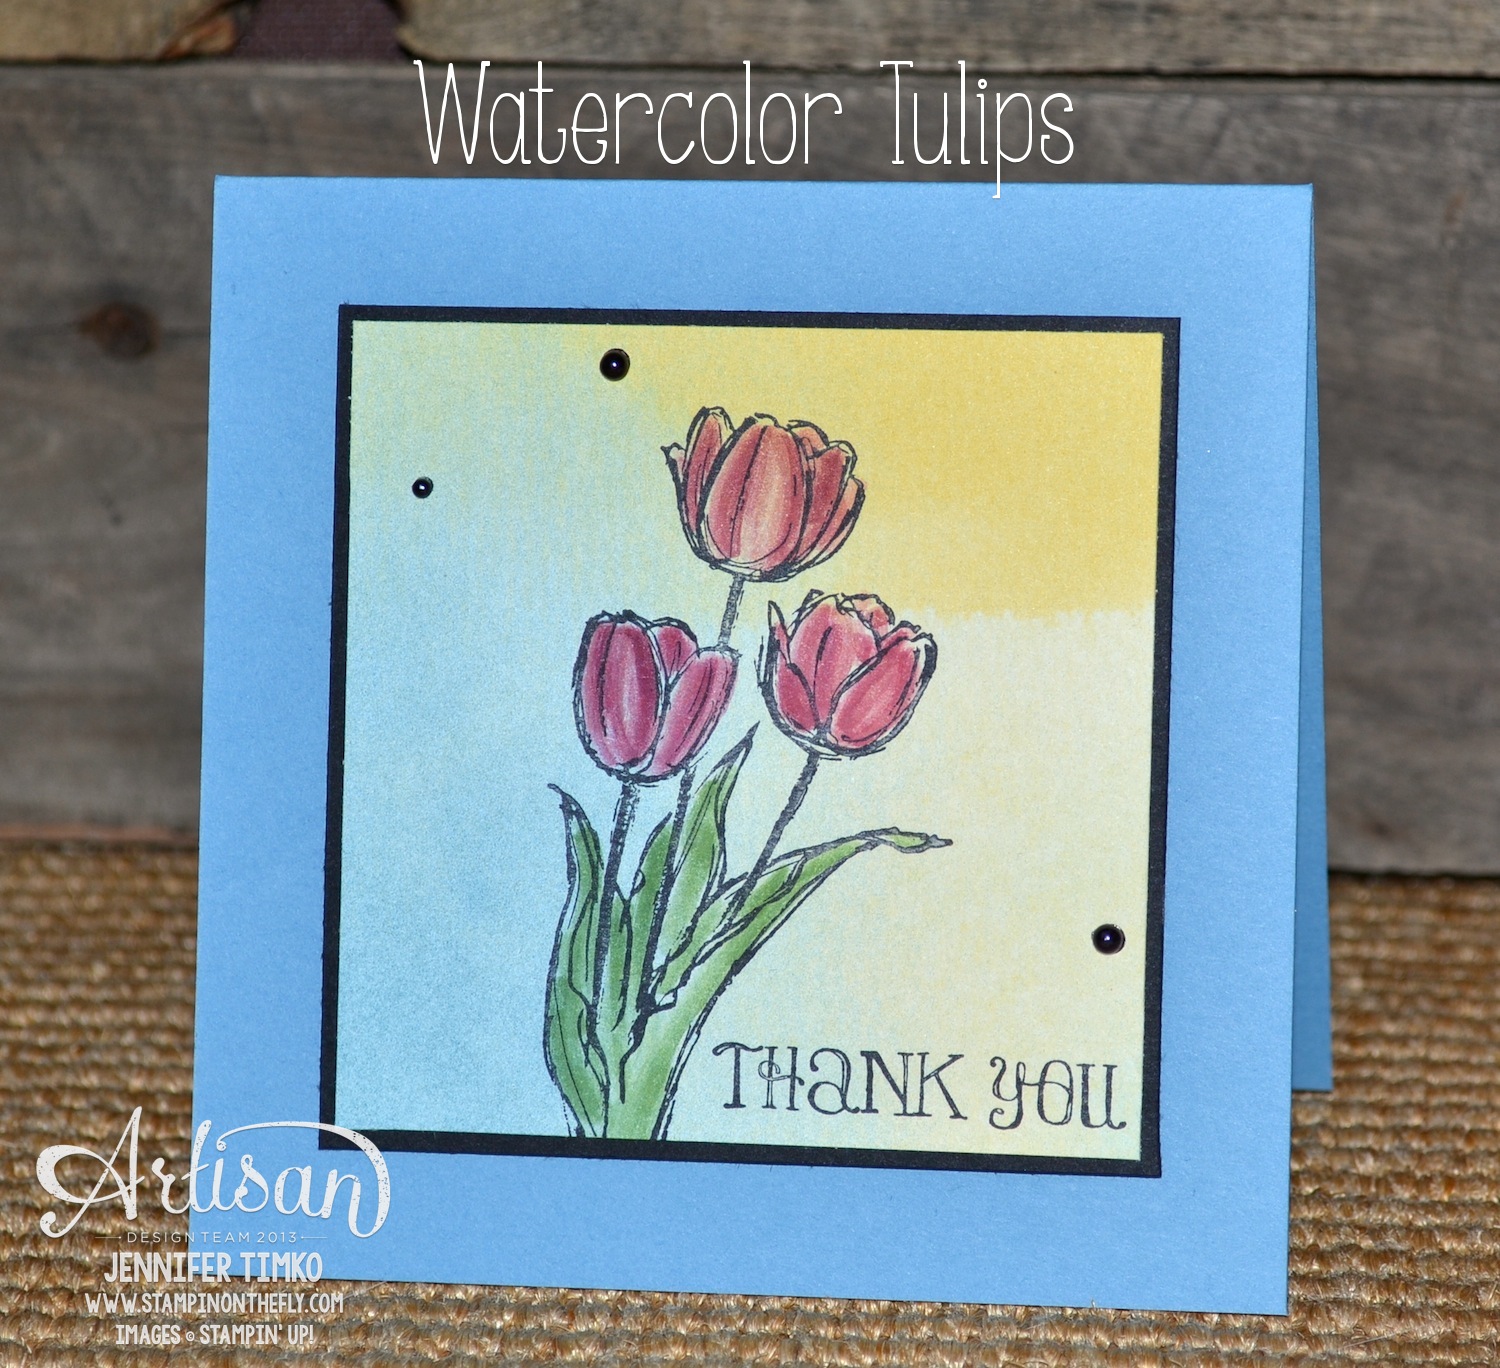
I am continuing on with my watercolor theme for the month with this latest card. I used the Watercolor Wonder DSP and chose a piece with a varied watercolored look. Then I stamped the tulips from Blessed Easter using Stazon Black ink. I colored them using my Blender Pen and the 2012-14 In Colors – Gumball Green, Primrose Petals and Raspberry Ripple. I added a sentiment from Lots of Thanks (what a great set!) and some Basic Pearls that I colored black using a permanent marker. I gave it a Basic Black frame and put it on a Marina Mist base.
I hope you like my card this week! I have had such fun showing you different ideas for watercoloring this month!! Last week I told you to expect a surprise. Well, I was a week off (that is what happens when you get really excited about something!!). But the whole team will be giving away blog candy. Expect all the specifics in next week’s hop and make sure you check out the SU Facebook Page on Friday for this month’s Artisan Showcase. This will be courtesy of Stampin’ Up so you KNOW it will be great!
Okay, off to go visit the awesome Mercedes Weber. I can’t wait for you to see what she has created! Make sure you hop around the whole loop to take a look at beautiful creations by the whole team…you’ll be happy you did!
Click HERE to purchase any of these wonderful Stampin’ Up products.
Happy beginning of the week to you all!! I hope that your weekend went well. I’m back from my training/check with United and ready for some more crafty goodness this week! Engine failures, electrical issues, hydraulic/flight control issues….all kinds of “fun” in the simulator for three days is enough to drive me running back to my stamp room. But my check went really well. It is always good to have that done (until the next one in 9 months). Ok…enough about that and on to stamping.
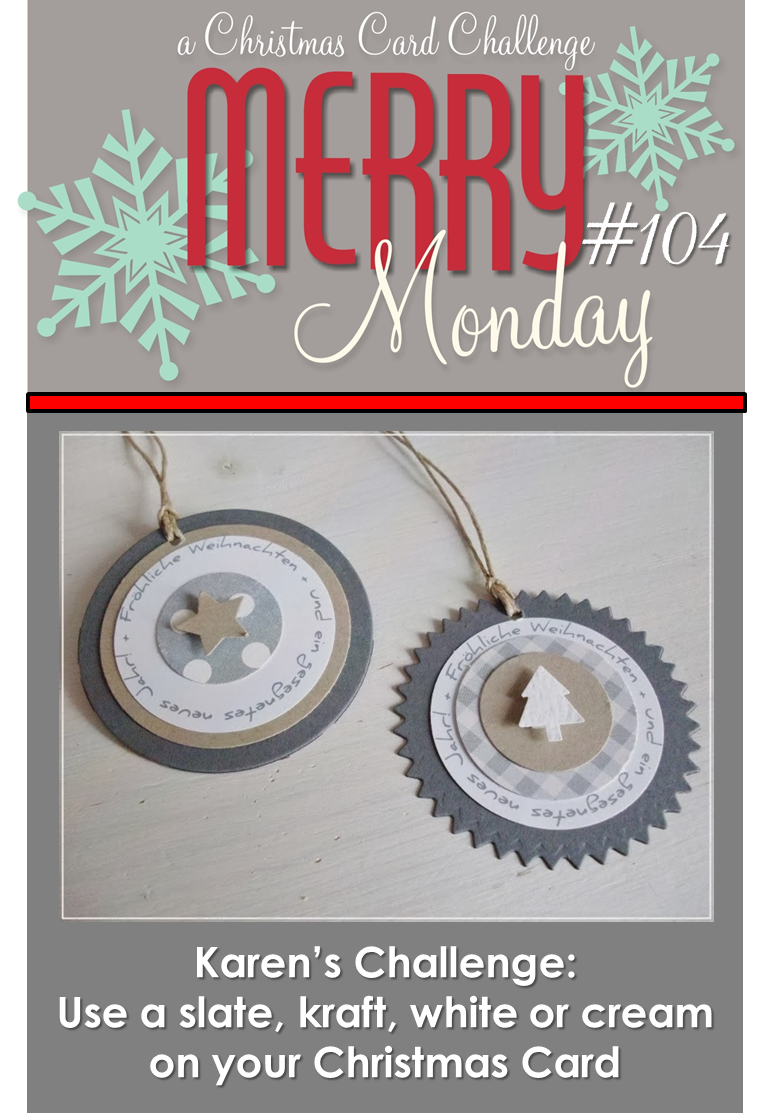
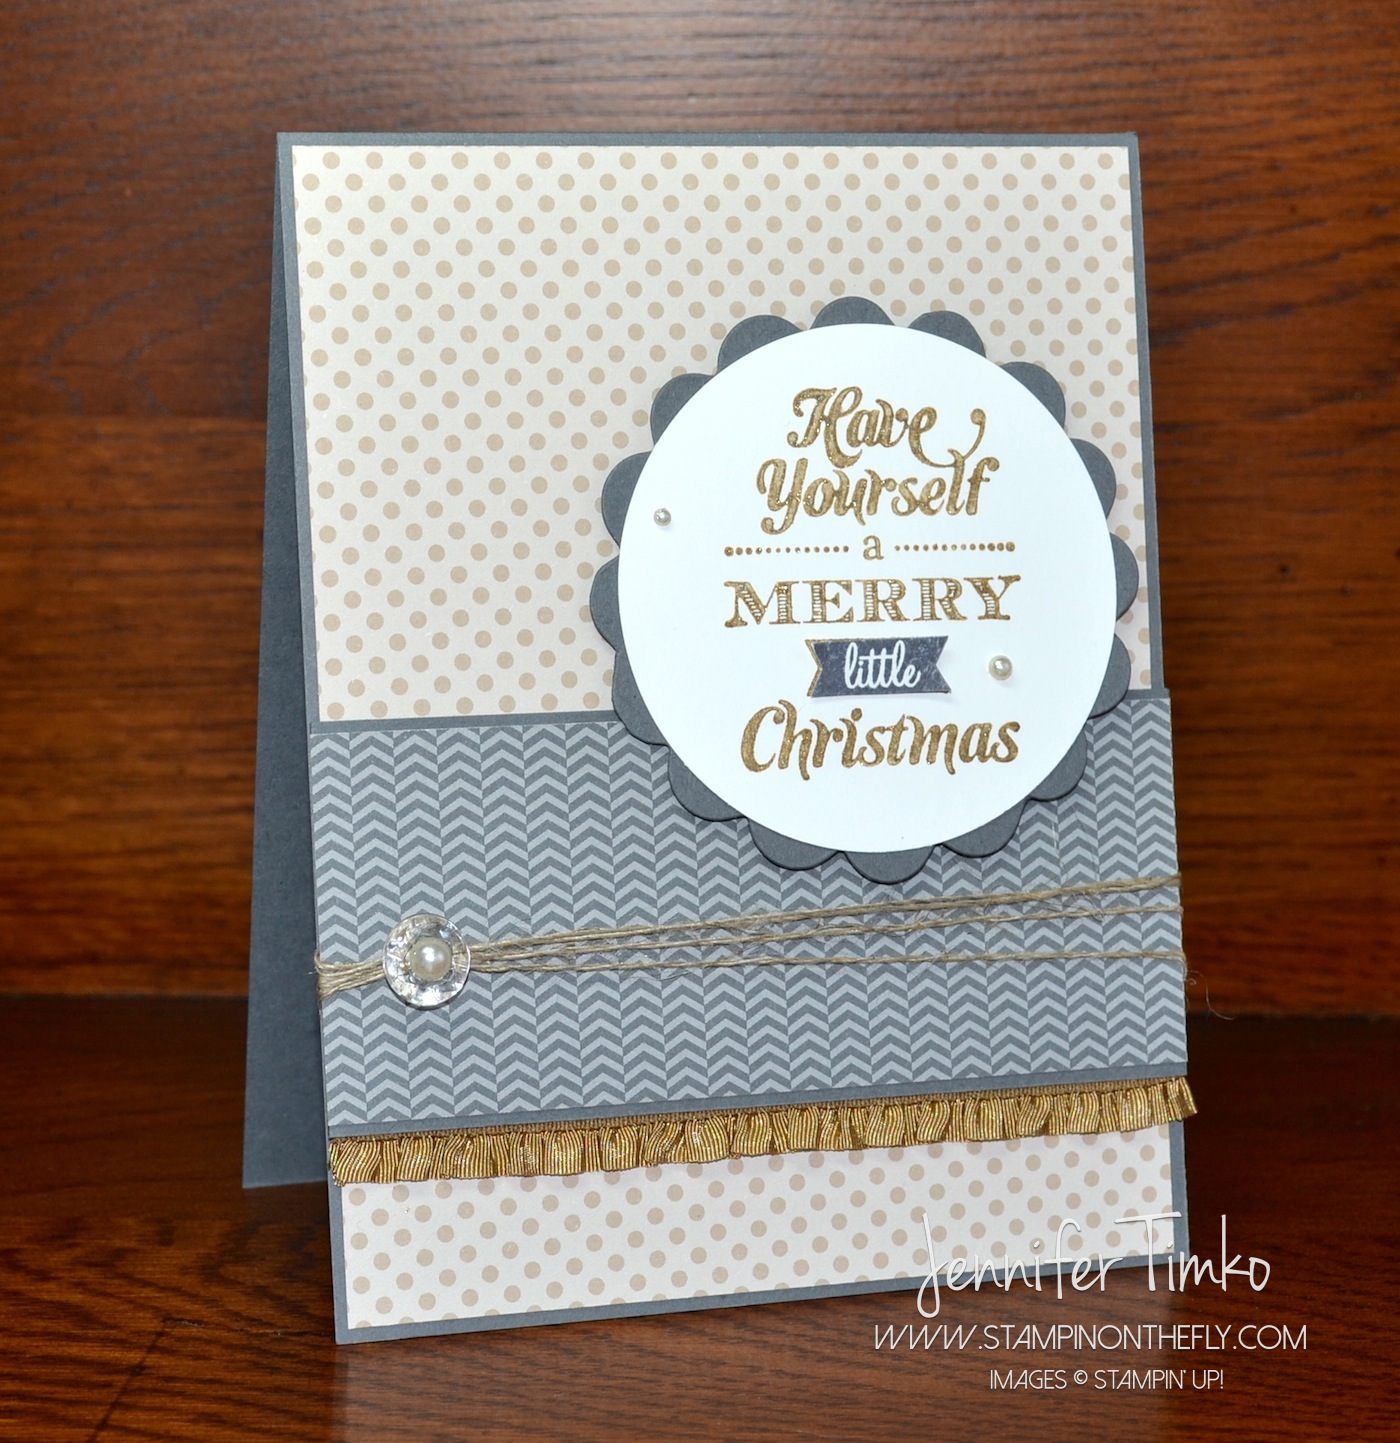
Don’t you LOVE the colors for this week’s Merry Monday Challenge?? I was smitten the second I saw them!
Do you recognize the papers on this card? No?? They are from the Calypso Coral Celebration Add-On Kit. Yes they are! As I was shuffling around looking for the right papers, they were sitting right on my desk. They work so well together of course since they are from the same kit. The stamp is a favorite of mine from the last Holiday Catalog, Merry Little Christmas. I stamped it on Whisper White. I first inked it in Crumb Cake and then used a sponge dauber to apply Champagne Mist Shimmer Paint on top (retired). It adds a pretty sparkle that was hard to capture with a camera.
The stamped words were punched out with my 2-1/2″ Circle Punch and backed with a scalloped circle from the Perfect Pennants Die. I added some Baked Brown Sugar Ruffled Trim for additional shimmer and texture. That trim is so pretty and perfect at the bottom of panels! Finally, a Vintage Faceted Button with Linen Thread and some random Pearls.
I hope you will play along with the challenge this week. The design team there has provided some amazing inspiration so make sure you take a look!
Click HERE to purchase wonderful Stampin’ Up products.
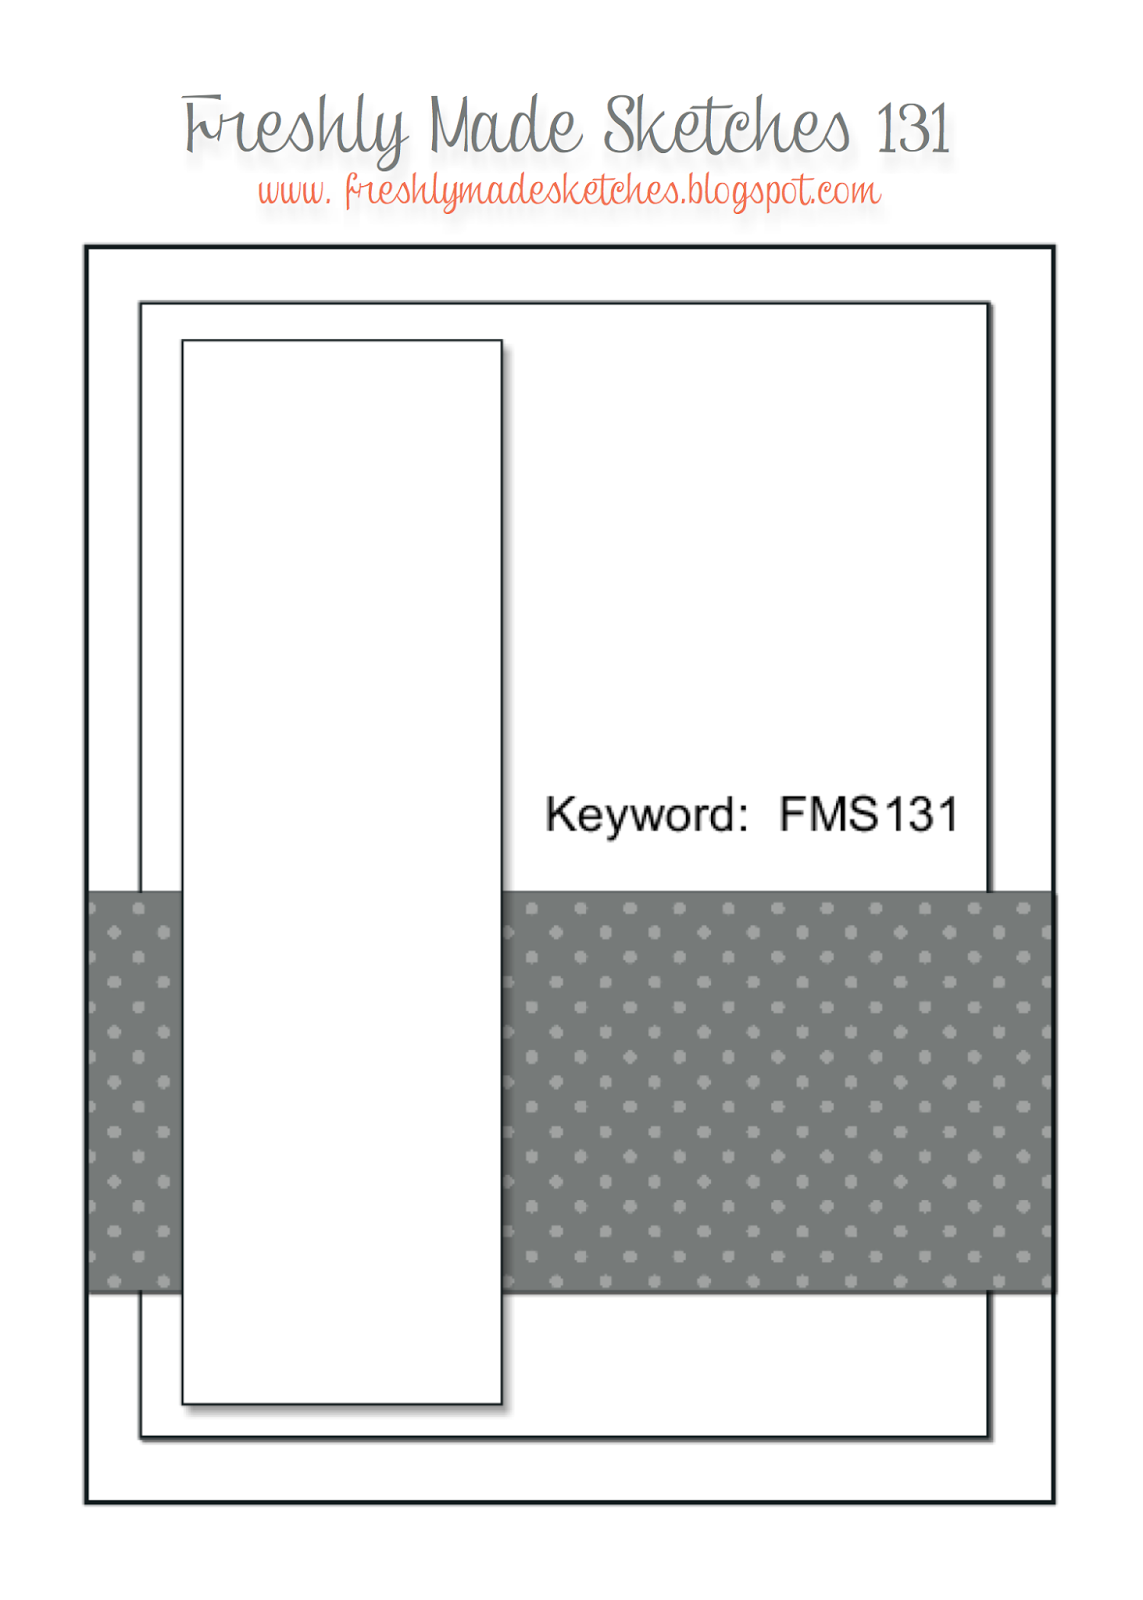
Cindy Hall is such a lovely person so it is no surprise that she has created a lovely sketch for us this week at Freshly Made Sketches! This is one of those that has a bunch of interpretations and the team has created exactly that. I love these ladies!
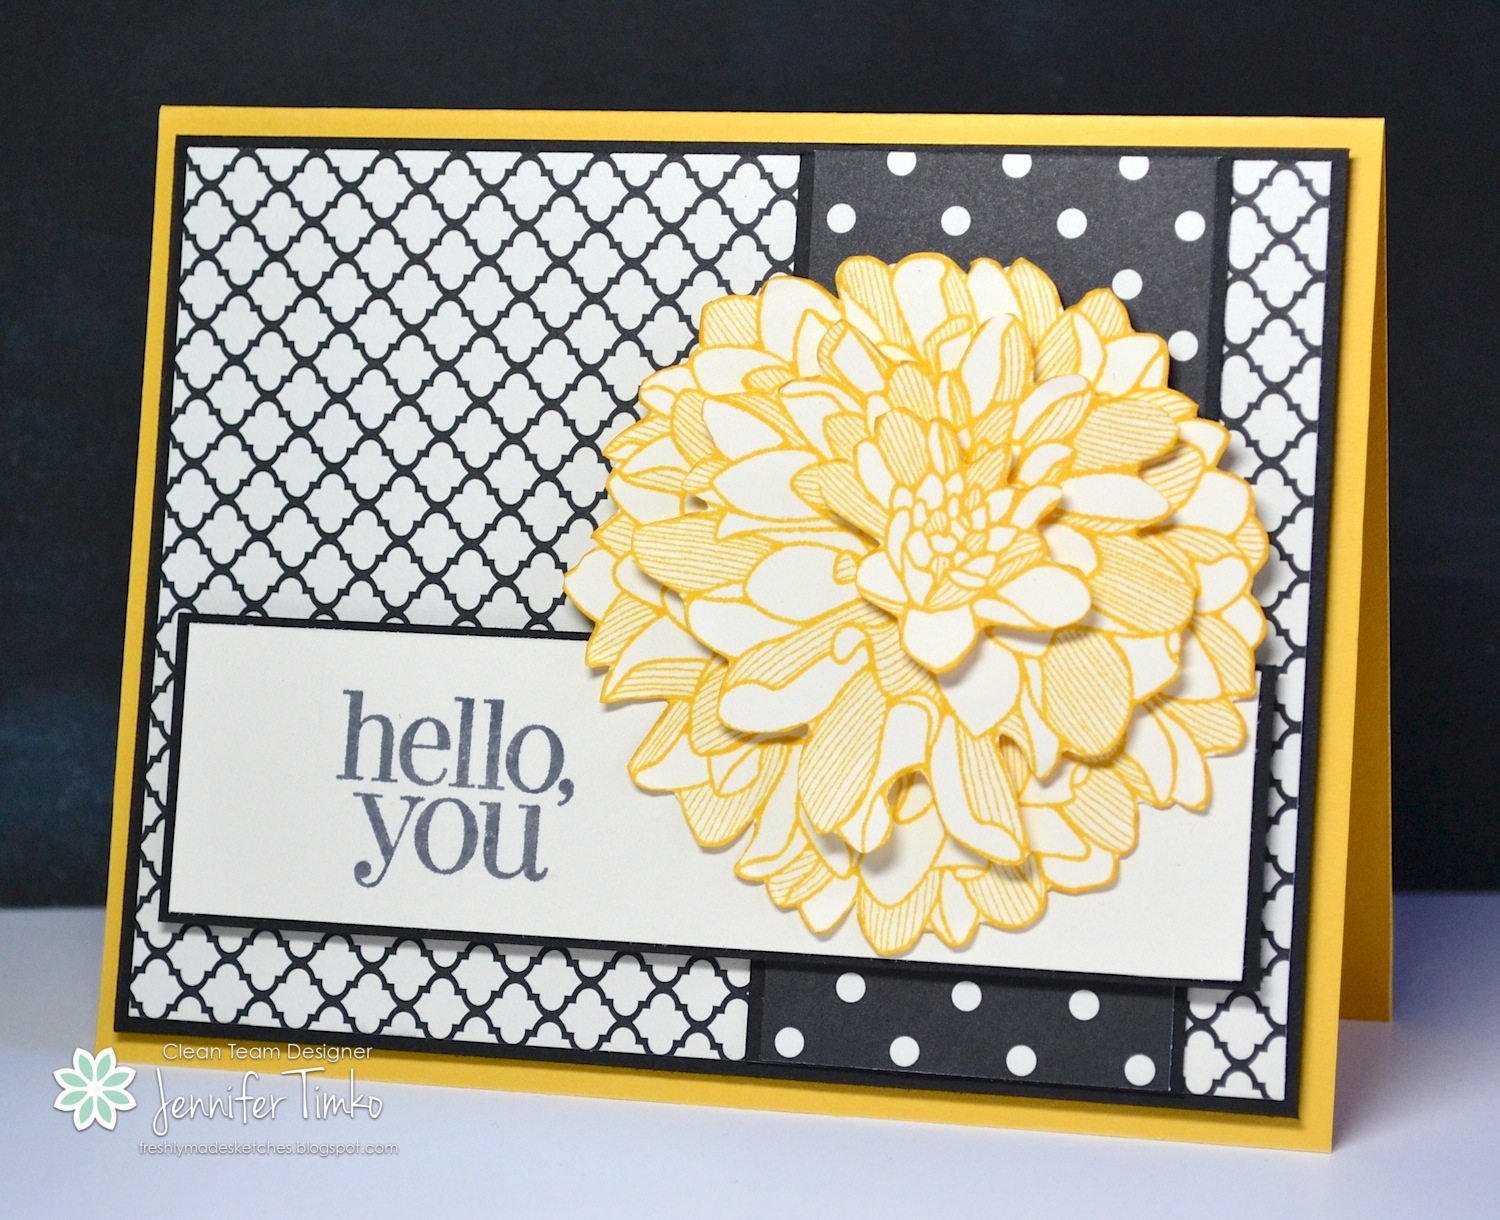
I thought I’d flip this one on its side to allow room for this pretty flower. As we approach new catalog time, I’m starting to pull out some of my favorites from the current catalog. Modern Medley DSP and Regarding Dahlias rank right at the top!! Together they are so fun! I usually seem to make this flower in some variation of red so I tried a change up today. The Daffodil Delight looks great with the Black and Vanilla, don’t you think? I stamped the flower three times and cut out the layers. After they were cut, I took a marker around the edges for a little extra definition (make sure you come from the back and not the front to avoid stray marks). Other than that, the card is pretty straight-forward. The prints do all the work. Love that!!
Busy week for me this week. I hope you have enjoyed my Merry Monday card and my Artisan card…if you haven’t seen them, just roll down to take a look. Take special note of a surprise coming in next week’s Artisan post. I have a check ride for the remainder of the week (a flying test with United) so no more stamping for me. But I’ll be back on Monday with another fun Christmas card! Until then, so glad you dropped by and I’ll see you again soon.
Click HERE to purchase wonderful Stampin’ Up products.
Stamp: Regarding Dahlias; Paper: Very Vanilla, Modern Medley DSP, Daffodil Delight; Ink: Daffodil Delight; Accessories: Dimensionals
The Artisan Design Team’s April box of products is a celebration of the Occasions Catalog. This catalog really has something for everyone! Just like last week, we have a great variety for you. If you have come over from amazing Jeanna, welcome to the next stop. If you are starting here, just continue around using the next buttons until you get back to me.
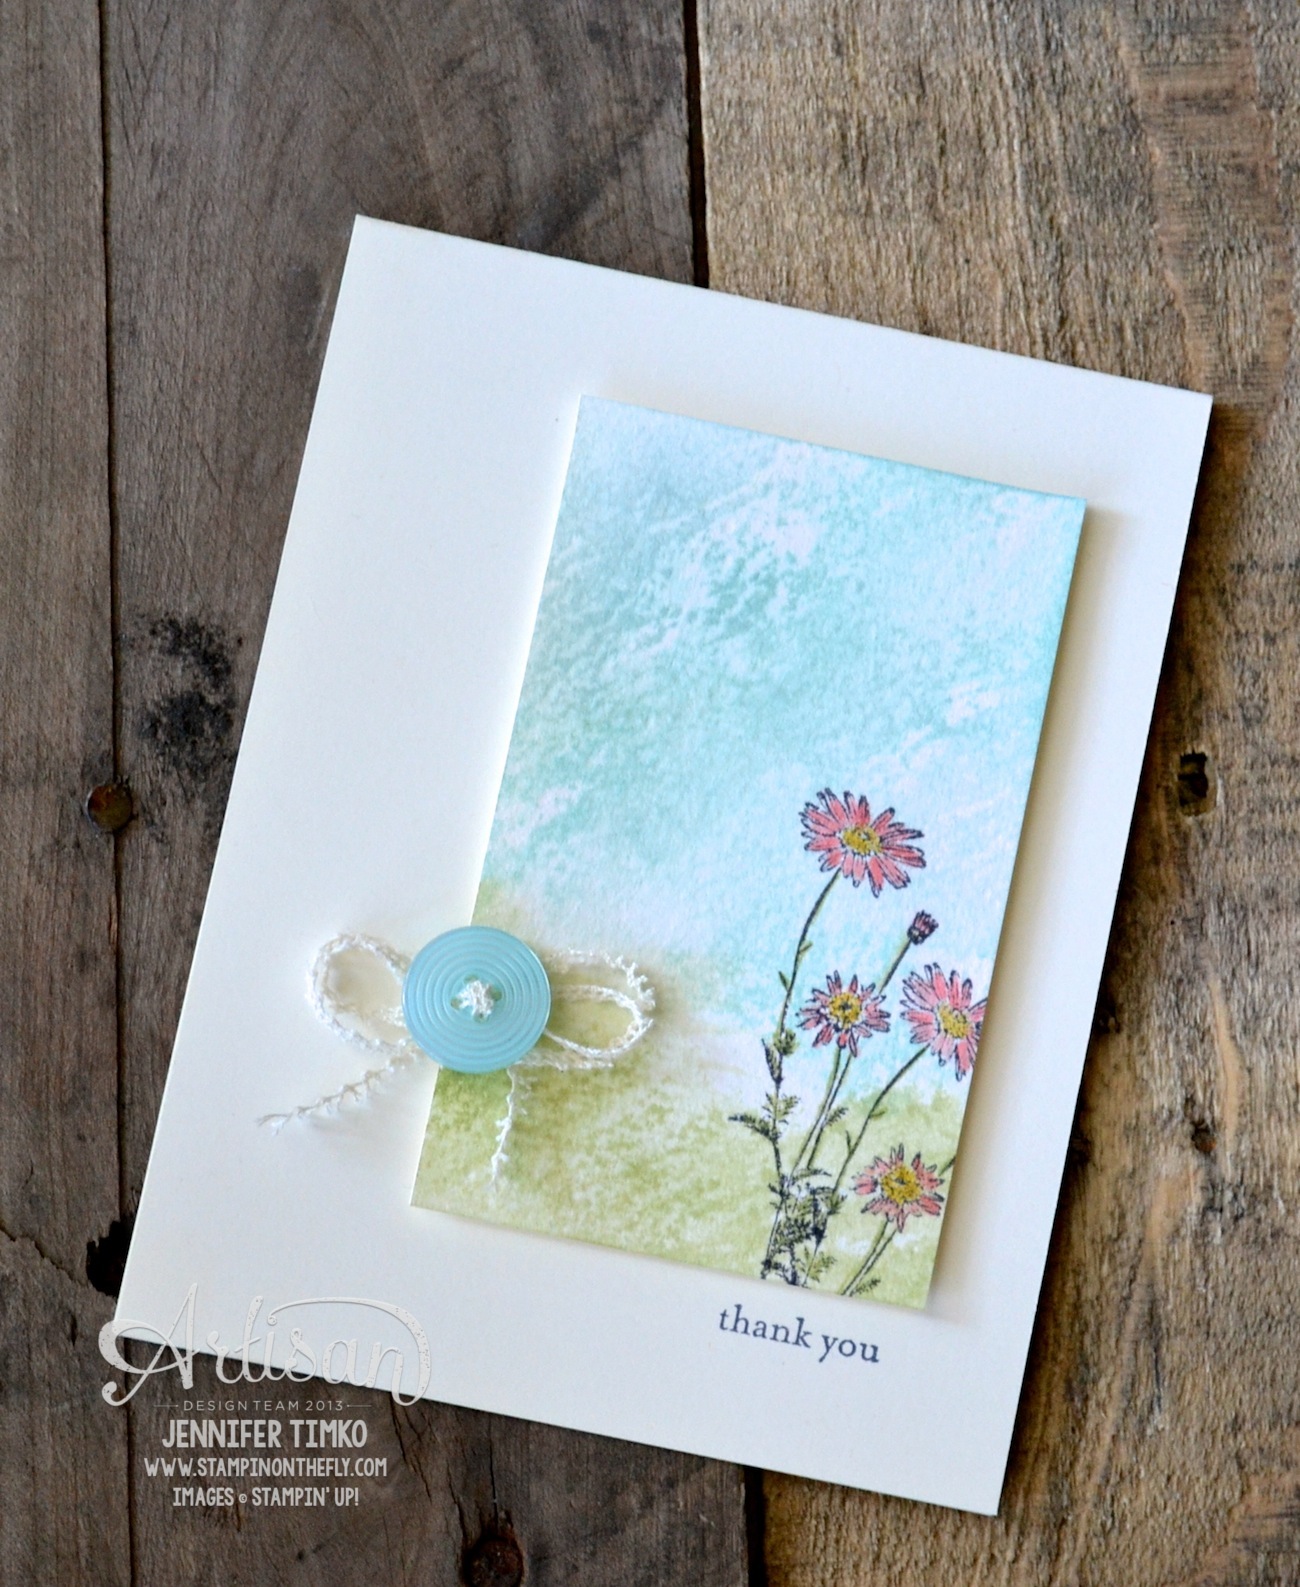
I continue to love this sweet little stamp set (Springtime Hello). I can’t get enough of it! So I figured I should share another way to use it. This time I created a background using my acrylic blocks that is really fun and creates this cool watercolor effect. Take your Stampin’ Write Marker and scribble on a block, spritz with water and drag it across the paper. Because the Watercolor paper isn’t smooth, the block kind of skips over sections and leaves it looking like this. I used both Soft Sky and Pool Party inks on the sky and Old Olive for the ground. Then I stamped on the flowers using my Basic Gray Classic Pad and colored the flowers using both a Blender Pen and direct marker to paper. Under the button, I cut off the edges of some Victoria Crochet Trim to create the bow underneath. The sentiment is from Teeny Tiny Wishes (an all-time great set!!).
I hope you like my card this week! I’m back tomorrow with the latest from Freshly Made Sketches! So glad you stopped by today. Next week, you really need to come again because the whole Artisan Design Team has a great surprise for you courtesy of Stampin’ Up!
Okay, off to go visit the awesome Mercedes Weber. I can’t wait for you to see what she has created! Make sure you hop around the whole loop to take a look at beautiful creations by the whole team…you’ll be happy you did!
Click HERE to purchase any of these wonderful Stampin’ Up products.
Stamp: Springtime Hello, Teeny Tiny Wishes; Ink: Basic Gray, Rich Razzleberry, Daffodil Delight, Basic Gray, Pool Party, Soft Sky, Old Olive; Paper: Watercolor, Very Vanilla; Accessories: Acrylic Blocks, Blender Pen, Subtles Buttons, Victoria Crochet Trim
So guess what??!! I get to be the Featured Designer on Merry Monday Challenge for the month of April. Totally great, right?! Well, it is even better because we get to use snowmen this week. Fantastic theme, don’t you think?
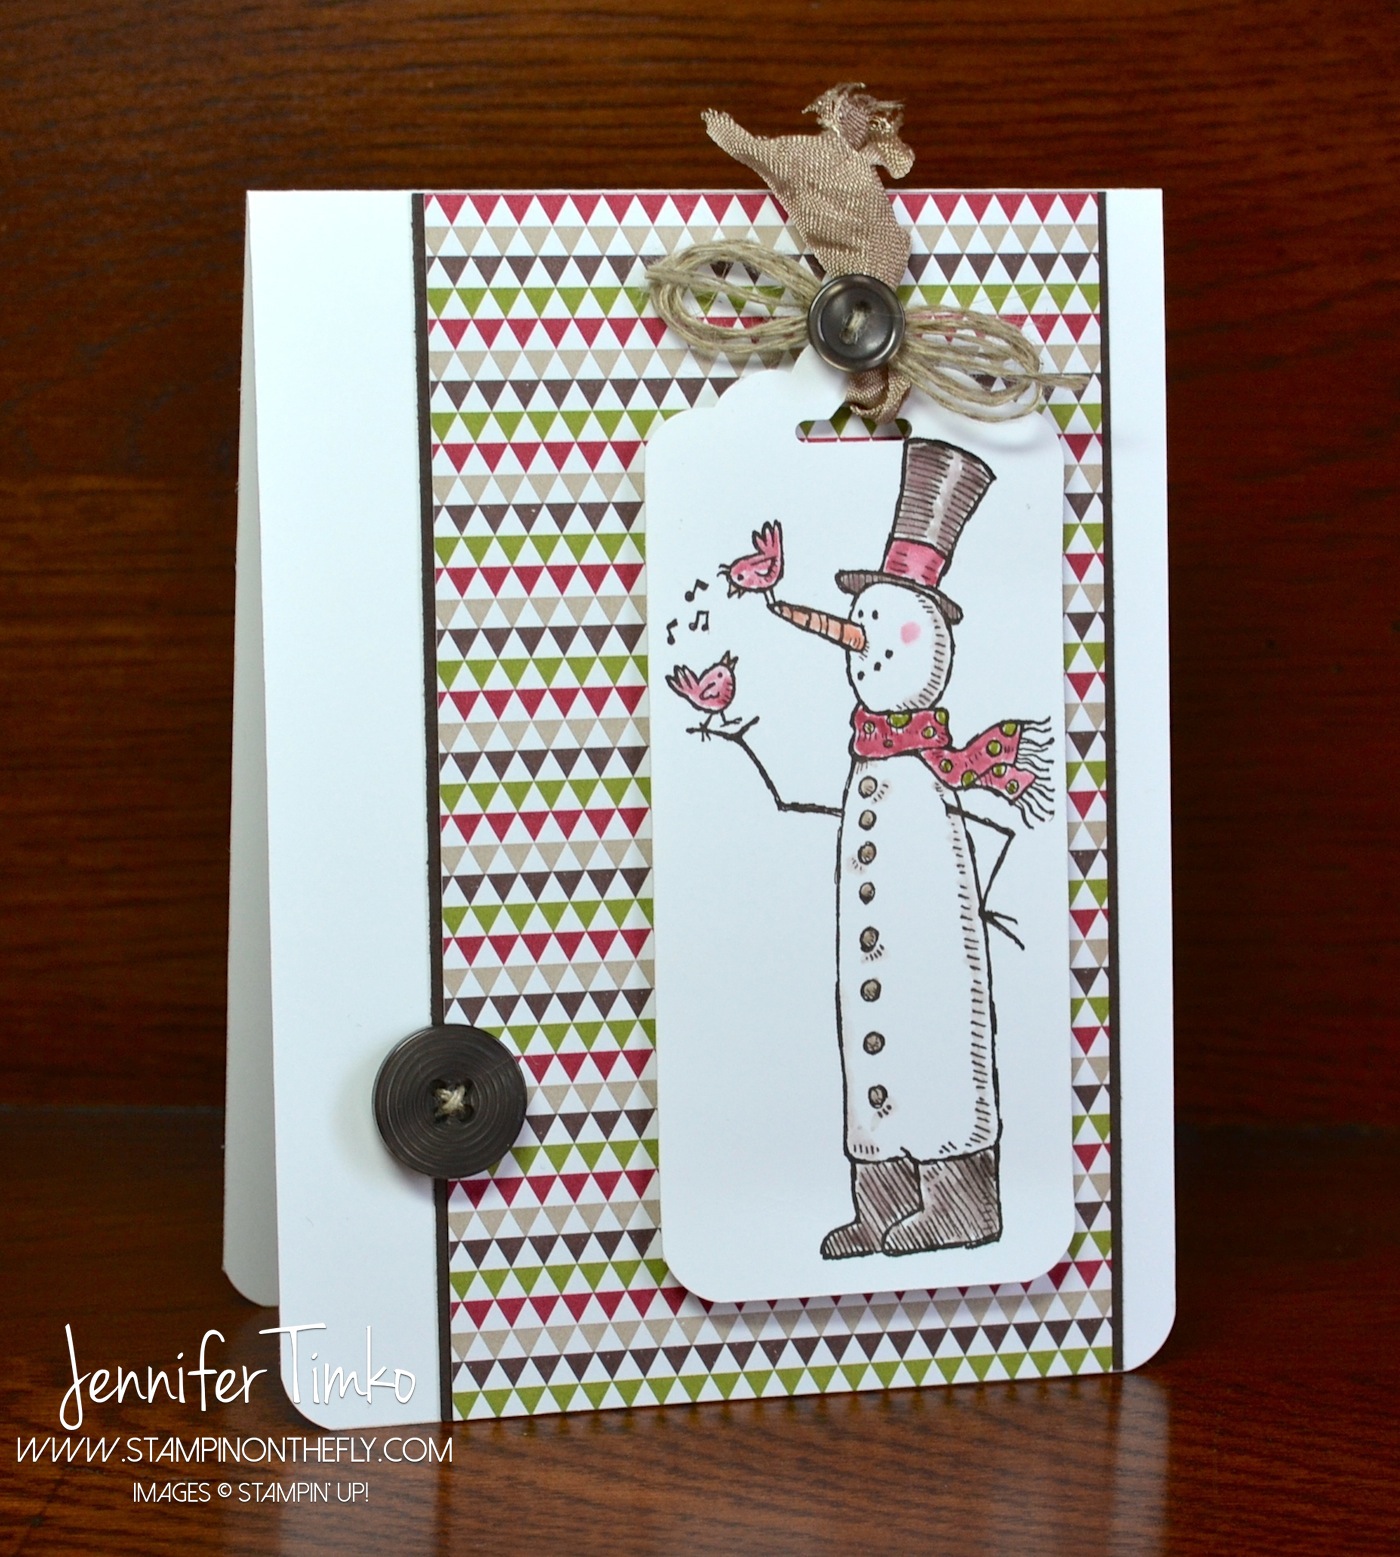
I had to pull out one of my favorite snowmen sets, Snow Much Fun. I think these guys are, well, so much fun. I stamped him on Whisper White in Early Espresso Ink. Then watercolored using a Blender Pen with Cherry Cobbler, Early Espresso, Old Olive and Pumpkin Pie. Using the Scalloped Tag Topper Punch, I created the tag and tied it up with Crumb Cake Seam Binding and Linen Thread. The paper is from the retired Season of Style. I think this print is fantastic and was glad to still have some on hand. The corners on the tag and the card are rounded using the Envelope Punch Board.
It was a nice change of pace to create a Christmas card this time of year and I can’t be happier to be a part of this great challenge all month. I hope you’ll join me and the team for the challenge!
Back tomorrow with my latest Artisan Wednesday Wow project. Until then, I hope the day is wonderful!
Click HERE to purchase wonderful Stampin’ Up products.
Stamp: Snow Much Fun; Paper: Whisper White, Early Espresso, Season of Style DSP; Ink: Early Espresso, Cherry Cobbler, Old Olive, Pumpkin Pie; Accessories: Scalloped Tag Topper Punch, Crumb Cake Seam Binding, Linen Thread, Neutrals Buttons, Dimensionals
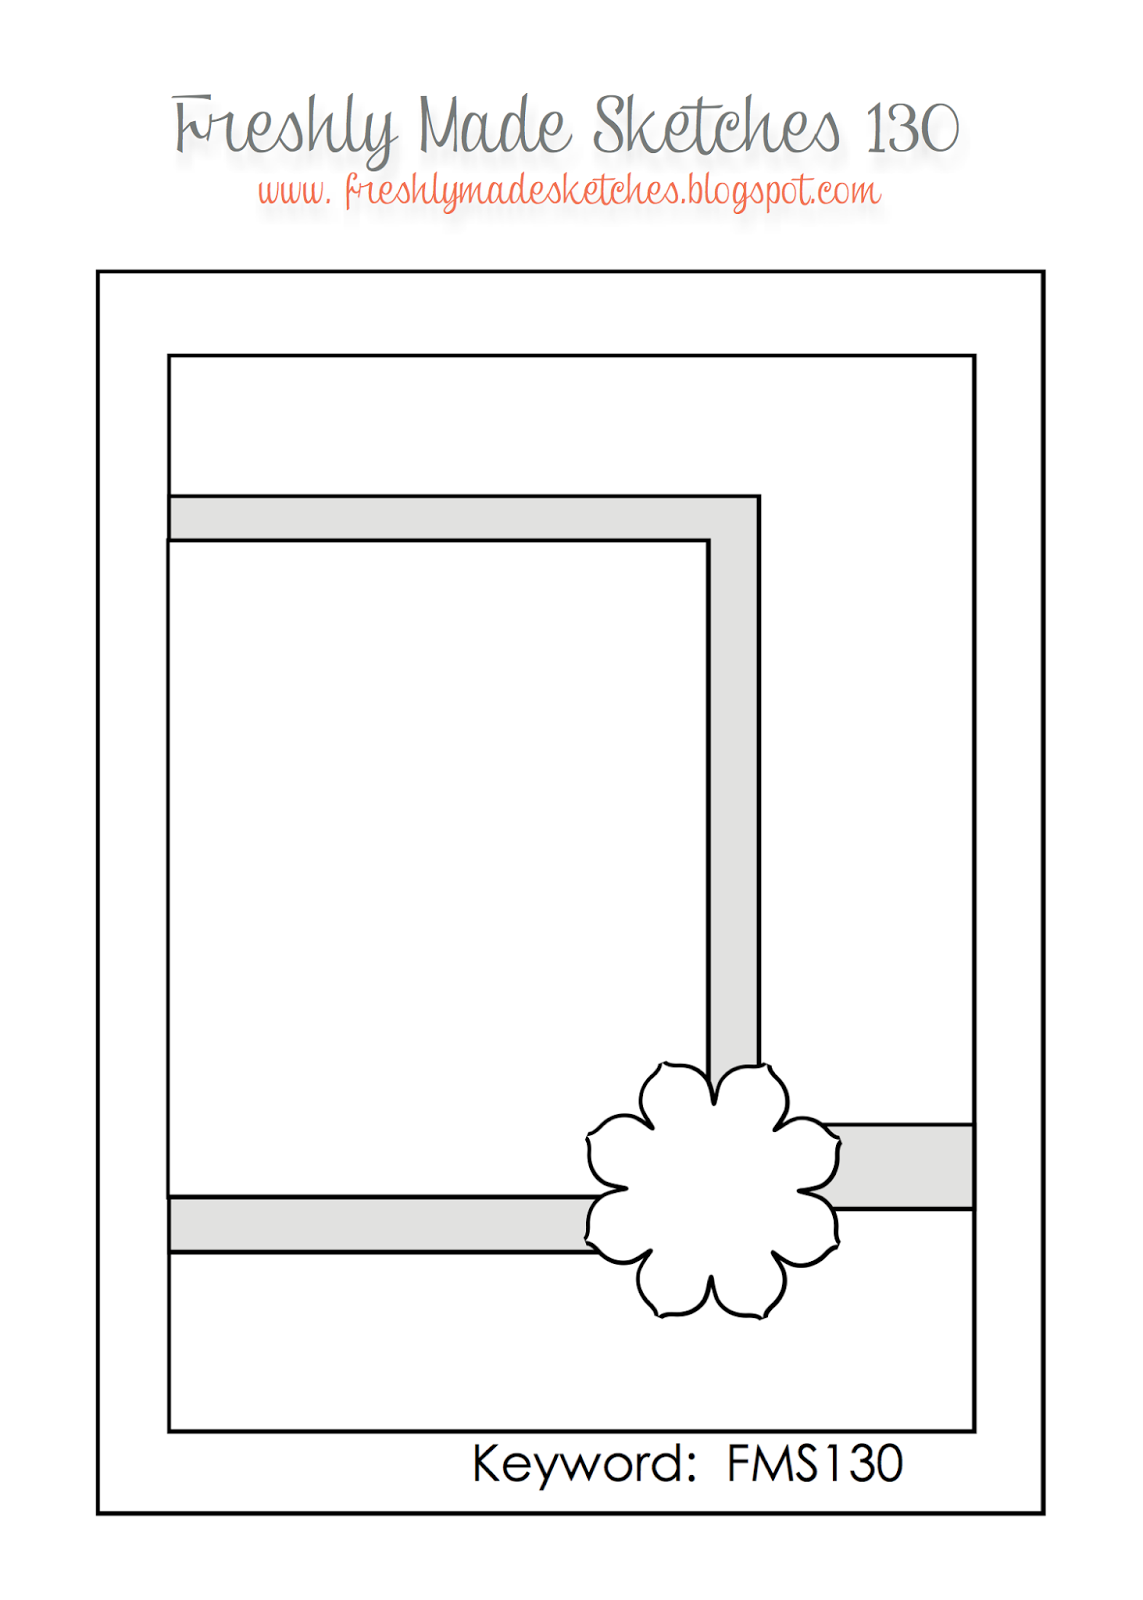
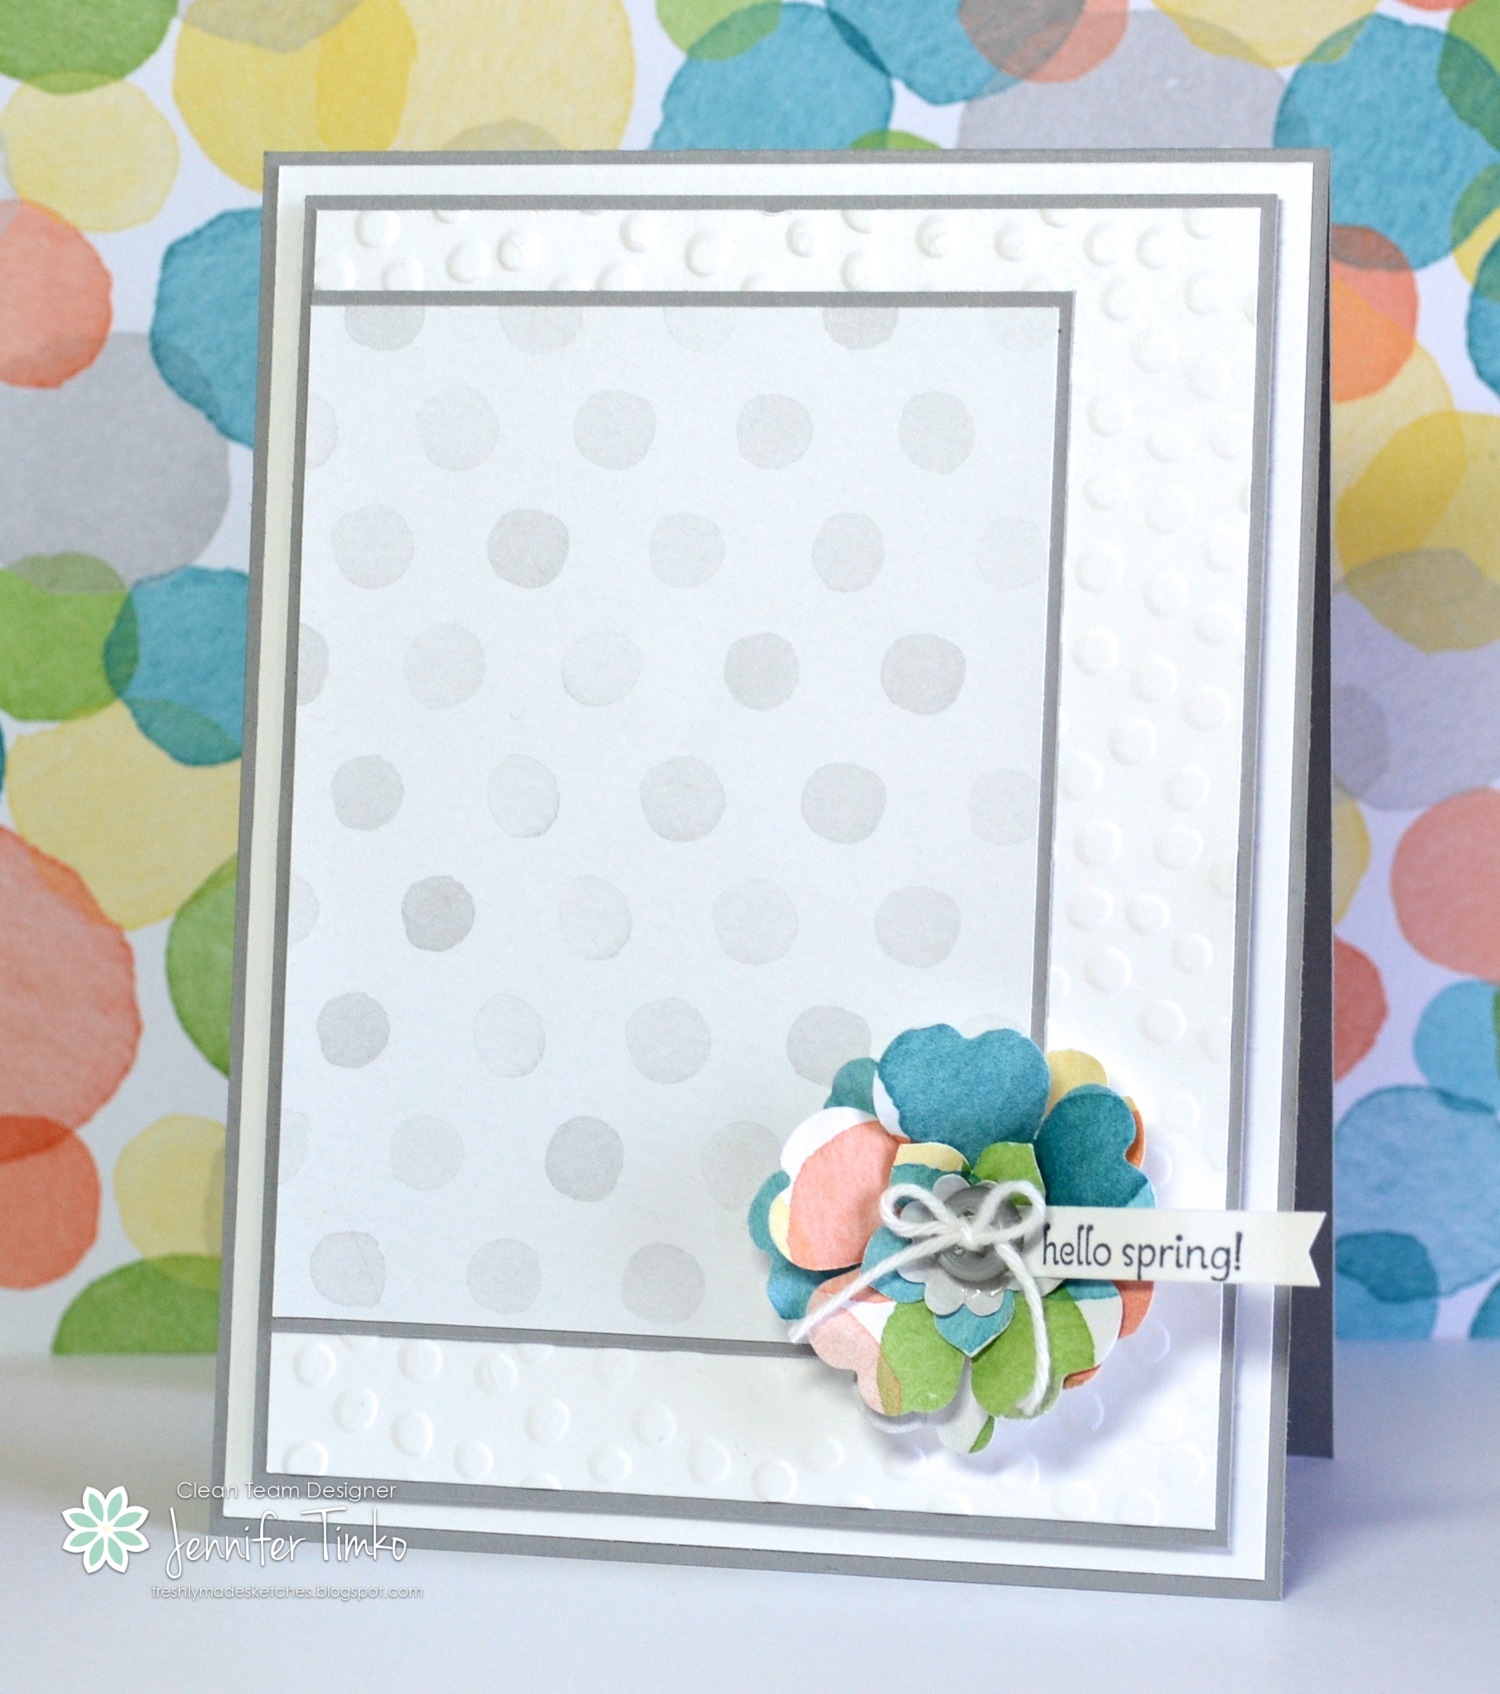
I have a theme this week apparently. Spring!! And Linda‘s fabulous sketch fit right in!! I see another awesome week at Freshly Made Sketches. Is is me or does this challenge get more fun every week??!!
If you saw yesterday’s card, I used this same sentiment. Yeah, I might be a little excited about spring really getting here!! I love the pretty papers in Watercolor Wonder and thought it would be fun to make a card with a bright flower and neutrals on everything else. Well, that DSP has it all! I mimicked the dots from the DSP with the Decorative Dots EF (SAB). The flower used the Pansy, Petite Petals and Boho Blossoms Punches. I spritzed them with a little water then formed them over my Tombow and Crystal Effects caps to get the added dimension.
I have been busily working on my April projects. I get to be a guest for a fun challenge this month (you’ll see more next week) and of course I have all the Artisan Design Team projects. We’ll even have some blog candy coming up later this month on our Artisan Wednesday Wow posts!!
So, I hope it is starting to feel like spring where you are (or to cool off if you are in the southern hemisphere)! I saw my first daffodil yesterday and that made me ready for more flowers! Make sure you check out the wonderful work from the FMS team this week. Another inspiring variety!! Thanks for stopping in. See you soon!
Click HERE to purchase wonderful Stampin’ Up products.
Stamp: Springtime Hello; Paper: Whisper White, Smoky Slate, Watercolor Wonder DSO; Ink: Basic Gray; Accessories: Pansy, Petite Petals and Boho Blossoms Punches, Big Shot, Decorative Dots EF (SAB), Neutrals Buttons, Baker’s Twine, Dimensionals
The Artisan Design Team’s April box of products is a celebration of the Occasions Catalog. This catalog really has something for everyone! I suspect you will see that in your hop this week. If you have come over from amazing Jeanna, welcome to the next stop. If you are starting here, just continue around using the next buttons until you get back to me.
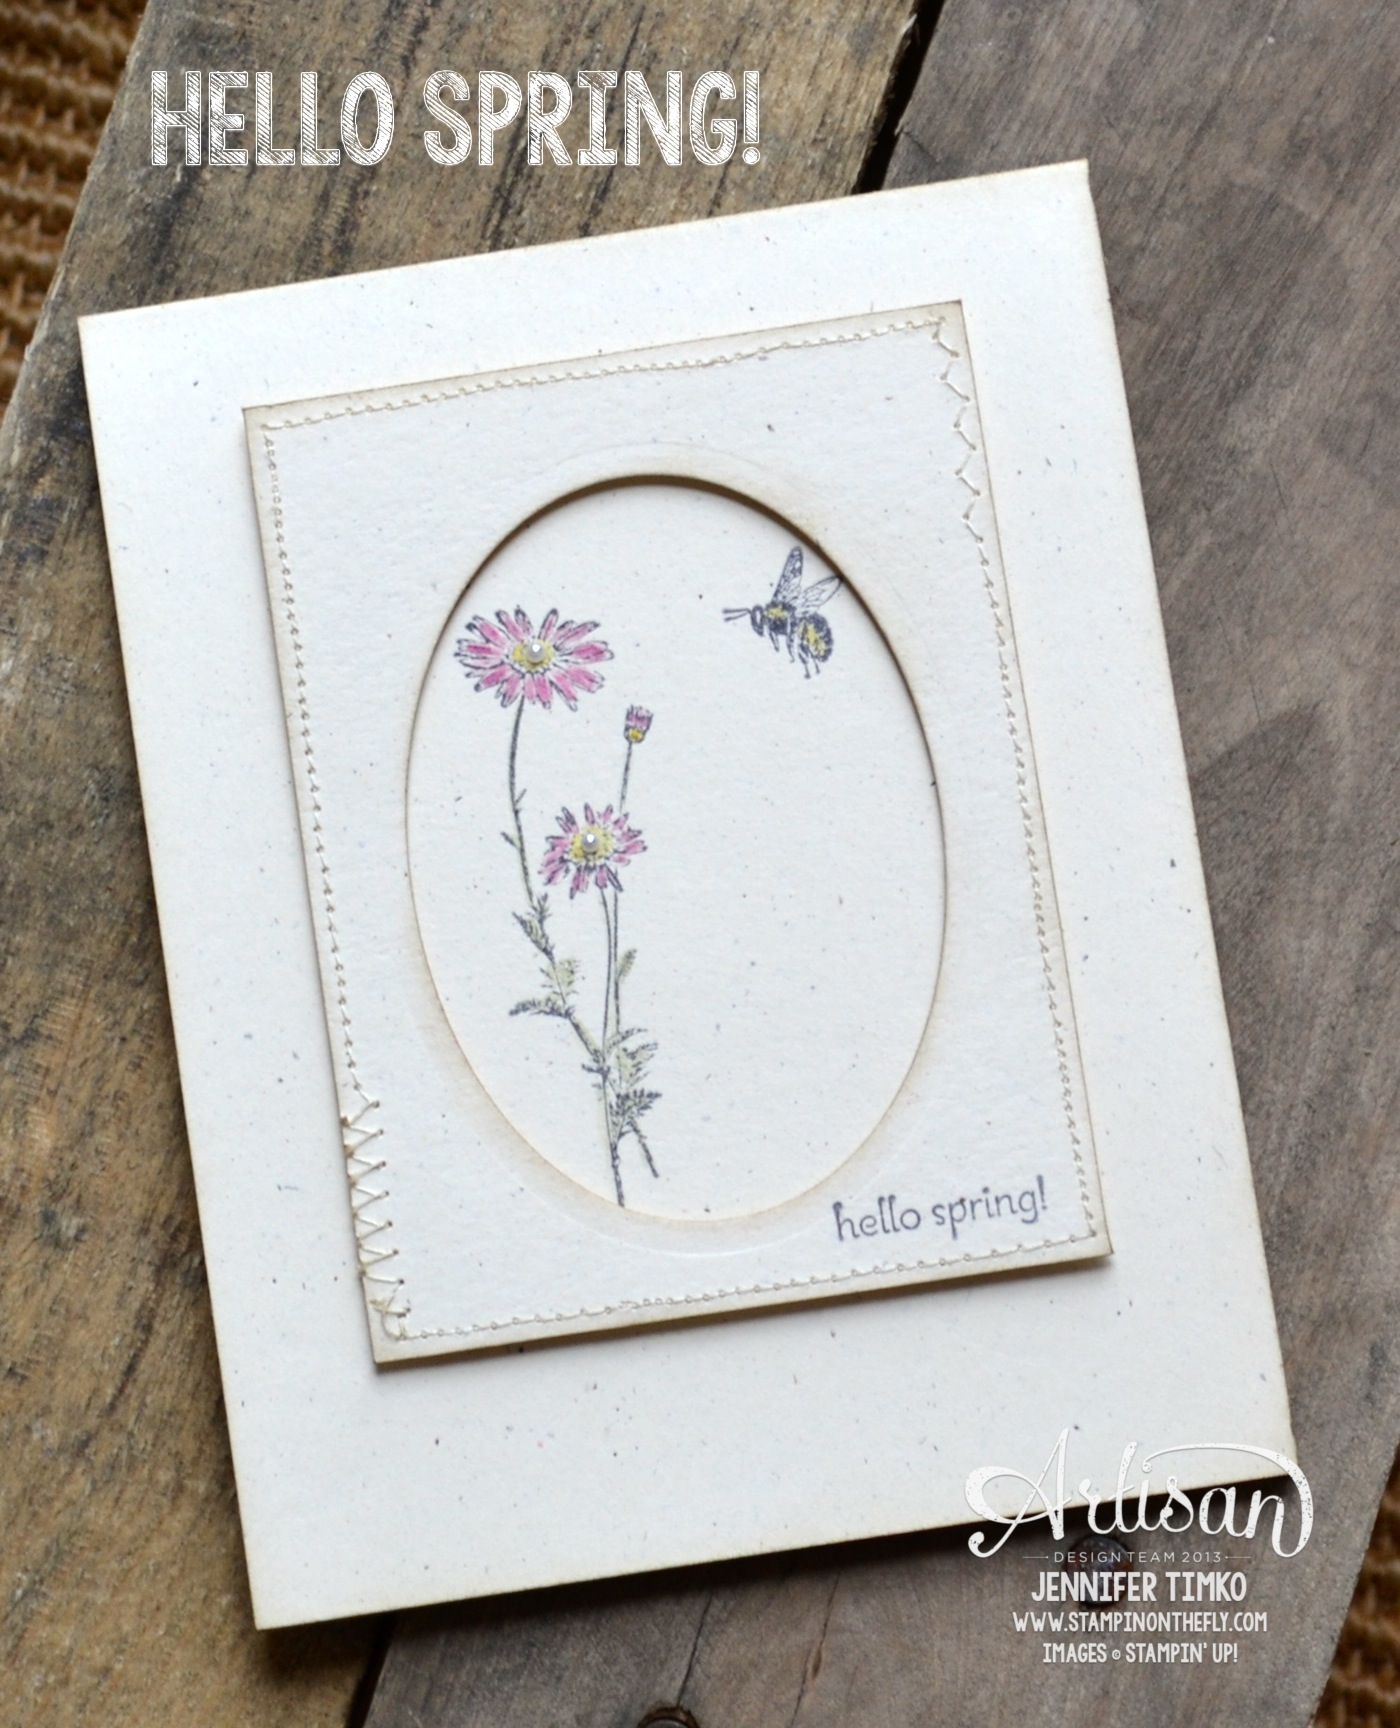
I’m saying this very, very carefully but I think it is here for real. HELLO SPRING!!! So happy to see you!! Enough to dedicate a card to you!! The stamps in Springtime Hello are so delicate and pretty. I love them so much. I wanted to find a way to show them off and not have the pretty artwork get lost in the card. So I stamped the flower and bee using Basic Gray Ink onto Naturals Ivory paper. I used my Blender Pen to touch on Rich Razzleberry, Daffodil Delight and Pear Pizzazz. Then I created a frame using the Ovals Framelits and stitched around the edges to add a little something special. I stamped the sentiment in Basic Gray and then sponged Crumb Cake Ink on the frame layer inside and out. The stamped panel was cut to size to hide behind the frame and I attached the two with Dimensionals then attached the entire thing to my base. I added a couple of little pearls to the flower centers for a last pretty detail.
While the colors are muted on this, it feels just like my yard. All the browns are beginning to be dotted with color. And I could not be happier about it! I’m so glad you stopped in to visit today. I’ll be back with another Freshly Made Sketch tomorrow!!
Okay, off to go visit the awesome Mercedes Weber. I can’t wait for you to see what she has created! Make sure you hop around the whole loop to take a look at beautiful creations by the whole team…you’ll be happy you did!
Click HERE to purchase any of these wonderful Stampin’ Up products.
I’m always so happy when it is Wednesday. Because Wednesdays are Freshly Made Sketches day! Jen Mitchell is our hostess this week and she has such a fun sketch for us. The team has shown all kinds of clever ways to use it so I know you’ll find it great to try!
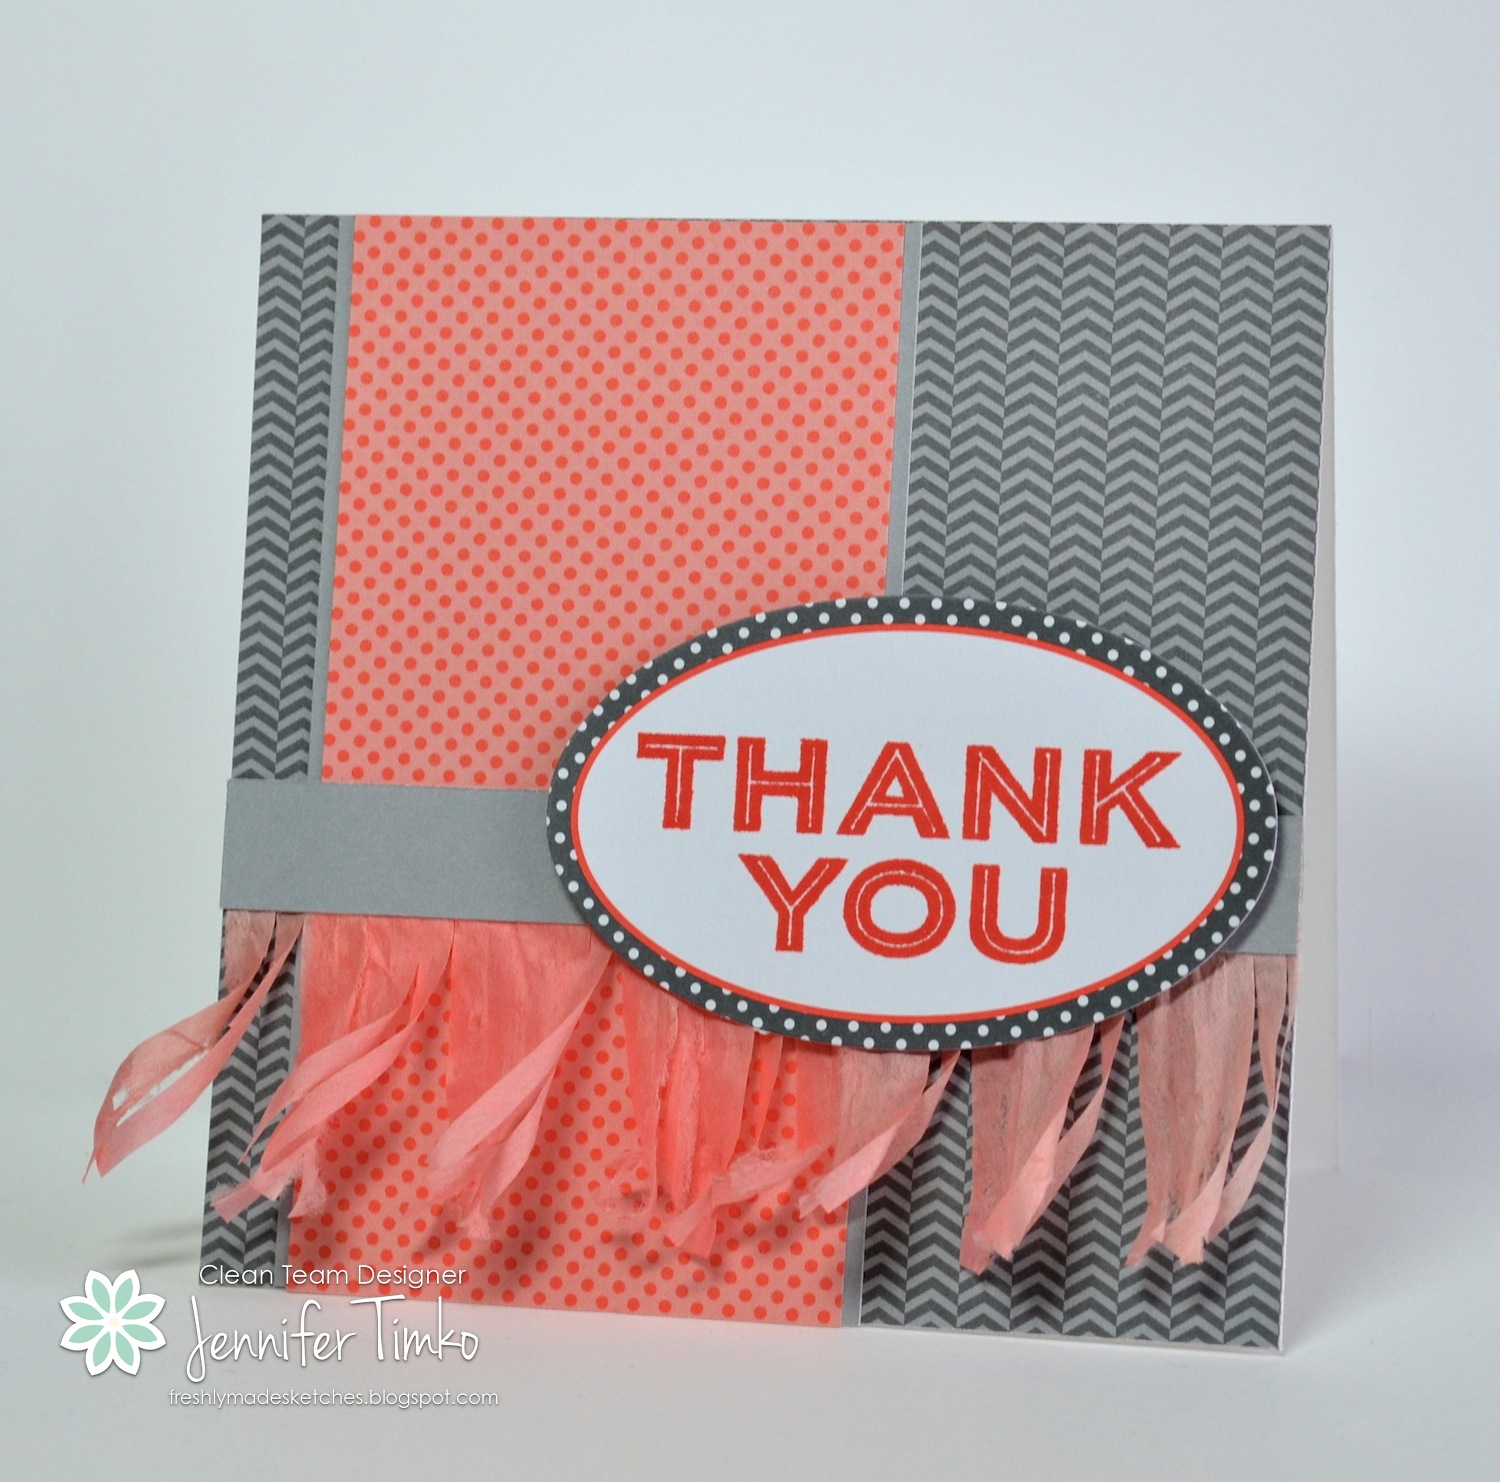
When Cindy Schuster created her adorable card for last week’s Artisan hop, I knew I wanted to use the technique with the fringed tissue. Everything on this card but the stamp is from the Celebrations Add-On Kit from the Occasions Catalog. Yes, it is intended to be an add on for the banners but I just needed to made it into a card! I’m so in love with these prints and colors! The papers are double sided so the Smoky Slate you see on the card is the back side of the Calypso Coral polka dots. For the tissue, I cut it to length (there is a sticky strip already attached) and the filled my spritzer (in the kit) with regular old rubbing alcohol and Calypso Coral reinker. Spritzed, let it dry a bit and then spritzed again. Once the paper had dried (really, let it dry…I started too early), use the Fringe Scissors to cut the tissue. It curls up like this on its own because of the coloring. Cool! The sentiment is from Simply Celebrate and fits perfectly on this tag piece. I “destuck” the tag a bit by putting it on my jeans a few times and then used Dimensionals to pop it up. I like the kit so much that I used it for another card today. It will be a bit before I can post that one though. *smile*
While I completely love all the kits that Stampin’ Up has been creating when they are used as advertised, I really love that they can be used in different ways. It makes them even more of a deal! And I love a deal! Ok…time for you to check out the fabulousness from the design team. There is so much to love!
Thanks so much for stopping in today. If you missed it, please check out my post about Pinterest from last week. Links to the Freshly Made Sketches Team page and other info too! See you again soon!
Click HERE to purchase wonderful Stampin’ Up products.
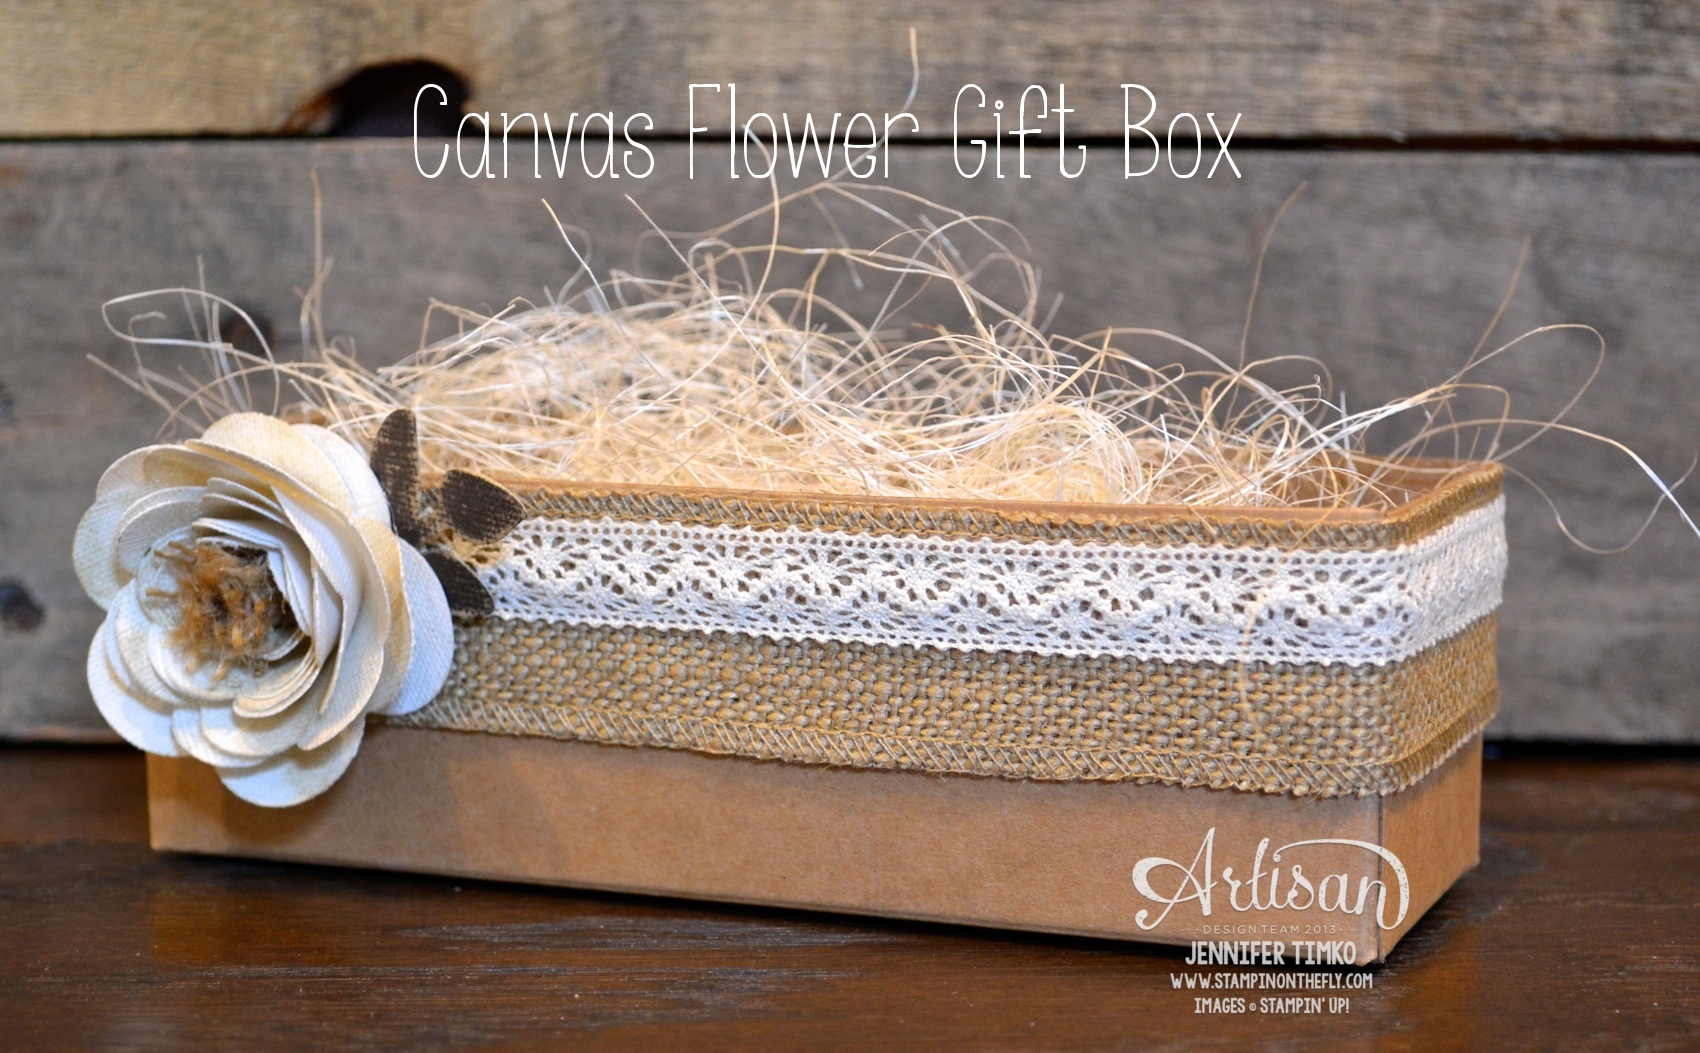
The Artisan Design Team’s March box of products is all about spring! While spring still seems to be elusive, it is here in my stamp room. Hopefully it will be in my yard soon too!! This is the last project with our April box and I have really loved this box! If you have come over from amazing Jeanna, welcome to the next stop. If you are starting here, just continue around using the next buttons until you get back to me.
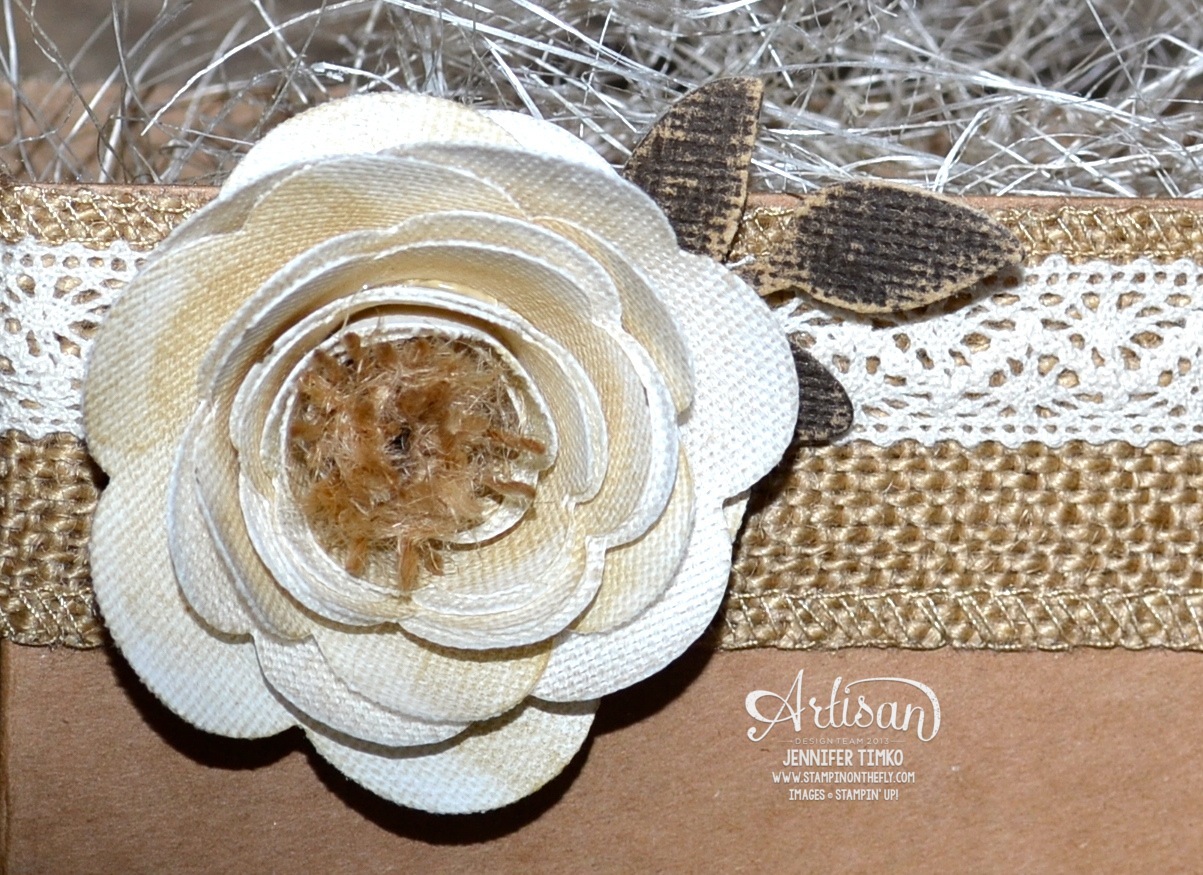
I needed a gift box for a hostess recently and I though the Spiral Flower Die would be perfect (again). Ok…I really am smitten with this die! So many different looks for your flowers! This time I used a Tag a Bag Gift Box as the base. I wrapped around a piece of Burlap Ribbon (I just love this ribbon) and then added on some Victoria’s Crochet Trim. Pretty together, don’t you think? Then I pulled out my Canvas Creations for the flower. I cut out two of them to create this one. Here is a close up:
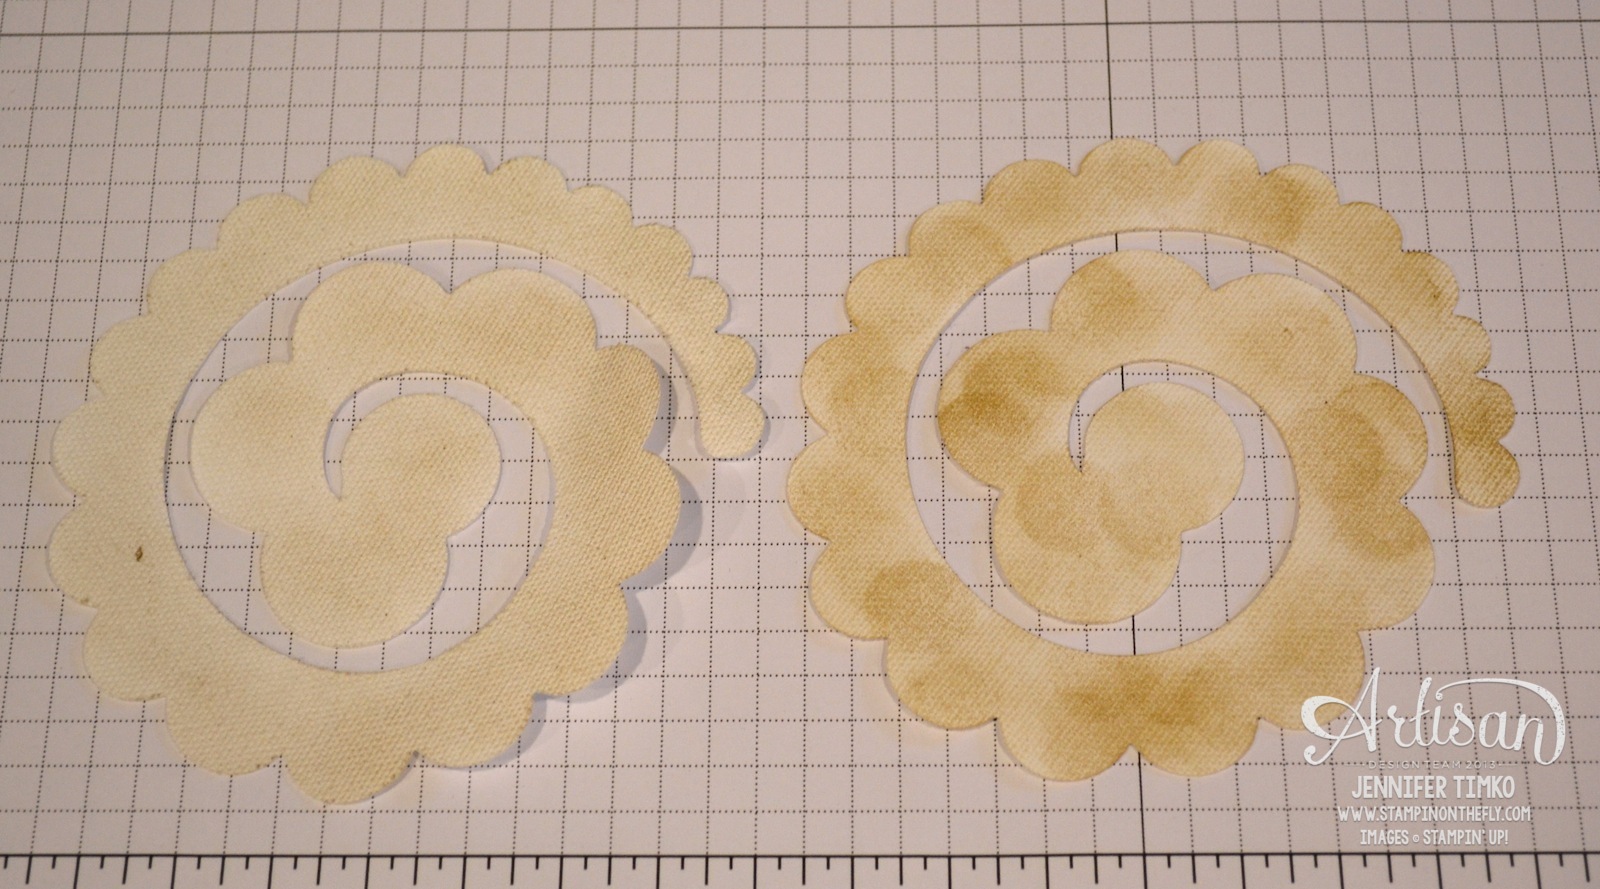
I sponged them (see below) pretty quickly and then rolled the two together and hot glued them together. Then I took another small piece of Burlap Ribbon (about 1-1/2″) and cut it in half down the middle. This leaves you with two halves held together by the stitching. Set one aside for another flower (make two of these while you are at it because you WILL find a use for them). On the other, snip along the non-stitched side with the Fringe Scissors then roll up and glue in the center of your flower. I used the leaf framelit from Secret Garden Framelits on some Core’dinations Early Espresso and sanded it to get the distressed look. Hot glue all of these onto you box and fill.
Here is a picture of my sponging. I told you it was fast! I didn’t really take the time to make it neat since you just don’t see the sponge dauber marks when it gets rolled up. I put the lighter one in front, staggered just a little, when rolling. Using your Bone Folder to add a little curl first is helpful, just like when you are rolling paper.
I hope you have enjoyed our projects this month. The team has created some truly beautiful things. I just ooh and aah each week! Back in the morning with the latest from Freshly Made Sketches.
Okay, off to go visit the awesome Mercedes Weber. I can’t wait for you to see what she has created! Make sure you hop around the whole loop to take a look at beautiful creations by the whole team…you’ll be happy you did!
Click HERE to purchase any of these wonderful Stampin’ Up products.
Ink: Crumb Cake; Paper: Core’dinations Early Espresso; Accessories: Tag a Bag Gift Box, Big Shot, Secret Garden Framelits, Burlap Ribbon, Victoria Crochet Trim, Canvas Creations, Sponge Daubers, Fringe Scissors, Hot Glue
Primary Sidebar
We use cookies on our website to give you the most relevant experience by remembering your preferences and repeat visits. By clicking “Accept”, you consent to the use of ALL the cookies.
This website uses cookies to improve your experience while you navigate through the website. Out of these, the cookies that are categorized as necessary are stored on your browser as they are essential for the working of basic functionalities of the website. We also use third-party cookies that help us analyze and understand how you use this website. These cookies will be stored in your browser only with your consent. You also have the option to opt-out of these cookies. But opting out of some of these cookies may affect your browsing experience.
Necessary cookies are absolutely essential for the website to function properly. This category only includes cookies that ensures basic functionalities and security features of the website. These cookies do not store any personal information.
Any cookies that may not be particularly necessary for the website to function and is used specifically to collect user personal data via analytics, ads, other embedded contents are termed as non-necessary cookies. It is mandatory to procure user consent prior to running these cookies on your website.