Skip to content

New Year, New Craft Room

New Year, New Craft Room published on 28 Comments on New Year, New Craft Room

For the last two months, our family’s basement has been under construction.  If you have ever had any work like this on your home, you know that it is a mixture of chaos and anticipation.  Since I started stamping, I have been working on my dining room table and my things have been stored in the office area.  Needless to say, that meant that the dining room was always a mess with half-finished projects.  My husband gets the patience award for putting up with that for so long!  So when we decided to finish the basement this fall, we agreed that a craft room was needed.  YEA FOR ME!!!  So, here is our progression:

Stamp room 1

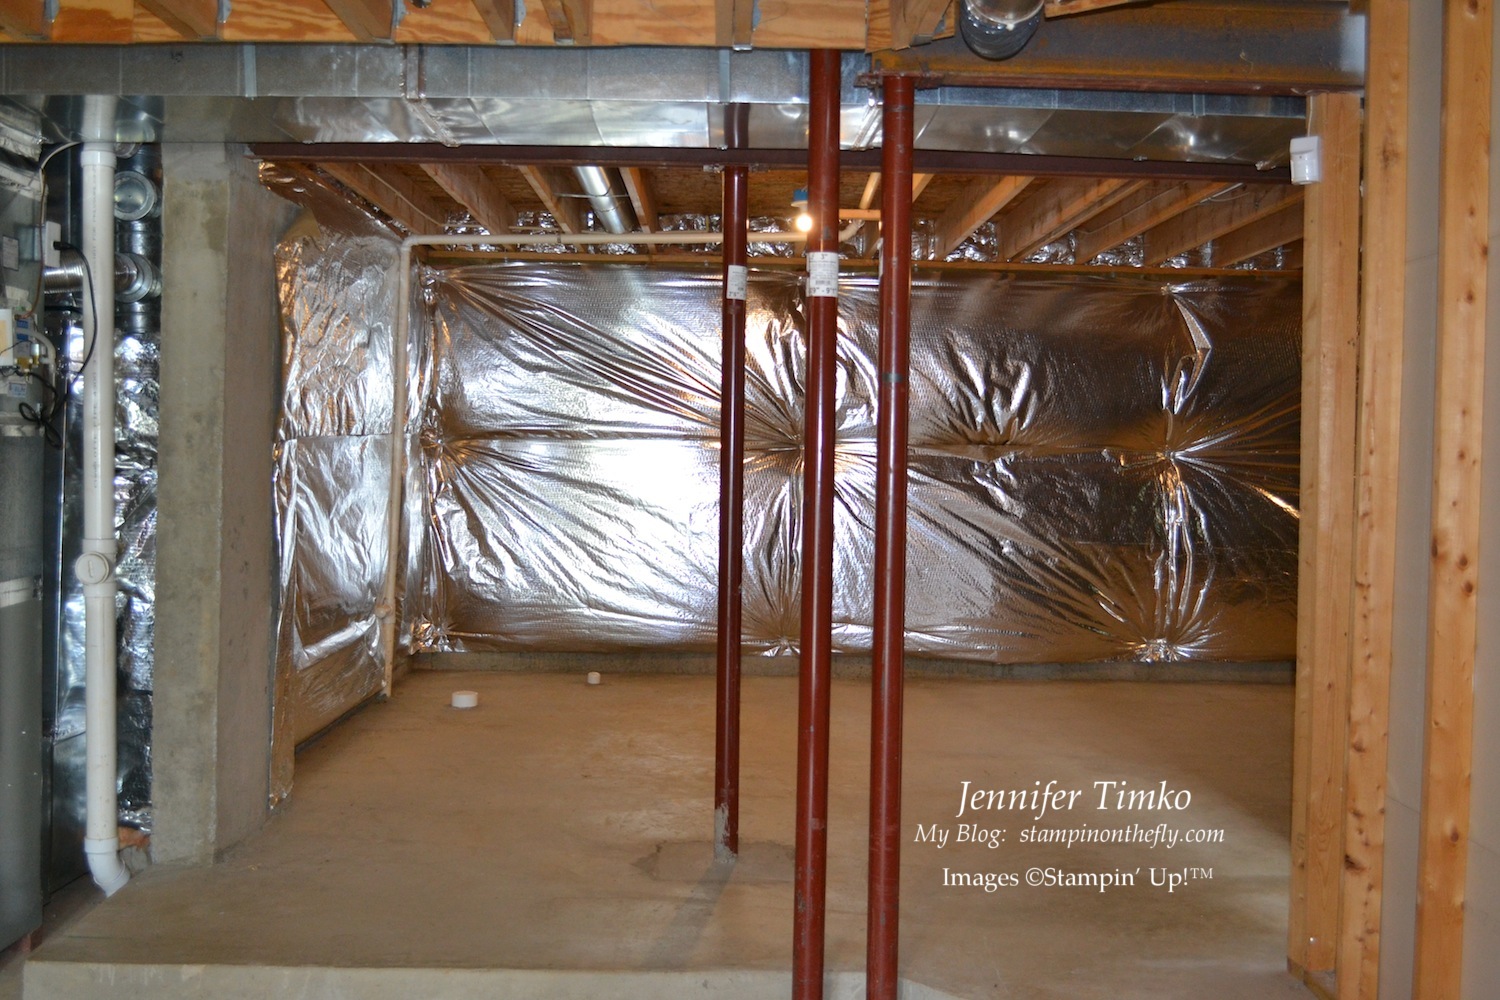
We started with a basement that was completely unfinished.  This is a picture of the area that was to become a small bathroom and the craft room.  The “wall” on the right was removed.

Stamp room 2
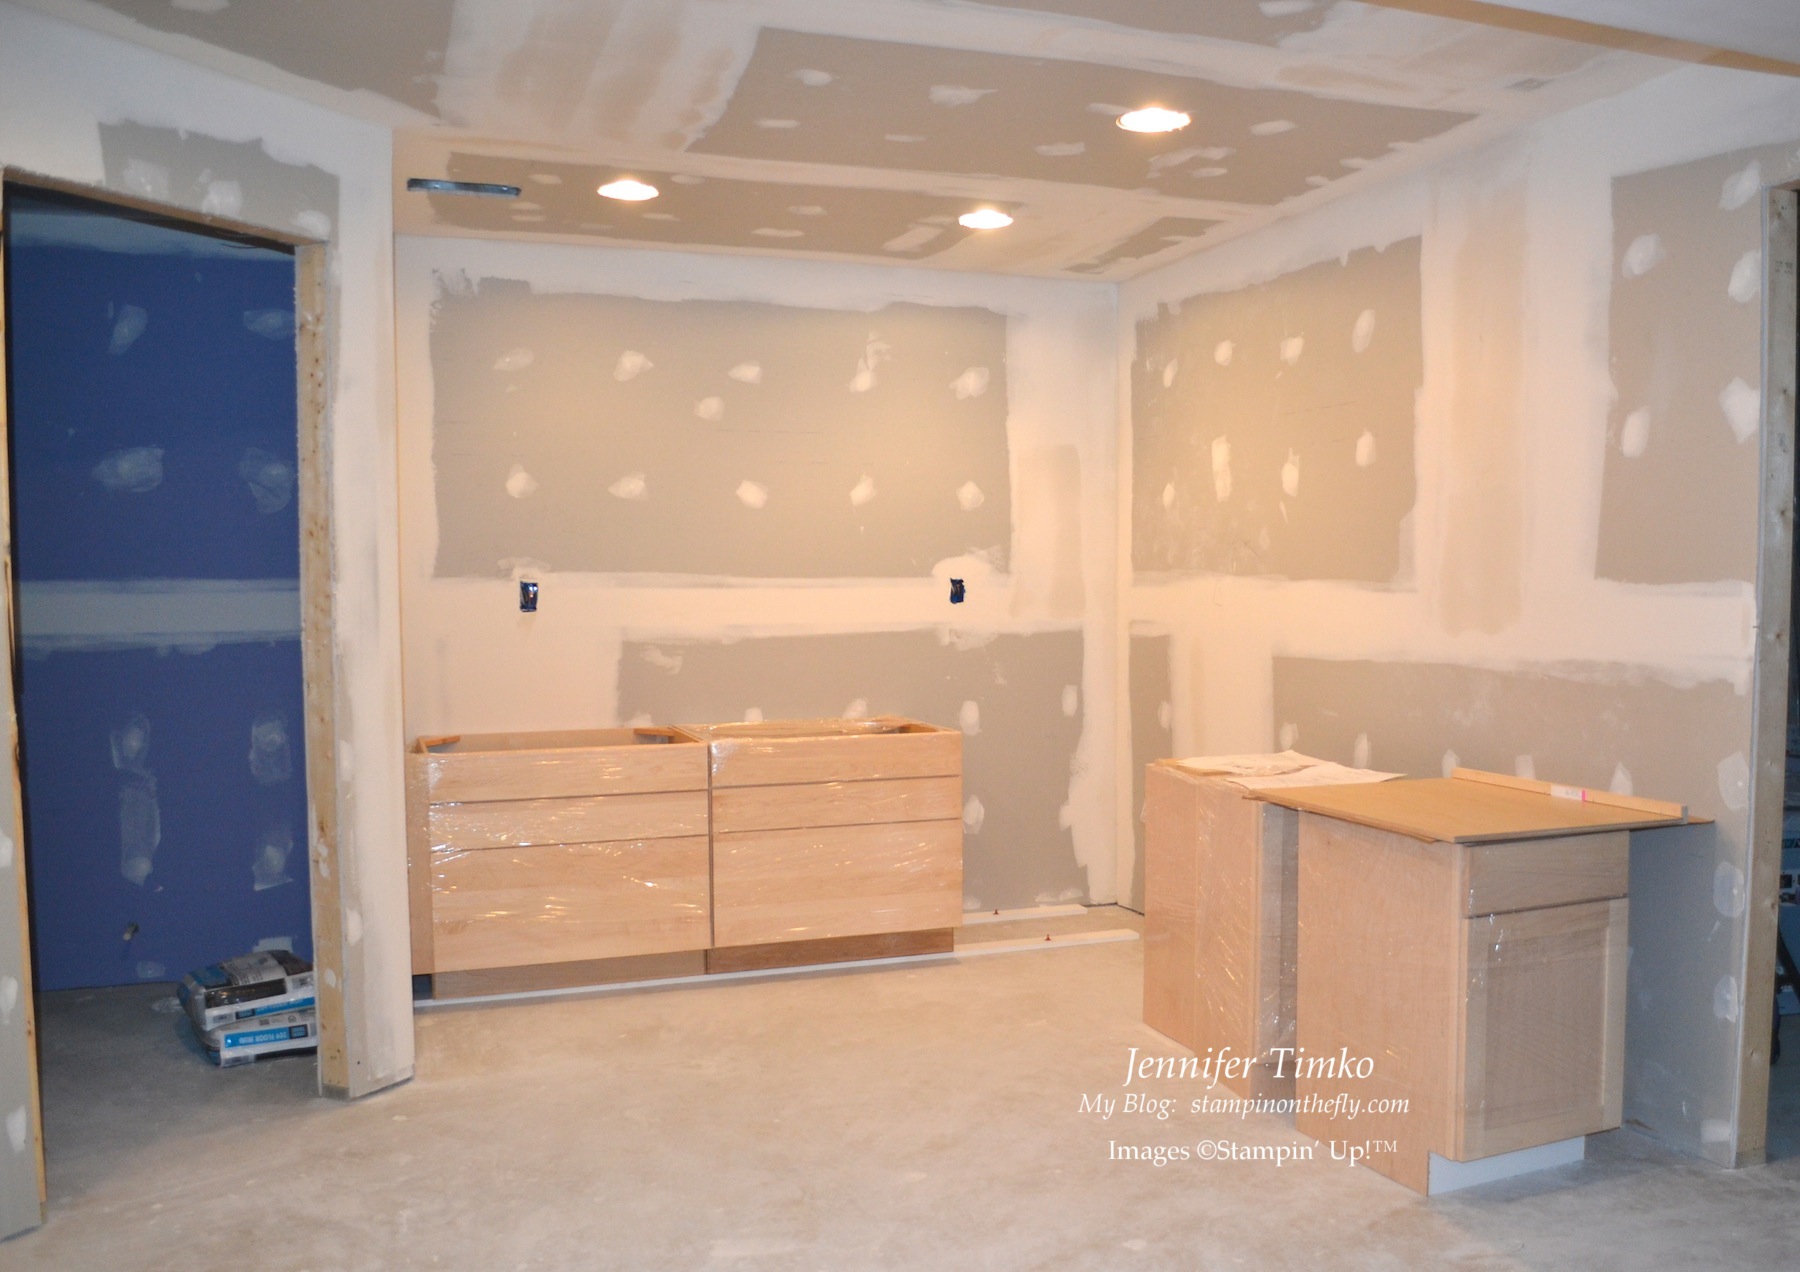
When they got to this stage, I started to get really excited because I could visualize where it was going.

Stamp room finalAnd this the the finished result!!  As you can see, I’m still in the process of moving in.  I’m figuring out what storage I need and I’m sure I’ll be moving some of the shelves around to accommodate that.  Once I get everything in its proper place, I’ll take another picture to show you what I came up with.

I have to say that I always like seeing people’s craft rooms and ideas so I am really excited to share mine with you.  For my local stampers, we’ll have classes here from now on!  This space make me so happy and all of my January projects have been created here already (and I just moved in last week).  Starting next week, I should have lots to show you.  The two teams will be back and I have all the work that I did back in November that I can show you soon too!  Lots and lots of inspiration for the Occasions and Sale-a-bration Catalogs!

I hope that you have a happy and safe new year celebration!  See you next year!

Blog signature 2013-001

More Christmas Projects

More Christmas Projects published on 2 Comments on More Christmas Projects

Please humor me because I suppose it is a little late to share these.  But I wanted to show you what my family and I have been up to in the final days before Christmas!  So, I have some things made by my boys (and one that included their friends) plus a final project from me.

Stylish BannerI’ll start with a card made and designed by my oldest son.  I had a few scraps lying about from projects you have already seen and he took them and ran.  Well that, and he really really wanted to use the HO3 stamp because is a big math fan.  So, I have another convert to Washi Tape (he says that it can be used on everything, lol) and I have to admit that I really love his design.  I even gave him is own watermark…I think he earned it on this!

Snow, snow, snowNot to be outdone, his younger brother got to work and chose the Best of Snow stamp to play with.  I unleashed him with some retired markers and paper and he made these for teachers.  You should have seen how proud he was to give it to his teacher!!  The joy of a handmade card!

Color Me TagsEarly in the Christmas break, I heard the dreaded “we’re bored”!!  Well, I needed some more tags and they had the time.  I cut some rectangles from Whisper White and gave them the images from Color Me Christmas.  The boys and two of their friends did all the coloring and added some sentiments too.  Then they cut the shapes they wanted.  These made me really happy too!  Perfect for family presents!

Simply Sketched bagNow finally, I created this little bag to hold a gift card.  I love that you can stamp on these and then watercolor them!  You can’t really see it but there is a tag to match.  The leaves are from Simply Sketched (a hostess set) and the sentiment is from Endless Wishes.  I threaded through some distressed Cherry Cobbler Seam Binding and tied on the tag with the original string from the bag.  This could really be made for any occasion to I wanted to show you how easy it is!

I hope that your Christmas was wonderful.  As I mentioned last week both the Artisan and Freshly Made Sketches teams are taking a break this week.  So instead I have a great post to share with you on Tuesday.  I have something awesome to show you that I have been not so patiently waiting to be completed for about 2 months.  Thanks for stopping in today.  See you in a couple of days!

Blog signature 2013-001


Artisan Wednesday Wow – Gold Embossed Thank You Notes

Artisan Wednesday Wow – Gold Embossed Thank You Notes published on 8 Comments on Artisan Wednesday Wow – Gold Embossed Thank You Notes

12-Dec-Blog-Hop-Button

Stampin’ Up’s Artisan Design Team is bringing our last projects from our December box.  If you have come over from amazing Jeanna, welcome to the next stop.  If you are starting here, just continue around using the next buttons until you get back to me.

AWW Dec - Gold Thank You Flat

First and foremost, I want to take the opportunity to wish you a very merry Christmas!  I am incredibly thankful for all of you who read this blog and let me be a part of your crafting lives.  I consider it a privilege to be able to create and share with you!  Thank you!

It is with that in mind that I created this fun set of cards.  I know it isn’t a secret that I think Washi Tape is awesome.  And the new Watercolor Wonder Washi Tape (available in the Occasions Spring Catalog) is really awesome.  Oh, the gold.  When the hilarious Bonnie Thurber told us at last summer’s SU Convention that gold was the new silver, I was skeptical.  I really should have believed her (because Bonnie is always right)!  I get it now!  *smile* These cards are made to be be easily created after the hustle and bustle of the holiday season.  I took Whisper White card stock and cut it to 4-7/8″ x 6-1/4″, then scored it at 3-3/8″.  This makes the top flap shorter than the bottom and allows the gold polka dot tape to show.  I stamped the sentiment from Another Thank You in Gold Encore Ink and embossed it with Gold Embossing Powder, then all I had to do was add the washi tape to the edges of the card.  I put one more strip of washi on the bottom of the Crumb Cake Note Card Envelopes and repeated to make more.

AWW Dec - Gold Thank You

These have a lovely wow factor because of the gold but you can make a whole stack in no time.  Then they are ready to send out to family and friends to let them know how much you appreciated their gifts.

This is our last Artisan hop of 2013.  We are taking New Year’s off so that we can spend time with our families.  Maybe, just maybe, we’ll all fit in a little crafting time too.  I hope that your new year celebrations are safe and happy!

Okay, off to go visit the awesome Mercedes Weber.  I can’t wait for you to see what she has created!  Make sure you hop around the whole loop to take a look at beautiful creations by the whole team…you’ll be happy you did!

12-Dec-Blog-Hop-NEXT-Button

Click HERE to purchase any of these wonderful Stampin’ Up products.

Paper:  Whisper White; Ink:  Gold Encore; Accessories:  Watercolor Wonder Washi Tape, Crumb Cake Note Card Envelopes, Heat Tool, Gold Stampin’ Emboss Powder

Blog signature 2013-001

Freshly Made Sketches #117

Freshly Made Sketches #117 published on 14 Comments on Freshly Made Sketches #117

FMS Final 117-001

How can it be that this is the last Freshly Made Sketches challenge of the year?!  The time has flown by!  This amazing sketch is courtesy of the lovely and talented Amy O’Neill.  I think everything she makes is extraordinary so it is no surprise that this sketch is too.  We will have this challenge open for longer than the usual time and it will not close out until January 6th.  The team will be taking the holidays off but I hope that means you will have plenty of time to play along.

FMS117 - Retro Banners

I pulled out some new things to play with for this one.  First of all, the new Occasions Catalog has Banner Framelits.  Oh yeah!!  Two of the sizes here are the smallest ones and the range up to some nice big banners.  Love them!  I paired the framelits with some new DSP called Retro Fresh.  Some fun colors and prints, don’t you think?  Finally I just had to show you the new Essentials Wooden Elements.  These are so on trend and easy to use.  I just stamped right on the wood with a sentiment from Six-Sided Sampler.  I added some watermarks with the Gorgeous Grunge stamp set and used the Coastal Cabana Ruffled Ribbon to complete the sketch.  This came together fast because it had to!  I’m still making Christmas cards (yes, yes…I know) and hoping to have most of them in the mail by tomorrow.  We’ll see….

Ok, so these new things will be available on January 3rd (yippee!!) and I’m happy to answer any questions you have about them.  Now I have one more piece of news.  This is the last week that design team member Linda Suarez will be with us.  She has some fun plans for the new year!  I am always inspired by Linda’s work and I will personally miss seeing her FMS cards.  A special thank you to her for all that she has done for our team.  Make sure you drop by and give her a good send off!

I’m so glad you stopped in today.  I really appreciate you coming over and I look forward to seeing you again soon!  Have a great week!

Stamps:  Six-Sided Sampler, Gorgeous Grunge; Paper:  Retro Fresh DSP, Coastal Cabana, Baked Brown Sugar; Ink:  Baked Brown Sugar; Accessories:  Big Shot, Banners Framelits, Essentials Wooden Elements, Coastal Cabana Ruffled Ribbon, Sticky Strip, Dimensionals

Click HERE to shop my Stampin’ Up Store.  Make sure you check out this week’s specials!

Blog signature 2013-001

Artisan Wednesday Wow – Boxes and Bows

Artisan Wednesday Wow – Boxes and Bows published on 4 Comments on Artisan Wednesday Wow – Boxes and Bows

12-Dec-Blog-Hop-Button

Stampin’ Up’s Artisan Design Team is bringing you projects from our December box again this week!  These are the projects that Stampin’ Up showed on their Facebook Page last Friday.  We are in full holiday mode and having so much fun!  If you have come over from amazing Jeanna, welcome to the next stop.  I know you loved that box and her husband is talented too, isn’t he?!  If you are starting here, just continue around using the next buttons until you get back to me.

Dec FB- Jennifer - Boxes and Bows

I know I’m not telling you anything you don’t know but it is crunch time!  Yep..it is time to finish up the last details and start enjoying the holidays.  So I’m bringing you a quick idea that is perfect for those last minute packaging problems.  Stampin’ Up’s boxes (this is the Kraft Gift Box) and the Gift Bow Die will come to the rescue.  I know I don’t have time left for anything fancy but that doesn’t mean I don’t want it to LOOK fancy.  I love that the bow can be make in nothing flat with leftover paper from your cards.  Oh, and a little extra piece to make the tag match (using the Stamp a Tag Kit)…you look like a genius!  The Baker’s Twine is something I use year round and it is a great finish to this project.

Okay, off to go visit the awesome Mercedes Weber.  She has a beautiful card that is a perfect welcome to the new year!  Make sure you hop around the whole loop to take a look at beautiful creations by the whole team…you’ll be happy you did!

12-Dec-Blog-Hop-NEXT-Button

Click HERE to purchase any of these wonderful Stampin’ Up products.

Paper:  Season of Style DSP, Whisper White; Ink:  Cherry Cobbler; Accessories:  Big Shot, Gift Bows Die, Kraft Gift Boxes, Regals Buttons, Cherry Cobbler Baker’s Twine, Stamp a Tag Kit, Sticky Strip

Blog signature 2013-001

Freshly Made Sketches #116

Freshly Made Sketches #116 published on 11 Comments on Freshly Made Sketches #116

FMS Final 116-001Well, it is Wednesday again.  Is it just me or is Christmas coming WAY too fast?!  Thank goodness for this fun sketch over at Freshly Made Sketches!  The wonderful Narelle Farrugia has given us this one.  Of course she has shown an elegant way to use it and the rest of the team has outdone themselves!

FMS116 - Candy Cane Christmas

I thought I’d focus on the candy cane stripes from Season of Style DSP and the Merry Little Christmas stamp seemed like a perfect match.  I also pulled out a new product to make my life SOOO much easier.  The brand new Banner Punch will be available to customers starting on Jan. 28th as a free (yes, FREE) option during Stampin’ Up’s annual Sale-a-bration promotion.  I was able to get it early as an Artisan Design Team member and other demonstrators can get it now too.  Yes, there are so many perks to begin a demo!  The punch and the paper did most of the work and I just added on a button tied up with Baker’s Twine to finish it off.

I hope you are able to join us this week because I know you’ll have fun working with this sketch!  Make sure you let Narelle know how much you enjoy it!

My house has been more chaotic than usual this week with lots of ice and snow in Virginia.  My kids had two days off from school (lots of happiness there) and they have a late start today.  I’m hoping to finish my Christmas cards today once I shuffle them out the door.  Wish me luck!  Thanks for stopping in today.  Hope your week is great!

Stamp:  Merry Little Christmas; Paper:  Season of Style Paper Stack, Early Espresso, Whisper White; Ink:  Cherry Cobbler, Early Espresso; Accessories:  Banner Punch (SAB), Neutrals Button, Cherry Cobbler Baker’s Twine

Click HERE to shop my Stampin’ Up Store.  Make sure you check out this week’s specials!

Blog signature 2013-001


Artisan Wednesday Wow – Snowflakes Galore

Artisan Wednesday Wow – Snowflakes Galore published on 3 Comments on Artisan Wednesday Wow – Snowflakes Galore

12-Dec-Blog-Hop-Button

Stampin’ Up’s Artisan Design Team is bringing you projects from our December box again this week!  We are in full holiday mode and having so much fun!  If you have come over from amazing Jeanna, welcome to the next stop.  If you are starting here, just continue around using the next buttons until you get back to me.

AWW Dec - Gold and Silver Snowflakes

So something funny happened on my way to this post…the set I used to create the project sold out!  Yes, I had created a card with Endless Wishes and it went like hot cakes.  I can see why since it is awesome!  So back to the drawing board, but yet not.  I created the exact same card using the still available Snowflake Soiree.  It is another amazing snowflake set and I just love the artwork on these!  I’m still obsessed with the silver and gold combination and they really make the card look rich.  The Gold Stampin’ Emboss Powder is so gorgeous and particularly so on such an intricate stamp!  I put Silver Glimmer Paper behind the snowflake layer for an extra bit of sparkle and the Basic Rhinestones are a great finishing touch.

AWW Dec - Gold and Silver Wishes -

So the original card?  Well, I thought I should share it too since so many of you have purchased the stamp.  I have to admit that these are SOOOO much prettier in person.  I just can’t seem to capture the sparkle and depth that comes from the glitter, rhinestones and embossing.

Okay, off to go visit the awesome Mercedes Weber.  She is so extraordinary and I can’t wait to see what she has made every week!  Make sure you hop around the whole loop to take a look at beautiful creations by the whole team…you’ll be happy you did!

12-Dec-Blog-Hop-NEXT-Button

Click HERE to purchase any of these wonderful Stampin’ Up products.

Stamps:  Snowflake Soiree, Endless Wishes (ret); Paper:  Whisper White, Silver Glimmer; Ink:  Gold and Silver Encore; Accessories:  Heat Tool, Gold Stampin’ Emboss Powder, Clear Stampin’ Emboss Powder, Basic Rhinestones, Dimensionals

Blog signature 2013-001

Freshly Made Sketches #115

Freshly Made Sketches #115 published on 11 Comments on Freshly Made Sketches #115

FMS Final 115-001For all of you in the US, I hope you had a wonderful Thanksgiving weekend!  Mine was nice and quiet and I actually got to spend it with friends and family here in Virginia.  I was on call for United but the phone didn’t ring.  A holiday blessing for sure!  I can’t believe that we are already into December.  I have so many Christmas cards left to make! I’m hoping I can use this sketch from Freshly Made Sketches to help me out.  I am the sketch hostess this week and I left it clean and basic…you can add as much or little as you want!

FMS115 - Geometrical TrianglesSo here I am needing Christmas cards but did I make one…of course not!  Do you do that too?  Well, I was simply too distracted by NEW products from Stampin’ Up that were still sitting on my table.  Still, you ask??  While these just became available on Dec. 1st for SU demonstrators (and available to everyone on Jan. 3rd), I have had them for few weeks.  I told you I have been creating and this a little of what I got to use!  The stamp set is called Geometrical and it has the triangles plus this sentiment (and others).  Cute, huh?!  The Bermuda Bay print is from the new Kaleidescope DSP.  These are all available in the upcoming Spring Catalog.  I added an edge to the borders around the DSP with the Tiny Wave blade on the Rotary Addition to the Stampin’ Trimmer.  All I needed was a few buttons to finish the card.  The button colors were pulled from the DSP.  It is seriously awesome DSP!  Now there is a new Triangle Punch that coordinates with this stamp and I cannot recommend it enough.  Mine are hand cut because the punch wasn’t ready to be sent so early but I will be getting it.  It will really make this stamp easy peasy to use!

Now if you are looking for Christmas ideas, roll down a little to last night’s post.  I made a card and matching “envelope” (a fun bag) that I really like.  It might be one of my favorites so far this season!

I hope you enjoy the sketch this week.  Please make sure you give a warm welcome to our new guest designer Cindy Lovell.  She is filling in while our amazing team mate Allisa Chilton takes a break.  You will love Cindy’s style…she is a great addition to our happy group of stampers!

Thanks so much for stopping in today.  I hope to be back in the next couple of days with more that I have been creating.  Until then, have a great week!

Stamp:  Geometrical; Paper:  Kaleidescope DSP, Whisper White, Bermuda Bay; Ink:  Bermuda Bay, Strawberry Slush, Crushed Curry; Accessories:  Rotary Addition, Tiny Wave Blade, Buttons, White Baker’s Twine, Dimensionals

Click HERE to shop my Stampin’ Up Store.  Make sure you check out this week’s specials!

Blog signature 2013-001

Artisan Wednesday Wow – Season of Style Gift Bag and Card

Artisan Wednesday Wow – Season of Style Gift Bag and Card published on 8 Comments on Artisan Wednesday Wow – Season of Style Gift Bag and Card

12-Dec-Blog-Hop-Button

Stampin’ Up’s Artisan Design Team is starting to bring you projects from our December box this week!  We are in full holiday mode and having so much fun!  If you have come over from amazing Jeanna, welcome to the next stop.  If you are starting here, just continue around using the next buttons until you get back to me.

AWW Dec - Stylish Bag and Card Set

I’m sure you have seen by now that I really love the Season of Style suite of products! The colors are so fantastic!  Well, I pulled out yet another of the coordinating items this week – the Season of Style This and That Journal.  And I did what I never thought I would.  I tore pages out.  Yep…right out of the journal.  The grid piece on the bag is the page I tore out.

AWW Dec - Stylish Gift Bag

I started by spritzing the page with Cherry Cobbler ink, then stamped on some stars from Simply Stars using Versamark Ink.  I added Heat & Stick Powder and then the amazing Gold Stampin’ Glitter.  Once the base layer was done I simply started adding stuff on.  I used the Cherry Cobbler print from Season of Style DSP to create the star.  The chevron arrow is a sticker from the Season of Style This and That Stickers.  So is the Crumb Cake layer where part of the sentiment is stamped.  The tag comes from the Stamp a Tag Kit and I attached a layer of White Vellum underneath to add a little more dimension. Season of Style Washi Tape combined with the new (Occasions Catalog – available Jan 3rd) Watercolor Wonder Washi Tape hold the layers together.  I added some more Versamark and Heat & Stick Powder to the edge of the little clothespin (from Tag a Bag Accessories) and put on a little more Gold Glitter.  It is all attached to a Tag a Bag Gift Bag.

AWW Dec - Stylish Card

I am using the bag as an envelope for this fun card (it will be sealed on the back with more Washi Tape).  Again, I went a little nuts with the stickers from the This and That Stickers set.  The words are from the coordinating Rotary Stamp.  Again, the lined paper is a page taken from the journal and I love how it works here.  A little arrow clip from Hung Up Cute Clips seemed like the perfect addition.

Now I know this combines a lot of products lines so it might not be for the beginning stamper.  But I wanted to show you how beautifully so many of the Stampin’ Up products work together to create this trendy, eclectic style.  Don’t be afraid to use projects in a way not originally intended.  It is fun and a great way to use up stuff that is sitting on your craft table.

Okay, off to go visit the awesome Mercedes Weber.  Every week she has another project I want to CASE!  She is so fabulous!  Make sure hop around the whole loop to take a look at beautiful creations by the whole team…you’ll be happy you did!

12-Dec-Blog-Hop-NEXT-Button

Click HERE to purchase any of these wonderful Stampin’ Up products.

Stamps:  Simply Stars, Season of Style Rotary Stamp, Endless Wishes (ret); Paper:  Season of Style DSP, Crumb Cake; Ink:  Old Olive, Early Espresso, Versamark; Accessories:  Season of Style This and That Journal, Stickers and Washi Tape; Heat and Stick Powder, Heat Tool, Gold Stampin’ Glitter, Watercolor Wonder Washi Tape, Hung Up Cute Clips, Tag a Bag Gift Bags and Accessory Kit

Blog signature 2013-001

Primary Sidebar