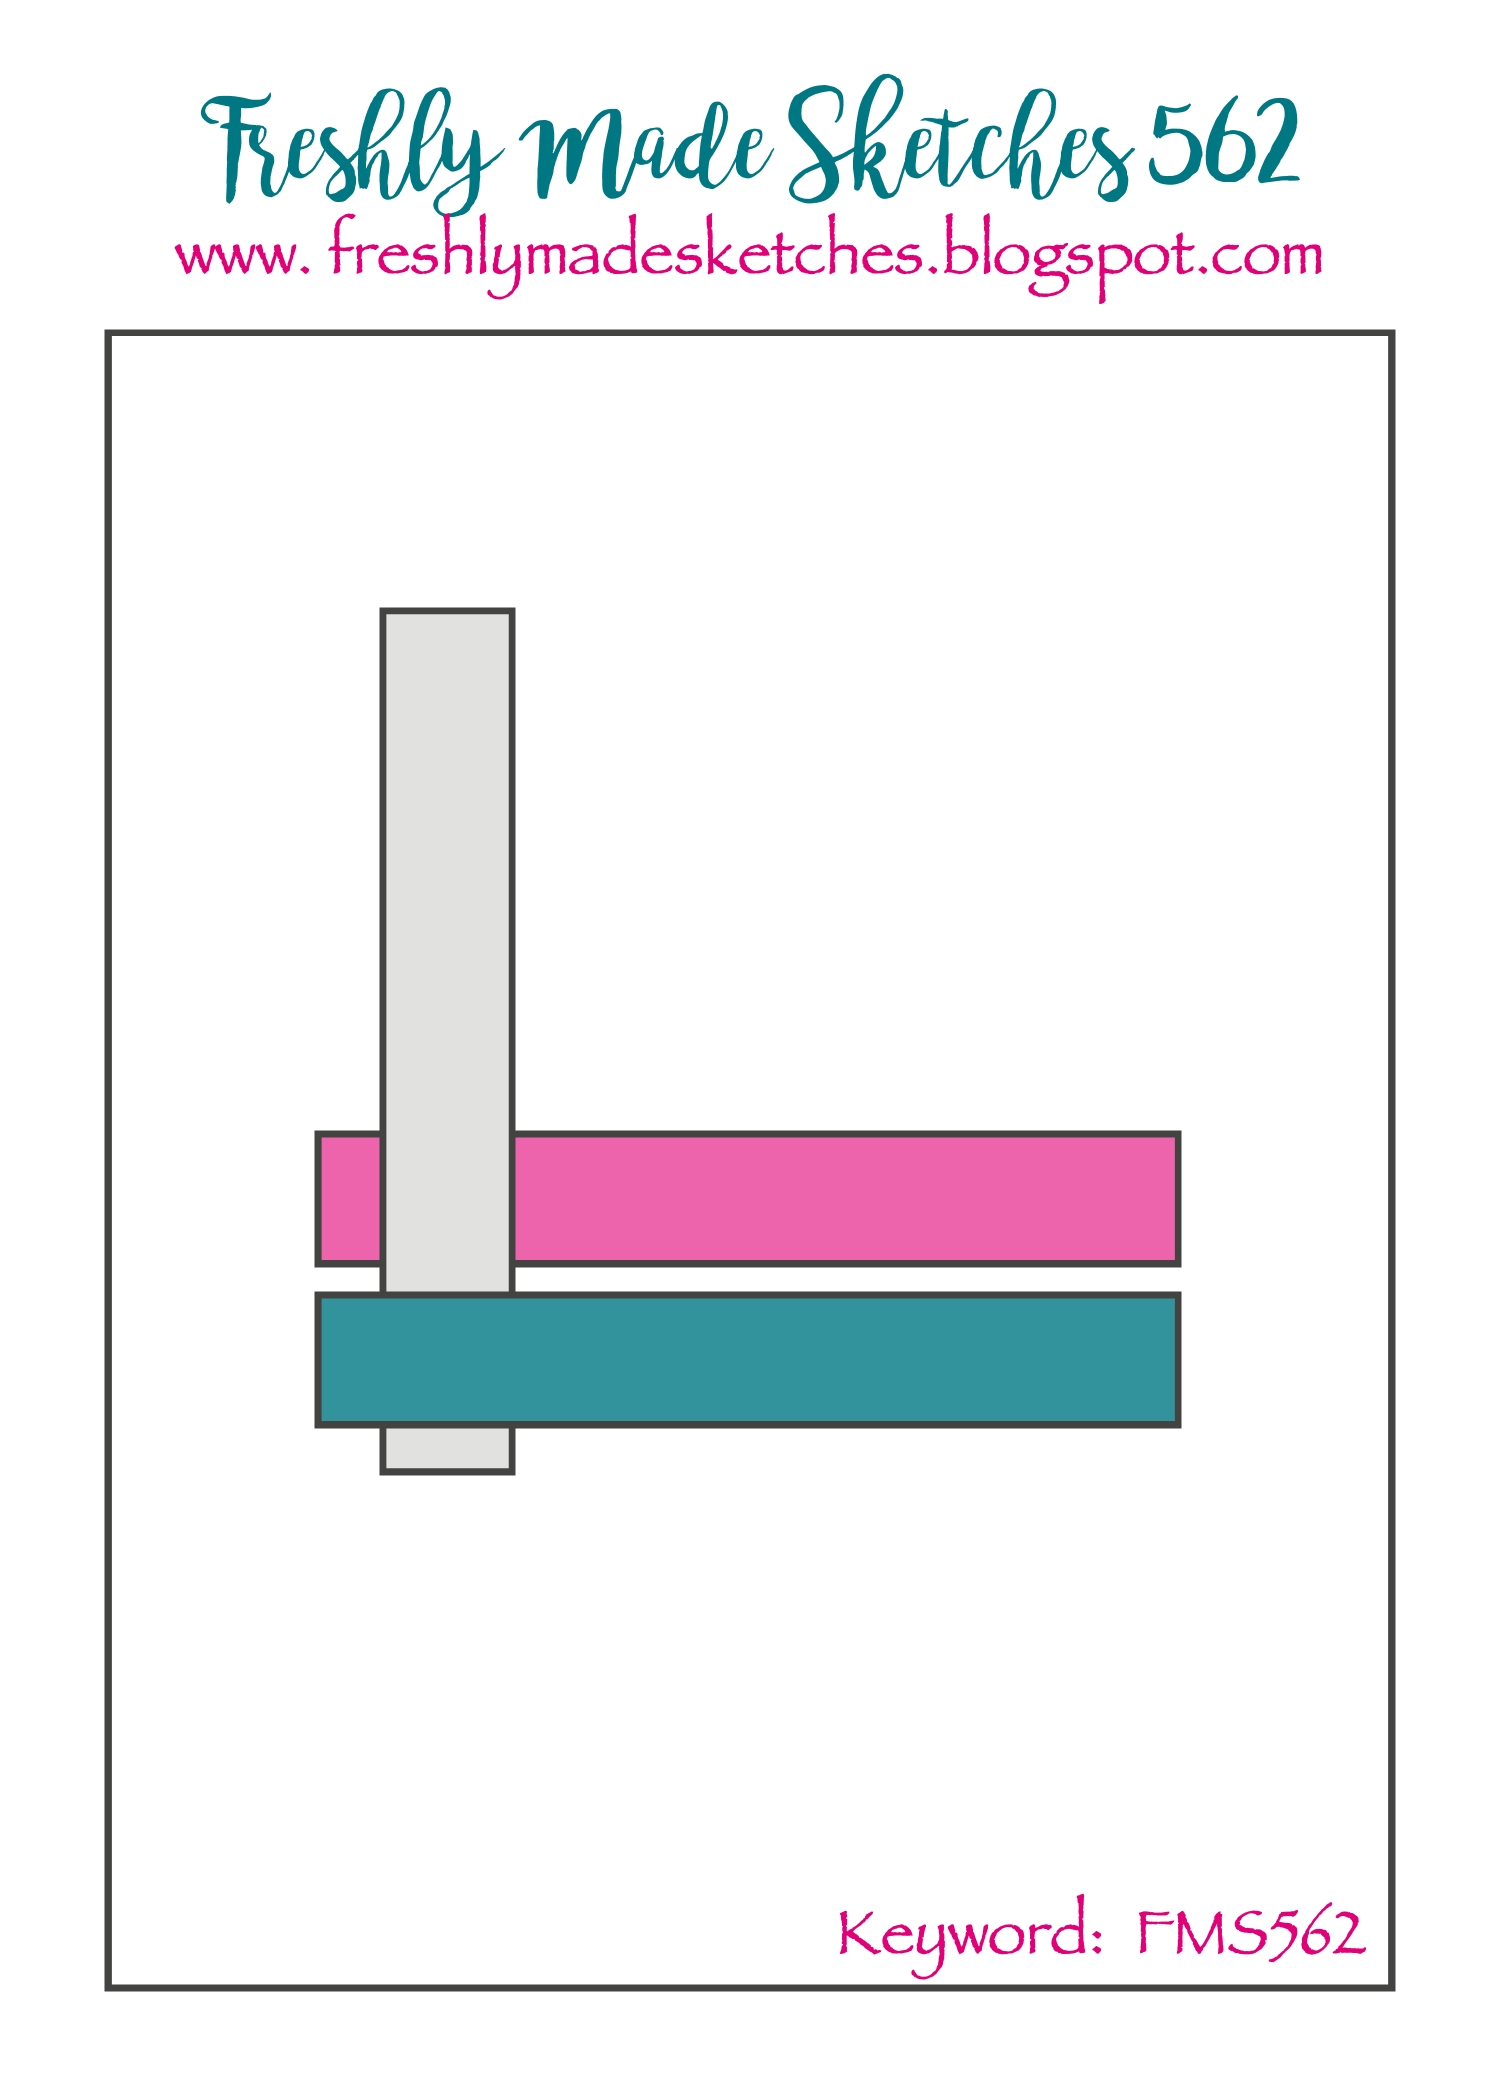
Super quick for today since I’m in the middle of a trip (typing from a hotel room and I’m TIRED!). I created this for the latest awesome sketch. This one was designed by our hiker extraordinaire, Jen Brum!
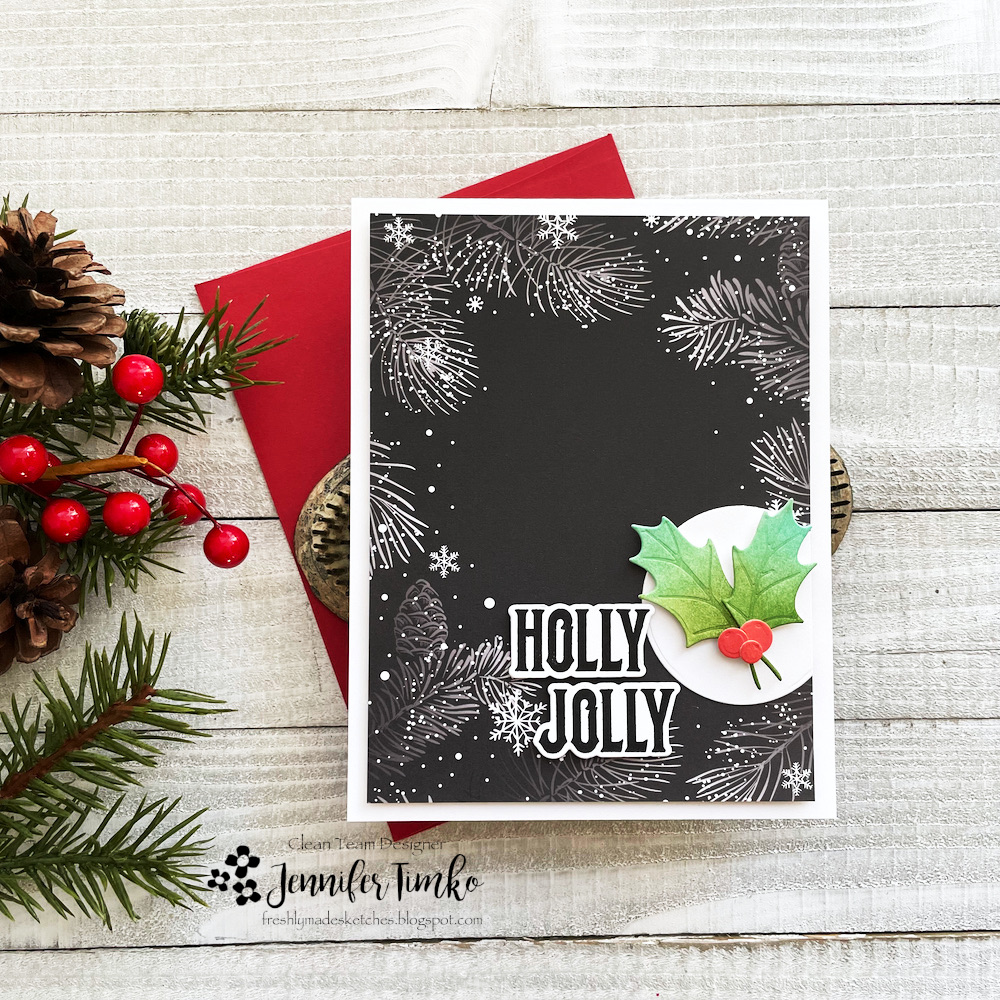
I saw this design from the free paper pack that came in my Honey Bee Stamps order (instant quick cards if you want and oh so cute). Thought it would be pretty for the sketch. I inked up some paper and cut these holly leaves and berries. So fast but so fun! I told you in Monday’s post about the Holly Jolly Background Stamp and the sentiment I cut out. This one was all ready to go and popped it right onto the card.
I think I will use more of these little cards in similar ways to create a stack of cards. I love when quick cards can still feel special. Hope you’ll come over and join us for the sketch this week.
For all of you in the US, wishing you a happy Thanksgiving holiday. If you are traveling, so am I! Keep an eye out in Houston, Charlotte, Chicago! See you again soon.
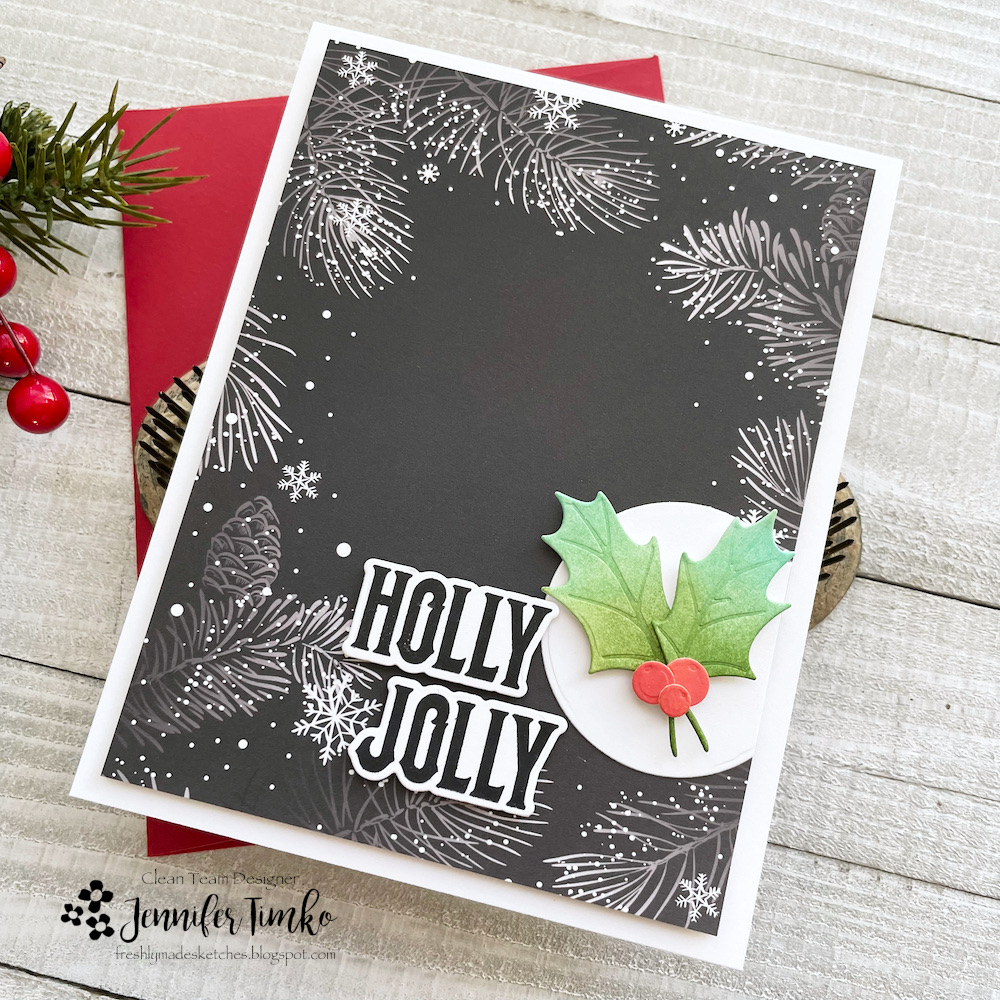
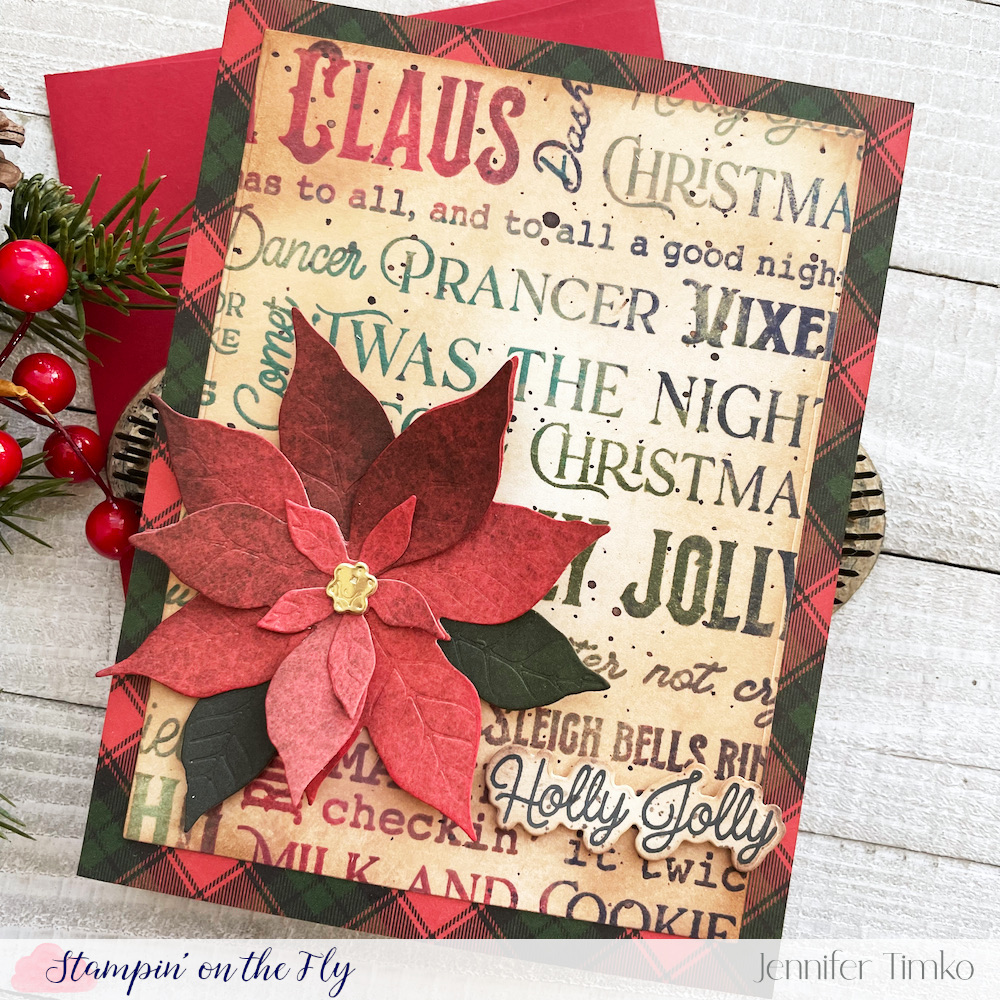
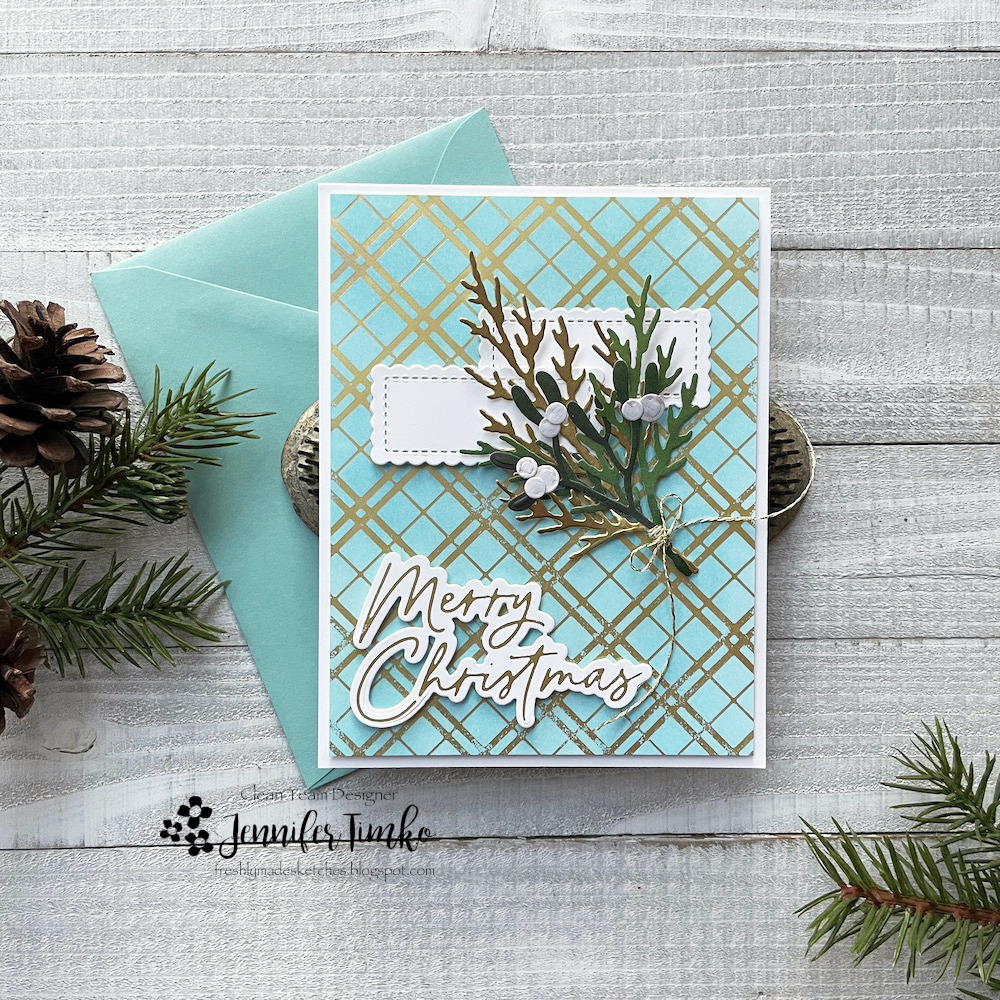
I have been working away on Christmas cards and trying some new techniques. I find that watching “lives” with my stamping friends inspires me to try things I would never otherwise do. This card is the result of one I watched with the queen of artsy, inky goodness – Lydia Fiedler.
Last week, Lydia was showing how to add color and depth to a background stamp and I was inspired to try it with the Holly Jolly background stamp from Honey Bee Stamps. There is nothing particularly hard about the process, it just takes a bit of time and patience. I started with a piece of Bristol Smooth paper larger than the image and put it in my Misti. The Misti is key to the technique since you stamp the image over and over again. Using my Mini Distress Inks, I started adding colors selectively on the image. I kind of went around and around the image adding and layering the inks. This gives you an idea of the work in progress. After this point I added some Peacock Feathers and Villainous Potion. It is kind of an experiment which is what makes it fun.
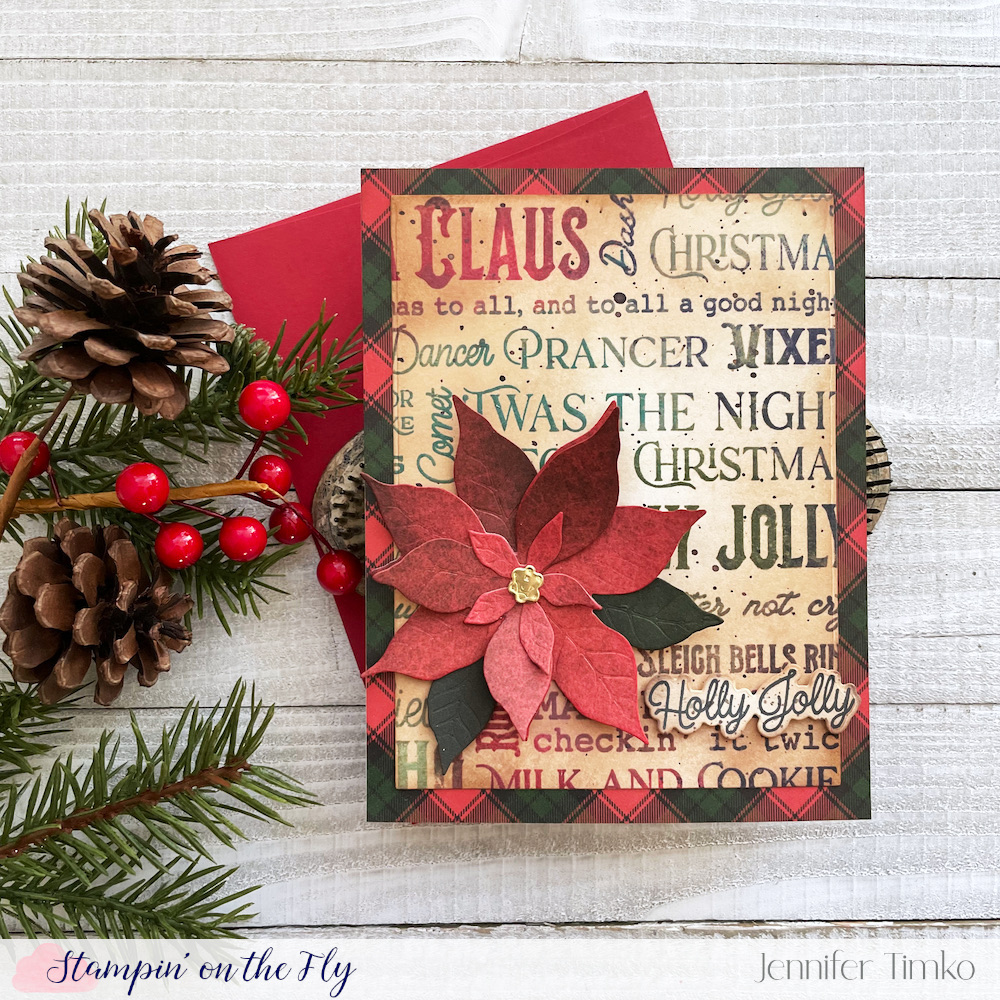
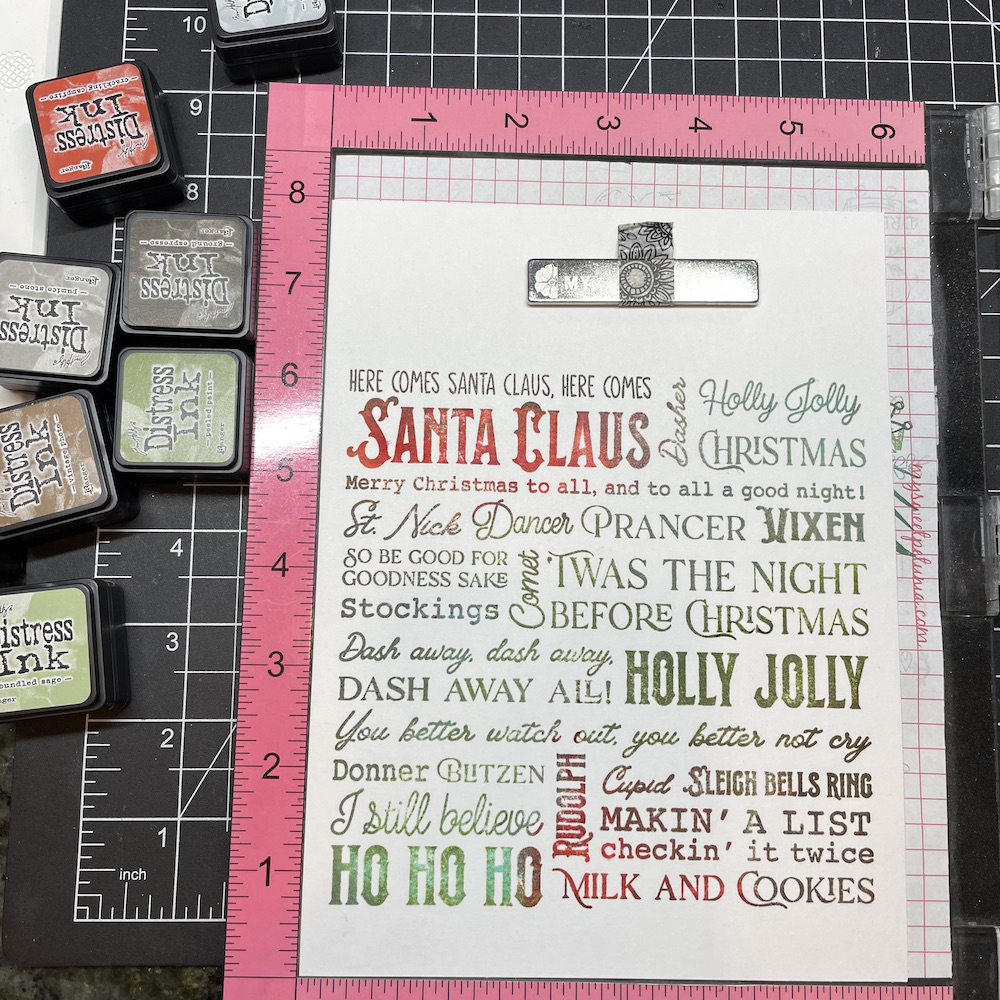
Once I had the panel inked, I decided I wanted it to take on a vintage vibe so I added Distress Oxide Ink in Antique Linen and some Vintage Photo Distress Ink on the edges. Next I splattered on some Early Espresso ink. I chose a section that seemed the most balanced and cut it with a rectangle die. Separately, I inked the big image in black ink and used the coordinating dies to cut all the sentiments out…such a great way to have a bunch of fun font sentiments on hand. I used the script Holly Jolly and matched the distress inking from the main panel.
Using the Make It Merry paper pack, I chose a plaid for the base layer and some of the red/green prints for my poinsettia. I little gold center to add some elegance.
This inking technique has made me look at some background stamps differently and I look forward to using this again. If you are every needing some inspiration to try new things, go visit my friend Lydia. She is amazing and truly her tutorials will just make your day happier. Hope you have a wonderful day!
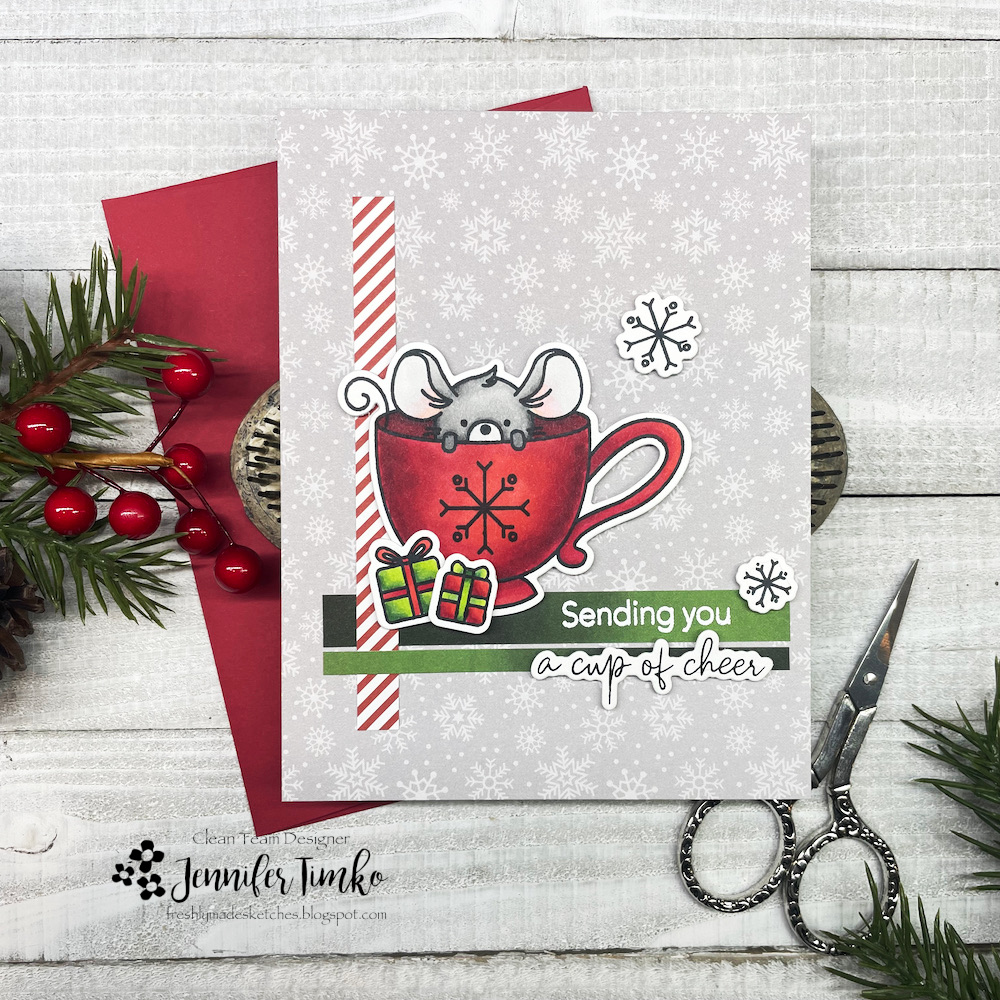
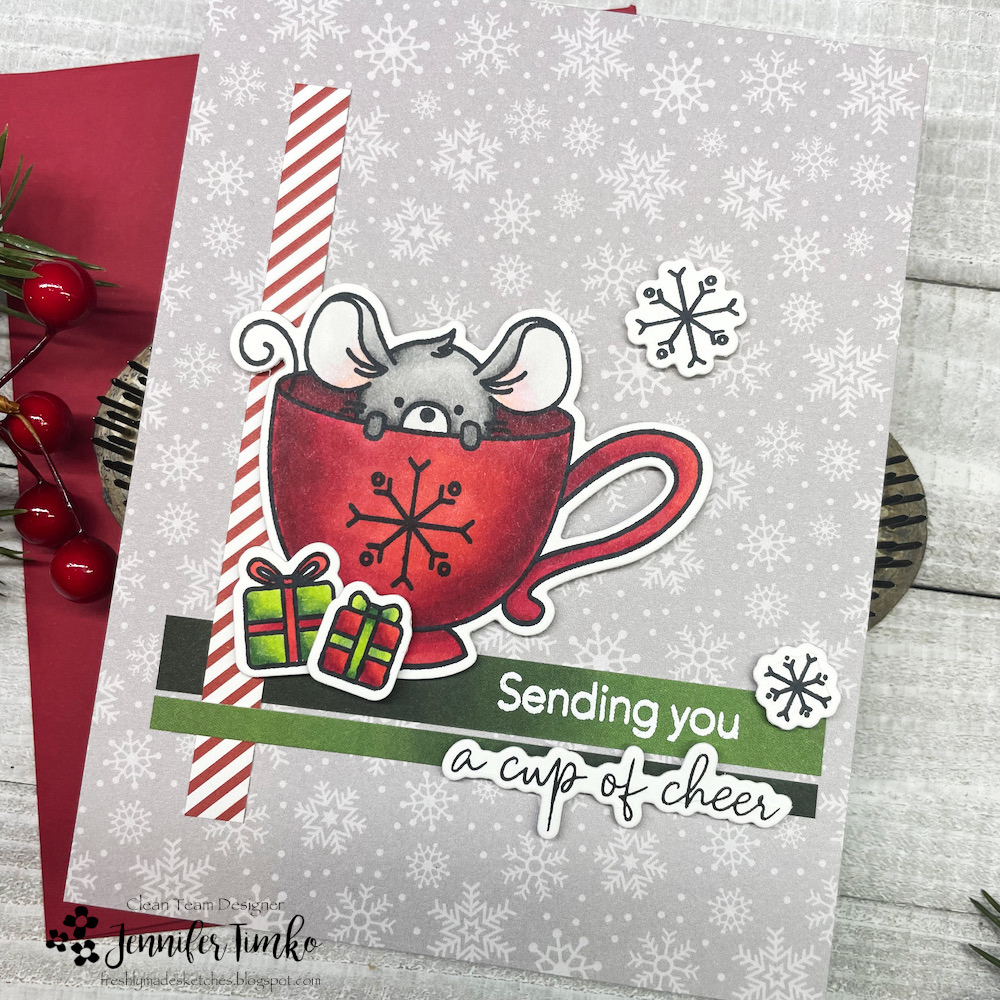
I had a bit of a break from the craft room and was out flying but managed to work in a quick card for this week’s Freshly Made Sketches. Our sketch designer, the awesome Kim Singdahlsen, has given us an interesting design that is open to so many options. I also wanted to work in a design for the 2022 Fall/Winter Coffee Lovers Blog Hop and I found just the right image!
I love this little mouse from the Merry Little Mice stamp set (Honey Bee Stamps) and when I pulled him out, I realized it had been a minute since I had done any Copic coloring. It was nice to use simple images that were not too fussy. And who can resist this little guy?! I added some presents and snowflakes from the same set and I love how the snowflakes from the stamp set (a set from last year) coordinate with this newly release patterned paper!
As I was looking at sentiments, this one made me chuckle. Not the classic cup of cheer but a fun one! It comes from the Hug in a Mug set which is meant to coordinate with a mug die. And I mentioned the paper, all the prints here (included the ombré green) are from the new Make It Merry Paper Pack. I heat embossed part of the sentiment on the top panel and turned the sister panel the opposite way for a little interest.
I have lots of excitement coming for the rest of the week…. Jury duty today, a little on call for United but then I get to go capture my college kid! Definitely moving in the right direction. Probably not much crafting time over the next week but I’m guessing a lot of flying time. If you are traveling out and about in airports, look for me! Thanks for stopping in today. Hope you have a great rest of your week.
This is a record of sorts lately…3 posts in 3 days! I know….crazy! I really am trying to get into gear with holiday crafting and have been spending a bit more time in the craft room where I can. Our sketch designer at Freshly Made Sketches this week is our ever humorous and always amazing Linda Callahan. I won’t lie when I said that at first I was a little stumped on the sketch. And then…..
Then I wasn’t. This card was put together in 15 minutes. I kid you not! In fairness, I had the pieces all done and laying on the table when I had the a-ha moment. I pulled out the scalloped rectangles dies and the rest was just adhesives! Now to the pieces. The background Plaid A2 Foil Plate (Honey Bee Stamps) came about from a foil fail. I was working on another card and rushed the foiling. Patience is not always my strong suit. I do find with background plates that I need to give them just a bit more time to evenly heat up. But I kind of liked the foil distress look and put it aside. Leaning on that idea, I pulled out some Distress Oxide Ink in Tumbled Glass. Yep, I love it.
For the bouquet of greenery, I had already put this together using the leftovers from the other card mentioned before. All these Lovely Layers: Winter Greenery pieces are so pretty!! The green pieces are cut from the Make It Merry paper pad (the berries from another lighter paper) and the gold cardstock goes perfectly with the foil. The sentiment is from the Foil Script: Holiday Hot Foil set. I foiled the sentiment all at once so I had this one sitting ready to go. So yeah, I made it in 15 min but only because I had already done the work while goofing around in the craft room.
I’m glad you stopped in today. Take a look around your stamp table and see if you can put some of those unfinished objects (UFOs) to work. And join us over at Freshly Made Sketches too! See you soon!
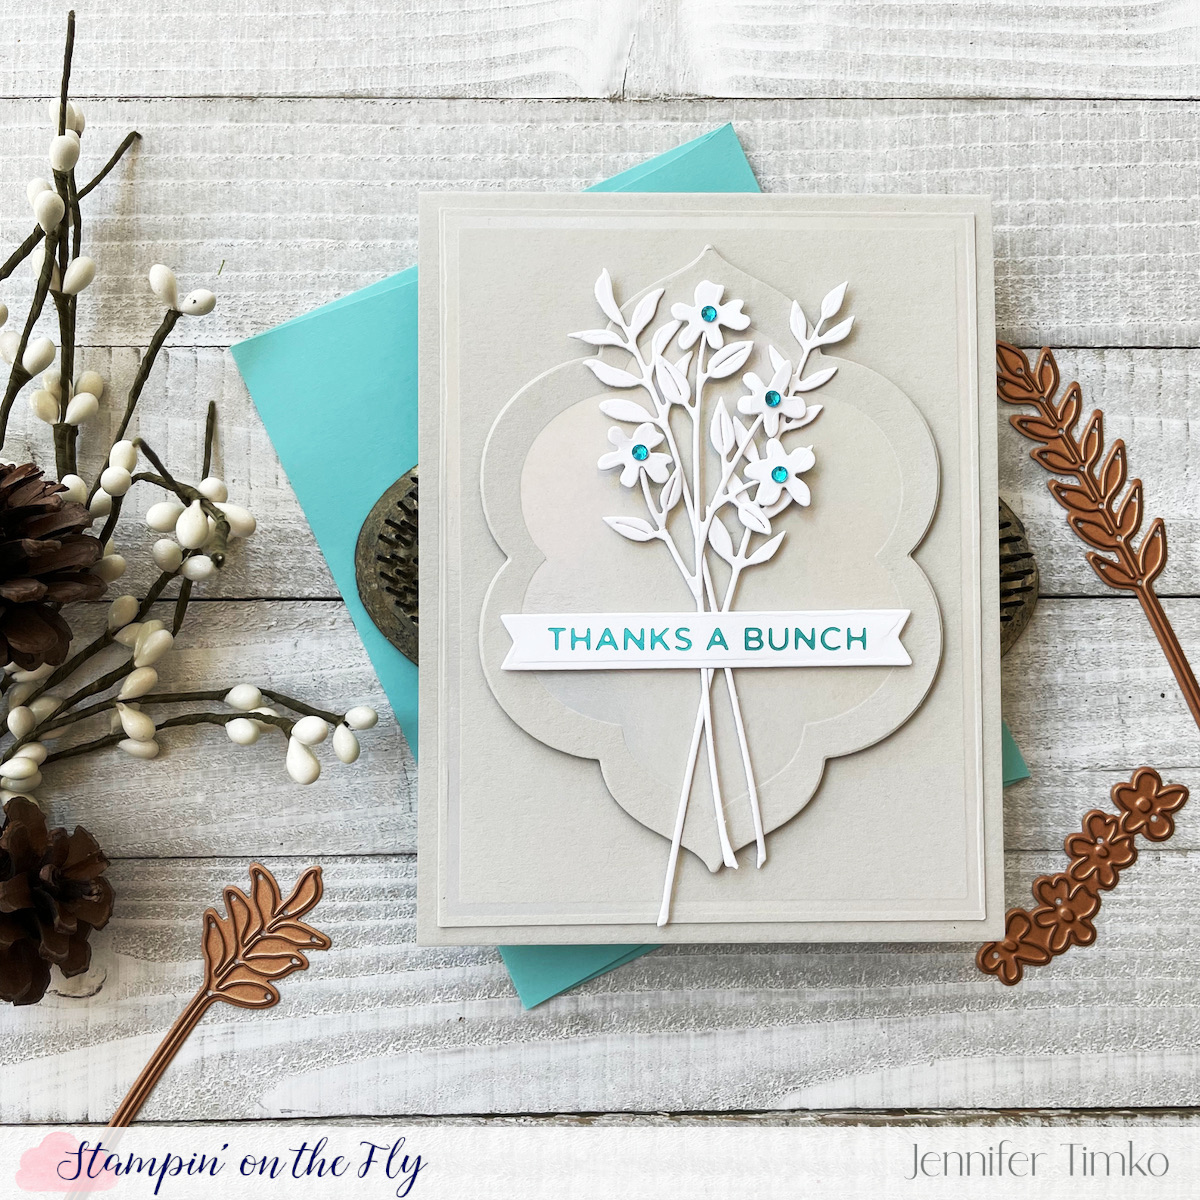
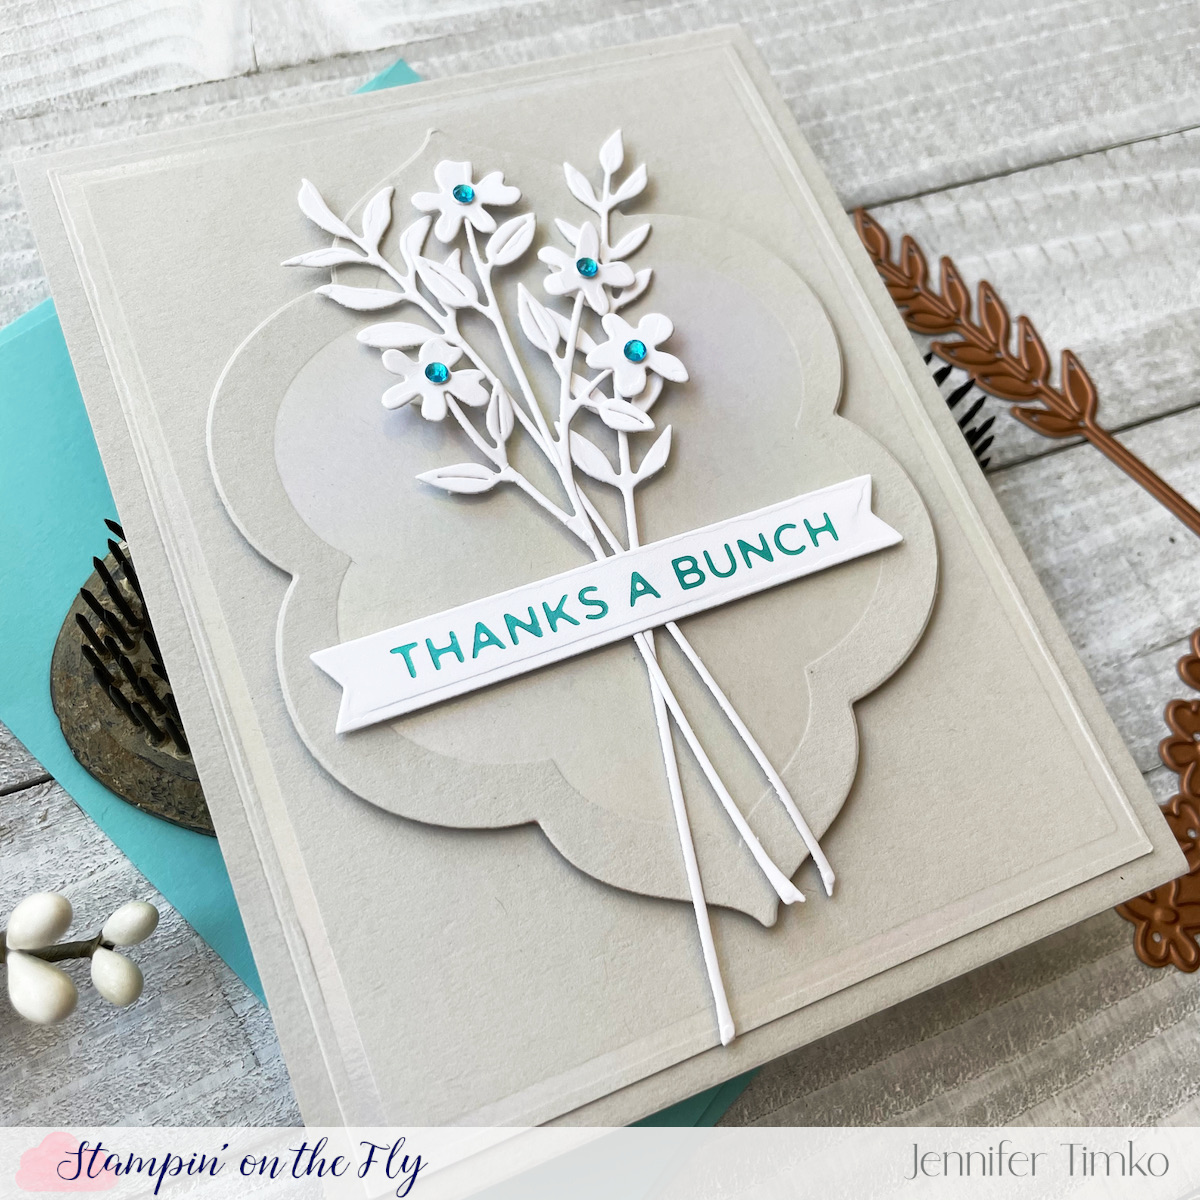
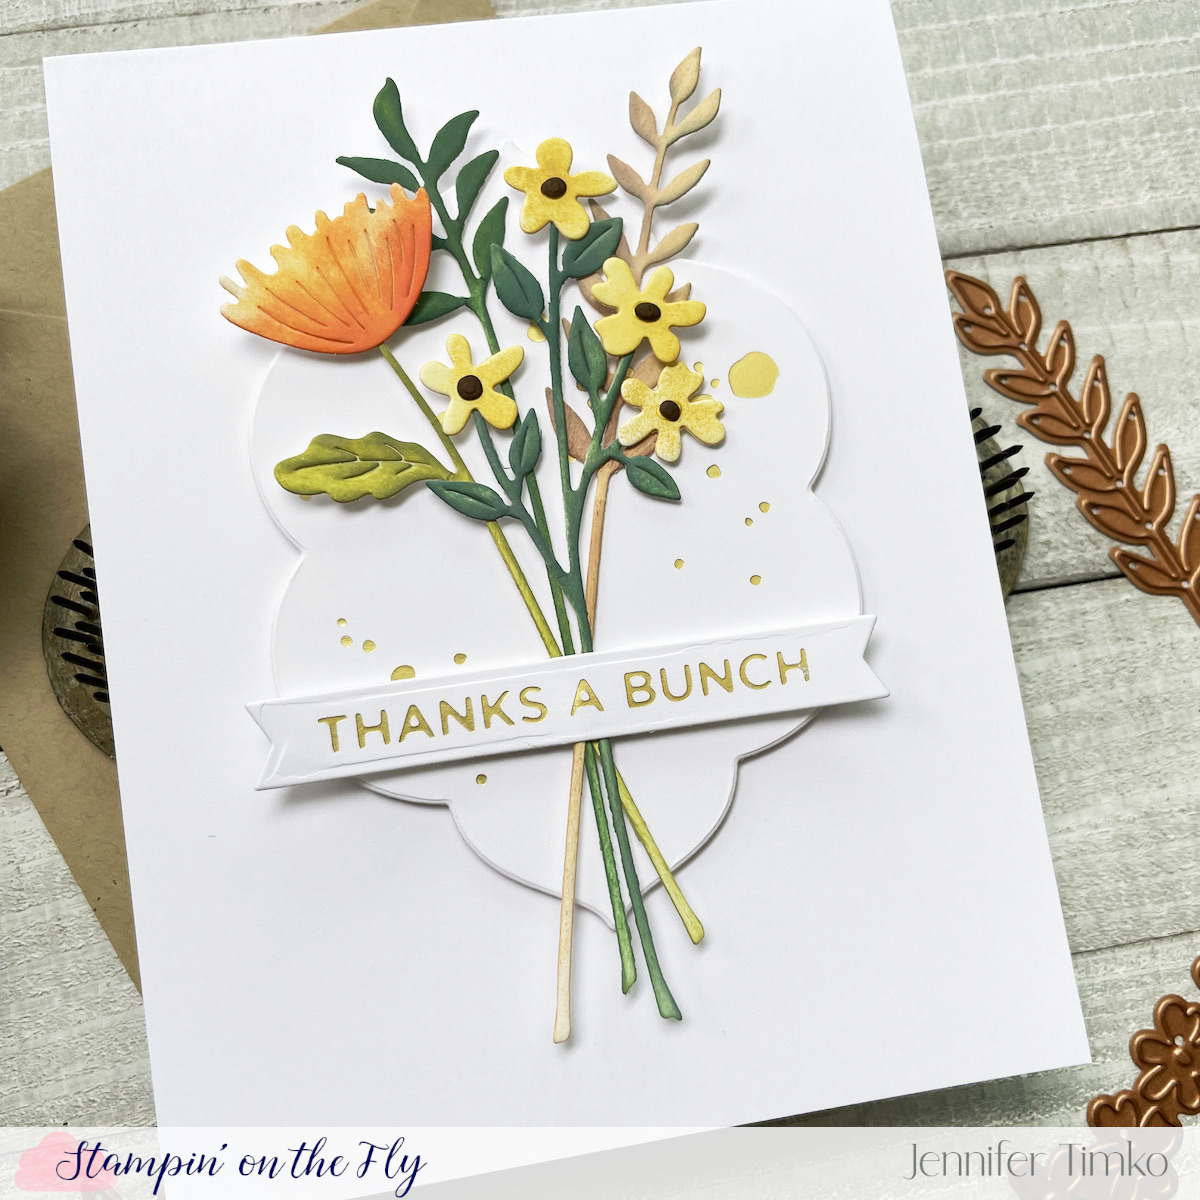
I’m super excited to be a part of the November release from Spellbinders and I get to share part of the Floral Reflection Collection. This is a beautiful group of products! To show the versatility, I created two cards with the same design but that look totally different.
My first card starts with a base of Fog cardstock. Using the Solid Floral Reflection Hot Foil Plate I added some Opal Foil to the paper and then cut it out with the coordinating Floral Reflection Etched Dies. As part of the supporting layer, I added more foil with the Splatter Sentiments rectangle hot foil plate. So pretty in person!
I cut some of the new Sealed Wildflowers from white cardstock and decided I liked the look of them just plain over the Opal Foil. So elegant! Using Moondust Foil, I added a sentiment from Everyday Sentiments II Hot Foil Plates. I found some matching gems in my stash which finish the flowers perfectly!
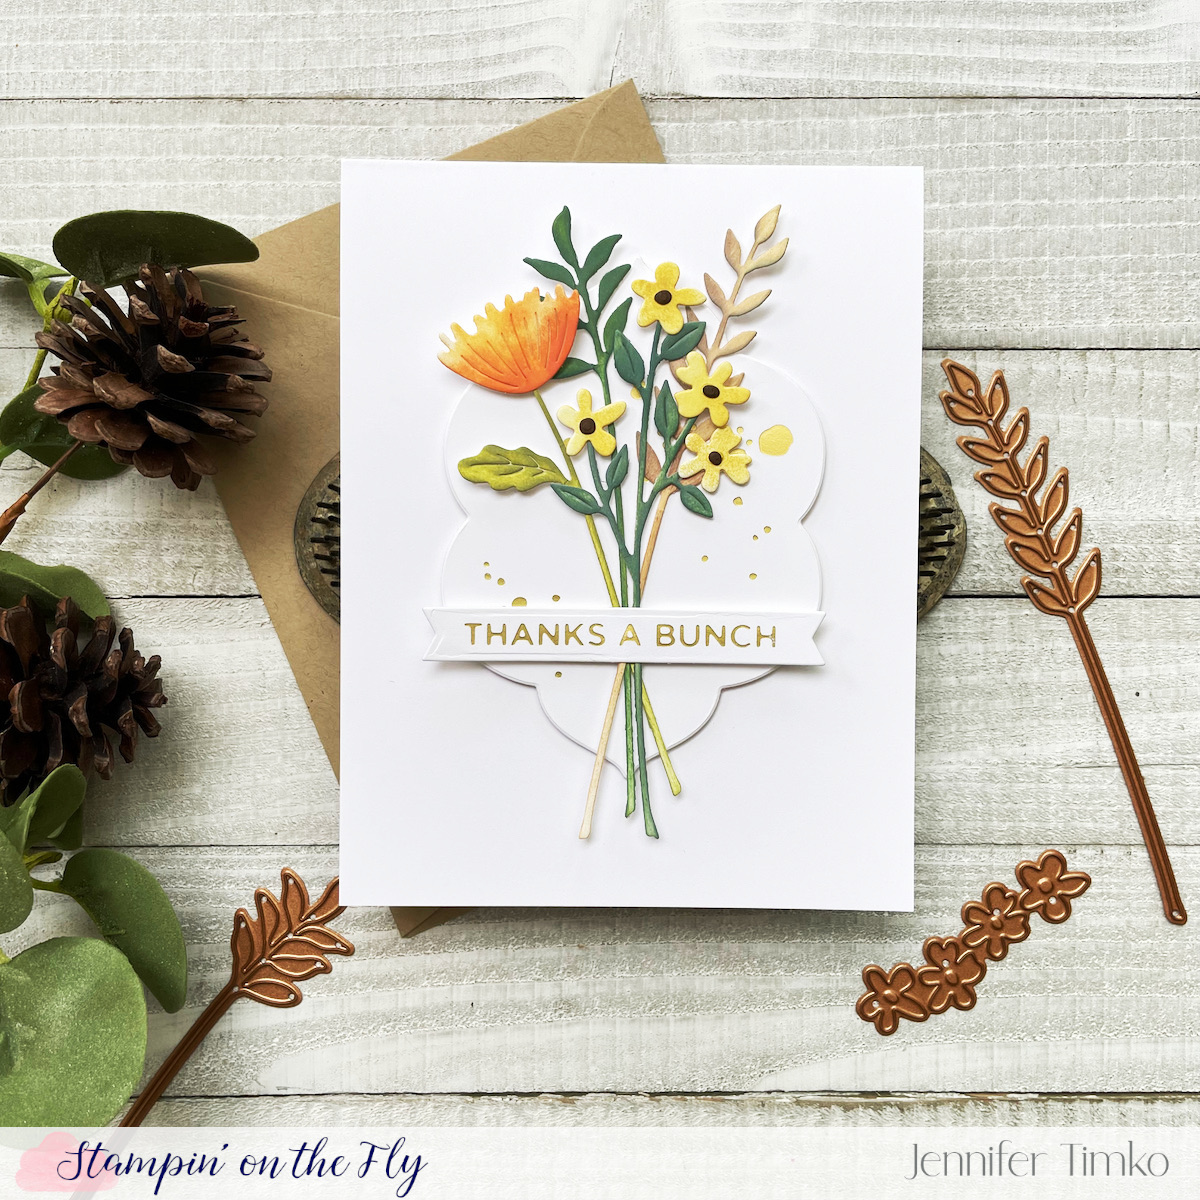
Not content with just one version, I thought it would be fun to color the flowers for a totally different effect. I chose fall colors in Distress Inks and blended them onto the die cut flowers. This time I foiled some Splatters with Matte Gold and cut them out with the same die.
The gold is so pretty with the fall colors and really creates a totally different feel that the first card. As you can see, I’m all about using one idea to create different cards right now. I am never a fan of mass production but sometimes designing all new things every time is prohibitive. This method is a sweet spot and maybe one you will find helpful too!
I hope you like these! Make sure to go over and check the entire new release from Spellbinders. Links below are to the products and you’ll be able to find more once you are there. Thanks for stopping in today. See you again soon!
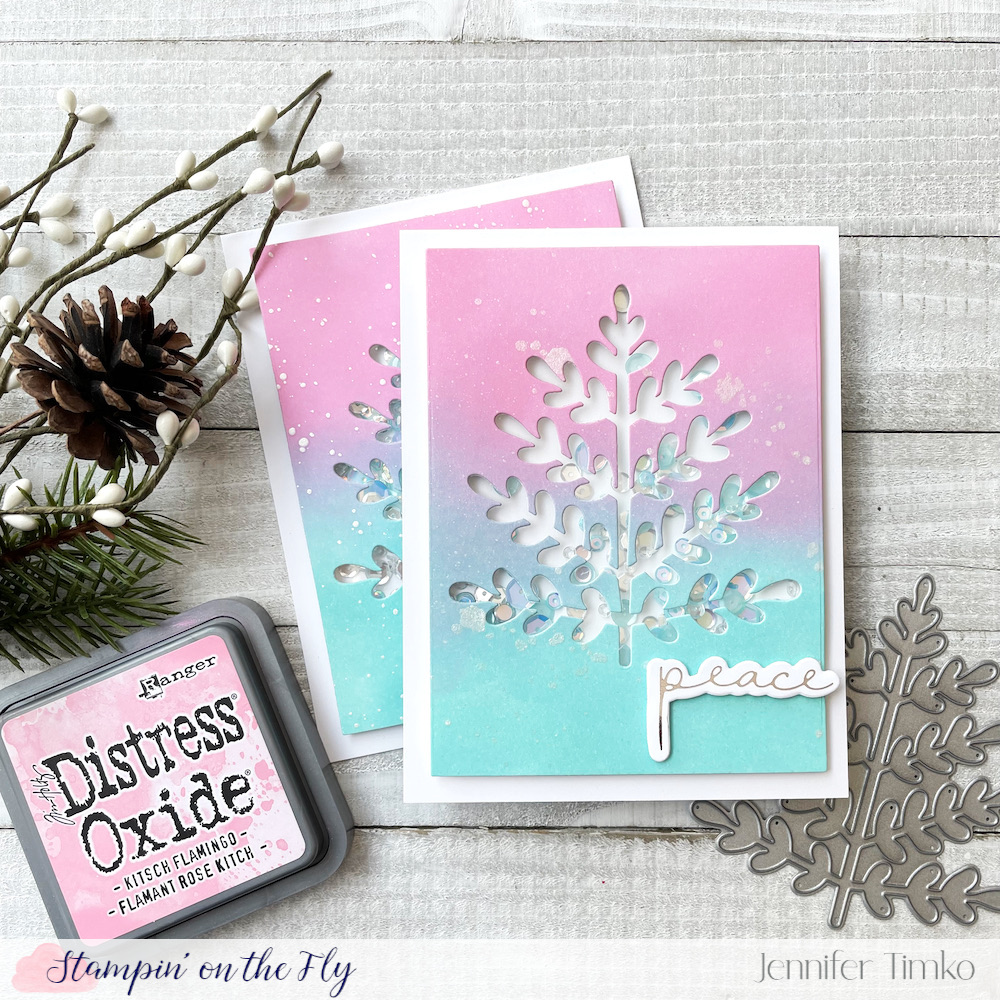
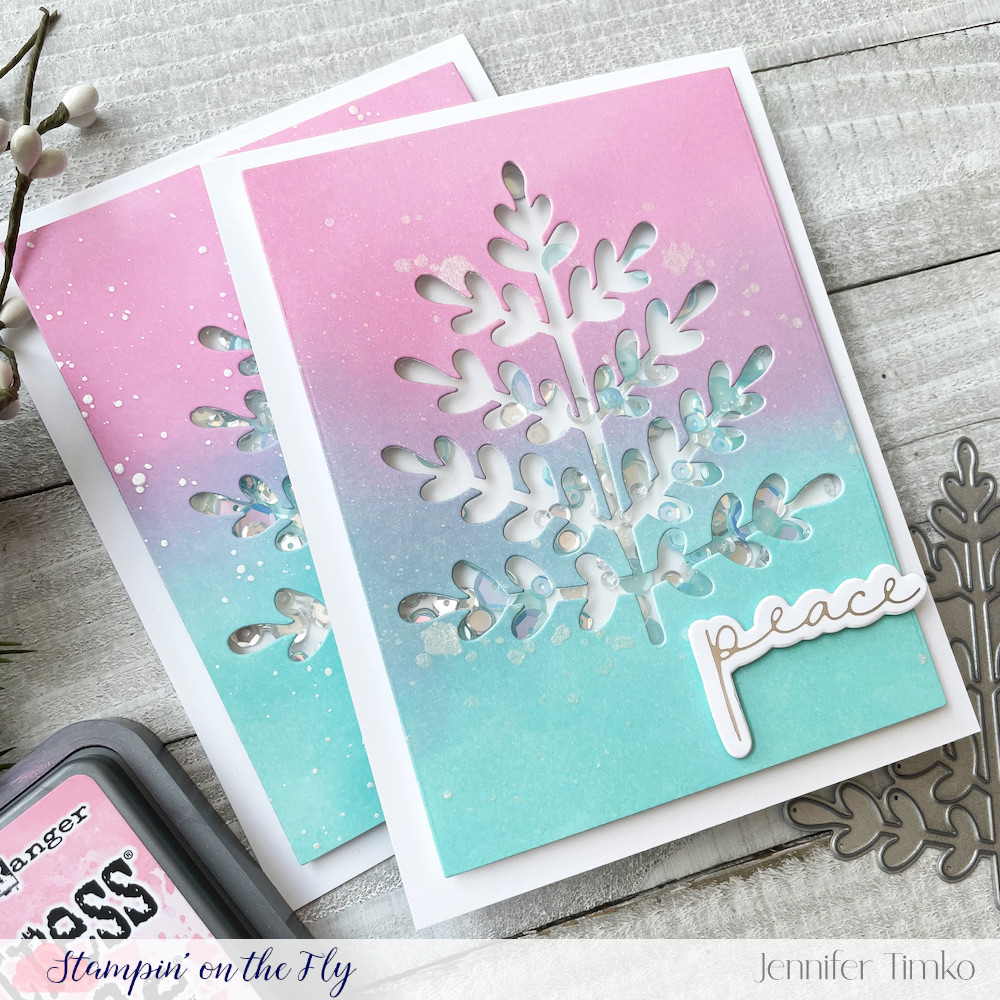
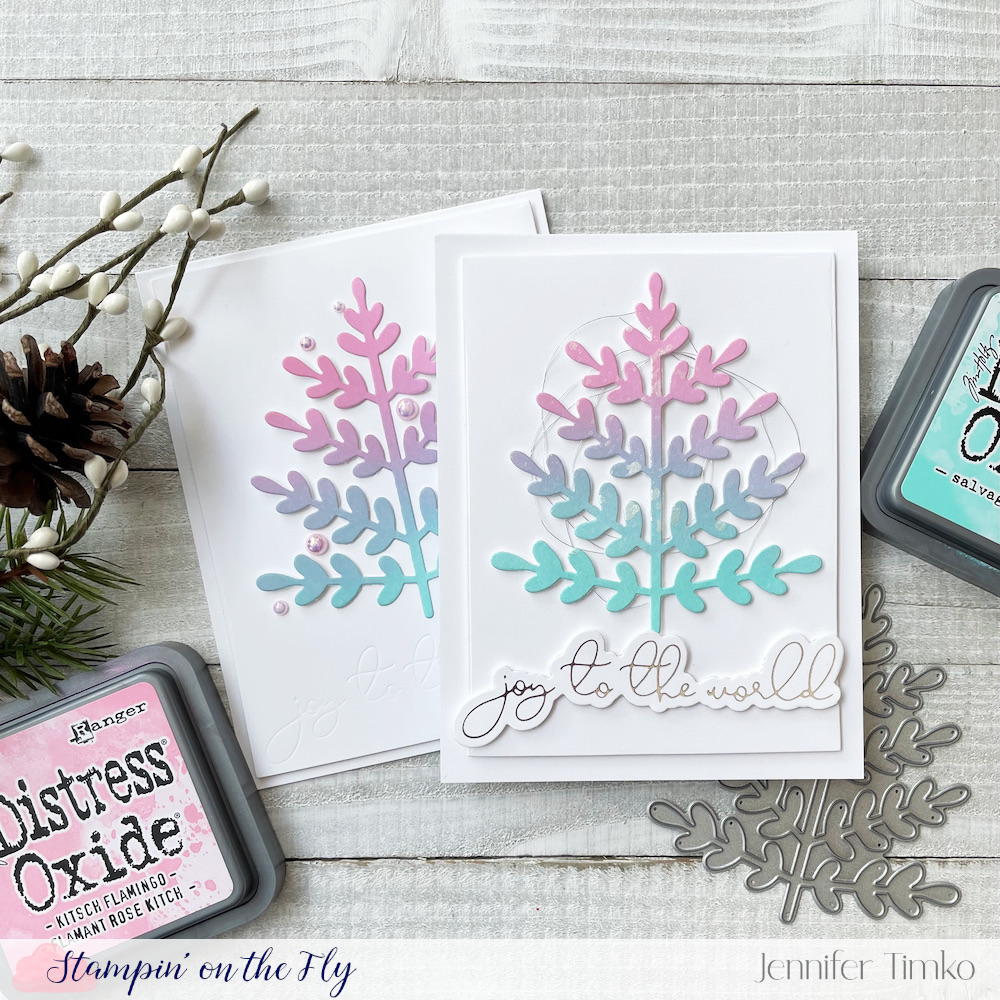
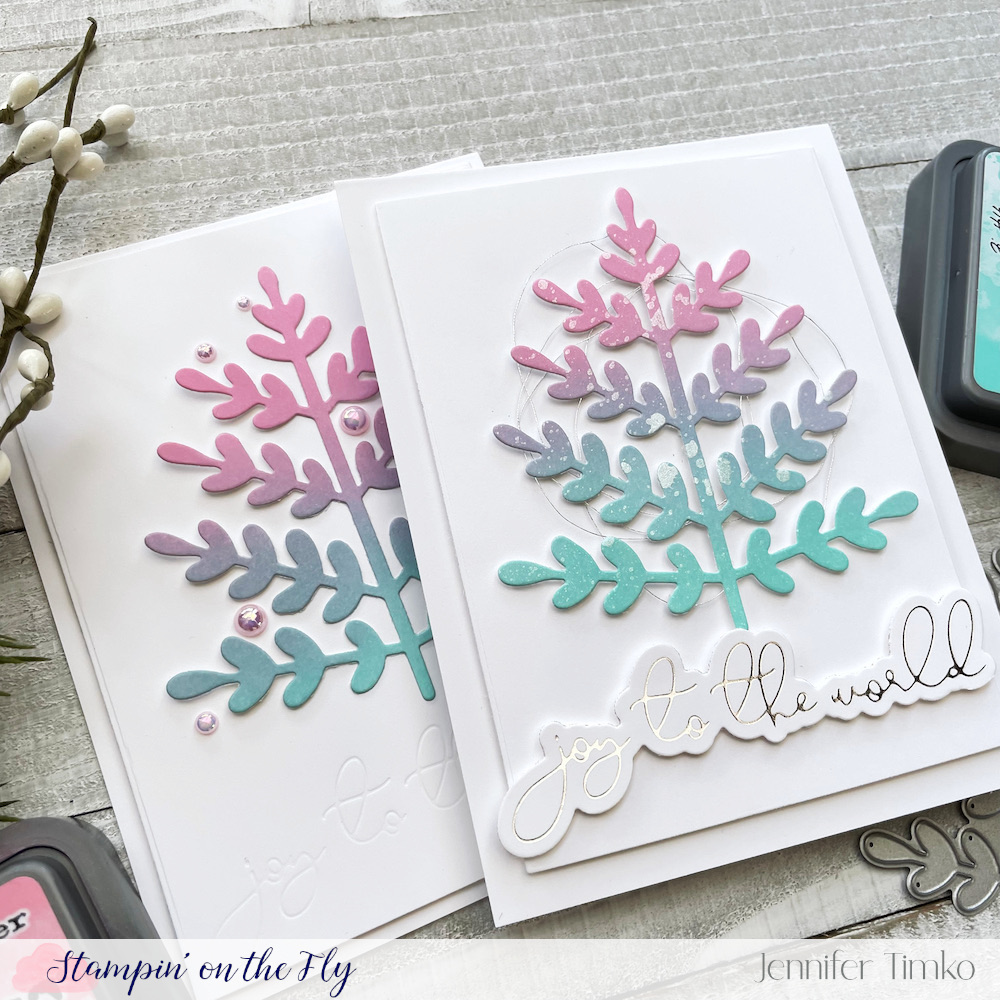
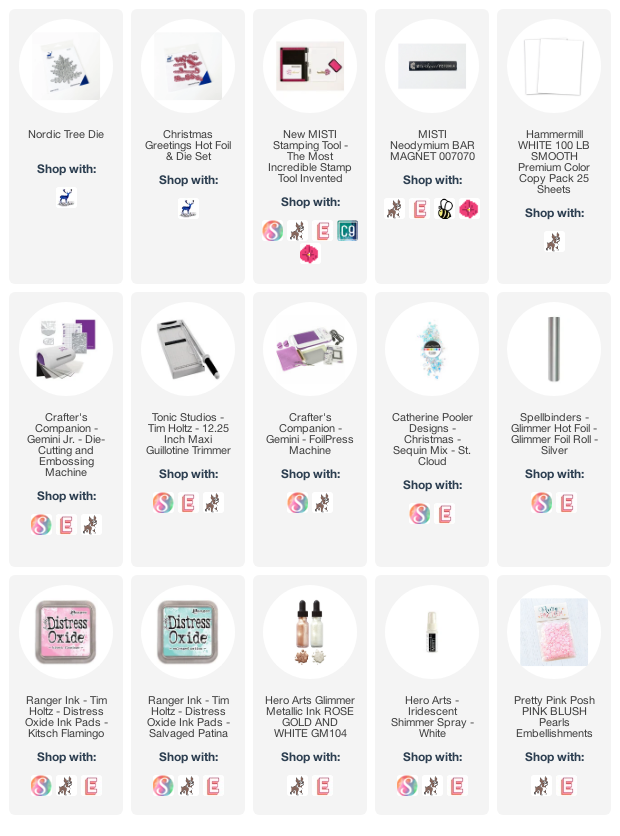
I have decided that I better start getting more serious about Christmas cards. November is bound to fly by and I’ll be woefully behind! While I’m not a big fan of mass production, I actually made 4 cards for today (all a little different) by using positive and negative die cuts.
I started by inking to A2 sized panels in a blend I have used before – Kitsch Flamingo and Salvaged Patina Distress Oxide Inks. I told you then that you would likely see it again and I’m truly obsessed with this color combination. I cut both panels with the Nordic Tree Die from Erin Lee Creative and then used a rectangle die to center and cut down the panels. I splattered one with Hero Arts Iridescent Shimmer Spray and one with Hero Arts White Glimmer Metallic Ink. The ink is a bit more opaque while the shimmer spray has a more subtle effect. Both are awesome!
I created shaker cards using the Catherine Pooler St. Cloud blend of sequins (they have the blue and clear and pink-ish colors that match the ink blend perfectly). Then using Silver Glimmer Hot Foil used the Christmas Greetings Hot Foil and Dies set from Erin Lee Creative for the sentiment.
Using the trees that I cut out (because why would I not?), I created two more cards. For the first, I sprayed again with Shimmer Spray and added some silver thread behind the tree for a little more shine. I used another of the sentiments from the Christmas Greetings set. **Tip: I actually foiled all the sentiment from the set at the same time so that I had them ready to go for these and other cards. **
On the bottom card here, I did not splatter and went for a cleaner look. In my attempt to foil the sentiment directly onto the panel, I had my foil backwards (seriously….those who have, those who will) and ended up with a letterpress look along with a pretty silver on my hot foil plate. It doesn’t hurt the plate, for the record. I kind of like the look so went with it. I added the tree but gluing the middle straight down but putting a bit of foam tape under the branches for dimension. I thought the Pink Blush Pearls from Pretty Pink Posh were the right add, almost like a free form ornament.
So there you have it. Four cards, all a little different but the same. WIN!! This pretty tree from Erin Lee Creative will stay in heavy rotation as I create. I love the modern look and clearly it allows for some diversity of design. Thanks so much for stopping in today. Back tomorrow with a fun new product!
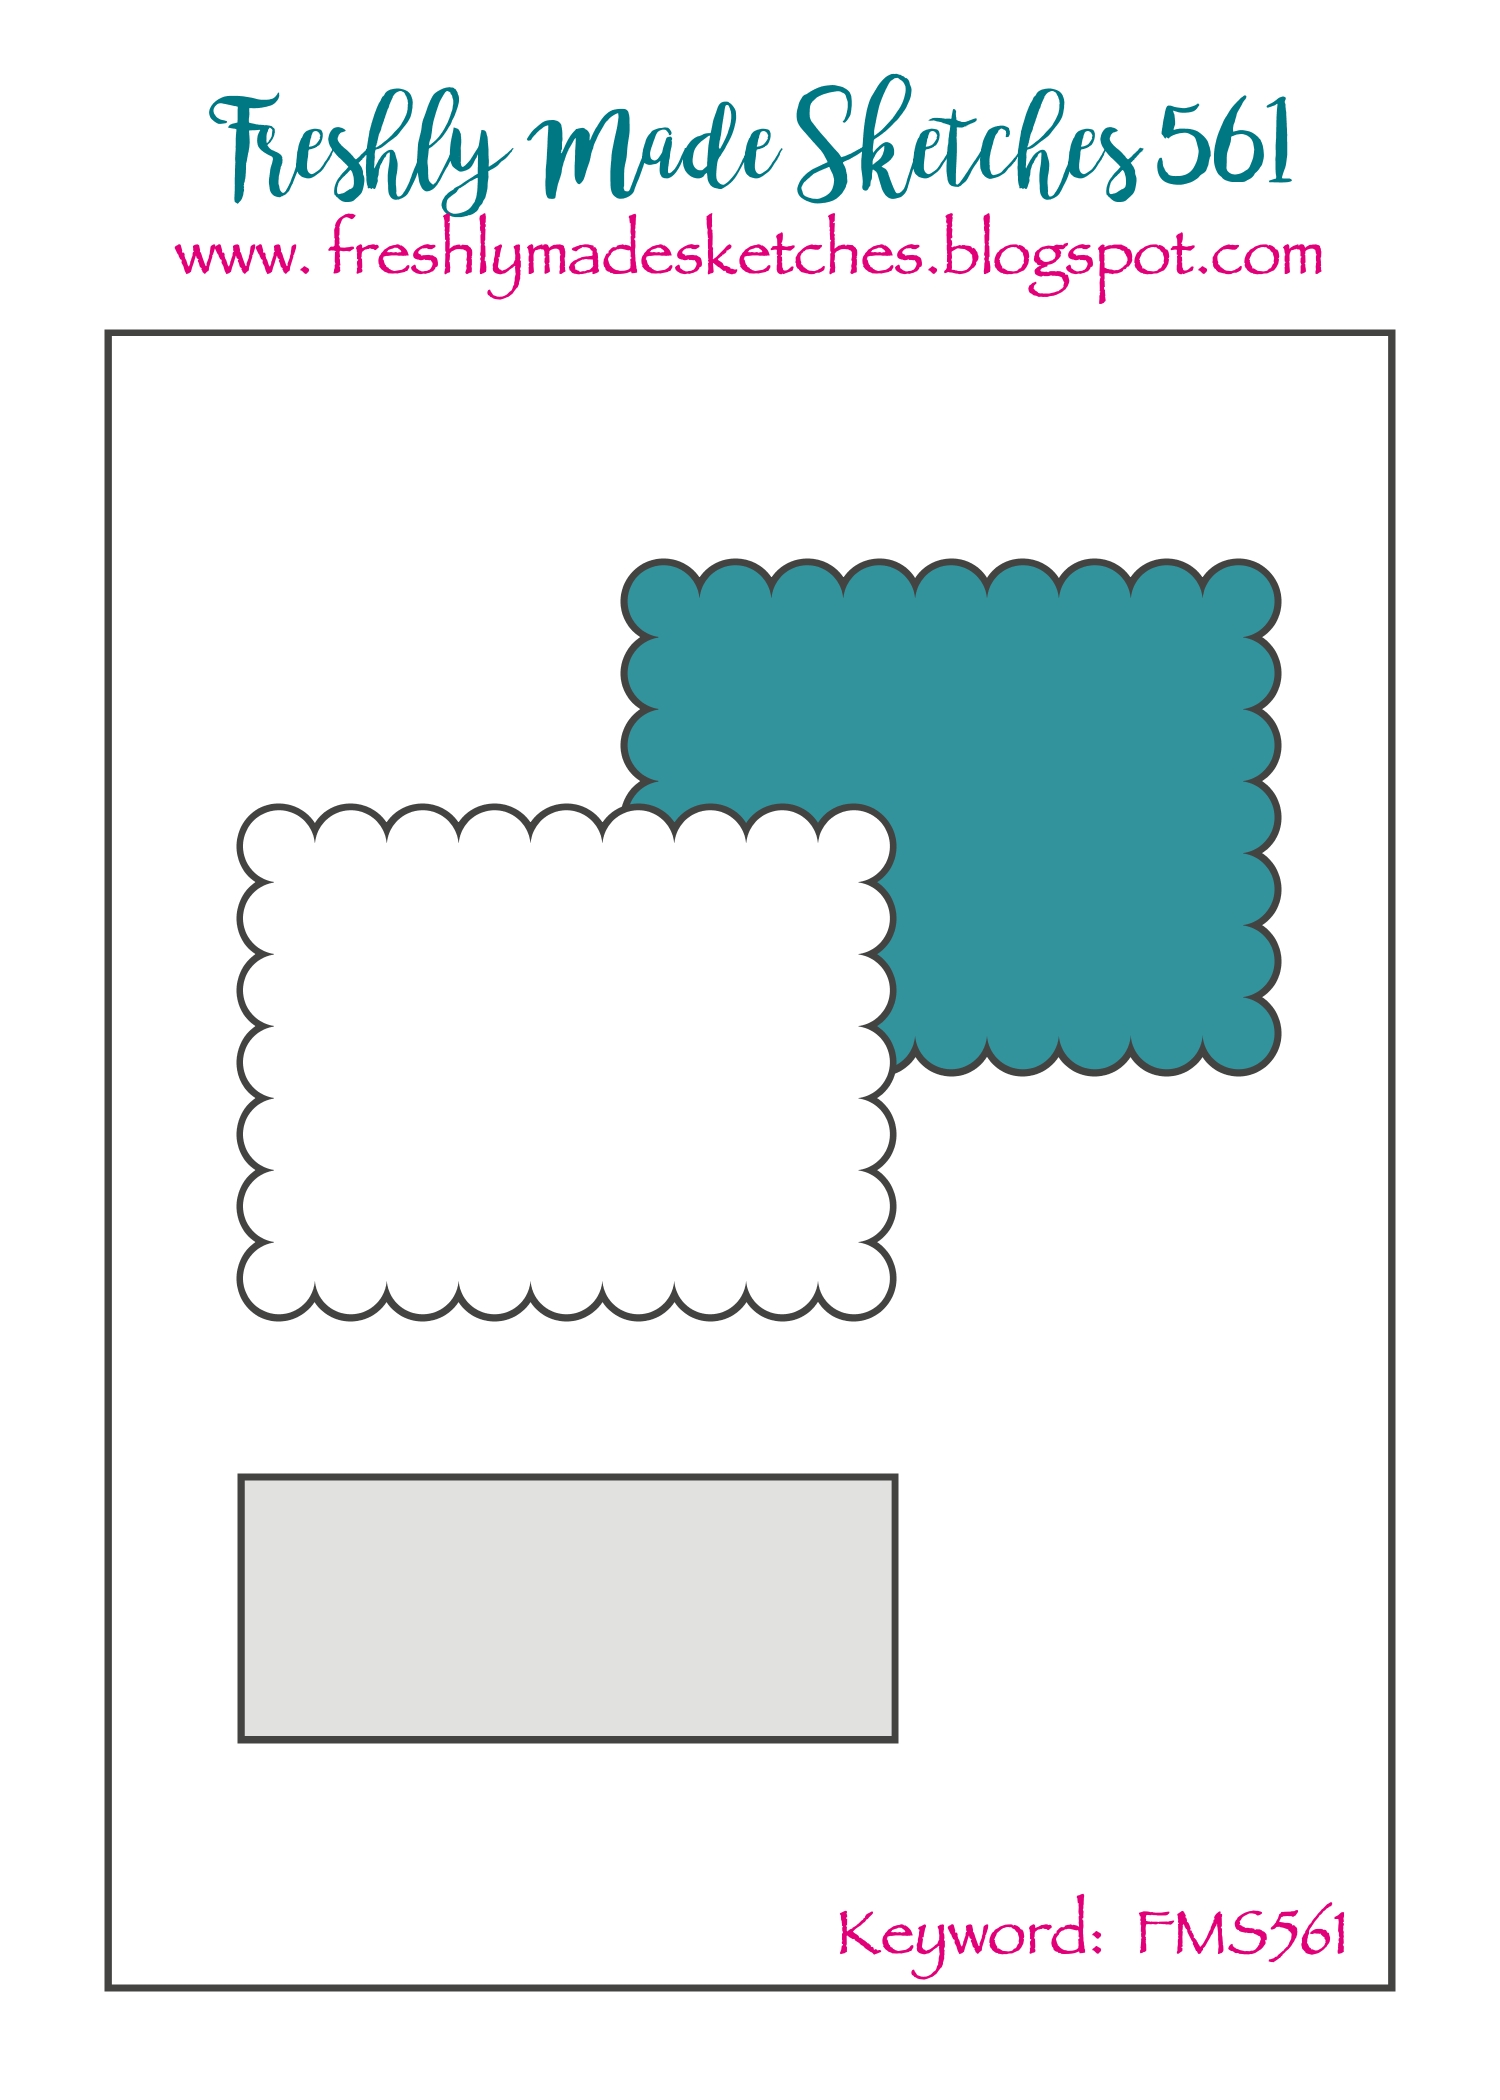
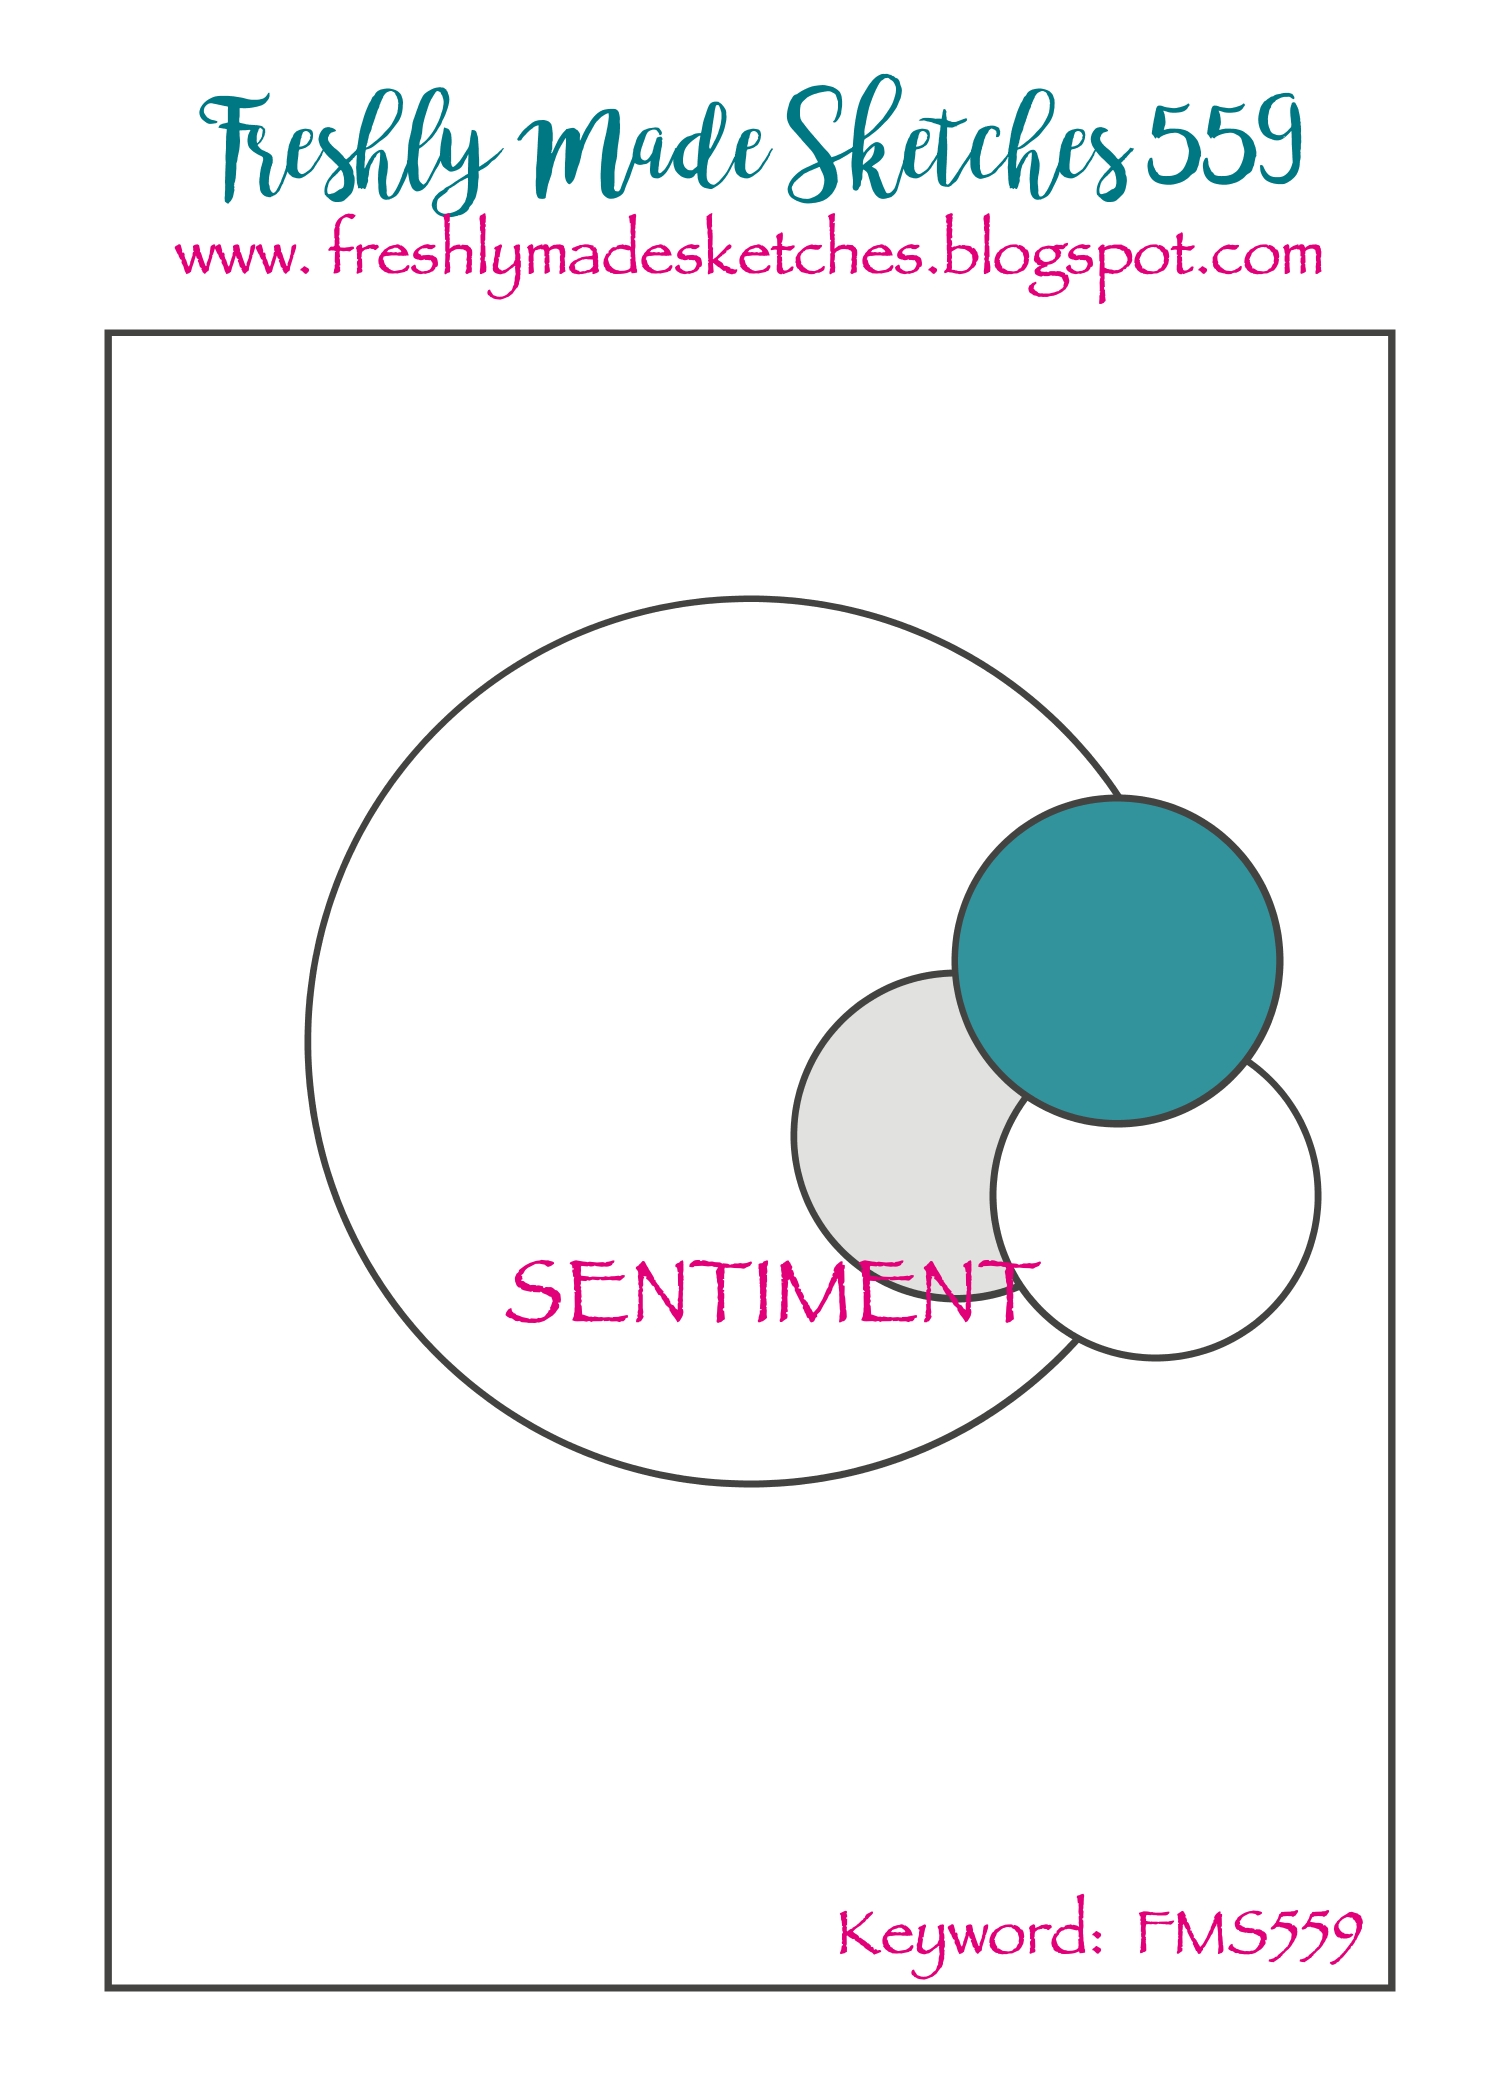
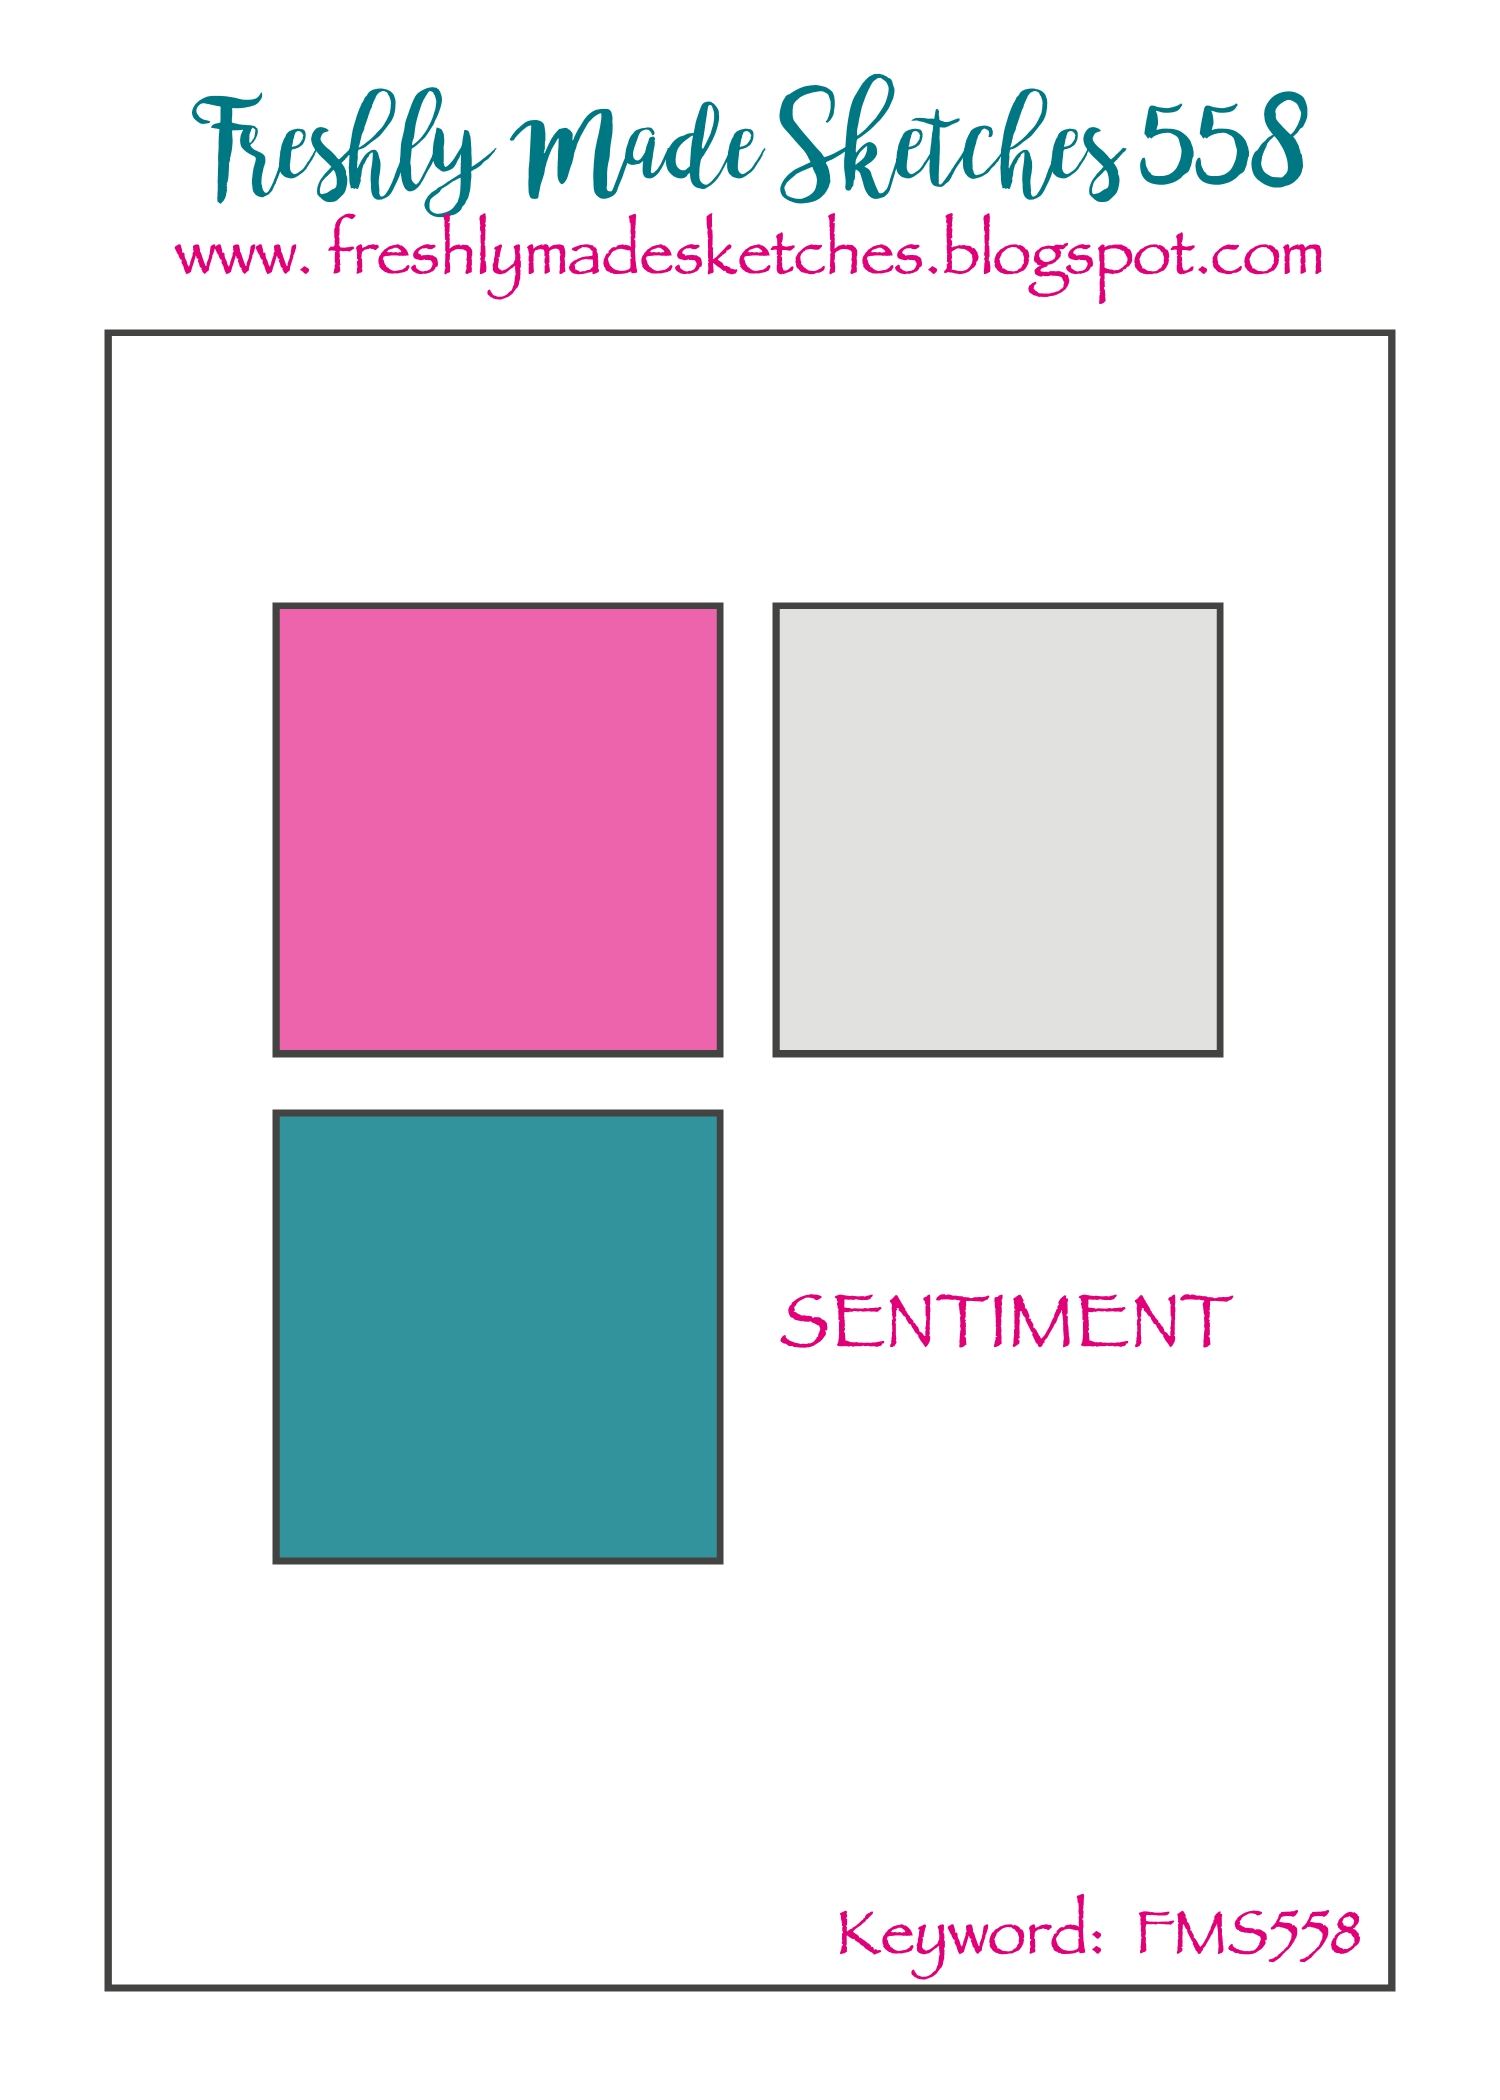
Happy Wednesday to you! I’m the sketch designer over at Freshly Made Sketches this week and I went with a little more detail than my normal design. But you can choose to interpret those circles however you want!
Taking a short break from the seasonal cards, I thought I’d use some of the pieces I had left in my pile of unused extras. I had these flowers from the Citrus Blooms set that I had previously watercolored and thought they would be pretty grouped together. I chose a the Inverted Stitched Scallop Circle (also Pinkfresh Studios) because I love the extra bit of detail on it.
I liked the idea of all the white but I thought a bit of gold would make it more special. I used the Fancy Script Words Hot Foil Plates and dies for the sentiment. A little bit of gold splatter and then some Matte Gold Pearls to finish.
The team, as always, has some amazing interpretations of the sketch and I look forward to seeing how you use it. I hope you have a good rest of your week! See you soon.
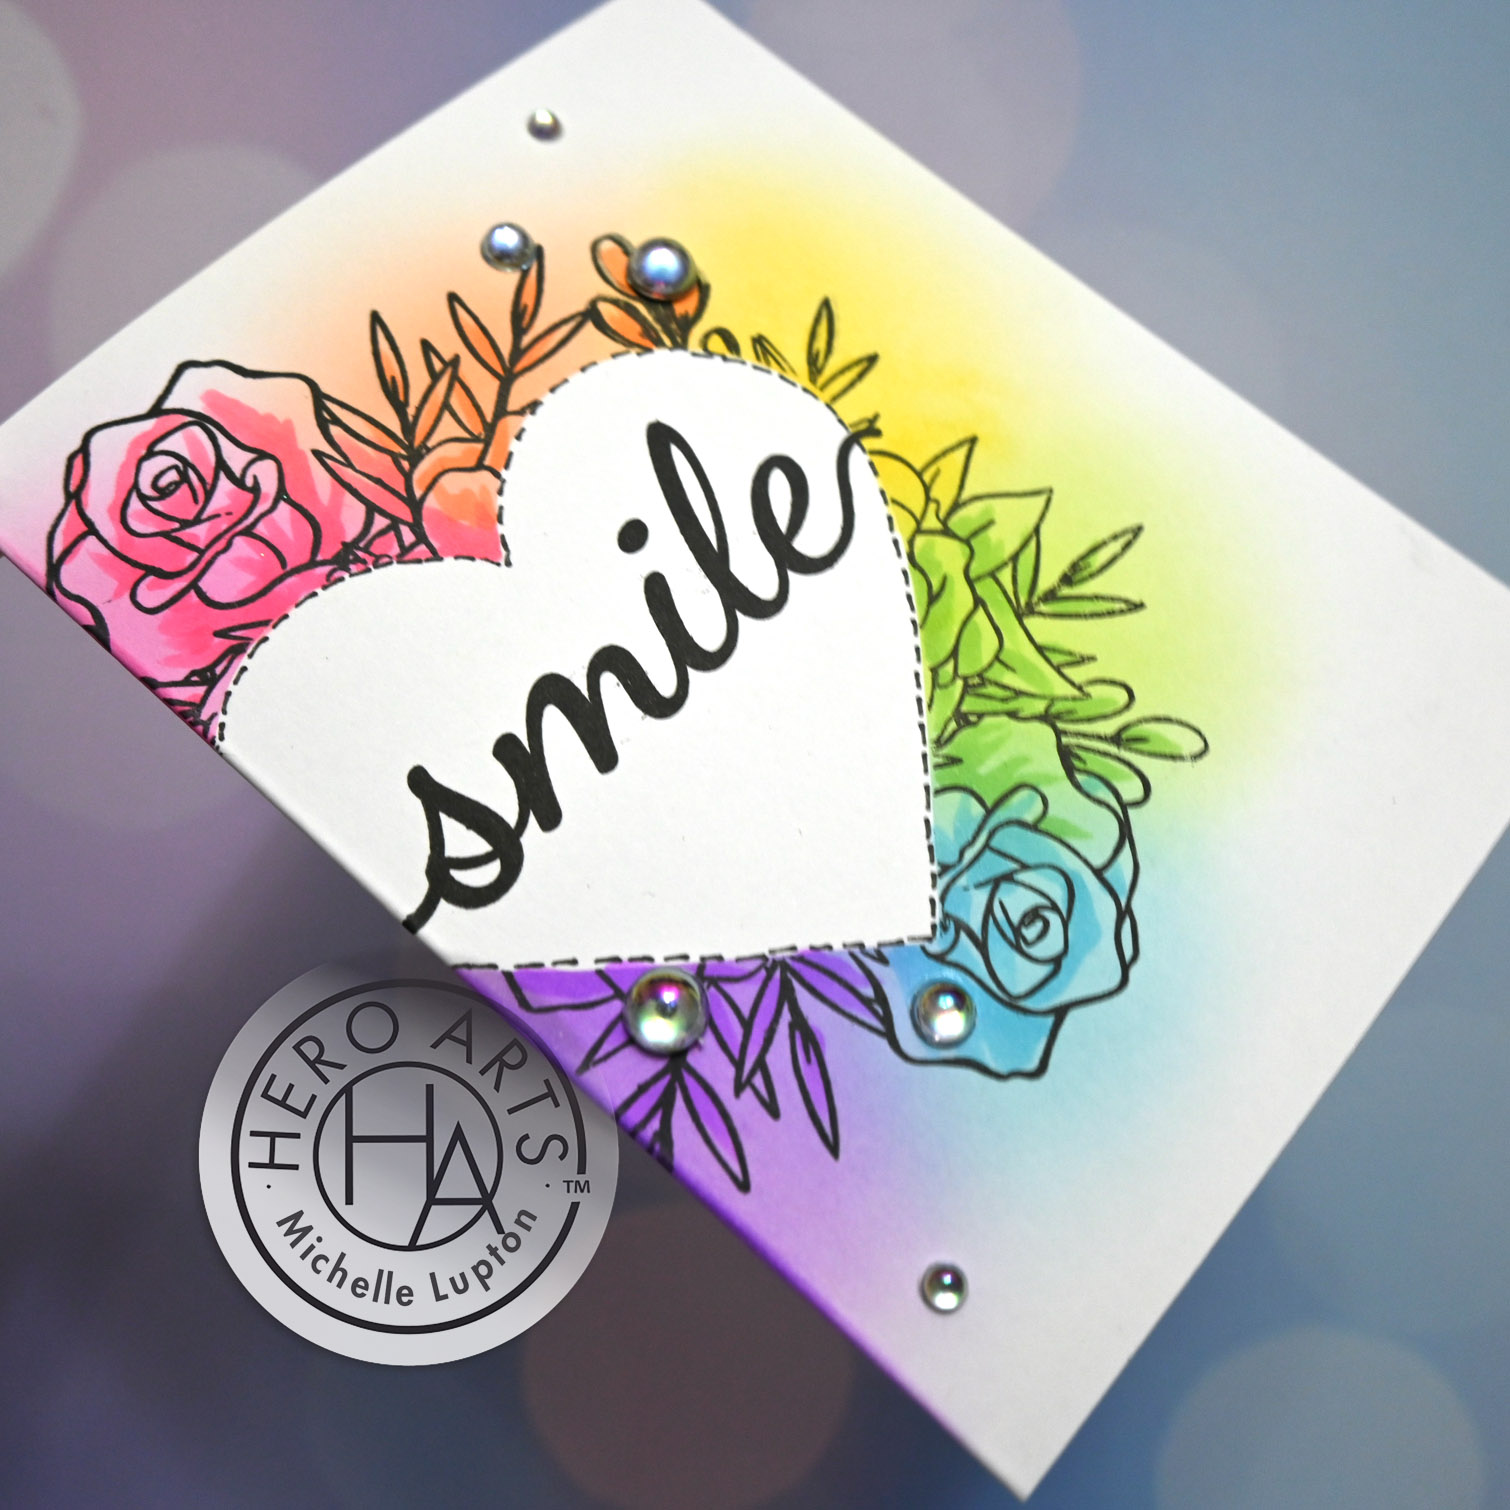
I’m so happy to be back today for a very special post! My friend Michelle Lupton has graciously invited me to join her CASE Me a Christmas Card series again this year. I love all the inspiration that comes from her collaborations each year and, let’s face it, I’ll take any excuse to CASE one of her cards.
Truly the hardest part about this is choosing what to CASE. I mean….just go look at her gallery of work and you’ll understand. I finally settled on a card from May that was full of rainbow goodness (you can see it below). In the rules of CASEing, as I have always done it, you change 3 things but keep the overall feel of the original. Things I kept: the side placement of the focal elements, the big sentiment, the scattered pearls. Things I changed: more monochromatic, stencil plus die cut, no background stamped image.
The products on this card are new from Erin Lee Creative and I love them! I started by inking through the Nordic Tree Stencil with Versamark Ink and then heat embossed with a pearl powder. Much more subtle shimmer in person! Using the Nordic Tree Die, I did an edge cut on the Gold Cardstock (also from Erin Lee). Before layering it on, I blended on Rustic Wilderness and Iced Spruce Distress Oxide Inks. The sentiment is from the new Christmas Greetings stamp set (which has coordinating hot foil plates and dies).
This is the card by Michelle and you can see more HERE about how she made it. Now part of the fun is that she also uses one of my cards to create a Christmas card and her new card is here: Michelle’s New CASE Me a Christmas Card.
Thanks so much for joining us for this fun series! Go follow Michelle to see all of her beautiful work!
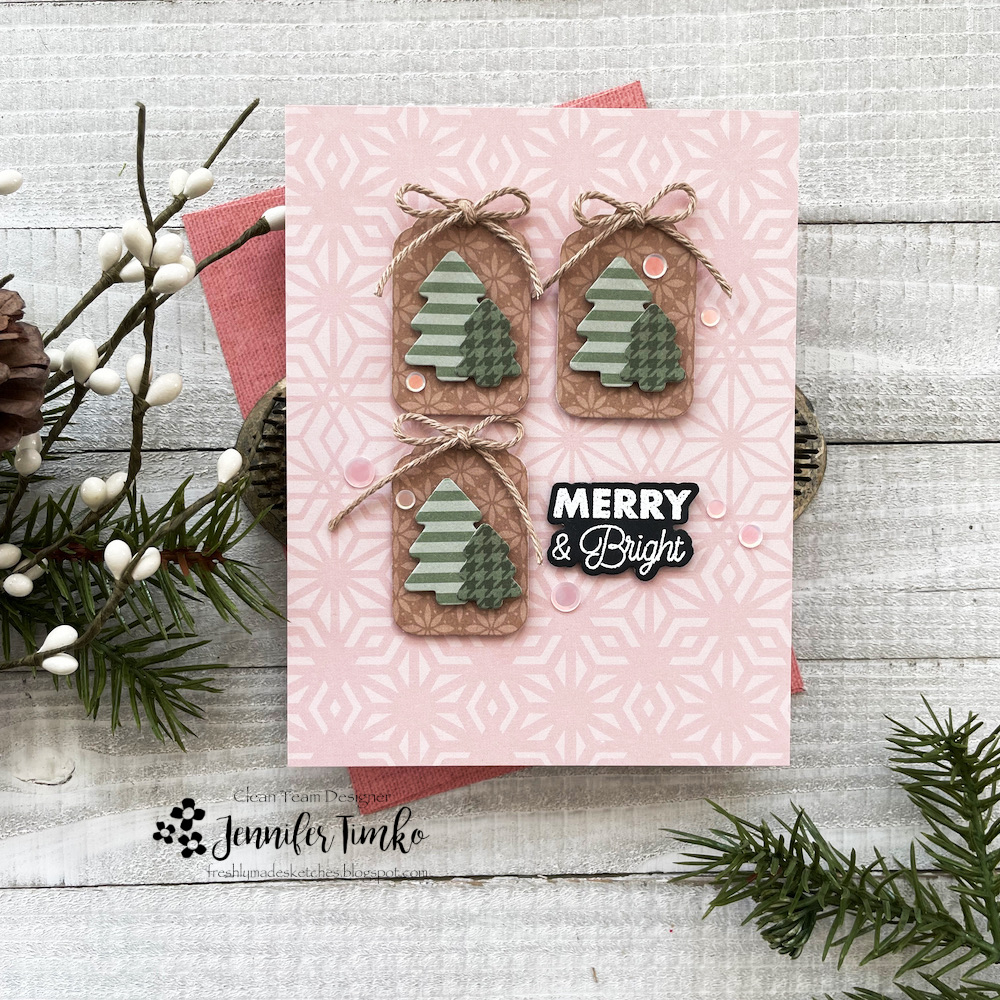
This is post one of two today. Later today, I have a fun collaboration with Michelle Lupton. But first, Freshly Made Sketches! Our sketch designer this week is our amazing Jacquie who has given us a trio of fun for the week.
When I saw the sketch, I thought about tags and I knew just the ones. The Tag Builder dies and coordinating Tag, You’re It Holidays set (Honey Bee Stamps) were just what I needed! I leaned on some of last year’s patterned paper (it is on sale now at Honey Bee) and let the dies do most of the work. I thought this pink paper was a modern choice and I love it with the kraft tags.
I used a sentiment from the stamp set and opted for a black base/white embossing look. The twine is from my stash and the sequins are from an old Honey Bee Stamps pack called Ballet Slippers.
Thanks for stopping in today. I hope you like this card and will come over to join us this week! Make sure you come back by later to see my second post of the day.
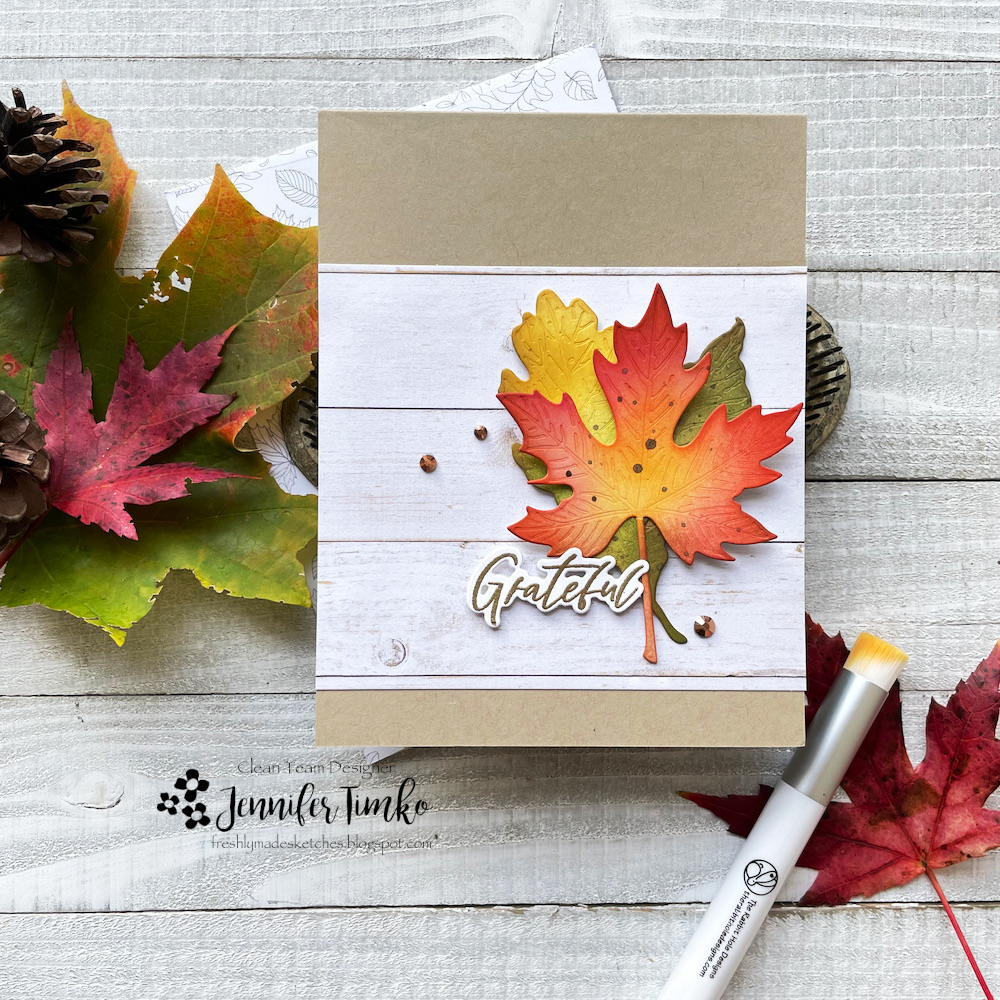
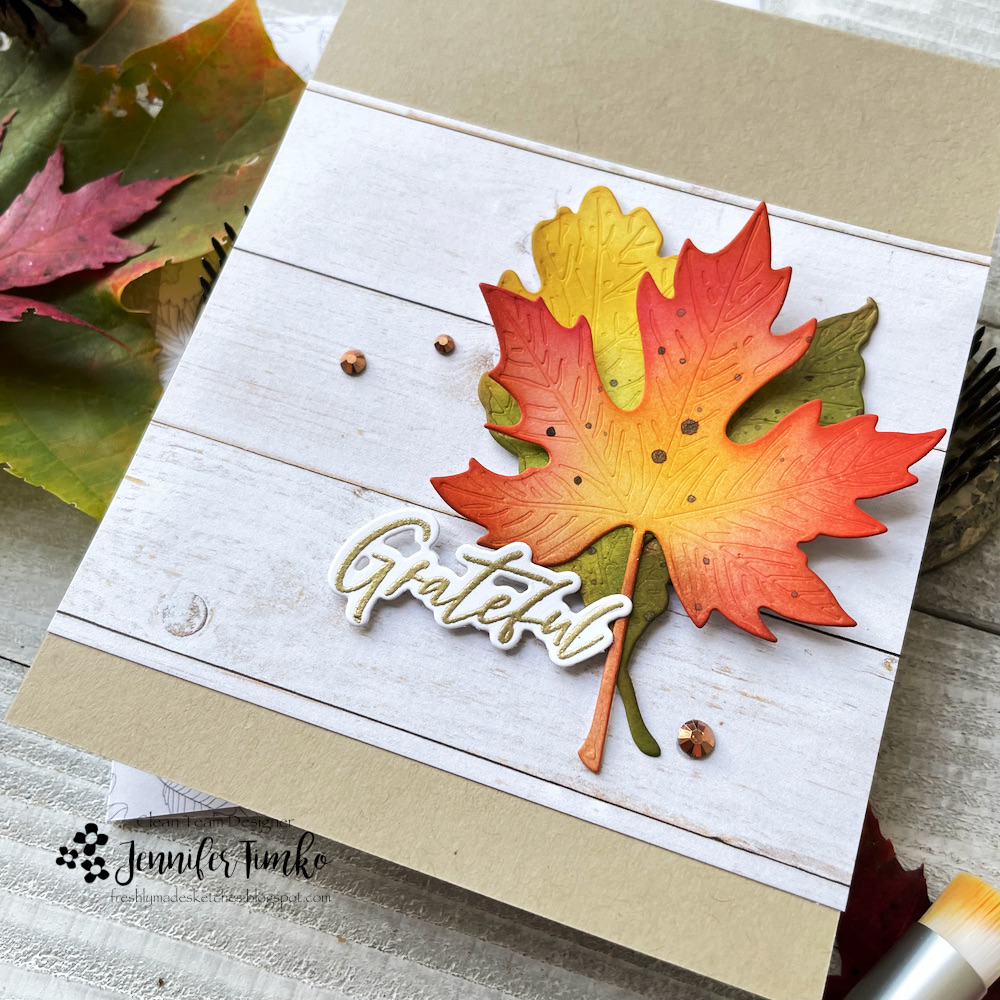
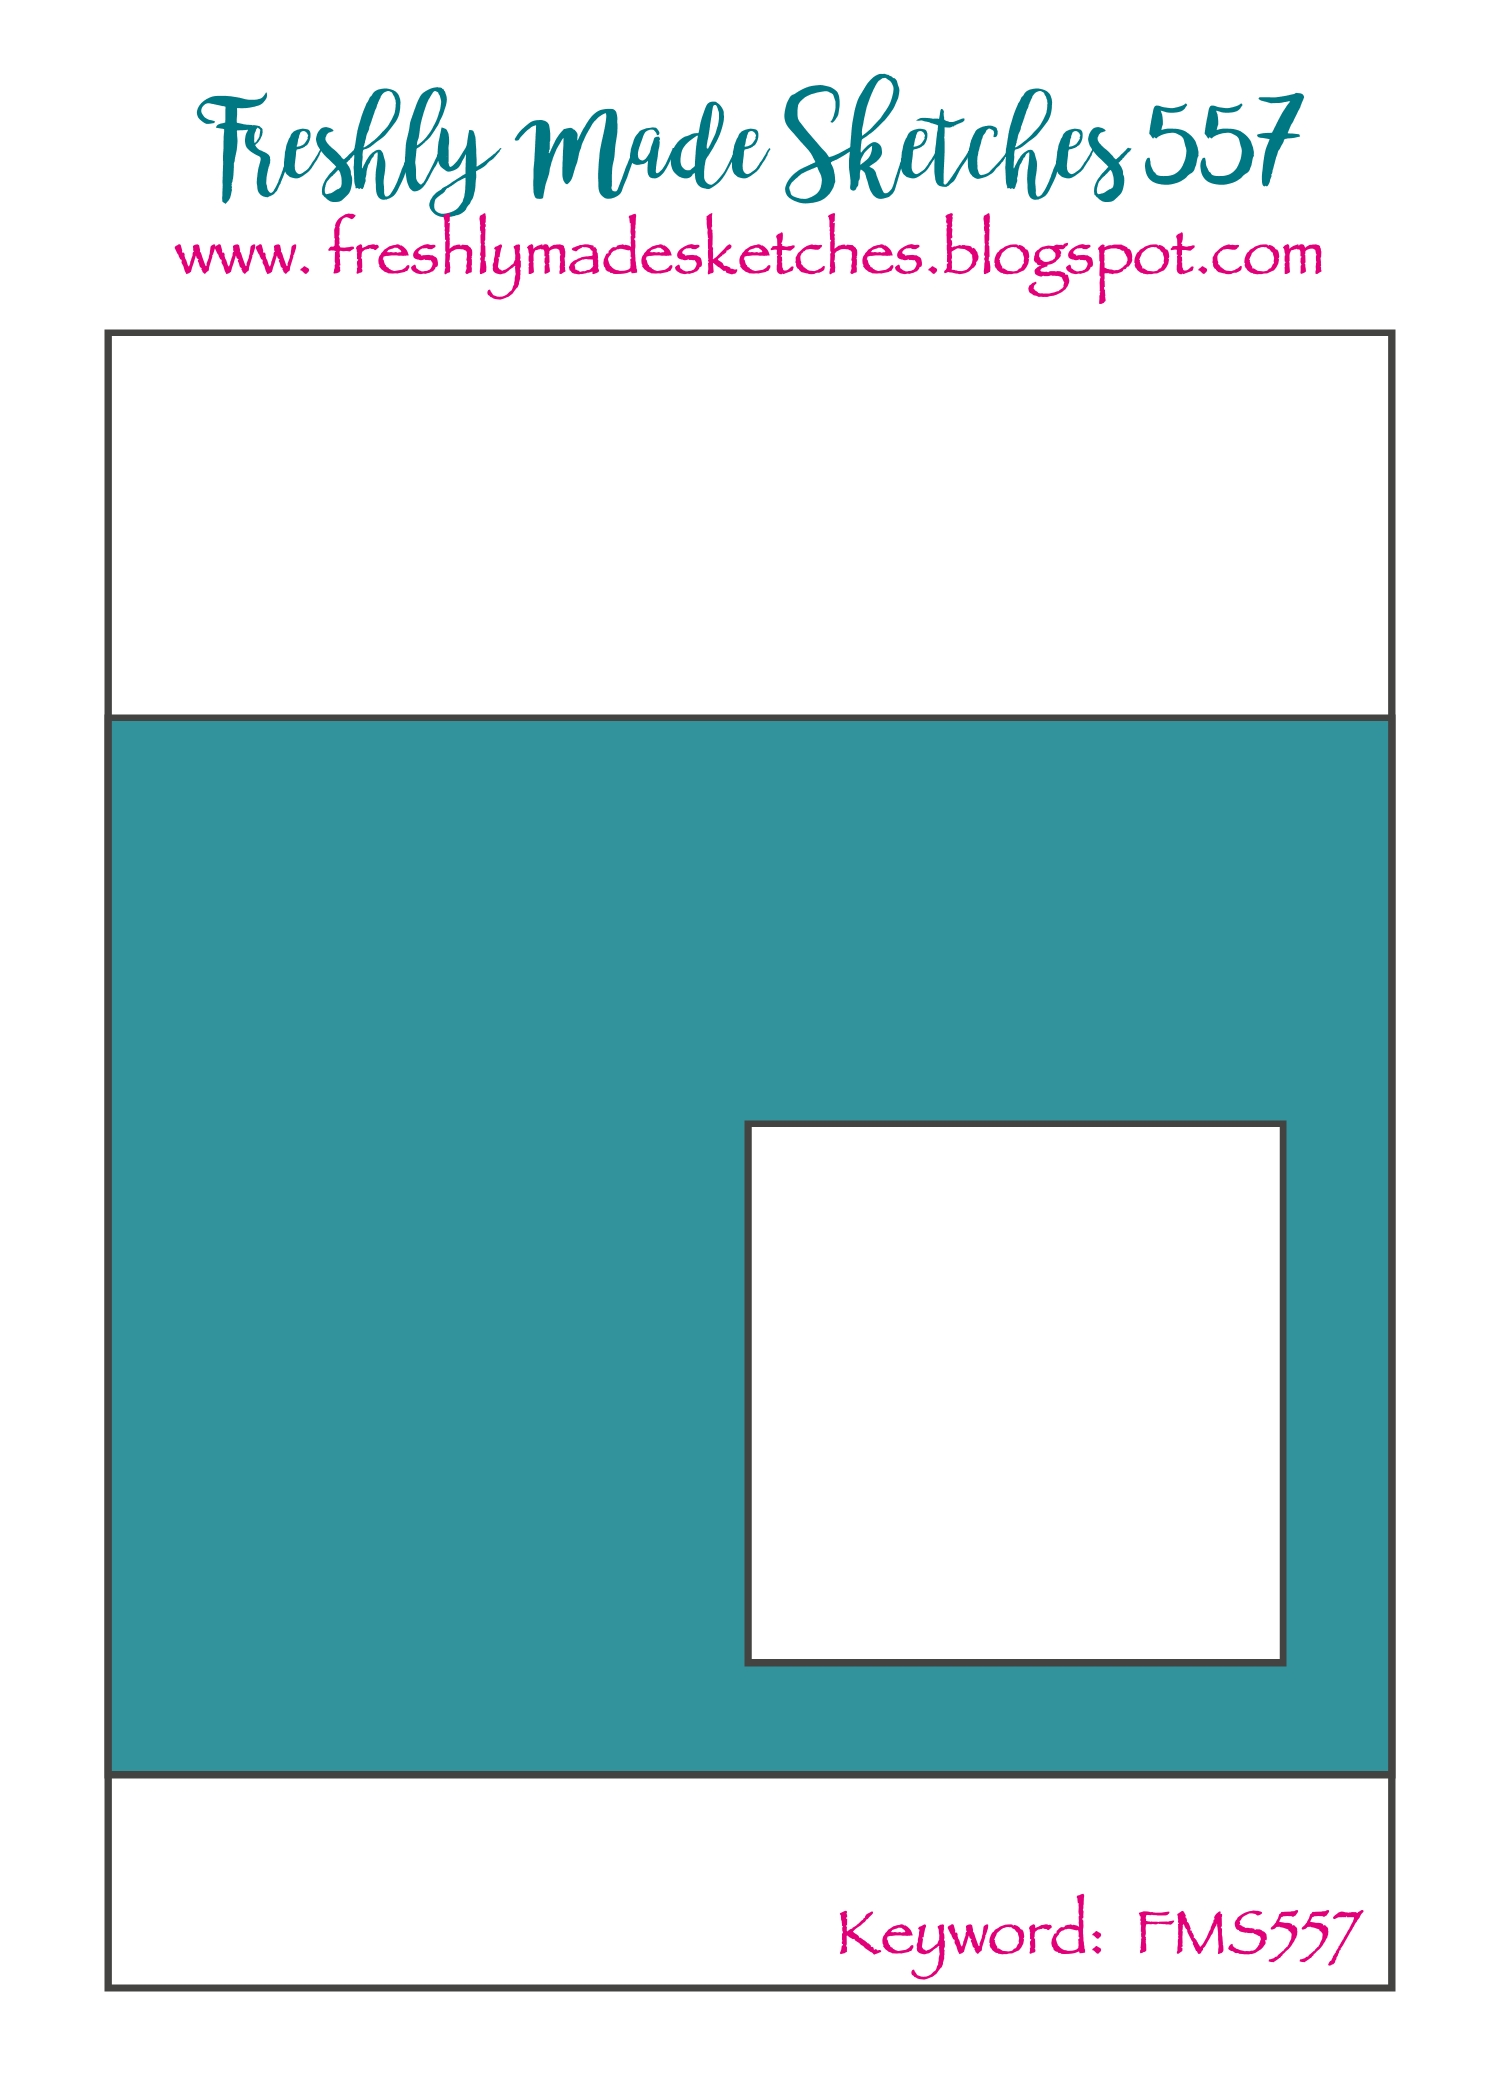
My leaves are starting to change and I’m all in on fall. Went to the apple orchard on Monday, made apple butter yesterday…I love fall in Virginia! Pretty much no matter what the sketch was this week, I was planning on using leaves and the sketch from our fabulous Judy Rozema is perfect!!!
The Lovely Layers: Fall Foliage dies from Honey Bee Stamps are simple glorious for perfect (and easy) leaf creating. I cut them out from Hammermill white paper and then blended on Distress Ink with my Bitty Blending Brushes. I love these little brushes for controlling where the color goes. I pulled a couple of leaves from my yard as color muses, as you can see. I added a few paint splatters to mimic the spots on my leaves.
I chose a sentiment from the new On The Line Fall Florals stamp set (Honey Bee Stamps) and I love how close the coordinating die cuts it. The background paper is from the Grain and Grunge Paper Pack and the gems are from the coordinating gem pack.
I hope you will come over to Freshly Made Sketches to check the gorgeous work from the team and play along. Thanks for stopping by today. I hope you have a beautiful day!
Primary Sidebar
We use cookies on our website to give you the most relevant experience by remembering your preferences and repeat visits. By clicking “Accept”, you consent to the use of ALL the cookies.
This website uses cookies to improve your experience while you navigate through the website. Out of these, the cookies that are categorized as necessary are stored on your browser as they are essential for the working of basic functionalities of the website. We also use third-party cookies that help us analyze and understand how you use this website. These cookies will be stored in your browser only with your consent. You also have the option to opt-out of these cookies. But opting out of some of these cookies may affect your browsing experience.
Necessary cookies are absolutely essential for the website to function properly. This category only includes cookies that ensures basic functionalities and security features of the website. These cookies do not store any personal information.
Any cookies that may not be particularly necessary for the website to function and is used specifically to collect user personal data via analytics, ads, other embedded contents are termed as non-necessary cookies. It is mandatory to procure user consent prior to running these cookies on your website.