Skip to content

Artisan Wednesday Wow – Gold Embossed Thank You Notes

Artisan Wednesday Wow – Gold Embossed Thank You Notes published on 8 Comments on Artisan Wednesday Wow – Gold Embossed Thank You Notes

12-Dec-Blog-Hop-Button

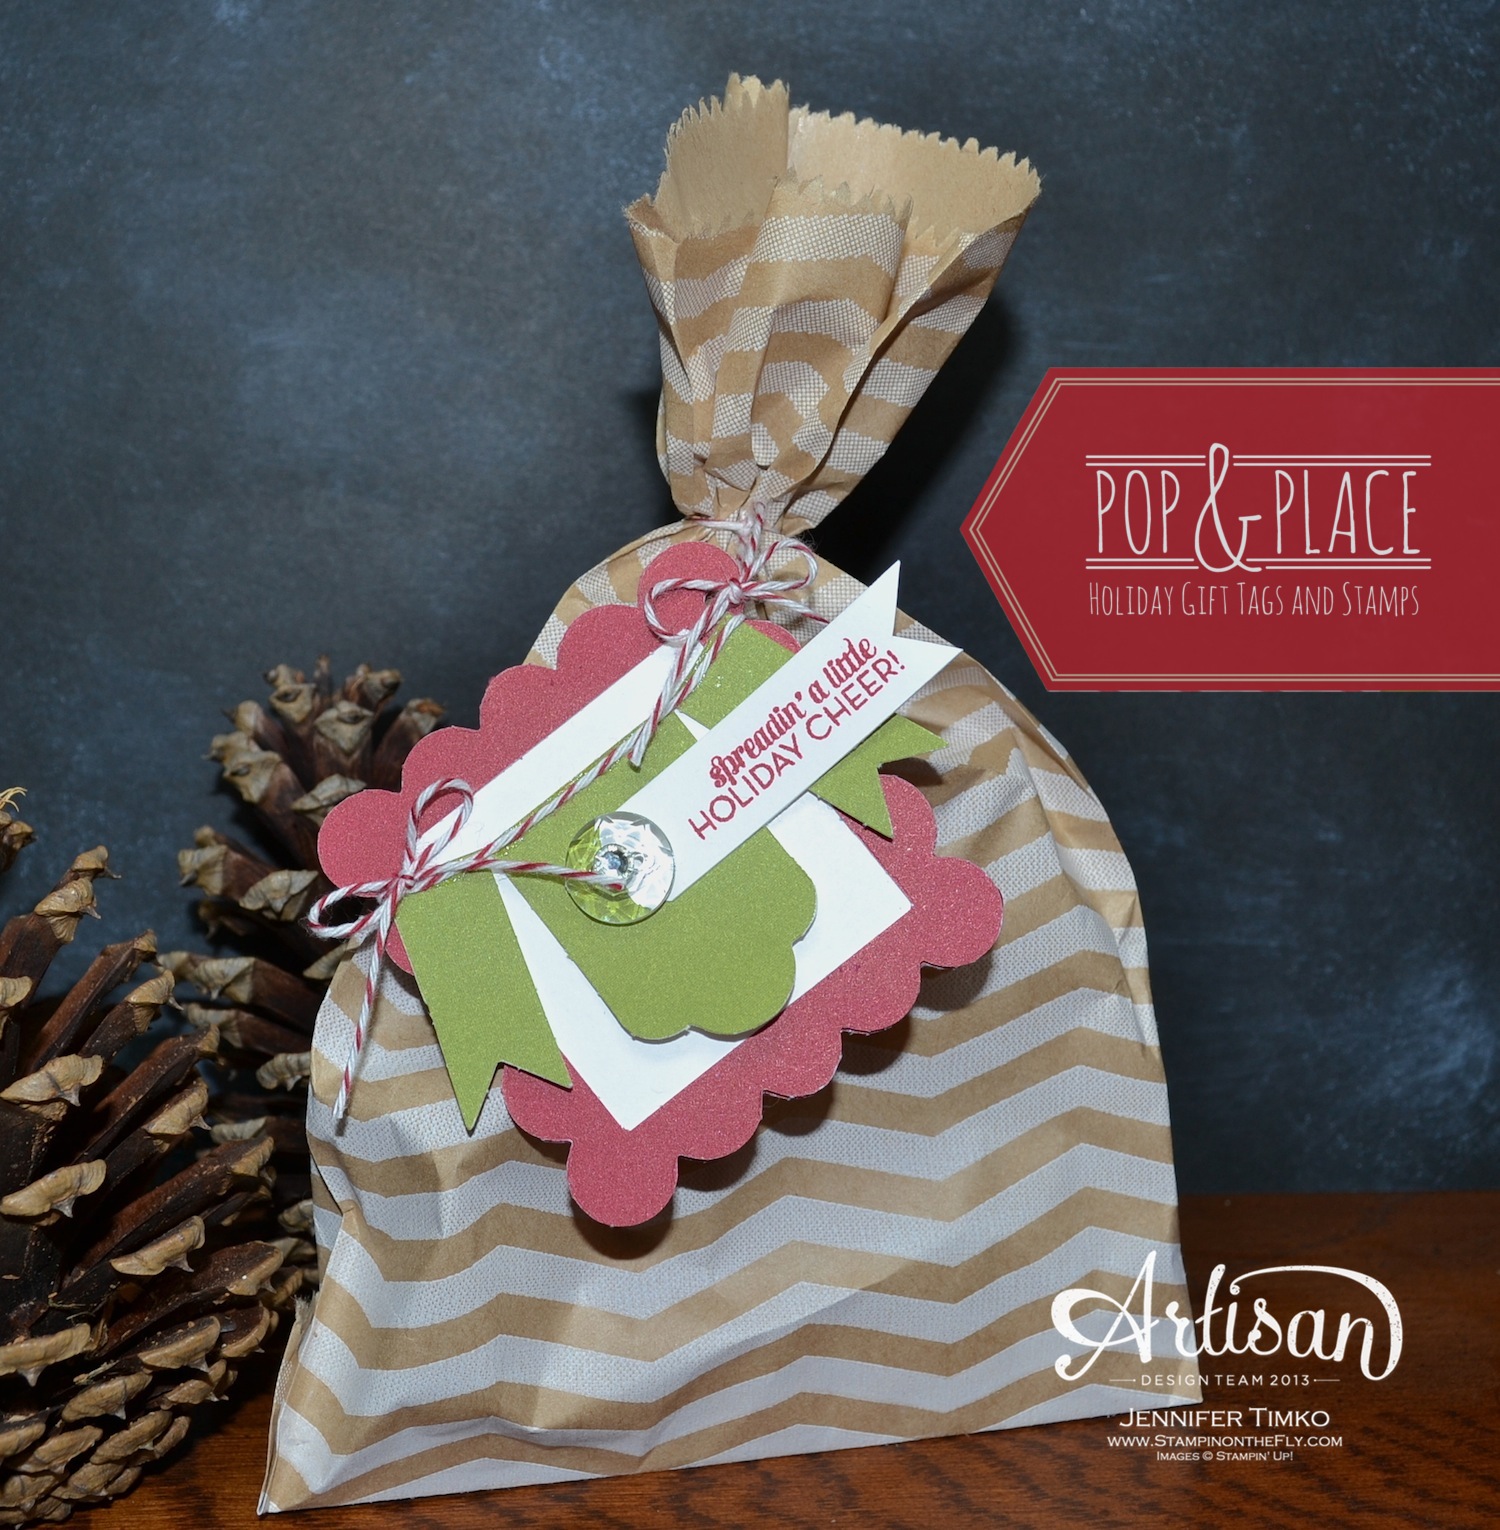
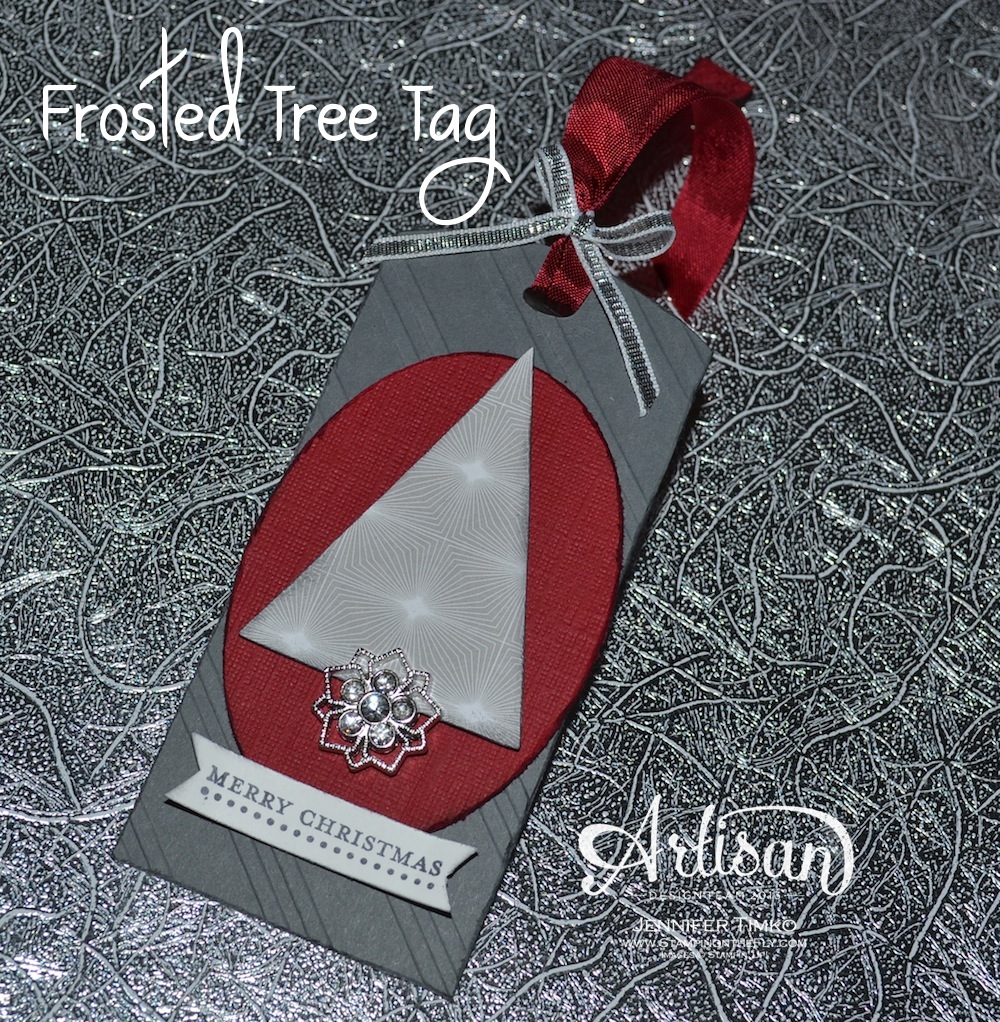
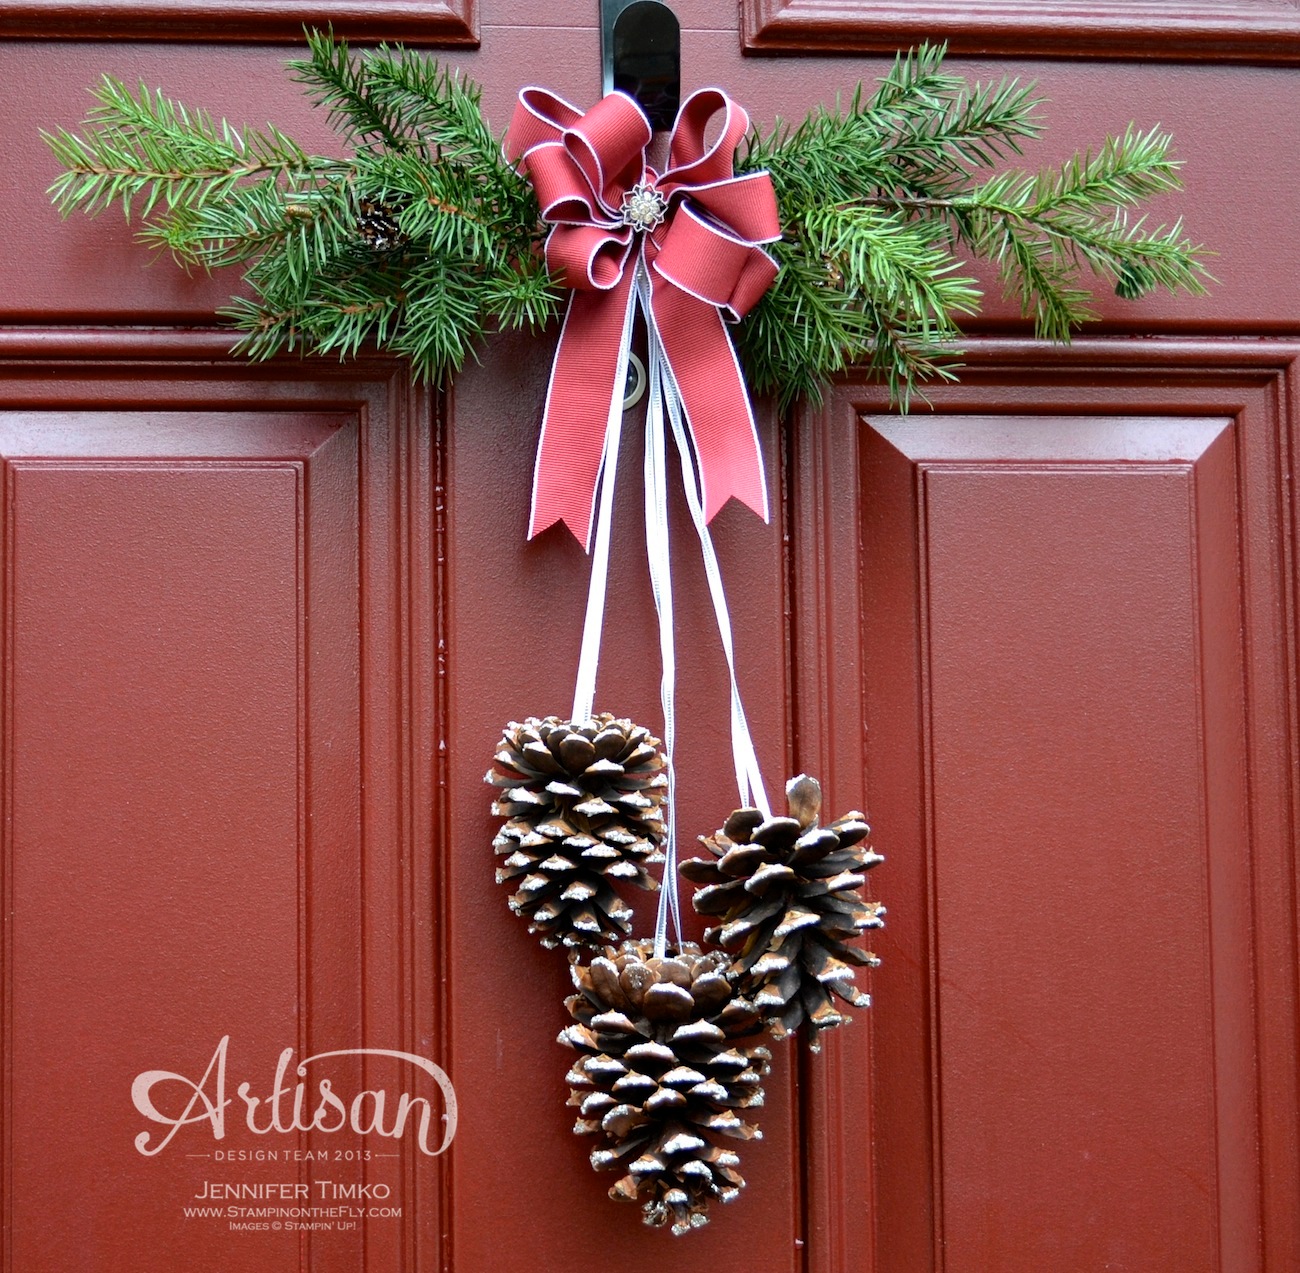
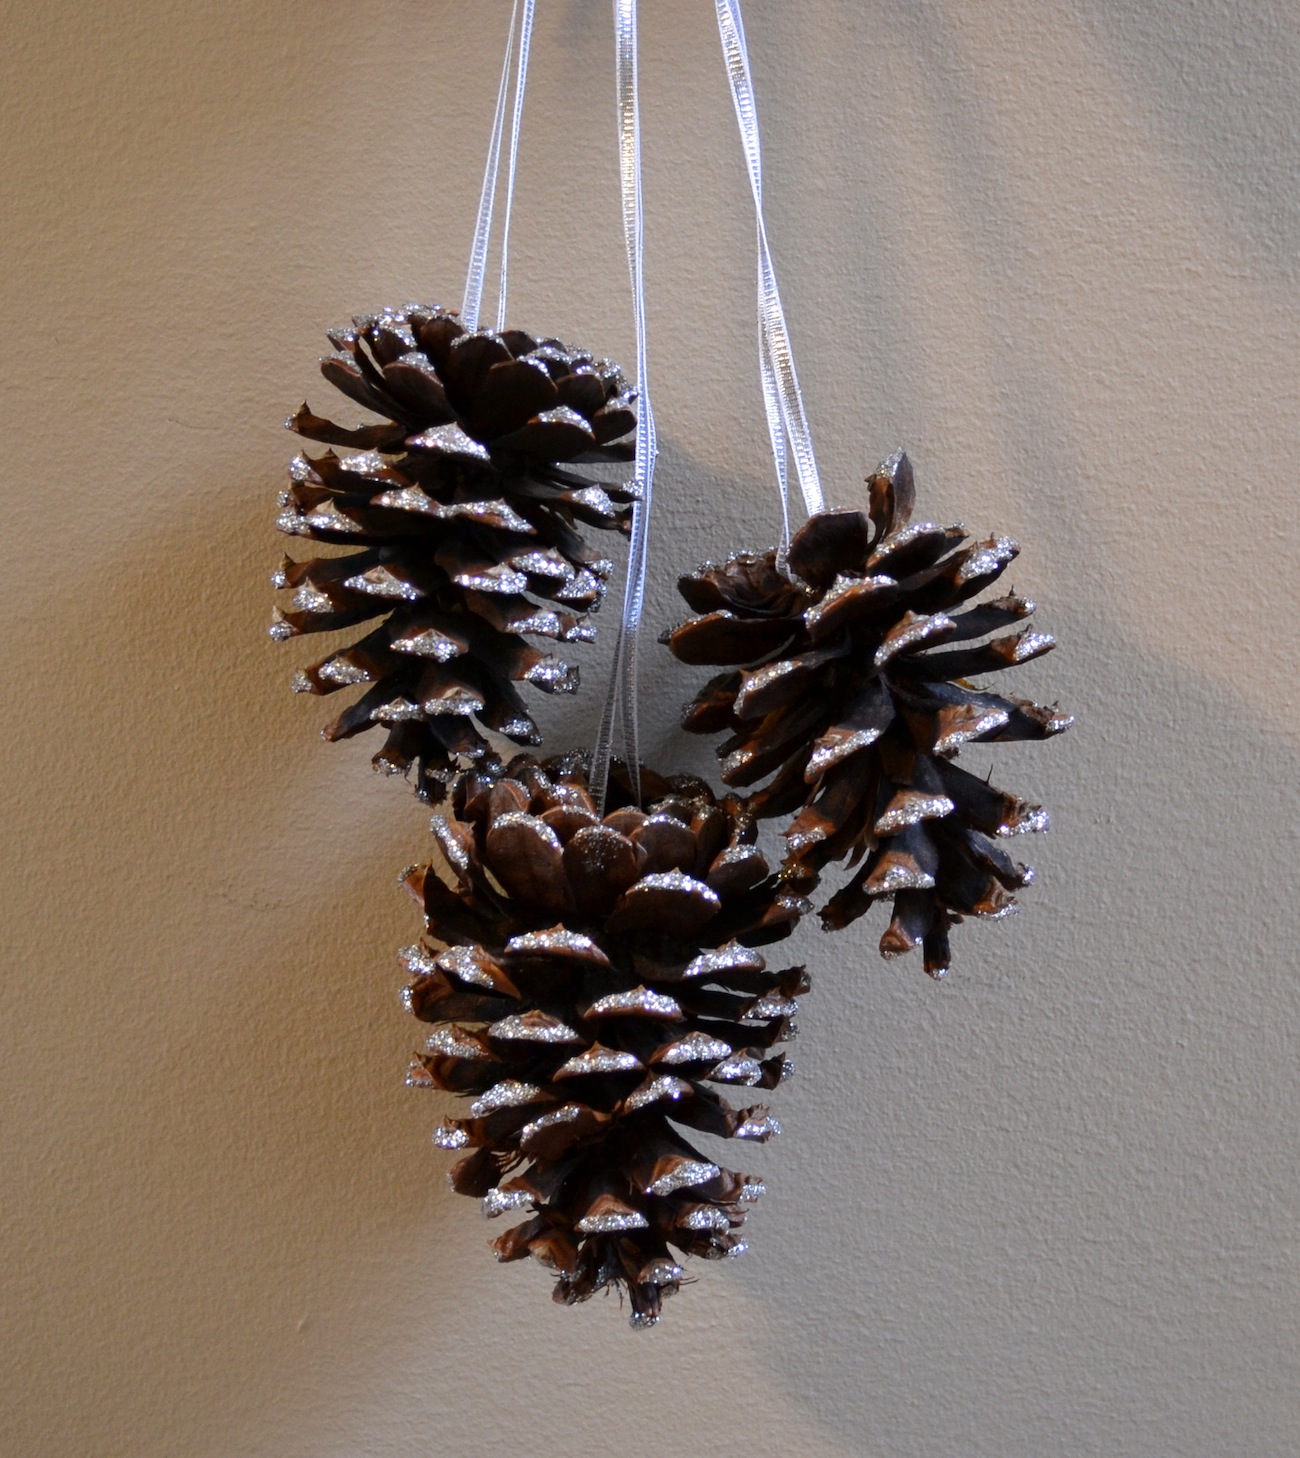
Stampin’ Up’s Artisan Design Team is bringing our last projects from our December box.  If you have come over from amazing Jeanna, welcome to the next stop.  If you are starting here, just continue around using the next buttons until you get back to me.

AWW Dec - Gold Thank You Flat

First and foremost, I want to take the opportunity to wish you a very merry Christmas!  I am incredibly thankful for all of you who read this blog and let me be a part of your crafting lives.  I consider it a privilege to be able to create and share with you!  Thank you!

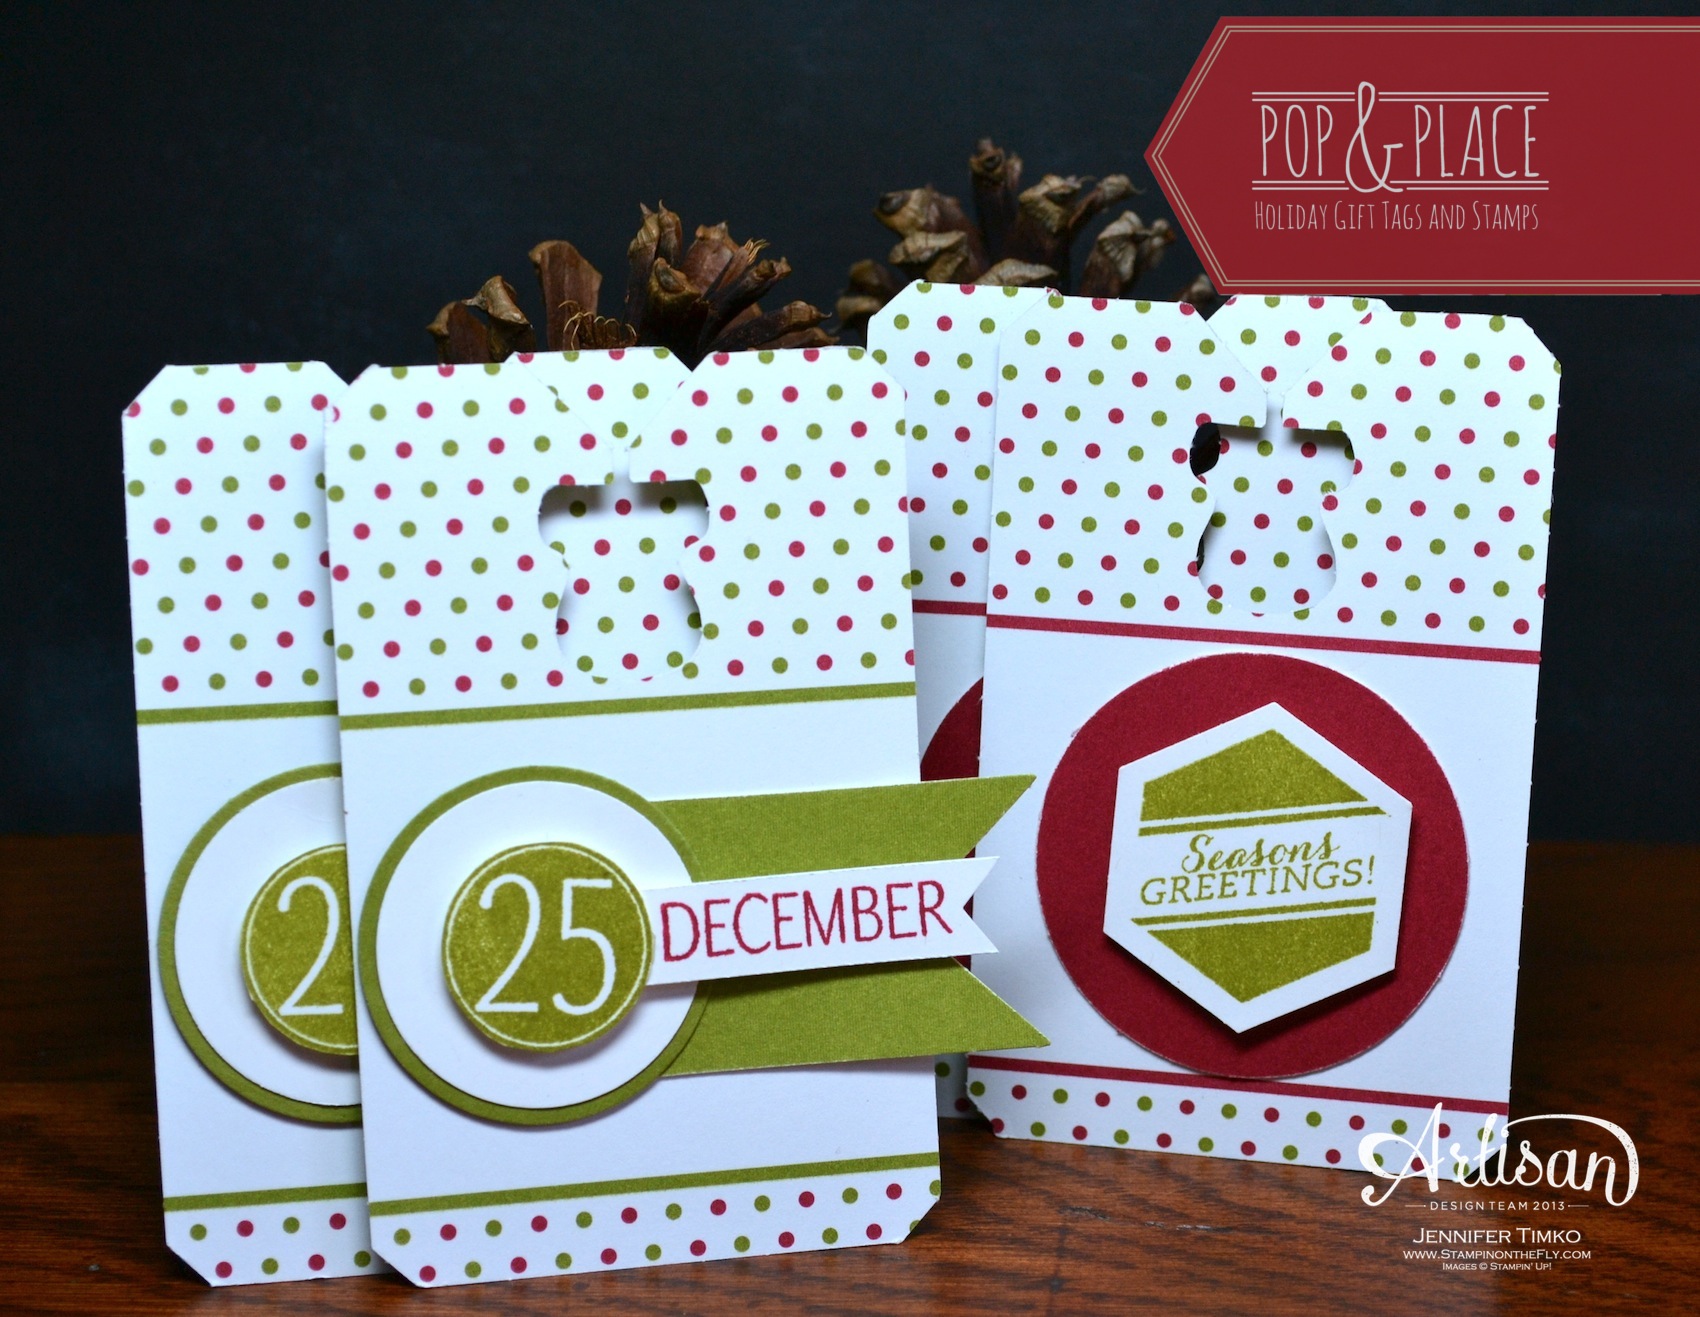
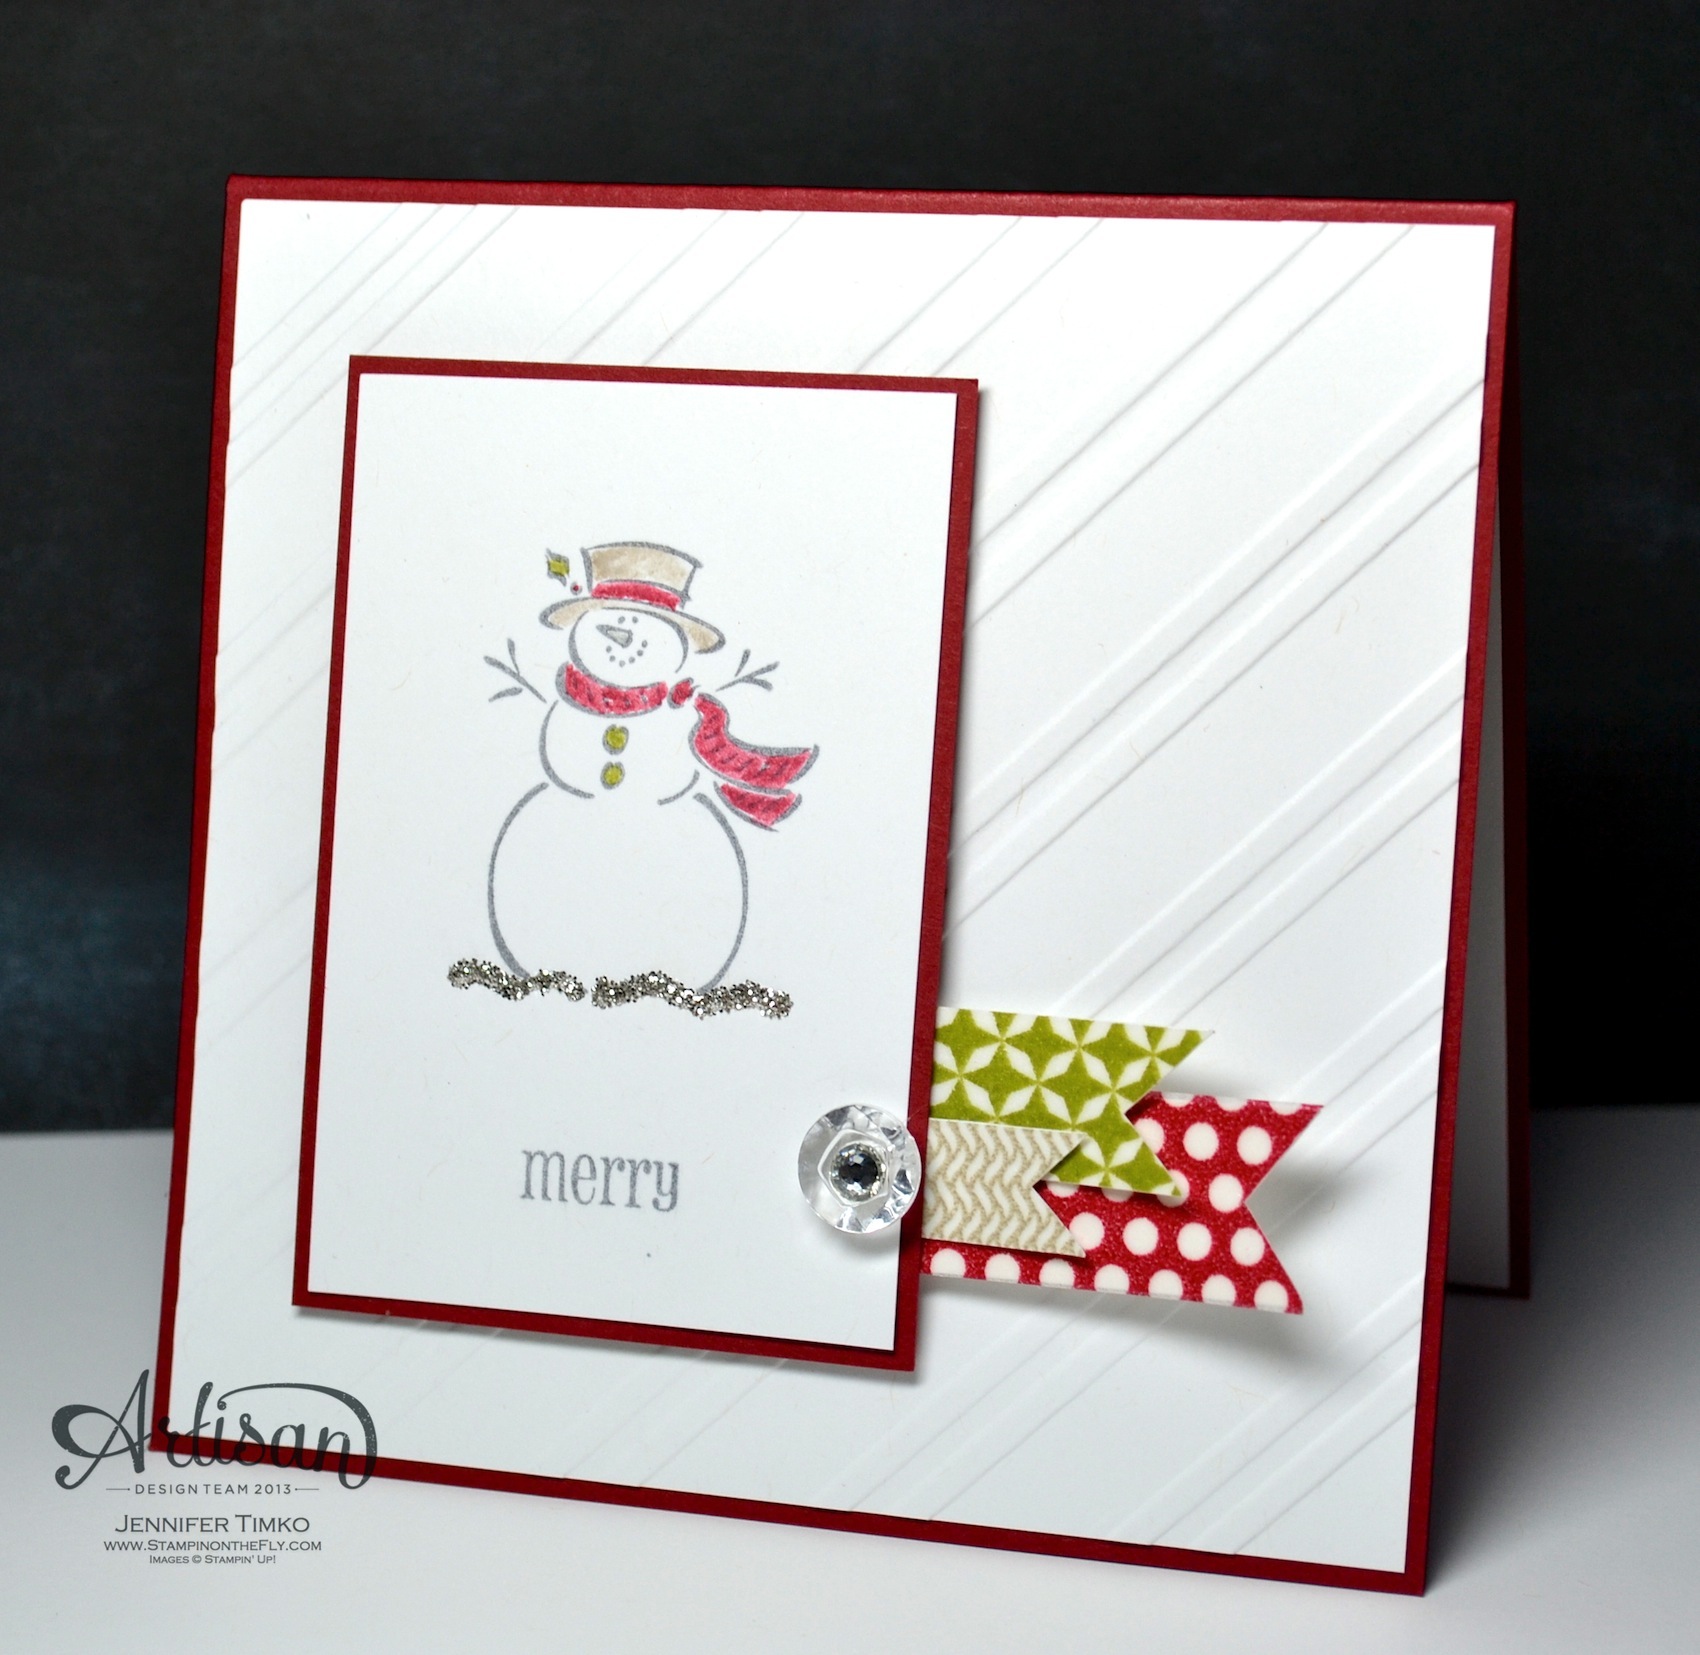
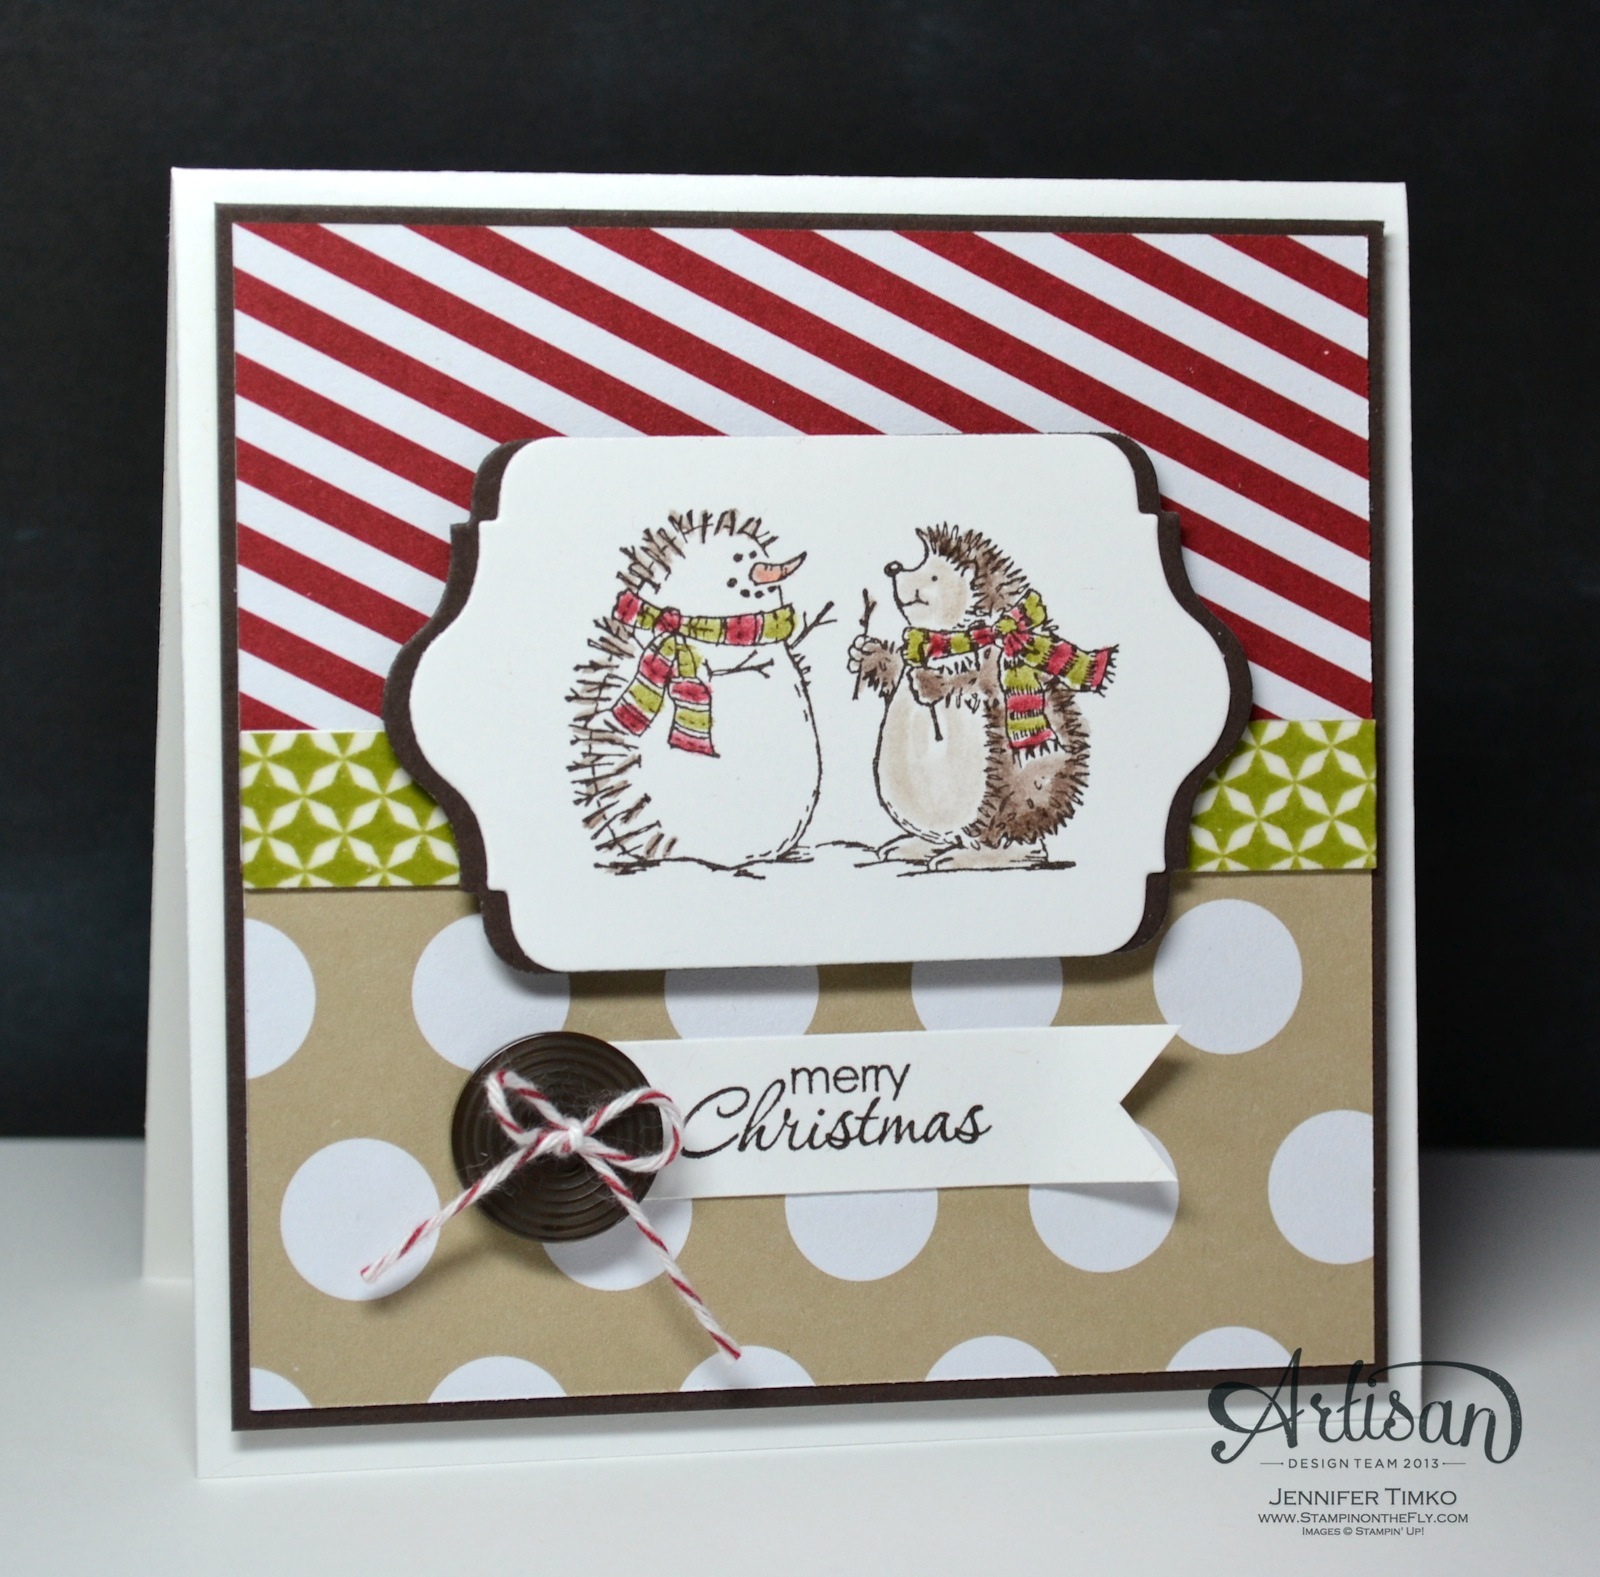
It is with that in mind that I created this fun set of cards.  I know it isn’t a secret that I think Washi Tape is awesome.  And the new Watercolor Wonder Washi Tape (available in the Occasions Spring Catalog) is really awesome.  Oh, the gold.  When the hilarious Bonnie Thurber told us at last summer’s SU Convention that gold was the new silver, I was skeptical.  I really should have believed her (because Bonnie is always right)!  I get it now!  *smile* These cards are made to be be easily created after the hustle and bustle of the holiday season.  I took Whisper White card stock and cut it to 4-7/8″ x 6-1/4″, then scored it at 3-3/8″.  This makes the top flap shorter than the bottom and allows the gold polka dot tape to show.  I stamped the sentiment from Another Thank You in Gold Encore Ink and embossed it with Gold Embossing Powder, then all I had to do was add the washi tape to the edges of the card.  I put one more strip of washi on the bottom of the Crumb Cake Note Card Envelopes and repeated to make more.

AWW Dec - Gold Thank You

These have a lovely wow factor because of the gold but you can make a whole stack in no time.  Then they are ready to send out to family and friends to let them know how much you appreciated their gifts.

This is our last Artisan hop of 2013.  We are taking New Year’s off so that we can spend time with our families.  Maybe, just maybe, we’ll all fit in a little crafting time too.  I hope that your new year celebrations are safe and happy!

Okay, off to go visit the awesome Mercedes Weber.  I can’t wait for you to see what she has created!  Make sure you hop around the whole loop to take a look at beautiful creations by the whole team…you’ll be happy you did!

12-Dec-Blog-Hop-NEXT-Button

Click HERE to purchase any of these wonderful Stampin’ Up products.

Paper:  Whisper White; Ink:  Gold Encore; Accessories:  Watercolor Wonder Washi Tape, Crumb Cake Note Card Envelopes, Heat Tool, Gold Stampin’ Emboss Powder

Blog signature 2013-001

Artisan Wednesday Wow – Boxes and Bows

Artisan Wednesday Wow – Boxes and Bows published on 4 Comments on Artisan Wednesday Wow – Boxes and Bows

12-Dec-Blog-Hop-Button

Stampin’ Up’s Artisan Design Team is bringing you projects from our December box again this week!  These are the projects that Stampin’ Up showed on their Facebook Page last Friday.  We are in full holiday mode and having so much fun!  If you have come over from amazing Jeanna, welcome to the next stop.  I know you loved that box and her husband is talented too, isn’t he?!  If you are starting here, just continue around using the next buttons until you get back to me.

Dec FB- Jennifer - Boxes and Bows

I know I’m not telling you anything you don’t know but it is crunch time!  Yep..it is time to finish up the last details and start enjoying the holidays.  So I’m bringing you a quick idea that is perfect for those last minute packaging problems.  Stampin’ Up’s boxes (this is the Kraft Gift Box) and the Gift Bow Die will come to the rescue.  I know I don’t have time left for anything fancy but that doesn’t mean I don’t want it to LOOK fancy.  I love that the bow can be make in nothing flat with leftover paper from your cards.  Oh, and a little extra piece to make the tag match (using the Stamp a Tag Kit)…you look like a genius!  The Baker’s Twine is something I use year round and it is a great finish to this project.

Okay, off to go visit the awesome Mercedes Weber.  She has a beautiful card that is a perfect welcome to the new year!  Make sure you hop around the whole loop to take a look at beautiful creations by the whole team…you’ll be happy you did!

12-Dec-Blog-Hop-NEXT-Button

Click HERE to purchase any of these wonderful Stampin’ Up products.

Paper:  Season of Style DSP, Whisper White; Ink:  Cherry Cobbler; Accessories:  Big Shot, Gift Bows Die, Kraft Gift Boxes, Regals Buttons, Cherry Cobbler Baker’s Twine, Stamp a Tag Kit, Sticky Strip

Blog signature 2013-001

Artisan Wednesday Wow – Snowflakes Galore

Artisan Wednesday Wow – Snowflakes Galore published on 3 Comments on Artisan Wednesday Wow – Snowflakes Galore

12-Dec-Blog-Hop-Button

Stampin’ Up’s Artisan Design Team is bringing you projects from our December box again this week!  We are in full holiday mode and having so much fun!  If you have come over from amazing Jeanna, welcome to the next stop.  If you are starting here, just continue around using the next buttons until you get back to me.

AWW Dec - Gold and Silver Snowflakes

So something funny happened on my way to this post…the set I used to create the project sold out!  Yes, I had created a card with Endless Wishes and it went like hot cakes.  I can see why since it is awesome!  So back to the drawing board, but yet not.  I created the exact same card using the still available Snowflake Soiree.  It is another amazing snowflake set and I just love the artwork on these!  I’m still obsessed with the silver and gold combination and they really make the card look rich.  The Gold Stampin’ Emboss Powder is so gorgeous and particularly so on such an intricate stamp!  I put Silver Glimmer Paper behind the snowflake layer for an extra bit of sparkle and the Basic Rhinestones are a great finishing touch.

AWW Dec - Gold and Silver Wishes -

So the original card?  Well, I thought I should share it too since so many of you have purchased the stamp.  I have to admit that these are SOOOO much prettier in person.  I just can’t seem to capture the sparkle and depth that comes from the glitter, rhinestones and embossing.

Okay, off to go visit the awesome Mercedes Weber.  She is so extraordinary and I can’t wait to see what she has made every week!  Make sure you hop around the whole loop to take a look at beautiful creations by the whole team…you’ll be happy you did!

12-Dec-Blog-Hop-NEXT-Button

Click HERE to purchase any of these wonderful Stampin’ Up products.

Stamps:  Snowflake Soiree, Endless Wishes (ret); Paper:  Whisper White, Silver Glimmer; Ink:  Gold and Silver Encore; Accessories:  Heat Tool, Gold Stampin’ Emboss Powder, Clear Stampin’ Emboss Powder, Basic Rhinestones, Dimensionals

Blog signature 2013-001

Artisan Wednesday Wow – Season of Style Gift Bag and Card

Artisan Wednesday Wow – Season of Style Gift Bag and Card published on 8 Comments on Artisan Wednesday Wow – Season of Style Gift Bag and Card

12-Dec-Blog-Hop-Button

Stampin’ Up’s Artisan Design Team is starting to bring you projects from our December box this week!  We are in full holiday mode and having so much fun!  If you have come over from amazing Jeanna, welcome to the next stop.  If you are starting here, just continue around using the next buttons until you get back to me.

AWW Dec - Stylish Bag and Card Set

I’m sure you have seen by now that I really love the Season of Style suite of products! The colors are so fantastic!  Well, I pulled out yet another of the coordinating items this week – the Season of Style This and That Journal.  And I did what I never thought I would.  I tore pages out.  Yep…right out of the journal.  The grid piece on the bag is the page I tore out.

AWW Dec - Stylish Gift Bag

I started by spritzing the page with Cherry Cobbler ink, then stamped on some stars from Simply Stars using Versamark Ink.  I added Heat & Stick Powder and then the amazing Gold Stampin’ Glitter.  Once the base layer was done I simply started adding stuff on.  I used the Cherry Cobbler print from Season of Style DSP to create the star.  The chevron arrow is a sticker from the Season of Style This and That Stickers.  So is the Crumb Cake layer where part of the sentiment is stamped.  The tag comes from the Stamp a Tag Kit and I attached a layer of White Vellum underneath to add a little more dimension. Season of Style Washi Tape combined with the new (Occasions Catalog – available Jan 3rd) Watercolor Wonder Washi Tape hold the layers together.  I added some more Versamark and Heat & Stick Powder to the edge of the little clothespin (from Tag a Bag Accessories) and put on a little more Gold Glitter.  It is all attached to a Tag a Bag Gift Bag.

AWW Dec - Stylish Card

I am using the bag as an envelope for this fun card (it will be sealed on the back with more Washi Tape).  Again, I went a little nuts with the stickers from the This and That Stickers set.  The words are from the coordinating Rotary Stamp.  Again, the lined paper is a page taken from the journal and I love how it works here.  A little arrow clip from Hung Up Cute Clips seemed like the perfect addition.

Now I know this combines a lot of products lines so it might not be for the beginning stamper.  But I wanted to show you how beautifully so many of the Stampin’ Up products work together to create this trendy, eclectic style.  Don’t be afraid to use projects in a way not originally intended.  It is fun and a great way to use up stuff that is sitting on your craft table.

Okay, off to go visit the awesome Mercedes Weber.  Every week she has another project I want to CASE!  She is so fabulous!  Make sure hop around the whole loop to take a look at beautiful creations by the whole team…you’ll be happy you did!

12-Dec-Blog-Hop-NEXT-Button

Click HERE to purchase any of these wonderful Stampin’ Up products.

Stamps:  Simply Stars, Season of Style Rotary Stamp, Endless Wishes (ret); Paper:  Season of Style DSP, Crumb Cake; Ink:  Old Olive, Early Espresso, Versamark; Accessories:  Season of Style This and That Journal, Stickers and Washi Tape; Heat and Stick Powder, Heat Tool, Gold Stampin’ Glitter, Watercolor Wonder Washi Tape, Hung Up Cute Clips, Tag a Bag Gift Bags and Accessory Kit

Blog signature 2013-001

Artisan Wednesday Wow – Pop & Place Tags

Artisan Wednesday Wow – Pop & Place Tags published on 2 Comments on Artisan Wednesday Wow – Pop & Place Tags

Pop-&-Place-Etc

Stampin’ Up’s Artisan Design Team is bringing you another Pop & Place hop this week. We are showing you projects made with the new Pop & Place Holiday Gift Tags and Stamps.  If you have come over from amazing Jeanna, welcome to the next stop.  If you are starting here, just continue around using the next buttons until you get back to me.

AWW Nov - Pop&Place Tags

I really wanted to show you what could be made using what comes in the kit.  These tags match the Chalk Talk tag and coordinate with the Hexagon and Circle Punches.  This makes a cute set of little tags for giving or just to have on hand.

AWW Nov - Pop&Place Bag

To package them up I used one of the Tag a Bag Gift Bags and created an additional tag using elements from the kit.  Now it is all ready for a little teacher or neighbor treat!

Okay, off to go visit the awesome Mercedes Weber.  You are sure to love what she has for you this week!  Make sure hop around the whole loop to take a look at fabulous creations of the whole team…you’ll be happy you did!

Logo-Pop-&-Place-next

Stamp:  Christmas Tagables Photopolymer Stamp; Paper:  Cherry Cobbler, Old Olive, Whisper White; Ink:  Cherry Cobbler, Old Olive; Accessories:  Pop & Place Tags, Vintage Faceted Buttons, Rhinestones, Cherry Cobbler Baker’s Twine, Dimensionals, Sanding Block

Click HERE to purchase any of these fun Stampin’ Up products.

Blog signature 2013-001

Artisan Wednesday Wow – Frosted Tree Tag

Artisan Wednesday Wow – Frosted Tree Tag published on 5 Comments on Artisan Wednesday Wow – Frosted Tree Tag

11-Nov-Blog-Hop-Button

Stampin’ Up’s Artisan Design Team is bringing you projects from our November box this week!  You will see that the SU season is turning a bit more towards the holidays.  The shimmer and shine continues this week! If you have come over from amazing Jeanna, welcome to the next stop.  If you are starting here, just continue around using the next buttons until you get back to me.

AWW Nov - Frosted Tree Tag


I have a fun little tag to show you today.  The perfect finish for a special present.  I created this tree using the Perfect Pennants Die (for the triangle).  I used the beautiful Winter Frost DSP and combined it with Cherry Cobbler and Basic Gray.  The base of the tree is a Frosted Finishes Embellishment…wow are these amazing!  I added an oval with the Ovals Framelits and rounded the top of the tag with an oval too.  My all time most used sentiment set ever, Teeny Tiny Wishes, provides the perfect little Merry Christmas and I finished the top with Cherry Cobbler Seam Binding and Silver 1/8″ Ribbon.  I love how this looks against silver wrapping paper!

Okay, off to go visit the awesome Mercedes Weber.  Every week she has another project I want to CASE!  She is so fabulous!  Make sure hop around the whole loop to take a look at beautiful creations by the whole team…you’ll be happy you did!

11-Nov-Blog-Hop-NEXT-Button


Click HERE to purchase any of these wonderful Stampin’ Up products.

Blog signature 2013-001

Artisan Wednesday Wow – Facebook Friday Edition

Artisan Wednesday Wow – Facebook Friday Edition published on 11 Comments on Artisan Wednesday Wow – Facebook Friday Edition

11-Nov-Blog-Hop-Button

Stampin’ Up’s Artisan Design Team is bringing you projects from our November box today in a special extra Friday post!  Once a month, Stampin’ Up features the Artisan Team projects on their Facebook Page and today was the day.  The shimmer and shine continues this week!  If you have come over from amazing Jeanna, welcome to the next stop.  I bet you were blown away by her tag project…I was!  If you are starting here, just continue around using the next buttons until you get back to me.

Nov FB - Glittered Pinecone Swag

I have been thinking about a project like this for a while.  When I opened the November box from Stampin’ Up, I knew I had to finally go for it!  So off to the craft store for some faux greenery I went.  I found some that I cut apart and then hot glued back together to create the base of the swag.  Next came the bow.  Now, I have questions periodically about tying bows and I struggle sometimes to answer.  I definitely have a technique for some of the smaller ones I make, but these larger ones usually are the product of playing around until it looks right.  With this one using Cherry Cobbler 1″ Stitched Edge Grosgrain Ribbon, I started by creating the first loop and then continued making “S-loops” until it looked properly full.  While I suspect that floral wire would work well to cinch it in the middle, I just used a little Linen Thread to do the job.  Then I tied the bow onto the swag.

Nov FB -Swag Bow


Next up the pinecones.  I cut varying lengths of the Silver 1/8″ Ribbon.  At the middle point, I hot glued them to the top of three pinecones.  Next came the Silver Stampin’ Glitter.  I have to say that this is the part I love the best and just could not get a decent photo to show you.  Using Multipurpose Glue (and some patience), I placed glue on the edges of the pinecones and then sprinkled on the glitter.  I let it dry in between so that I could get all the sides.  Disclaimer:  This is messy.  Really messy.  It will make you all glittery!  *smile*  Frankly, that glitter is so sparkly that it gives off funny reflections to the camera.  While not great for photography, it is really great for you.  It is gorgeous! knotted the ribbon at the top and looped them together using the remainder of the Linen Thread used to tie on the bow.  Finally I created a loop out of the Cherry ribbon and hot glued it to the back so this could hang on a wreath hanger or hook.

Nov FB - Glittered Pinecones

This is a picture of the pinecones inside my house with different lighting to show you a little more of the glitter.

Okay, off to go visit the awesome Mercedes Weber.  I have the advantage of having seen her work for this week.  I’m in love with those cards!  She is so fabulous!  Make sure hop around the whole loop to take a look at beautiful creations by the whole team…you’ll be happy you did!

11-Nov-Blog-Hop-NEXT-Button

Accessories:  Cherry Cobbler 1″ Stitched Edge Grosgrain Ribbon, Frosted Finishes Embellishments, Silver 1/8″ Ribbon, Silver Stampin’ Glitter, Multipurpose Liquid Glue, Hot glue, Pinecones, Faux greenery

Click HERE to purchase any of these wonderful Stampin’ Up products.

Blog signature 2013-001

Artisan Wednesday Wow – Glimmer Snowflake Tags

Artisan Wednesday Wow – Glimmer Snowflake Tags published on 11 Comments on Artisan Wednesday Wow – Glimmer Snowflake Tags

11-Nov-Blog-Hop-Button

Stampin’ Up’s Artisan Design Team is bringing you projects from our November box this week!  You will see that the SU season is turning a bit more towards the holidays.  The shimmer and shine continues this week! If you have come over from amazing Jeanna, welcome to the next stop.  If you are starting here, just continue around using the next buttons until you get back to me.

AWW Nov - Glimmer Snowflake Tag

My silver and gold obsession continues this week with some fun tags.  Apparently my no glitter stance has been firmly crushed and I am adding it to everything this year!  Stampin’ Up’s Glimmer Paper makes it easy and WAY less messy.  I started by cutting the base of the tag out of the Silver Glimmer Paper with a Chalk Talk Framelit.  Then, using my new Festive Flurry Framelits, I cut a snowflake out of the Champagne Glimmer Paper.  Using White Vellum card stock, I created a banner and stamped on the sentiment from More Merry Messages (have I mentioned this is a must have set?!) in Basic Gray ink.  Now the only part that was hard about the whole project was figuring out the best way to attach the vellum banner.  So, some well placed Glue Dots solved the problem.

AWW Nov - Snowflake how-to

I placed the Glue Dots towards the edges and mostly you really don’t notice them but I thought it looked cleaner to conceal them by adding on some Basic Rhinestones.  Problem solved!  The snowflake is attached using a Dimensional.

AWW Nov - Glimmer Tags

You can see how the Rhinestones add just another layer of sparkle.  I topped them off with Silver 1/8″ Ribbon and they are so pretty.  Because the back of the Glimmer Paper is white, I added a to/from there making these not only pretty but functional.

Okay, off to go visit the awesome Mercedes Weber.  Every week she has another project I want to CASE!  She is so fabulous!  Make sure hop around the whole loop to take a look at beautiful creations by the whole team…you’ll be happy you did!

11-Nov-Blog-Hop-NEXT-Button

Stamp:  More Merry Messages; Paper:  Silver and Champagne Glimmer Paper, White Velluml; Ink:  Basic Gray; Accessories:  Chalk Talk Framelits, Festive Flurry Framelits, Big Shot, Silve 1/8″ Ribbon, Glue Dots, Dimensionals

Don’t forget that you save 15% if you bundle the Festive Flurry Stamp and Framelits!

Click HERE to purchase any of these wonderful Stampin’ Up products.

Blog signature 2013-001

Artisan Wednesday Wow – Silver and Gold Flurry

Artisan Wednesday Wow – Silver and Gold Flurry published on 14 Comments on Artisan Wednesday Wow – Silver and Gold Flurry

11-Nov-Blog-Hop-Button

Stampin’ Up’s Artisan Design Team is bringing you projects from our November box this week!  You will see that the SU season is turning a bit more towards the holidays.  Sparkle, snowflakes and so much more! If you have come over from amazing Jeanna, welcome to the next stop.  If you are starting here, just continue around using the next buttons until you get back to me.

AWW Nov - Silver and GoldI can’t tell you how excited I was to get the Festive Flurry Bundle in this latest package!  Wow, oh wow, are these pretty!  And the framelits make the snowflakes so easy to use!  I thought I would jump on the trend of mixing metallic colors and I am so glad I did.  I love this card (local stampers, we will be making this one in a class soon).  I inked up the snow flakes with the Metallic Encore Pads (both Gold and Silver) and stamped them onto White Vellum Card Stock.  Then I embossed them with a Heat Tool and Clear Stampin’ Emboss Powder.  The Festive Flurry Framelits cut them out perfectly and all I had to do was layer them with Dimensionals in between.  The snowflakes are topped off with one of the Frosted Finishes Embellishments (they are SOOO pretty!!).  Using a sentiment from More Merry Messages (this really is a seasonal must-have), I stamped with the Gold Encore Ink and embossed with clear powder again.  A frame was created for the Crumb Cake stamped layer using the Gold Foil Sheets.  After attaching the snowflake, I placed some Basic Rhinestones randomly and put the whole thing up one some more Dimensionals.  This is definitely one of those card that is even prettier in person.  The subtle shine of the metallic inks and the sparkle of the embellishment/rhinestones make this a wow!

Okay, off to go visit the awesome Mercedes Weber.  You are sure to love what she has for you this week!  Make sure hop around the whole loop to take a look at fabulous creations of the whole team…you’ll be happy you did!

11-Nov-Blog-Hop-NEXT-Button

Stamp:  Festive Flurry, More Merry Messages; Paper:  Crumb Cake, White Vellum, Gold Foil; Ink:  Gold and Silver Encore Metallic; Accessories:  Festive Flurry Framelits, Big Shot, Clear Stampin’ Emboss Powder, Heat Tool, Frosted Finishes Embellishments, Basic Rhinestones, Dimensionals, Glue Dots

Don’t forget that you save 15% if you bundle the Festive Flurry Stamp and Framelits!

Click HERE to purchase any of these wonderful Stampin’ Up products.

Blog signature 2013-001

Best of Snow

Best of Snow published on 5 Comments on Best of Snow

As a member of the Artisan Design Team for Stampin’ Up, I get some amazing privileges! Today I get to show you one.  I was lucky enough to receive the new Best of Snow stamp set prior to its release and create some projects for the SU Blog.

Please check out the whole post here:  The Best of Snow Stamp Set.

Of course, I could hardly wait to share the pictures of the set and the cards!  So here they are:

SU Nov Blog - 1

SU Nov Blog - 2

SU Nov Blog - 3All of the specifics are over at the Stampin’ Up Blog but I’m glad I get to share here too!

Here is a picture of the whole set:


Best of Snow

Best of Snow – Clear Mount Stamp Set   Item #134387

Price:  $14.95

Thanks for letting share my fun with you!  I will be back next week with the latest from the whole Artisan Design Team and our new November box!  Until then, I appreciate you stopping by.  Have a great weekend!

Blog signature 2013-001

Primary Sidebar