 As we approach the end of October, I wanted to show you one more card for the Creative Crew at Splitcoaststampers. This one is for the All Things That Glitter challenge, CCREW1011. I have been making this all week with my Christmas 101 Class and they have LOVED it! The point of Christmas 101 is cards that can be easily duplicated in bulk. For me, they need to have something special that LOOKS hard but really isn’t.
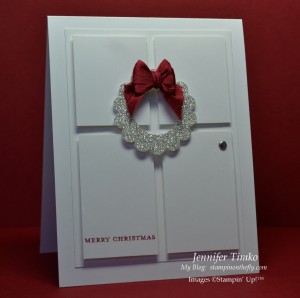
 The door idea is nothing new but when I saw this door from LeAnne Pugliese I knew I needed to make my own version! I kept the white on white because I thought it was so striking. But I decided to add a wreath made out of the amazing Silver Glimmer Paper. The picture doesn’t even come close to capturing the real sparkle! I started with a 1″ Circle Punch and then punched the 1 3/4″ Scallop Circle around it. It really is much easier this way (thanks, LeAnne)! The little Cherry Cobbler bow uses the fork bow method just like I showed you in this tutorial. The only difference is that I left the tails on. A Silver Brad is the door knob and I added a sentiment from Teeny Tiny Wishes to complete the visual triangle. The large rectangle is attached directly to the base and the door panels are popped up on Dimensionals. The wreath, too, is up on Dimensionals (cut in half or use the little side pieces) and the bow is attached with Mini Glue Dots.
The hardest part about the card was figuring out the dimensions of the door panels so I will share those with you:
-
The base rectangle is 3 5/8″ x 4 7/8″.
-
The door panels start with a rectangle that is 3 1/8″ x 4 3/8″. Cut the rectangle in half long ways at 1 9/16″. Then cut each of those rectangles at 2 1/2″. You will be left with two panels that are 1 9/16″ x 2 1/2″ and two that are 1 9/16″ x 1 7/8″.
Yes, yes, I know they are a little odd. I tried to make them a bit easier (for class purposes) but they were either too big visually or too small for the sentiment. When I did them in bulk, it went really fast.
I hope you have fun with this one! Don’t forget to come take a look at my gallery at Splitcoaststampers on Tuesday for the big reveal of the new Creative Crew Challenges for November. You’ll have a whole month to join in!
I’ll be back tomorrow with another card from my Christmas 101 Class. Until then, have a great day!
Stamp: Teeny Tiny Wishes; Paper: Whisper White, Silver Glimmer Paper; Ink: Cherry Cobbler; Accessories: Silver Brads, Cherry Cobbler Seam Binding, Dimensionals, Mini Glue Dots
All products are Stampin’ Up!


10 Comments
Oh my goodness! I LOVE this card! It’s so striking!
Wow! That is gorgeous!! It is so clean and elegant! Love it!
So clean and beautiful! I love these so much, I don’t know why I haven’t made one yet!
Gonna have to make me one of these! Wow. It’s gorgeous! Thanks for sharing the measurements. 🙂
Love it! Very nice!
What a lovely card! It feels so welcoming!
I love this card–so elegant!
Soooo pretty and elegant. Love it.
What a yummy wreath! You all are using that glimmer paper to max effect 🙂
So simple, yet so gorgeous! Love it!