Welcome to your next stop on the Stampin’ Addicts Birthday Blog Hop!! I am in the middle of the hop so if you want to start at the beginning, simply click on the banner above for the list in order. I hope you are enjoying this birthday celebration featuring techniques! If you have been following the hop, you just came over from Debra Burgin’s Heartfelt Inkspirations. Her polished stone technique is really fantastic (okay, everything she does is really fantastic)!! Did you see that clock…oh my!! My job today is to show you clear block stamping. I was a little slow to get on board with the clear mount stamps but now I LOVE them! I love the storage, I love the price and I love the clear blocks. The best part…these clear blocks can be used as a stamping tool along with their “real” job of holding stamps. You can click on any of my pictures to see them larger.
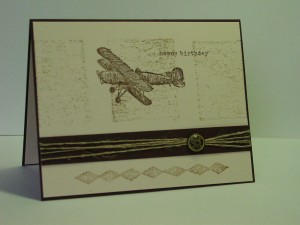
 My first card shows how to use clear block stamps to add dimension. I inked up my Block C with a Soft Suede Ink Pad and stamped it onto some Naturals Ivory paper. I followed up with the airplane from Plane & Simple (Occasions Mini) over the center block in Early Espresso. A little Linen Thread cinched with an Antique Brad added just the right touch. I love this border stamp and the words from the stamp set are perfect to finish it off.
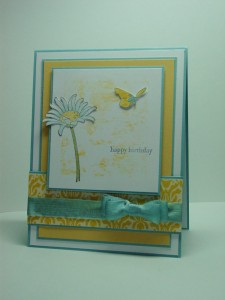
 For my next card I wanted the clear block to add a little color as a background. It looks alot like reverse masking without having to cut a mask and sponge. I inked up my Block D with Daffodil Delight and stamped it off before stamping it on Whisper White. I stamped the flower from Every Moment over the yellow and then again onto another piece of Whisper White. The top of the second flower was colored, then cut out and the stem on the clear block stamped piece was colored with Pear Pizzazz (direct marker to paper). By cutting out the flower and placing it right on top clear block stamped stem, I have a faux outside the box look. The sentiment for this card comes from Teeny Tiny Wishes…a set that covers almost any occasion.
Hint: Put your card stock on a surface with a little give to it in order to get your best image (I used a pad of notebook paper).
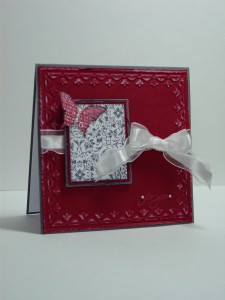
 For my last project today, I used the clear block in a totally different way. One of the hardest things as a new stamper is having enough tools to create different looks. Vintage and distressing are very popular now and your clear block can help you out. You see all the white on the Framed Tulips border, I used a clear block to put it there!! No brayer required!! I will be back on Monday to show you more details on how to do this. I love the Clearly For You set combined with the Sale-a-bration Set Bliss (mine is actually the French version, Joie). My Organza Ribbon was curled a bit using a heat tool after the bow was tied (be careful…it doesn’t take long). The very talented Lyssa over at Song of My Heart Stampers shows all the details on the ribbon.
Thanks for stopping by today! On your next stop, Rhonda Griffin over at The Stampin’ Bunny is going to show you the Baby Wipe Ink Pad technique. She even uses a clear block with her baby wipe on one of her projects! Have fun on the hop and don’t forget to come back next week for more details and recipes.


30 Comments
The airplane card is just great!
Your cards are wonderful and my favorite is the airplane card as well! I love these blog hops! Thanks.
So pretty! I really like the “out of the box” idea on the second card. Cool bow too!
Love all your projects, but that second card is my favorite. You’ve got such great style!
Beautiful cards! Love how you used the technique and also the extra touches like the thread treatment on the first card. TFS
Wow! So much inspiration and learnin’ in this post. I can’t wait to visit the other blogs and see what they’ve done!
All of these cards are fabulous! Such a variety of ways to use the clear blocks too! I can’t even pick a favorite 🙂
Using the clear block to ink the embossing is one of the most clever ideas I have ever heard! Thank you so much for that! Great projects all the way around!
Now why am I not surprized that you snagged the airplane set?!? Great cards – cannot choose a favorite, I love them all!! Thanks for sharing!
Such cool ideas. What great ways to help upsell the blocks! I love card #3!
These are great examples of block stamping — I especially the idea of using the block to hit the embossing high spots with ink. Brilliant! Love the thread detail on the first card, too.
So pretty! The colors are so uplifting and spring like on the second card.
Fabulous projects Jennifer!! I can’t believe I’ve never tried this technique. It seems so easy!! Love all your projects, but that first card keeps catching my eye. Perfect masculine card. And those are always the hardest!! Great job!
these are all beautiful cards and I love the airplane card, but the butterfly has to be my favorite card
LOL, that clear block brayering is too clever, Jen! But my favorite is the airplane card. . . . something about the string span says ‘wing span’ to me. . . .
Very cool ideas!! I love that airplane card how cool is that! Err now I want that set more! lol
Wonderful! That plane one is perfect may have to case it!
I love all your cards! Love the sets and the color schemes–prepare to be cased! Great job!
Love the way you used the block for card #3, but the Plane & Simple card is my fave. Hope you don’t mind me CASEing it!
Love the subtle effects this technique yields. It works so well with the Plane & Simple card you’ve created. Love that sample!
I love all the cards you made, but I have to say that the one with the aeroplane (airplane), is my favourite. I hope we get this set in Australia.
I love the three clear block panels on the first, using the block for a brayer is a great idea, plus, the background for the flower–oh my!
Love all your cards! I really love daisies, so I’m partial to that one. I also appreciate the tip about stamping on something with give. I’ve not had good success with getting a good impression with the clear blocks, so maybe that will help.
Beautiful cards, all of them!! I love all of them, and am very curious about the red one 🙂
Susan
Jen, what a wonderful set of cards. I really like using those clear blocks to add some background to my cards. You did a beautiful job and I’m going to have to cas that airplane card because I love it!
I love all the projects. There are so many uses for the clear blocks.
Great projects! I keep meaning to use this technique – thanks for the inspiration to give it a go
These are all so gorgeous! Love the plane, but the floral daffodil is WOWIE!
Your cards are all so pretty! I love the this background technique. I will have to give this a try.
Thanks for sharing! 🙂
Beautiful! And you and Cindy E make such pretty bows – I couldn’t help but notice. lol.
Thanks for sharing some wonderful ways to use the clear blocks!