Skip to content

Holly Jolly from Honey Bee Stamps

Holly Jolly from Honey Bee Stamps published on No Comments on Holly Jolly from Honey Bee Stamps

I have been working away on Christmas cards and trying some new techniques. I find that watching “lives” with my stamping friends inspires me to try things I would never otherwise do. This card is the result of one I watched with the queen of artsy, inky goodness – Lydia Fiedler.

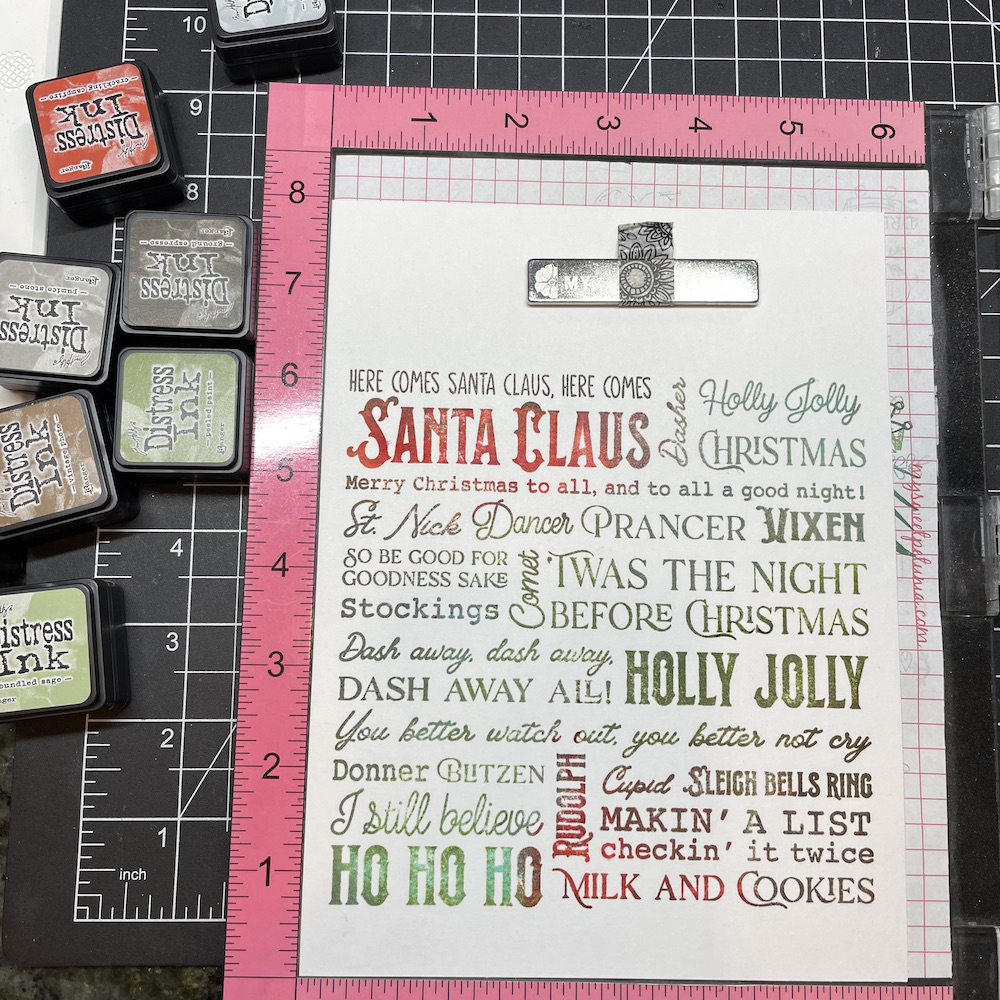
Last week, Lydia was showing how to add color and depth to a background stamp and I was inspired to try it with the Holly Jolly background stamp from Honey Bee Stamps. There is nothing particularly hard about the process, it just takes a bit of time and patience. I started with a piece of Bristol Smooth paper larger than the image and put it in my Misti. The Misti is key to the technique since you stamp the image over and over again. Using my Mini Distress Inks, I started adding colors selectively on the image. I kind of went around and around the image adding and layering the inks. This gives you an idea of the work in progress. After this point I added some Peacock Feathers and Villainous Potion. It is kind of an experiment which is what makes it fun.

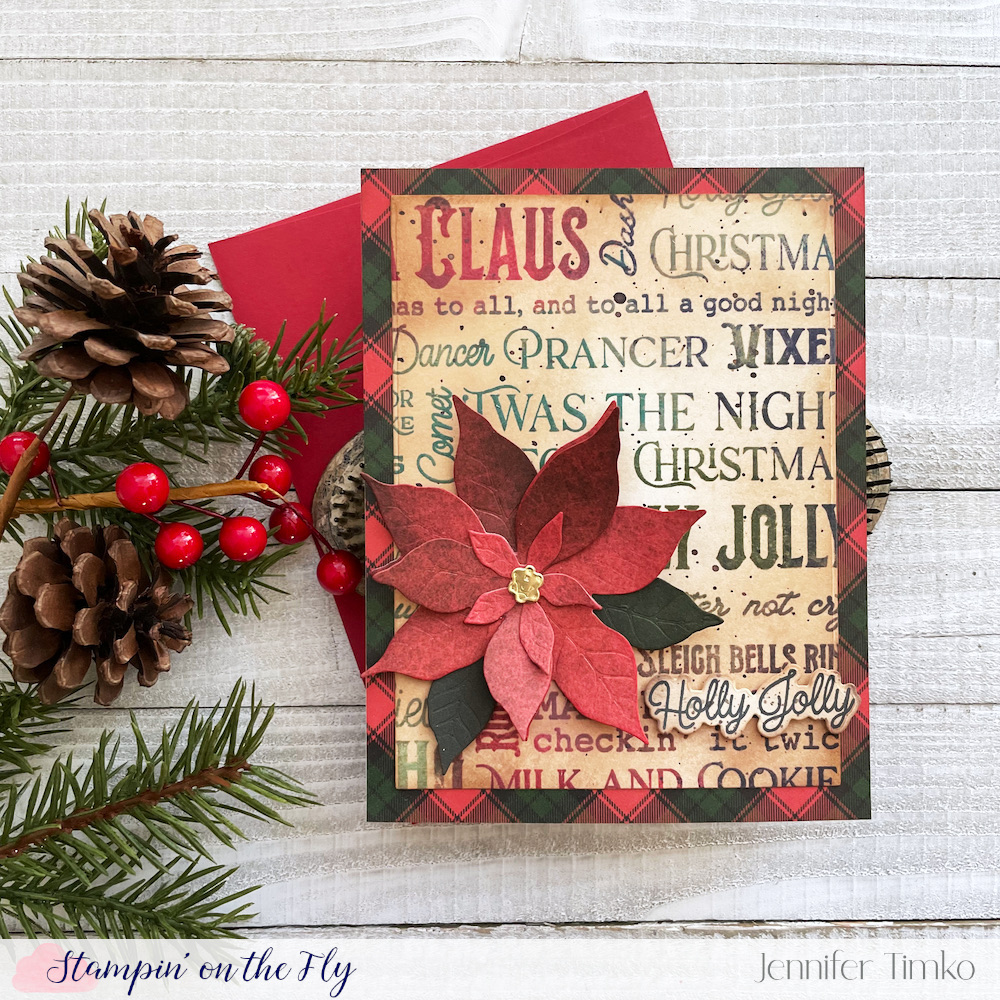
Once I had the panel inked, I decided I wanted it to take on a vintage vibe so I added Distress Oxide Ink in Antique Linen and some Vintage Photo Distress Ink on the edges. Next I splattered on some Early Espresso ink. I chose a section that seemed the most balanced and cut it with a rectangle die. Separately, I inked the big image in black ink and used the coordinating dies to cut all the sentiments out…such a great way to have a bunch of fun font sentiments on hand. I used the script Holly Jolly and matched the distress inking from the main panel.

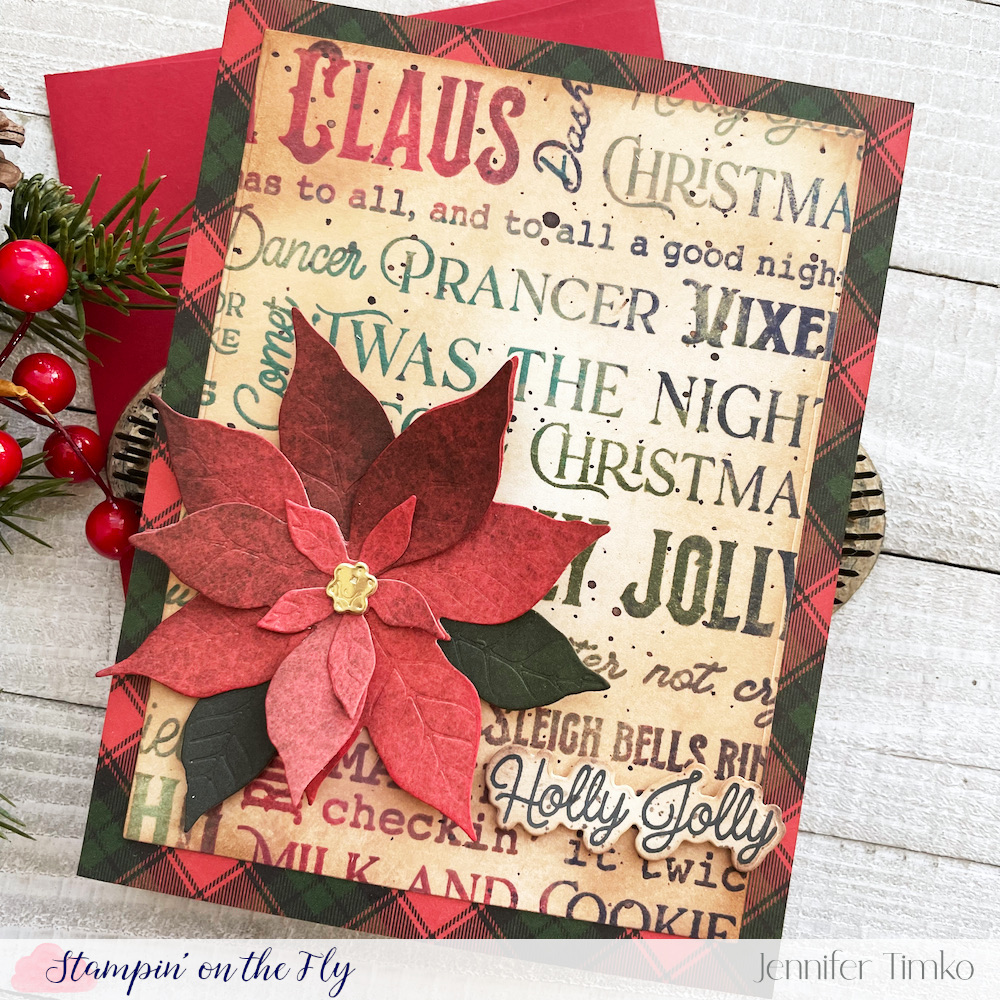
Using the Make It Merry paper pack, I chose a plaid for the base layer and some of the red/green prints for my poinsettia. I little gold center to add some elegance.

This inking technique has made me look at some background stamps differently and I look forward to using this again. If you are every needing some inspiration to try new things, go visit my friend Lydia. She is amazing and truly her tutorials will just make your day happier. Hope you have a wonderful day!

Picket Fence Studios May Release plus a SALE and GIVEAWAY

Picket Fence Studios May Release plus a SALE and GIVEAWAY published on 9 Comments on Picket Fence Studios May Release plus a SALE and GIVEAWAY

Welcome to release day with Picket Fence Studios!!  I’m excited to share for a couple of reasons.  First, this release is really outstanding (again).  But second, and most importantly, this is a big month for Picket Fence Studios.  It is their 1-year anniversary!!  And the whole team gets to celebrate by sharing a gift certificate with lucky winners.  That’s right!  Each and every design team member gets to give away a $100 Shopping Spree and a COUPON CODE.  Details are at the bottom of my post.

In My Prayers by Jen Timko | Peach and Piper Stamp Set by Picket Fence Studios, Layers of Grass Stencil by Picket Fence Studios, Life Changing Blender Brushes, Copic ColoringSo first up on the release is a set called Peach and Piper (with coordinating dies).  I’m going to be REALLY honest with you.  If you want this set, you need to go to my link below and buy it now.  Like right now.  Because it is going to fly off the shelves.  It is so incredibly cute with fantastic sentiments.  I am pretty sure the whole team is making stuff with it because we simply cannot stop ourselves.  I stamped the little hugging bunnies with Momento Tuxedo Black and colored using Copic Markers.  Then I created a little bit of texture inside of the scalloped frame with the new Layers of Grass Stencil.  I love how it has the positive and the negative to easily ink both the grass and the background or sky.  I inked the little frame using Peachy Keen (Lawn Fawn) to coordinate with the paper but also to keep with the stenciled ink look (all the inking is super fast with the Life Changing Blender Brushes!).  I chose a sentiment from Peach and Piper and then added a little bird from Chirp Chirp.
Inlaid Flower Die by Jen Timko | Flower Negative Die by Picket Fence Studios, A Bright Night Stamp Set by Picket Fence Studios, Alcohol Ink TechniquesFor my second card, I thought it would be fun to try and inlaid die technique.  I first colored a piece of Yupo using Wild Plum and Silver Alcohol Inks and then cut it out using the new Flower Negative Die.  It was easier to show you than tell you so I created a short video on the how to.

The direct link is here: Inlaid Die Technique

Now on to the details of the sale and giveaway. First of all, a sale. Yes, a SALE!!! To celebrate the one year anniversary, there is a 20% off sale.  How do you get it?? Click this link:  PICKET FENCE STUDIOS and use code PFS20.

For this giveaway, I’ll be running it on Instagram.  Later today, look for the post in my feed with all the details (I will be posting after I fly this morning).  I am there as jentimko or you can click my link in the sidebar on the right for IG.

Happy sale shopping and I hope to see you over at IG for the giveaways.  Thanks so much for stopping in. I’ll be back tomorrow with another card from this release and the latest from Freshly Made Sketches.  See you then!


Reverse Confetti and Misti Blog Hop

Reverse Confetti and Misti Blog Hop published on 62 Comments on Reverse Confetti and Misti Blog Hop

I cannot even tell you how excited I am to be participating today in a hop with Reverse Confetti and My Sweet Petunia!  You are going to be blown away by all the inspiration as the two design teams combine.

Enjoy Today by Jen Timko | Take Flight Stamp and Dies by Reverse Confetti, Sunburst Tag Layer Confetti Cuts (Reverse Confetti), Copic Coloring, My Sweet Petunia's Original Misti

I fell completely in love with the Take Flight stamp set (big surprise, right?!) and thought it would be such fun to use with the Sunburst Tag Layer.  I knew the sentiment was a great fit in that circle but making sure it stamped there perfectly was up to my Misti!

Enjoy Today - Jen Timko | Take Flight Stamp (Reverse Confetti) with a Misti Original by My Sweet PetuniaHonestly the best part of the Misti is just KNOWING it will be right.  And if it isn’t the first time, it becomes perfect because you can stamp again.  I’m not sure how I ever created without this tool and I know for certain that there is no going back.  It simply lives on my table.

After stamping, I attached the Sunburst tag to the Topped Off Tag base and tied on a bit of baker’s twine.  The kite from the stamp set was the perfect little image to add.  Something about a kite brings thoughts of a happy summer day and that seemed to fit so well with the sentiment.  After attaching the kite to the tag, I just put the whole thing on a pretty polka dotted base.

As if all this crafty goodness wasn’t enough, we will choose two lucky commenters from the hop to win one of two prizes: a $60 shopping spree at www.mysweetpetunia.com and a $60 shopping spree at www.Reverseconfetti.com.  You must leave your comments no later than Sunday, March 25th, at 11:59 PM Central time and winners will be announced on Tuesday March 27th, on the Reverse Confetti and My Sweet Petunia blogs.

So make sure you stop by all the amazing blogs and leave a little love!  Up next is the incredible Kelly Lunceford.  And here is the whole list to make it easy to find everyone.

Amy Tsuruta
Ilina Crouse
Lisa Henke
Jeanne Streiff
Susan Liles
My Sweet Petunia
Tricia Barber
Kia Gibson-Clapper
Deanne Kuntz
Ceal Pritchett
Melissa Phillips
Giovana Smith
Audrey Tokach
Chris Dayton
Kathy Schweinfurth
Stephanie Severin
Laurie Schmidlin
Janine Tinklenberg
Amy Rohl
Dina Kowal
Heather Hoffman
Jana Millen
Reverse Confetti
Jennifer Timko (you are here)
Kelly Lunceford
Joan Bardee
Olga Moss
Judy Rozema
Jeanne Jachna
Susan Wymer
Lydia Fiedler

Stamp: Take Flight (Reverse Confetti); Ink:  Versafine Onyx Black, Momento Tuxedo Black; Paper: Thick Whisper White (SU), Itsy Bitsy Polka Dots Pastels Pack (MFT); Accessories:  Big Shot, Sunburst Tag Layer Confetti Cuts (Reverse Confetti), Topped Off Tag Confetti Cuts (Reverse Confetti), Original MISTI, Yellow Baker’s Twine, Mini Dimensionals (SU)

Signature 2016 - 1

SaveSave

SaveSave

SaveSave

SaveSave

NND and Therm O Web

NND and Therm O Web published on 22 Comments on NND and Therm O Web

This week Newton’s Nook Designs and Therm O Web are partnering for a fabulous inspiration week! All week long both design teams will be sharing ways to add fun foils and more to your cards using Therm O Web products with Newton’s Nook Designs stamps! There are prizes too! Read all the way to the end of this post to find out how you can win!
You're Out of This World by Jen Timko | Cosmic Newton Stamp and Dies by Newton's Nook Designs, Shattered Glass Foil by Therm-o-web, Deco Foil Transfer Gel by Therm-o-webSomething about sparkling foil made me know that I should pull out my Cosmic Newton stamp and Starfield Stencil and I’m so glad I did.  I will say that the Therm O Web Deco Foil is a new to me product and I love how easy it is to use.  The Transfer Gel works just like embossing paste and then you simply foil over it.  For Newton, I stamped in Momento ink first and colored with Copics, then stamped again with Versamark (the Misti is a life-saver here!!) and embossed with silver embossing powder. So easy and no worries about messing up your Copic tips with the embossing.  I created a short video to show you the whole process!

I have a direct link here if you would prefer:  Foiling with Thermoweb and Newton’s Nook Designs

Look to the Newton’s Nook Designs and Therm O Web blogs all this week for tons of inspiration!!

Would you like to win a prize pack including a $25 store credit to Therm O Web AND a $25 store credit to Newton’s Nook Designs?

Here’s how to win: Leave comments on the NND & Design Team blog posts using therm-o-web products all week (March 5-9) to enter. One winner will be randomly chosen from blog posts throughout the week so the more posts you leave comments on the better your chances are of winning! You have until Friday March 9th at midnight CST to comment. The winner will be announced on the NND blog post on Monday, March 12th.

Want another chance to win? Therm O Web will also be giving away a prize pack! Visit the Therm O Web blog each day this week for more inspiration and leave comments there for another chance to win!

Stamp: Cosmic Newton (Newton’s Nook Designs); Ink:  Momento Tuxedo Black, Versamark, Copic Markers; Paper:  Thick Whisper White (SU), Basic Black (SU); Accessories:  Big Shot, Cosmic Newton Dies (Newton’s Nook Designs), Starfield Stencil (Newton’s Nook Designs), Misti, Stitched Shapes Dies (SU), Deco Foil White Foam Adhesive (Therm O Web), Shattered Glass Deco Foil (Therm O Web), Deco Foil Transfer Gel (Therm O Web), Laminator

Signature 2016 - 1


SaveSave


SaveSave

SaveSave

SaveSave

SaveSave

SaveSave

SaveSave

Primary Sidebar