Just a quick note to let you know that I have a project over on the Stampin’ Up Customer Blog today! Want a peek?
Just click on the link above to see the whole project and all the details!

Just a quick note to let you know that I have a project over on the Stampin’ Up Customer Blog today! Want a peek?
Just click on the link above to see the whole project and all the details!
Welcome to a bonus edition of the Artisan weekly hop! Because of the timeline for August, we need to add in an extra day to be able to show you all our projects. Up for today, the Facebook projects shown on the Stampin’ Up Facebook page. As usual, I know that Jeanna has blown you away with her awesomeness! If you are starting here, just hop around using the next buttons at the bottom of our posts.
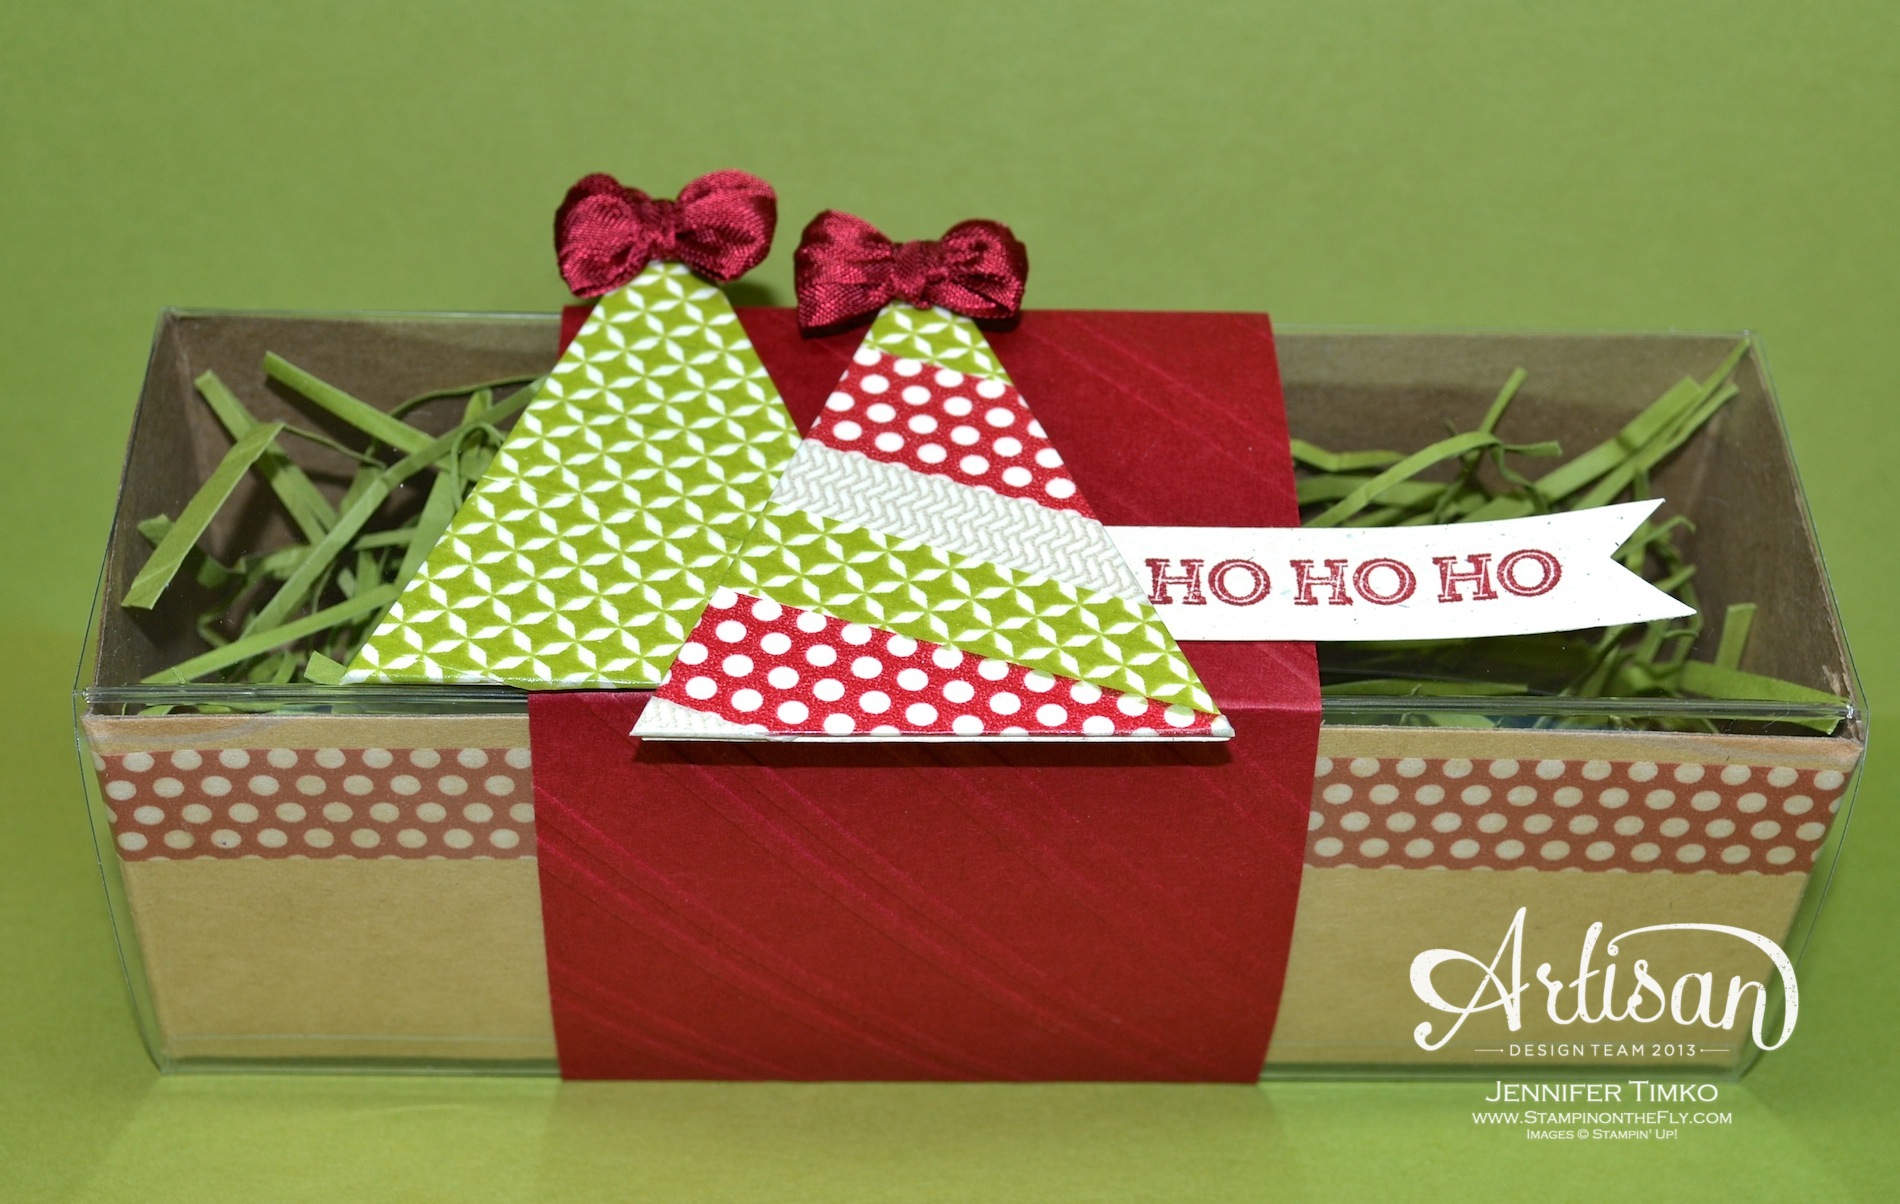
I thought it would be fun to combine these awesome Tag a Bag Gift Boxes with the Season of Style Washi Tape to create an easy and fun holiday packaging idea. I started by cutting out the triangles with the Big Shot using my Perfect Pennants Die. What are they made of? The new Coaster Board!! And yes, it is really fabulous to use! I love that it has a little more “oomph” which makes it perfect for creating these trees. Then all I had to do was add the Washi Tape.
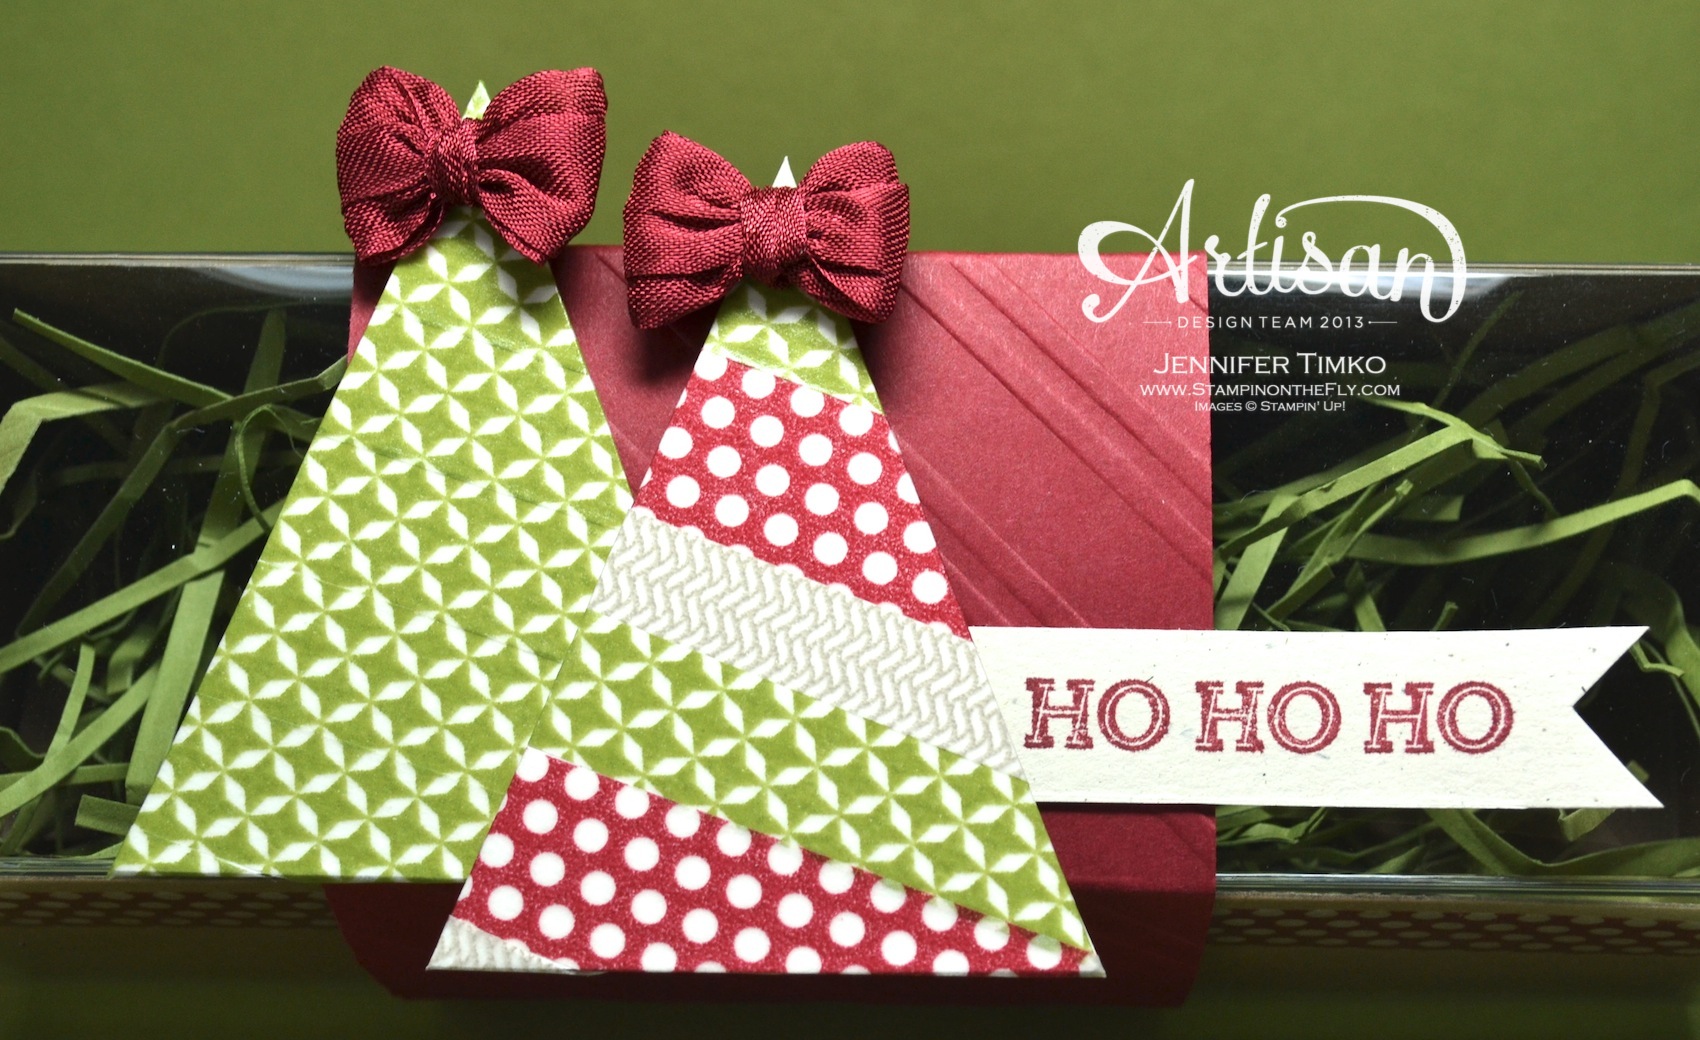
Just look at how the Old Olive pattern on the tape lines up when you use it all by itself. Cool, huh? I had two trees that were the same but it seemed to be missing something so I created another one that use all of the patterns from this set of Washi Tape. That did it for me! I added in another triangle made from Naturals Ivory card stock behind the Washi Tape triangle to tidy up the back. Because I’m me (and I LOVE a bow), I added in little “fork” bows (triple wrap) to the top of the trees. They make me so happy!! To create a belly band for the box, I embossed some Cherry Cobbler card stock with the Stylish Stripes Embossing Folder. I did have to emboss twice to get the whole piece done. Finally a little sentiment from Oh, Goodie stamped in Cherry Cobbler ink. Now as I looked at the box, it seemed to need another something so I wrapped around some more Washi Tape near the top. I love that I can make these ahead and have them all ready to fill with wonderful treats for the holidays.
And hey, what do you know…triangles again! I am loving them! Linking this to the Moxie Fab Trendy Triangles Challenge.
I hope you enjoy this project as much as I did! For my local stampers this will be the first one we make at my Artisan Class in September! Now time to get on with the hop. The lovely Mercedes Weber is next and you will love what she has created.
Stamp: Oh, Goodie; Paper: Cherry Cobbler, Naturals Ivory; Ink: Cherry Cobbler; Accessories: Tag a Bag Gift Box, Big Shot, Perfect Pennants Bigz Die, Season of Style Washi Tape, Stylish Stripes Embossing Folder, Cherry Cobbler Seam Binding, Dimensionals, Sticky Strip
Click HERE to shop with me!


I am so glad you are here for the second post of the day! From now on, you can expect two posts from me every Wednesday. My Artisan Wednesday Wow post and my Freshly Made Sketches post. So Wednesday is REALLY going to be an awesome stamping day!! Today’s challenge from Freshly Made Sketches is from the lovely and awesome Rita Wright. I just know you are all going to have fun with it!!
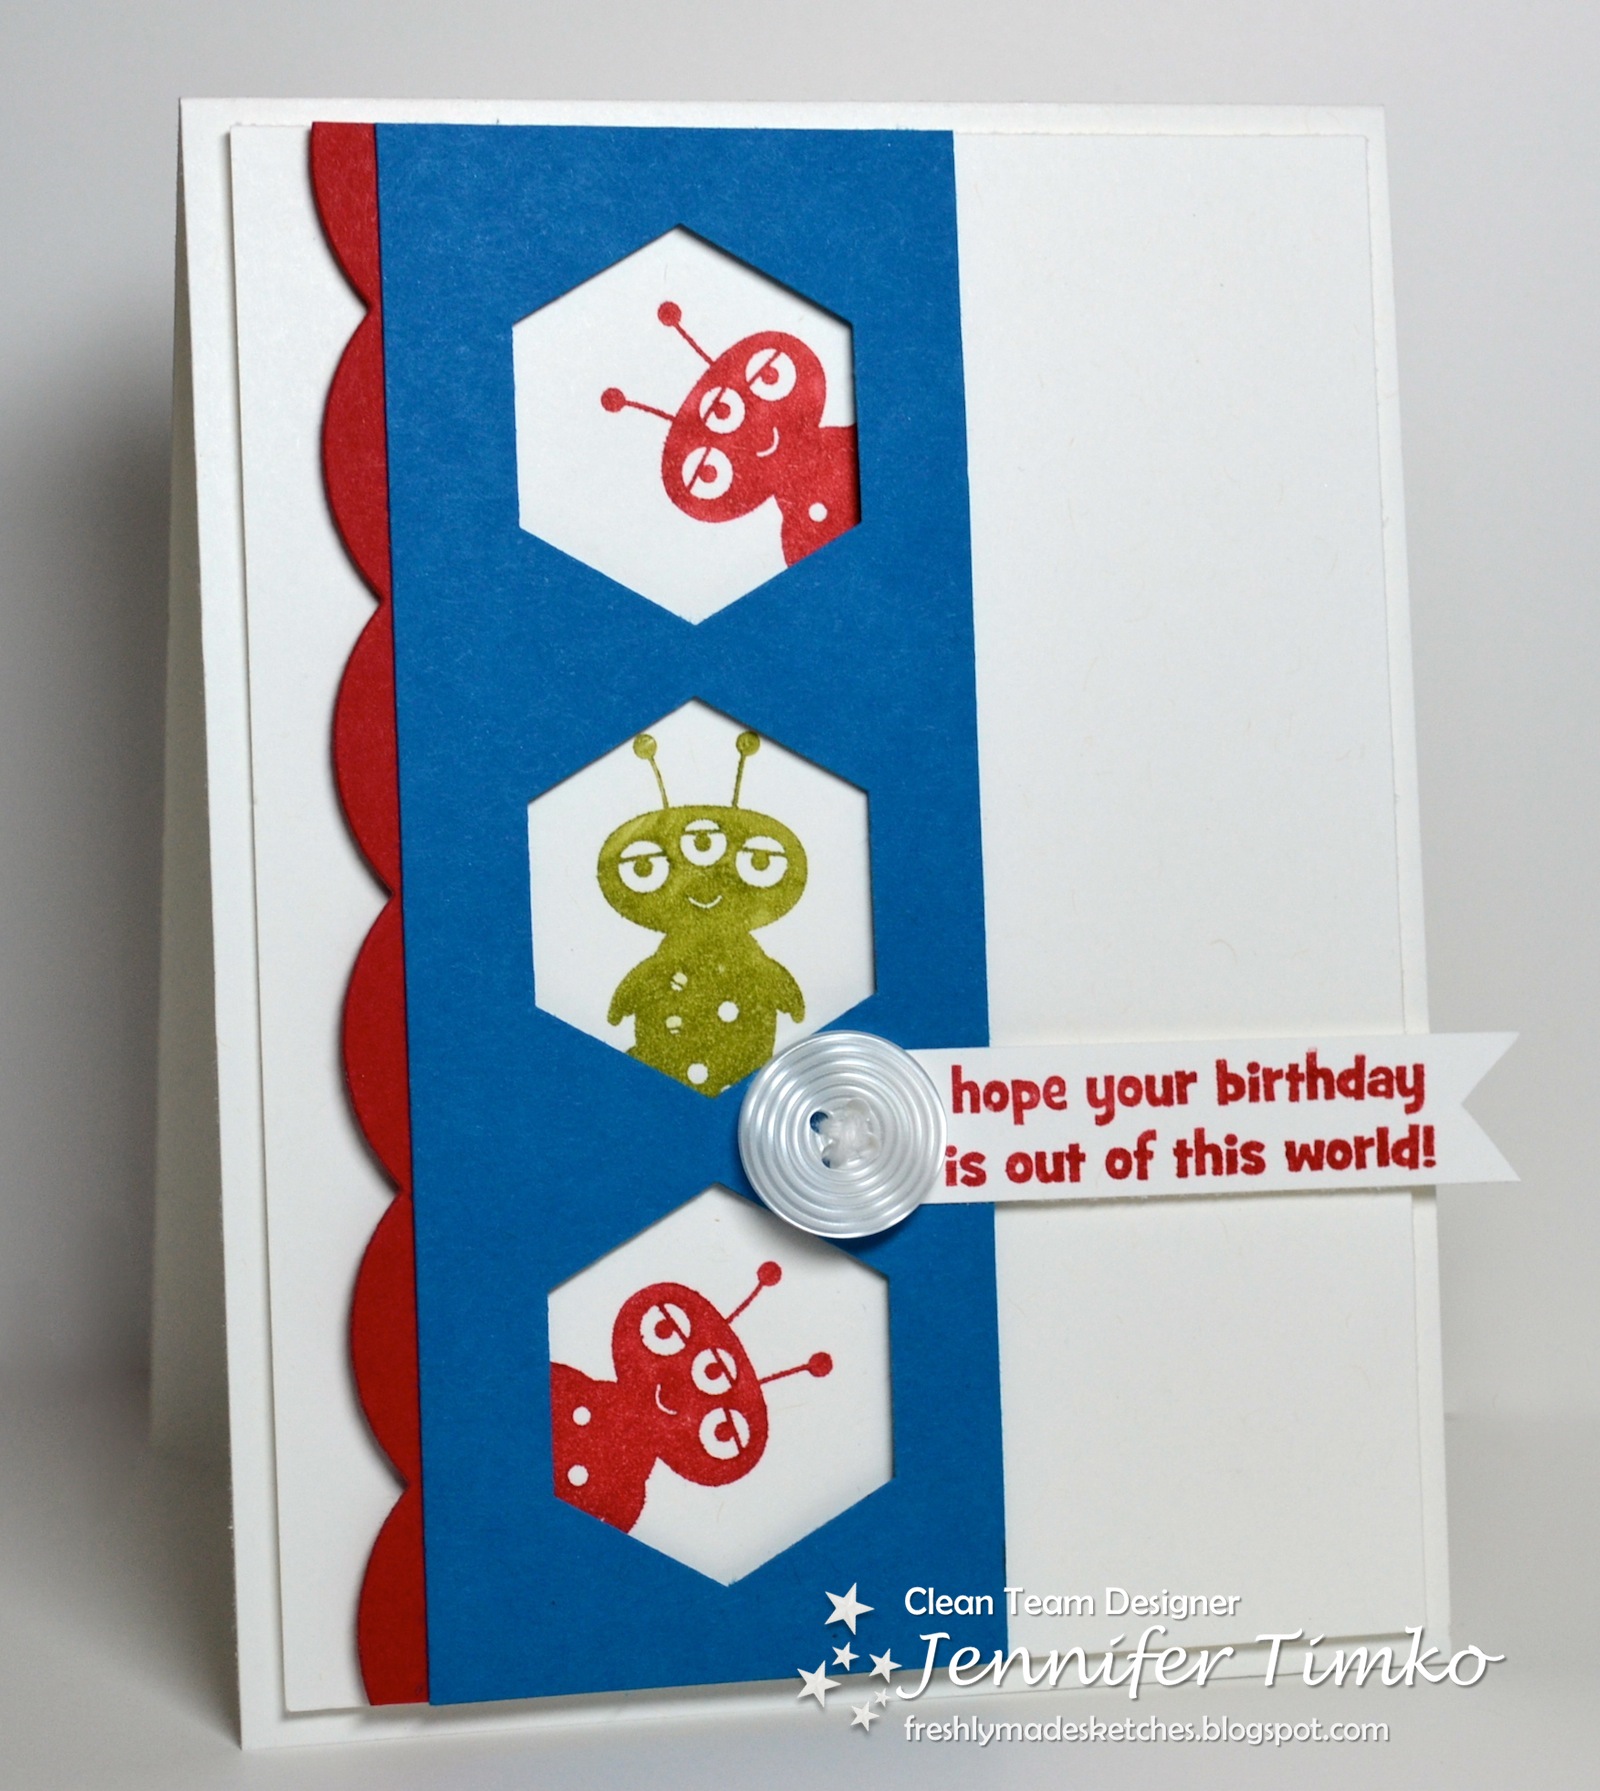 I needed a birthday card this week and this sketch was so perfect to use! I thought that using my Hexagon Punch to create little windows for the aliens from Blast Off would be fun. Let’s face it, these little aliens are just so adorable! And perfect for a 7 yo little boy. I punched the hexagons and then stamped the aliens on separate paper so I could position them. I added the scallop for a little pop of extra color and the sentiment is from the same set. To make sure the hexagons lined up just right, I drew a light pencil line on the back of the card stock and used it as a guide for punching.
The team has created some awesome cards this week and I know you will appreciate them as much as I do. Now you may notice that this is challenge #99. Hmmm….what do you want to bet that we have some AWESOME stuff lined up for sketch #100 next week!! *smile* We can’t wait to see what you create for this week and then make sure you come back for the fun next week!
Thanks for stopping in for two posts today! I’ll be back on Friday night (Saturday for e-mail followers) with an extra Artisan treat! See you then!
Stamp: Blast Off; Paper: Pacific Point, Real Red, Whisper White; Ink: Real Red, Old Olive; Accessories: Hexagon Punch, Big Shot, Large Scallop Edgelit, Neutrals Buttons, White Baker’s Twine, Dimensionals
 Welcome to my first Artisan Wednesday Wow post as a new member of the Artisan Design Team 2013! You can expect to start getting two posts from me on Wednesdays – my normal Freshly Made Sketches card and now an Artisan Wednesday Wow project. Every Wednesday the whole team will be posting inspiration for you in the form of a blog hop. Ever since I got my first box of goodies from Stampin’ Up I have been looking forward to this! Didn’t you love Jeanna’s project??
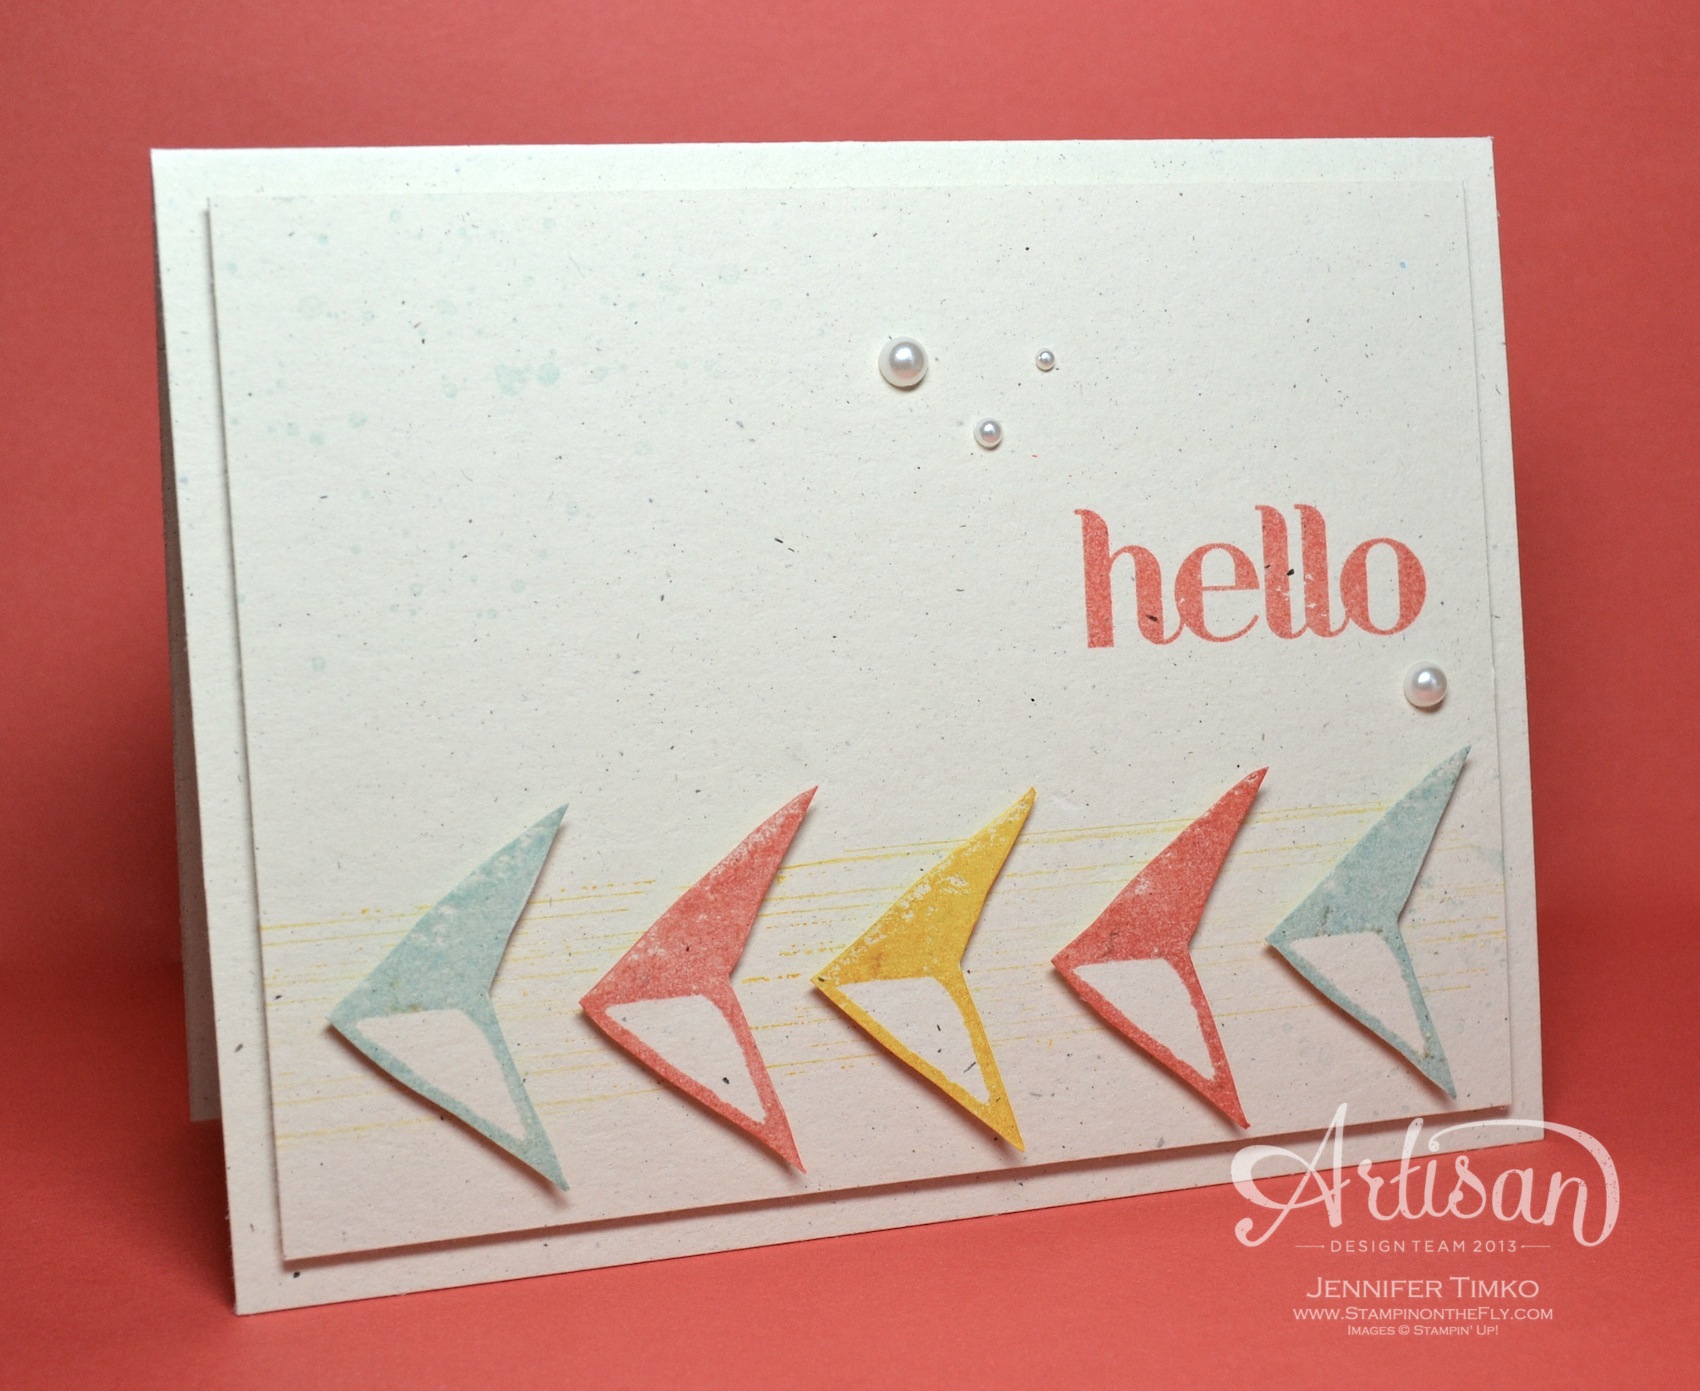
I thought that the perfect way to start was by showing you a new product, Undefined. What is Undefined? It is a stamp carving set where you can design anything you want. How awesome is that??!! Now I had to decide what to carve. I decided to start pretty simple and use a basic shape. After consulting with my 10 year old son, we opted for a cool triangle since they are so on trend. I drew this shape and he told me that one side should be opened up. Smart boy!! I traced it that way onto some paper with a pencil and then laid the paper onto the stamp to transfer it. Then we started carving. Here is the result:
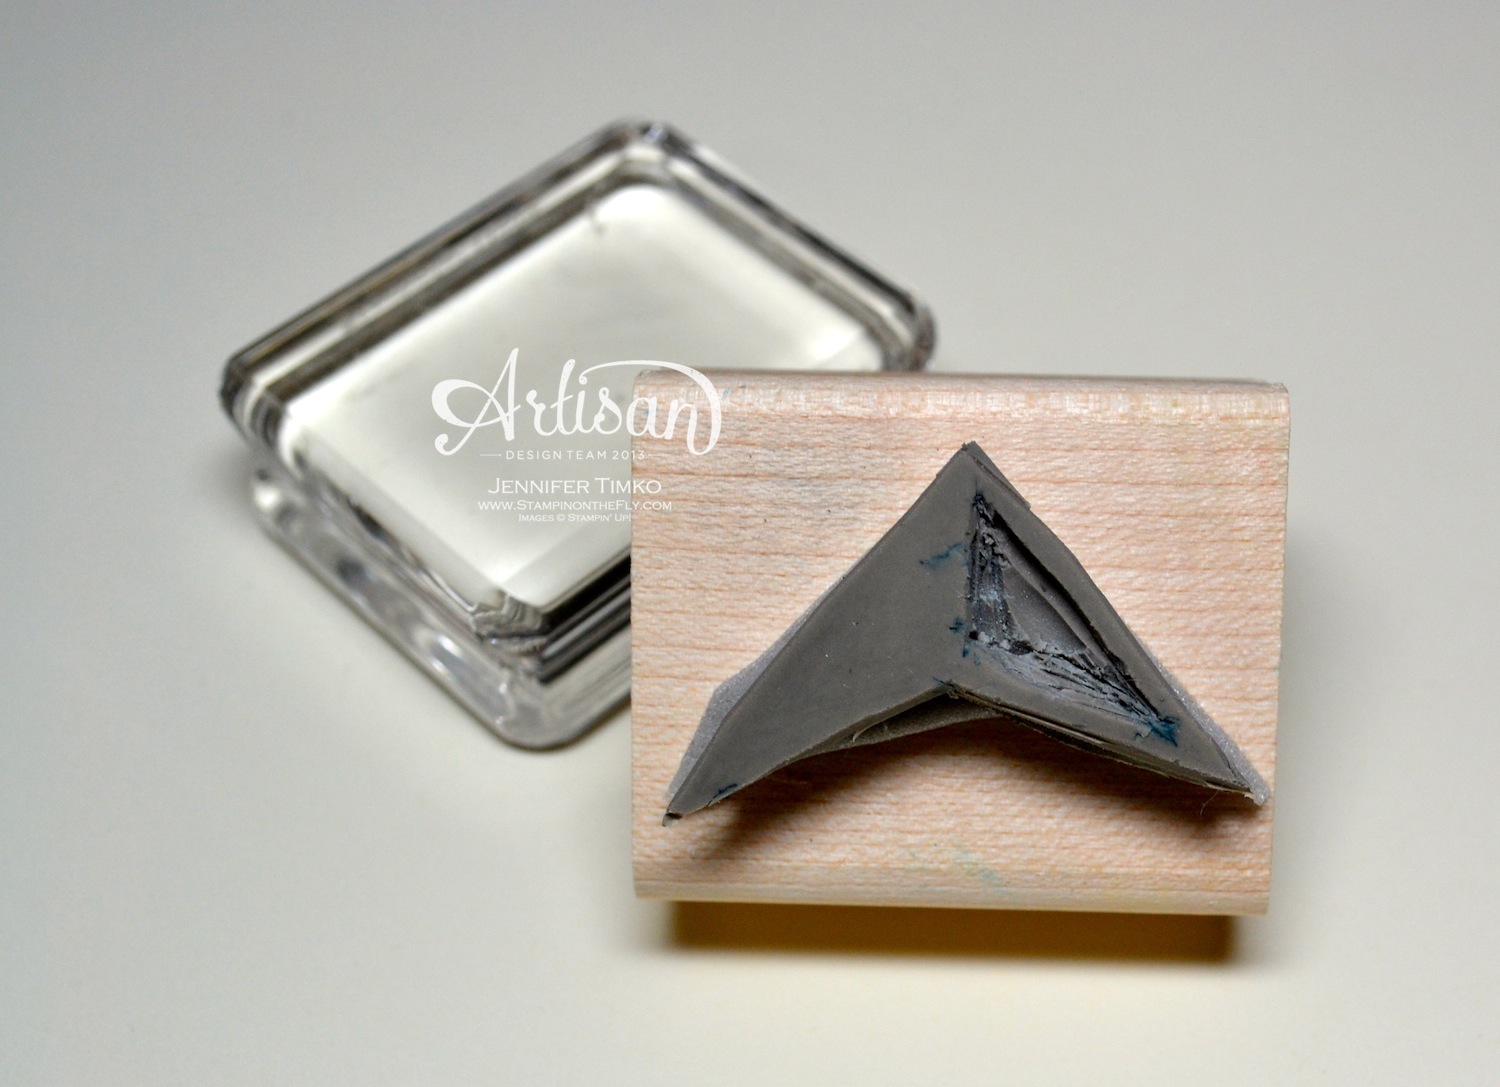 Ok, it isn’t cleaned off very well here. My son has been using it to stamp on all kinds of things (yes, I will have pictures to show you in the future). I also made a second stamp (another shape) and left the basic rubber in more of a rectangle shape around the stamp, carving away the edges instead of cutting them off. This is so much fun because you can really make it how you like!
For my card, I stamped the triangles in Soft Sky, Calypso Coral and Daffodil Delight onto Naturals Ivory card stock and cut them out. I stamped the sentiment from Four You (love this font) and added some details from Gorgeous Grunge. Then I popped up the triangles on Dimensionals and added some Basic Pearls.
Remember when I said the triangles were trendy? Well, Moxie Fab World has a Trendy Triangles Challenge so I am going to link this up there.
Now on with the hop. I know you will love Mercedes’ project today (and of course the ones from the rest of the team!). See you later today with my Freshly Made Sketches post.
Stamps: Undefined (Triangle created by me), Four You, Gorgeous Grunge; Paper: Naturals Ivory; Ink: Soft Sky, Calypso Coral, Daffodil Delight; Accessories: Basic Pearls, Dimensionals
Welcome to Day 10 of the 2013 Artisan Award Winner Blog Hop!! I am so incredibly excited to FINALLY be able to share, in detail, the projects I created for my submission to the contest. If you came over from Jeanna Bohanon’s blog, Stamp Time Somewhere, I know you have already been impressed by her amazing work. If not, you can just start the hop here and follow around until you get back to me.
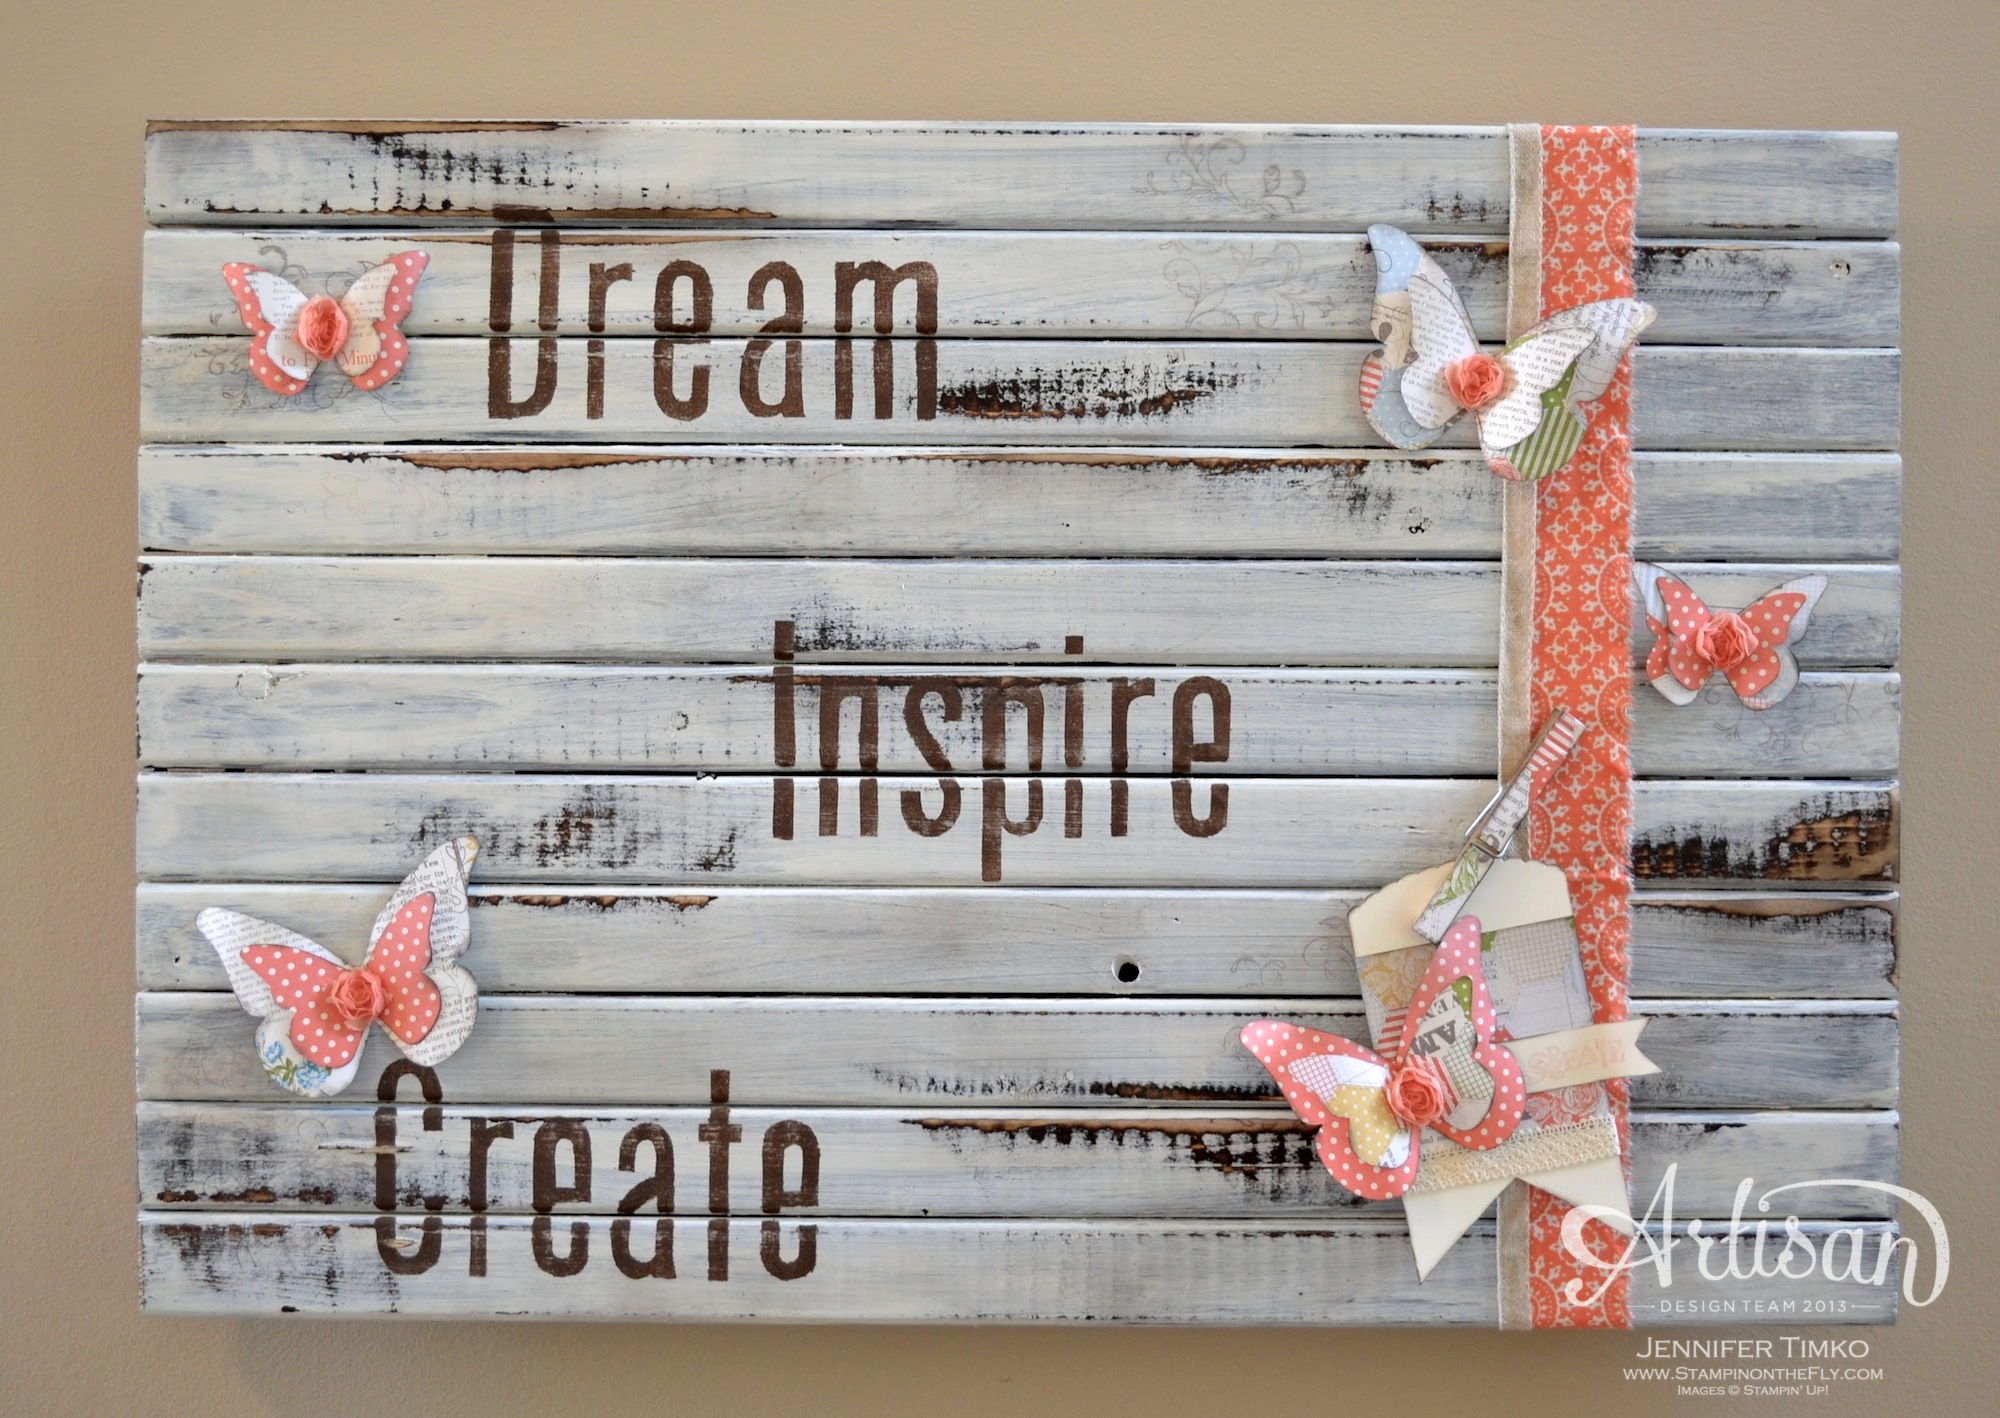
Here we are on the last day of this hop! I saved my favorite item for today (you can click on the pictures to see more detail). This pallet idea spun around in my brain for awhile before I finally just went for it. For scale, this is 24″ x 18″. I started with plain old wood strips from a home store and my husband helped me concoct this pallet.
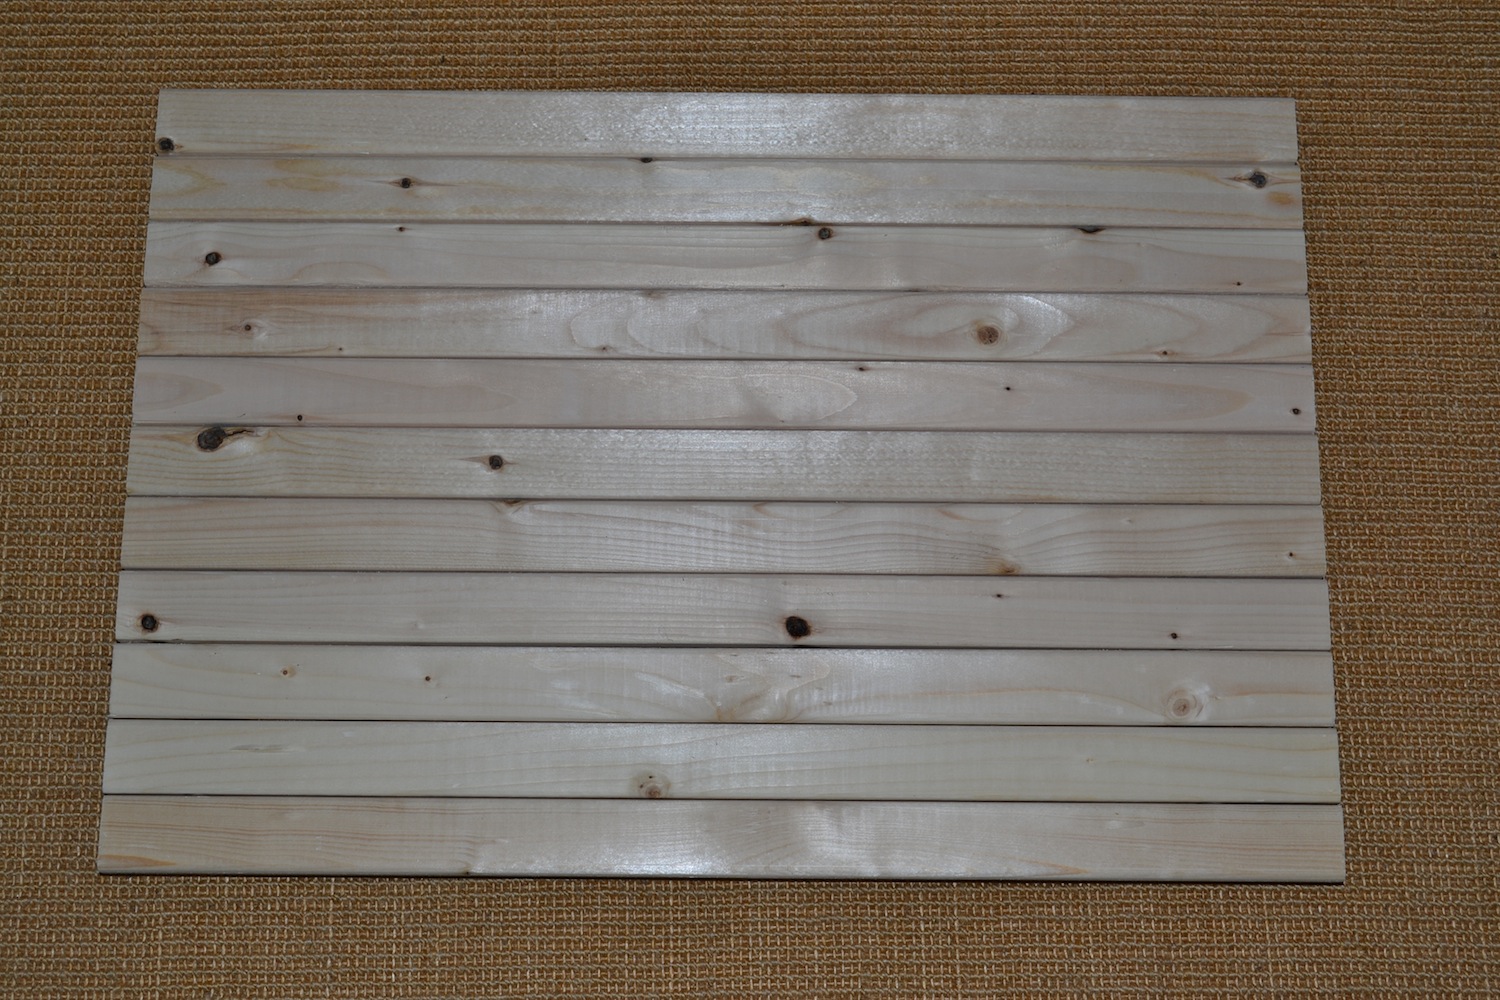
This is what is started off looking like. First I stained it with a dark stain. Then it was painted with an acrylic paint allowing some of the stain to show through. Sanding was next to reveal some of the stain again and some of the wood. Next up the lettering. Here is my disclaimer. If you have an e-cutter this would be much, much easier!! I used letter punches in MDS to create the words I wanted to use. I printed them out and then used an exacto knife to cut them out of contact paper. The contact paper was my stencil. This took a while. Again, with an e-cutter and the SVG files of MDS…super easy. I sponged on paint over the contact paper. Once it was dry, I used my Stampin’ Sanding Block to distress them a bit. Then I stamped randomly with the flourish from Creative Elements using Early Espresso Ink. I sealed it all with a spray sealant.
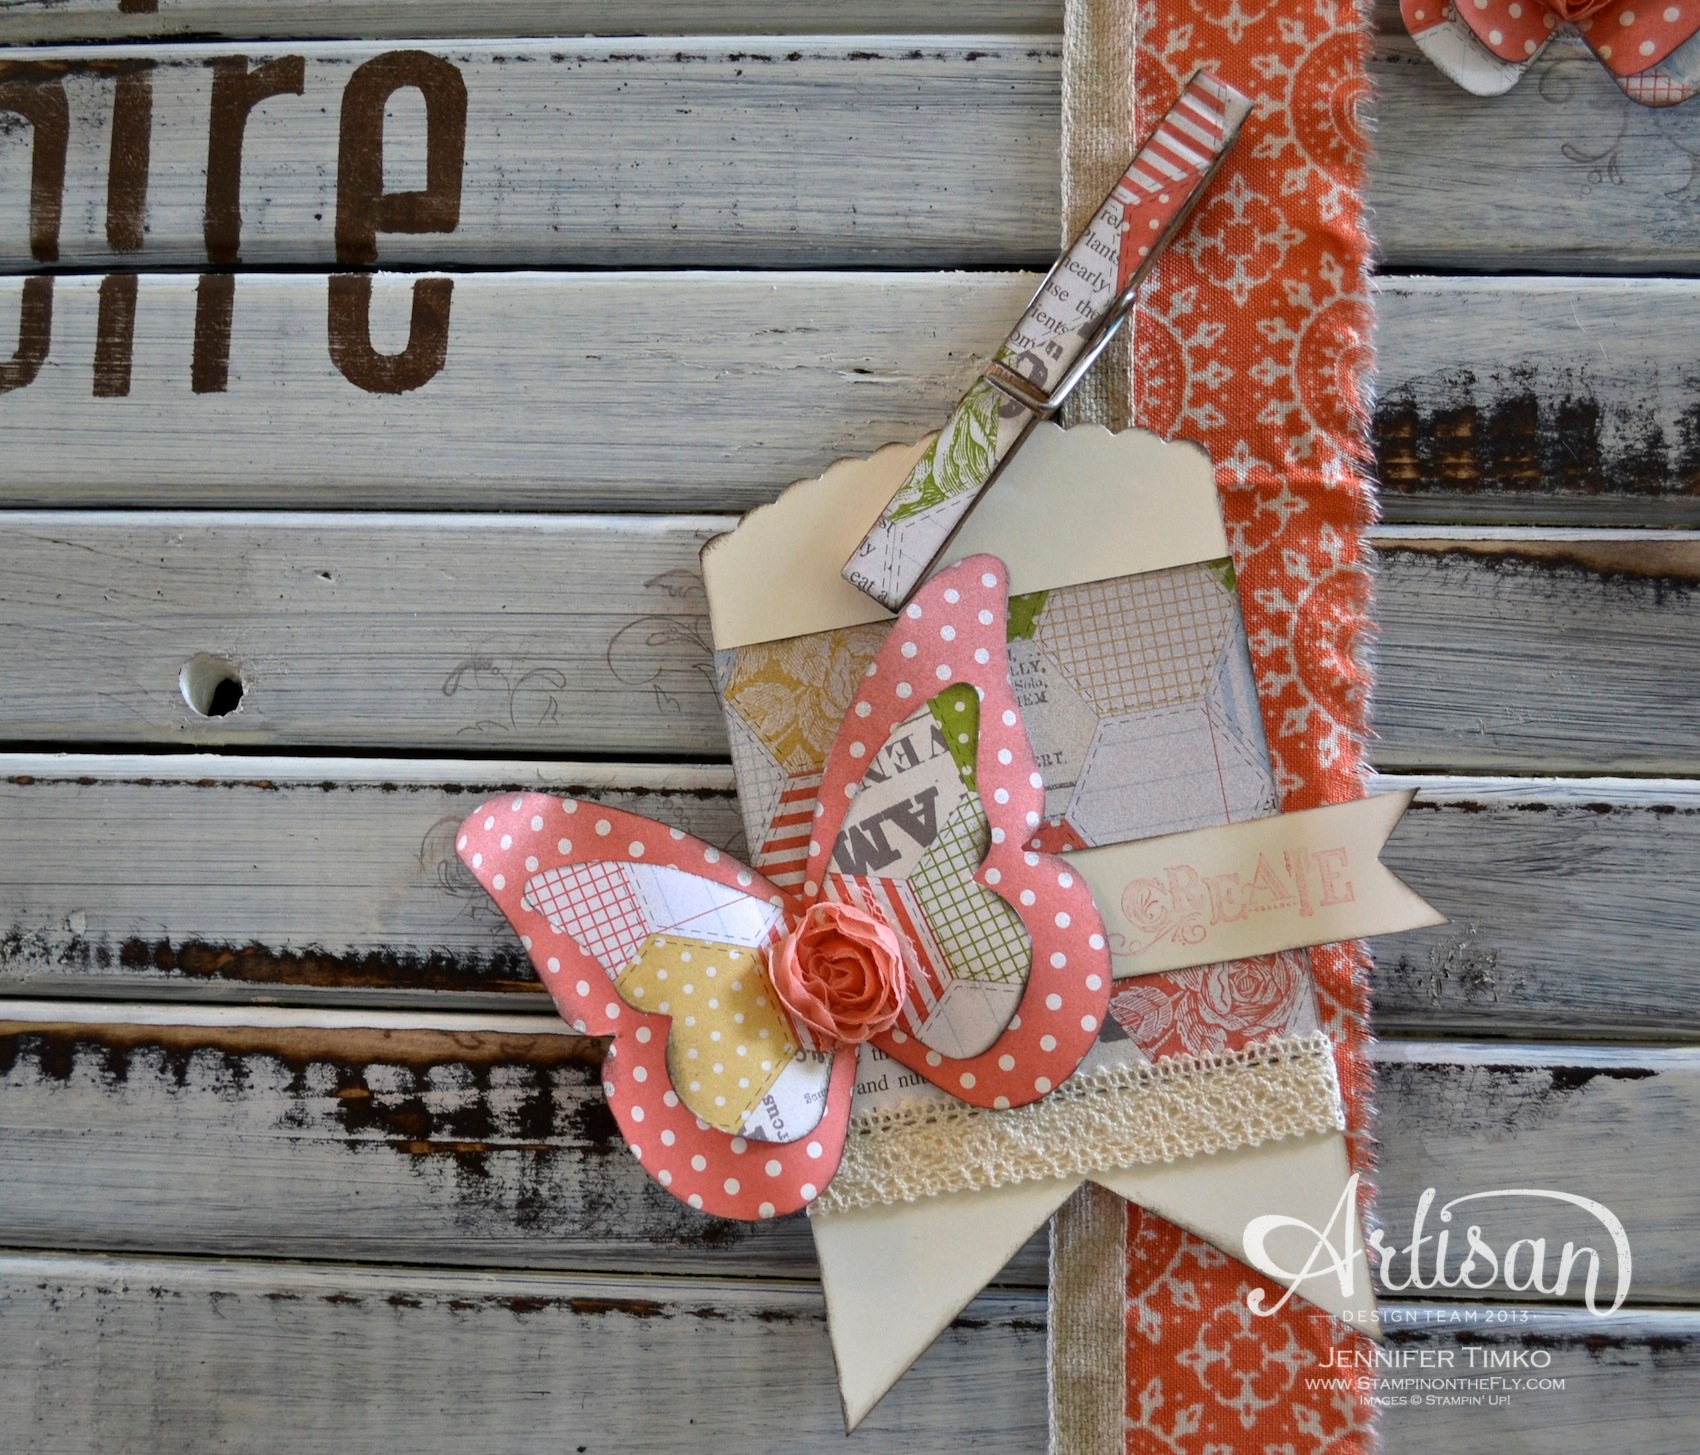 Next up was the final decoration. I used my Beautiful Butterflies Die to create a forest of butterflies out of the Tea for Two DSP and started playing around with them to find what worked. I sponged them and formed them so that they would have dimension and attached them with hot glue. The balance was still a bit off so I added a strip of the Tea for Two Fabric that I tore (I liked the shabby edge) and some Naturals 7/16″ Ribbon. Finally I added the tag attached with a decorated clothespin. The tag top was created with the largest Ovals Framelit.
I hope you have enjoyed seeing these projects as much as I have enjoyed sharing them. Thank you for the kind comments you have left for me. I really appreciate them! Starting on August 13th, the whole team will be back for our first Artisan Wednesday Wow hop. Every Wednesday we will be here to provide inspiration!
Now on to see the amazing Mercedes Weber of Creations by Mercedes!!
Thanks for stopping in today. See you soon!
Stamp: Creative Elements; Paper: Very Vanilla, Tea for Two DSP; Ink: Early Espresso, Calypso Coral; Accessories: Big Shot, Beautiful Butterflies Die, Tea for Two fabric (ret), Victoria Crochet Lace, Flower Trim (ret), Naturals Ribbon, My Digital Studio, Stampin’ Sanding Block, Clothespin, Wood, Crystal Effects (as glue), hot glue
Welcome to Day 9 of the 2013 Artisan Award Winner Blog Hop!! I am so incredibly excited to FINALLY be able to share, in detail, the projects I created for my submission to the contest. If you came over from Jeanna Bohanon’s blog, Stamp Time Somewhere, I know you have already been impressed by her amazing work. If not, you can just start the hop here and follow around until you get back to me.
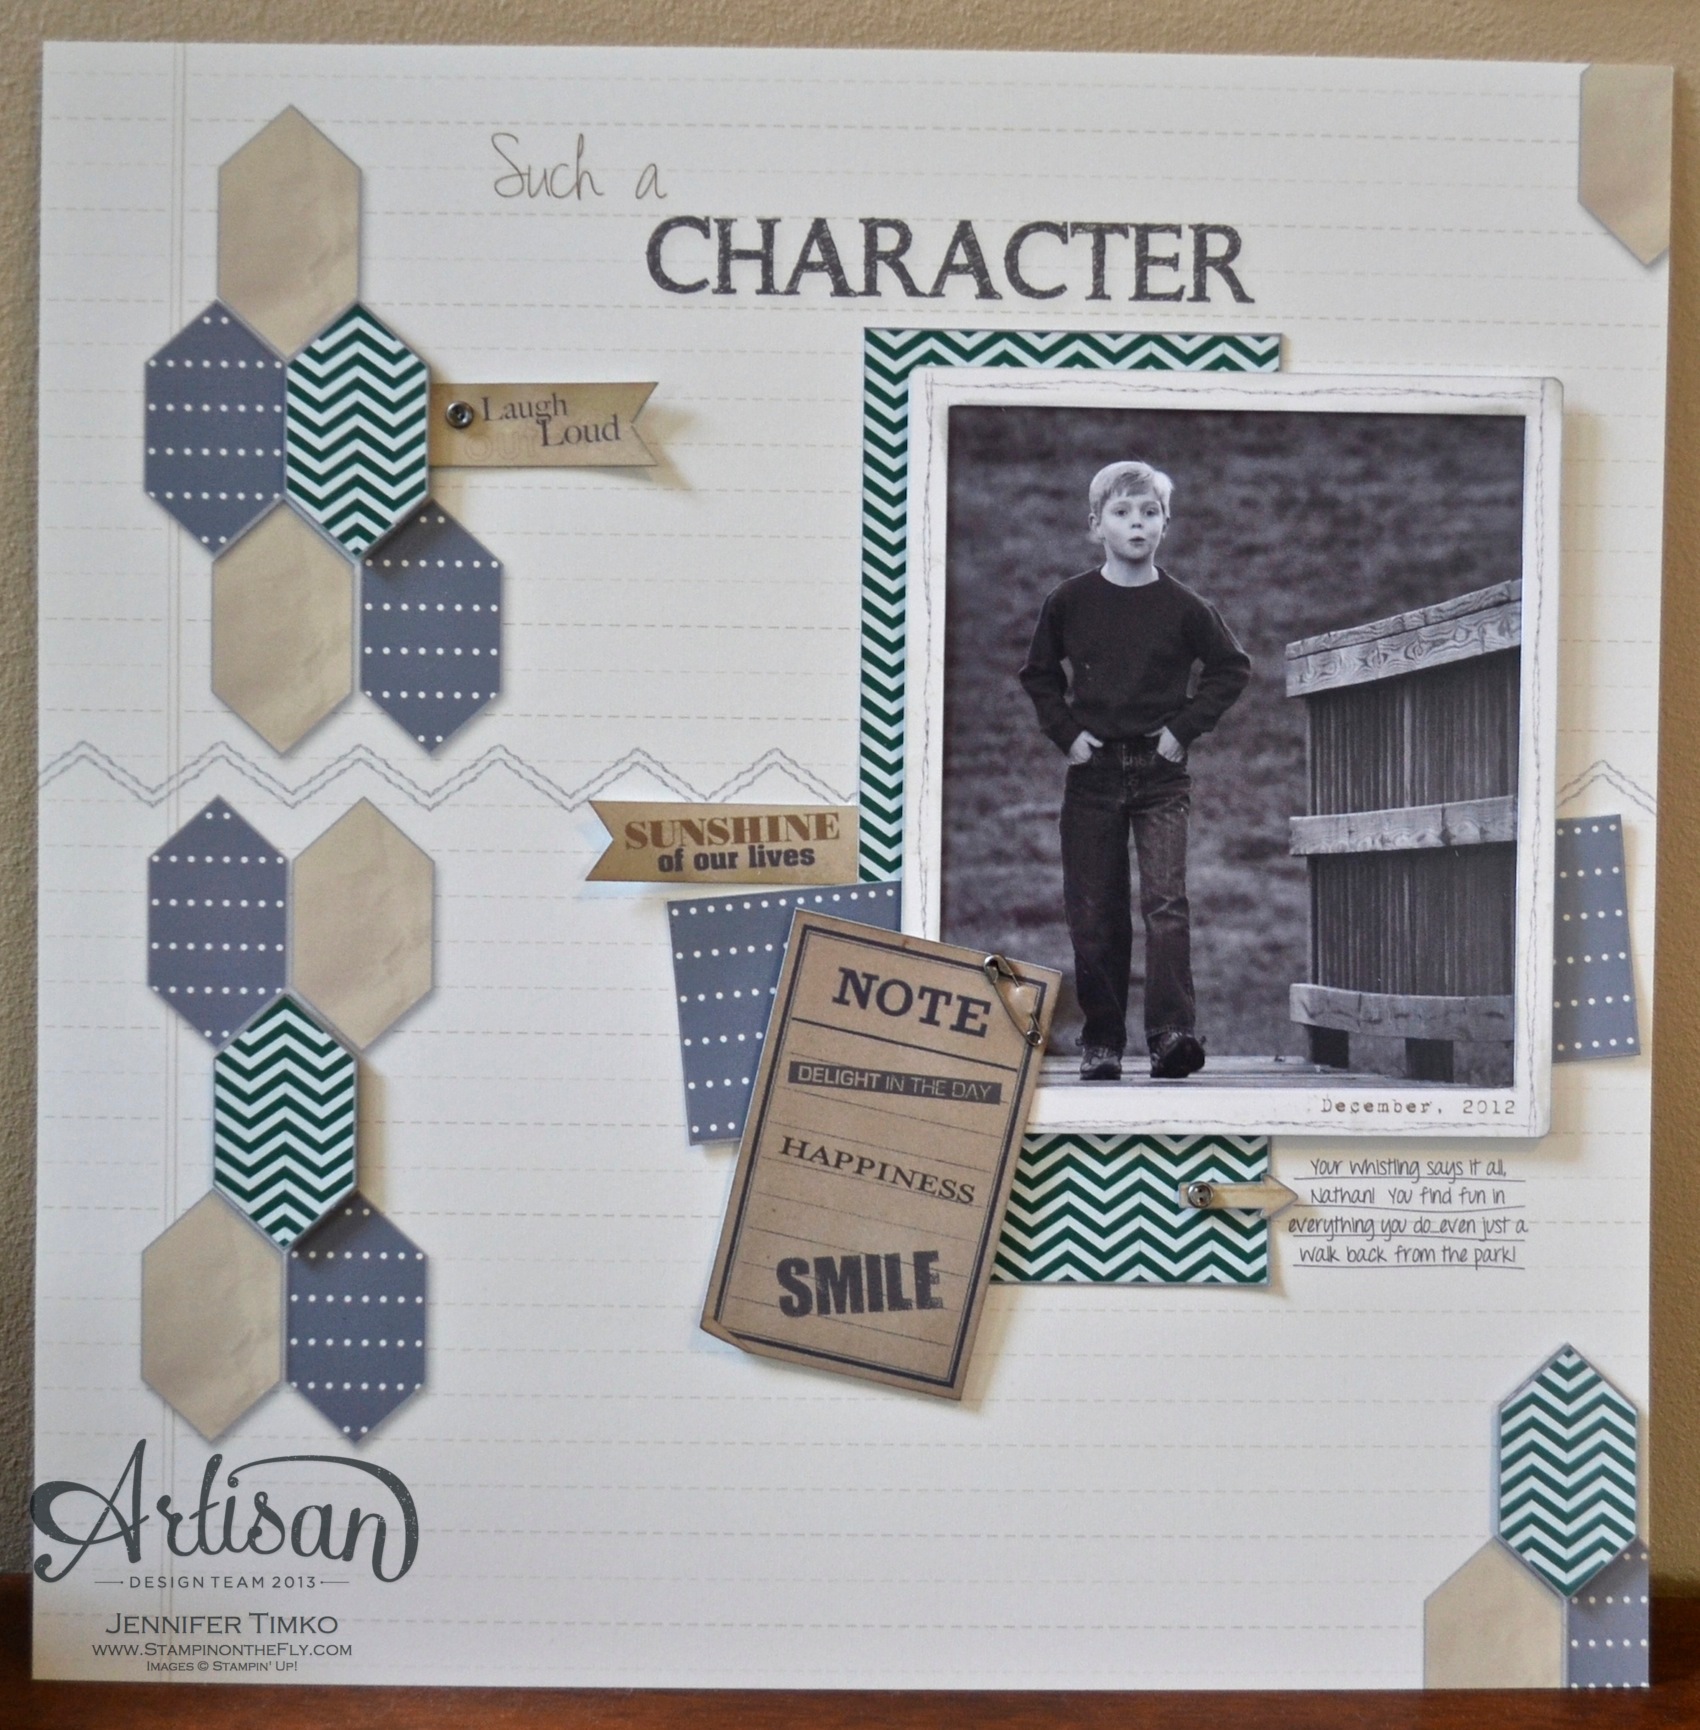
This is the last of my scrapbook page entries to show you but it was the first I worked on. I love this picture of my youngest son…love it!! It was taken by a dear friend and talented photographer Jud McCrehin when I wanted some pictures of my boys to give to my husband for Christmas. This one captures the spirit of my little one perfectly! The page is completely MDS except for some Vintage Trinkets but I wanted it to have a traditional feel. I printed the base page (just the elongated hexagons, the stitching and the journaling) and then had all the elements printed separately so that I could cut them out. I popped up some of the hexagons and added the layers after sponging them.
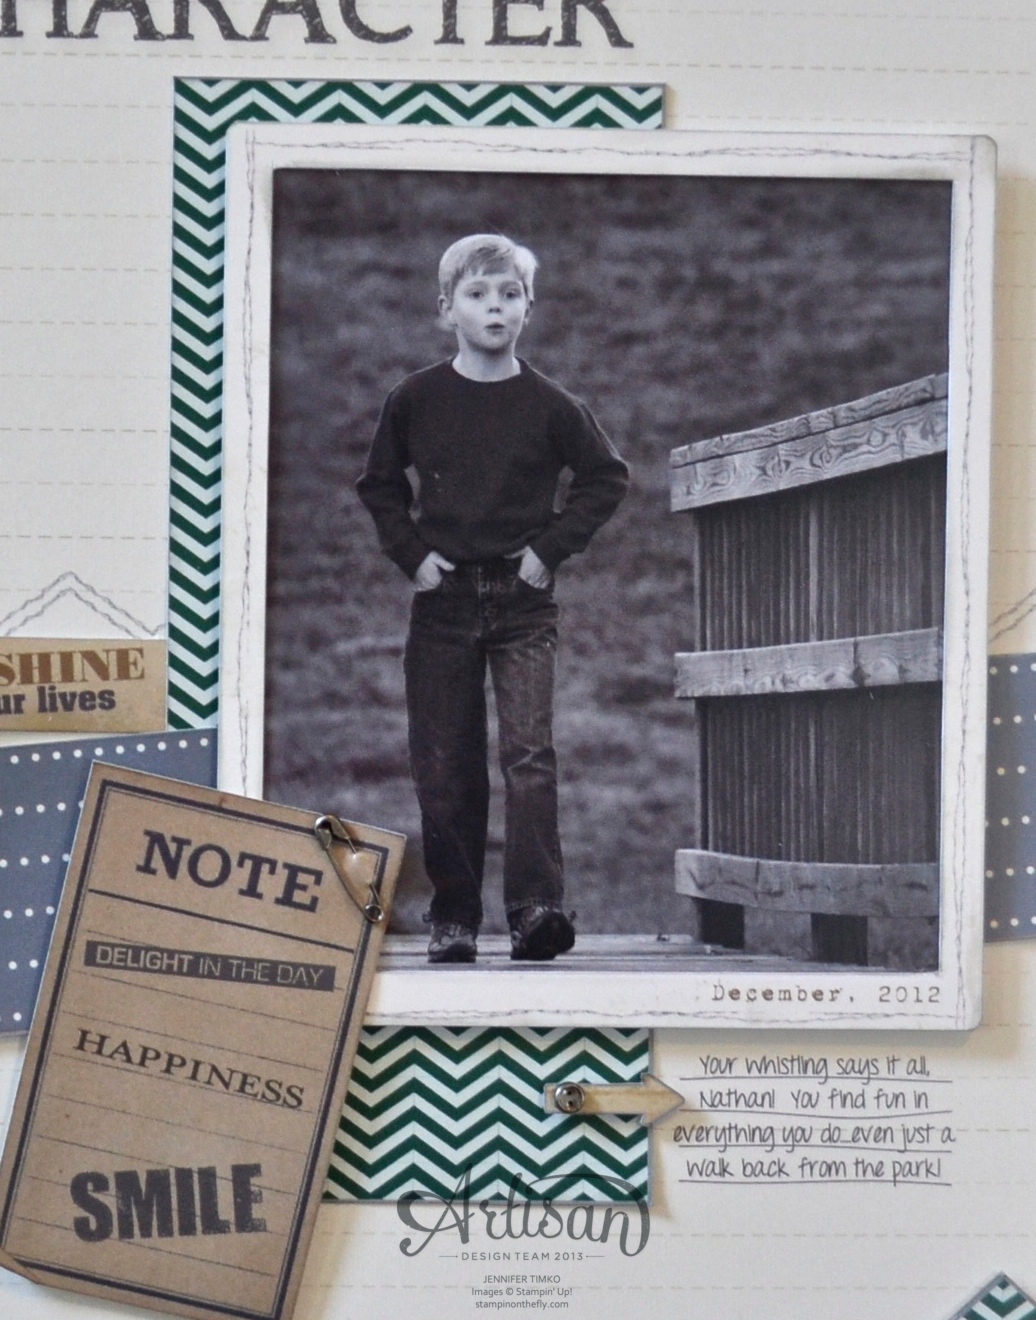
The detail on the frame is the part that made me the happiest. I cut out the frame and the picture separately (the stitching on the frame is digital), then layered them and popped them both on Dimensionals. You can see how many layers there are in this closeup. You can click the picture to see it in even more detail.
For the hexagons, I created my own punch by elongating the current digital hexagon punch. The paper fills are a combination of existing products and my own creations. The green is a color I created to color that pattern using the tools in MDS. I needed one that was a little darker (I called it the Midnight Muse of greens) and love the richness it gives. The grays in the journaling are color matched to the grayscale of the picture to make it look perfect. Just like with the soccer page from a few days ago, I printed doubles of everything so I have one of these for me as well. Creating this page proved to me that your creativity is truly the only limit with MDS!
I’m sure you have noticed that the projects are getting better and better every day so click right over Mercedes Weber of Creations by Mercedes. She will wow you again!
Thanks for stopping in today. See you tomorrow!
My Digital Studio: Hip and Handsome Overlays, Downtown Grunge, Life Celebrated, Lemonade Stand (Sale-a-bration), You’re My Sunshine, Delight in the Day, A Split Second, Enjoying Everything, Hexagon Punch, Flag Punch,
Welcome to Day 8 of the 2013 Artisan Award Winner Blog Hop!! I am so incredibly excited to FINALLY be able to share, in detail, the projects I created for my submission to the contest. If you came over from Jeanna Bohanon’s blog, Stamp Time Somewhere, I know you have already been impressed by her amazing work. If not, you can just start the hop here and follow around until you get back to me.

Today is the last of the cards I submitted and I saved my favorite. I wanted to make a pocket card invitation but one that had a fresh look to it. I have created a pocket similar to this before and thought it would be really fun to change it up and use the Tea for Two DSP (it is retired now but there is an updated version called Afternoon Picnic that is a must have!). So I used my Simply Scored Scoring Tool to make this interesting fold on the pocket. The back print is attached to a piece of Naturals Ivory so that the back is plain. Then I stitched around the edges with mom’s trusty machine. I popped out some flowers from the Fun Flowers Bigz Die, spritzed them with water then curved the centers over my bottle of Multipurpose Glue (that green top is just the right size). While still damp I used a Bone Folder to curl the petals. The center flower is from Boho Blossoms and then I attached a Vintage Faceted Button center tied with Linen Thread.
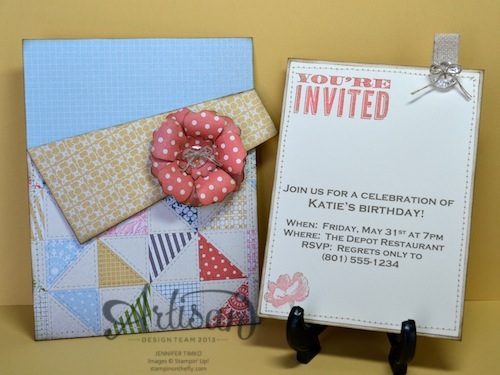
Now for the inside. This is the part that you didn’t get to see on the board at Convention. I love this part! I printed up the invitation on Very Vanilla. I used the RGB codes from My Digital Studio to match Soft Suede. Then I stamped it with Oh, Hello and sponged. The Vanilla layer is attached to a Naturals Ivory layer and stitched again. Some Natural 7/16″ Trim is sewn in as the pull tab and another button finishes it. By the way, as I debated what to put on the invitation, I had no idea what name to use. The first one that came to mind is Kate (my cat) so Katie the cat is apparently going to have a pretty upscale party!
Now on with the hop! No surprise that Mercedes Weber of Creations by Mercedes has another fabulous project to show you.
Thanks for stopping in today. See you tomorrow!
Stamp: Oh, Hello; Paper: Tea for Two DSP, Natural Ivory, Very Vanilla; Ink: Soft Suede, Calypso Coral; Accessories: Big Shot, Fun Flowers Die, Simply Scored Scoring Tool, Vintage Facted Buttons, Linen Thread, Naturals Ribbon, Crystal Effects, Dimensionals, sewing machine
 Happy Wednesday to you! I am so happy to be here with this week’s Freshly Made Sketches challenge. If you are looking for the 2013 Artisan Design Team Blog Hop just click here. So yes, I will have two posts today! This sketch is from the awesome Jen Mitchell and it is a great one!
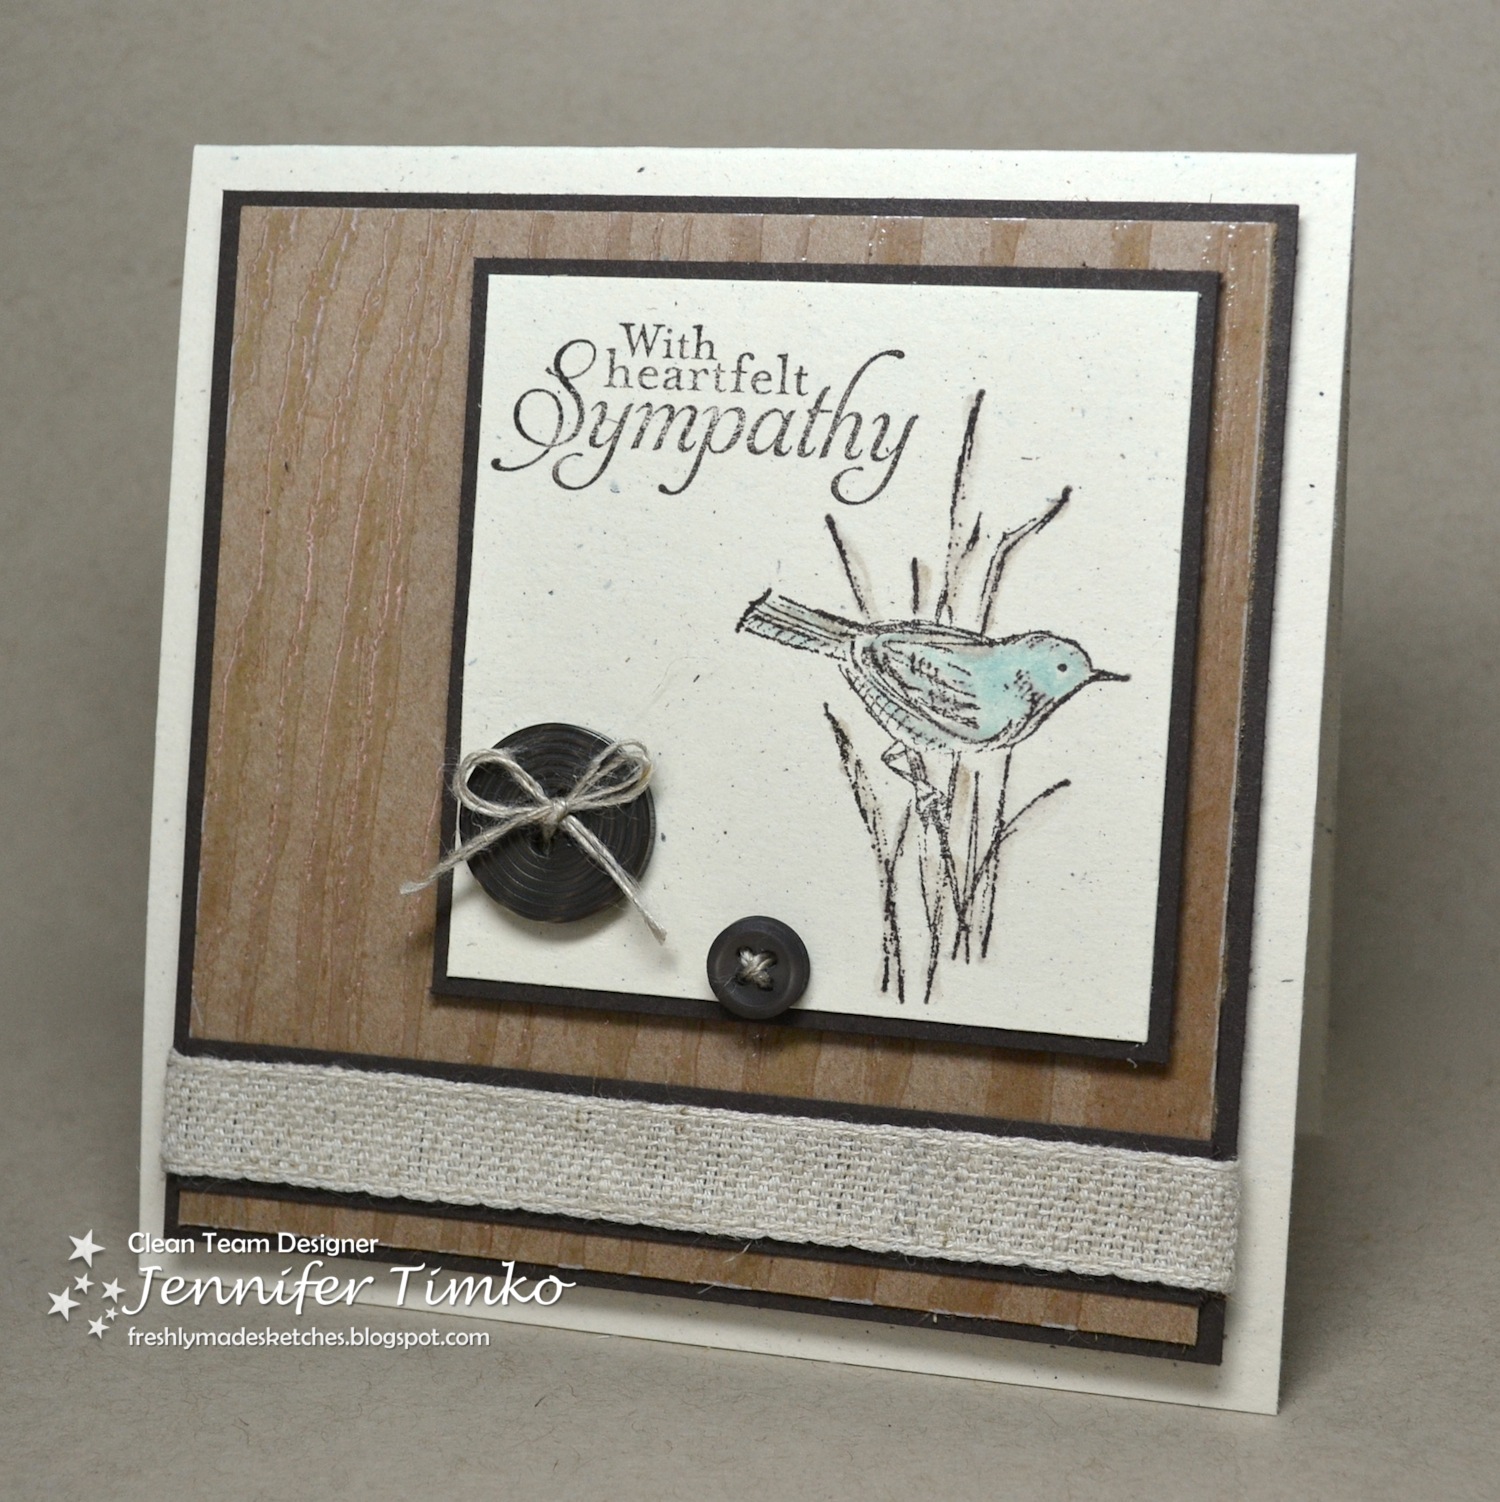 I needed a sympathy card for a very special person this week and I immediately thought of using Simply Sketched for it. This hostess set is so fantastic for so many kinds of cards. I wanted to focus on the bird so I kept the rest of the card really neutral. This wood grain from Natural Composition Specialty Paper seemed perfect. I stamped in Early Espresso ink and the added in touches of Crumb Cake with a Blender Pen. The bird is Soft Sky. I might have a new favorite blue!! The Naturals Trim ribbon kept with the tone and these new buttons matched up with the sketch really well, don’t you think? It is never good to need a card like this but it is nice to know that I have a set that makes it easier to make one.
It will be no surprise that the team at Freshly Made Sketches has made a fantastic variety of examples (again!). Make sure you go take a look and let Jen M. know how much you love this sketch!
I will be back tomorrow with more of the Artisan project hop. If you haven’t seen it yet, it is something worth visiting! The new 2013 Artisan Design Team is sharing the project they entered for the contest! Thanks for stopping in today. See you soon!
Stamp: Simply Sketched; Paper: Natural Composition Specialty, Naturals Ivory, Early Espresso; Ink: Early Espresso, Crumb Cake, Soft Sky; Accessories: Natural Trim Ribbon, Neutrals Buttons, Linen Thread, Dimensionals
Welcome to Day 7 of the 2013 Artisan Award Winner Blog Hop!! I am so incredibly excited to FINALLY be able to share, in detail, the projects I created for my submission to the contest. If you came over from Jeanna Bohanon’s blog, Stamp Time Somewhere, I know you have already been impressed by her amazing work. If not, you can just start the hop here and follow around until you get back to me.
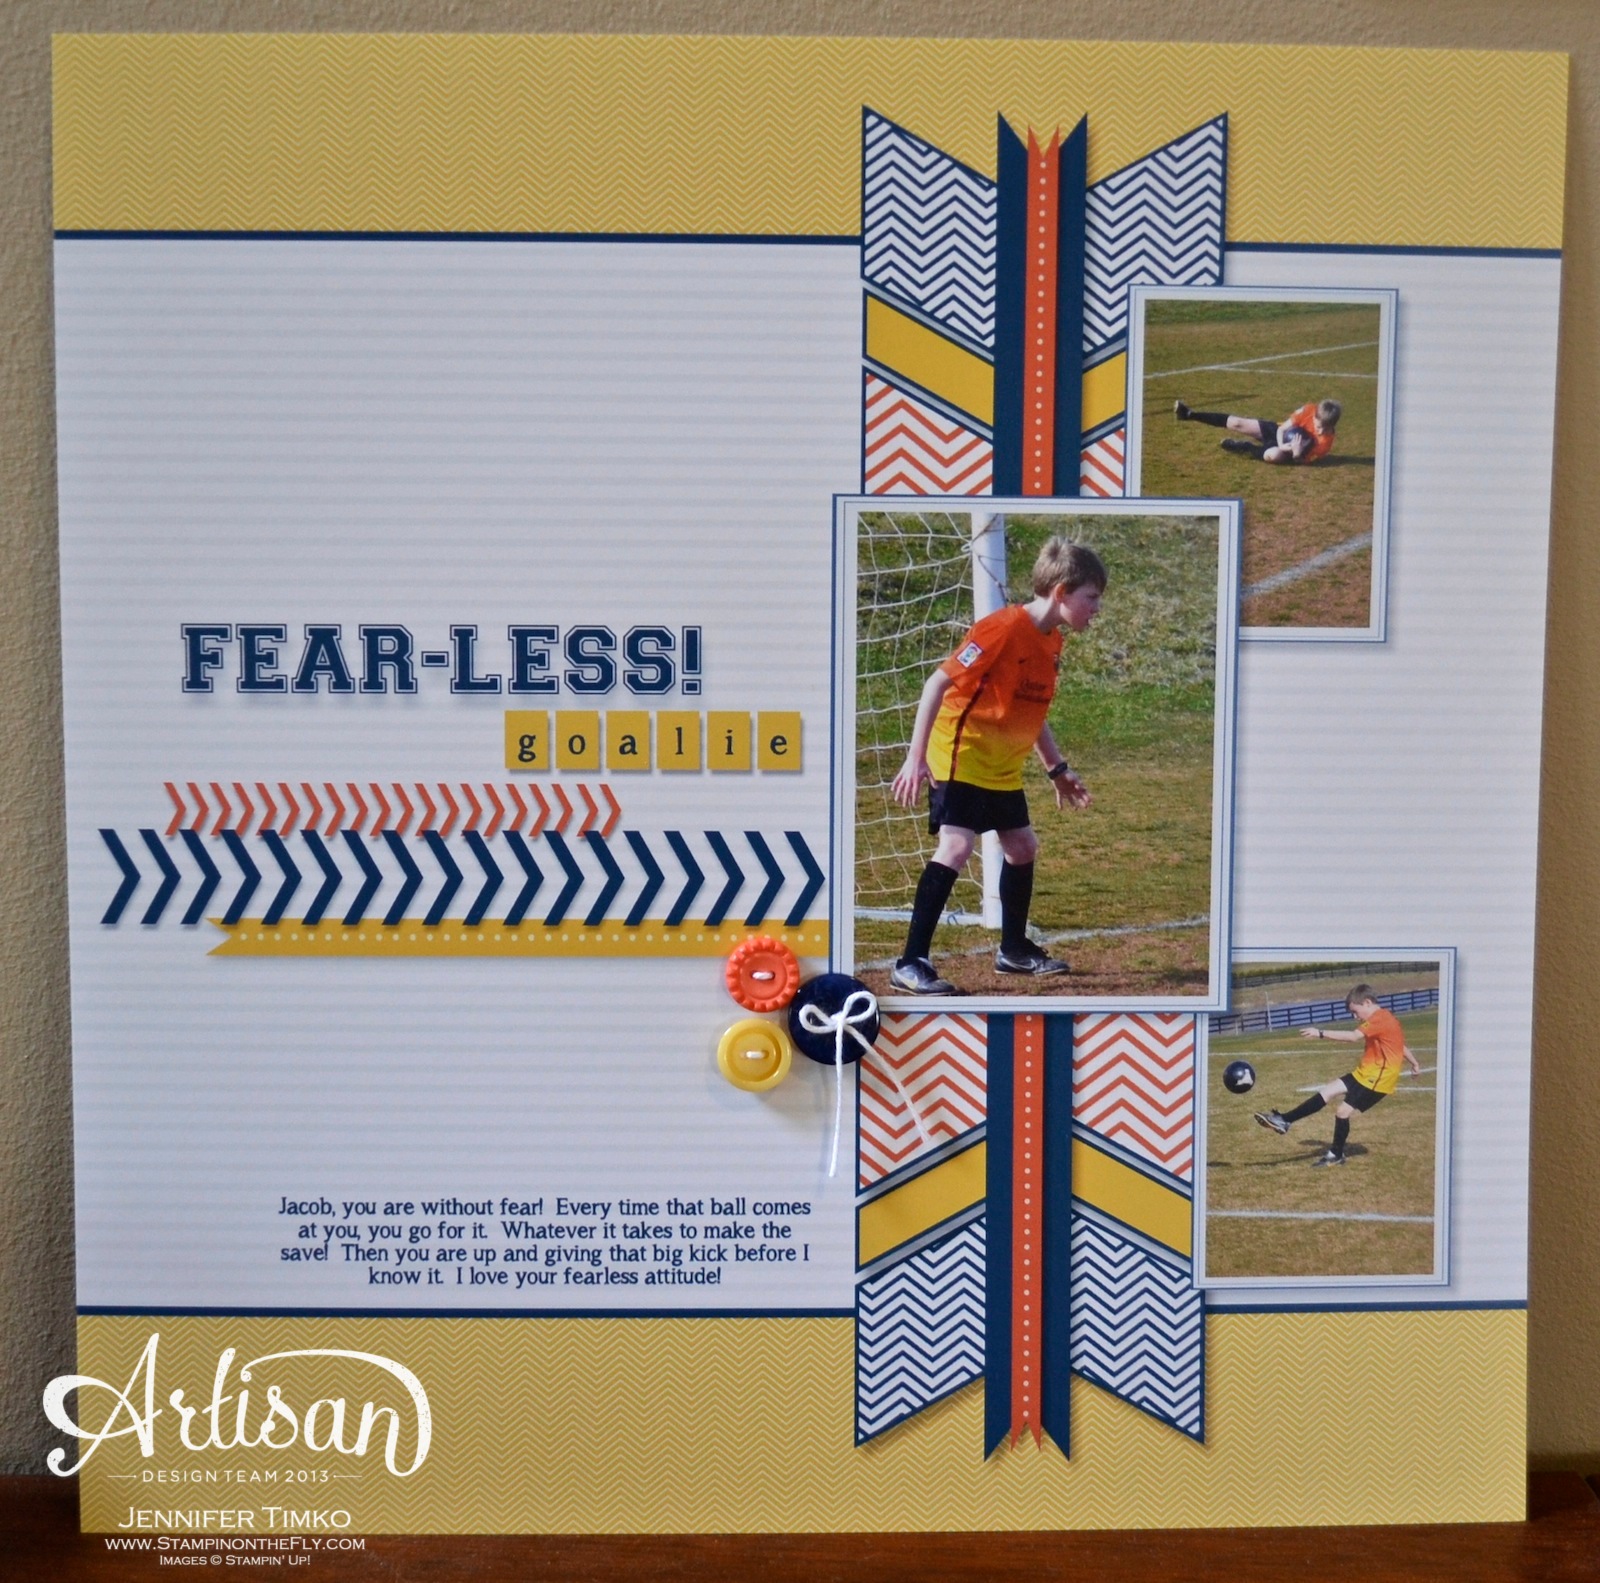 So My Digital Studio is pretty much awesome! I have never been much of a scrapbooker. Something about the pages have intimidated me. The feeling they need to be perfect maybe?? In any case, MDS has solved that for me. I don’t like it, hit undo (one of my favorite buttons). I need a new color, change it. The DSP I have isn’t working for me (hard to believe since there is so much!!), make my own! I did a little of that on this. The Chevron DSP’s in Tangerine Tango and Midnight Muse were actually papers that were recolored, resized then saved as my own DSP to put in here. Cooh, huh? I had so much fun playing with this page that it was hard to stop! I had two of them printed (another awesome feature of MDS) so even after I sent this one off, I still have one for me! The only thing not MDS on this are buttons. I think this page captures my oldest son perfectly and he really loves it! On a personal note, while I was at Convention he asked if all the “stamping people” loved the pictures of him and his brother and asked if they are famous now. Of course I said yes!!
Ok, time to move on with the hop because you are going to love today’s project from Mercedes Weber of Creations by Mercedes.
Thanks for stopping in today. See you tomorrow!
My Digital Studio: Delight in the Day, Made from Scratch, Hip and Handsome Overlays, Whisper White Patterns, Chevron Punch, Flag Punch, Square Punch; Buttons: Brights, Regals and Sale-a-bration; White Baker’s Twine
Welcome to Day 6 of the 2013 Artisan Award Winner Blog Hop!! I am so incredibly excited to FINALLY be able to share, in detail, the projects I created for my submission to the contest. If you came over from Jeanna Bohanon’s blog, Stamp Time Somewhere, I know you have already been impressed by her amazing work. If not, you can just start the hop here and follow around until you get back to me.
 I thought I’d change it up today and share a 3-d project with you. I have to admit that these were the category that intimidated me the most. But when Stampin’ Up announced the new Epic Day Washi Tape I knew EXACTLY what I wanted to do! Monograms are so big right now and I just could not wait to washi tape one! I found this paper mache “S” at a hobby store (for Stampin’ Up since they were the recipient) that seemed just perfect. I just started laying the tape and until the patten was finished and then trimmed the edges with an exacto knife. There were still some rough edges so I used the Sanding Block to clean them up. To add to the durability, I put on a couple of coats of Modge Podge. The frame is a shadow box with the glass removed and the background is a piece of Epic Day DSP. I did absolutely nothing to that paper since I thought is was already perfect! To decorate the letter, I created a ribbon flower by circling the Basic Black/Basic Gray Wide Ribbon (retired) on a Jumbo Sticky Round. The center of the flower is a Vintage Faceted Button with a Large Basic Pearl Center. To hang it, I created a bow attached to another piece of the ribbon.
Because of space limitations at Convention, this piece was sitting on a shelf so you could not see the hangar. My picture has the bow a bit askew but it was taken on mailing day and I was trying to meet the deadline. This project is really fun and makable! I’m hoping to do a version in a local class.
Now, on to the beautiful work of Mercedes Weber of Creations by Mercedes.
Thanks for stopping in today. See you tomorrow!
Paper: Epic Day DSP; Accessories: Paper Mache Letter, Epic Day Washi Tape, Basic Black/Basic Gray Wide Ribbon (ret), Vintage Faceted Buttons, Large Basic Pearls, Jumbo Sticky Round, Sanding Block, Shadow Box, Crystal Effects (as glue), Modge Podge