I am so excited to be a Monday Guest over at the Pink Paper Bakery! This is a group of Stampin’ Up demonstrators who work together on this fun blog! So much inspiration and talent! They asked me to share a card with them and I think I have just the right one.
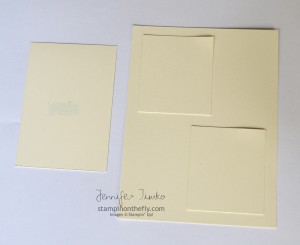
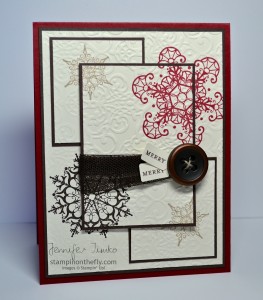 I have been seeing the Triple Time technique everywhere and finally gave in to trying it after seeing a card by the amazing Ann Schach. She changed up the layout a bit from some others and I loved the effect!! I knew that the snowflakes from Snowflake Soiree would be fantastic for this technique and got right to work. Another super talented stamper, Dawn Olchefske, has a tutorial on the technique that I viewed before giving this a go. The key to the technique is the illusion that you have stamped multiple times and and magically lined them up perfectly. While I do love my Stamp-a-ma-jig, even I would not have the patience to line everything up for multiples of this card!! LOL! So I started with a base of Very Vanilla (3-7/8″ x 5-1/8″). I cut two rectangles of Very Vanilla to 1-7/8″ x 2-1/8″ and another one rectangle to 2-3/8″ x 3-3/8″. As per the tutorial, attach them to the base using a repositionable glue since you will need to pull them back up and attach their “frames”.
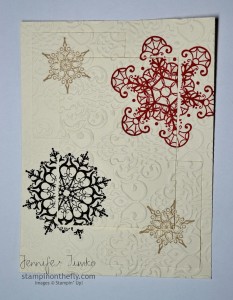
Once you have these in place, stamp your images. You will need to apply a little extra pressure to the stamping to minimize the gap that will happen where the layers meet. Now I like to use 1/8″ borders (and did here) but a wider border is a bit more forgiving in the “magic” of this technique. You may need to play with it a bit to find what works best for you. After I stamped, I embossed the image using the Lacy Brocade Embossing Folder. I found that this helps in the reassembly part since you can use the embossing pattern as an additional guide.
You can see the gaps I was talking about in this picture. Now, you carefully (take your time) pull the layers apart and then attach the back border panels (frames) to the layers. I used Early Espresso for this with the panels as follows: 4″ x 5-1/4″, two panels 2″ x 2-1/4″, 2-1/2″ x 3-1/2″. I’m guessing this makes the measurements above make a bit more sense. *smile* The base of the card is Cherry Cobbler.
I folded a small piece of the Early Espresso 3-1/2″ Tulle Ribbon in thirds and tied on a Brushed Bronze Button with some Linen Thread. The middle panel is raised up on Dimensionals. Finally, I added the sentiment from Teeny Tiny Wishes (I inked only part of the stamp with a Stampin’ Write Marker) that was punched with the Jewelry Tag Punch and attached with Mini Glue Dots.
I hope you like this card as much as I do! I made this with my Holiday Catalog Class last weekend. We all agreed that the technique takes a little patience but is well worth it!
My thanks to the Pink Paper Bakery for letting me be a guest! I’ll be back tomorrow with the latest SUO Challenge. Have a great day!
Stamps: Snowflake Soiree, Teeny Tiny Wishes; Paper: Very Vanilla, Early Espresso, Cherry Cobbler; Ink: Early Espresso, Cherry Cobbler, Crumb Cake; Accessories: Big Shot, Lacy Brocade Embossing Folder, Early Espresso 3-1/2″ Tulle Ribbon, Brushed Bronze Button, Linen Thread, Dimensionals, Mini Glue Dots


4 Comments
I love your take on this technique. I am in awe of the look but so often the cards get so busy. Your card beautifully showcases the technique but keeps it clean and gorgeous!
Absolutely stunning, Jen! This was the perfect set to use with this technique! I love the Lacy Brocade embossing! And thanks for the sweet shout out!
Jennifer,
Thank you for being a guest blogger on PinkPaperBakery today. I love your card and appreciate the time you took to post on our blog. Thanks so much!
Alicia
pretty…pretty….love it!!!