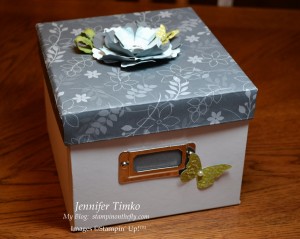
Ok, I suppose this really should be named “Decorating the outside of the box”!! The new Card Keeper box, that is. My hostess club got together yesterday and this was one of our projects.
 You may recognize the paper on top as the retired Walk in the Park DSP. Stampin’ Up used to have a bulk buy feature for demonstrators and this was one of those paper sets. Using the bulk buy paper allowed all of us to make the same design with the box. The box comes with the lid already assembled. The box is folded neatly within along with the hardware, templates and instructions. I chose to only cover the top although there are template available for the covering the whole box. Here are the tips that will help you:
- You have to make sure that the box is folded so that the tabs are inside. They come folded the opposite way of the direction they need to go and you need to give them a firm fold the other way so that the seams lie correctly.
- The glue on the tabs is very strong! Once in place, it it in place. Practice putting together the box (complete with lid) before you glue it down.
- The lid has a snug fit. When putting the box together it is important that the seams are really straight (especially near the top).
- Cut out the template you intend to use and then trace onto the back side of your DSP (or covering material). Then cut out.
- The Simply Scored Tool is really helpful to score the lines as indicated on the template.
- Because of cutting variations and manufacturing tolerences, the template may need to be trimmed a bit. Just put it up to your lid and check the folds before you glue.
- The Anywhere Glue Stick worked great with the DSP. Apply the glue to the lid instead of the paper for even coverage.
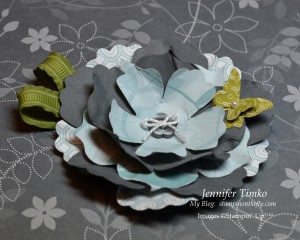
 The flower was made using the Fun Flowers Die. I made one cut with the DSP and one with Basic Gray card stock. I alternated the DSP. Crystal Effects was used as my glue. It has the added benefit of adding some substance to the base of the flower which is helpful when attaching it to the box. I thought the addition of some Beautiful Wings butterflies added a little something special (the Kiwi Kiss paper is the back side of the Basic Gray design). I found that the Lucky Limeade Ruffled Ribbon was a nice go-with to the Kiwi Kiss paper and used it to make the leaves. Of course a couple of Basic Pearls were “needed” to finish off the butterflies. The label for the front is a piece of 1″x2″ Basic Gray paper. Once I commit to how I am using this, I will complete the label.
I initially thought that I would use this as a card organizer. But as I mentioned a while ago, I had lost one of my Embossing Folders. This may become the home for those and some other Big Shot items like the little Embosslits and I guess I’ll have to make a second one for cards.
Glad you were able to stop in today. I am working on Christmas card for a class next week and the next Creative Crew Challenges. The paper is flying and the ribbon is out of control. I’ll be back next week to share some of these creations! Have a great weekend!


8 Comments
Absolutely gorgeous! Thanks for all of your helpful tips!
Very pretty, Jen! I love that flower on top and the butterfly accents.
Beautiful box. And -doh- what a great idea to use it for storing embossing folders. (As she smacks herself in the forehead like in the v8 commercials….)
So pretty! Great idea to use this for your embossing folders and embosslits!
I love it – love your embellishments! How did club go?
Love how you decorated this box! I miss the bulk buys…
Great idea to store embossing folders in there! Love it!
Hey Jen, your box is gorgeous!! Love your flower on top — awesome choice for the DSP. I really loved that you gave tips on putting the box together — wish I would have seen this before I did my box. I had to call DS to find out why my sticky strips were not on the correct side, only to find out that I had to re-fold the box (yah, that was a big “dah” moment for me). Thanks for stopping by my blog!
Sandi