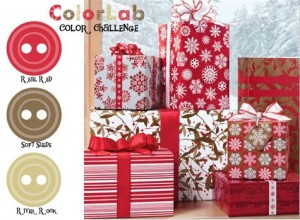
There was great cause to celebrate when River Rock came back during the Color Renovation!! I was down to the last of my stash and could only use it sparingly. I love how it changes with different pairing of color! Imagine how happy I was to see this week’s Color Lab colors…take a look:
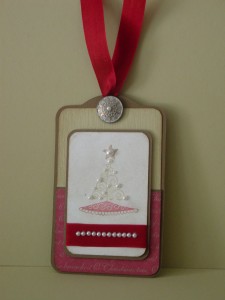
 River Rock is great with Soft Suede (and Early Espresso, for that matter) and adding Cherry Cobbler, awesome!! I went a little different route as I continue prepping for Christmas and made a tag. I may have gone a little pearl crazy on this one but who can stop once you get going on those fun little things??!! Admittedly, this will have to be for a VERY special package…good thing my husband doesn’t read this very often!! Enough typing…here is the tag:
 I’m in love with this little tree from Holiday Hoopla and the pearls just went where the ornaments are on the stamp. I even added a pearl to the Antique Brad to finish the look. The base of the tag is the Two Tags Die for my Big Shot. I can’t wait to see this one on the package. I found some Cherry Cobbler wrapping paper (yes, I took my card stock with me) and this will be perfect!
I hope the rest of your week goes well. I have a lot to do to finish getting ready for my family’s Christmas so I probably won’t post again until next week. Thanks for stopping in today!!
You may have noticed that the colors this week include Real Red and not Cherry Cobbler. Apparently in my Christmas chaos, I missed that fact. I hope you like the tag with the Cherry instead…sorry about that!
Stamp: Holiday Hoopla; Paper: Deck the Halls DSP, River Rock, Soft Suede, Very Vanilla; Ink: River Rock, Soft Suede, Cherry Cobbler; Accessories: Basic Pearls, Cherry Cobbler Seam Binding, Shimmer Paint (sponged on image panel), Big Shot, Two Tags Die, Antique Brads
All products are Stampin’ Up!

10 Comments
Beautiful!
What a pretty tag! Love the pearl details.
So beautiful! The pearls are such a wonderful touch!
Well, I think we should take you out back with a wet noodle because you used the wrong color! 🙂 Great tag!
So pretty!! I love all the pearls… and the Cherry Cobbler. 🙂 The Antique Brad is adds lots of charm.
This is a great tag! I’ve been SO into tags lately. And I couldn’t agree more about the River Rock comeback. I was down to a very few scraps when I got the good news!
Stunning!!! I love the tag and the embellishments such as the pearls and brad. They really do add the perfect finishing touches!
By covering the tag base, you can’t see the crease, correct? Can you still see it from the back? Or were you able to eliminate the crease mark somehow? I’m trying to figure out how to do this as I love this particular tag and would love to figure out how to use it without having to fold it all the time.
It works with Cherry Cobbler OR Real Red! Probably Always Artichoke, too, though that wasn’t the challenge. 😉
Gorgeous tag, I love all the details! River Rock has quickly become one of my favorite colors too – makes me wonder why I didn’t like it when it was an In Color.
I love those pearl accents–Cherry Cobbler is my go to color this year!