After all the holiday preparation, the team at SUO Challenges is a little punchy this week!! We are creating projects with our punches and can’t wait to see how you use yours. Now I will freely admit that I am not a “punch art” talent but I know that many of you are. I always love seeing what people create!
There is nothing quite like a punch to simplify your life and make a quick card so I went with that idea for my card. This is a birthday card for a friend of my oldest son. She loves orange so I figured a Pumpkin Pie flower was just the thing! I punched out 9 Scallop Circles from some Brights Designer Paper and layered them alternating the patterns. The background was the Old Olive dots pattern from the same DSP and plain Old Olive card stock. The sentiment is from Inviting. I got the sketch from a Fall-to Layout Challenge (171) from a couple of weeks ago. Once you punch out the Scallop Circles, just crumple the papers to soften the fibers. Then layer them (with a Basic Black scallop as a base) and re-fluff. I sewed them together but you can use a brad too.
My mom is leaving today and we have been busy with all the holiday stuff. I hope to be back a little later in the week with some new things. I hope you are having a great week. Thanks for stopping by and I will see you again soon!
Stamp: Inviting; Paper: Brights Designer Paper Pack, Old Olive, Whisper White, Basic Black; Ink: Basic Black; Accessories: Scallop Circle Punch, Neutrals Button, White Taffeta Ribbon, Dimensionals
As I sit here on Christmas Eve I realize that I haven’t posted in over a week. I, like many of you, have been running around getting everything ready for Christmas. My cards are finally all sent and most of the presents are wrapped. My children are doing a bit of arts and crafts for final decorations. My mother is here enjoying the chaos of two little boys as they get more and more excited for the big day. In short…not much time for posting. I have been working on some projects for the new year so I will have lots for you as we get into January.
I thought it appropriate to show you two final cards using Bright Hopes. I might as well have called these “A few of my favorite things”. My favorite Christmas set this year, my favorite color combination (Vanilla/Always Artichoke), my favorite embossing folder (Framed Tulips) and my favorite ribbon (Seam Binding). This first version doesn’t photograph as pretty as it is in person. I used Naturals Ivory paper and embossed the wreath with Clear Embossing Powder (over Versamark/Always Artichoke). I didn’t make lots of them but enough to share with some close family and my club members.
The second version was a bit quicker with no heat embossing. I used the lovely tree and Very Vanilla card stock on this one.
I hope that all of you have a happy holiday season. Whether it be Christmas, Hanukkah, or Kwanzaa, I hope that you are surrounded by family and friends. I feel blessed to share my stamping adventures with you and I thank you for sharing your thoughts back with me. I wish you peace and joy!
See you next week with some new challenges and maybe (I really hope I can get one done) a preview of the new Occasions Mini.
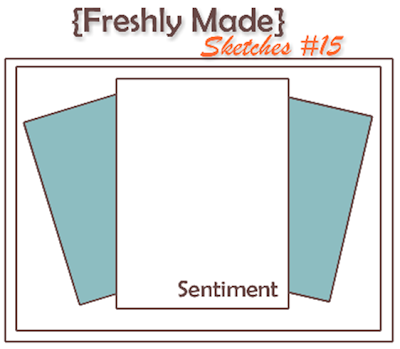
Happy Wednesday! I am here with Freshly Made Sketches Challenge #15. The lovely and talented Cindy Hall from Pretty Impact brought us the sketch today. I love that it is different and made me think a bit. I tend to go towards linear things so those little tilted panels seem to add such interest!
I knew when I saw the layout that I wanted one of the snowmen from Snow Much Fun to be on the center panel. I chose this little trouble making fellow because my boys really like him. They love that he has a sly grin as he gets ready to start a snowball fight (much like two little boys I know). I wanted to make him a little bit vintage but with a “clean” twist. No distressing or sponging here. I used the colors from Well Worn DSP as my starting place to color the snowman (Not Quite Navy, River Rock, Early Espresso). I then chose this Not Quite Navy print for the panels and River Rock stock as a background. It was still missing something so I added some River Rock Seam Binding. What was that??? River Rock?? Ok, I really added some Very Vanilla Seam Binding that had been dyed River Rock. Dying is a great solution when you only need a little of a color. A button tied with Linen Thread and a part of a sentiment from Teeny Tiny Wishes punched with the Jewelry Tag Punch were the finishing touches.
I hope you like my “vintage light” version of a snowman. Just wait until you see what the rest of the team has made. As always, their work is so fantastic!
Thanks so much for stopping it today! I hope your week is going well. See you again soon!
Stamps: Snow Much Fun, Teeny Tiny Wishes; Paper: Well Worn DSP, River Rock, Early Espresso, Watercolor; Ink: Not Quite Navy, River Rock, Crumb Cake, Stazon, Blushing Bride, Tangerine Tango; Accessories: Blender Pen, Very Vanilla Seam Binding, Neutrals Buttons, Linen Thread, Sticky Strip, Mini Glue Dots
For the next two weeks the team at SU Only Challenges is celebrating December holidays…all of them! The challenge is “Merry and Happy” and we want to see the cards you make to share your joy.
This is the time of the season that I tend to lean on some favorites to make my remaining cards. I am woefully behind on my Christmas cards and Dasher came to the rescue (again). I combined him with one of the prints from Frostwood Lodge DSP. The sketch comes from Inkspirations Challenges #99. I love that I could use those little squares and get a pop of color. The sentiment comes from Bright Hopes. Early Espresso Baker’s Twine was used to tie up a Crumb Cake button. I think I’ll be making a few more of these!
When you see what the rest of the team has made you will be so impressed. It is clear that we love our December holidays!! Can’t wait to see what you will make!
I’ll see you tomorrow with a Freshly Made Sketch! Until then, thanks for dropping by and have a great day!
Stamps: Dasher, Bright Hopes; Paper: Frostwood Lodge DSP, Early Espresso, Crumb Cake, Whisper White; Ink: Cherry Cobbler, Early Espresso; Accessories: Early Espresso Baker’s Twine, Neutrals Buttons, Dimensionals
Big post disclaimer…I did none of the work for this post other than taking the picture (my watermark is simply there as protection)!! But I was so excited about this that I had to show you!
One of my dear stamping friends Brenda came over yesterday to stamp and she brought me the most lovely surprise! Now it is no secret that I think Dasher is one of the best stamps ever created by Stampin’ Up. That little reindeer has worked hard for me since the day he showed up on the big brown truck. My stampers know this too, of course, since they get to make things with him every year. Brenda found Dasher a friend for me and then packaged them together. Yes…I was jumping up and down.
Brenda found Prancer from a company called Scentsy and knew how much I would love him too. I mean really, look at him and the colors of his warmer (this company sells warmers that melt scented wax). So not only did Brenda get this for me, she then went and created a card to go with it. Seriously, how amazing is that??!! Just look at the two together!
She made this gorgeous center step card with Dasher embossed in Black. It is even more striking in person! And the rhinestones add the perfect sparkle! How lucky am I to have such a talented and generous friend??!! I knew you would all love seeing this so thanks for letting me share.
Hope you have a wonderful weekend. More Christmas cards will be coming your way next week (and maybe a sneak peek of the new Occasions Mini). Thanks for stopping by today!
Welcome back to another challenge from Freshly Made Sketches! I am the hostess this week and this is my very first sketch! I love square cards so it seemed perfect to use one this week. I also know that in the middle of holiday card making I seem to end up with lots of designer paper scraps. I hoped that this sketch would provide a way to use them.
When I intially designed the sketch I had intended to use it very literally with a snowflake from Northern Frost. I realized, however, that I have been using that die a whole lot so wanted to shake it up a bit….but not too far. I went with my go-to stamp set for the season this year, Bright Hopes. I love this wreath! Jen Mitchell has been using her Deck the Halls DSP from last year on a lot of cards lately and I have been admiring them all! I went digging in my paper pile. Low and behold…I had some! Yippee! And how pretty it is with the wreath! I wanted to add a little bow to the wreath and chose to do another fork bow (tutorial here). I used the Early Espresso Quilted Ribbon for this one. I chose to put the sentiment in place of the snowflake and keep it clean.
Well, since the design team has already made some fabulous cards with the sketch, I am breathing a bit easier. Make sure you stop over the the challenge site and see them. I love the variety of interpretations! I know you will show us even more cool ways to use the layout!
Thanks for stopping by today. I hope you are having a great week! See you again soon!
Stamp: Bright Hopes; Paper: Deck the Halls DSP (retired), Early Espresso, Very Vanilla; Ink: Early Espresso; Accessories: Early Espresso Quilted Satin Ribbon, Dimensionals
Hi everyone! I am here today with another of my Creative Crew Challenge projects. The Creative Crew Gallery is so inspirational this month. You’ll be amazed by the variety of projects! Staying within my chosen colors of Early Espresso, Cherry Cobbler and a neutral, the challenge is to create a home decor item (keyword: CCREW1211HF, CreativeCrew).
The amazing and talented Connie Babbert from Inkspired Treasures created a card for one of the Freshly Made Sketches challenges that had a cool Christmas tree on it. Immediately I knew I wanted to turn it into a tag. I contacted her to make sure it was okay to CASE (Copy and Share Everything) for a class. Not only did she say yes, she had a brilliant suggestion. Her card used real buttons but for a tag class (5 tags of each design) that isn’t practical. She said to use the Buttons #5 Die. Problem solved!! Stampin’ Up demonstrators are really some of the most generous people I know! I adjusted the measurements a little from hers. My largest triangle is a 1 3/4″ square cut on the diagonal and then a 1 1/2″, 1 1/4″ and 1 ” square cut the same way. The sentiment is pulled from the Season of Joy word stamp and the tree trunk is Early Espresso Quilted Satin Ribbon.
Now just look at my little bag on my entry way table. Isn’t it great?? I stamped the tissue paper with the snowflake from Bright Hopes to make it coordinate with the colors of the tag. I also found some wrapping paper that matches this tag for my presents so cross another thing off of the Christmas to-do list!
I hope you enjoy this little tag idea as much as my class did! Thanks again to Connie for the idea! I’ll be back tomorrow with the latest Freshly Made Sketches Challenge. This week is my turn on creating the sketch! Thanks for stopping in today. Hope your week is great!
Stamps: Season of Joy, Bright Hopes; Paper: Frostwood Lodge DSP, Crumb Cake, Early Espresso; Ink: Early Espresso; Accessories: Big Shot, Buttons #5 Die, Early Espresso Quilted Satin Ribbon, Baker’s Twine, 1/8″ Hole Punch, Dimensionals, Crystal Effects (on the button)
I mentioned before that the Creative Crew Challenges this month required us to choose a color group for all of our projects. I almost stumbled on the wearable art challenge. What to make with Early Espresso, Cherry Cobbler and a neutral??!! Then I remembered the Deck the Halls fabric!
I found a cool tutorial on these poofy flowers at Jones Design Company and I thought it would be fun to use on a hair band. Now their tutorial has you hand cut flowers out of felt. I let my Big Shot do all the work and it cut my fabric with the Fun Flowers Die (I cut about 5 layers at a time). She also cut the little corner before adding the hot glue and I did not do this step. I did not take pictures (unfortunately) because this was my first try and a big experiment. Wish I had because it was easy! The first thing I did was take my Cherry Cobbler Seam Binding roll and grab the end of the ribbon. Found a center thread and started pulling until I had enough scrunched ribbon to double up for the center. I simply folded it in half, added some hot glue to the ends and stuck it to the center of my felt piece (I did use felt as the base like in the tutorial…might try just the fabric next time). I gave it some time to set up and then started adding the folded up flowers until the base was full. Then I set it aside to dry. I cut a slightly smaller circle from the felt and created a “sandwich”. First the smaller felt piece, then the hair band, finally the decorated felt piece. I attached the two felt pieces with hot glue and smooshed the hair band in-between.
My next critical step was to check it with the toughest critics of all…two 8 year old girls! I knew they would be honest! Two of my oldest son’s best friends helped me out and they are both “pictured” here with permission of their moms. Now I thought about this as a hair band, of course, but apparently one of the new trends in the young girl crowd here is to wear the hair bands on their wrists. I have to say, this is really cute that way!! I am starting to debate other options including velcro. These could be interchangeable but then just making a bunch to go with every outfit is easy enough. I think I may make more for some nieces as a fun treat! I knew was on to something by the reaction of one of the girls. I took the hair band to a workshop at her mom’s house on Tuesday night. I had promised her that it was hers as soon as I was done with pictures and the party. In my packing up I inadvertently put the hair band in my bag and brought it home. She was none too thrilled with me in the morning when she expected to get up and wear it to school. Needless to say, I have fixed my error and saw her wearing it the very next day!
I will give you the cautionary tale of the hot glue gun. Ummm, the glue is hot. Yep, I was a little too quick to touch the glue while sealing the two felt circles and burned my finger. Don’t let it happen to you! My finger is fine…no worries.
Tomorrow is one of my favorite classes of the year, the Christmas Tag Class. I will be back next week with some of the samples! Until then, I hope you have a fantastic weekend! Thanks for stopping in today!
Accessories: Deck the Halls fabric, Cherry Cobbler Seam Binding, Big Shot, Hair Band, Hot Glue Gun, Felt
Happy December everyone! Today I am bringing you the first of my Creative Crew projects for the month. Our overall theme this month is Color My World and the whole team chose different color combinations for their work. My colors choices were Early Espresso, Cherry Cobbler and a neutral. Yes, yes…I chose to work with some of my very favorite colors for the holidays!
I thought this sketch was so much fun and really unique. You have to go see all the different variations that the Creative Crew team came up with!
My card has a very clean feel to it. The contrast of the dark rich Early Espresso and Cherry Cobbler snowflakes against the Very Vanilla really appealed to me. I love that this is a card that can be made in large quantities and mailed without extra shipping charges! Perfect for those last minute Christmas cards! The sentiment is from Season of Joy. I isolated one of the phrases from the big stamp of words. Basic Pearls seem to be just the right finish for these snowflakes. So glad they come in packs of a lot of pearls!! I seem to be using them on everything!
I hope you will be able to join us at Splitcoastampers this month. If you use this sketch the key words are CCREW1211DF and CreativeCrew. I will be posting more projects over the next couple of weeks but if you want to see them all go check out my gallery.
Thanks for dropping by today. I hope that you have a wonderful day!
Stamp: Season of Joy; Paper: Early Espresso, Cherry Cobbler, Very Vanilla; Ink: Early Espresso; Accessories: Big Shot, Northern Frost Die, Basic Pearls
The layout from Freshly Made Sketches this week is courtesy of the amazing Lesley Croghan from Always Playing with Paper. Lesley is an incredibly talented stamper (who apparently never sleeps!). She is the creator of the Freshly Made Sketches Challenge as well as the Paper Players Challenge. All this takes a back seat to her just being a fantastic person…make sure you go check out her blog. I know you will find new favorites there.
I definitely put emphasis on the clean part of the design today. I knew I wanted to use the Silver Glimmer Paper to create snowflakes with my Northern Frost Die and wow are they pretty (sadly, the camera just never captures the sparkle). With the emphasis on those snowflakes I kept the rest of the card fairly neutral. I used the Snow Burst Embossing Folder on both Whisper White and Cherry Cobbler then chose one to show the embossed side and one to show the debossed side. I tied on some Cherry Cobbler Seam Binding for balance and then topped off the snowflakes with Basic Pearls. Yes, I did color them Cherry Cobbler. You see, I have a brother-in-law that used to work for Sharpie and when I was up visiting their house a couple of weekends ago I asked if they had this color. When my dear sister-in-law said she did, she was kind enough to let me come home with it. I debated adding a sentiment but, after staring at the card for a couple of days, decided to go without. I may add it on as a tag from the bow. What do you think??
You will be amazed by the work the design team has for you this week. Such wonderful variety!! I can’t wait to see what you do with the sketch…so many choices for those shapes!
I’ll be back tomorrow with my latest project for the Creative Crew. Until then, have a great day!! Thanks so much for dropping by!
We use cookies on our website to give you the most relevant experience by remembering your preferences and repeat visits. By clicking “Accept”, you consent to the use of ALL the cookies.
This website uses cookies to improve your experience while you navigate through the website. Out of these, the cookies that are categorized as necessary are stored on your browser as they are essential for the working of basic functionalities of the website. We also use third-party cookies that help us analyze and understand how you use this website. These cookies will be stored in your browser only with your consent. You also have the option to opt-out of these cookies. But opting out of some of these cookies may affect your browsing experience.
Necessary cookies are absolutely essential for the website to function properly. This category only includes cookies that ensures basic functionalities and security features of the website. These cookies do not store any personal information.
Any cookies that may not be particularly necessary for the website to function and is used specifically to collect user personal data via analytics, ads, other embedded contents are termed as non-necessary cookies. It is mandatory to procure user consent prior to running these cookies on your website.

 There is nothing quite like a punch to simplify your life and make a quick card so I went with that idea for my card. This is a birthday card for a friend of my oldest son. She loves orange so I figured a Pumpkin Pie flower was just the thing! I punched out 9 Scallop Circles from some Brights Designer Paper and layered them alternating the patterns. The background was the Old Olive dots pattern from the same DSP and plain Old Olive card stock. The sentiment is from Inviting. I got the sketch from a Fall-to Layout Challenge (171) from a couple of weeks ago. Once you punch out the Scallop Circles, just crumple the papers to soften the fibers. Then layer them (with a Basic Black scallop as a base) and re-fluff. I sewed them together but you can use a brad too.