Skip to content

SUOC54 – For the Kids!

SUOC54 – For the Kids! published on 2 Comments on SUOC54 – For the Kids!

Our theme over at SUO Challenges this week is near and dear to my heart – For the Kids!!  Let’s face it, kid projects and cards are always such fun to make.  They bring out the kids in all of us who create, I think!  The team has come up with all kinds of awesome ideas so get ready to pin and CASE!
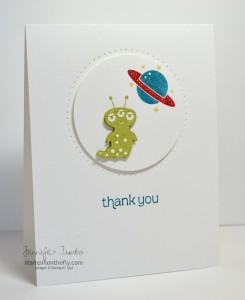
I went with a really clean card for this one.  Why?  Because these were mass produced!!  I made them as birthday thank you cards for one of my sons and needed to make quite a number of them.  The best part is that while it is clean, it still has some great little elements that make it special.  First of all, I am in love with this little alien from Blast Off.  My guys love this set and they actually helped me choose this fellow and his color (Lucky Limeade).  I stamped him and the planet on Whisper White and the punched them out with my 2-1/2″ Circle punch. Then I stamped another alien, fussy cut him and popped him up on a Dimensional.  I used the new Essentials Paper-Piercing Pack to pierce a circle and then put the punched circle up on some more Dimensionals.  The sentiment is from Made For You.

Making cards like this is fun, especially when the kids pitch in to help.  I hope you will share your projects for the kids with us this week!

Back tomorrow with a new Freshly Made Sketches challenge.  I hope you are having a great week so far.  See you soon!

Stamps:  Blast Off, Made For You; Paper:  Whisper White; Ink:  Lucky Limeade, Island Indigo, Real Red, Daffodil Delight (all Stampin’ Write Markers); Accessories:  Essentials Paper-Piercing Pack, Paper-Piercing Tool, Stampin’ Pierce Mat, Stamp-a-ma-jig

Triple Time Snowflakes

Triple Time Snowflakes published on 4 Comments on Triple Time Snowflakes

I am so excited to be a Monday Guest over at the Pink Paper Bakery!  This is a group of Stampin’ Up demonstrators who work together on this fun blog!  So much inspiration and talent!  They asked me to share a card with them and I think I have just the right one.

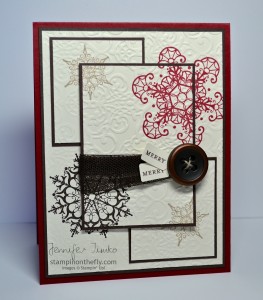
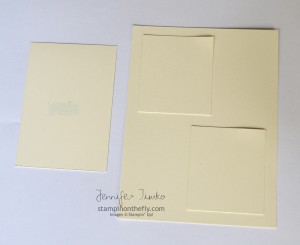
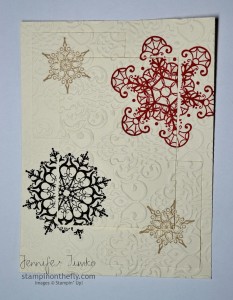
I have been seeing the Triple Time technique everywhere and finally gave in to trying it after seeing a card by the amazing Ann Schach.  She changed up the layout a bit from some others and I loved the effect!!  I knew that the snowflakes from Snowflake Soiree would be fantastic for this technique and got right to work.  Another super talented stamper, Dawn Olchefske, has a tutorial on the technique that I viewed before giving this a go.  The key to the technique is the illusion that you have stamped multiple times and and magically lined them up perfectly.  While I do love my Stamp-a-ma-jig, even I would not have the patience to line everything up for multiples of this card!!  LOL!  So I started with a base of Very Vanilla (3-7/8″ x 5-1/8″).  I cut two rectangles of Very Vanilla to 1-7/8″ x 2-1/8″ and another one rectangle to 2-3/8″ x 3-3/8″.  As per the tutorial, attach them to the base using a repositionable glue since you will need to pull them back up and attach their “frames”.

Once you have these in place, stamp your images.  You will need to apply a little extra pressure to the stamping to minimize the gap that will happen where the layers meet.  Now I like to use 1/8″ borders (and did here) but a wider border is a bit more forgiving in the “magic” of this technique.  You may need to play with it a bit to find what works best for you.  After I stamped, I embossed the image using the Lacy Brocade Embossing Folder.  I found that this helps in the reassembly part since you can use the embossing pattern as an additional guide.

You can see the gaps I was talking about in this picture.  Now, you carefully (take your time) pull the layers apart and then attach the back border panels (frames) to the layers.  I used Early Espresso for this with the panels as follows:  4″ x 5-1/4″, two panels 2″ x 2-1/4″, 2-1/2″ x 3-1/2″.  I’m guessing this makes the measurements above make a bit more sense.  *smile*  The base of the card is Cherry Cobbler.

I folded a small piece of the Early Espresso 3-1/2″ Tulle Ribbon in thirds and tied on a Brushed Bronze Button with some Linen Thread.  The middle panel is raised up on Dimensionals.  Finally, I added the sentiment from Teeny Tiny Wishes (I inked only part of the stamp with a Stampin’ Write Marker) that was punched with the Jewelry Tag Punch and attached with Mini Glue Dots.

I hope you like this card as much as I do!  I made this with my Holiday Catalog Class last weekend.  We all agreed that the technique takes a little patience but is well worth it!

My thanks to the Pink Paper Bakery for letting me be a guest!  I’ll be back tomorrow with the latest SUO Challenge.  Have a great day!

Stamps:  Snowflake Soiree, Teeny Tiny Wishes; Paper:  Very Vanilla, Early Espresso, Cherry Cobbler; Ink:  Early Espresso, Cherry Cobbler, Crumb Cake; Accessories:  Big Shot, Lacy Brocade Embossing Folder, Early Espresso 3-1/2″ Tulle Ribbon, Brushed Bronze Button, Linen Thread, Dimensionals, Mini Glue Dots

Freshly Made Sketches First Anniversary

Freshly Made Sketches First Anniversary published on 10 Comments on Freshly Made Sketches First Anniversary

Happy Wednesday to you all!!  It is a very exciting day and the whole team at Freshly Made Sketches is celebrating the first anniversary of the challenge!  You’ll notice that I don’t have a sketch posted….hmmm.  That is because we are opening up EVERY sketch from the last year as a choice.  Good luck with that because I had a very hard time choosing!!  Click on over to the blog and there is a link to all the previous sketches.  Not surprisingly, the team has outdone themselves.  We are even welcoming back Rita Wright and Linda Callahan for this one!

I went with this awesome sketch originally created by Linda Callahan.  I loved so many cards that were made with this sketch and I thought it would be fun to make one really different than my original.

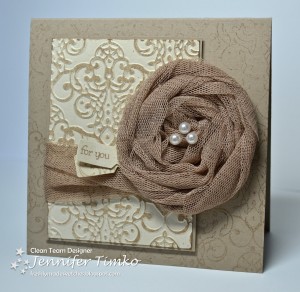
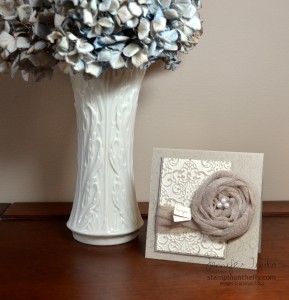
I am so completely in love with the new 3-1/2″ Scalloped Tulle Ribbon and have been wanting to make one of these flowers with it.  It is so easy now that Stampin’ Up has the new 2-1/2″ Jumbo Sticky Rounds.  I simply tied a knot in the end of the ribbon and stuck it to the middle and started wrapping in circles.  You twist the ribbon as you wrap and I love how some of the loose scallops add to the look of the flower.  I applied the ribbon straight from the roll of ribbon so I don’t have a length for you.  I do recommend this technique, though, since you won’t waste one little bit of the ribbon that way!  A Naturals Ivory panel was embossed using the Lacy Brocade Embossing Folder and then lightly brayered with Crumb Cake ink to highlight the pattern.  Now that background panel on the base…you’ll notice it matched the embossing folder perfectly.  Nope, it isn’t a stamp….I used the embossing folder to stamp it!  Just brayer the ink onto the folder and carefully stamp it down.  Now of course it doesn’t hold ink like the rubber but the effect is pretty for a card like this.

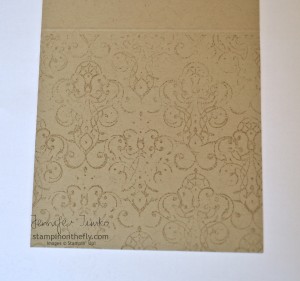
This is what it looks like when the panel is stamped with the folder.  Cool, huh?  I love so many of the patterns on our embossing folders so I think I’ll be using this technique again.

I want to take the time to thank Lesley Croghan and the whole team at Freshly Made Sketches!  I am so inspired by your artistry and so grateful to have the privilege of working with you all.

I was looking back to my post for the first challenge and my card was for the 10th anniversary of 9-11.  I guess that is fitting since my post yesterday reflects on that in a different way.  What a great year it has been for this challenge and I am looking forward to seeing what everyone makes for this one (and all the challenges in the upcoming year!).  Hope you will be able to join us!

Stamps:  Teeny Tiny Wishes; Paper:  Crumb Cake, Naturals Ivory; Ink:  Crumb Cake; Accessories:  Brayer, Big Shot, Lacy Brocade EF, 3-1/2″ Crumb Cake Tulle Ribbon, Jumbo Sticky Rounds, Jewelry Tag Punch, Basic Pearls, Dimensionals

11 Years Later

11 Years Later published on 12 Comments on 11 Years Later

I have written a before of my personal experiences on September 11, 2001 on both the 9th and 10th anniversaries so today I will simply ask you to remember.  Remember where you were, how you felt and how you wanted the people you love near you.  It is easy in our day to day lives to focus on the small.  That day, though, many of us forgot the small and petty things in our lives and re-evaluted what was really important to us.  The best way to remember, then, is maybe to go back to that feeling.  Because I will just bet that the things that became important were not things at all but the people you love so much.

I recently had the privilege of flying a brand new arrival into Ronald Reagan Washington National Airport.  When we fly around the country, planes fly to specified points and sometimes on specified routes (like highways in the sky).  In order to facilitate getting traffic in and out of busy airports there are arrival corridors and departure corridors.  These arrivals, too, are like roads and you fly from point to point on the way in.  The brand new arrival is called the “Freedom” 1.  In actuality is is called the FRDMM ONE because the points all have 5 letter names.  When we fly this, I promise you that your crews will never forget.  The points:

HONNR  BRVRY  COURG  (Honor Bravery Courage)

WEEEE  WLLLL  NEVVR  FORGT  SEPII  (We Will Never Forget Sep 11)

ALWYZ  STAND TGTHR  (Always Stand Together)

and finally:

LETZZ  RLLLL  (Let’s Roll)

It is emotional to fly that approach from each point to the next but the fact that they built it says everything.  So today, I remember and I celebrate that my deployed husband returned yesterday (a week early).  Talk about what is important.  The smiles on my boys faces when they were surprised by daddy was worth more than anything in the world.

I wish you a safe and peaceful Patriot’s Day!

In memory of:

United 93:  Jason Dahl, LeRoy Homer, Lorraine Bay, Sandra Bradshaw, Wanda Green, CeeCee Lyles, Deorah Welsh

United 175:  Victor Saracini, Michael Horrocks, Robert Fangman, Amy Jarret, Amy King, Kathryn Laborie, Alfred Marchand, Michael Tarrou, Alicia Titus

American 11:  John Ogonowski, Thomas McGuinness, Barbara Arestegui, Jeffrey Collman, Sara Low, Karen Martin, Kathleen Nicosia, Betty Ong, Jean D. Roger, Dianne Snyder, Amy Sweeney

American 77:  Charles Burlingame III, David Charlebois, Michele Heidenberger, Jennifer Lewis, Kenneth Lewis, Renee May

Blog candy winner

Blog candy winner published on No Comments on Blog candy winner

Thanks for all the wonderful comments last week and I really appreciate everyone who reads my blog!  I have to say that 100,000 hits is quite an amazing number to me.  I never thought that when I started this blog back in January 2010 that anything like this would be possible.  I wanted to use it as a way to share what I love and to grow as a stamper.  Never would I have imagined the friends that I would develop along the way!  How grateful I am for the generosity and kindness in the stampers I meet in person and online.

Without further waiting….the blog candy winner is Nanc (I used a random number generator).  I will send you an email and get your mailing address from you.  Hope you enjoy the Googly Ghouls!

This week will be a little calmer for posts but I have been working ahead for some upcoming challenges, a class this week and a surprise guest blog visit.  Make sure you come back on Wednesday for the One Year Anniversary of Freshly Made Sketches!  It is going to be so much fun!!  See you soon!


Fab Friday (on Thursday)

Fab Friday (on Thursday) published on 22 Comments on Fab Friday (on Thursday)


My friend, the oh so talented Mindy Backes,  has started up a brand new challenge called Fab Friday.  The design team over there are some stamping “rock stars” and are a group I admire so much.  So of course I had to play along on their first challenge!!  The first one is a sketch…and you know that I cannot resist a sketch!  This one is really great and I had such fun with it!

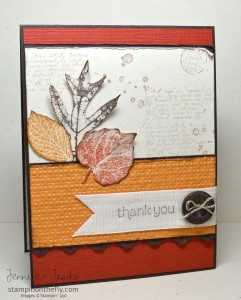
Here is the final proof this week that the Seasonal Stamper’s Disorder (my inability to stamp in anything other than the “seasonal” colors) has taken over completely.  Bring on the fall colors!  Naturally, with fall colors come the most wonderful set, French Foliage.  Love this one so much!  I found an old piece of Cajun Craze textured card stock in my stash and it was just the right size for a card base.  Meant to be!  I did some distressing and decided that adding texture to the More Mustard panel with the Square Lattice Embossing Folder was needed.  Perfect!  I love these leaves cut out so I just stamped, cut and sponged the edges a bit.  For the sentiment, I pulled out my new 7/8″ Cotton Ribbon from the Holiday Catalog (you didn’t think I could pass up a new ribbon did you?).  It is designed to be stamped on so I used it for my sentiment from Made For You.  I have to say that this card makes me happy!  Not sure why, but it does.  I LOVE, LOVE fall and I particularly love it in Virginia!

*Blog Candy*

In case you missed yesterday’s post, I am giving away some blog candy for coming up on 100,000 blog hits.  I will be giving away a clear mount Googly Ghouls stamp set.  All you have to do is comment on this post, Tuesday’s SUO Challenges post or yesterday’s Freshly Made Sketches post to be entered.  I’ll select one winner from all the comments (sometime after 6p Eastern Time on Sunday, Sep. 9th).  Feel free to comment on all of them for more chances.  Sorry but SU rules don’t allow me to ship outside of the U.S.

I mentioned stamping rock stars before.  Well, this card is also for another set of my favorite stampers…The Paper Players!  Their theme this week is Leaves Are Falling.  Awesome!

Make sure you take the time to go see what each of these groups has created.  You will be so inspired to join in!

Don’t forget to leave me a note!!  I can’t wait to send the Googly Ghouls to someone!!  Thanks for stopping in today.  See you again soon!

Stamps:  French Foliage, Made For You; Paper:  Cajun Craze Textured (ret), More Mustard, Early Espresso, Naturals Ivory; Ink:  Cajun Craze, More Mustard, Early Espresso; Accessories:  Big Shot, Square Lattice EF, Eyelet Border Punch (ret), 7/8″ Cotton Ribbon, Neutrals Button, Linen Thread, Sponges

Freshly Made Sketches #51

Freshly Made Sketches #51 published on 18 Comments on Freshly Made Sketches #51

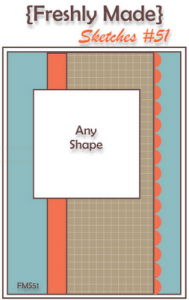
After yesterday’s shabby chic box, today’s project will look seasonal in another way!  This week’s sketch at Freshly Made Sketches comes from Cindy Hall and she has brought us a fabulous one!  So many ways to use that little panel on the side, so many shapes that fit perfectly here!  Cindy’s card is absolutely gorgeous and the rest of the team has some awesome projects too.

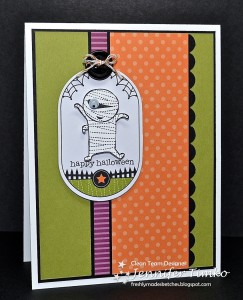
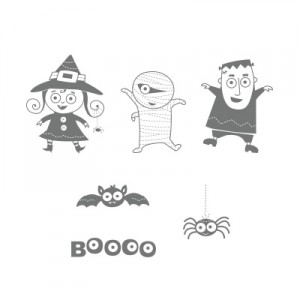
Ok, I finally did it!  After all the adorable projects I have been seeing with Googly Ghouls, I could resist no longer.  I love them!  I love the little mummy and the spider (which is crazy because in general, spiders are NOT a favorite) and the Frankenstein guy!  I see so many cute things to be made with these….so I got the whole  Ghoulish Googlies Bundle.  Guess what, it isn’t just for treat bags!!  I used one of the little tags here as my shape and I am so excited about this card.  I don’t even normally make Halloween cards but I will this year!  I used the sentiment from Teeny Tiny Wishes and it fits perfectly just below the mummy.  The mummy is cut out and popped up on a Dimensional and I added the Pumpkin Pie/White Baker’s Twine from the kit to a button to finish it off.  The Googlies googly eye is part of the kit but can also be gotten separately.  How adorable is it on this guy??!!  The DSP is from my Brights Designer Series Paper Pack but the new Howlstooth & Scaringbone DSP is on the way…could not resist that either!

Now you will notice that this is sketch #51.  You know what…next week is #52 and we will be celebrating the one year anniversary of Freshly Made Sketches!  You will not want to miss it.  Plan some stamping time now!!

*Blog Candy*

Speaking of celebrating, I just realized that I am about to go over 100,000 hits on my blog (at least based on that counter on the side).  To celebrate, I just have to give away something cool!  How about a Googly Ghouls clear mount stamp set??!!  Seems appropriate.  All you have to do is comment on this post, yesterday’s SUO Challenges post or tomorrow’s Fab Friday post to be entered.  I’ll select one winner from all the comments (sometime after 6p Eastern Time on Sunday, Sep. 9th).  Feel free to comment on all of them for more chances.  Sorry but SU rules don’t allow me to ship outside of the U.S.  Thanks for all the support you give to me via this blog!  How lucky I am to be in such a fabulous community of stampers!

So glad you could drop in today.  I’ll be back tomorrow with a card for the brand new Fab Friday Challenge (and also for The Paper Players).  Hope to see you then!

Stamps:  Googly Ghouls, Teeny Tiny Wishes; Paper:  Brights DSP Pack, Lucky Limeade, Whisper White, Basic Black; Ink:  Basic Black Stampin’ Write Marker; Accessories:  Ghoulish Googlies Designer Kit, Dimensionals, Stamp-a-ma-jig, Scallop Edge Border Punch

SUOC53 – Boxes and Bags

SUOC53 – Boxes and Bags published on 8 Comments on SUOC53 – Boxes and Bags

SUO Challenges has such a fun theme this week – Boxes and Bags.  With all the variations of these out there, I’m certain we will see all kinds of fun things!!  Look no further than the design team and you will know what I mean.  There are some awesomely fantastic examples posted!

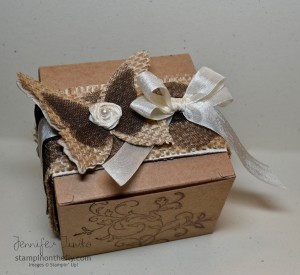
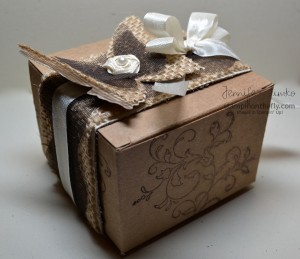
When I saw the theme, the first things that came to mind was the Kraft Gift Boxes.  I love these things…love them!  They are easy to decorate, hold all kinds of cool things and the price is unbeatable!  I have seen lots of cute decorations for these so I wanted to take a different direction.  Sort of shabby chic.  I’m sure you know by now that this isn’t my normal stamping style but I love it and always admire those who do it well.  I wanted to go with the latest trend I’ve been seeing and use some burlap and combine it with different textures.  The burlap is a quick fabric store find and combines so perfectly with our Stampin’ Up products.

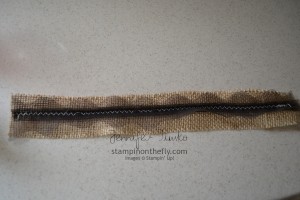
I cut out a piece that was 2″ x 13″ and started seeing how it could form a belly band around the Kraft Box.  After a bit, I figured out that I love the contrast of the new 3-1/2″ Scalloped Tulle Ribbon against the roughness of the burlap.  But how to attach it??!!  Here comes the funny part (you’ll have to pardon the length of the post).  At the beginning of the summer, my mom (who is a quilter) brought me a sewing machine…a really nice one that had been hers.  Way back when I was pregnant with my oldest, I had taken sewing lessons and learned some of the basics.  This is about the time frame where I discovered stamping too.  Well, I haven’t really sewn anything since then and my mom gave me some reminders and machine specific instructions while she was visiting.  Then I put the machine away and continued with the summer craziness.  Well, I realized that sewing was the best way to attach the tulle to the burlap and mostly had the machine set up right…mostly.  Had to call mom to figure out the last details, of course!  She reminds me that with flying airplanes, I should be able to handle a Bernina.  Uh huh.  I practiced on a few scraps and then committed to sewing the pieces together.  As my two boys and one of their friends “supervised” I did it!  I chose a zigzag pattern just to make sure more ribbon got attached and it worked pretty well.  I’ll even show you how it looked if you promise not to laugh too hard at the stitch variations (user error) but they are functional.

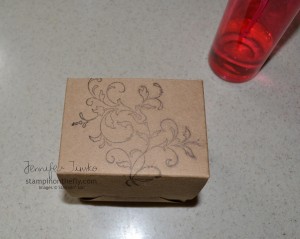
I knew I was planning on an additional layer on top of the stitching so the variations are ok.  You can see that I just bunched the ribbon in the middle to make the scallops the right width.  Using Multipurpose Liquid Glue (Tombo), I attached this layer to some Naturals Ivory Card Stock that had been distressed and sponged with Early Espresso.  I stamped the box with the flourish from Creative Elements in Early Espresso and then spritzed it with water to distress the ink a bit.

Finally I attached some Very Vanilla Seam Binding to the top of the Tulle Ribbon with Sticky Strip and tied on a bow made out of Seam Binding.  The butterfly is made using the Beautiful Butterflies Bigz Die and I cut the large full butterfly out of the burlap and out of some Naturals Ivory card stock.  Then I cut two of the smaller butterflies out of the Tulle Ribbon for layering.  The layers were attached using Crystal Effects.  Finally I added a rosette made from the Seam Binding and topped it off with a Basic Pearl.  The whole butterfly is attached to the belly band using Crystal Effects.

As usual with 3-D items, I had a hard time getting a picture that shows how pretty it is in person.  I didn’t put a tag or any sentiment on it yet since I haven’t figured out who it is for.  I think I will make a coordinating set of 3″ x 3″ note cards to put inside.

Thanks for sticking through the post.  The sewing thing really is pretty funny and the kids’ surprise that it actually worked cracked me up!  I know my mom will get a good chuckle when she reads this!  That said…it could be dangerous.  You may see more sewing (albeit on paper) in the future!!

I’ll be back tomorrow with a new sketch from Freshly Made Sketches!  Hope to see you then!  Thanks for stopping in today!

Stamps:  Creative Elements; Paper:  Naturals Ivory; Ink:  Early Espresso; Accessories:  Big Shot, Beautiful Butterflies Bigz Die, Very Vanilla Seam Binding, Early Espresso 3-1/3″ Scalloped Tulle, Basic Pearls,  Multipurpose Liquid Glue, Crystal Effects, Sticky Strip, Burlap Fabric (fabric store), Kraft Gift Box

Snowflake tags and mini paint can

Snowflake tags and mini paint can published on 2 Comments on Snowflake tags and mini paint can

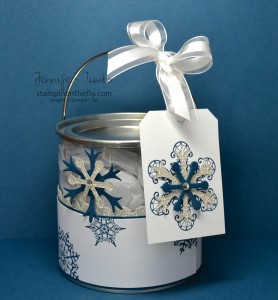
Finally, the details on the mini paint can and the coordinating tags!  I just love these little cans that I got from the Container Store.  They are clear and can be decorated in lots of different ways.  Here I simply cut two pieces of Whisper White, Midnight Muse and Silver Glimmer papers to create a wrap around for the bottom of the container.  I made them short enough that they go under the handle attachment points to keep it easy!  Before attaching them to the can with Sticky Strip, I stamped the snowflakes from Snowflake Soiree and cut the scallops in the Glimmer Paper with the Adorning Accents Edgelit.

I wanted to create a tag for the can and started playing with the snowflakes in the set and the snowflakes in the new Snow Flurry Bigz Die.  What do you know??  They coordinate!  Of course!!  So I cut some out of the Silver Glimmer Paper and Midnight Muse card stock.  I layered two of the flakes on top of the stamped snowflake and then used the inverse flakes to add an embellishment to the can.  Basic Rhinestones were are great last detail to add additional sparkle!  I’m not normally a “glitter gal” but these products sure to make it easy to love shine and shimmer!

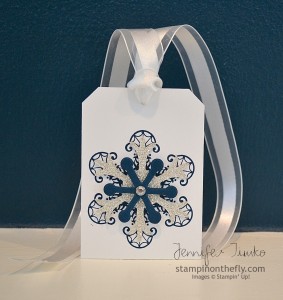
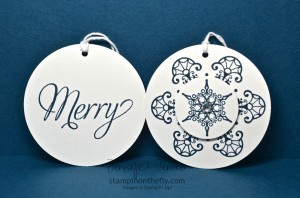
I made a bunch of tags to put into the paint can (along with some other treats).  These are so quick and easy!  I stamped the snowflakes on Shimmery White Paper and punched them out with a 2-1/2″ Circle Punch and a 1-1/4″ Circle Punch.  I just love the words in the Snowflake Soiree set and I chose ‘Merry’ for the back of the tag.  Of course a To/From would be great here too.  The smaller snowflake was layered using a Dimensional and another Basic Rhinestone finished the centers.  I used some White Baker’s Twine for attaching these to bags or boxes.

As many times as I tried, I could never get the sparkle on these to photograph but trust me when I say they are really pretty!  I hope you love these little projects.  Never too soon to start working on teacher gifts or gifts for the special people in your life!!

Thanks for stopping in today.  For those of you in the US, I hope you have a wonderful and safe Labor Day weekend!  See you again soon.

Stamps:  Snowflake Soiree; Paper:  Whisper White, Shimmery White, Silver Glimmer, Midnight Muse; Ink:  Midnight Muse; Accessories:  Big Shot, Snow Flurry Bigz Die, Circle Punches (2-1/2″, 1-1/4″, 1/16″), White Baker’s Twine, White 5/8″ Organza Ribbon, Basic Rhinestones, Mini Paint Can

Freshly Made Sketches #50

Freshly Made Sketches #50 published on 13 Comments on Freshly Made Sketches #50

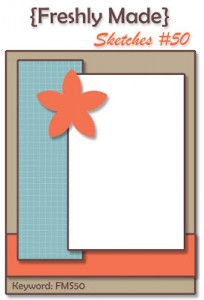
Happy middle of the week!!  I hope yours is going well.  It is time for the latest Freshly Made Sketches Challenge and Lesley has brought us an awesome sketch!!  This is one you will reach for again and again.  I know that I already have some CASEing to do from the design team’s samples this week!

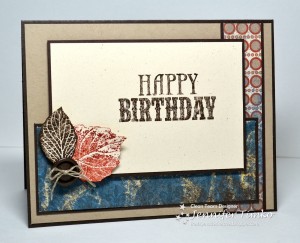
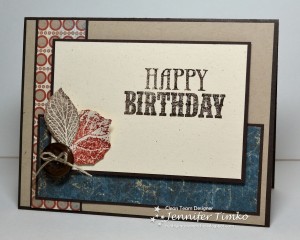
I told you the other day that I am starting to make my “seasonal stamper’s disorder” transition to fall colors (SSD = inability to stamp in anything but the seasonal colors, enabled by Stampin’ Up’s beautiful DSPs).  I needed to make a card for my mom to use for a friend.  You see, she has used some others that I have made for the wife in this family and the poor husband just could not be slighted!  We got to work and created a card with last year’s Well Worn DSP (perfect for a masculine card and I keep it just for that!) and the always just right French Foliage.  Now, I was looking at the sketch when I made the card with my mom but somehow still didn’t follow it.  So that card is pictured below.  I liked it enough that I created a new version with the actual sketch and will have it for a family birthday coming up in September.  Wow, I’m actually ahead??!!  The sentiment is from the new set You’re Amazing and I love how it is large enough to be the focal point!  The leaves were stamped and then cut out and attached with an Early Espresso button.

Here is the original version I made.  Some panels flipped around but otherwise the same card.  Well, I was feeling pretty proud of these and THEN…I saw what the rest of the team has made.  WOW, WOW, WOW!!  Get right over there because their cards are fabulous!

I have spend the last two morning re-organizing my stamp area and you know what???  I am ready to get stamping!!  Really…it was that bad.  I couldn’t even think to stamp with the clutter.  I suspect you will start seeing the results next week and I will have the paint can/tag information from the blog hop (over a week ago) on Friday.  So glad you stopped in today.  I hope your week is wonderful!

Stamps:  You’re Amazing, French Foliage; Paper:  Well Worn DSP, Naturals Ivory, Early Espresso; Ink:  Early Espresso, Cajun Craze; Accessories:  Neutrals Buttons, Linen Thread, Mini Glue Dots, Dimensionals

Primary Sidebar