Happy Monday! I hope your weekend was great! Now that Sale-a-bration is in full swing, I am so happy to be sharing these projects from the Leadership Display Boards. I have another project made with Petal Parade to show you today.
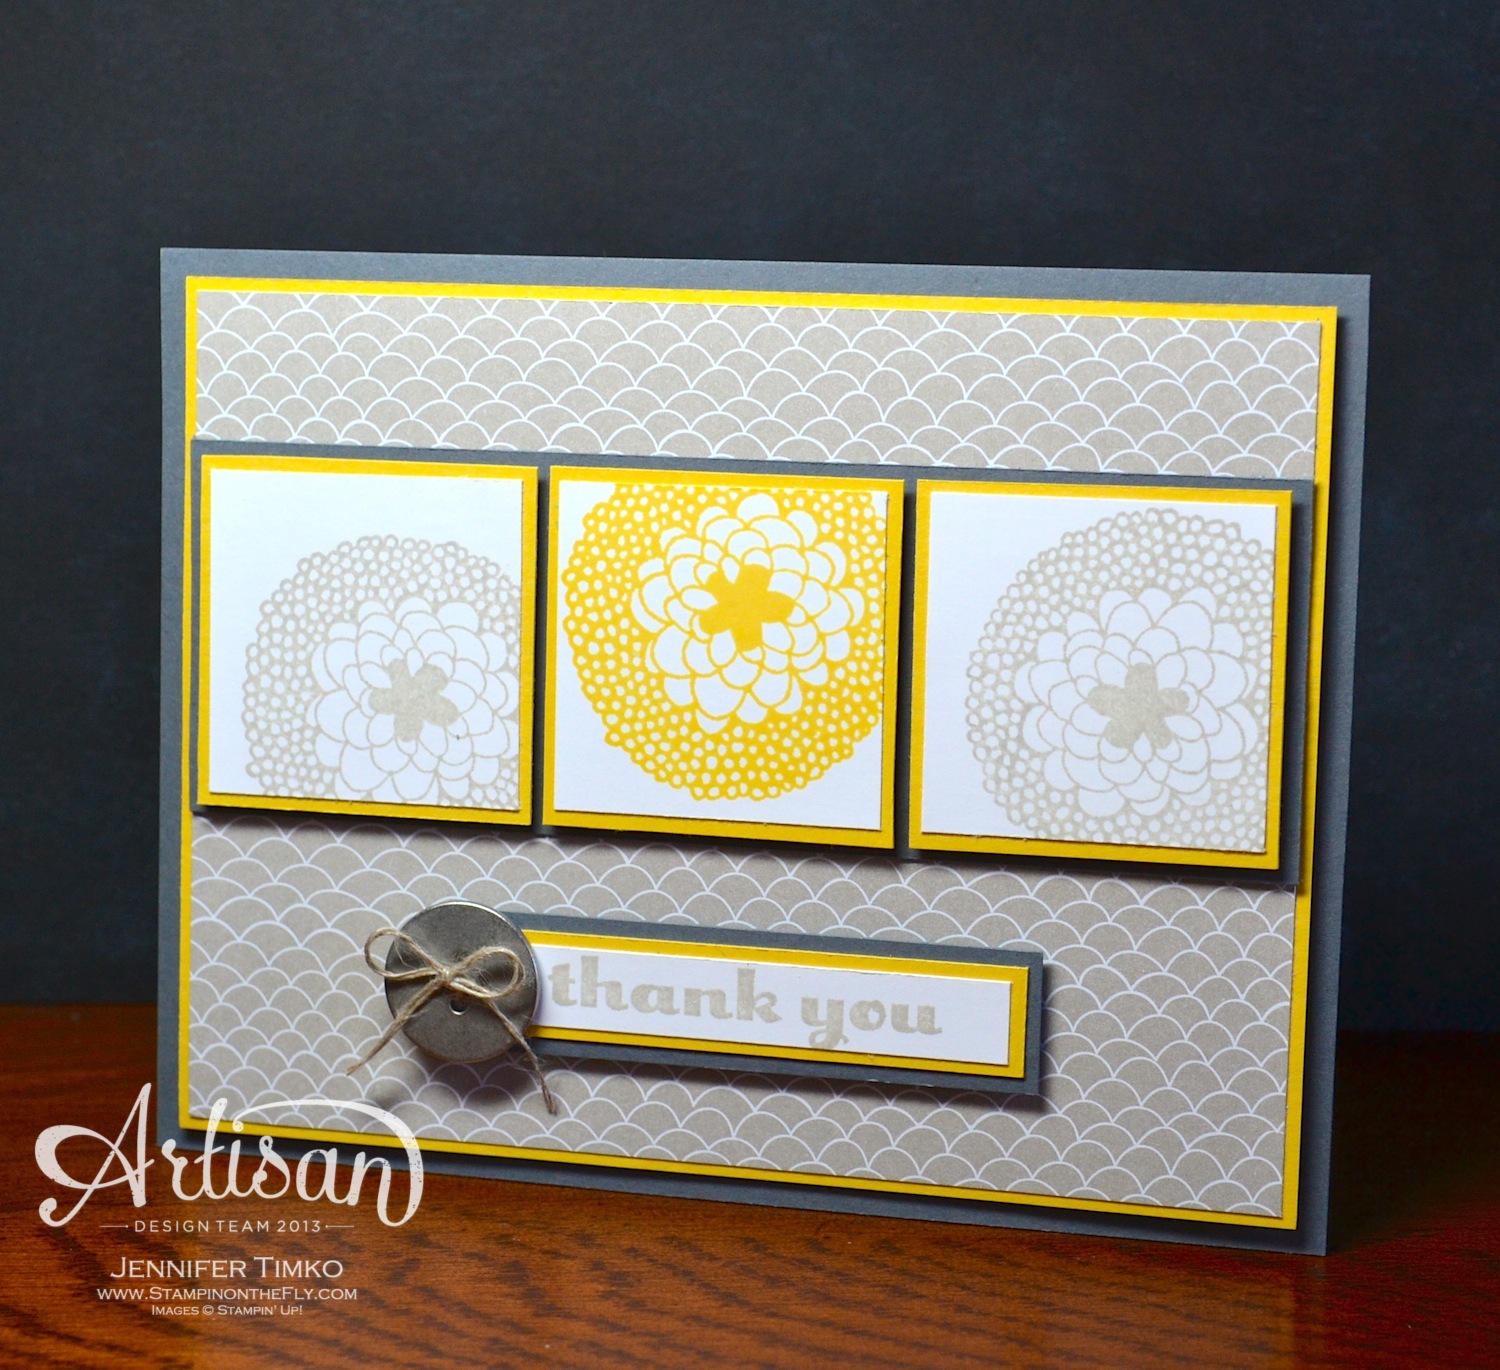
I chose this pattern from the SAB paper Sweet Sorbet and the color and print lends itself to so many cards. I thought I’d use one of my favorite color pairings on this. Sahara Sand, Daffodil Delight and Basic Gray are so cool together. All I did was stamp the flowers a bit off center on each panel. It keeps the stamping simple. The sentiment is from Regarding Dahlias and the little metal button from the Occasions Catalog is wonderful tied with Linen Thread. While there are lots of layers here, the card itself is pretty quick to come together. Another one that would be great in a variety of colors/DSPs.
I’ll be back tomorrow with my first card with the February Artisan box. It is a great one and the team is excited to get going with this one.
The rest of the team is showing their Leadership Display Board projects as well so make sure you take a look!
Almost the weekend and I wanted to show you another of my favorites from my Leadership Display projects. This is one of those cards that isn’t hard to make but something about it makes me really happy.
I think maybe that it is because, as usual, I found that the products from Stampin’ Up coordinated perfectly. This fun print from the Kaleidescope DSP and the triangle in the banners of Banner Blast seem meant to go together! I cut the little strip of DSP and then stamped the banners in coordinating colors (Crushed Curry and Strawberry Slush). The sentiment is from Yippee-Skippee and these fonts are so fun. The DSP and the banners are popped up on Dimensionals and I added in a few Basic Rhinestones to finish.
I hope your week has been going well and that you are enjoying the display projects. I’m actually getting some stamping time today and working on my Artisan projects for next month. Another fun box!! I’ll be back on Monday with another Leadership project.
Like many of you, things have been a little crazy around here. My kids keep having random days off from school due to weather which adds a special form of chaos. *smile* At least they had enough snow last week to get in some sledding! Fortunately I was still able to hold some stamp classes in between that and flying. I love when I get to stamp with my friends! Wishing you a wonderful weekend. Thanks so much for stopping by!!
The rest of the team is showing their Leadership Display Board projects as well so make sure you take a look!
I hope that your weekend was wonderful! Mine was pretty busy. I had some work to do with United and then was home to celebrate my youngest’s birthday yesterday. Made lots of Whoopie Pie Cookies for him to take to school today to celebrate with his friends.
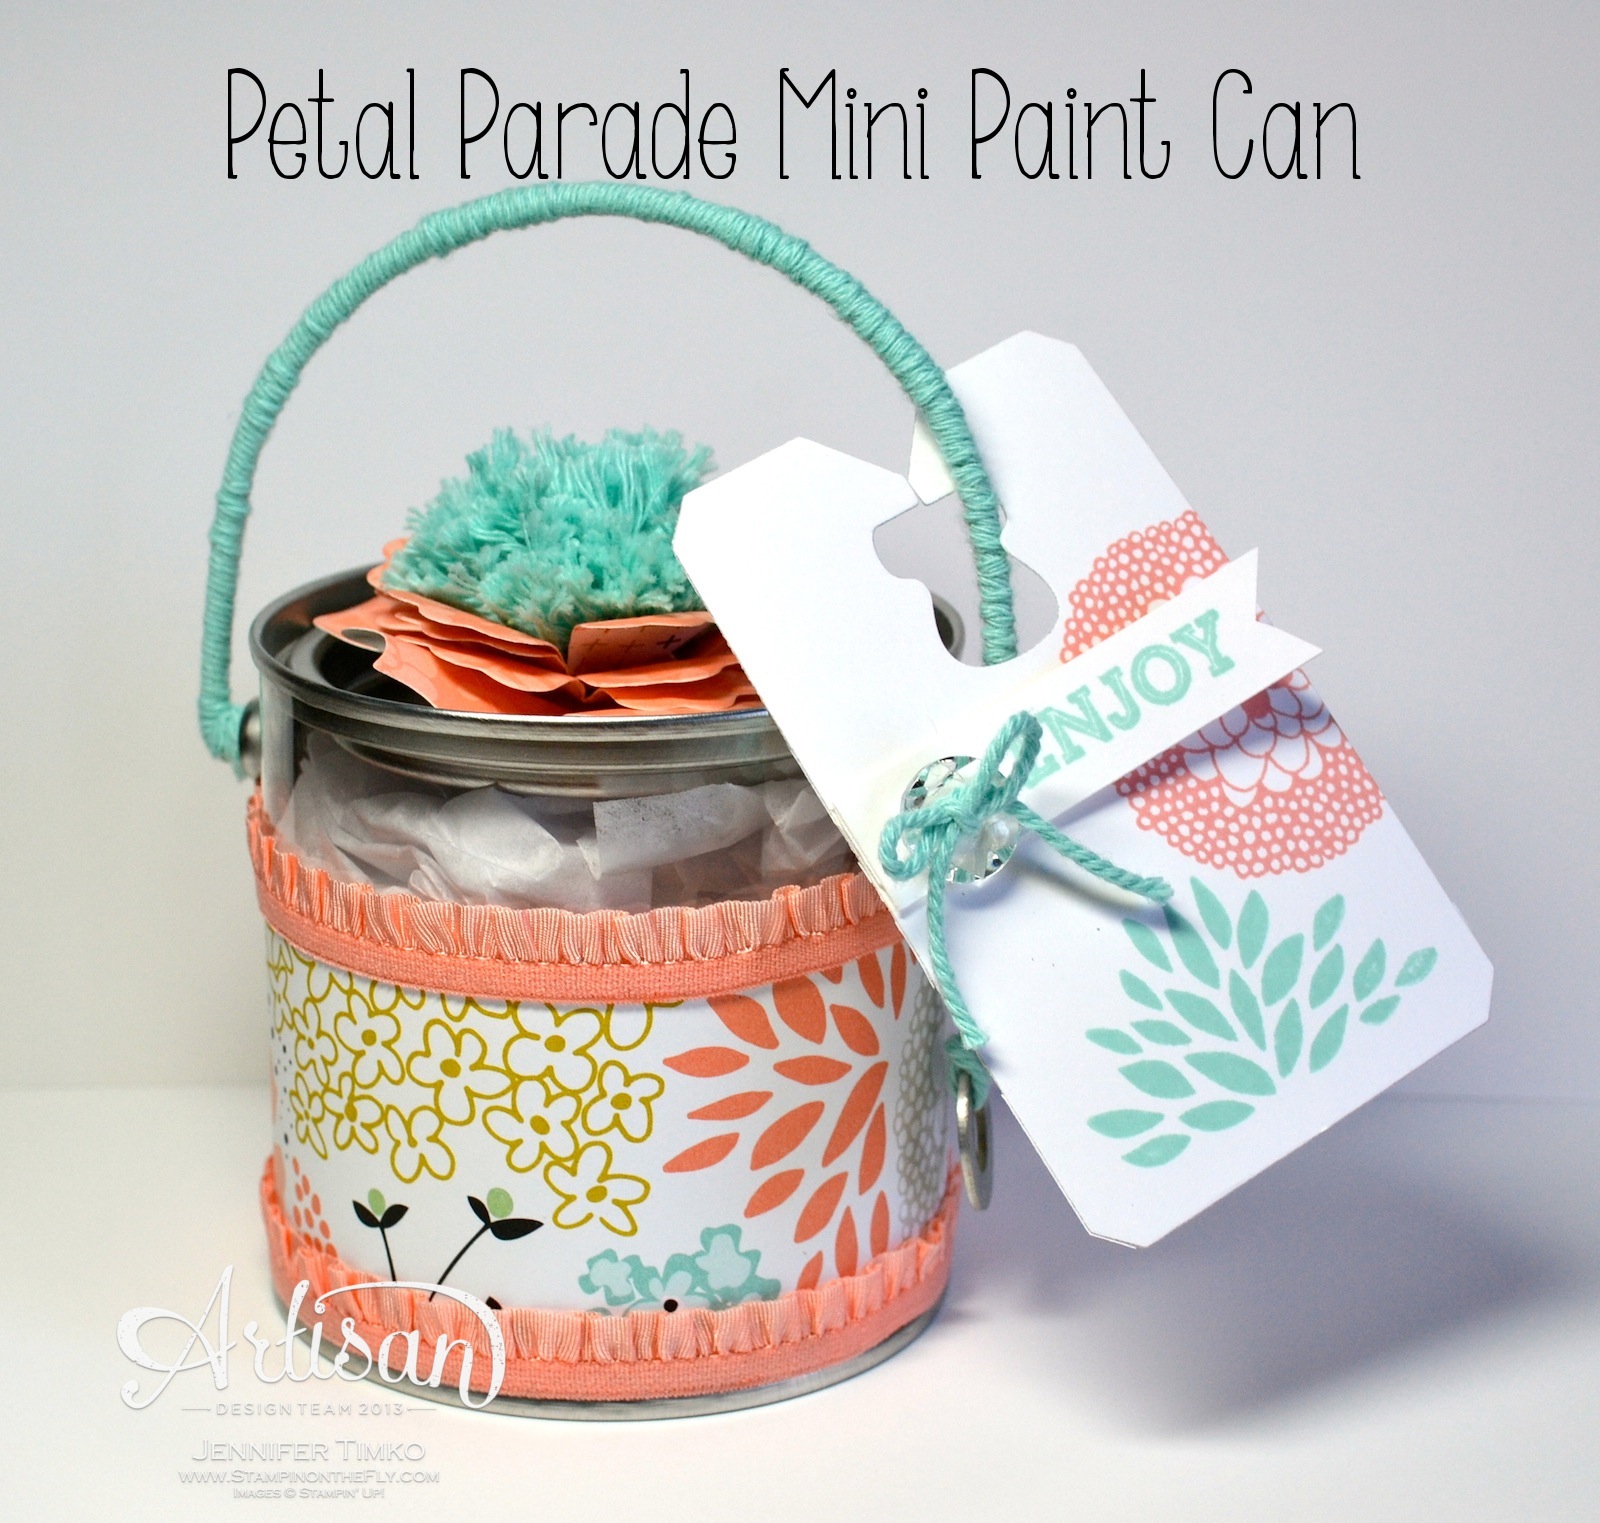
I have another of my Leadership Display projects to share today. This one used the Petal Parade stamp set combined with the Sweet Sorbet DSP to create a fun little treat container.
I love mini paint cans and the new Sale-a-bration (SAB) products make one so fun to decorate. I started by taking a print from the Sweet Sorbet DSP and wrapping it around the can. I cut it narrow enough to fall right under the little handle attachment places. The DSP is attached using Sticky Strip. Then I added on some Crisp Cantaloupe Ruffled Ribbon which is attached using Multipurpose Glue. Already super cute if you leave it at that! But I could not stop, lol! I cut out some flowers using the Fun Flowers Die using my Big Shot and some more of the paper from Sweet Sorbet.
In order to give the flowers a little more dimension, all I did was spritz them with a bit of water and form them on top of the cap of my Multipurpose Glue. Once dry, they keep their shape. So easy but it makes a difference! Then using the twine from the Sweet Sorbet Accessory pack I started working on the flower center. I simply wrapped the twine around two fingers until I thought it was thick enough. Pulled it off my fingers and tied in the middle with another piece of twine. Cut the looped ends to the desired length and fluffed. I attached it to the flower using Crystal Effects as glue. After removing the handle, I took more twine and wrapped the handle. A Glue dot at the beginning and end does the trick for holding it in place and then re-attach the handle. I thought a fun tag would complete it so I stamped using the Petal Parade set using the colors in the paper (Crisp Cantaloupe and Pool Party) then cut out the tag with my Chalk Talk Framelits. A little banner made with Oh Goodie (carried over from the Holiday Catalog) and a Vintage Faceted Button tied with a little more twine to finish. The would be pretty for so many spring occasions and not hard to make a bunch of them!
I hope you like this one. I hope to be back a little later today with a bonus project (hint…it will be on the Stampin’ Up Blog first). Definitely back tomorrow with the latest Artisan Wednesday Wow. The team will be giving you details on the projects shown in the Stampin’ Up Facebook Gallery last Friday.
The rest of the team is showing their Leadership Display Board projects as well so make sure you take a look!
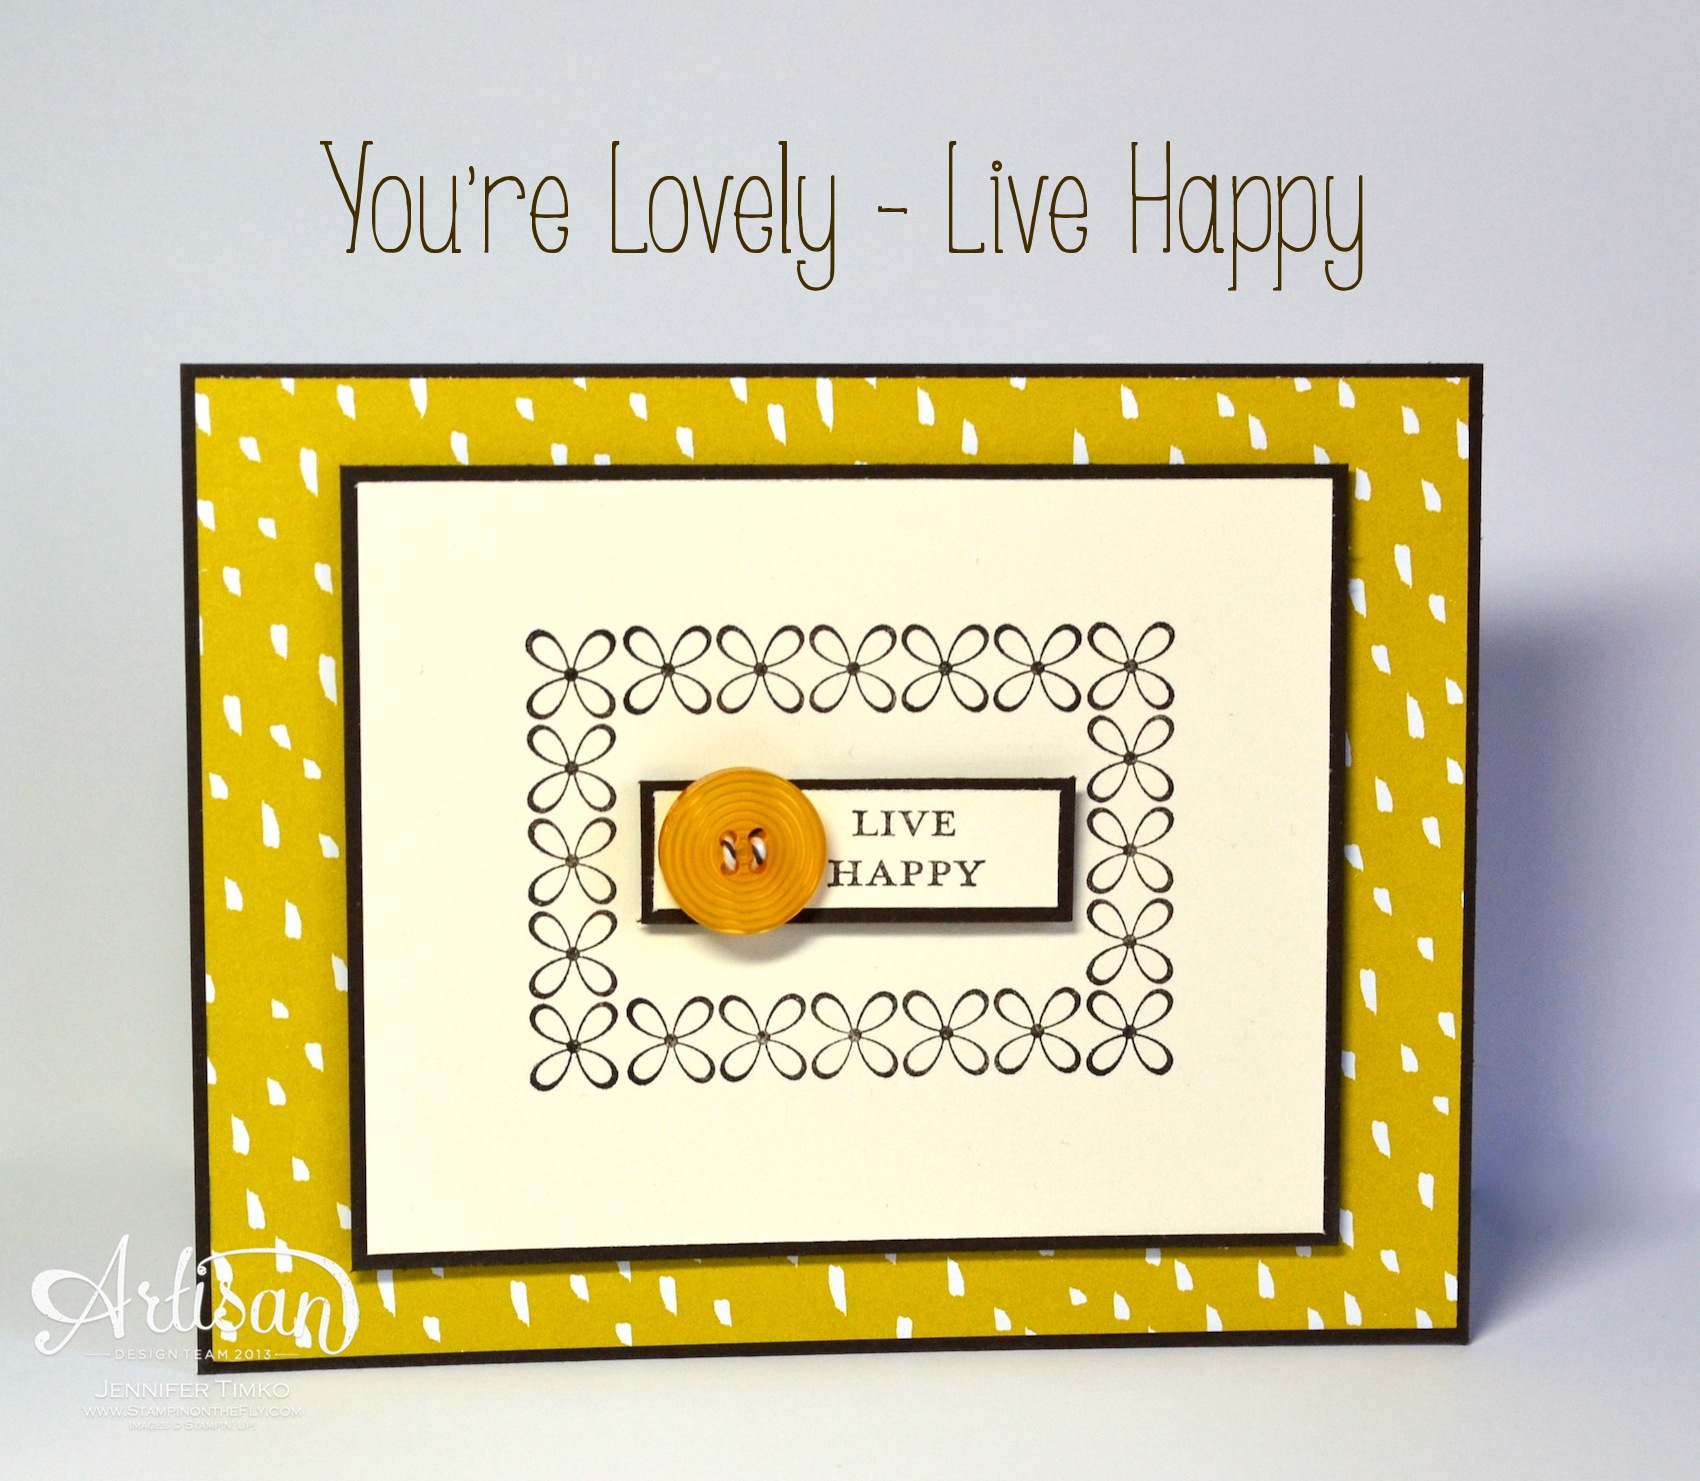
I have my final Leadership Display project of the week to share with you today. I think this Sale-a-bration set is wonderful and it has such flexibility. The pretty flowers are so easy to use, of course, but I wanted to make a card that showcased the sentiments and the little flower border.
I chose to make a pretty clean card that is all about symmetry. Using my trusty Stamp-a-ma-jig I created the rectangle using the border stamp (it is so easy with that awesome tool). I inked it up with Early Espresso and created layers with Very Vanilla and Early Espresso card stock. The pattern is the Summer Starfruit pattern in the Sweet Sorbet DSP (Sale-a-bration). The button is Crushed Curry but goes beautifully here and it is tied with Early Espresso Baker’s Twine.
I hope you are enjoying my projects so far. I will be back on Monday to show you some more.
The rest of the team is showing their Leadership Display Board projects as well so make sure you take a look!
I’m a little late getting my post up today. I had a stamp class this morning (yippee!) and finally got to sit down and share. I’m continuing with my Leadership Display cards today and showing you one that I made with Geometrical.
This stamp set has such clean and graphic art work so I wanted to really play off of that with this card. I chose only one triangle pattern to use and then stamped it in both Midnight Muse and Calypso Coral. Amazing how just repeating an image can have such a wow effect! I did not have the Triangle Punch available when I made this back in November but it will make this card so easy and fun to replicate. Just add in a sentiment from the set and a few buttons. Different colors will change the look and would make a cute set.
The rest of the team is showing their Leadership Display Board projects as well so make sure you take a look!
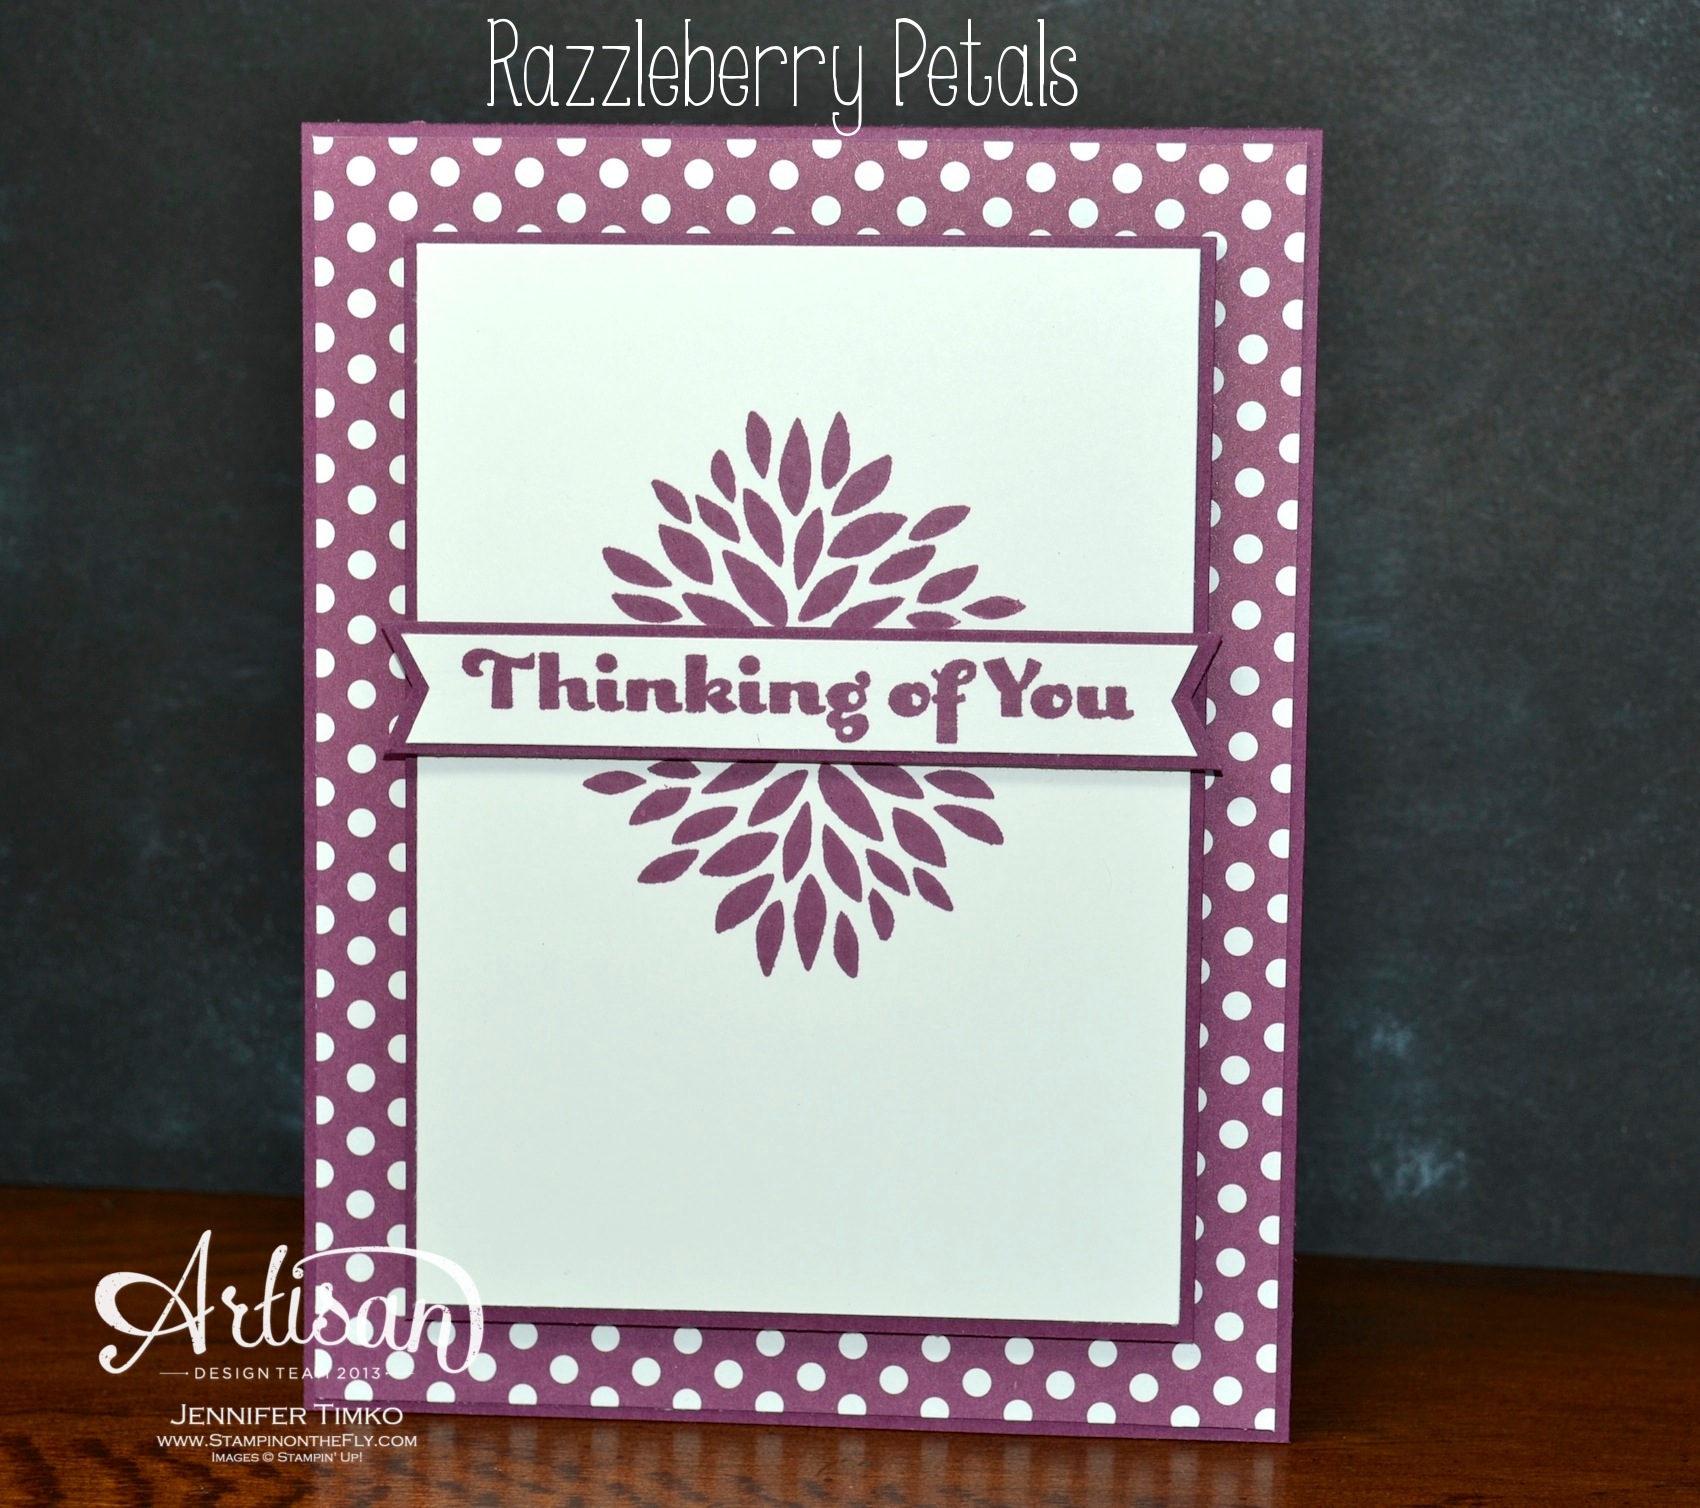
Happy Monday to you! I have another of my Leadership display samples to share with you. This time, I’m showing off the Sale-a-bration set Petal Parade. It is a really fun set, I have to say!
I love this flower image from the set. It is great because you can use it by itself or stamp it twice with the the wide sides facing each other to create a round flower. I sort of split the difference on this one. I separated it just enough to make room for the banner in between. The fun bright colors from Polka Dot Parade DSP always make me think of spring and summer, and I figured we could use a little brightening up at this time of year. The Rich Razzleberry is a super trendy color right now (Stampin’ Up was so ahead on this one!) and I love the monochromatic look. All of that combined to make this quick but yet special card. The sentiment is from Four You, a main catty set that is a must have. I created the banners by using the Hexagon Punch on the ends. Combine the DSP, Four You and the punch and you are there for earning Petal Parade for free during Sale-a-bration. You could make a set of these in all the colors in the Polka Dot Parade paper!
The rest of the team is showing their Leadership Display Board projects as well so make sure you take a look!
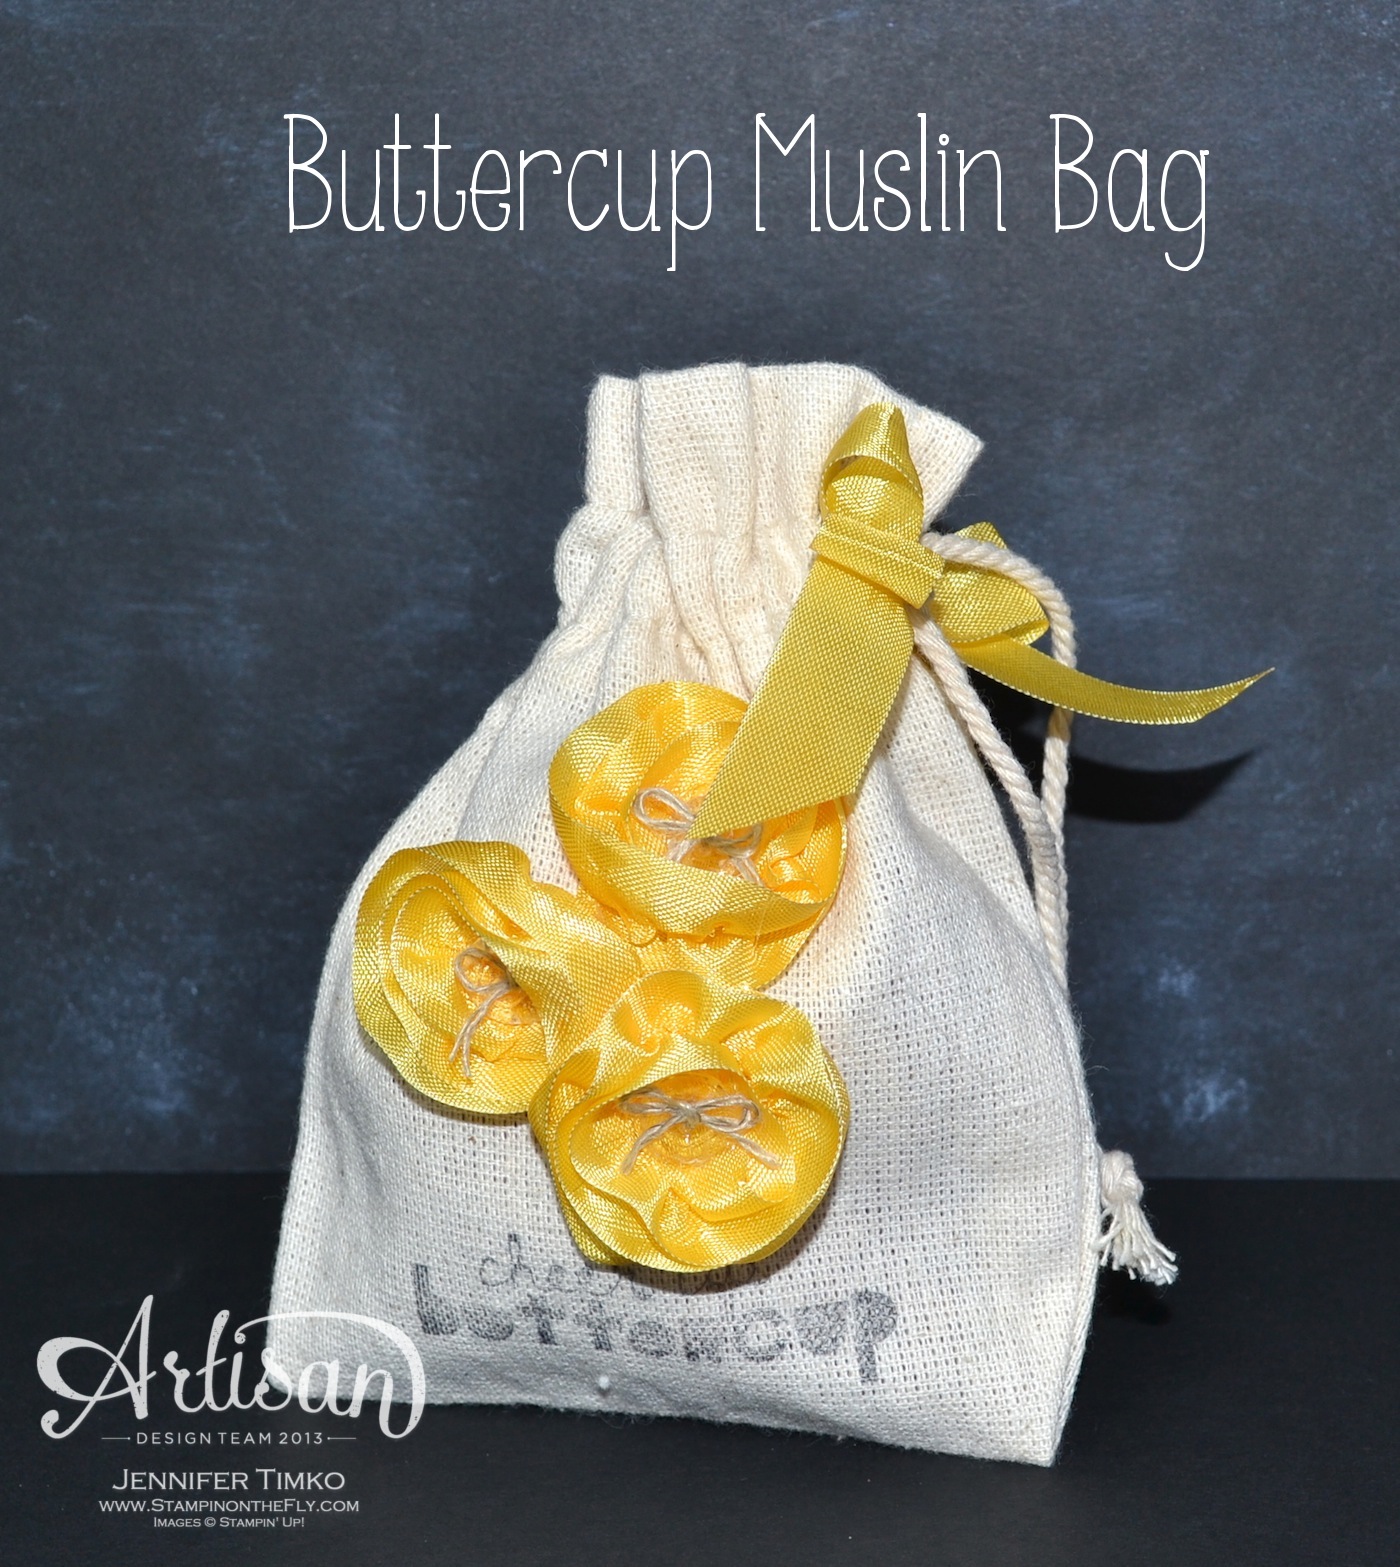
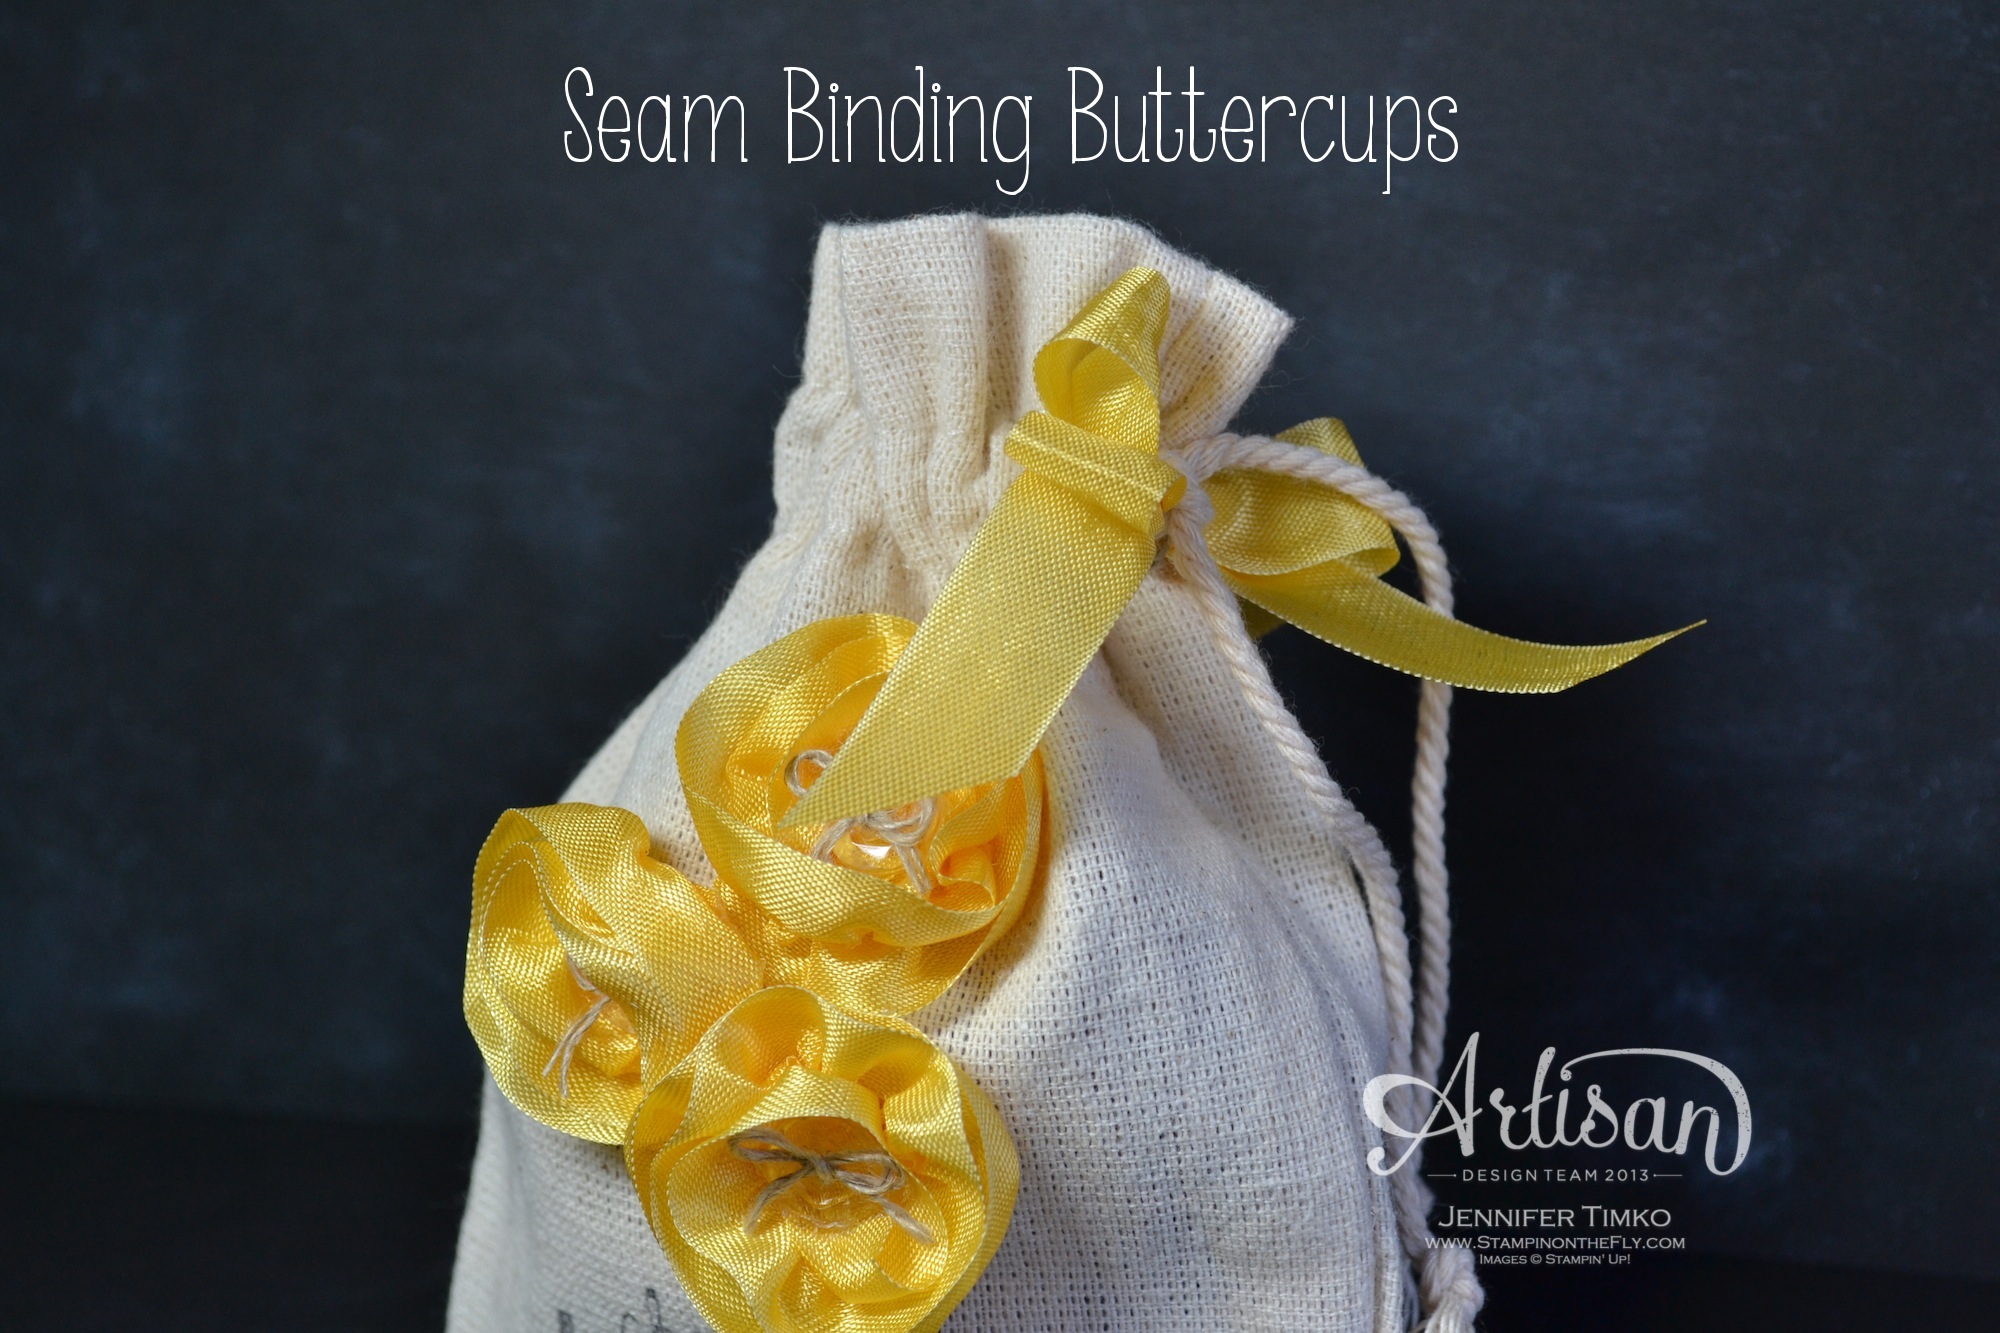
I am back on track showing you a project made with the Occasions Catalog set Geometrical today. When Stampin’ Up asked the Artisan Design Team to be display stampers, the gave us a list of how many cards, scrapbook pages and 3-d projects they needed from us. I have to say that the first time I saw the sentiment “Cheer Up Buttercup” I knew I would have to figure out how to make some buttercups.
Give that I love Stampin’ Up’s ribbons so much, I immediately went to my Daffodil Delight Seam Binding to see what I could do. While still on the roll, I took one of the threads near the edge of the end of the ribbon and started pulling gently. This starts to scrunch up the ribbon and gives it a natural curling action that helps you form a flower. Just keep pulling until you have enough to make a flower of the size you want.
*Hint: It is so much easier to leave the ribbon on the roll as you do this. First it saves ribbon because it is hard to judge how much you will need. Second, it keep the thread from being pulled though. *
Once you have enough, tuck the “ugly” end (where you started pulling the thread) under and then just wrap in a circle. Place a blob (yep, that is the official term) of hot glue on the Silicone Craft Sheet and stick the bottom of the flower in it. Let dry. I put a Vintage Faceted Button tied with Linen Thread in the center of the flower (again with just a touch of hot glue). To finish the bag I stamped the sentiment in Basic Gray ink onto the Mini Muslin Bag and then attach the flowers with hot glue.
*Another hint – Stick your Silicone Craft Sheet inside the bag as you hot glue the flowers on. This prevents the bag from getting glued together as the glue seeps through the weave of the fabric.*
I filled my bag with a flowered potpourri but you could put just about anything in it. Once the bag is cinched, I pinned on a bow made from Daffodil Delight Seam Binding using a Vintage Trinkets safety pin. Such a pretty gift to lift someone’s day!
The rest of the team is showing their Leadership Display Board projects as well so make sure you take a look!
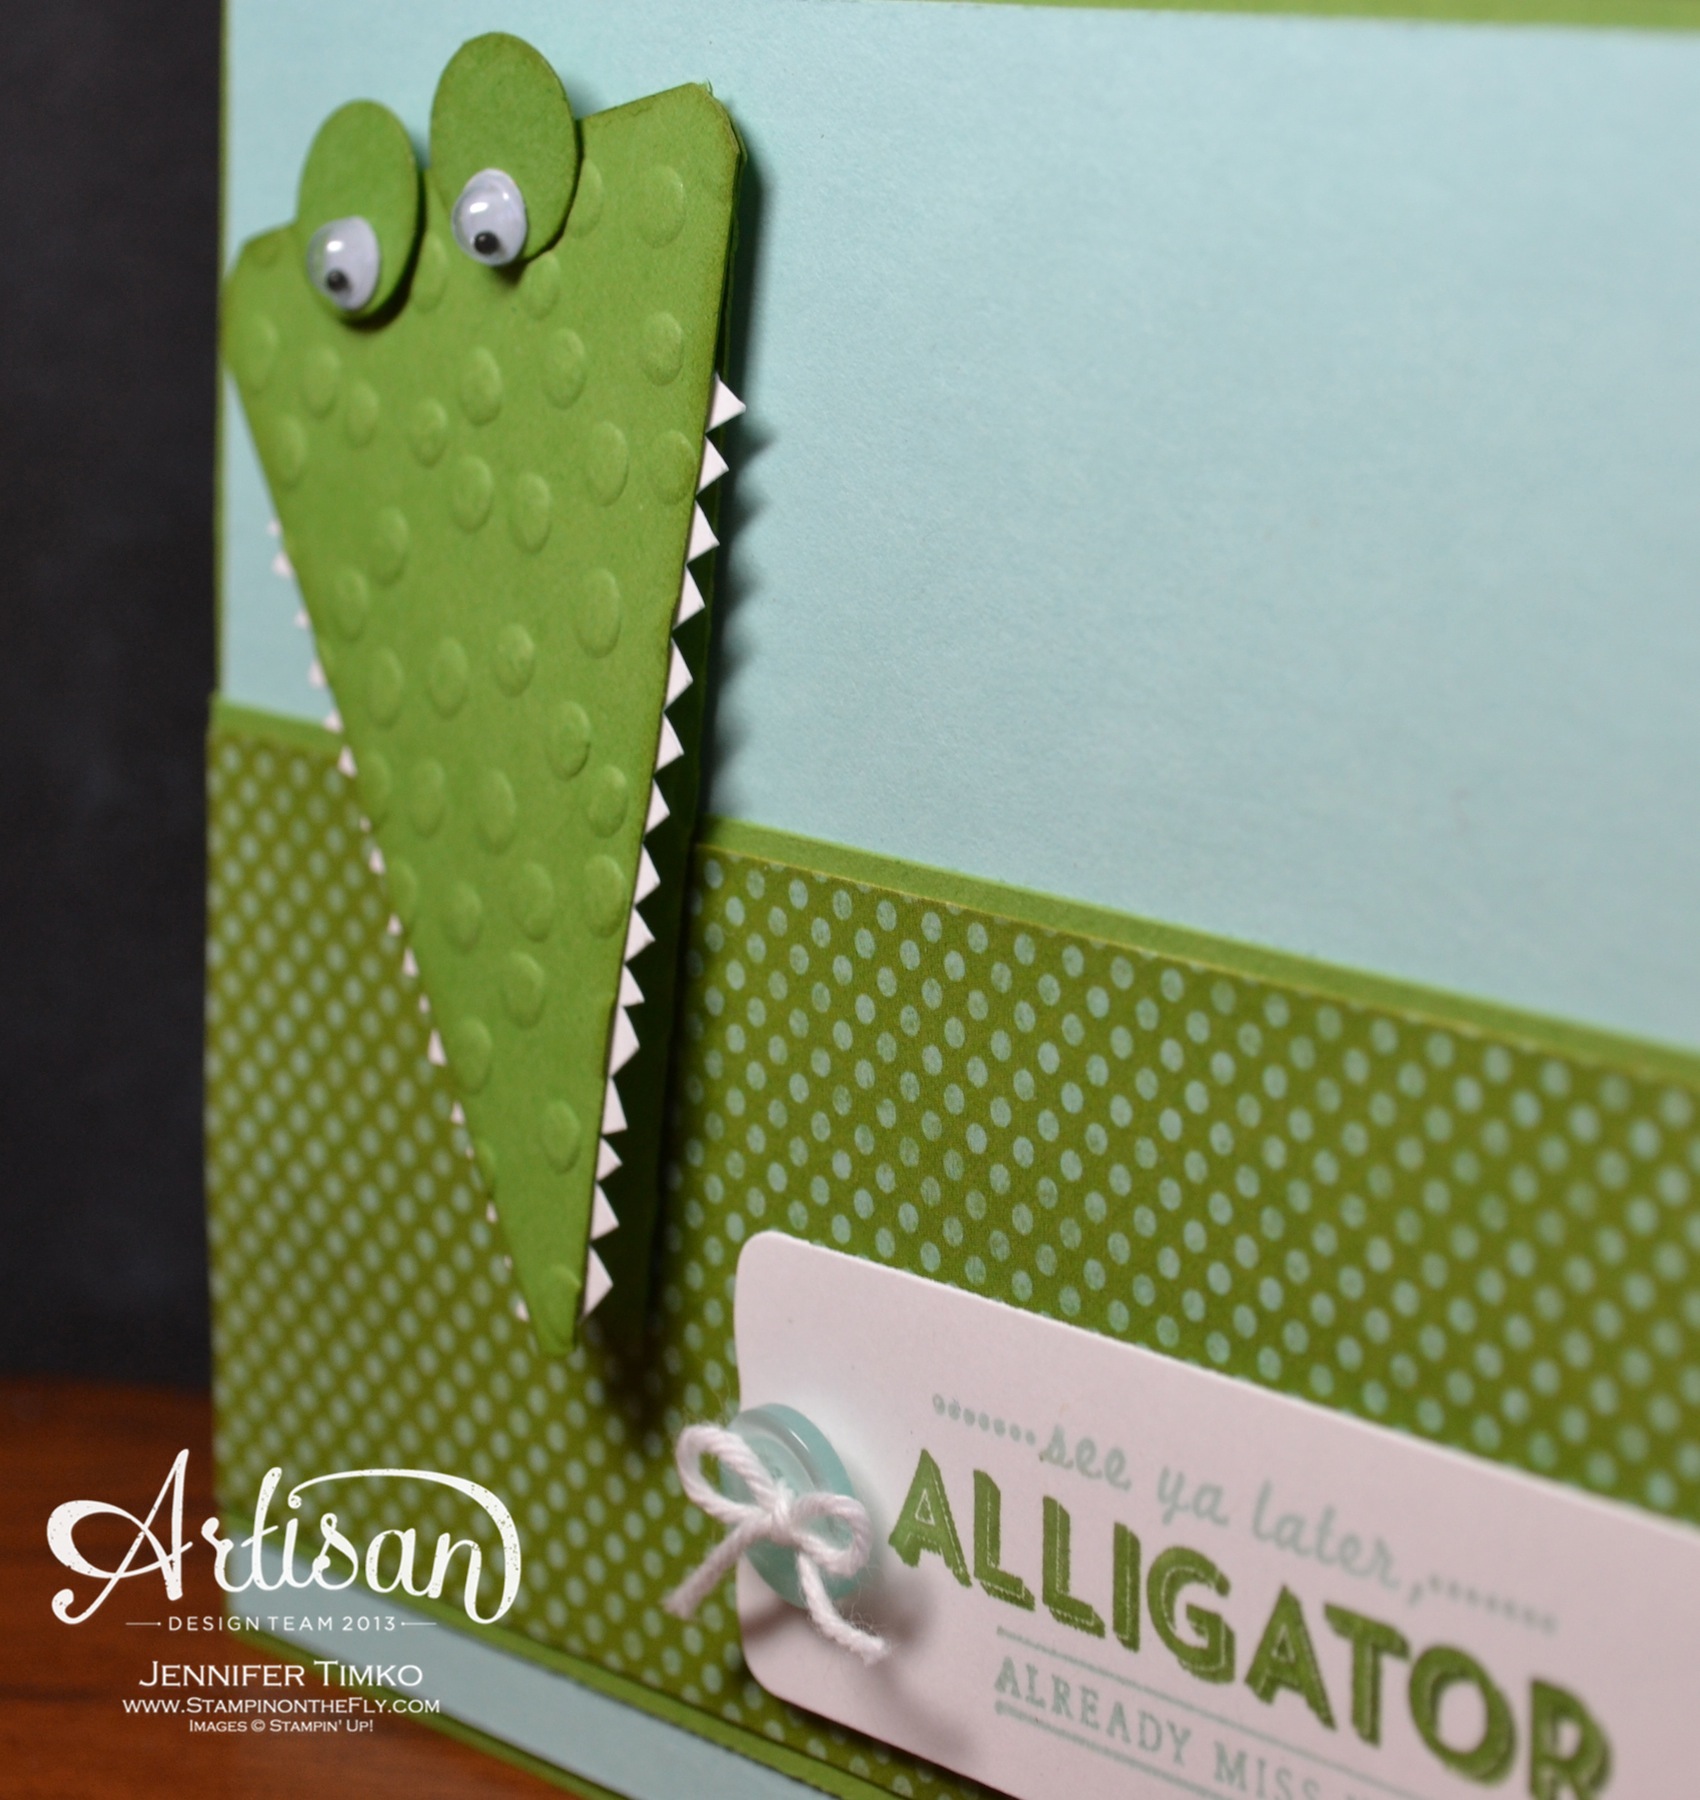
Yep, there is more Leadership fun to share today! In fact, I’m going to share two! I changed up what I am posting (I promised Geometrical) because I thought you’d enjoy seeing a preview of a set that will be available during Sale-a-bration (otherwise known as the most wonderful time of the year for stampers!). The set I am using today is called See Ya’ Later and it has wonderful sentiments.
I have to say that since I went to Florida State University, I haven’t ever spent a lot of energy on “Gator” things (the Florida Gators are a big rival) but when faced with a sentiment this cute I could not resist. I had one of those moments of inspiration and realized that a triangle from my Perfect Pennants Die would make an adorable alligator. I cut out two of them out of Gumball Green (I used the medium sized one) to start. My Envelope Punch Board was sitting on my table at the time and I used the corner rounder on that to round off all the corners. Then, I ran the triangles through my Big Shot with the Decorative Dots Embossing Folder (another Sale-a-bration product). On the bottom triangle, I scored it with my Simply Scored Tool 1/2″ from the wide end and then, using Sticky Strip, attached the two triangles. This scoring allows a bit of a hinge so his mouth can open some. I cut another triangle out with the Big Shot from Whisper White then hand cut the little triangle on the edges.
After trimming off the wide end a bit, I positioned it inside his mouth and attached. Put a Dimensional in between the layer of his mouth to help it stay open. Finally for his eyes, I used a 1/2″ Circle Punch and attached some googly eyes. The alligator goes up on Dimensionals to allow his mouth to be open on the card. The DSP is from Epic Day and the back panel is Pool Party Card Stock. The inks match and I used a Pool Party button and some White Baker’s Twine to finish it off.
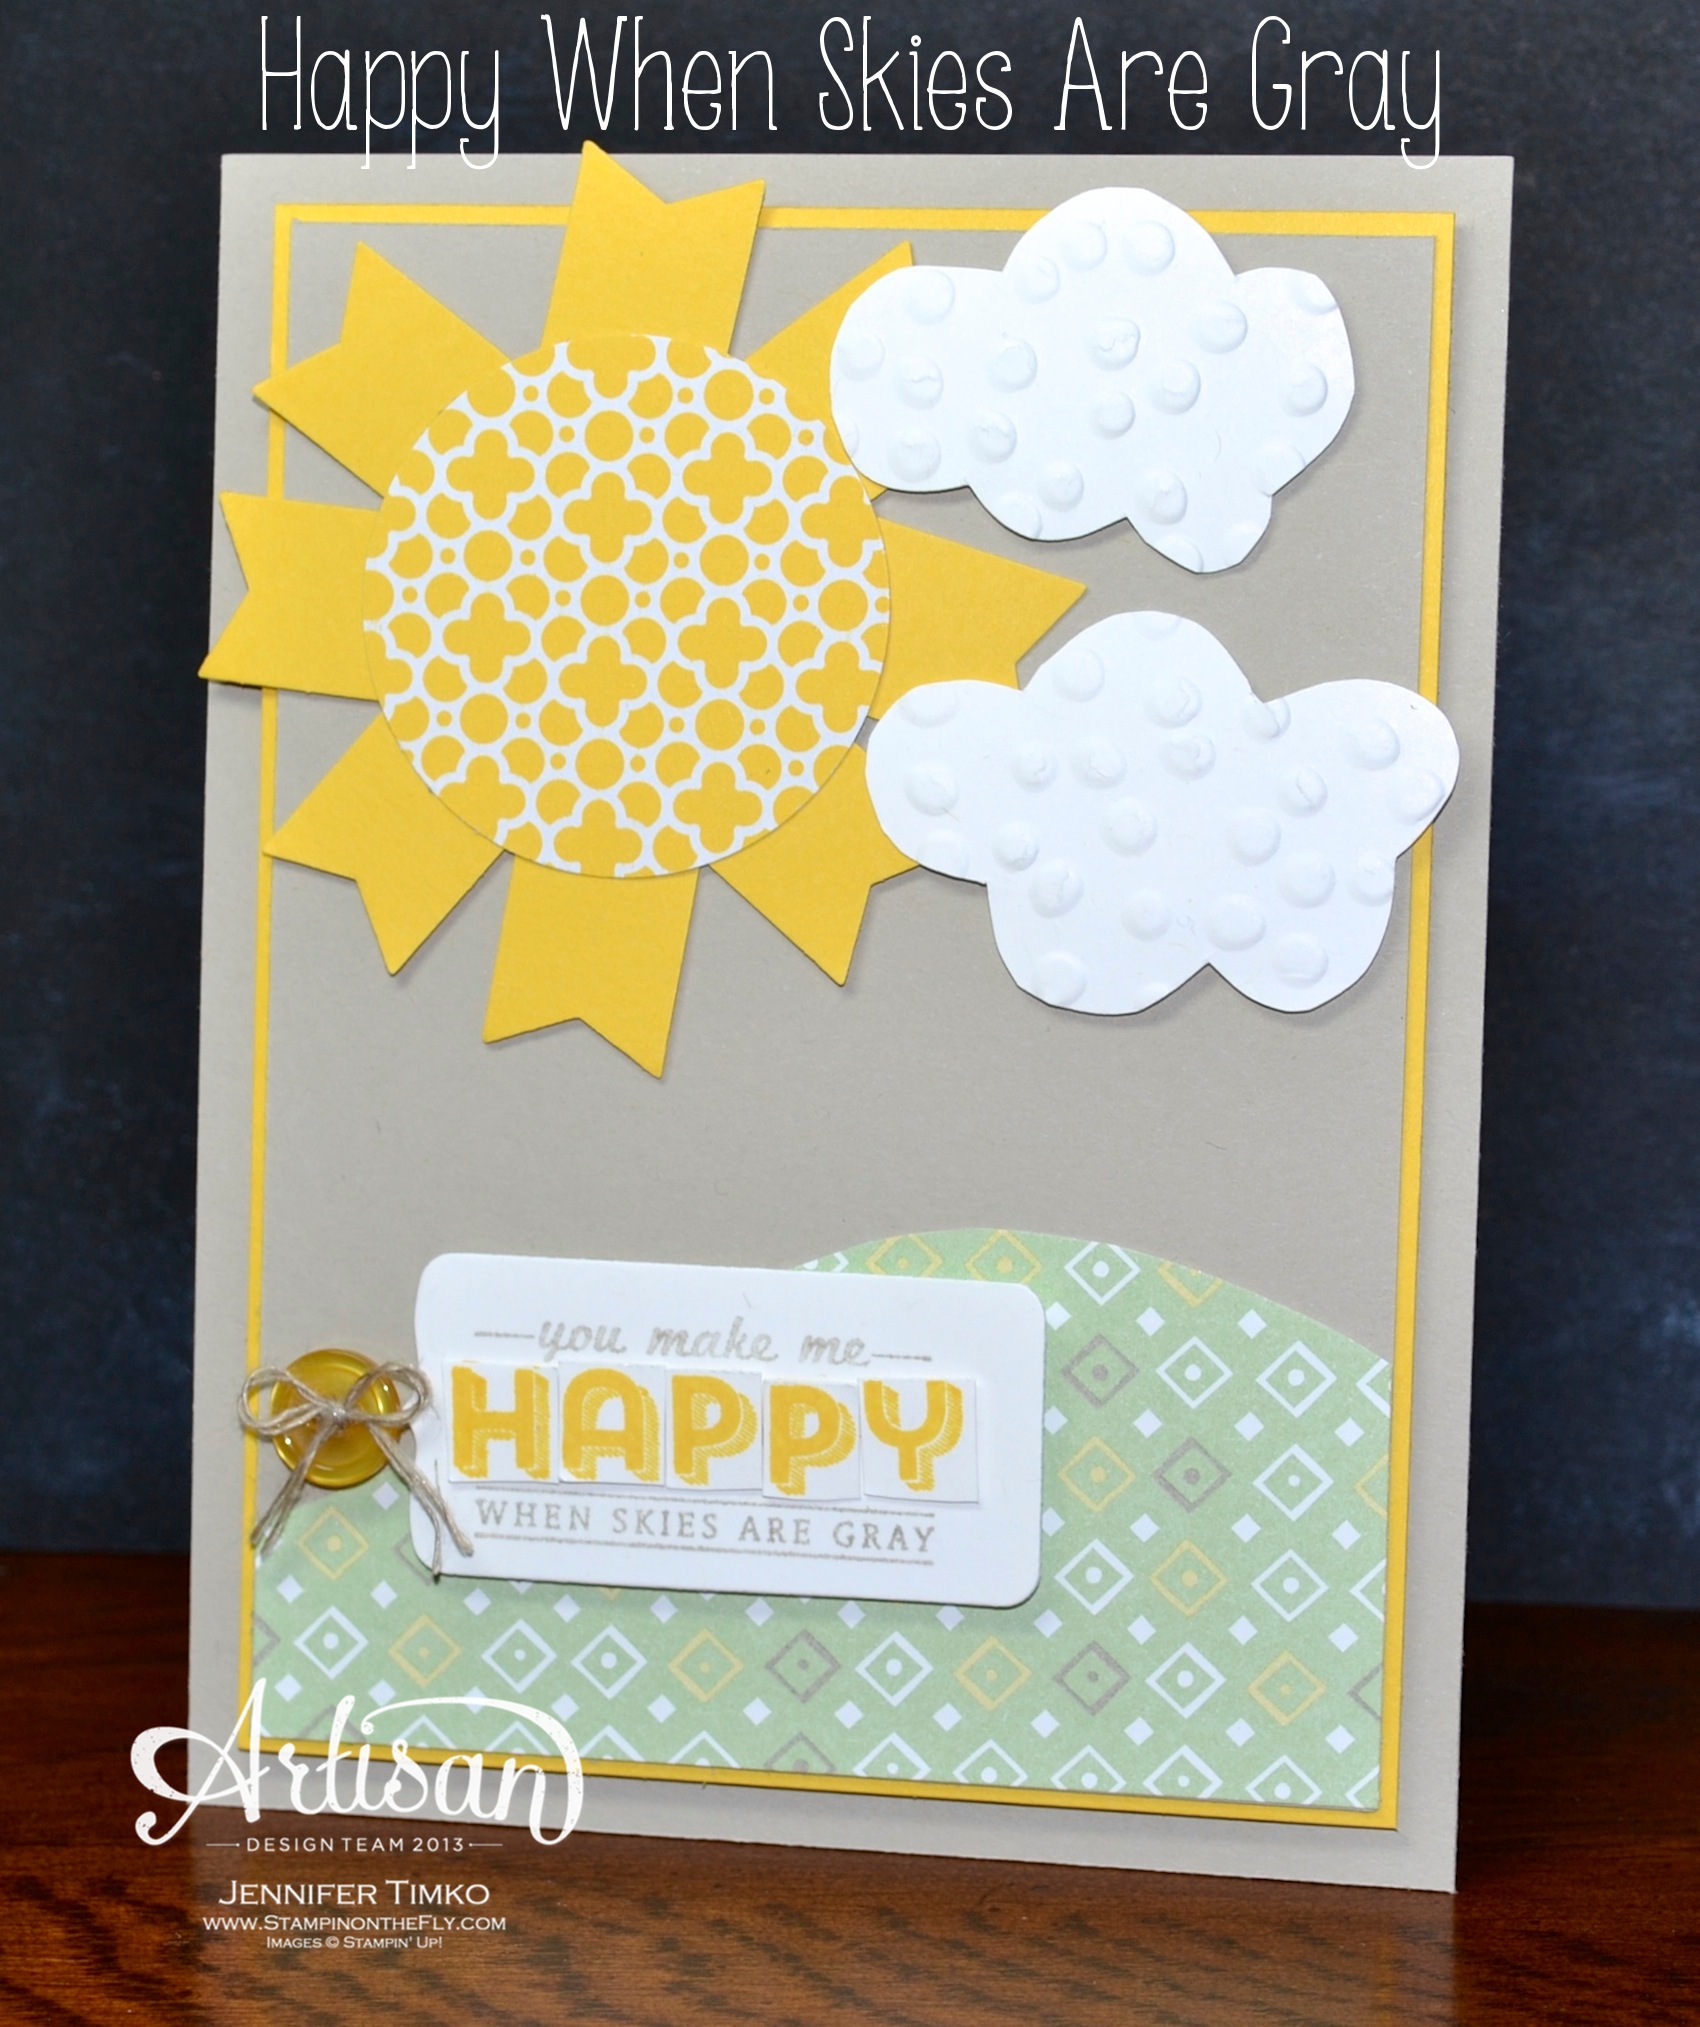
Since you already saw my Artisan Wednesday Wow using this concept, I thought I’d share my sunshine card too. I started with a base of Sahara Sand and added grass using the Sale-a-bration DSP Sweet Sorbet. I used the 1-3/8″ Circle Punch and Quatrefancy DSP for the sun center and the Banner Punch (Sale-a-bration) on Daffodil Delight for the sun rays. Because I didn’t have the Word Bubble Framelit yet, I hand cut the clouds but it is so much easier with the framelit!! They are embossed with the Decorative Dots Embossing Folder. The sentiment was stamped on Whisper White and cut out using the Chalk Talk Framelits. I shortened the length and the rounded the corners again with the Envelope Punch Board rounder. I stamped the word Happy in Daffodil Delight ink and hand cut the letters apart and attached with Glue Dots to give a little more texture to the sentiment.
I hope you like these and that you will enjoy the Sale-a-bration products as much as I already have! The promotion begins on January 28th so start making your lists. For every $50 you spend, you can get one of these SAB items FREE!
The rest of the team is showing their Leadership Display Board projects as well so make sure you take a look!
I am so excited to finally be able to share with you my projects made for Stampin’ Up’s Leadership Conference. This is a meeting of top demonstrators where they share business ideas and, of course, new creative projects. One of the many perks of being on the Artisan Design Team is that we were asked to make display samples to inspire these demonstrators…and of course the whole team said yes! Now that the conference is over, we will be sharing the projects with you on our individual blogs. Everyone will be posting at separate times and my best advice is to stop by often (or simply subscribe to their blogs!). I will have a blog roll at the end of each Leadership sample post to make this easy.
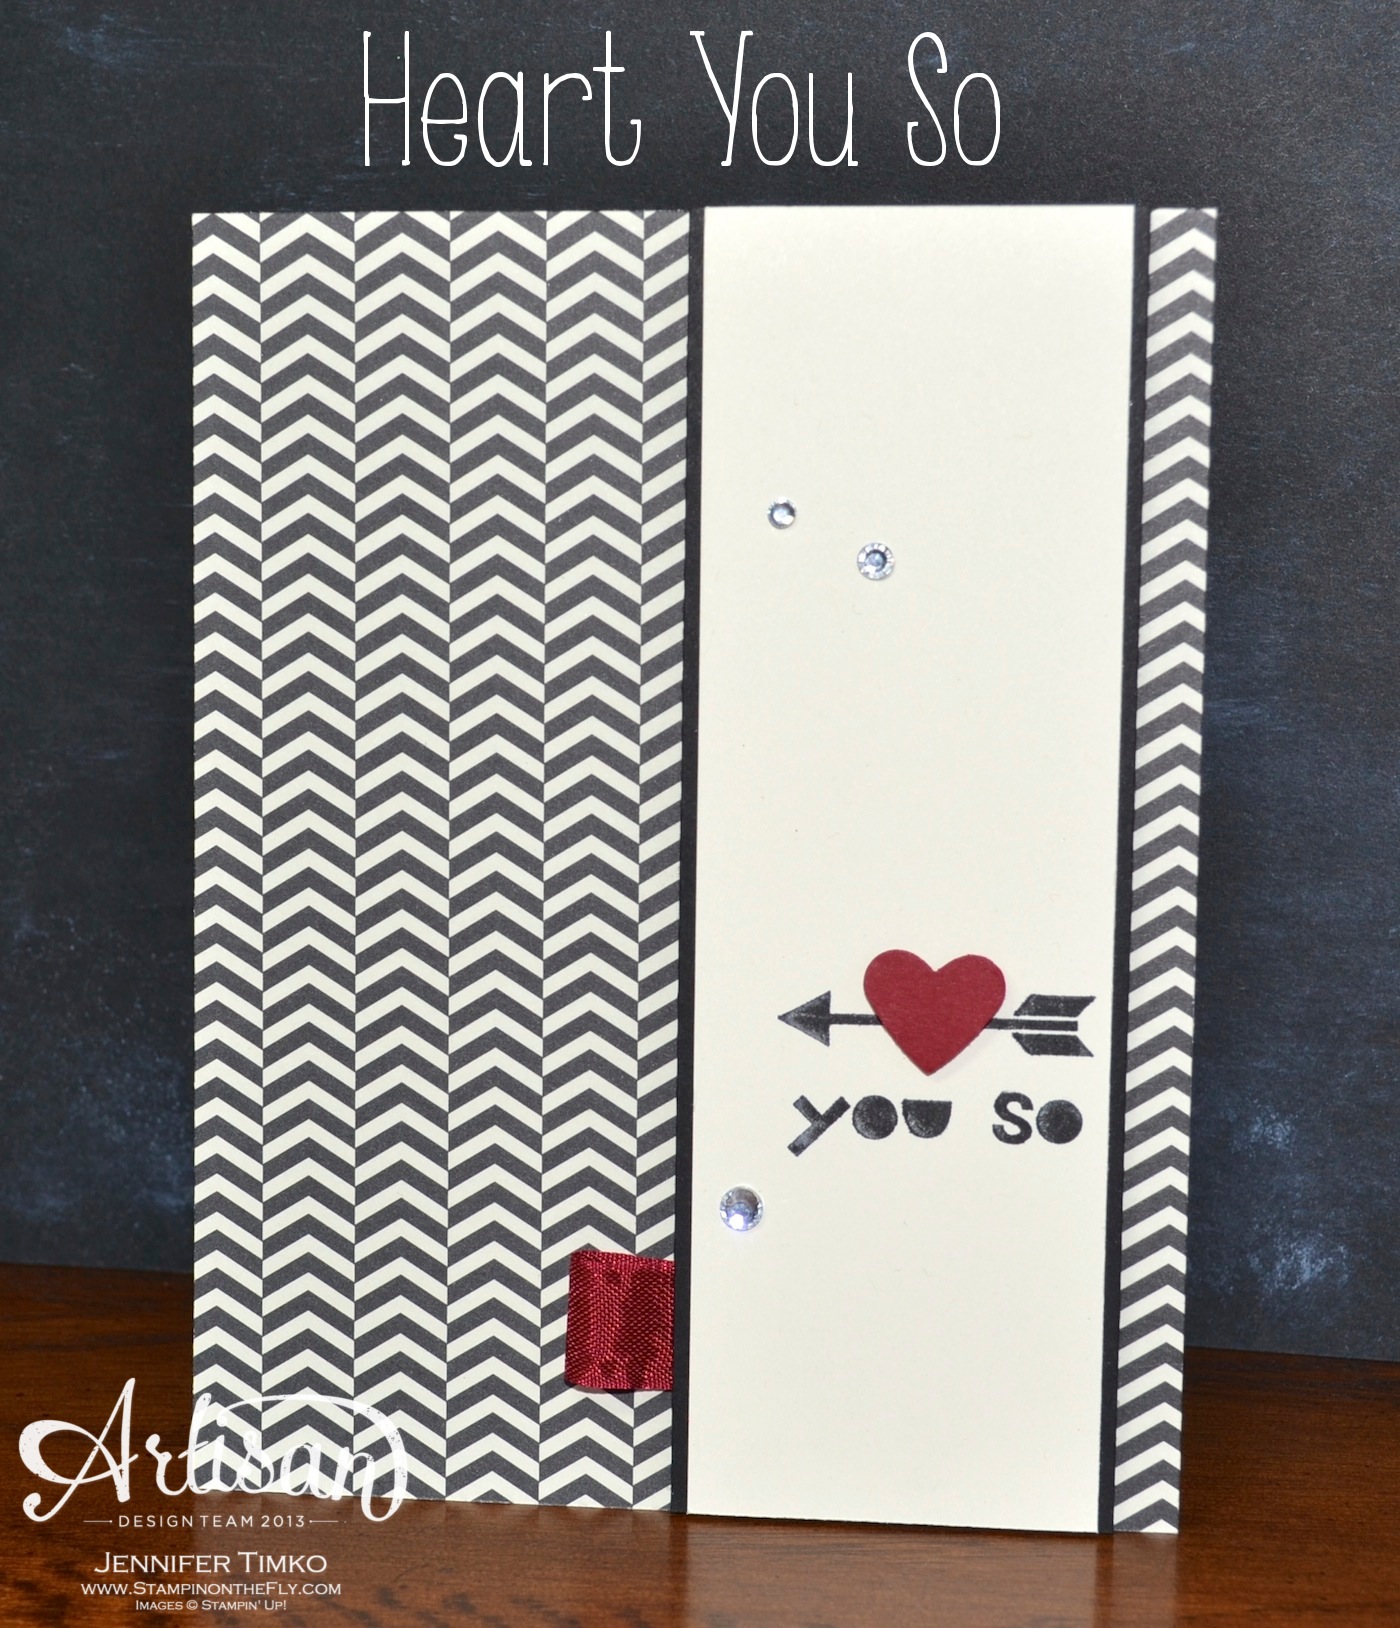
I thought that the easiest way to show you my projects was to work by stamp set. Each of us were given different sets from the Occasions Catalog to use and we were all given Geometrical since it was a set given out at the conference. I love this set so I thought it was a great place to start!
I think the sentiments in this set are super fun and trendy so I wanted one card to capture that a bit. I chose a background of the chevrons from Modern Medley DSP because it was so bold and graphic…in the same style as the stamp set. I took a Very Vanilla panel and stamped the arrow in Basic Black and then inked only the two words with my Basic Black. I punched a heart out of Cherry Cobbler with my Small Heart Punch and added it over the arrow. A little tab from Cherry Cobbler Seam Binding and Rhinestones to finish. This is such a quick card to make but I love how it came out. Hope you do too!
We are all working on creating links that take you specifically to these samples but bear with us. Since we are working on different schedules, some links might not be specific for a couple of days.
I’ll be back tomorrow with the latest Artisan Wednesday Wow post, here Wednesday with a new FMS sketch and then back on Thursday and Friday with more from Geometrical! So glad you stopped in today. See you again soon!
Stamp: Geometrical; Paper: Modern Medley DSP, Basic Black, Very Vanilla; Ink: Basic Black Stampin’ Write Marker; Accessories: Small Heart Punch, Basic Rhinestones, Cherry Cobbler Seam Binding
Click HERE to purchase any of these wonderful Stampin’ Up products.
Happy New Year from Stampin’ Up’s Artisan Design Team! We are so thrilled to be sharing projects using some of the latest and greatest from the Occasions Catalog. If you have come over from amazing Jeanna, welcome to the next stop. If you are starting here, just continue around using the next buttons until you get back to me.
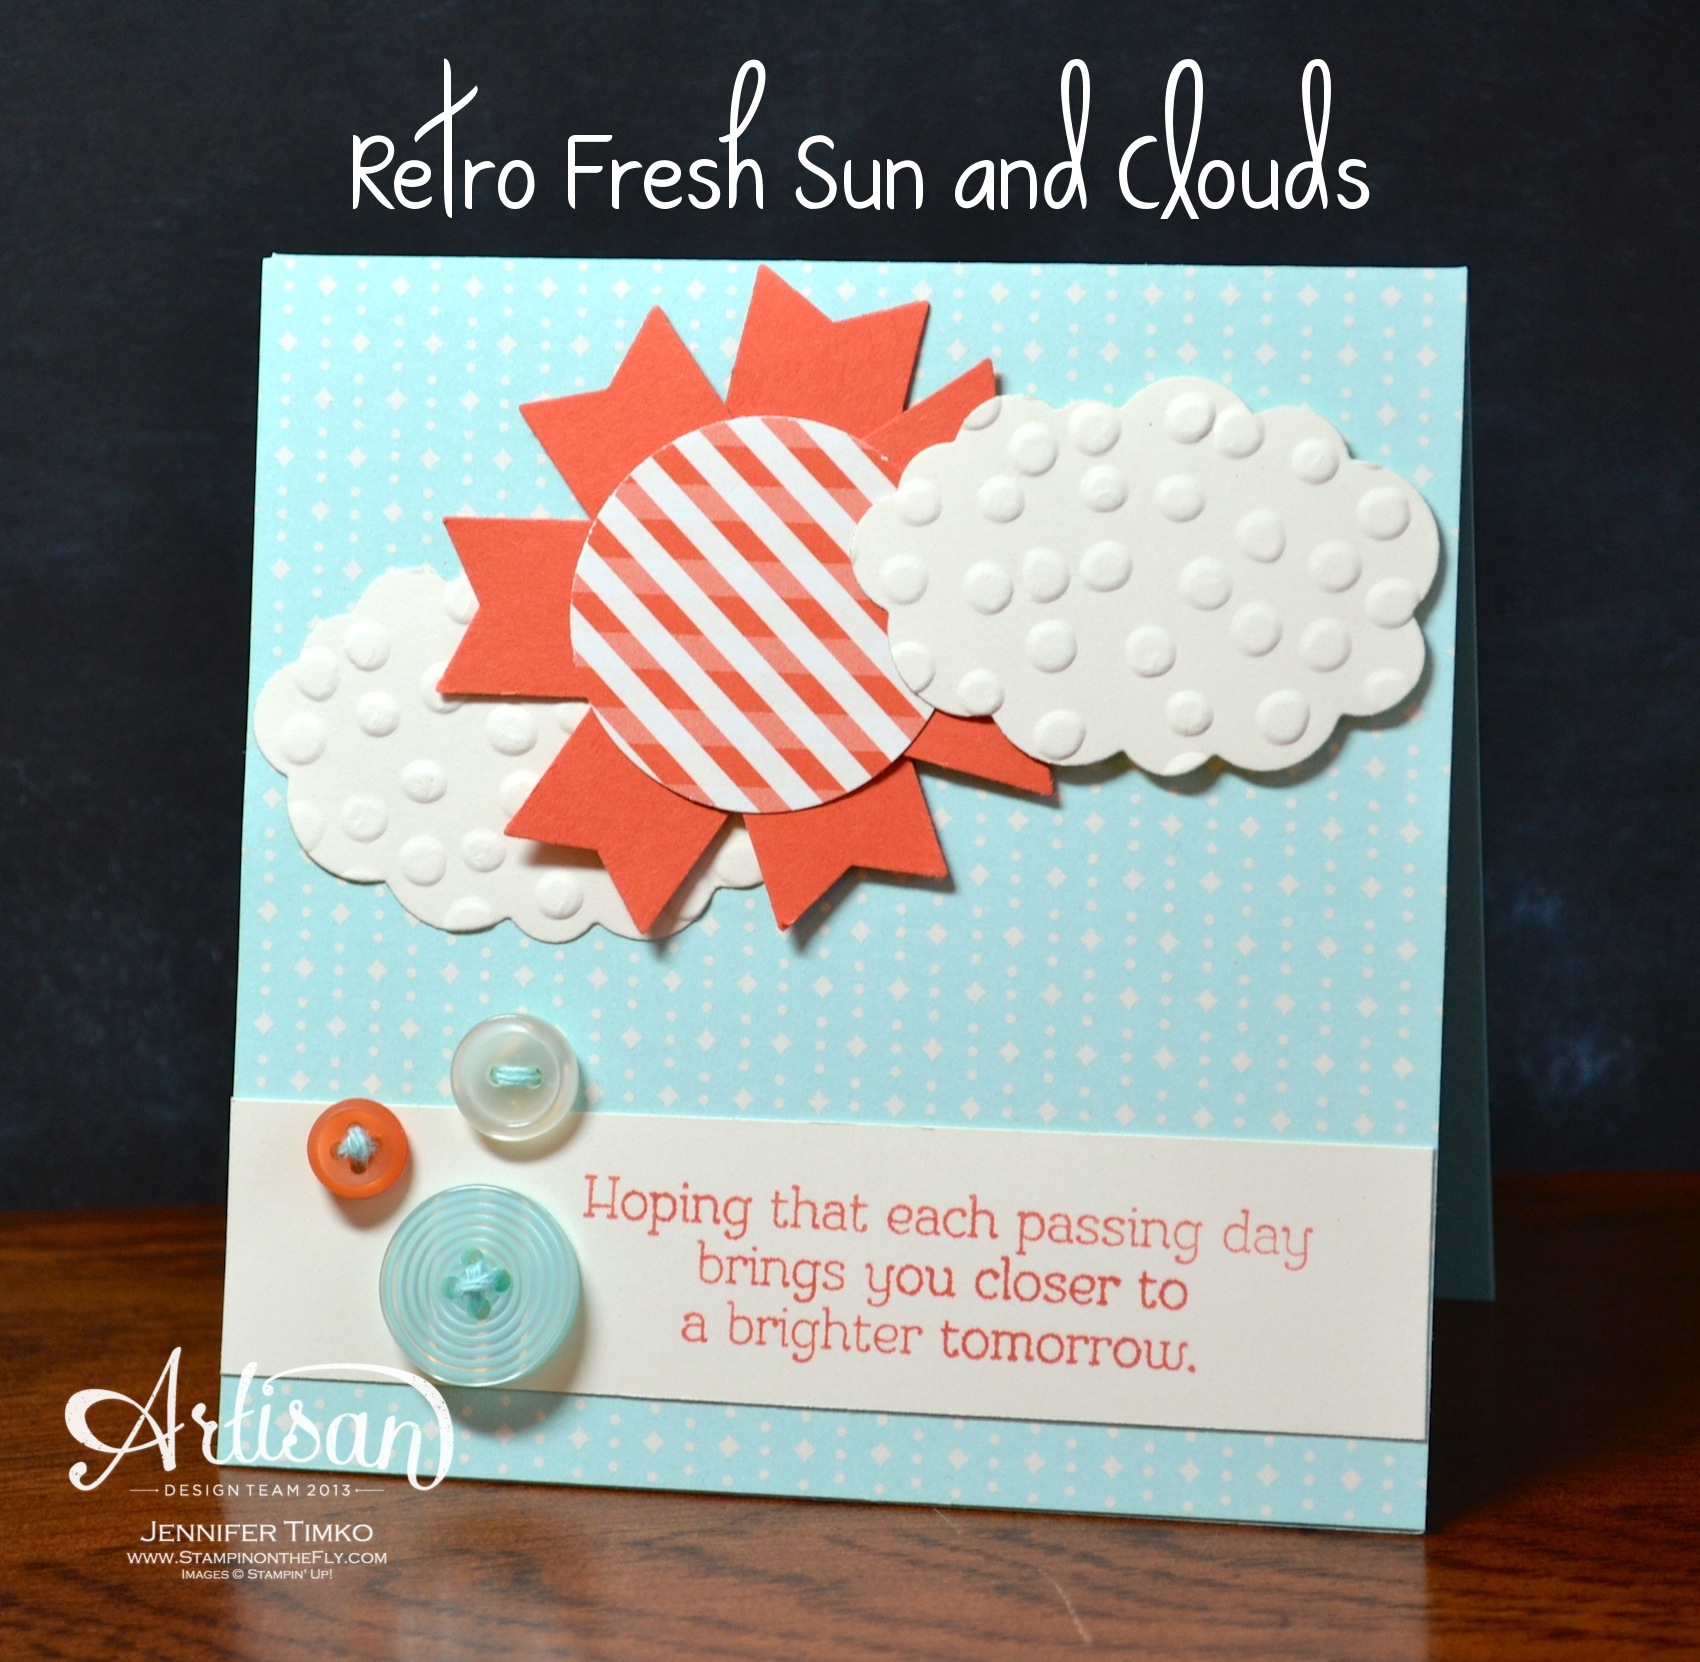
I am so thrilled with the products in this new catalog. They look so fresh and fun! In fact…Retro Fresh! That is the DSP used here. Aren’t the colors great?! I combined it with some items from the upcoming Sale-a-bration (SAB) promotion. What is that? Well, on January 28th the most marvelous thing happens. For every $50 (US) you spend, you get to choose a FREE item from the SAB catalog!! See those little banners I used to make the sun…Banner Punch…free! See the texture on the clouds? Decorative Dots Embossing Folder…free!! You get the point! It is awesome! Ok, for the rest of the details. I cut the print from Retro Fresh to 4-1/4″ x 4-1/4″ to make it the same size as my Pool Party card base. Then I punched a circle out of the Tangerine Tango striped print with my 1-3/8″ Circle Punch. A bunch of banners with the Banner Punch out of Tangerine Tango Card Stock and arrange until you are happy with your sun. The clouds? The shape is one of the Word Bubbles Framelits and then I ran it through with the Decorative Dots Embossing Folder to give it a little more dimension. The sentiment is from Gifts of Kindness (a main catalog set) and it just seemed perfect with the sun and clouds. A few buttons threaded with Pool Party Twine (from the Sweet Sorbet Accessory Pack…also from SAB and free) to finish it off.
There are lots of ways to use this idea. Spoiler alert…some of you going to Leadership Conference may see it again on the display boards. *smile* I know that I will be using it again for sure. Nothing like punches and framelits to make cute things quickly!
Starting next Monday, I will begin sharing projects I made for Stampin’ Up’s Leadership Conference. I can’t wait to show you all that I was working on at the end of November! The entire Artisan Design Team created projects for the display boards so keep an eye on all of our blogs for the details…yep, we’ll be showing you the how-to’s!
Okay, off to go visit the awesome Mercedes Weber. I can’t wait for you to see what she has created! Make sure you hop around the whole loop to take a look at beautiful creations by the whole team…you’ll be happy you did!
Click HERE to purchase any of these wonderful Stampin’ Up products.
Stamp: Gifts of Kindness; Paper: Whisper White, Pool Party, Tangerine Tango, Retro Fresh DSP; Ink: Tangerine Tango; Accessories: Banner Punch (SAB), 1-3/8″ Circle Punch, Big Shot, Word Bubbles Framelits, Decorative Dots Embossing Folder (SAB), Sweet Sorbet Accessory Pack (SAB), Buttons, Dimensionals
Primary Sidebar
We use cookies on our website to give you the most relevant experience by remembering your preferences and repeat visits. By clicking “Accept”, you consent to the use of ALL the cookies.
This website uses cookies to improve your experience while you navigate through the website. Out of these, the cookies that are categorized as necessary are stored on your browser as they are essential for the working of basic functionalities of the website. We also use third-party cookies that help us analyze and understand how you use this website. These cookies will be stored in your browser only with your consent. You also have the option to opt-out of these cookies. But opting out of some of these cookies may affect your browsing experience.
Necessary cookies are absolutely essential for the website to function properly. This category only includes cookies that ensures basic functionalities and security features of the website. These cookies do not store any personal information.
Any cookies that may not be particularly necessary for the website to function and is used specifically to collect user personal data via analytics, ads, other embedded contents are termed as non-necessary cookies. It is mandatory to procure user consent prior to running these cookies on your website.