Skip to content

Banner Blast – Awesome

Banner Blast – Awesome published on 1 Comment on Banner Blast – Awesome

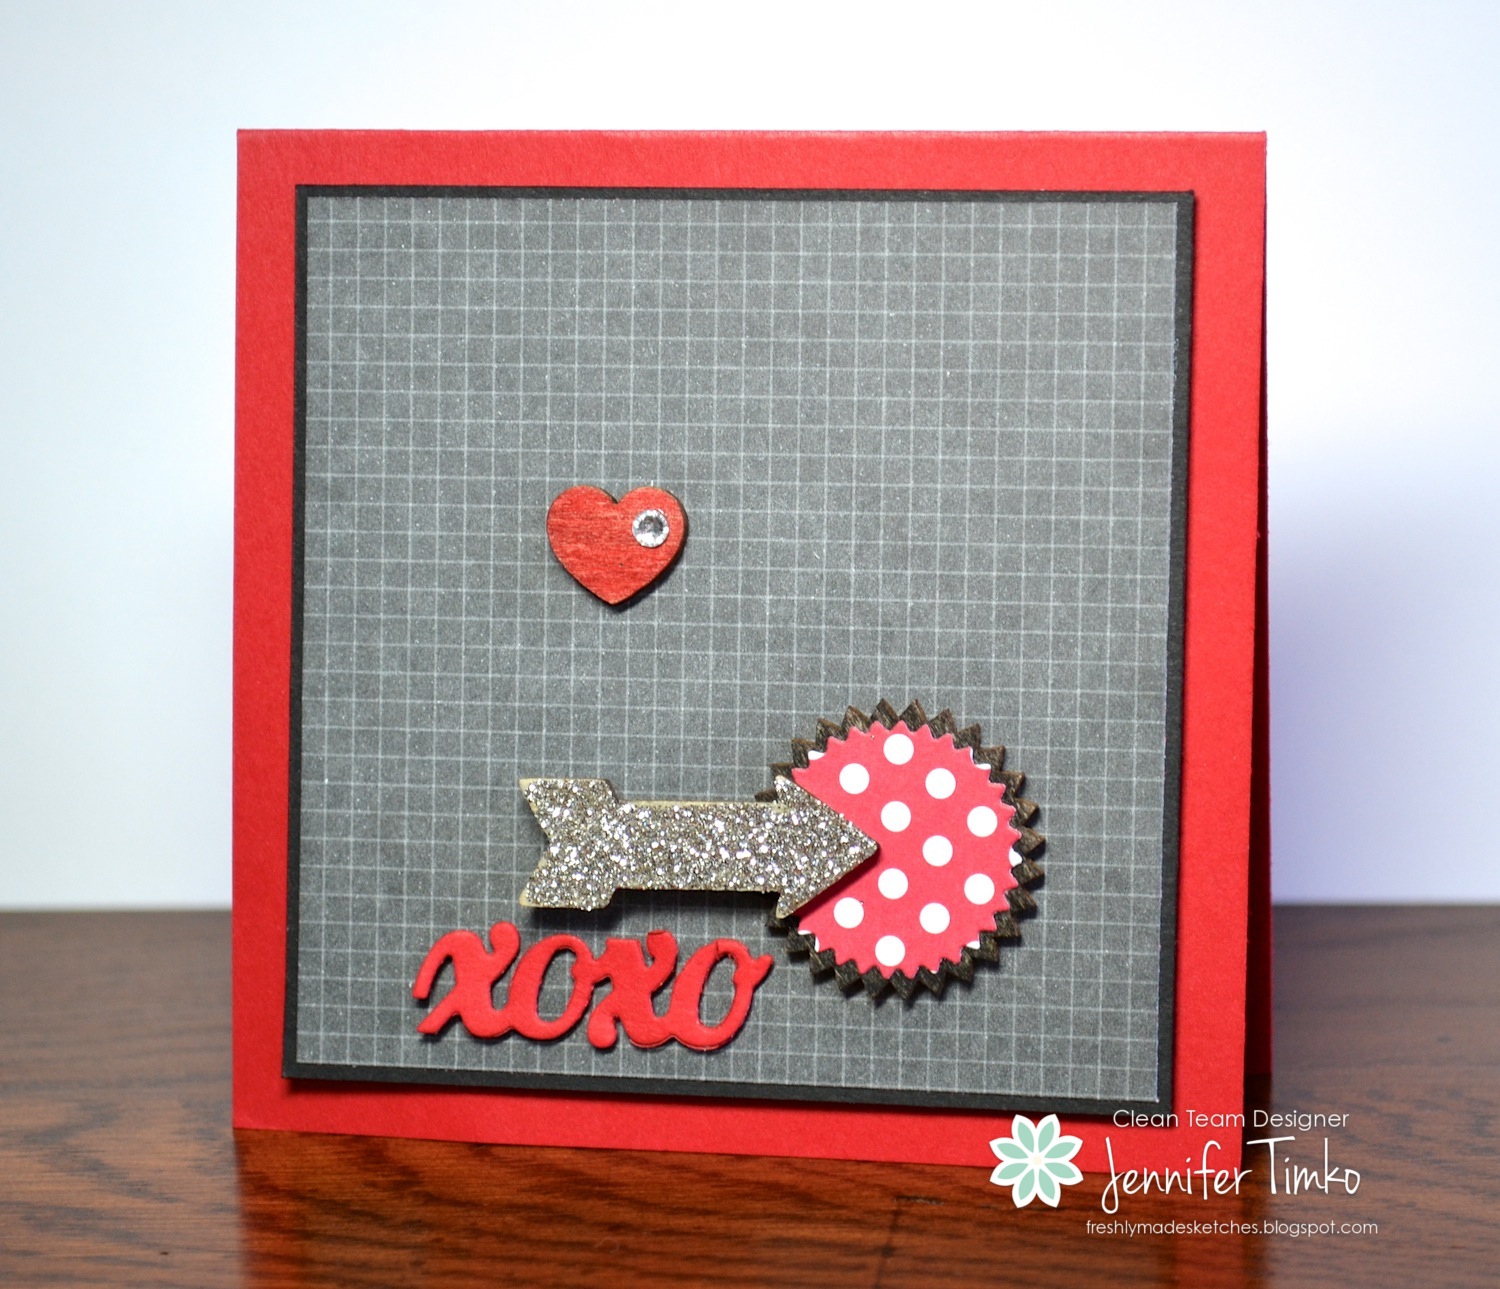
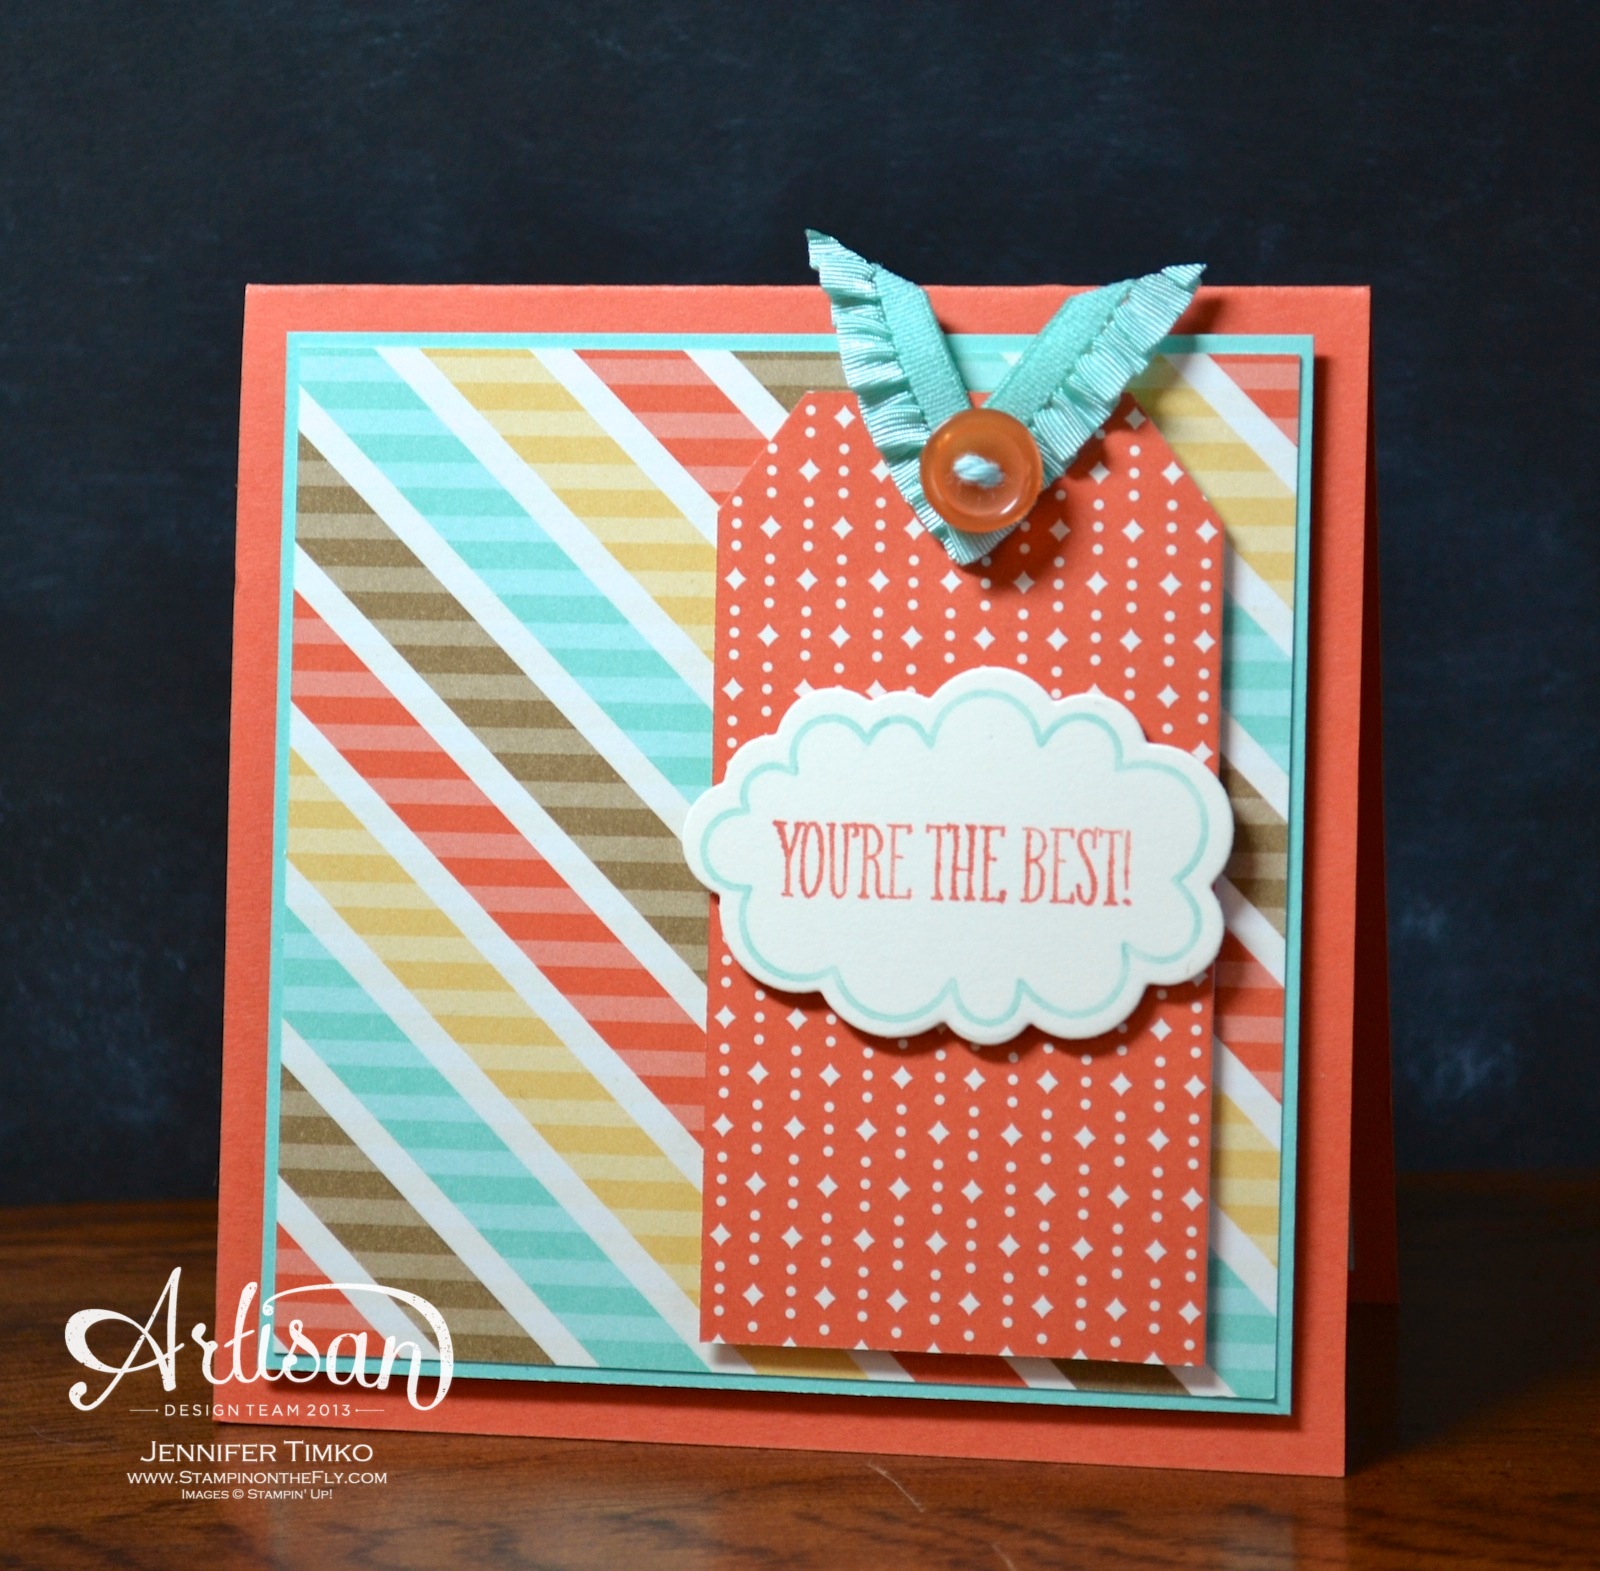
Almost the weekend and I wanted to show you another of my favorites from my Leadership Display projects.  This is one of those cards that isn’t hard to make but something about it makes me really happy.

Banner Blast - Awesome

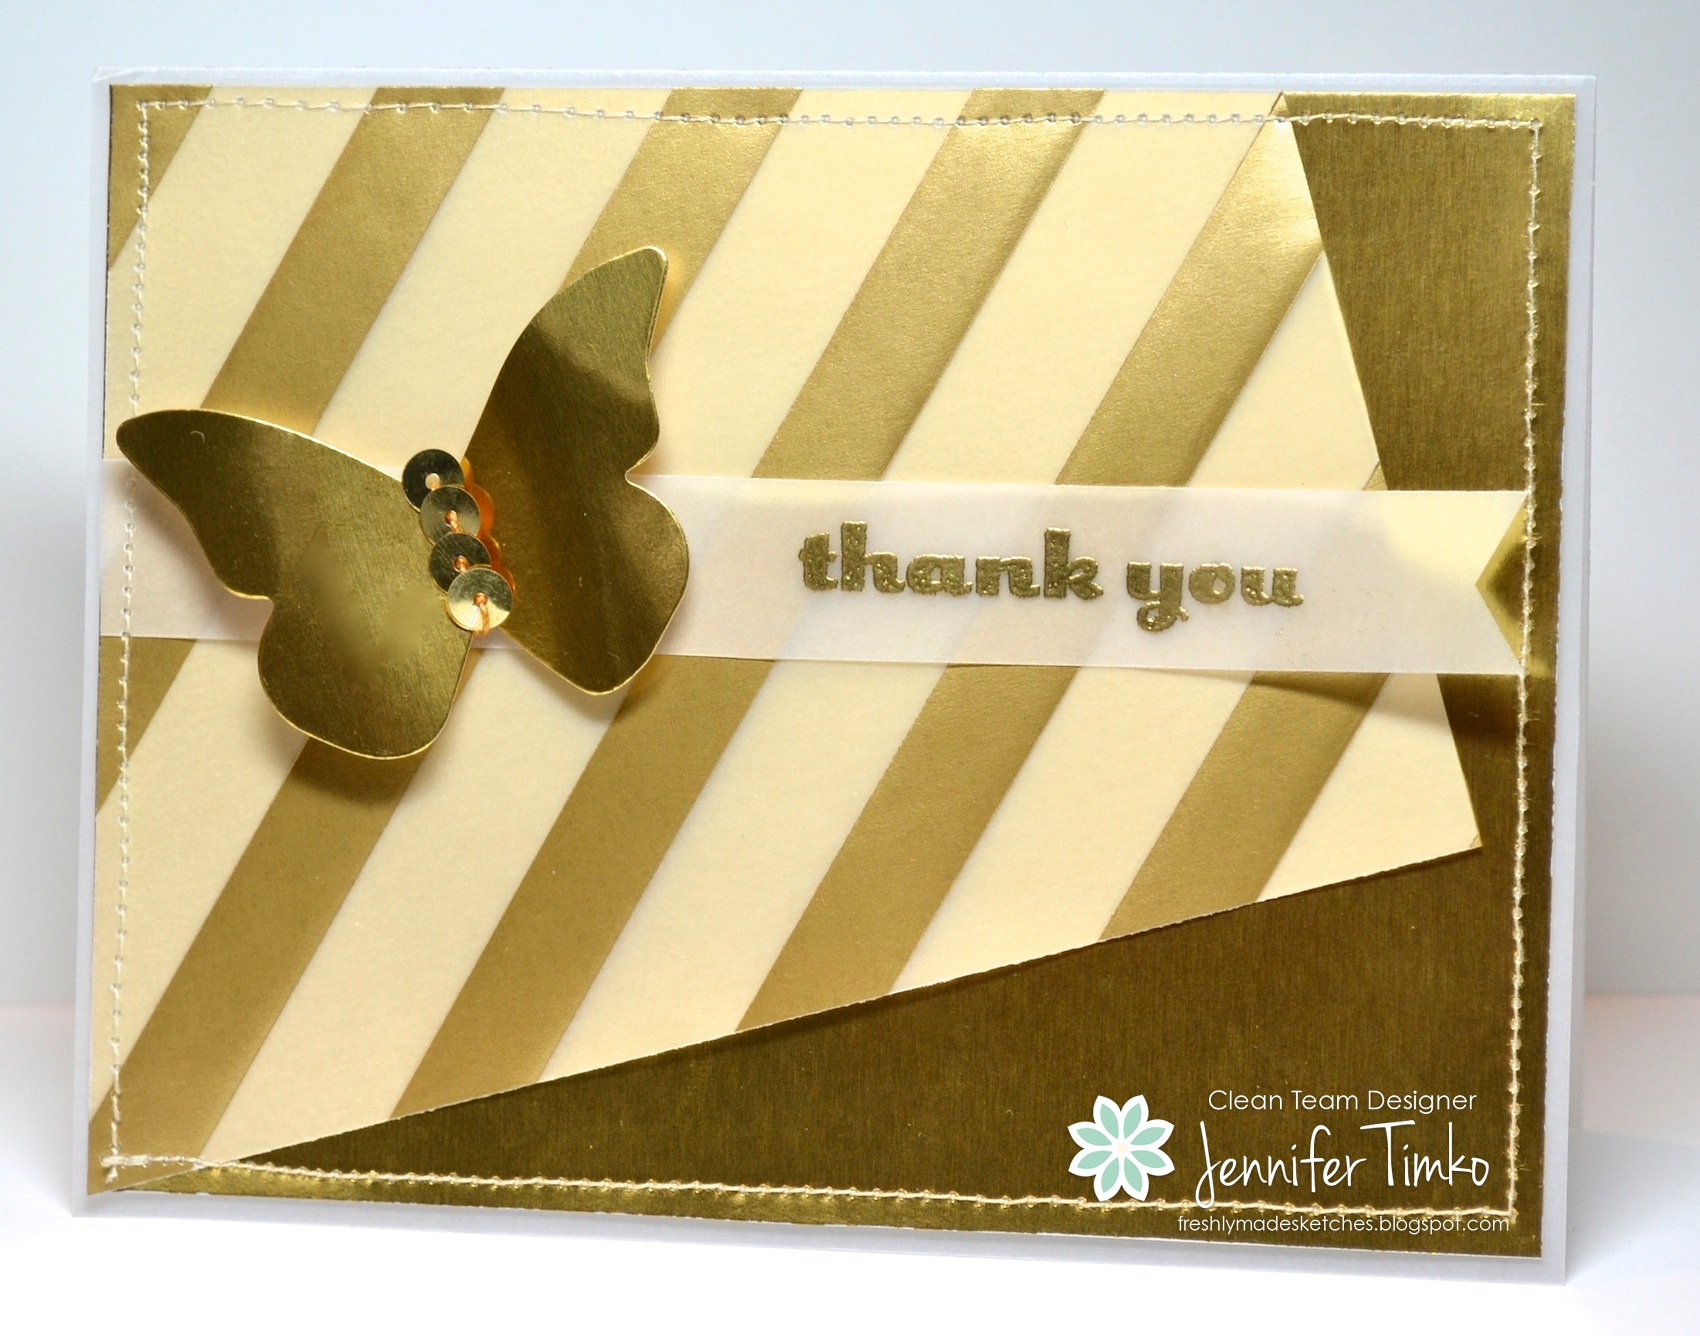
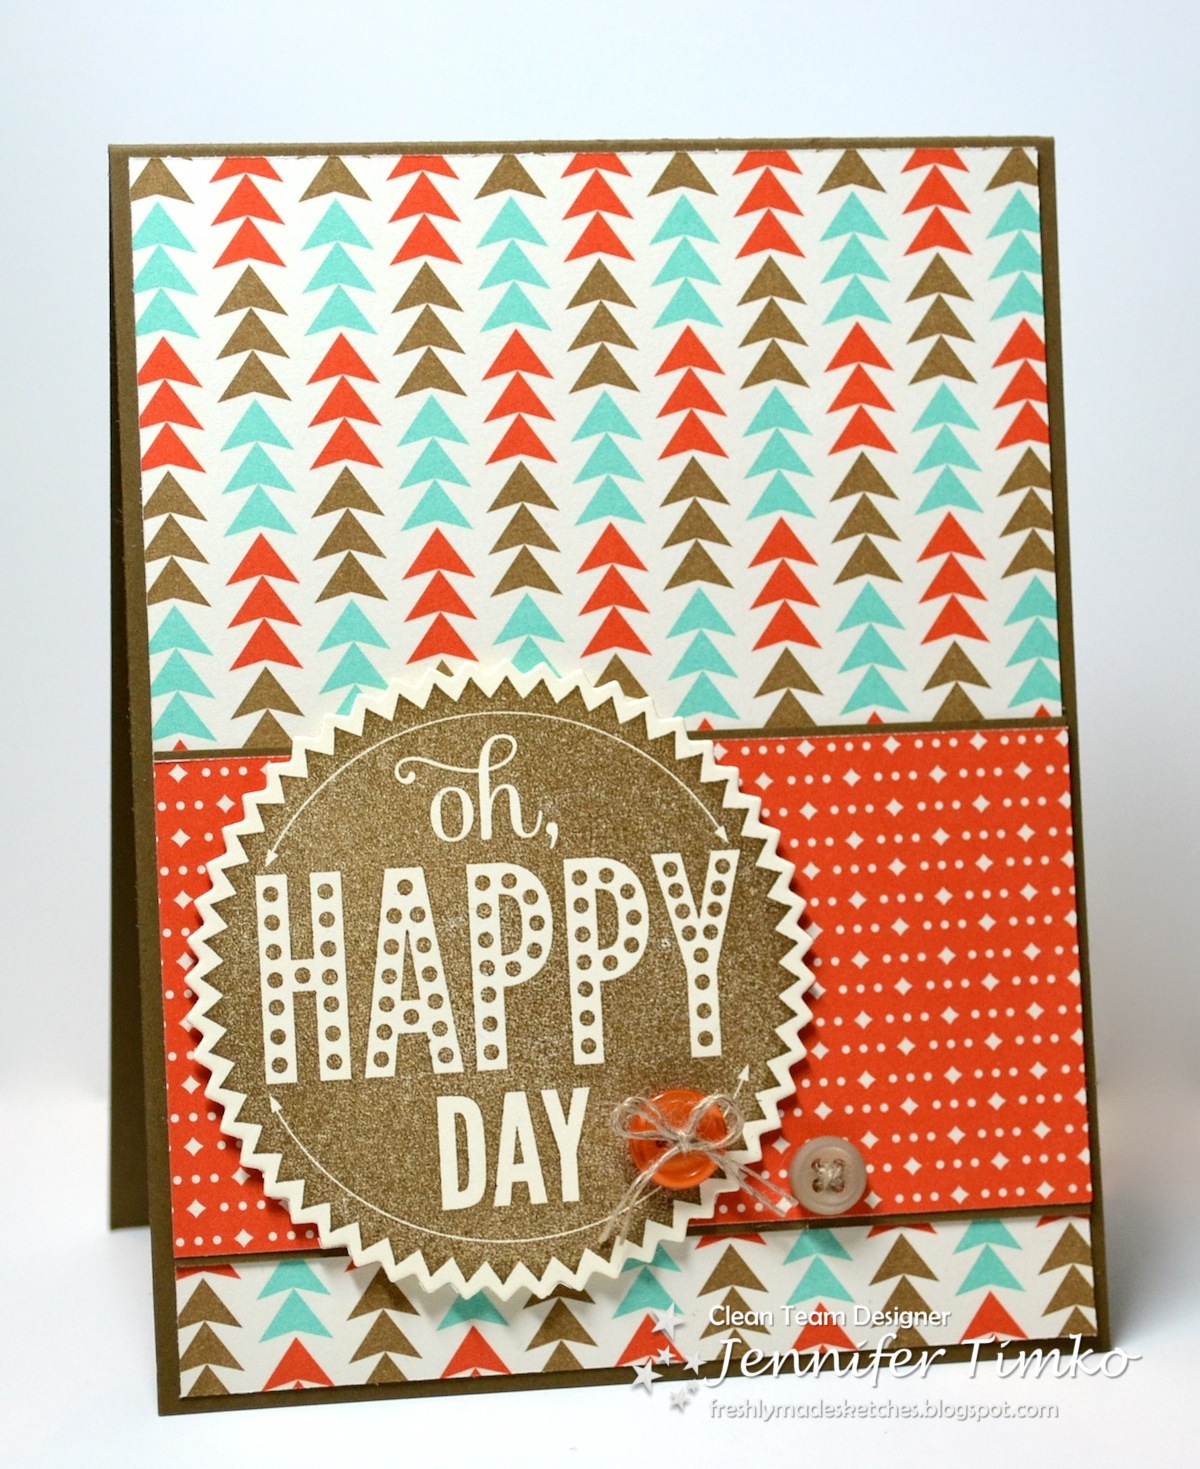
I think maybe that it is because, as usual, I found that the products from Stampin’ Up coordinated perfectly.  This fun print from the Kaleidescope DSP and the triangle in the banners of Banner Blast seem meant to go together!  I cut the little strip of DSP and then stamped the banners in coordinating colors (Crushed Curry and Strawberry Slush).  The sentiment is from Yippee-Skippee and these fonts are so fun.  The DSP and the banners are popped up on Dimensionals and I added in a few Basic Rhinestones to finish.

I hope your week has been going well and that you are enjoying the display projects.  I’m actually getting some stamping time today and working on my Artisan projects for next month.  Another fun box!!  I’ll be back on Monday with another Leadership project.

Like many of you, things have been a little crazy around here.  My kids keep having random days off from school due to weather which adds a special form of chaos.  *smile*  At least they had enough snow last week to get in some sledding!  Fortunately I was still able to hold some stamp classes in between that and flying.  I love when I get to stamp with my friends!  Wishing you a wonderful weekend.  Thanks so much for stopping by!!

The rest of the team is showing their Leadership Display Board projects as well so make sure you take a look!

Here is the rest of the Artisan Design Team:


Click HERE to purchase wonderful Stampin’ Up products.

Blog Signature 2014-001

Freshly Made Sketches #121

Freshly Made Sketches #121 published on 10 Comments on Freshly Made Sketches #121

FMS Final 121-001


I know what you are thinking already.  What an awesome sketch we have this week at Freshly Made Sketches!!  Yep…I could not agree more.  The amazing Linda Callahan has given us this uber trendy looking design and the team has created some amazing projects!

FMS121 - Elemental Valentine

A sketch like this tends to make my imagination run a bit and I just decided it was ok to run with it.  Something about the Essentials Wooden Elements just seemed like a perfect fit.  These little things are crazy cool and I had such fun with them.  So what can you do with them?  Apparently just about anything.  I colored the heart with my Real Red Stampin’ Write Marker.  Then I colored the starburst with a Basic Black Stampin’ Write Marker and cut out a coordinating shape with the Starburst Framelits out of Polka Dot Parade DSP to layer on.  Finally I applied some Multipurpose Adhesive to the arrow and loaded on some Silver Stampin’ Glitter.  The background paper is from Kaleidescope DSP and the little xoxo is from the Circle Card Thinlits.

Those of you who hopped over from the challenge may notice that I have a new look to my blog but I know my email subscribers may not have seen it yet.  I’d love to hear what you think so just click on over and let me know.  I designed it (and my shopping and signature buttons) using My Digital Studio.  It is so fun to be able to change up the look when I feel like it!!

The team has some fun stuff to show you this week and I’m certain the gallery is going to have a fabulous flair to it!  Hope you’ll be able to join in this week.

I’m taking tomorrow off (out flying today) so I’ll be back on Friday with some more from my Leadership Display work.  Hope your day is fantastic!

Click HERE to purchase wonderful Stampin’ Up products.

Blog Signature 2014-001

Geometrical – Love You So Triangles

Geometrical – Love You So Triangles published on No Comments on Geometrical – Love You So Triangles

I’m a little late getting my post up today.  I had a stamp class this morning (yippee!) and finally got to sit down and share.  I’m continuing with my Leadership Display cards today and showing you one that I made with Geometrical.

Geometrical - Triangle Love You

This stamp set has such clean and graphic art work so I wanted to really play off of that with this card.  I chose only one triangle pattern to use and then stamped it in both Midnight Muse and Calypso Coral.  Amazing how just repeating an image can have such a wow effect!  I did not have the Triangle Punch available when I made this back in November but it will make this card so easy and fun to replicate.  Just add in a sentiment from the set and a few buttons.  Different colors will change the look and would make a cute set.

The rest of the team is showing their Leadership Display Board projects as well so make sure you take a look!

Here is the rest of the Artisan Design Team:


I’ll be back tomorrow with another Leadership Display project!  I can’t wait to share it with you.  Until then…have a great day!

Click HERE to purchase wonderful Stampin’ Up products.

Blog signature 2013-001

Freshly Made Sketches #120

Freshly Made Sketches #120 published on 10 Comments on Freshly Made Sketches #120

FMS Final 120-001Happy Wednesday to you!  It is one of the most wonderful stamping days of the week because there is a new challenge from Freshly Made Sketches!   The lovely Rita Wright has given us an amazing layout and I know the gallery is going to be full of gorgeous creations again this week.

FMS120- Hey There

As with yesterday’s card, I chose to combine the super cool Retro Fresh DSP and the Just Sayin’/Word Bubbles Framelit combination.  They really do work well together!  I have always been such a fan of DSP mostly because it does so much of the designing for you.  This new set of papers from the Occasions Mini combines trendy prints with great colors and I am having such fun using it!  All I had to do was pull the Tangerine Tango and Coastal Cabana colors from the paper for the stamp.  The phrase is from Just Sayin’ and I inked it with Stampin’ Write Markers then cut it out using my Big Shot and the Word Bubbles Framelits.  The layered banner is easy to create too.  Just cut two of the same sized banners using the Banners Framelits using a print and the framing color (in my case Soft Suede).  I trimmed 1/16″ off of either side of the printed banner and the same off the top to create the perfect layering.  So easy!!  A few coordinating buttons tied with Linen Thread and done!

This is another card that could be used for men or women and also for a number of occasions.  The perfect card for my stash!  I hope that you enjoy playing with us this week and I am certain you will love what the whole Design Team has made.

I’ll be back tomorrow with another of my projects from the Leadership Display Boards.  Until then, I’m so glad you stopped in!

Click HERE to shop my Stampin’ Up Store.

Blog signature 2013-001

Artisan Wednesday Wow – You’re the Best

Artisan Wednesday Wow – You’re the Best published on 4 Comments on Artisan Wednesday Wow – You’re the Best

01-Jan-Blog-Hop-Button

I am so excited to continue showing projects from the Artisan Design Teams January box of products.  We are so thrilled to be sharing ideas using some of the latest and greatest from the Occasions Catalog.  If you have come over from amazing Jeanna, welcome to the next stop.  If you are starting here, just continue around using the next buttons until you get back to me.

AWW Jan - You're the Best

What is is about a cute stamp set and coordinating framelits that makes me just want to stamp?  I don’t know but the matchup of Just Sayin’ and the Word Bubbles Framelits is simply fantastic!  So many cute ways to use them!  Now just add in some great DSP and the card practically designs itself.  I’m back to using this great Retro Fresh DSP because…well…I think it is so fun! It finds that happy balance of helping create cards that can be for both men and women.  That in itself is almost magic!  I chose these two prints because I love how they work together and started playing with layering.  Then I had a burst of inspiration and pulled out the Angled Tag Topper Punch and found a winner.  Just look at that tag!  The perfect way to jazz up a card with no actual work.  Oh of course the punch can be used to created tags for whatever you need but don’t you think it is fun added to a card?  I stamped the sentiment from Just Sayin’ onto Very Vanilla card stock after inking it with Tangerine Tango and Pool Party Stampin’ Write Markers.  Then I ran it through my Big Shot using the matching Word Bubble Framelit and popped it up on a Dimensional to attach it to the tag.  I added a little bit of Coastal Cabana Ruffled Ribbon and a button tied with the Sweet Sorbet Accessory Pack twine (Sale-a-bration).

I hope you enjoy this fun and fast card.  I’ll be back tomorrow with another card using some of the same products!

Okay, off to go visit the awesome Mercedes Weber.  I can’t wait for you to see what she has created!  Make sure you hop around the whole loop to take a look at beautiful creations by the whole team…you’ll be happy you did!

01-Jan-Blog-Hop-NEXT-Button

Click HERE to purchase any of these wonderful Stampin’ Up products.

Stamp: Just Sayin’; Paper:  Retro Fresh DSP, Tangerine Tango, Coastal Cabana; Ink:  Tangerine Tango, Coastal Cabana; Accessories:  Angled Tag Topper Punch, Big Shot, Word Bubbles Framelits, Coastal Cabana, Ruffled Ribbon, Button, Sweet Sorbet Accessory Pack

Blog signature 2013-001

Petal Parade – Razzleberry Petals

Petal Parade – Razzleberry Petals published on No Comments on Petal Parade – Razzleberry Petals

Happy Monday to you!  I have another of my Leadership display samples to share with you.  This time, I’m showing off the Sale-a-bration set Petal Parade.  It is a really fun set, I have to say!

Petal Parade - Razzleberry Petals

I love this flower image from the set.  It is great because you can use it by itself or stamp it twice with the the wide sides facing each other to create a round flower.  I sort of split the difference on this one.  I separated it just enough to make room for the banner in between.  The fun bright colors from Polka Dot Parade DSP always make me think of spring and summer, and I figured we could use a little brightening up at this time of year. The Rich Razzleberry is a super trendy color right now (Stampin’ Up was so ahead on this one!) and I love the monochromatic look.  All of that combined to make this quick but yet special card.  The sentiment is from Four You, a main catty set that is a must have.  I created the banners by using the Hexagon Punch on the ends.  Combine the DSP, Four You and the punch and you are there for earning Petal Parade for free during Sale-a-bration.  You could make a set of these in all the colors in the Polka Dot Parade paper!

The rest of the team is showing their Leadership Display Board projects as well so make sure you take a look!

Here is the rest of the Artisan Design Team:


I’ll be back tomorrow with the latest Artisan project!  I can’t wait to share it with you.  Until then…have a great day!

Click HERE to purchase wonderful Stampin’ Up products.

Blog signature 2013-001

Geometrical – Cheer Up Buttercup Bag

Geometrical – Cheer Up Buttercup Bag published on No Comments on Geometrical – Cheer Up Buttercup Bag

I am back on track showing you a project made with the Occasions Catalog set Geometrical today.  When Stampin’ Up asked the Artisan Design Team to be display stampers, the gave us a list of how many cards, scrapbook pages and 3-d projects they needed from us.  I have to say that the first time I saw the sentiment “Cheer Up Buttercup” I knew I would have to figure out how to make some buttercups.

Geometrical - Buttercup bag

Give that I love Stampin’ Up’s ribbons so much, I immediately went to my Daffodil Delight Seam Binding to see what I could do.  While still on the roll, I took one of the threads near the edge of the end of the ribbon and started pulling gently.  This starts to scrunch up the ribbon and gives it a natural curling action that helps you form a flower.  Just keep pulling until you have enough to make a flower of the size you want.

*Hint:  It is so much easier to leave the ribbon on the roll as you do this.  First it saves ribbon because it is hard to judge how much you will need.  Second, it keep the thread from being pulled though. *

Geometrical - Buttercup closeup

Once you have enough, tuck the “ugly” end (where you started pulling the thread) under and then just wrap in a circle.  Place a blob (yep, that is the official term) of hot glue on the Silicone Craft Sheet and stick the bottom of the flower in it.  Let dry.  I put a Vintage Faceted Button tied with Linen Thread in the center of the flower (again with just a touch of hot glue).  To finish the bag I stamped the sentiment in Basic Gray ink onto the Mini Muslin Bag and then attach the flowers with hot glue.

*Another hint – Stick your Silicone Craft Sheet inside the bag as you hot glue the flowers on.  This prevents the bag from getting glued together as the glue seeps through the weave of the fabric.*

I filled my bag with a flowered potpourri but you could put just about anything in it.  Once the bag is cinched, I pinned on a bow made from Daffodil Delight Seam Binding using a Vintage Trinkets safety pin.  Such a pretty gift to lift someone’s day!

The rest of the team is showing their Leadership Display Board projects as well so make sure you take a look!

Here is the rest of the Artisan Design Team:


I will be back on Monday to continue with my Leadership Display projects.  Until then, thanks for stopping in and I hope you day is great!

Click HERE to purchase wonderful Stampin’ Up products.

Blog signature 2013-001

Freshly Made Sketches #119

Freshly Made Sketches #119 published on 8 Comments on Freshly Made Sketches #119

FMS Final 119-001I’m back with the latest sketch from Freshly Made Sketches.  Our new designer Cindy Lovell has designed her very first sketch and it is so cool!  Playing with the angles is a challenge at first but the results are so fun!

FMS119 - Fancy Foil in Gold


I continued on with my gold theme from yesterday’s post for this one.  Let’s face it, gold is incredibly trendy and I’m pretty happy that Stampin’ Up has so many “toys” to play with in this great metallic.  I used the Fancy Foil Vellum and backed it with the Gold Foil and I love the two together.  Attaching vellum can always be a challenge since you want to conceal the adhesive.  The Fancy Foil allows you to hide it behind stripes (and dots and hearts) which makes it pretty easy to use.  Now, I went a step further and actually sewed it on but this is completely makable without the machine.  I added on a butterfly from Beautiful Butterflies cut from the foil then stamped and embossed a regular White Vellum sheet with the sentiment from Regarding Dahlias (stamped in Gold Encore and embossed with Gold Stampin’ Emboss Powder).  I added a little bit of the new  Gold Sequin Trim to the butterfly to fancy him up.  The whole whole thing is attached to a White Vellum card base.

I am really excited to see what you will come up with for this sketch.  The design team has such a variety of amazing cards and it is fun to see the different interpretations!

If you missed it, I started posting my projects for the Leadership Display Boards on Monday.  I will be back tomorrow and Friday with some more!  Can’t wait to show you!  Until then, thanks so much for stopping by and I look forward to see you soon!

Stamp:  Regarding Dahlias; Paper:  Fancy Foil Gold, Gold Foil, White Vellum Card Stock; Ink:  Gold Encore; Accessories:  Big Shot, Beautiful Butterflies Die, Gold Sequin Trim, Heat Tool, Gold Stampin’ Emboss Powder, Glue Dots

Click HERE to shop my Stampin’ Up Store.

Blog signature 2013-001

Artisan Wednesday Wow – Hearts of Gold

Artisan Wednesday Wow – Hearts of Gold published on 5 Comments on Artisan Wednesday Wow – Hearts of Gold

01-Jan-Blog-Hop-Button


I am so excited to continue showing projects from the Artisan Design Teams January box of products.  We are so thrilled to be sharing ideas using some of the latest and greatest from the Occasions Catalog.  If you have come over from amazing Jeanna, welcome to the next stop.  If you are starting here, just continue around using the next buttons until you get back to me.

AWW Jan - Gold xoxo

I started by pulling out the Fancy Foil Designer Vellum in Gold.  It is so amazing and even more so when paired with the Gold Foil Sheets!  Using a collection of heart framelits and punches (Hearts a Flutter, Circle Card Thinlits, Small Heart Punch), I created a collection of hearts that I simply sewed together into a little banner.  Then using the Banners Framelits, I cut out a piece of the diagonal strip vellum and sewed it onto some Crumb Cake card stock.  I took my Gorgeous Grunge stamp set and added some splatters with Gold Encore Ink and embossed it with Gold Stampin’ Emboss Powder.  Finally I cut the xoxo with the Circle Card Thinlit Die and added it as a sentiment.  This was such a fun card to put together and I am loving the gold…you’ll even see more of it in tomorrow’s post!

Okay, off to go visit the awesome Mercedes Weber.  I can’t wait for you to see what she has created!  Make sure you hop around the whole loop to take a look at beautiful creations by the whole team…you’ll be happy you did!

01-Jan-Blog-Hop-NEXT-Button

Click HERE to purchase any of these wonderful Stampin’ Up products.

Stamp: Gorgeous Grunge; Paper:  Crumb Cake, Gold Foil Sheets, Gold Fancy Foil Vellum; Ink:  Encore Gold Metallic; Accessories:  Big Shot, Circle Card Thinlits, Hearts a Flutter Framelits, Small Heart Punch, Gold Stampin’ Emboss Powder, Heat Tool

Blog signature 2013-001

Freshly Made Sketches #118

Freshly Made Sketches #118 published on 15 Comments on Freshly Made Sketches #118

FMS Final 118-001


Freshly Made Sketches is off and running with our new challenges for the new year.  The extraordinary Jen Mitchell is our sketch hostess this week and this one should have everyone playing along!  We also have the privilege of welcoming a new Design Team member this week!  Karren Johnson has been a gallery favorite for a long time and we are thrilled she will be joining us to inspire you.

FMS118 - Oh Happy Day

I’m continuing on with my Retro Fresh theme of the week.  Make sure you check out yesterday’s card (it is one of my favorites in a while and has Sale-a-bration peeks).  I love that this DSP can take on a more masculine flair.  I thought the sketch made it perfect to show you the new Starburst Sayings stamp set and its matching Starburst Framelits.  They are so awesome!!  This stamp particularly is so great since it can be used for so many occasions (birthday, promotion, graduation).  Yep, I think a stack of these in varying colors/DSPs will be added to my stash for those times when I need a last minute card.

The team obviously recharged their creative batteries because the DT samples this week are so fantastic!  I know you will love them too so make sure you go on over and take a look.

Starting next Monday, I will begin sharing projects I made for Stampin’ Up’s Leadership Conference.  I can’t wait to show you all that I was working on at the end of November!  Until then…have a great rest of your week!

Click HERE to shop my Stampin’ Up Store.

Blog signature 2013-001

Primary Sidebar