Skip to content

Snow Day Stampin’ Fun!

Snow Day Stampin’ Fun! published on 1 Comment on Snow Day Stampin’ Fun!

So apparently my children will be going to school through June.  Or maybe not but wow, they have been home a lot for snow days!!  A LOT!  After the hours and hours of Minecraft, I finally decided it was time for something else.  Fortunately I had not one but two things at the ready for them.  And you know what?!  These guys are seriously great (ok, the products are seriously great and they are perfect for any level of crafter…but I’m a mom so I have to give credit to the kids!)!!!  Wanna see??  Of course you do!!

First of all, I decided that we were going to start a Project Life by Stampin’ Up album created by the boys with some of their favorite events.  Sometimes weekly, sometimes more, depending on what we are up to.  I pulled out the kits I have and they got to work.  Because they aren’t me, they have the courage to mix and match and just create what makes sense to them.  I have a lot to learn from them!!  Using the Everyday Adventure, Playground and Sale-a-bration This Day kits and accessories here are their first pages.  I can’t even wait until they create more!  Ok…truthfully they will be creating more pretty much the second I finish typing this post.  *smile*

PL by Jacob - Stampin' on the Fly

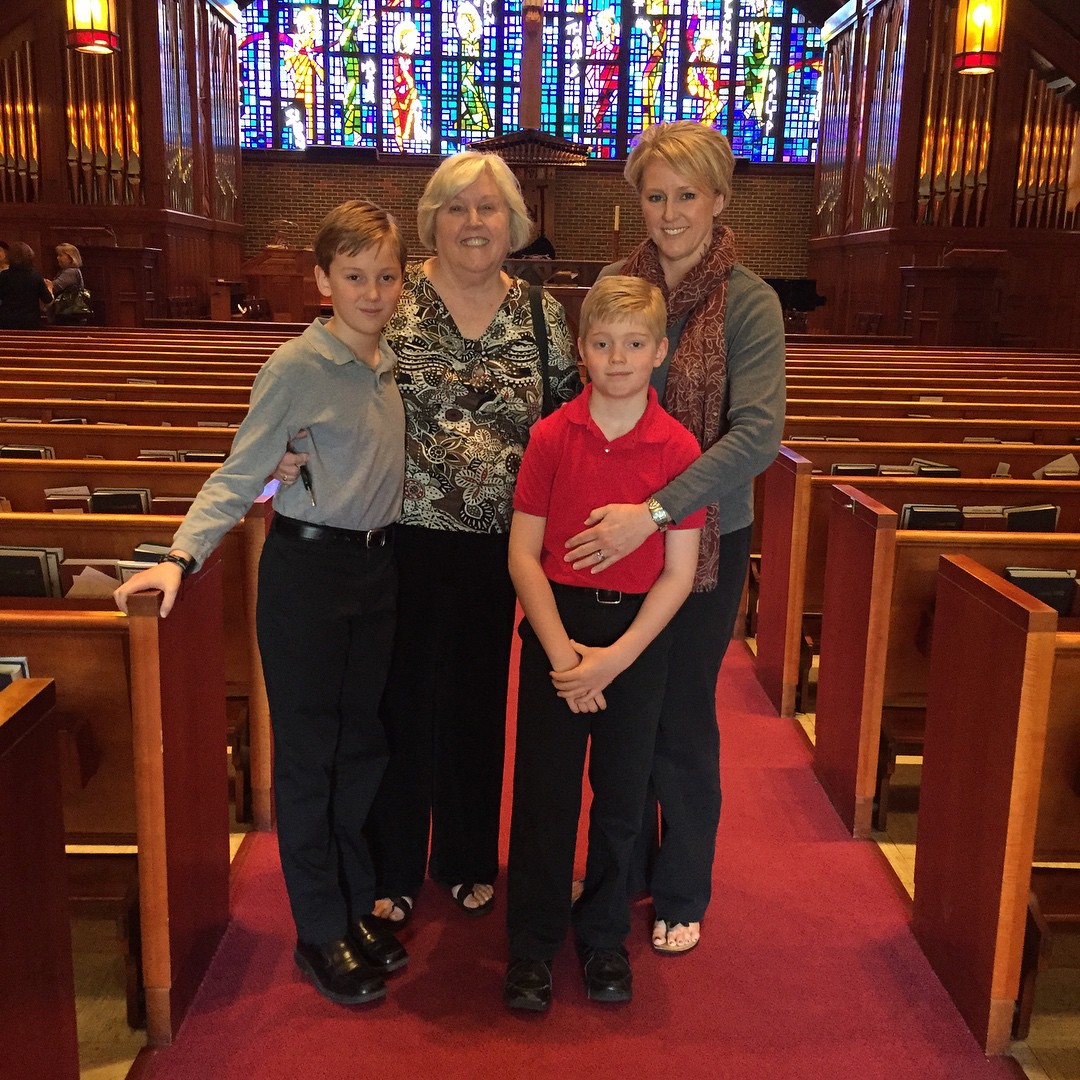
First, my oldest created these fun pages.  I love the one he made using a funny picture of him and his older cousin taken while we visited Orlando a couple of weeks ago.  The other picture he chose is “The Supervisor” doing what she does best.  He chose to put in the ikat style DSP (Sweet Dreams) pattern to match!  He used the PL Cards and Labels Framelits to make it match perfectly.

PL by Nathan - Stampin' on the Fly

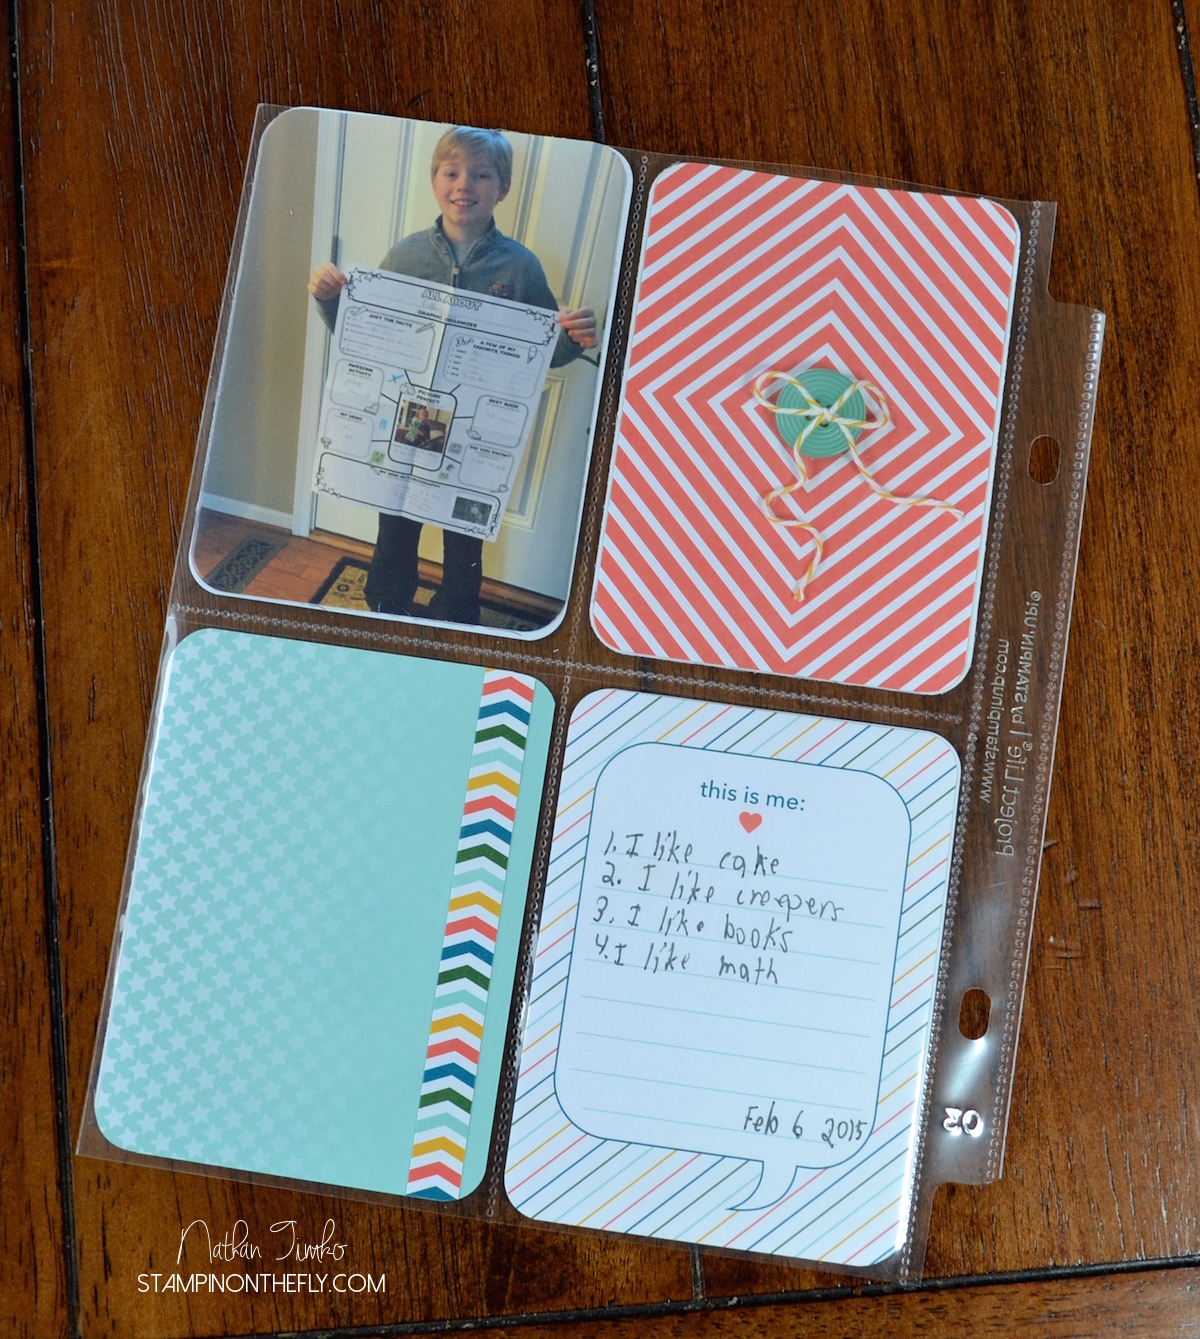
Not to be outdone, my youngest chose a picture of himself from when he was the Star Student (a way to let the other kids know more about each child).  He took some of the things he had written about himself on the poster and put them on the card.  Isn’t this PL card perfect?!

Feb PP - Thanks

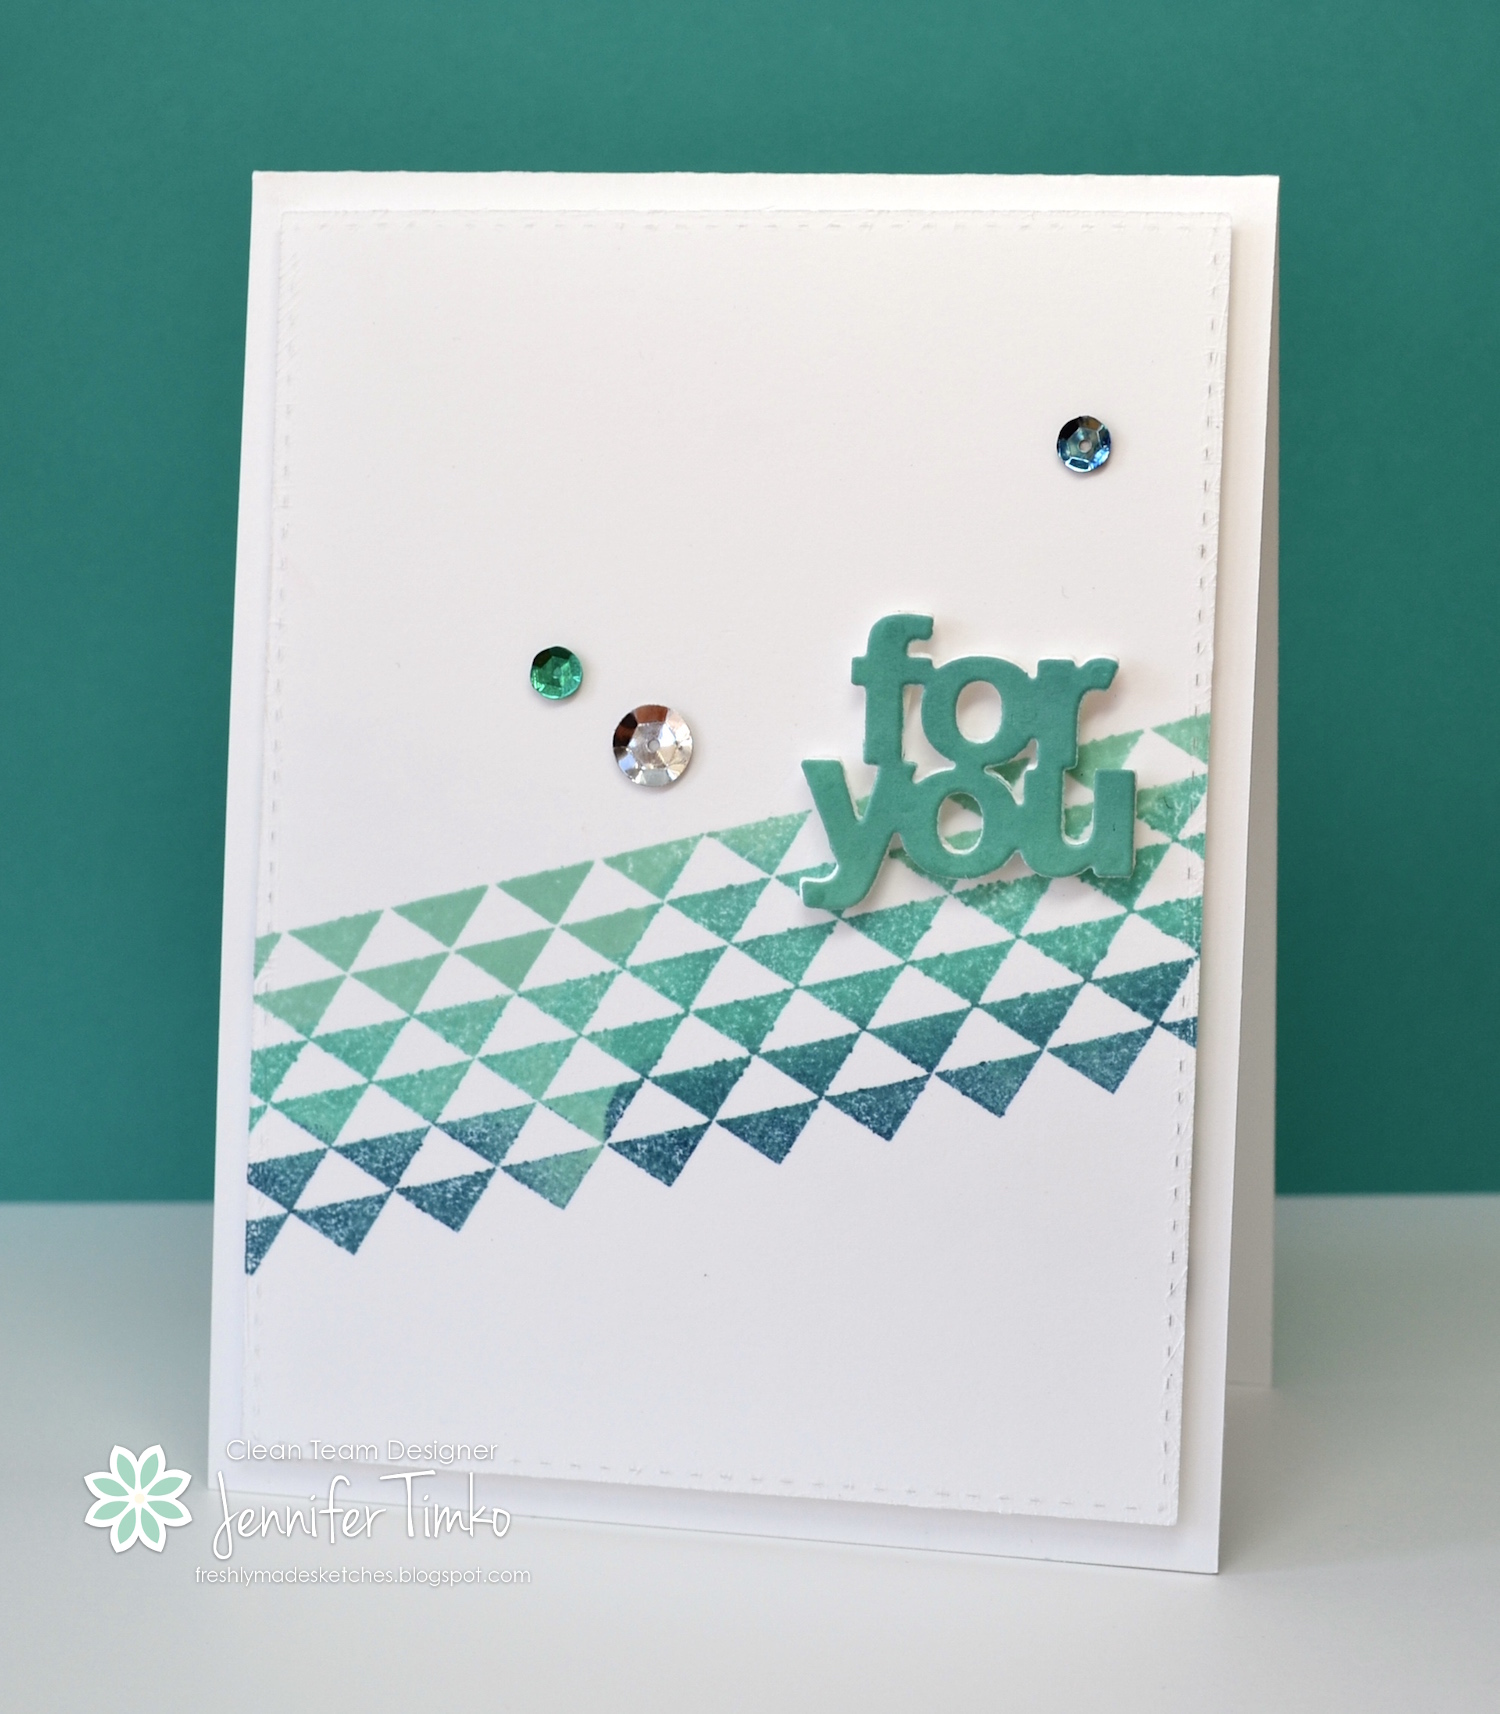
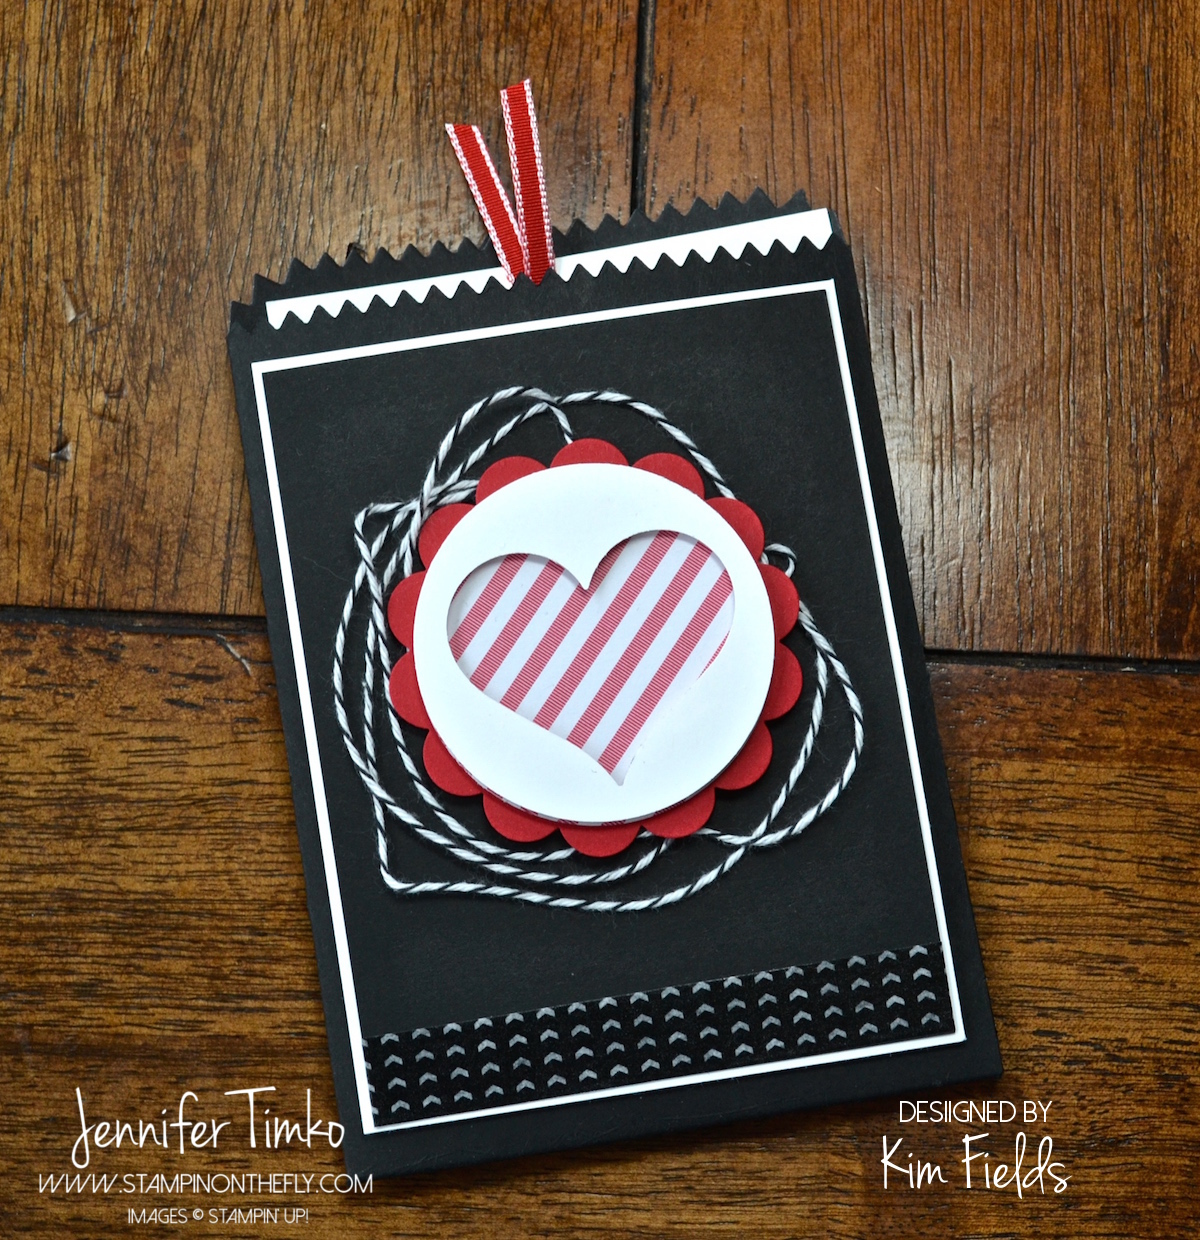
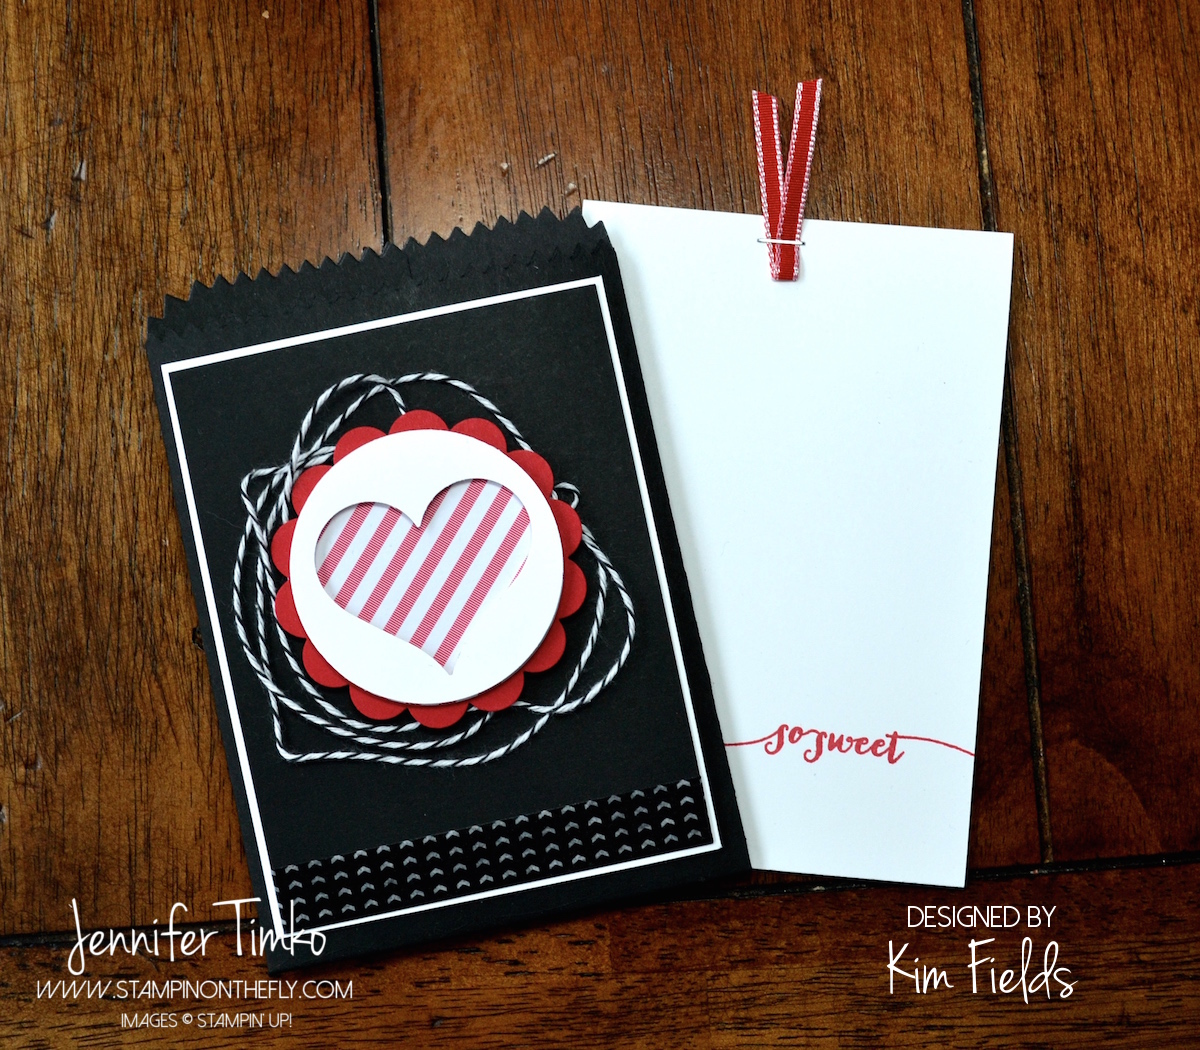
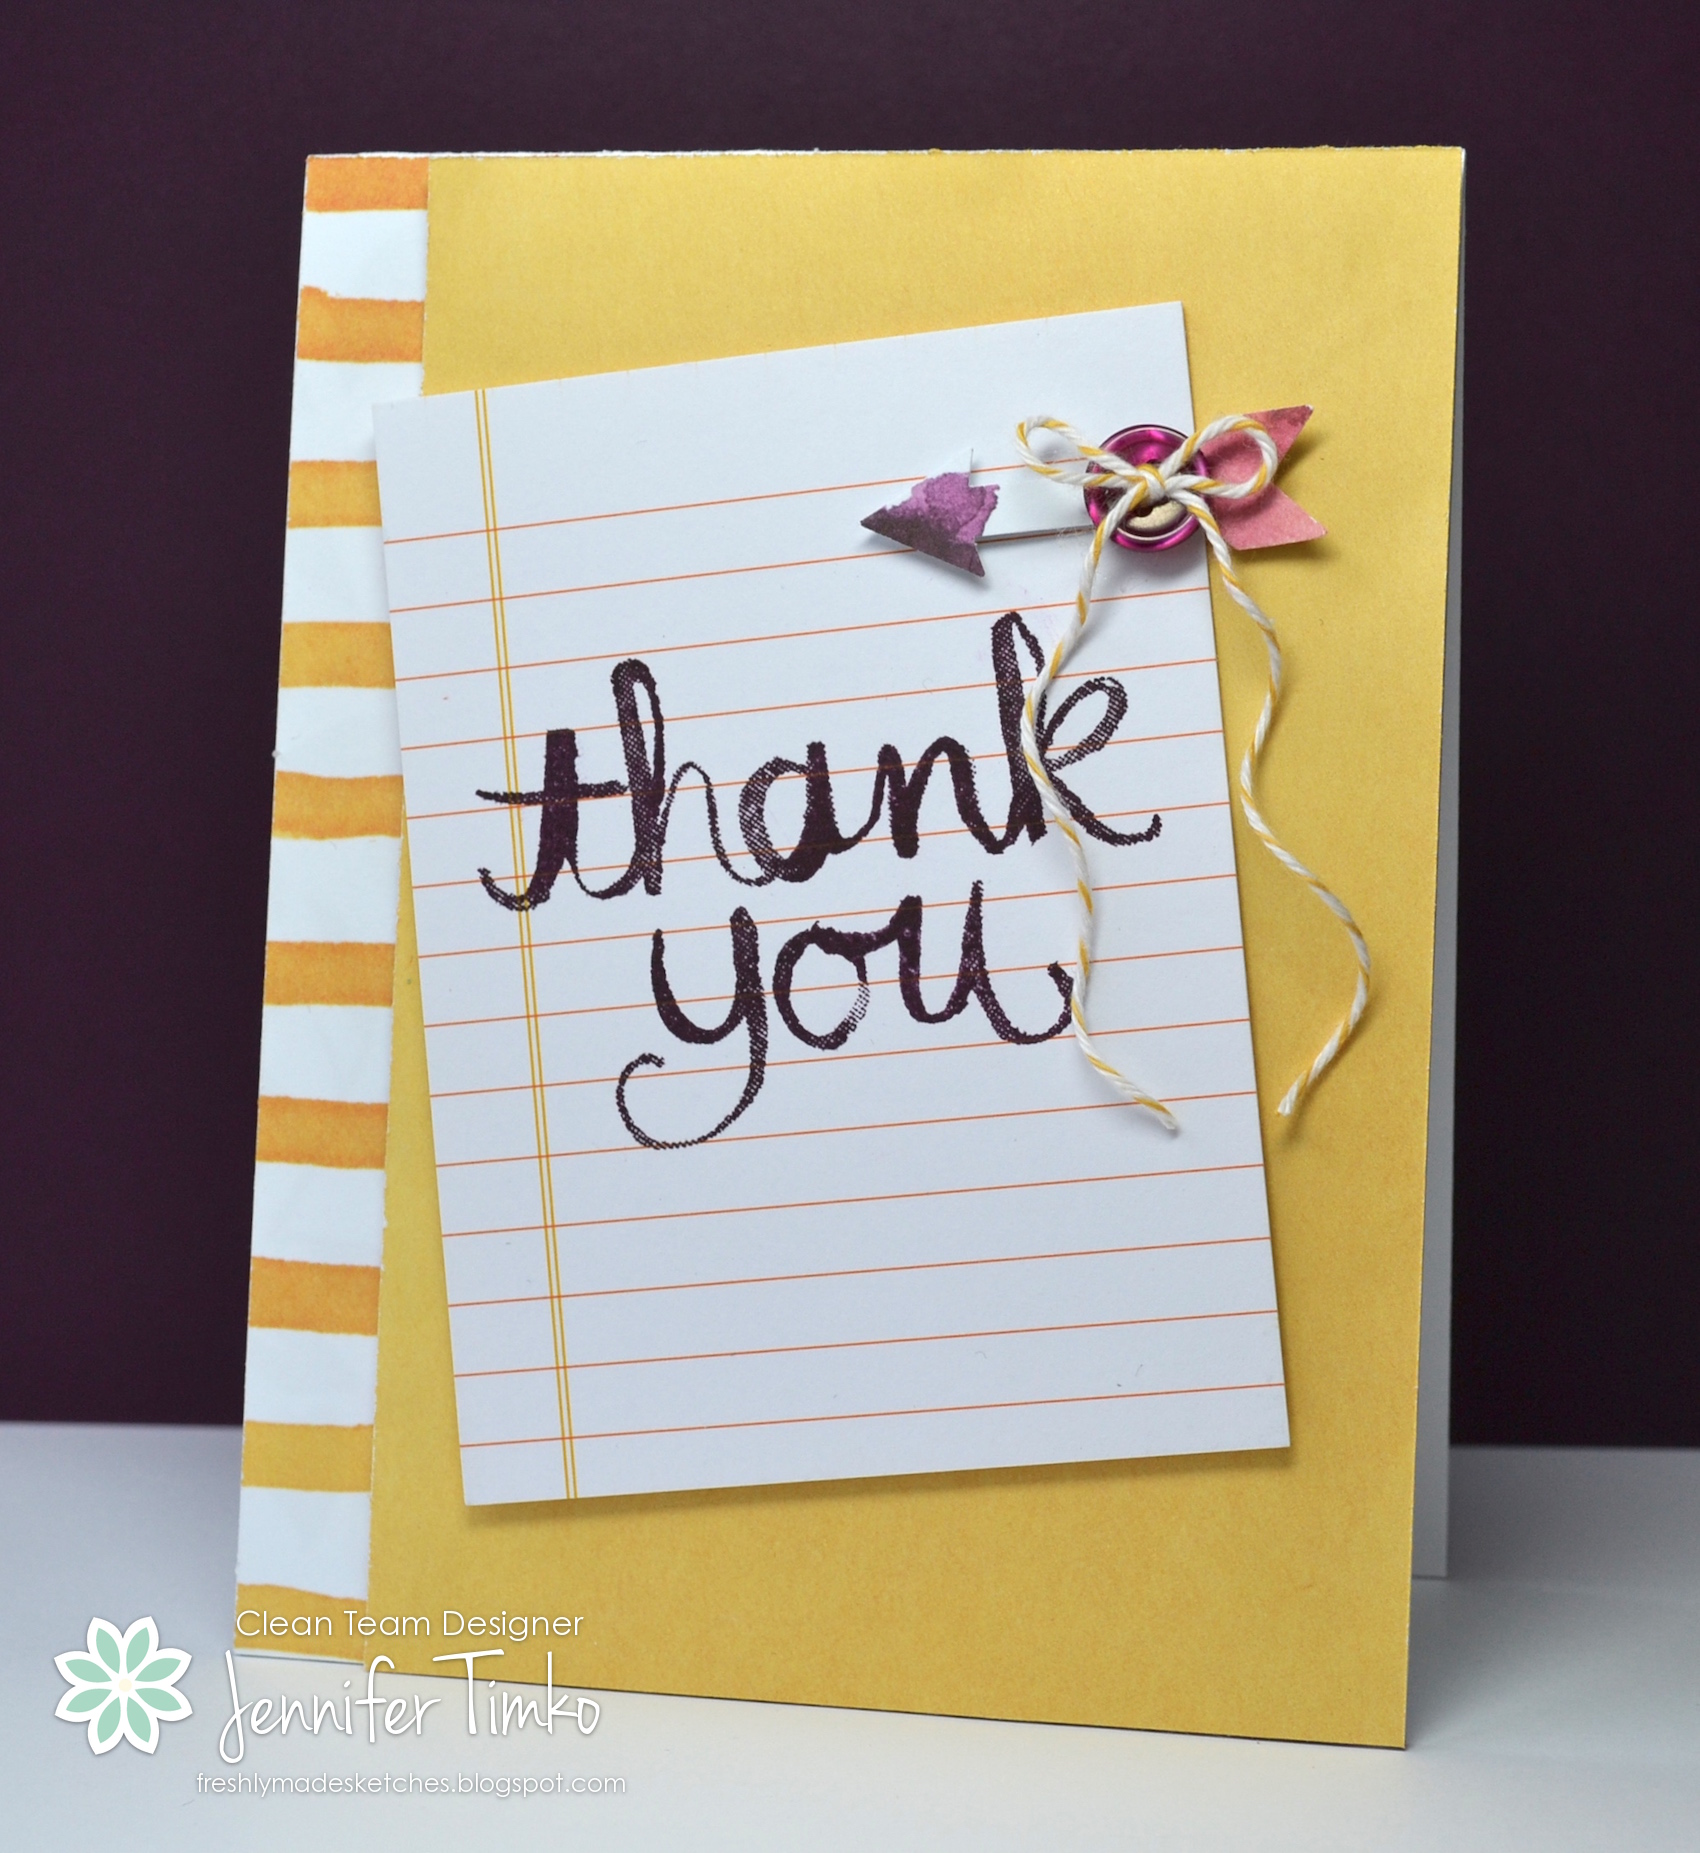
So we finished the Project Life work for the day and they still felt like crafting (insert mom cheer here!).  I went right to the Paper Pumpkin kit for February!!  They made this card above (and others like it) which is pretty much the design straight from the kit.  But then I showed them a fun post from Concept Artist Melody Hyde (go leave her some love because she is brilliant) and they just had to create their versions of the star card.  I cut apart an accordion for them and they got to work.

Feb PP - Cards

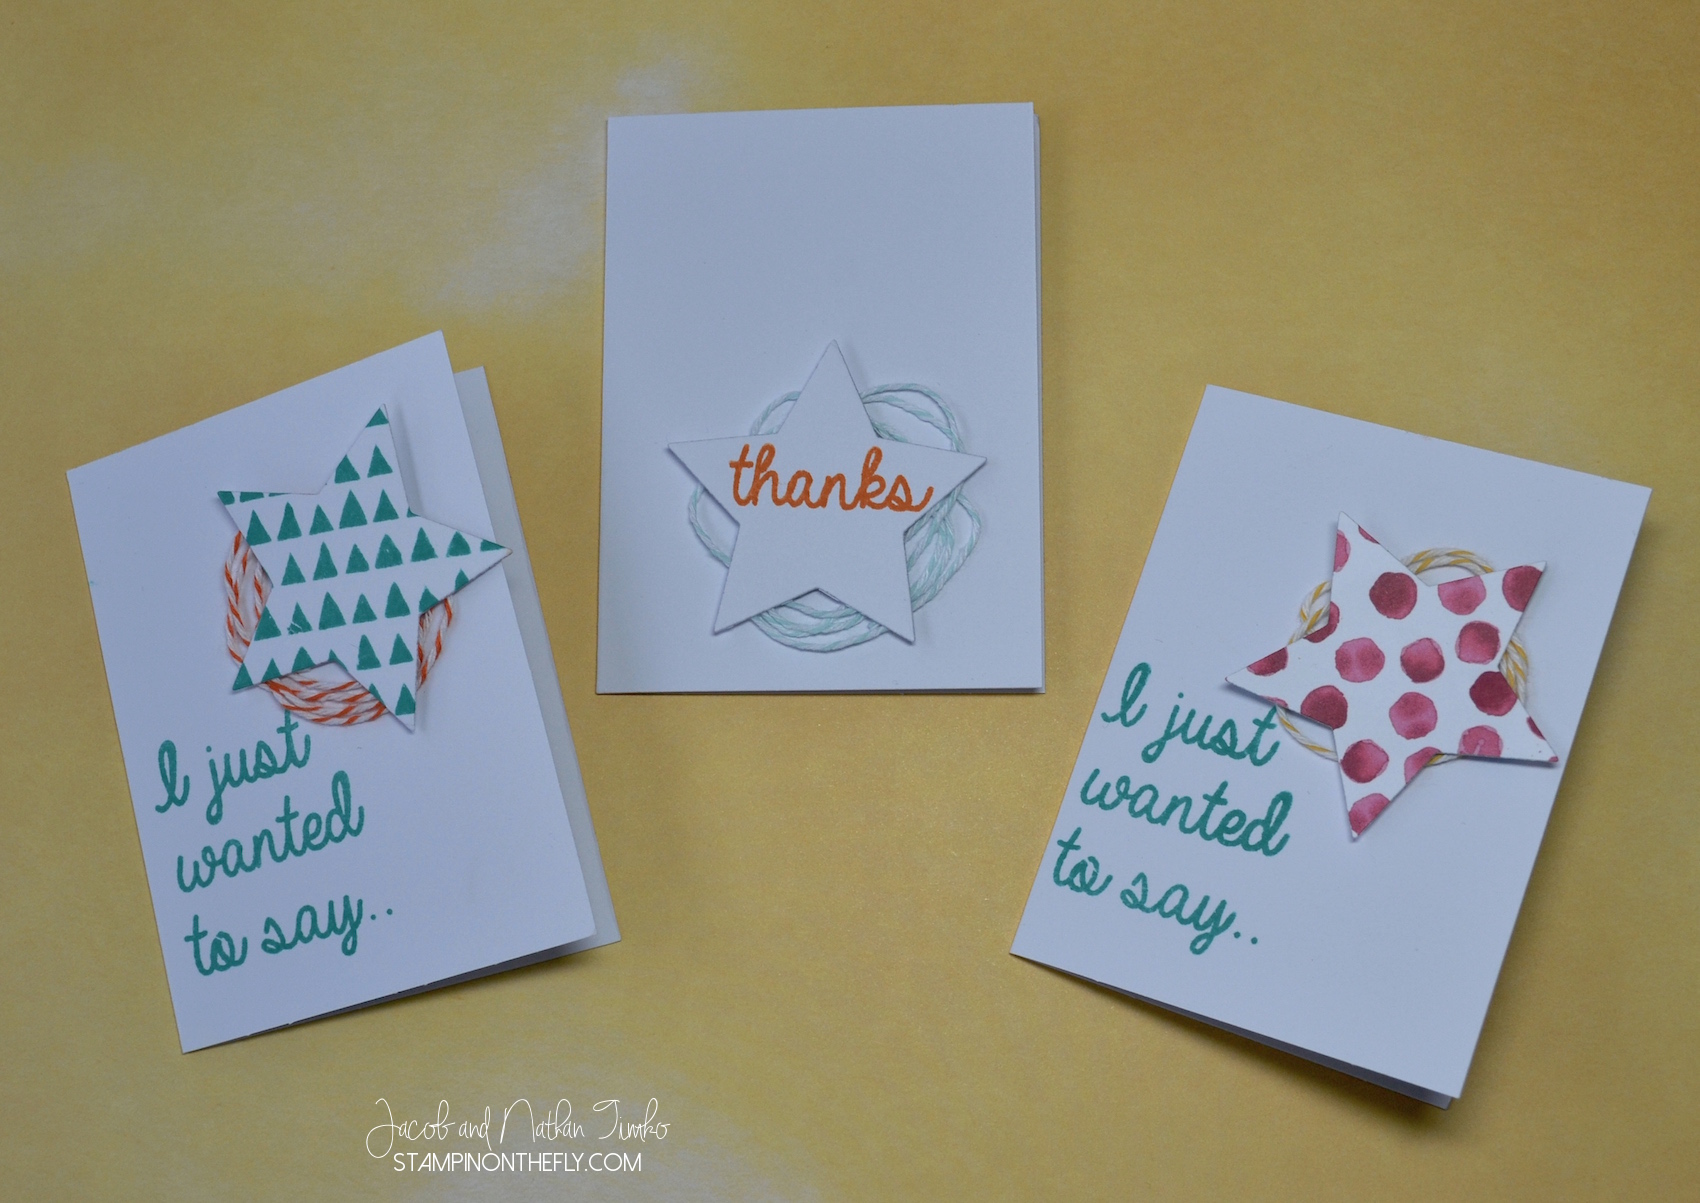
I helped show them how to wrap the twine like Melody did and they chose different colors from my stash.  I may go and create another group just like them and put them in one of the cute envelopes from the kit to have ready as a little treat for someone.  You know….I might be doing that while the boys are working on PL!!

Ok.  Enough typing.  I have crafting (YAY!) and snow shoveling (BOO!!) to do today.  I hope you have a fabulous and crafty day!  See you soon!

Click HERE to purchase these wonderful Stampin’ Up products!

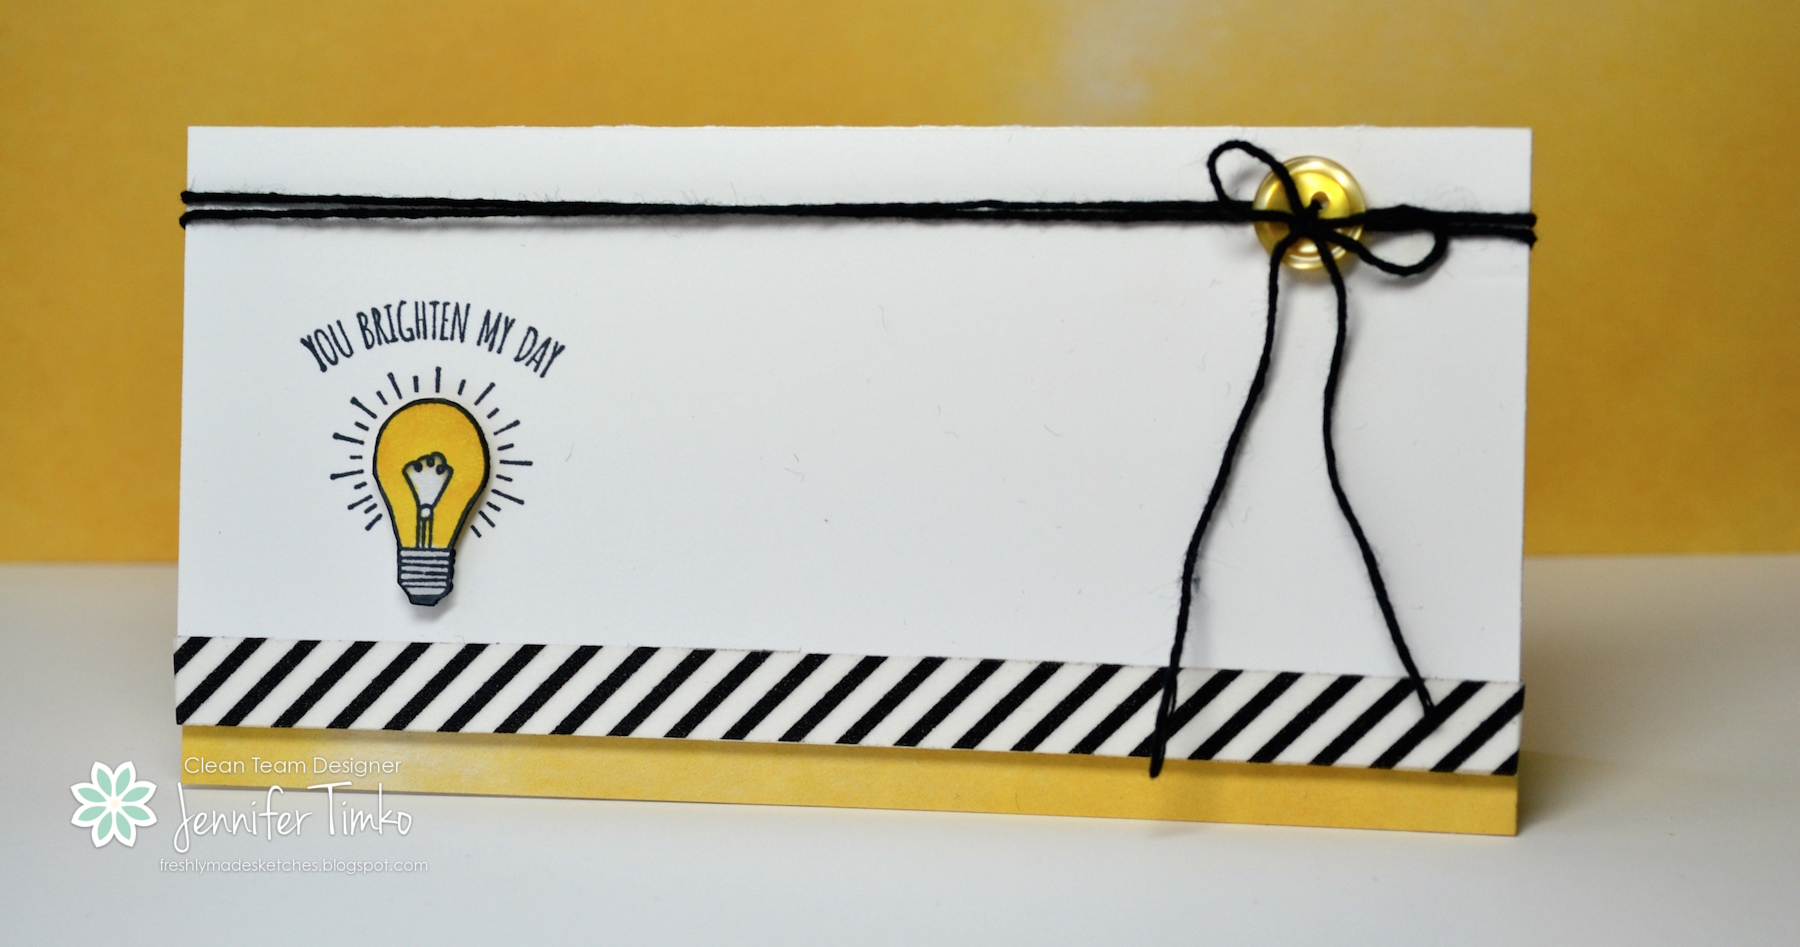
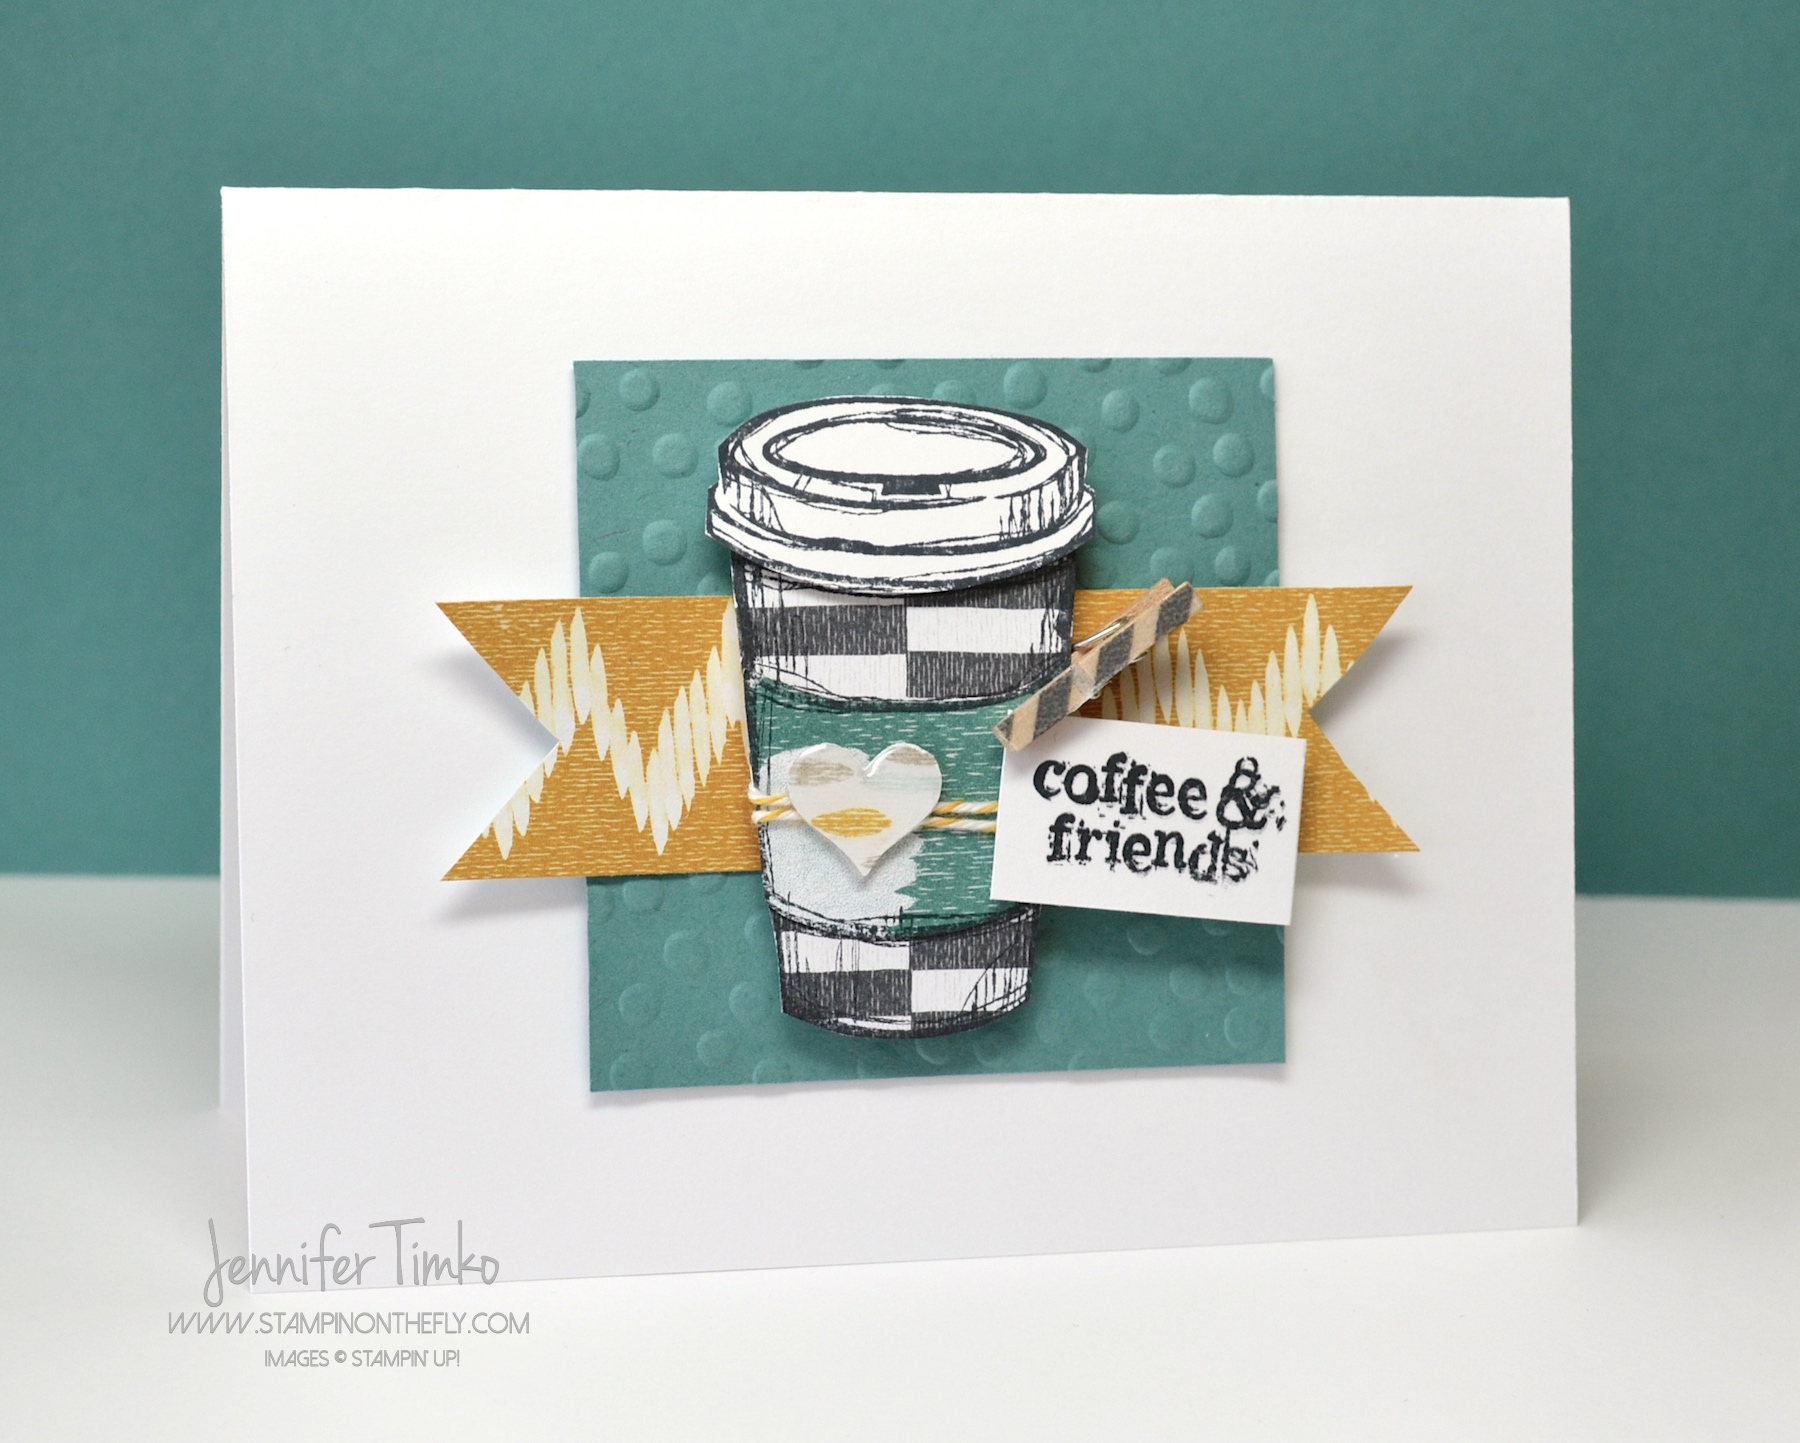
Stamps:  February Paper Pumpkin; Paper:  Sweet Dreams DSP, PLxSU, Paper Pumpkin; Ink:  Pool Party, Daffodil Delight, Bermuda Bay, Pumpkin Pie; Accessories: PLxSU Everyday Adventure, Playground, SAB This Day, Buttons, Baker’s Twine (from Paper Pumpkin plus Crushed Curry, Pool Party, What’s Up Punch, Big Shot, PL Card and Labels Framelits, Stars Framelits

Blog Signature 2015


Freshly Made Sketches #176

Freshly Made Sketches #176 published on 11 Comments on Freshly Made Sketches #176

So we are switching things up this week over at Freshly Made Sketches.  The lovely and oh so sweet Cindy Hall has taken us out of our box.  Well, she has taken us out of our standard rectangle, at least.  She came up with a plan to create elongated cards and we knew she was onto something.  So besides being lovely and sweet, she is brilliant!

Jen Timko - FMS176 - You Brighten My Day

One of the reasons I had to have this Sale-a-bration stamp set (You Brighten My Day) is this little light bulb.  What is it about certain little stamps that just speak to us?  I just don’t have anything like this and I’m so glad I was able to get it.  The fact that it was free…well, that makes it even better!!  But I digress.  I stamped this little bulb twice.  Once on a scratch piece and once on a piece of Whisper White cut to 2-1/2″ x 5-1/2.  I colored the one on the scratch piece using my Daffodil Delight Blendies (these are currently unavailable for order pending SU working a quality control issue).  I cut it out and popped it on a Dimensional.  I took some of the washi tape from the So You Project Kit (a work in progress that I’m getting really excited about, by the way) and used the washi in place of the scallops.  I tied on Black Baker’s Twine and a Daffodil Delight Button.  Then I cut a base of 5-1/2″ square and folded it in half.  I put a little strip of Painted Blooms DSP at the bottom and popped the image panel up on Dimensionals.  This card makes me happy and I know just who it is going to!

FMS Final 176-001

Here in Northern VA we have been having LOTS of snow day.  Lots of them.  In fact, I think tomorrow will be another.  So after too many hours of Minecraft (*smile*), I found something else for the boys to do.  I’ll be back tomorrow to show you.  Until then, I’m glad you stopped in today.  Hope your day is great!

Click HERE to purchase these wonderful Stampin’ Up products!

Stamps:  You Brighten My Day (SAB); Paper:  Whisper White, Painted Blooms DSP; Ink:  Momento Tuxedo Black, Daffodil Delight Blendabilities, Copics Markers; Accessories:  Washi Tape (So You Project Kit), Baker’s Twine (Paper Pumpkin), Brights Buttons,

Blog Signature 2015


Coffee and Friends

Coffee and Friends published on 49 Comments on Coffee and Friends

Print

So I have a Saturday card!  Yay!!!  I had some time to stamp yesterday and just could not resist joining in this fabulous blog hop.  Amy and Chaitali have created this spring version of the Coffee Lovers Blog Hop.  Such fun!  I mean let’s face it.  What is stamping without coffee??!!  I know that my stamping is fueled by coffee.

Jen Timko - Coffee and Friends

The other thing that goes perfectly with coffee is friends!  I love when I get to enjoy a nice cup with mine…such a special treat.  I combined the Perfect Blend stamp set with Sweet Dreams DSP to create this fun little card.  I stamped the cup three times – on the rectangle print, on the circles print and on Whisper White. I cut them out and then pieced them together to create my cute cup.  I wrapped a little bit of Crushed Curry Baker’s Twine around the cup and then added an Itty Bitty Accents Epoxy Sticker with a little piece of coordinating DSP cut with the heart from the Itty Bitty Accents Punch Pack.  I took some washi tape and added it to a little clothespin and clipped on the sentiment from the stamp set.  More DSP for the banner and Lost Lagoon card stock embossed with Decorative Dots TIEF.

FabFri58I used this sketch from my friends over at Fab Friday for this card.  Now you need to go check out this fun hop.  So many people already linked in and guess what?!  There are loads of amazing sponsors and all you have to do is join in for a chance to win.

Hope you enjoy this card.  I have my stamp club coming over this weekend and I can’t wait to stamp with them!  I hope your weekend is full of stamping too!  So glad you stopped by today.  See you again soon!

Click HERE to purchase these wonderful Stampin’ Up products!

Stamps:  Perfect Blend; Paper:  Sweet Dreams DSP, Whisper White; Ink:  Momento Tuxedo Black; Accessories: Mini Clothespin, Washi Tape, Crushed Curry Baker’s Twine, Itty Bitty Accents Epoxy Stickers and Punch, Big Shot, Decorative Dots TIEF

Blog Signature 2015


Freshly Made Sketches #175

Freshly Made Sketches #175 published on 15 Comments on Freshly Made Sketches #175

I am so happy to share today’s card with you!  My friend Jen Brum has created such a fun sketch for us over at Freshly Made Sketches.  In honor of Jen’s, um, aversion to circles I have created a card that is all about circles.  *smile*  I hope she appreciates my sense of humor on it!

Jen Timko - FMS175 - Bokeh Wishes

So the bokeh technique is all about circles.  Or at least my version is.  Bokeh is a photography technique defined as the way a lens renders points of light.  The key is the blur effect.  Bokeh has also been all the rage in the stamping world for a while and I finally gave it a go.  I’ll tell you a bit about how I created the card and then I have photos on how I created the panel itself.  I stamped this sentiment from Butterfly Basic in Gold Encore Ink onto Vellum and then heat embossed it with Gold Stampin’ Emboss Powder.  Then I punched it out with my 2-1/2″ Circle Punch.  I love the way the vellum mimics the look of the inked circles!  I used a little bit of Tombow Multipurpose Adhesive on the vellum behind the words to attach the vellum invisibly and also tacked down the portion I folded over on the back side.  I had this Blushing Bride Gold Baker’s Twine left over from this month’s Paper Pumpkin kit and it worked perfectly here, don’t you think?  To go along with the gold, I added a Gold Mini Metallic Clothespin and Gold Sequin Trim.

Bokeh - Watercolor

Now for the panel.  You can click on the photos to expand them if needed.  I took watercolor paper and taped it to a piece of chipboard (the stuff that comes in kits to protect materials) using old washi tape.  Then using a paint brush I washed water over the whole panel.  I put a few drops of Daffodil Delight Reinker in a container and using the same wet brush, picked up the reinker and splatted it onto the paper.  Then I did the same with Calypso Coral Reinker.  On the places where is seemed really dark or too watery, I pounced on the paper with a paper towel to absorb some of the extra.  This leads to a mottle look and I feel like the mottling is key to success with the rest of the technique.  You can let it dry naturally or use the low setting of your heat tool.  You can see which one I chose (because I’m impatient).

Bokeh - Sponging

Here you can see my reinker containers (old button boxes).  Then using circle punches I made a template using card stock (punches listed in materials below).  If you have circle framelits, you can use them instead.  I grabbed a trusty sponge dauber and started adding on circles using White Craft Ink.  Bigger circles are lighter and smaller circles are darker.  You can use just the dauber for the small circles if you want but my precision with those is a bit lacking.  I liked the template better.  Just add circles until you have the effect you want.  Let that panel dry thoroughly again, pull it up and trim to size.  It really is MUCH easier than I expected!!  I used this video as a basis for mine and then just used Stampin’ Up stuff instead.

FMS Final 175-001Let me know if you have any questions about this!  Don’t be like me and put it off.  Pull out some of your favorite colors and give it a try!

The team has done their usual fantastic job with the sketch and I know you will have fun with it too.  Another classic in the making!  Thanks so much for stopping in today.   See you soon!

Click HERE to purchase these wonderful Stampin’ Up products!

Stamps:  Butterfly Basics; Paper:  Watercolor, White, White Vellum; Ink:  Daffodil Delight, Calypso Coral, Gold Encore, White Craft; Accessories:  Circle Punches – 1/2″, 1-1/4″, 1-3/8″, 1-3/4″, 2-1/2″; Mini Metallic Clothespins, Gold Sequin Trim, Blushing Bride Gold Baker’s Twine (Paper Pumpkin), Sponge Daubers, Heat Tool, Gold Stampin’ Emboss Powder

Blog Signature 2015


Blackberry Butterfly

Blackberry Butterfly published on 2 Comments on Blackberry Butterfly

Well, my card was ready for yesterday but not my post.  Hmmm…  Well, it happens, I guess.  My boys and I had a quick get away this weekend to Orlando.  Unknown to my mom who lives there, we had a surprise birthday party planned for her on Saturday!!  It was such fun and we managed to keep the surprise.  My boys were so worried they would give something away but they did great!  I made my mom a special card too, of course.  She love purple and she is the one who gave me my sewing machine so naturally I created this.

Blackberry ButterflyI had a tough time with the light getting a good picture before we had to leave but I think you can see the idea.  It seems prettier in person though.  The background splatter is from Gorgeous Grunge and is stamped in Gold Encore Ink.  Then I inked the butterfly from Butterfly Basics in Blackberry Bliss.  I hand cut this one out and then added on a gold metal button tied with a Vanilla Baker’s Twine that came in a Christmas card kit (these kits just keep giving).  I added some Venetian Crochet Trim and Blackberry Bliss Stitched Satin Ribbon underneath the butterfly.  The sentiment is from the same stamp set.

10498177_10204992492865672_186847248359245993_o

Quick post today but I thought I’d share a picture from our weekend.  This was taken at my mom’s church and I thought it was really nice.

So glad you stopped in today.  I’ll be back tomorrow with the latest from Freshly Made Sketches.  Hope your day is great!

Click HERE to purchase these wonderful Stampin’ Up products!

Stamps:  Butterfly Basics, Gorgeous Grunge; Paper:  Very Vanilla; Ink:  Blackberry Bliss, Gold Encore; Accessories: Sewing Machine, Venetian Crochet Trim, Blackberry Bliss Stitched Satin Ribbon, Basic Gold Metal Button, Vanilla Baker’s Twine

Blog Signature 2015


Freshly Made Sketches #174

Freshly Made Sketches #174 published on 12 Comments on Freshly Made Sketches #174

This week over at Freshly Made Sketches, the incredible Cindy Lovell is our sketch hostess.  Cindy has the most fabulous eye for design and detail.  I love her cards!  Of course it is no surprise that her design is perfect for lots of interpretations.  It is fantastic!

FMS174 - Triangles For You


I knew I wanted to use this graphic and fun stamp Dotty Angles when I saw the sketch.  But what to do with it?  And which shape, triangles or circles? After playing with it a bit, I thought I do a take on ombre stamping.  I sponged Pool Party, Bermuda Bay and Midnight Muse (retired In Color) inks onto the triangle stamp.  Makes for a pretty cool effect, don’t you think?  I chose the sentiment die from the Mini Treat Bag Thinlits and cut out a few from white card stock.  I used the inky sponge dauber already loaded with Bermuda Bay (from inking the stamp) to sponge color on the top layer.  You could used colored card stock but this effect is a little softer.  The sequins are from the Holiday Catalog (silver) and from Paper Pumpkin.  The darkest one is colored with a Night of Navy Blendabilities marker to make it match.

FMS Final 174-001

I think you are going to have fun with this sketch.  So many great ways to create with the angled panel and circle element.  The team does its usual magic and you will love their work!  I’ll be back Friday with a quick and easy card you are sure to like.  So glad you stopped in today.  Hope your day is great!

Click HERE to purchase these wonderful Stampin’ Up products!

Stamps:  Dotty Angles; Paper:  Neenah White; Ink:  Pool Party, Bermuda Bay, Midnight Muse (ret); Accessories:  Big Shot, Mini Treat Bag Thinlits, Sponge Daubers, Sequins, SSS Stitched Rectangles Die

Blog Signature 2015


Stamp Review Crew – Wondrous Wreath

Stamp Review Crew – Wondrous Wreath published on 14 Comments on Stamp Review Crew – Wondrous Wreath

SRC-Wondrous-Wreath-banner

I am so excited to be a part of this amazing group of Stampin’ Up demonstrators!  If you haven’t heard of “The Crew” yet, you are going to be so thrilled with this.  We are here to show you the versatility of one stamp set every time we hop (the 1st and 3rd Monday of each month).  We have a whole team of people and different stampers participate each time.  Like you, we look to find ways to maximize our investments and the single focus on one set allows you to see all the possibilities!  This week, our featured stamp is Wondrous Wreath.  Let me repeat that…Wondrous Wreath.  Yes, the one from the Holiday Catalog!  Did you know it is on the Returning Favorites List in the Occasions Catalog? Good news if you missed it before in all the holiday madness!

If you just came over from the lovely Yapha Mason, I’m so glad you are here!  If you want to see everyone who is hopping or if you get lost along the way, just click over to The Stamp Review Crew blog.

Jen Timko - SRC - Wondrous WreathThe best part about this stamp is the versatility!  It is not just for Christmas, that is for sure!  Just look at this adorable spring wreath and you can start to see how many variations you can make.  I stamped the wreath in Whisper White Craft Ink and embossed it with White Stampin’ Emboss Powder.  I added a sentiment from the Sale-a-bration set Simply Wonderful in the same way.  Then using the Painted Blooms DSP suite, I added the embellishments.  The Kraft card stock is cut to 3-1/2″ x 5-1/2″ and the striped DSP in the background is cut to 4″ x 5-1/2″.  That allows a practical cutting pattern for the 12″ x 12″ DSP and you can get 6 of these from one sheet.  Love that!  I punched the little flowers out of some scraps of a flower print from the DSP (like the arrow from last week’s FMS card) and doubled them up for these cute add-ons.  The Wild Wasabi twine is from the Painted Blooms Cotton Twine Pack and I colored the pearls to match with Blendabilities.  Just take the middle green from the Old Olive blendies and color first.  Then go back over the pearl with a touch of the darkest marker from the Soft Sky blendies pack.  You can custom blend with these!!  Oh how I adore this feature!  The striped DSP is attached to a white base then the Kraft layer is up on Dimensionals.  I attached the bow and the flowers using Crystal Effects as glue.  Super secure and dries fast!  Perfect for people like me with no patience!

I hope you like today’s card.  Like you, I can’t wait to see all that the others have for inspiration!  Hop on over to Rochelle Blok to continue on your way around.  So glad you dropped in today.  See you again soon!

Click HERE to purchase these wonderful Stampin’ Up products!

Stamps:  Wondrous Wreath, Simply Wonderful; Paper:  Painted Blooms DSP, Kraft; Ink:  White Craft Ink, Blendabilities – Old Olive, Soft Sky; Accessories:  Heat Tool, White Stampin’ Emboss Powder, Itty Bitty Accents Punch Pack, Basic Pearls, Painted Blooms Cotton Twine, Crystal Effects

SRC-Wondrous-Wreath-prevSRC-Wondrous-Wreath-next


Blog Signature 2015


You’re the Best

You’re the Best published on 1 Comment on You’re the Best

I had the privilege of going to a wonderful gathering of Stampin’ Up demonstrators last Saturday and wow was it fun!  My friend Rose-Ellen Eastman puts on an event that mimics the style of Stampin’ Up corporate events and it is always a treat to go!  She puts in a lot of work to make it happen.  This time I offered to help by creating a Make-n-Take.  Everyone seemed to like it and I hope you will too.  I also got to make other designers’ projects as make-n-takes and thought it would be fun to share!

You're the Best - Make and Take

My card shows how easy it is to incorporate stencils into a cute design.  I just love these little hearts from the Hearts and Stars Mask set.  I sponged on Soft Sky ink with a sponge dauber.  Then I punched a piece of the heart print from the Fancy Foil vellum and a piece of Soft Sky card stock using the Note Tag Punch.  I tied the Painted Blooms Twine onto a Mini Metallic Clothespin and cinched the two tags together.  The sentiment comes from the FREE Sale-a-bration set Simply Wonderful.  How do you get that set??  Easy.  Order the stuff used to make this card and you’ll have gifts that keep on giving in your craft stash.  AND you’ll get to choose the free stamp.

  • Note Tag Punch
  • Painted Blooms Twine
  • Fancy Foil Vellum (Silver)
  • Hearts & Stars Mask
  • Mini Metallic Clothespins
  • Sponge Daubers
  • Stampin’ Dimensionals

All this together comes to $50.65 and then you just choose the stamp set for free.  And all of these products can be used to make loads of other things!!  AWESOME!

One of the best things about demonstrator events is that we, of course, just have to make things while we are together.  This adorable little valentine treat bag was designed by the very talented Kim Fields for all of us to make.  I was privileged enough to see her original design.  Do to time constraints the twine was left off the project for the event (we made tons of stuff) but I could not resist adding it.  So I brought my bag home and finished it here so that I could copy Kim’s version completely.  Is this not totally fantastic??!!

Kim's Bag - Closed  Kim's Bag - Open

Our hostess Rose-Ellen really outdid herself with other projects and I just had to show you another favorite.  This adorable little lollipop holder was designed by her for us to make based on a project she saw at Leadership.  What was that??  Yes, you DO still have time to make a few of these before the 14th!!

Rose-Ellen's Treat

I hope these were worth the wait!  If you have any questions about any of the projects, just drop me a note and I’ll be happy to get you the info.  Want to participate in events like this one??  I’d love for you to join my team!  Send me an email or simply click on the tab at the top for more info.  Sale-A-Bration is such a great time to join and I’d love to have you take advantage of all the perks being a demonstrator can give!!

I’m so glad you stopped in today to visit.  I’m working on a project for a blog hop next week and I can’t wait to show you.  Until then, have a great day!

Click HERE to purchase these wonderful Stampin’ Up products!

Stamps:   Simply Wonderful (SAB), Hello Life, Hey Valentine; Paper:  Whisper White, Fancy Foil Silver Vellum, Stacked with Love DSP Pack, Basic Black, Real Red; Ink:  Soft Sky, Momento Black, Blendabilities – Coastal Cabana, Real Red, Pumpkin Pie; Accessories:  Note Tag Punch, Mini Metallic Clothespins, Painted Petals Twine, Hearts and Stars Mask, Sponge Daubers, Big Shot, Mini Gift Bag Thinlit, 2″ Circle Punch, Scalloped Circle Punch, Heart Punch, Black Baker’s Twine, Stacked with Love Washi Tape, Scalloped Tag Punch, Happy Heart Embossing Folder, 1/8″ Real Red Taffeta Ribbon

Blog Signature 2015

Freshly Made Sketches #173

Freshly Made Sketches #173 published on 8 Comments on Freshly Made Sketches #173


So a funny thing happened on the way to this week’s sketch.  Like many design teams, our Freshly Made Sketches team has a separate blog where we can upload sketches and challenges cards early in order to make the weekly challenge happen.  Kind of the magic behind of the scenes.  The team loads in their latest sketches and I convert them to final form in My Digital Studio.  Well, when Kim Singdahlsen uploaded her sketch, I got to work on getting it drawn.  After I got everything done and loaded on the DT page, I looked at the sketch and it was crooked.  Surely, I thought, I hadn’t mistakenly hit rotate??  Seriously??  So I went back to the sketch and no, I hadn’t.  I pulled out a real straight edge and held it to my screen and yep, it is straight.  So apparently Kim is so creative that she can not only concoct great sketches, she can invent optical illusions!!!  We all know she is a card making genius and now we just know that she is a multi-faceted genius!

FMS173 - Thank You


I started my card with the awesome new Painted Blooms DSP.  Both the stripe print and the Daffodil Delight background paper are from that pack.  Aren’t they pretty?!  I love the ombre variation in the stripes!  I decided to pair it up with a card out of the Project Life Everyday Adventure Kit.  That awesome little notebook paper print goes perfectly with the DSP and I didn’t have to cut a thing.  I stamped on the Watercolor Thank You stamp (a single) in Blackberry Bliss.  Then I added an arrow punched with the What’s Up Punch out of a flower print from the Painted Blooms DSP.  A Razzleberry button tied with Crushed Curry Baker’s Twine to finish.  I just love the look of this card….clean but with a sense of fun.

FMS Final 173-001

And here is our funny optical illusion sketch for the week.  I was relieved that the card itself didn’t take on the illusion of the sketch illustration!!  Ok, you KNOW you want to check it yourself.  Go ahead.  The outside rectangle is straight, I promise!!

The team has some fun inspiration for you and I think you are going to have a ball with this one….again.  I have to say (with only a little too much of a bragging voice) that the team has been on fire with the sketches lately!  And the gallery has been incredible as a result.  I am grateful for all the cool stuff I get to see every week as I see what you share.

Ok….so I have my make and take AND some cool samples from the Northern Virginia Regional Event I went to last week.  I finally got some pictures and have them edited so I really will have them up tomorrow.  Life just got away from me over the last couple of days and I could not seem to get the posts up.  But I did teach some awesome kids in 6th grade about the Women’s Airforce Service Pilots and did some other stuff for my boys.  Like working on Valentine’s!  I hope your week is going well and I look forward to having you stop in again tomorrow.  Until then, have a great day!

Click HERE to purchase these wonderful Stampin’ Up products!

Stamps:  Watercolor Thank You; Paper:  Painted Blooms DSP, PLxSU Everyday Adventure; Ink:  Blackberry Bliss; Accessories:  What’s Up Punch, Button,  Crushed Curry Baker’s Twine, Dimensionals

Blog Signature 2015


Celebrate

Celebrate published on 2 Comments on Celebrate

A quick and fun card for you today!  This was a card for my husband’s birthday last week.  Shaker cards are so great because they have an extra element of interest without being all “girly”.  While I love a girly card for sure, around my house I have a need for cards that skew to the masculine side.  I think this one hit the mark!

Celebrate


I used the Stacked with Love DSP Stack again.  Love these prints! Again, interesting but not too feminine.  I cut the frame out with the On Film Framelits and then cut a matching size out of the Window Sheets to fill the square.  I stamped the sentiment from Fabulous Four in Stazon Black Ink.  A little Black Baker’s Twine, a Cherry Cobbler Button and a fun bow (just like the one in my video tutorial from Wednesday).  Then I added some leftover white sequins from my December Paper Pumpkin and attached the frame with foam tape.  This is one of those cards that you could really tailor to the age and color preferences of the recipient.

Now….I’m off today to see my friend Rose-Ellen Eastman.  She is hosting a Northern Virginia demonstrator event tomorrow and I can’t wait.  I can’t wait enough that I’m going to go see what she is up to today.  *smile*  I’ll be back Sunday or Monday with one of the make and take cards from the event that I designed.  Until then, I hope you have a great weekend.  I appreciate you stopping in today!

Click HERE to purchase these wonderful Stampin’ Up products!

Stamp:   Fabulous Four; Paper:  Whisper White, Stacked with Love DSP Pack; Ink:  Stazon Black; Accessories:  Black Baker’s Twine, Cherry Cobbler Button, Big Shot, On Film Framelits, Sequins, Foam Tape

Blog Signature 2015

Primary Sidebar