Skip to content

Fancy Friday – Snowflake Tags

Fancy Friday – Snowflake Tags published on 5 Comments on Fancy Friday – Snowflake Tags

I know it isn’t the last Friday of the month yet but, like last month, the Fancy Friday team decided to hop a little early in order to get ahead for the holidays.  Our team is a group of demonstrators who love to make beautiful things.  Sometimes they are clean, sometimes they are layered but the one thing I can say for sure is that our projects will be fancy!  If you hopped over from my dear friend Cindy, welcome to the next stop.  For December we are creating a Fancy Tags.  Always a last minute thing for me so I’m happy to see (and share) some ideas for you!

FF Dec - Snowflake Tags

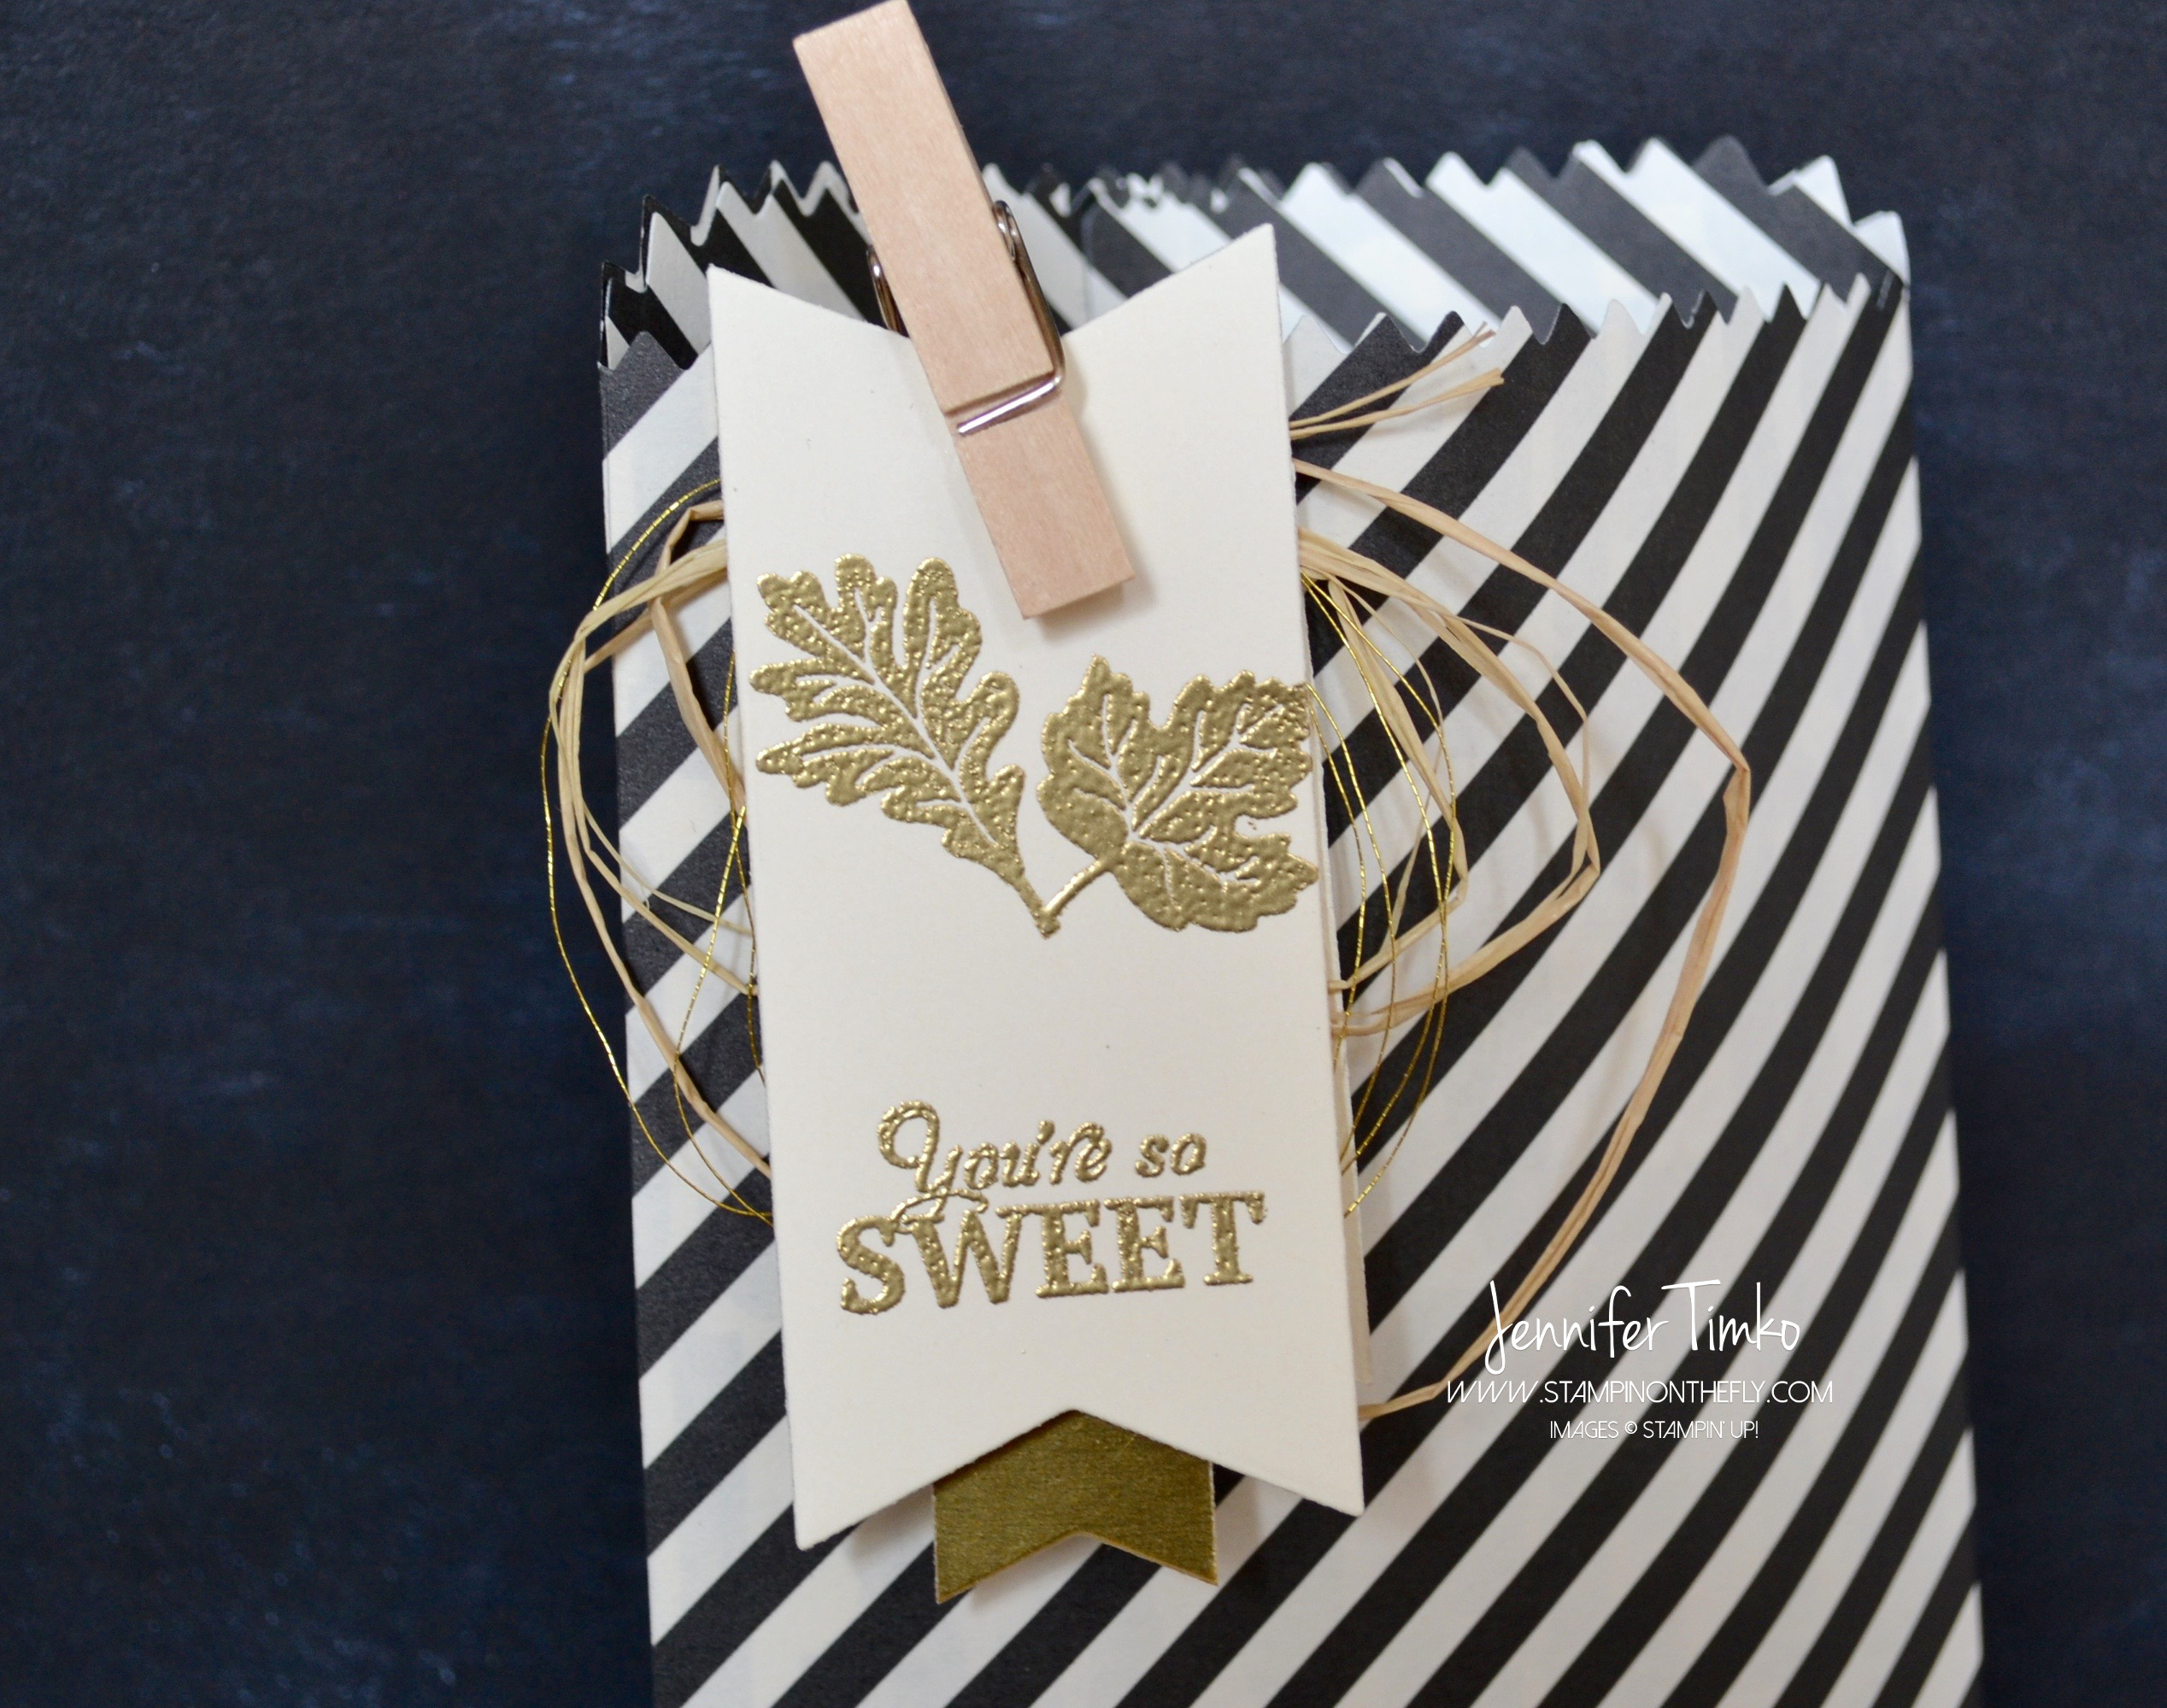
The first thing you may notice about these tags is that they are distinctly different styles.  The second….they are all the same tag.  Just like the two cards I posted last week, at this time of year it is simply too hard for me to come up with totally new sketches and ideas.  So, I just kind of do a riff on one idea.  Totally what I did here.  The tags are created using the Scalloped Tag Topper Punch and the corner rounder from my Envelope Punch Board (but the Project Life Corner Punch works perfectly too).  I cut the paper to 3-1/2″ x 2″ and punched.  The two outside tags are Thick Whisper White and the middle tag is Fabriano Watercolor Paper.

Here are the specifics of each:

Gold Tag – Apply Embossing Buddy to whole tag.  Take your Versamark ink pad and dip the edges of your tag right onto the pad.  Apply Gold Stampin’ Emboss Powder on the inked edges and heat emboss.  Smoosh your Snowflake Element into Versamark and apply more Gold Stampin’ Emboss Powder, heat emboss that too.  Stamp sentiment from Santa’s Gifts with Versamark and add even more embossing powder.  Tie on some Gold Thread, add Gold Sequin Trim holding it on with a Gold Mini Metallic Clothespin.

Watercolor Tag –  Apply Embossing Buddy to whole tag.  Stamp sentiment with Versamark ink and add White Stampin’ Emboss Powder.  Heat Emboss.  Apply a little bit of water to the paper, using an Aquapainter apply Bermuda Bay Ink.  Ink up Snowflake Element with Versamark and add White Stampin’ Emboss Powder then heat emboss.  Tie on Bermuda Bay Sequin Trim with Bermuda Bay Baker’s Twine.

Sequin Tag – Using Tim Holtz Distress Ink in Chipped Sapphire, sponge on ink using the Mini Blending Tool (Tim Holtz).  Spritz on water and let dry.  Ink Softly Falling Embossing Folder with Versamark and stamp onto tag.  Add White Stampin’ Emboss Powder and heat emboss.  Stamp sentiment with Momento Tuxedo Black.  Emboss snowflake with white (like above).  Tie on Silver Baker’s Twine (this came from an old Paper Pumpkin).  Add sequins.

All the snowflakes were attached to the tags using the Fine Tip Glue Pen with a place for the To/From on the back.

6a00e54f94e01b883401b8d05ef236970c-500wi

Along with Allison, Kaitlyn, Krista and Marisa that joined in last month, we are also welcoming Sarah for December.  These ladies are seriously talented and totally fancy!!

The fabulous Mercedes Weber is up next!   Wait until you see what she created!

And you can click our logo above to get to the Fancy Friday Pinterest page!

6a00e54f94e01b883401b8d05f0bdc970c-320wi-2

Click HERE to purchase these wonderful Stampin’ Up products!

Stamp:  Santa’s Gifts; Paper:  Thick Whisper White, Watercolor (Fabriano), Tangerine Tango, Thick Whisper White (base);  Ink:  Bermuda Bay, Versamark, Momento Black, Tim Holtz Distress Ink; Accessories:  Scalloped Tag Topper Punch, Envelope Punch Board, Heat Tool, Gold and White Stampin’ Emboss Powder, Embossing Buddy, Aquapainter, Snowflake Elements, Gold Metallic Thread, Silver and Bermuda Bay Baker’s Twine, Sequins, Fine Tip Glue Pen, Softly Falling Embossing Folder (for stamping), Gold Mini Metallic Clothespin, Gold and Bermuda Bay Sequin Trim

Blog Signature 2015

Holly Jolly in Silver & Gold

Holly Jolly in Silver & Gold published on 2 Comments on Holly Jolly in Silver & Gold

Holly Jolly Gold

I’m here today with two cards that are pretty much exactly the same but with a very different look.  Let’s face it, this is the time of year to work smarter not harder!  So the basics….  I stamped the awesome snowflake from Holly Jolly Greeting with Versamark and heat embossed with Gold (and Silver) Stampin’ Emboss Powder.  The image panels were cut out using the Stitched Rectangles Die (Simon Says Stamp).  Using the lovely sentiment dies from the Wonderful Wreath Framelits, I cut multiple layers from Thick Whisper White.  I then stacked them up and glued them together using the Fine Tip Glue Pen.  For the top layer, I used Watercolor Paper (Fabriano) and Silver Glimmer paper respectively.  On the watercolor paper, I colored the sentiment with Tim Holtz Distress Ink (Mowed Lawn) and an Aquapainter, dabbing some off to create an ombre look.  Once dry, I covered the sentiment with Clear Wink of Stella (coming in the new Occasions catalog!).  I added sequins onto each to add a little more shine.

Holly Jolly Silver

So there you have it!  Two versions of the same card.  Easy to duplicate and fun to make!  I think I need to make a few more!

Hope you had a great week.  Thanks for stopping in today!

Stamp:  Holly Jolly Greetings; Ink:  Versamark, Tim Holtz Distress Ink; Paper: Fabriano Watercolor, Thick Whisper White, Silver Glimmer Paper; Accessories: Big Shot, Wonderful Wreath Framelits, Stitched Rectangles (SSS), Heat Tool, Metallics Sequins, Retired Sequins, Basic Rhinestones, Clear Wink of Stella, Fine Tip Glue Pen

Blog Signature 2015

CTS#151 – My Friend

CTS#151 – My Friend published on 4 Comments on CTS#151 – My Friend

CTS#151 - Butterflies

I had some time to stamp last week and thought I would give the latest sketch at CAS(E) this Sketch a go.  All the circles were a little daunting at first but then I found my butterfly stamp from Garden in Bloom.  It works perfectly.  Using my handy dandy Misti, I was able to line these up just by moving the card stock in fixed intervals.  Worked pretty well!  The butterflies are stamped first using Pool Party and then the outlines were stamped with Momento Tuxedo Black.  I cut the panel using  the Stitched Rectangles die from Simon Says Stamp and added the sentiment from the CAS-ual Fridays set Mon Ami.  I added a black background panel and some black sequins from the Metallics Sequins pack.

CTS_151Hope you enjoy this one today.  There is still some time to give the sketch a go and you’ll be happy you did.  Back tomorrow with the latest from Freshly Made Sketches.  Until then, have a great day!

Stamps:  Garden in Bloom, Mon Ami (CAS-ual Fridays Stamps); Ink: Pool Party, Momento Tuxedo Black; Paper:  Thick Whisper White (SU), Basic Black; Accessories:  Big Shot, Stitched Rectangles Dies (SSS), Metallic Sequins, MISTI

Blog Signature 2015

Freshly Made Sketches #214

Freshly Made Sketches #214 published on 12 Comments on Freshly Made Sketches #214

FMS214 - Butterfly

Happy Wednesday!  I hope your week is going well.  For those of you in the US, I’m sure you are getting ready for Thanksgiving and I hope yours is safe and happy!  I’m the sketch hostess over at Freshly Made Sketches  this week and I thought I’d give you one that wasn’t too complicated.  Hopefully you’ll have some time in the hustle and bustle of your week to join in!

My card is one of those that was just impossible to photograph.  I wish I could figure out why that happens but this one is so much prettier in person.  I embossed Thick Whisper White using the Softly Falling folder and then cut out the butterfly with Bold Butterfly Framelits.  Behind the butterfly, I used distress inks and sponged a rainbow of colors onto watercolor paper.  Then I topped the colors with Wink of Stella to make it sparkle.  I added some sequins left over from the Watercolor Wishes kit and a sentiment from And Many More stamped in Bermuda Bay.

FMS Final 214-001

I hope that you enjoy this sketch!  I know the team has done their usual amazing work and you will love the inspiration as always!

I’m off the blog for a few days to enjoy time with family.  Thanks so much for stopping in.  See you soon!

Click HERE to purchase wonderful Stampin’ Up products!

Stamps:  And Many More; Ink: Tim Holtz Distress Inks, Bermuda Bay; Paper:  Fabriano Cold Press 140 lb Watercolor, Thick Whisper White; Accessories:  Sequins (Watercolor Wishes Card Kit), Big Shot, Softly Falling TIEF, Bold Butterfly Framelits, Wink of Stella

Blog Signature 2015

Freshly Made Sketches #212

Freshly Made Sketches #212 published on 7 Comments on Freshly Made Sketches #212

FMS212 - Hydrandgeas

As promised, I have a fun card to share with you today plus a video.  We have this super sketch this week at Freshly Made Sketches from the queen of layers, Narelle.  She makes layering look effortless and always elegant!  As for me….it wasn’t working.  So I took a step back and simply layered the images instead.  I hope she doesn’t mind too much.  Here is the how to on my card:

Direct link HERE

I’m still in Denver taking my check ride (3 days of fun in the simulator) but I did get to have coffee with the amazing Kim Singdahlsen from the team.  I tell you what, it made facing all those engine out approaches much more tolerable!!  *smile*

Ok….back to studying.  I hope you enjoy the video and this fun sketch.  Go check out all the inspiration from the team, of course, too!  See you again Friday with another fun card!

FMS Final 212-001Click HERE to purchase wonderful Stampin’ Up products!

Stamps:  Best Thoughts, And Many More; Ink: Versamark, Tim Holtz Distress Inks; Paper:  Fabriano Cold Press 140 lb Watercolor, Soft Sky; Accessories:  Heat Tool, White Stampin’ Emboss Powder, Sequins (Watercolor Wishes Card Kit), Big Shot, Stitched Rectangles Dies (SSS), Zig Watercolor Pen

Blog Signature 2015

Fancy Friday – Treats, not Tricks

Fancy Friday – Treats, not Tricks published on 2 Comments on Fancy Friday – Treats, not Tricks

It is time again for our monthly Fancy Friday hop!  If you just came over from the amazing Jeanna, welcome to the next stop.  My friends and I want to be able to share with you our ideas in a monthly format.  We will use different themes each month – sometimes colors, sometimes a sketch, sometimes a stamp set focus.  The one thing you can count on is that it will be fancy!  Over our year together on the ADT,  “fancy” became our word to describe the best projects, the best new clothes, even the best pedicure colors.  Now we want to share with you our take on “fancy” each month.  This month we have a theme challenge that the whole team will be using as inspiration – Tricks, not Treats!  Perfect for your last minute Halloween crafting or as inspiration for other fall fun!

FF Oct - You're so sweet

I decided to go for a treat bag that I can use anytime over the next month or so.  I used my September Paper Pumpkin kit to create those darling little broom bags for teachers yesterday (yep, the hard work is all done for you!!!) so I still had this stamp set sitting on my table.  I know I have said it a lot but the Paper Pumpkin stamps are a gift that keep giving.  I used one for my card on Wednesday and now again for this.  I started with the Mini Treat Bag Thinlit Dies and cut this bag out using the Typeset DSP.  That die allows you to create whatever kind of bag you want out of whatever paper you want.  AWESOME!!  I used the little banner die in the set to cut this one out of Very Vanilla.  Then I pulled out the leaves and sentiment from the Paper Pumpkin stamp set.  I stamped them in Versamark and heat embossed with Gold Stampin’ Emboss Powder.  I used the banner die to flag the ends of the Gold Foil piece to tuck underneath.  I had one piece of raffia left from the kit (an extra…they multiplied…???) so I wrapped it and some Gold Thread around and tucked them under the tag.  I attached them using Glue Dots and then added another slightly shortened banner to make a sandwich to secure everything.  Clip the tag on with a Clothespin and done.  All that remains is to fill the bag.

FF Oct - Tag closeup

6a00e54f94e01b883401b8d05ef236970c-500wi

Here is a bit of a closeup so you can click in and see the details more.  I just have to say that these Paper Pumpkin kits are a fantastic value.  Many times, the sets have sentiments that are really modern and feel very on trend.  The ink spots are super to have on hand (especially when I am using my Misti…much easier to ink with them!).  And of course, the projects.  The Concept Artists who work on these really out-do themselves each month.  If you really love a project, you can buy extras once you are a subscriber.  I never thought that I “needed” kits because my craft room is so fully, um, stocked.  But these kits fill a niche for me that makes me continue to invest.  My kids LOVE the projects and help me make them most of the time.  Because everything is prepared, we get right to creating.  Perfect for the attention span of my boys.

Ok, ok….I’ll quit waxing poetic about the kits, haha!  Time for you to get on with the hop!!

I hope you will be inspired by all the lovely creations in our hop this month.  I know you will find each stop a real treat!

The amazing Mercedes Weber is up next!   Wait until you see the fancy project she created!

And you can click our logo above to get to the Fancy Friday Pinterest page!

6a00e54f94e01b883401b8d05f0bdc970c-320wi-2

Click HERE to purchase these wonderful Stampin’ Up products!

Stamps:  Wickedly Sweet Treat (PP Sept 2015); Paper:  Very Vanilla, Typeset DSP, Gold Foil; Ink:  Versamark; Accessories:  Big Shot, Mini Treat Bag Thinlits, Gold Thread, Raffia (PP Sept 2015), Heat Tool, Gold Stampin’ Emboss Powder, Clothespin

Blog Signature 2015

A Gift from Santa

A Gift from Santa published on No Comments on A Gift from Santa

Misti - SantaGuess what?!!  It is time for another product review over at  Splitcoaststampers and I could not be more excited to share today!  What are we reviewing???  Misti – or the Most Incredible Stamp Tool Invented!  Um…Jen….the Misti has been around for a while so what are you talking about?  Let me show you!!!!  Check out this video!

A direct link to the video is HERE.

Ok, back to my card today.  I pulled out this adorable set, Santa’s Gifts, and I just love it.  Love the Santa and all the little images that go with him.  Using my Misti to stamp with this set makes it even better.  I simply cut a mask for Santa and lined up the present image on my Misti.  Once I was sure it was right, I ink it up and stamped.  No chance for my hand to slip and perfect placement every time.  Once I had everything stamped, I used my Zig Clean Color markers to color the scene.

Want to learn more about the new configuration for the Misti?  Hop right over to the Product Focus page and you can see all the reviews and projects from the whole Product Review Team!

Also make sure you take advantage of the Splitcoaststampers special savings code!  You’ll find it on the Product Focus page linked above!!  The code is only good through today (Oct. 22nd), so shop fast!

I’ll be back tomorrow with another project complete with a tutorial using the Misti!!  Until then, have a great day!

Click HERE to purchase wonderful Stampin’ Up products!

Stamp: Santa’s Gifts; Ink:  Momento Tuxedo Black, Zig Clean Color Markers; Paper:  Real Red, Basic Black, Watercolor (Fabriano Cold Press) ; Accessories: Misti, Heat Tool, Clear Stampin’ Emboss Powder, Zig Watercolor Brush, Wink of Stella Clear

Blog Signature 2015

Stamp Review Crew – For All Things

Stamp Review Crew – For All Things published on 12 Comments on Stamp Review Crew – For All Things

SRC-For-All-Things-bannerI am so excited to be a part of this amazing group of Stampin’ Up demonstrators!  If you haven’t heard of “The Crew” yet, you are going to be so thrilled with this.  We are here to show you the versatility of one stamp set every time we hop (the 1st and 3rd Monday of each month).  We have a whole team of people and different stampers participate each time.  Like you, we look to find ways to maximize our investments and the single focus on one set allows you to see all the possibilities!  This week, our featured stamp is For All Things.  I have loved this set from the moment I got it…so pretty and so versatile!

If you just came over from Dawn Tidd, I’m so glad you are here!  If you want to see everyone who is hopping or if you get lost along the way, just click over to The Stamp Review Crew blog.

SRC - Leaves and Thanks

I thought playing with these awesome leaves would be perfect for today since we are having such pretty fall weather.  I played with a new (to me) technique using my Misti (a cool stamp positioner that allows for over stamping multiple times).  I sponged on Hello Honey ink and added a little bit of Cajun Craze then stamped the middle leaf.  Without moving the paper, I sponged on some Early Espresso ink and stamped back down again.  What a great effect!  I masked the middle leaf and did the same for the top and bottom leaves. You’ll notice the texture on the white card stock.  This piece was a leftover from last year’s Christmas card kit but you could easily get exactly the same look using Whisper White and the Woodgrain Embossing Folder.  I love how you see the texture in the stamping!!  Finally, I stamped the sentiment in Early Espresso.  Again, the Misti is really helpful since I needed to stamp a few times to get the right depth of color on the embossed panel.  I added some twine I had from a Paper Pumpkin kit and popped the panel on Dimensionals and put it onto an Early Espresso card base.

Hope you like this fall inspiration!  I’m the end of the hop but you can keep going in the loop by jumping right over to see Sue Plote.  I can promise you’ll be inspired!  So glad you dropped in today.  See you again soon!

Click HERE to purchase these wonderful Stampin’ Up products!

Stamp:  For All Things; Paper:  Early Espresso, White; Ink:  Hello Honey, Cajun Craze, Early Espresso; Accessories:  Misti, Sponge Daubers, Twine

SRC-For-All-Things-prevSRC-For-All-Things-next

Blog Signature 2015

Freshly Made Sketches #207

Freshly Made Sketches #207 published on 9 Comments on Freshly Made Sketches #207

FMS207 - Glimmer Joy

Another Wednesday and another fabulous sketch over at Freshly Made Sketches!  Our sketch hostess this week is the extraordinary Kim Singdahlsen.  She created this sketch as a way to showcase designer papers but, per usual, I broke the rules.  Just goes to show how really flexible this sketch can be!!

Now where would my week be without using another of these snowflakes?!  I have already admitted my obsession with them so….  Today some silver.  And glitter!  For the base of the image panel, I chose the gorgeous Silver Glimmer paper and then topped it with Thick Whisper White panels that were embossed with the Softly Falling Folder.  I cut the ‘Joy’ from the same paper and then 3 more times from Thick Whisper White.  This one is from the Wonderful Wreath Framelits.  Layering those makes the sentiment pop up but still keeps it easy to adhere to the card.  The big snowflake from Snowflake Elements was heat embossed using Versamark Ink and Silver Stampin’ Emboss Powder.  I added an Iced Rhinestone to the center.  Aren’t they perfect together??  And that is it.  All the work is done by the shimmer and shine!

*Hint*

For the blocked panels.  Don’t make the math hard.  Really.  Don’t!  I don’t know the measurements.  Here is what I did.  I cut the white panel 1/16″ narrower that I would have and normal on the length (I usually use 1/8″ spacing for layers like this).  That little bit extra is what give you the space between.  Next I cut the long panel off the side.  With the remaining (slightly wider panel), I cut it in two with a 1/3 to 2/3 proportion….ish.  I didn’t measure, I just eyeballed it.  Then from the larger of those, I cut an addition 1/16″ off to make room for that little space between them.  Once they were all cut, I laid them on the embossing folder and ran it through the Big Shot.  I found if you try to emboss first and then cut, the paper cutter does not give you super clean edges on those narrow cuts.  To adhere the panels, I used Fast Fuse.  Glue dots work well with the Glimmer Paper too.

FMS Final 207-001

I hope you enjoy this card today.  Have fun with the sketch and make sure you check out what the team has for inspiration!  I’ll be back soon with another of the cards I made for my class last weekend.  Until then, have a great day!  Thanks for stopping in!

Click HERE to purchase wonderful Stampin’ Up products!

Ink: Versamark; Paper:  Thick Whisper White, Silver Shimmer; Accessories:  Big Shot, Wonderful Wreath Framelits, Snowflake Elements, Silver Stampin’ Emboss Powder, Heat Tool, Iced Rhinestone, Dimensionals

Blog Signature 2015

Peace & Joy

Peace & Joy published on 7 Comments on Peace & Joy

Peace & Joy

I am so excited to share with you today.  I got to stamp with some friends over the weekend and it was so much fun.  I even had a new stamper join in.  Four cards, Jen style, and she totally kept up with us!!  This was our technique card of the class and we had more fun with it.  This background is so spectacular and yet SOOO easy.  Really!  Trust me.  Ok….I thought you might not believe me so I made a video.

If it doesn’t show correctly in your email, click here:  Peace & Joy Tutorial

I saw this cool technique last week as shown by the oh so talented Jennifer McGuire.  She used a different medium and I wanted to see what happened when I tried reinkers.  Wow is what happens!  Beyond the background I love how the Sleigh Ride Edgelits can be used to create a pretty scene within the PL Cards & Labels Framelits.  This may be one of my favorite cards so far this season.  Hope you love it too!

I’ll be back tomorrow with a new card for Freshly Made Sketches.  Until then, have a great day!

Click HERE to purchase wonderful Stampin’ Up products!

Stamp:  Holly Jolly Christmas ; Ink:  Night of Navy, Blackberry Bliss; Paper: Watercolor, Thick Whisper White, Dazzling Diamonds Glimmer Paper; Accessories: Big Shot, Sleigh Ride Edgelits, Project Life Card & Labels Framelits, Softly Falling Embossing Folder, Iced Rhinestones, Dimensionals

Blog Signature 2015

Primary Sidebar