Skip to content

Freshly Made Sketches #336

Freshly Made Sketches #336 published on 8 Comments on Freshly Made Sketches #336

FMS336 by Jen Timko | Monogram J Stamp by Concord and 9th, Monogram Dies by Concord and 9th, Distress Oxide Ink
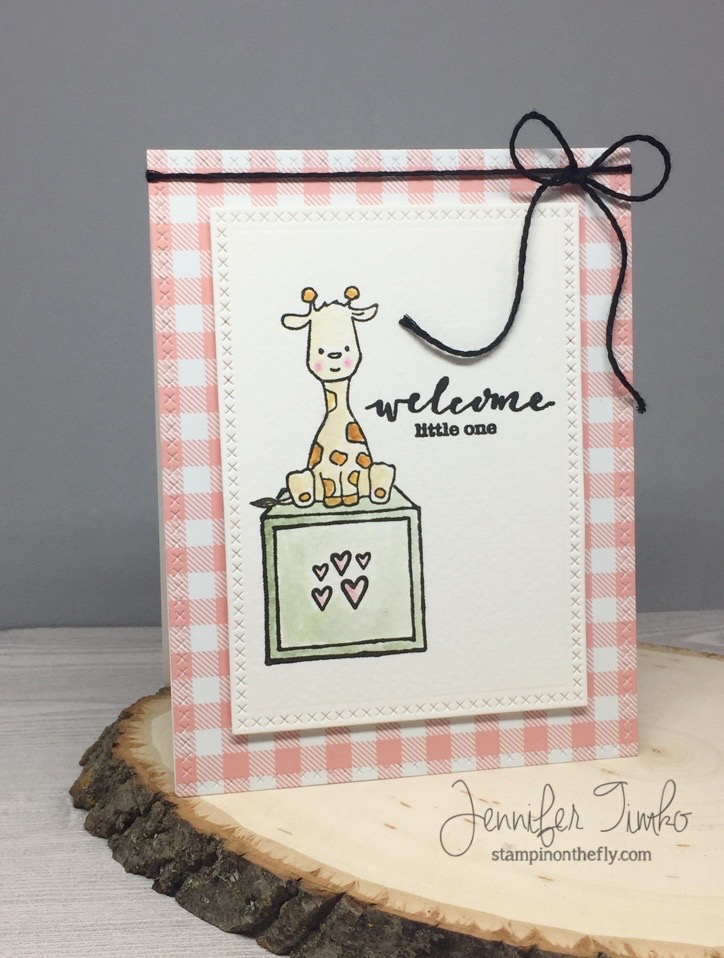
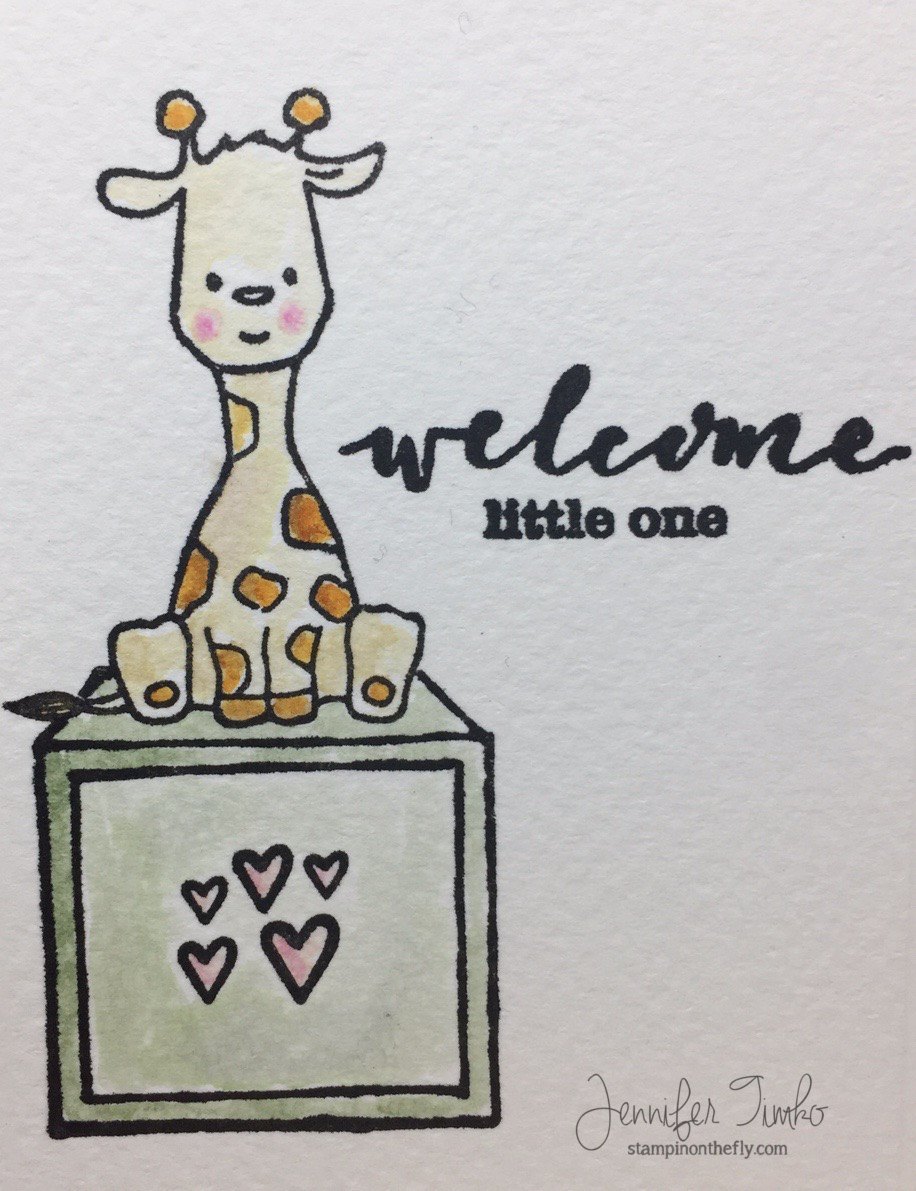
This is my first post of the day. I’ll be up a bit later with a card for the Newton’s Nook Designs blog and in support of Layton’s Legacy.

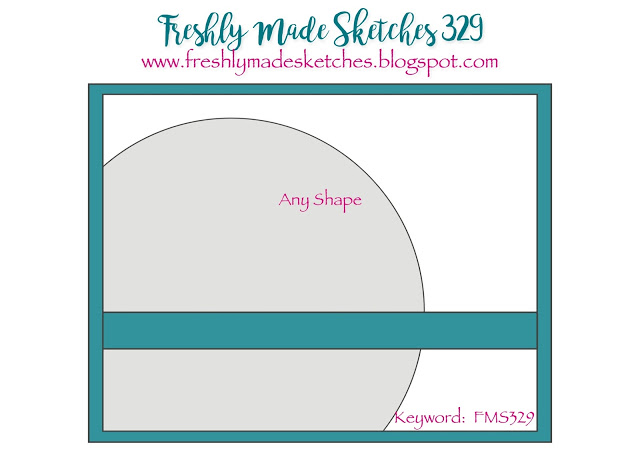
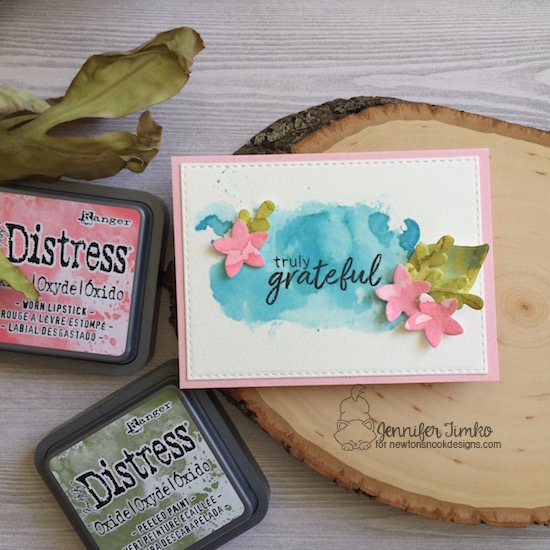
I do love my Wednesdays because it is Freshly Made Sketches day!  And today we have a fabulous sketch by Jen Mitchell.  Jen creates the most remarkable cards and also happens to be just an amazing person.  No surprise that she has created a fun sketch for the week!

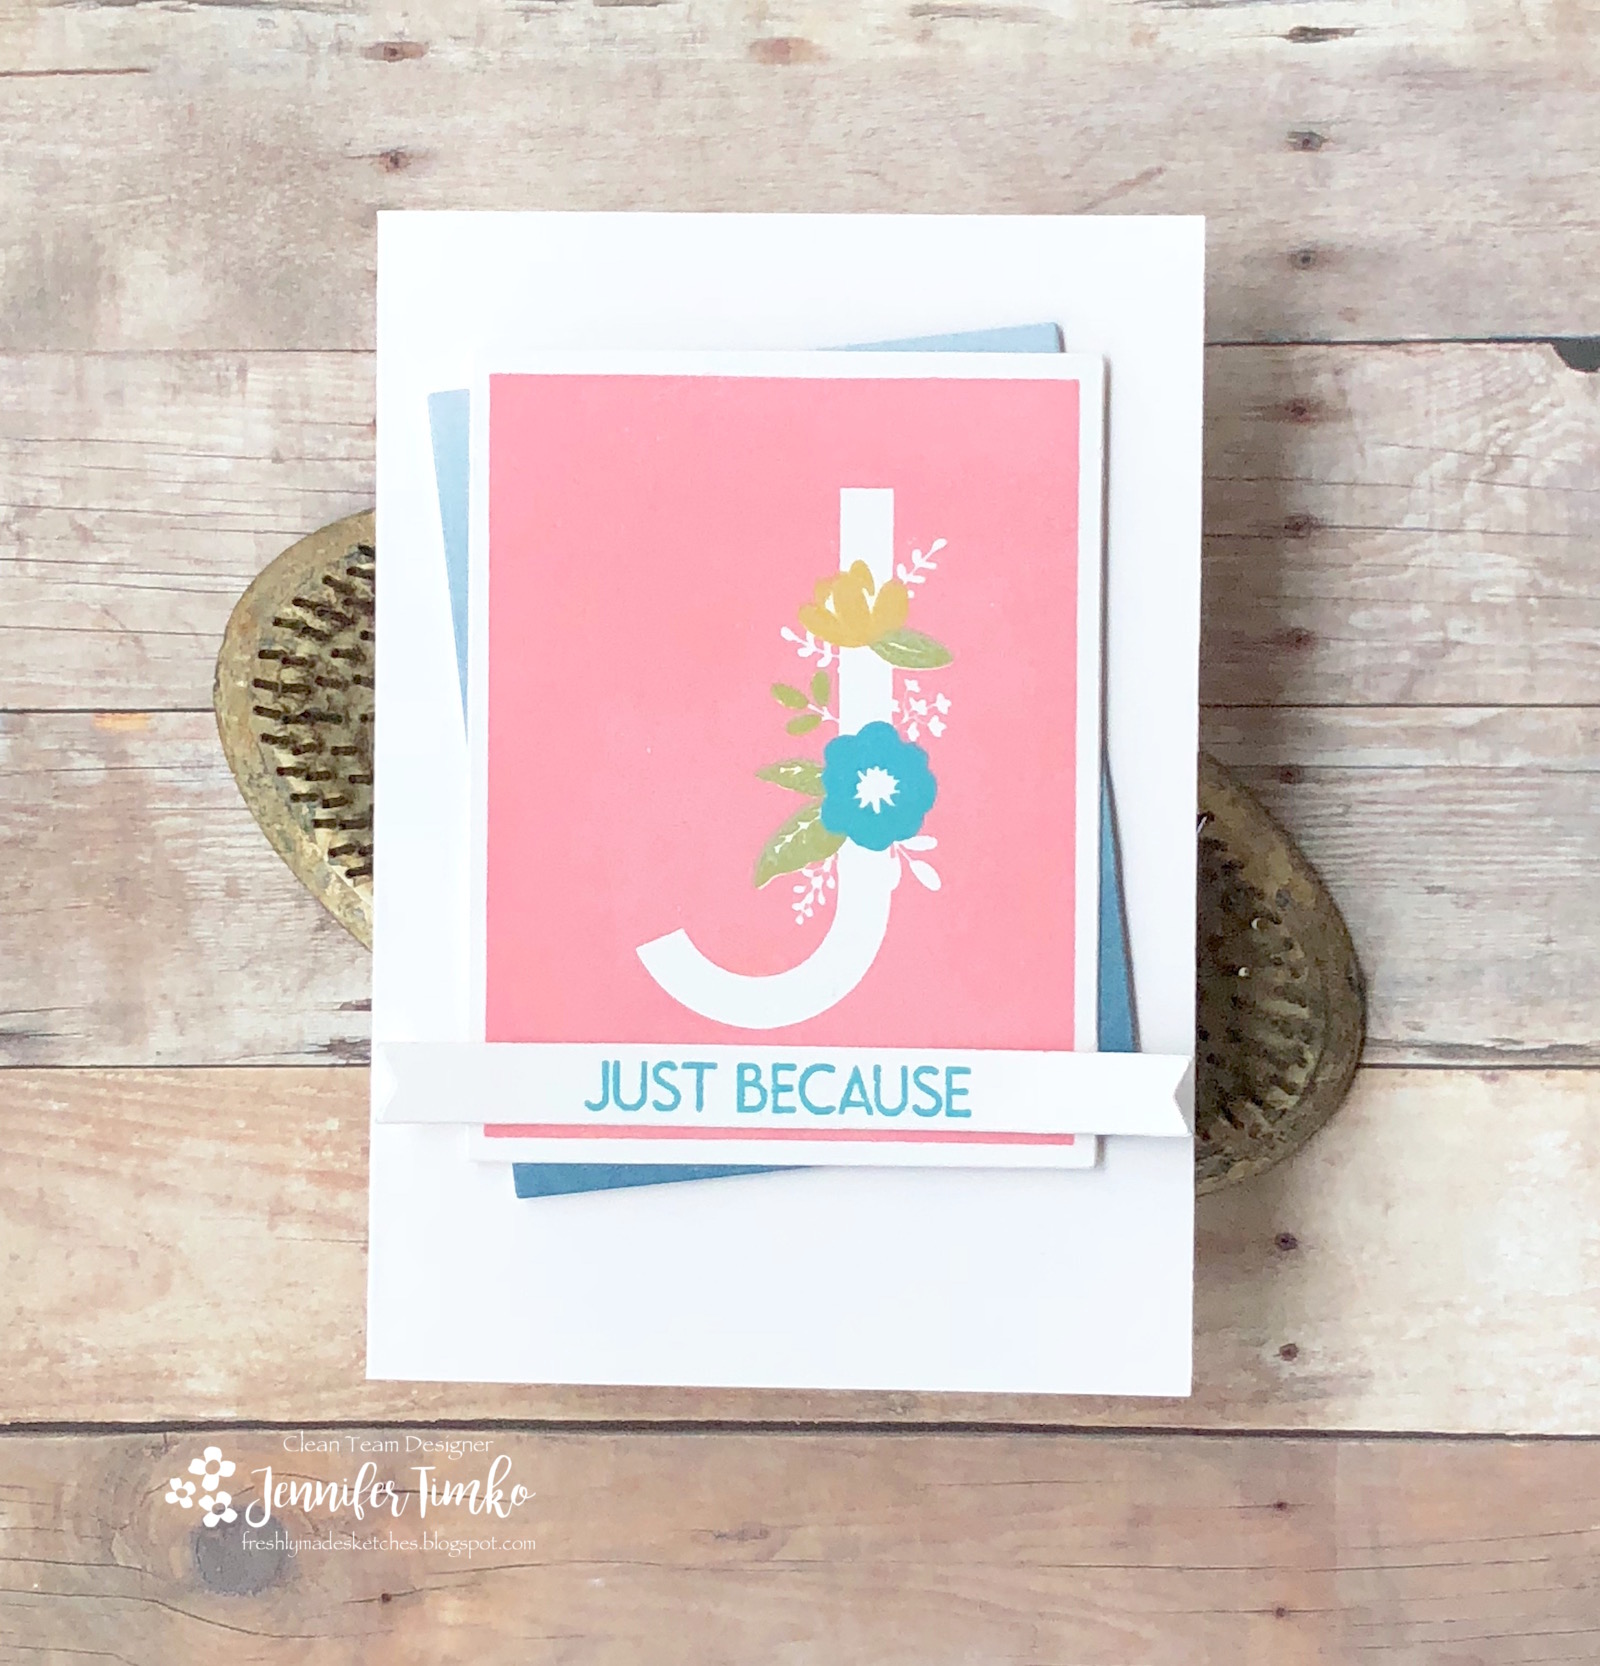
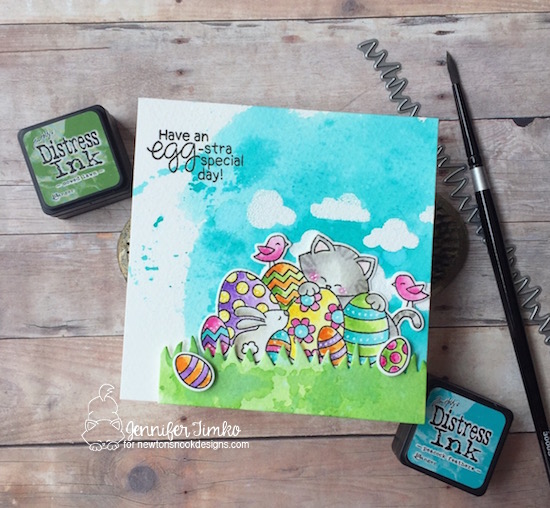
As soon as I saw the sketch, I knew that I was going to use my brand new Monogram J stamp from Concord and 9th.  When faced with a whole alphabet of choices, I chose the J and the T.  Hmmm…..  I inked the J up with Worn Lipstick Distress Oxide Ink and then filled in the flowers and leaves with Fossilized Amber, Broken China and Peeled Paint Oxide Inks.  I cut out the panel with the coordinating dies and then cut another panel of the same size using some Color Theory paper (SU).  I stamped the sentiment from the stamp set and used the banner die from the die set to cut it out.  I can’t wait to play with more color varieties and ink styles on this stamp!!

Well, since more is coming in just a bit, I’ll sign off for now.  Make sure you go visit the FMS blog and I hope you will join us this week.  See you soon!

Supplies (affiliate links included):

Stamp: Monogram J (Concord and 9th); Paper:  Thick Whisper White (SU), Whisper White Note Cards and Envelopes (SU), Color Theory Paper Stack (SU); Ink:  Tim Holtz Distress Oxide Inks (Worn Lipstick, Fossilized Amber, Peeled Paint, Broken China) ; Accessories: Misti, Big Shot, Monogram Dies (Concord and 9th)

Signature 2016 - 1


SaveSave

Newton’s Nook Designs April Release – Wedding Frills and Floral Lace

Newton’s Nook Designs April Release – Wedding Frills and Floral Lace published on 29 Comments on Newton’s Nook Designs April Release – Wedding Frills and Floral Lace

Welcome back for day 2 of the April Release from Newton’s Nook Designs.  Today we have a wonderfully elegant set that is perfect for another fixture of spring…weddings.  It is called Wedding Frills and it is gorgeous.  As if that were not enough, we are showcasing a new stencil called Floral Lace as well.

Happily Ever After by Jen Timko | Wedding Frills Stamp Set and Dies by Newton's Nook Designs, Frames and Flags Dies by Newton's Nook DesignsWhen I saw these gorgeous images, I immediately wanted to make them look like lace on a wedding dress.  Something about embossing white on kraft colored card stock does that!  I cut the image layer with the Frames and Flags Dies and then stamped the big flower and sentiment with Versamark Ink (I did this in steps to avoid causing smudges with the Versamark).  Using Wow! Bright White Embossing Powder, I heat embossed.  Then I stamped a few of the little flowers and did the same.  Using the coordinating Wedding Frills dies, I cut those out and popped them up.  Finally I added some pearls to go with my wedding flowers.  I love the elegant feel of this card!

Hello by Jen Timko | Floral Stencil by Newton's Nook Designs, Essential Alphabet Dies by Newton's Nook DesignsFor my second card I wanted something with a more spring-like feel.  I cannot even tell you how awesome this stencil is to use!  I taped it onto some Bristol Smooth card stock and then sponged on Distress Inks  to highlight the flowers and leaves.  I sponged a little bit more of the paper and then cut out my sentiment letters with the new Essential Alphabet Dies.  I just used a bit of foam tape to pop them up and make them stand out more.  Think of all the color combinations you can try!  I can’t wait to make more of them.

I hope you enjoy these!  What a day 2!!  I know you have lots of hopping to do so off to visit the rest of the team for you.  But first….a chance to win!!

Would you like to win the “Wedding Frills” Stamp Set?

Each set will be given away to ONE lucky winner!

Here’s how to win:

Comment on the NND blog and Design Team blogs (see list below)! The winner will be chosen at random from the collective reveal posts. Make sure to check out each of their blogs and comment for your chance to win. You will not know which blog has been chosen so the more you comment on the better your chances are of winning! You have until Thursday, April 19th at 9pm CST to comment  — winners will be announced on the blog post on Friday, April 20th.

Thanks for stopping in today and during this whole week.  Make sure you stop back in tomorrow for Day 3 of the release.Supplies:

Stamp: Wedding Frills (Newton’s Nook Designs); Ink:  Versamark, Tim Holtz Distress Ink; Paper:  Crumb Cake (SU), Strathmore Bristol Smooth; Accessories:  Big Shot, Wedding Frills Dies (Newton’s Nook Designs), Essential Alphabet Dies (Newton’s Nook Designs), Dimensionals (SU), Misti, Heat Tool, Wow Bright White Embossing Powder, Blending Tool (Ranger), Pearls (SU), Foam Tape,

Signature 2016 - 1


SaveSave

SaveSave

SaveSave

SaveSave

SaveSave


SaveSave

SaveSave

SaveSave

SaveSave


SaveSave

SaveSave

SaveSave


SaveSave


SaveSave

SaveSave

Freshly Made Sketches #329

Freshly Made Sketches #329 published on 9 Comments on Freshly Made Sketches #329

FMS329 by Jen Timko | Free Spirit Stamp Set by Taylored Expressions, Mandala Cutting Plate by Taylored Expressions, Tim Holtz Distress InkI’m busy, busy showing you projects this week and I have been waiting to show you this one.  I made this while I was at Stamping Away and just love it!!  It seems perfect that the wonderful Kim Singdahlsen is the sketch hostess this week at Freshly Made Sketches.  I love what she creates with Taylored Expressions products so it seems fitting that I was able to use some of those for her sketch.

I started with the Mandala Cutting Plate and what a wow it is!  I cut it out of some Bristol Smooth paper so that I could watercolor it.  I smooshed some Distress Ink onto a clear block and added some water, then used that to color the mandala.  I saved the large cut out section on the right side so that I could color it too.  So bold and super simple to do!  Another of the TE design team members, Jen Shults, brought this die (and many of its friends) to Stamping Away and she also brought a ton of TE stamps.  I was like a kid in a candy store!!  Took me a while but I finally narrowed down to the perfect sentiment from the Free Spirit stamp set.  I cut out a banner with the Double Ended Flag Stacklet and then stamped on the sentiment using my Misti.

This may be my favorite card that I have made in a while and I was clearly inspired by all the rainbows and creativity while I was at the Whatever Craft House!  I hope you enjoy this sketch as well…so many beautiful projects from our design team!!  Thanks so much for stopping in.  I’ll see you soon!

Supplies (affiliate links included):

Stamp: Free Spirit (Taylored Expressions); Paper:  Neenah Solar White #110, Strathmore Bristol Smooth; Ink: Versafine Onyx Black, Tim Holtz Distress Ink (Broken China, Picked Raspberry, Squeezed Lemonade, Spiced Marmalade, Twisted Citron); Accessories: Misti, Big Shot, Mandala Cutting Plate (Taylored Expressions), Double Ended Flag Stacklet (Taylored Expressions

Signature 2016 - 1

SaveSave

SaveSave

So Very Kind

So Very Kind published on No Comments on So Very Kind

So Very Kind by Jen Timko | So Very Kind Greeting Die by Lil' Inker Designs, Tim Holtz Distress InksDropping in today to show you some sweet little note cards that I made.  Something about a little card that you can tuck into a package always makes me smile.  And I don’t seem to make them enough.  This little die with the sentiment comes from Lil’ Inker Designs and was among the sweet products I got at Stamping Away (I might as well warn you that I have many posts worth of enabling as I get to use these items).  I made little 3″ x 3″ squares and then used the die to cut out the centers.  Because I used Bristol Smooth paper, I was able to add these fun watercolor looks using Tim Holtz Distress Ink.  I simply smooshed the ink onto a small acrylic block, spritzed with water and dabbed the color onto cut sentiments.  So easy and yet so fun!  Once dry, I attached them onto 3″ x 3″ cards and they are all ready to go.  These already have homes that they are going to so I think I need to set about making more to have on hand.

Thanks so much to Lil’ Inker Designs for sponsoring Stamping Away.  You are, indeed, so very kind!

Back tomorrow with a fun hop that you are going to LOVE!  Until then, have a great day!

Supplies (affiliate links may be included):

Paper: Thick Whisper White (SU), Strathmore Bristol Smooth; Ink: Tim Holtz Distress Ink (Twisted Citron, Peacock Feathers, Picked Raspberry); Accessories: Big Shot, So Very Kind Greetings Die (Lil’ Inker Designs)

Signature 2016 - 1

SaveSave

Newton’s Nook Designs March Release – Birthday Essentials

Newton’s Nook Designs March Release – Birthday Essentials published on 28 Comments on Newton’s Nook Designs March Release – Birthday Essentials

Welcome back for the last day of the March Release from Newton’s Nook Designs.  For our final reveal I have what you are sure to see as a “work horse” stamp set…a wonderful sentiment set called Birthday Essentials.

Celebrate by Jen Timko | Birthday Essentials Stamp Set by Newton's Nook Designs, Magic Stamp by Clear Snap, Distress Oxide Ink by Tim HoltzSo I have a confession to make.  My name is Jennifer and I’m a sentiment hoarder.  I love sentiment sets.  I “collect” sentiment sets.  Having just the right ones for inside and outside the card is simply a quest so I hold on to them even as I let images go now and then.  So when a set that is all about birthdays comes along, you can bet that I’m doing a happy dance.  Another truth (because, hey it is just among friends)…I never seem to have enough masculine cards.  Perhaps it is because Kitty Kate and I are outnumbered.  Perhaps it is my obsession with cute images and all flowers.  But somehow, when it comes time to reach for a card for man, I don’t have the right one.  So I committed to making one (and I’ll be making a few more just like it).  I felt like I need a cool background so I used this fun Magic Stamp by Clearsnap.  It allows you to make your own background and just stamp.  I was playing with it on my trip to Kansas and the incredible Jen Shults (yes, I did just name drop) suggested I press it into some concrete on the sidewalk.  And I got this texture.  Cool!!  I inked it up with Distress Oxide Ink and just stamped onto watercolor paper, then spritzed with a little water.

Celebrate by Jen Timko closeup | Birthday Essentials Stamp by Newton's Nook Designs, Magic Stamp by Clear SnapThis big bold sentiment (which fits perfectly onto the Frames and Flags Die banner) becomes the focus and I have a fabulous, non-girly, no bling birthday card.  Yay!!!  And while this is super clean, the great script sentiment makes this still feel special.  Birthday Essentials for the win!!

I hope you like this card idea and I’m just sure you will love everything the team made for today.  Now one more time for this release…  A chance to win!!

Would you like to win the “Birthday Essentials” Stamp Set?

Each set will be given away to ONE lucky winner!

Here’s how to win:

Comment on the NND blog and Design Team blogs (see list below)! The winner will be chosen at random from the collective reveal posts. Make sure to check out each of their blogs and comment for your chance to win. You will not know which blog has been chosen so the more you comment on the better your chances are of winning! You have until Thursday, March 15th at 9pm CST to comment  — winners will be announced on the blog post on Friday, March 16th.

Thanks for stopping in today and during this whole week.  All of your comments are so appreciated and I’m so happy you share some of your time with me.  The release goes live tomorrow so make your list and check it twice.  I think this one is going fly off the shelves!Supplies:

Stamps: Birthday Essentials (Newton’s Nook Designs), Magic Stamp (Clear Snap); Ink:  Broken China Distress Oxide Ink (Tim Holtz); Paper:  Canson XL Watercolor Paper; Accessories:  Big Shot, Frames and Flags Dies (NND), Stitched Rectangles Dies (SSS), Dimensionals (SU)

Signature 2016 - 1


SaveSave

SaveSave

SaveSave

SaveSave

SaveSave


SaveSave

SaveSave

SaveSave

SaveSave


SaveSave

SaveSave

SaveSave


SaveSave


SaveSave

Welcome to the Family – Winnie and Walter Rerun

Welcome to the Family – Winnie and Walter Rerun published on 6 Comments on Welcome to the Family – Winnie and Walter Rerun

Happy Friday everyone!!  I’m thrilled to be here today to help launch a new Rerun Feature and Challenge over at Winnie and Walter.  The stamp set for this month is Welcome to the Family with Eveline T Designs.

Welcome Little One by Jen Timko | Welcome to the Family Stamp by Winnie and Walter, Lawn Fawn Gotta Have Gingham Paper, Tim Holtz Distress Ink WatercoloringI think this little set is simply precious and I fell in love with the giraffe.  With a baby them in mind, I chose soft Distress Ink Colors and colored this little fellow on Fabriano Watercolor paper.  Just a little masking to allow him to sit on the block.

Welcome Little One by Jen Timko | CloseupI masked the sentiment as well to mix the script with the print….love the flexibility to do that!  Once everything was stamped and colored, I cut the image layer and the gingham paper using cross stitched dies.  Finally a little black twine for an added detail.

I talked a bit about the Stamping Away retreat that I attended last week in my post from Wednesday and this is another of the sets so generously given to us by Shay of Winnie and Walter.  She really is incredible!!  And the Rerun has cards created by some of my retreat friends too so make sure to go see them all!

I’m also linking this with the Simon Wednesday Challenge where the theme is Girl Power and the focus is on Winnie and Walter stamps.  Hope you enjoy my card and that you will be inspired to join in this month!  Make sure to go check out the Winnie and Walter blog for all the details!  Thanks so much for stopping in.  See you soon!

Supplies (affiliate links included):

Stamp: Welcome to the Family with Eveline T Designs (Winnie and Walter); Paper:  Fabriano Watercolor Paper, Gotta Have Gingham (Lawn Fawn); Ink: Versafine Onyx Black, Tim Holtz Distress Ink; Accessories: Misti, Black Twine, Big Shot, Large Cross Stitched Dies (Lawn Fawn)

Signature 2016 - 1

SaveSave

SaveSave

SaveSave

SaveSave

Truly Grateful

Truly Grateful published on 2 Comments on Truly Grateful

Truly Grateful by Jen Timko | Shades of Autumn Stamp and Dies by Newton's Nook Designs, Lovely Blooms Dies by Newton's Nook Designs, Tim Holtz Distress Oxide InkToday is my day to share a project on the Newton’s Nook Designs Blog.  Even though it is the beginning of March, we are starting to see signs of spring here in Virginia.  My daffodils seem almost ready to bloom, if you can believe it.  I went a little non-standard and actually started with a set introduced in the fall…Shades of Autumn.  But I gave it a spring twist courtesy of the color palette and some flower dies from Lovely Blooms.

I pulled out my Distress Oxide inks in Worn Lipstick and Peeled Paint and created some backgrounds that I could cut with my dies.  The green I cut with the Shades of Autumn Dies and Lovely Blooms Dies (the leaves).  Then I cut out some blossoms with the Lovely Blooms flowers.  I love the variations from the Oxide inks and how they make these dies take on such depth.  On some more watercolor paper, I created a background with Broken China Oxide ink and then stamped the sentiment from Shades of Autumn in the middle.  I found some pink card stock to coordinate with the flowers and that completes the spring feel, don’t you think?  We may yet have a touch of winter coming but at least I can celebrate flowers and greenery in my stamp room!

I hope you like this fun way to use dies!  Make sure to stop by the Newton’s Nook Designs blog for daily inspiration.  Thanks so much for stopping in and I’ll see you soon!

Stamp: Shades of Autumn (Newton’s Nook Designs); Ink:  Versafine Onyx Black; Paper:  Strathmore Watercolor; Accessories:  Big Shot, Lovely Blooms Dies (Newton’s Nook Designs), Shades of Autumn Dies (Newton’s Nook Designs), Misti, Stitched Rectangles Dies (SSS)

Signature 2016 - 1


SaveSave


Newton’s Nook Designs February Release – Newton’s Easter Basket

Newton’s Nook Designs February Release – Newton’s Easter Basket published on 28 Comments on Newton’s Nook Designs February Release – Newton’s Easter Basket


Welcome to day 1 of the February Release from Newton’s Nook Designs.  This month’s reveals are going to wow you, as usual.  Such variety and fun!  Today we have an adorable set called Newton’s Easter Basket (with coordinating dies) along with a new stencil called Cloudy Sky.

Egg-stra Special Day by Jen Timko | Newton's Easter Basket Stamp Set and Dies by Newton's Nook Designs, Cloudy Sky Stencil by Newton's Nook Designs, Watercolor, Tim Holtz Distress InkI love that we get to start off with our favorite kitty this month!  I chose the image with all the eggs but you are going to love the Newton “bunny” and Newton in the egg too.  Such fun!  I started by using the new Cloudy Sky stencil with Versamark ink and clear embossing powder.  I just applied the ink straight from the pad.  A little less precise but that was the look I was going for….just like real clouds!  The embossed areas resist the watercoloring.  I used Distress Ink in Peacock Feathers for the sky.  I created the grass using Mowed Lawn and cut the edge with the Land Borders Dies.  Then the real fun started!  I stamped Newton, a few extra eggs and an extra bird.  Using more Distress Inks I chose bright and happy colors and got to coloring.  The coordinating dies make cutting out the elements easy.  I added two extra eggs for dimension and the little bird seemed perfect on Newton’s tail.  I pulled out my white gel pen to add a little more detail to finish.

Isn’t this a great day 1?  Yep, I knew you would think so.  Now on to everyone’s favorite part of release week.  A chance to win!!

Would you like to win the “Newton’s Easter Basket” Stamp Set?

Each set will be given away to ONE lucky winner!

Here’s how to win:

Comment on the NND blog and Design Team blogs (see list below)! The winner will be chosen at random from the collective reveal posts. Make sure to check out each of their blogs and comment for your chance to win. You will not know which blog has been chosen so the more you comment on the better your chances are of winning! You have until Thursday, February 15th at 9pm CST to comment  — winners will be announced on the blog post on Friday, February 16th.

Thanks for stopping in today and during this whole week.  Make sure you stop back in tomorrow for Day 2 of the release.Supplies:

Stamps: Newton’s Easter Basket (Newton’s Nook Designs); Ink:  Versafine Onyx Black, Tim Holtz Distress Inks, Versamark; Paper:  Fabriano Extra White Watercolor, Thick Whisper White (SU – card base); Accessories:  Big Shot, Newton’s Easter Basket Dies (Newton’s Nook Designs), Land Borders Dies (Newton’s Nook Designs), Cloudy Sky Stencil (Newton’s Nook Designs), Heat Tool, Clear Embossing Powder (SU), Silver Paint Brush, Dimensionals (SU)

Signature 2016 - 1


SaveSave

SaveSave

SaveSave

SaveSave

SaveSave


SaveSave

SaveSave

SaveSave

SaveSave


SaveSave

SaveSave

SaveSave

SaveSave

Newton’s Nook Designs January Release – Love Bites + Tumbling Hearts

Newton’s Nook Designs January Release – Love Bites + Tumbling Hearts published on 36 Comments on Newton’s Nook Designs January Release – Love Bites + Tumbling Hearts

Welcome to day 1 of the January  Release from Newton’s Nook Designs.  Love is definitely in the air and you are going to enjoy this week’s fun and whimsical offerings!  We are starting off today with a new stamp set called Love Bites and a stencil called Tumbling Hearts.

Totally My Jam by Jen Timko | Love Bites Stamp Set and Dies by Newton's Nook Designs, Tim Holtz Distress Ink ColoringThis adorable set features some creative pairings that you are sure to love!  I’ll admit that the “totally my jam” sentiment called out to be used first.  My youngest will often say that the radio is playing his jam when a favorite song comes on so this will be a perfect card for him.  I stamped the images onto Bristol Smooth paper and colored using Tim Holtz Distress Inks.  I thought this print (retired paper) was the perfect complement to the toast and allowed the jam to pop.  When a set is this cute, I think that is all you need to created a fun clean and special (CAS) card.  I can’t wait to play with the other images in this set…good for Valentine’s but also for all year long.

The new stencil is another must have for your repertoire.  I will be showing it off later in the week but I’m sure the team has some examples to show you today.  You can see it and all the images in the stamp set in the graphic below.  Now on to everyone’s favorite part of release week.  A chance to win!!

Would you like to win the “Love Bites” Stamp Set?

Each set will be given away to ONE lucky winner!

Here’s how to win:

Comment on the NND blog and Design Team blogs (see list below)! The winner will be chosen at random from the collective reveal posts. Make sure to check out each of their blogs and comment for your chance to win. You will not know which blog has been chosen so the more you comment on the better your chances are of winning! You have until Thursday, January 18th at 9pm CST to comment  — winners will be announced on the blog post on Friday, January 19th.

Thanks for stopping in today and during this whole week.  Make sure you stop back in tomorrow for Day 2 of the release.


Supplies:

Stamp: Love Bites (Newton’s Nook Designs); Ink:  Versafine Onyx Black, Tim Holtz Distress Ink (Antique Linen, Vintage Photo, Mustard Seed, Scattered Straw, Picked Raspberry); Paper:  Thick Whisper White (SU), Sweater Weather DSP (SU ret), Strathmore Bristol Smooth; Accessories:  Big Shot, Love Bites Dies (Newton’s Nook Designs), Stitched Rectangles Dies (SSS)

Signature 2016 - 1


SaveSave

SaveSave

SaveSave

SaveSave

SaveSave


SaveSave

SaveSave

SaveSave

SaveSave


Freshly Made Sketches #307

Freshly Made Sketches #307 published on 6 Comments on Freshly Made Sketches #307

FMS307 by Jen Timko | Autumn Leaves Dies by Newton's Nook Designs, Stitched Shapes Framelits by Stampin' Up, Tim Holtz Oxide Inks, Paper Pumpkin, Wood Textures DSP by Stampin' UpHappy Wednesday to you!  I took a little bit of a break last week to catch up on home things and to even clean my stamp room.  Seriously, it was out of control and I needed to reorganize before I could work in there anymore.  I’m sure you have been there!

I’m the sketch hostess this week over at Freshly Made Sketches and I wanted to make a sketch that could be interpreted in a few different ways.  I chose to go with it “as is” and made a little frame using my Stitched Shapes Framelits.  If you follow the Newton’s Nook Designs newsletter, you saw how I created these leaves for yesterday’s “Designer’s Nook”.  They use the Autumn Leaves Dies and are so pretty!!  The background is the fabulous Wood Textures paper by Stampin’ Up (a go-to for fall, don’t you think?!).  I added a piece of the 5/8″ Burlap Ribbon as another layer of texture.  The sentiment strip was cut from the same paper that I used for the leaves (where I had splattered ink) and this stamp is from the July Paper Pumpkin.  Don’t forget how much those add to your sentiment repertoire!  I found a few sequins in coordinating colors so of course I had to throw them on!

I hope you enjoy this sketch.  The design team has tons of inspiration, as always, and I would love to see you in the gallery!  Thanks so much for stopping by today!  See you soon!

Supplies:

Stamp:  July Paper Pumpkin Sentiment; Paper:  Arches Watercolor Paper, Wood Textures DSP (SU); Ink:  Early Espresso, Tim Holtz Oxide Ink; Accessories: Misti, Big Shot, Stitched Shapes Dies (SU), Autumn Leaves Dies (Newton’s Nook Designs), 5/8″ Burlap Ribbon (SU), Sequins (Honey Bee Stamps, Pretty Pink Posh)

Signature 2016 - 1

SaveSave

SaveSave

Primary Sidebar